| |||||||
| Search Forums |
| Advanced Search |
| Go to Page... |
 |
| Search this Thread |  12,843 views |
| | #1 | |
| BHPian | DIY: Upgrading Mahindra XUV300 horn to Hella Chrome Trumpet Hello everyone! I'm sharing this thread to serve as a handy DIY guide for XUV300 owners who wish to upgrade their horns in a plug-n-play fashion (I feel there could be many in this boat). My reference was BHPian Reinhard's super detailed Nexon horn upgrade. (DIY - Trumpet horns in my Tata Nexon) However, the upgrade process specific to XUV300 was nowhere to be found in the forum. While there are 2 Youtube videos on horn upgrade, one should be outright rejected as there is splicing of wire involved and the other (while achieves a native connection to stock) misses out on quite a few details - the video isn't clear at all. I'm hoping this thread helps in providing the details of a DIY horn upgrade to the fullest extent for an XUV300. Please leave your questions on the thread or feel free to DM me, would be happy to help! Prelude So this was a long pending checklist upgrade for me to do, even before our XUV300 came home. During the test drive itself, I had noted the sound of stock XUV300 horns and wasn't a fan of it. Not only does it sound feeble but it's also unfitting to the character that XUV300 has (in my opinion). Quoting from my ownership thread: Quote:
I'm someone who avoids honking as much as possible. However, the current traffic woes of Bangalore traffic made me feel this change is urgent. Wrong side vehicles, delivery boys on their Yulu listening to music/talking to someone and mindlessly going through the traffic, and most important folks who text and drive (especially hate this breed) who slowly drift between lanes oblivious to the surrounding, the list is endless. So whenever I use the horn (which is rare), I want it to be something which sounds good and gets the attention it deserves while being completely street legal. The Hella Chrome Trumpet Horns is what I finalized on. Sounded good to my ears, was louder than the stock and the price felt reasonable. The DIY Plan The Mahindra XUV300 stock horn is a two-tone horn. The first and foremost requirement was to not splice any wires and everything should natively connect to the stock harness and be within the power ratings of the horn. What power rating of horn is safe for the XUV300? While there is no official power rating for the stock horn available (not even written on the horn), a quick look at the owner's manual shows the fuse rating for the horn relay as 20A (as shown by the green box in the image below). This means both horns can have a maximum combined draw (being theoretical here) of 20A. Ideally, you would want sufficient margin to this fuse rating to be on the safer side.  You may also notice that there is another fuse rating of 15A mentioned for horn (shown in red box) - you can ignore this because the power line from the relay is what's actually powering the horn. I was also confused of this concept until I found this video that beautifully (and succinctly) explains the circuitry of a standard horn circuit For those who don't want to watch the video, the horn circuit is like two parallel circuits which are connected at the horn relay. When you press the horn pad, the power flows to the relay which acts as a secondary switch closing the actual horn circuit. This allows the power to flow from the battery to the horn and make them sound. Why this complication you may ask? Well, this redundancy (and isolation of actual circuit) allows for many advantages, two of them being 1. Any short circuit or surge in power in the main circuit will not transfer into the cabin or other components harming them. 2. You wouldn't need thick wires to carry the current all the way across from the cabin to the engine bay. So do you need a relay for the XUV300? No, because the car comes with a horn relay as standard. All you need to ensure is that the horn you're fitting is well within what the car is designed to handle. In this case, our benchmark is 20A. The Hella Chrome Trumpet Horns come with a power rating of 72W each, so a total of 12A will be drawn by them. Therefore, my assumption is that this should hold good. PS: Experts on electrical circuits, please let me know if the above understanding is correct. I have no background on this subject and all of the above conclusions are based on my research on internet. How to achieve a native connection to the stock harness? Connecting an aftermarket horn to the stock harness is the biggest technical gap. From Reinhard's post on Nexon upgrade I could make out that the connector used in XUV300 is visually identical to what Nexon is using. The female socket of the stock horn wiring harness  As suggested in Reinhard's thread, this is commonly found with CNG retrofit workshops. I found out that the connector type is exactly what's used in the wiring harness for a Timing Advance Process that CNG retrofits need. This wiring harness is hooked on to the CKP (crankshaft position) sensor. Anyway, without digressing, the wiring harness from the below kit is what you need. The wiring harness is only one component in the below kit  I found the above in a CNG retrofit shop near my place. However, he charged me a bomb for it because he had to cut it out of the kit. As per him, the harness doesn't come on its own (which I doubt) and there was no scrap to be found in his shop. I just weighed my options and decided to cough up what he was asking because it really wasn't worth my time to go around finding this connector. In my head, this was a price to pay for the ability to retain warranty (i.e go back to stock whenever I want) and the added advantage of achieving an OEM level secure finish to the upgrade. Location of horns As mentioned earlier the XUV300 comes with a two-tone horn as stock. The High Tone (HT) horn is located just behind the grill above the radiator and can be easily accessed by opening up the plastic trim that's covering that portion. In this catalog diagram, you can see the location of horns. 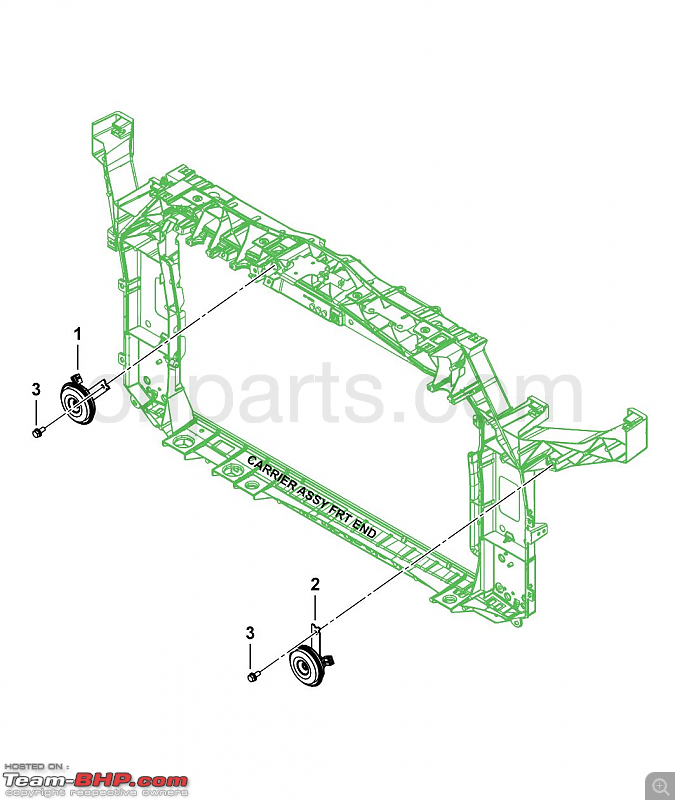 Diagram courtesy - Boodmo Catalog Image To make things more clear through some actual pictures: In the image below, the green wire visible behind the grill is where the HT horn is located. The below image is for reference, the stock horn was already removed by then. 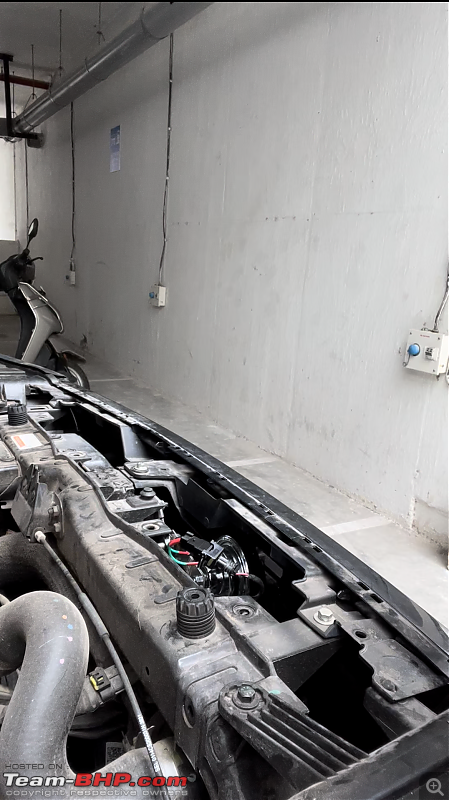 However, the Low Tone (LT) horn is located in a completely weird location. It is located below the passenger side headlight assembly and is extremely difficult to access. Cheap upgrades done by installers would splice the wire behind the grill and connect both horns there itself, but that's a sure shot way of voiding warranty but more importantly, increasing chances of electrical fire. It might be a little difficult to make out from the image below, but the photo is taken facing forwards and is just below the passenger side headlight assembly  I was not confident on opening up all the cladding, bumper etc. to access the horn primarily because there are quite a few sensitive elements like the front parking sensors. I did a recon of the engine bay around the LT horn and found that it is possible to swap it out by accessing through the engine bay itself - but it was going to be a delicate task. Something that needs finesse and more than that patience. I was willing to go this route because in this case, there is very low risk of damage to any component and all it needs is time and patience. Needless to say, this method of DIY will definitely need a ratchet with an extender. I have this bad boy ratchet/spanner set by Amazonbasics but it is currently unavailable. But more on the tools required below. Tools Required
Items Required
Skills Required Patience.  I have no background in electrical engineering but as a person I love to tinker with stuff. The only car DIY that I have done so far is fixing a dual channel dashcam. So you could say I’m a beginner in car DIYs and therefore, all this build needs is patience and attention to detail! Last edited by krishnakumar : 19th July 2022 at 15:15. | |
| |  (22)
Thanks (22)
Thanks
 |
| The following 22 BHPians Thank krishnakumar for this useful post: | anantpoddar, ashishk29, Ashtoncastelino, Bibendum90949, brownkaiser, chinmaypillay, dailydriver, deepCarLover, digitalnirvana, Ertigiat, FiFo_, gischethans, Goandiaries, GTO, InControl, lxskllr, neil.jericho, Potenza, R2D2, Reinhard, theexperthand, vaasu |
| |
| | #2 |
| BHPian | Re: DIY: Upgrading Mahindra XUV300 horn to Hella Chrome Trumpet Step 1: Preparing the Pig Tail Connector The Pig Tail Connector (henceforth referred to as PTC) is basically the connector that will allow us to connect the horn to the stock wiring harness natively (with a satisfying click  ). ).Throughout the below guide, I'll be using a few terminologies that might sound confusing. So to make things standard, this is what each of the words would mean:
The female connector on the left side is on the stock wiring harness, the middle female connector is from the CKP sensor wiring and the male connector is of the final PTC that we'll be making now. 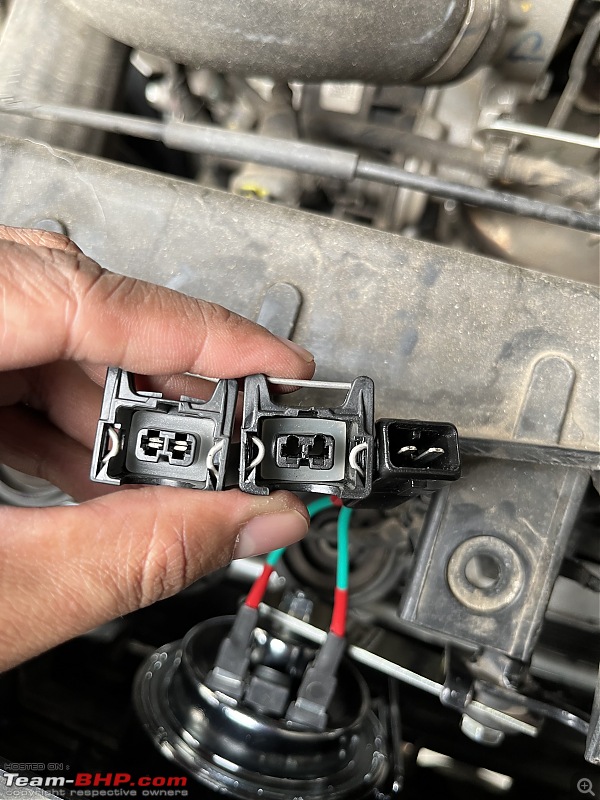 However, the CKP sensor connector and wiring comes with really thin wires that, to my eyes at least, didn't look like it could handle high current. With a power rating of 72W (for 1 horn) and 12V across it, we are looking at 6A on these wires. Needless to say, the most important consideration for all of this is to prevent the possibility of a fire because the wire heated up. Even though the connector is only like 10cm long at max, it's best to over index on safety here. So cut off all the wires but leave a tail out from the connector pins as it'll help you in removing them from the connector. 1a. Removing the connector pins from the male connector For someone who regularly works on electrical/electronics projects, this might be an easy step. But for noobs like me, it was fairly complicated to understand how to remove the pin without damaging them/the male connector. In all such connectors, there is usually some sort of a clip that latches into the connector pin holding it in place. You can use a safety pin or those SIM card slot pins that you get with smartphones these days. It needs to be a slightly longer one, I had one lying around from the OnePlus box and it worked for me. But a long safety pin should do the trick. Just push the locking clip down and slowly pull the connector pins from behind (using the leftover wire that was left). The connector pin should easily come out and if it hasn't, then it is still hooked somewhere. So don't pull hard as you may damage them. Slightly reposition the safety pin (take it out and reinsert) and then try again. Be patient and gentle. No need to rush through these steps. The red arrow shows the location of the clips for locking the connector pins. If you push a safety pin down onto this spot, you should free the connector pins allowing you to pull them from behind. 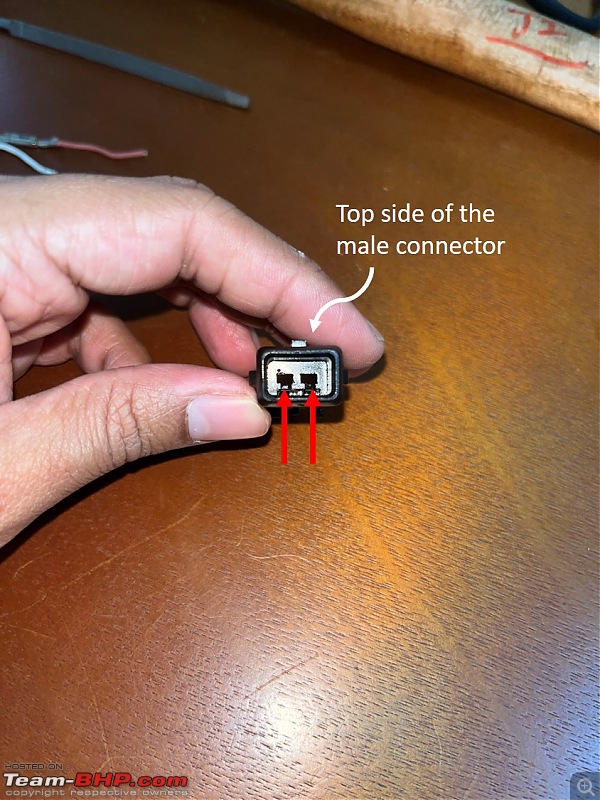 Using a head mounted LED torch makes it easy to look into such spots without having to fiddle around. I was using one that I had bought from Decathlon. I also practiced on the female connector since I could afford to damage them. That way I'll get to a mental model for removing the pins also gaining some confidence and pointers on what could work and what may not work. It took me easily 15-20mins to remove all the connector pins safely the first time around. Now that I know how these connector pins are removed, it'd hardly take me a couple of seconds - the point is it's easy. Just be patient and don't lose heart (I almost did the first time). 1b. Trimming the connector pin and removing the existing wire Now that the connector pins are removed, you'll need to remove the excess wire that was left to aid the removal of the connector pins. This task is fairly straightforward but took a lot of time for me because the crimp on the connector pin was closed very hard. To undo that crimp without damaging the connector pin itself was quite a challenge. It took me nearly an hour (or maybe more, because I was in a zone then) to clean them out and open out the crimps. Note that there is still some copper wire there from the old wire, which is absolutely fine. What we need to remove from there are the old wire's insulation if any. Cleaned connector pins with the bottom crimp opened. Took a lot of time to get this done, but was worth it 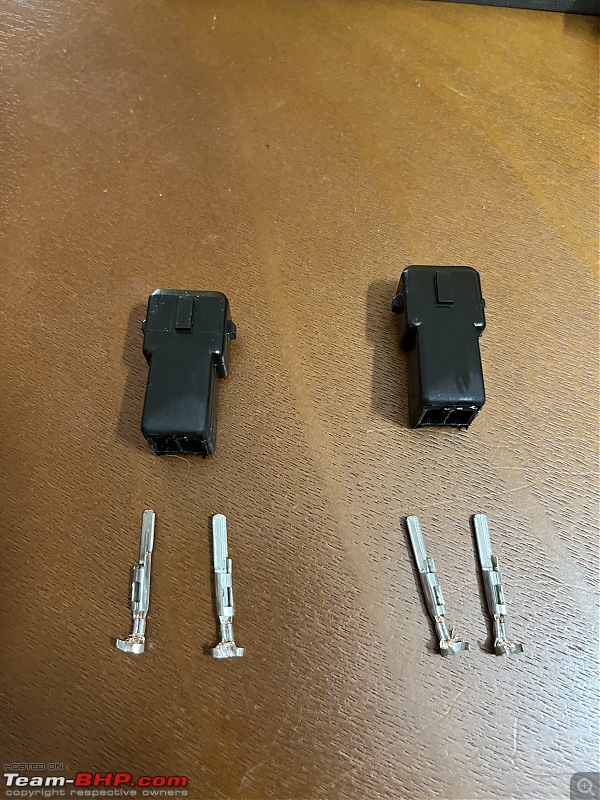 Now the connector pins are ready to receive the new 1sqmm wires that we'll use for making the PTC. 1c. Making the Pig Tail Connector (PTC) Take around 10cm of the new wire and strip of some insulation on both sides. One side goes to the connector pin and the other goes to the spade thimble lug (or Lex pin). Crimp both sides. As you can see, I have attached the new wires and crimped them 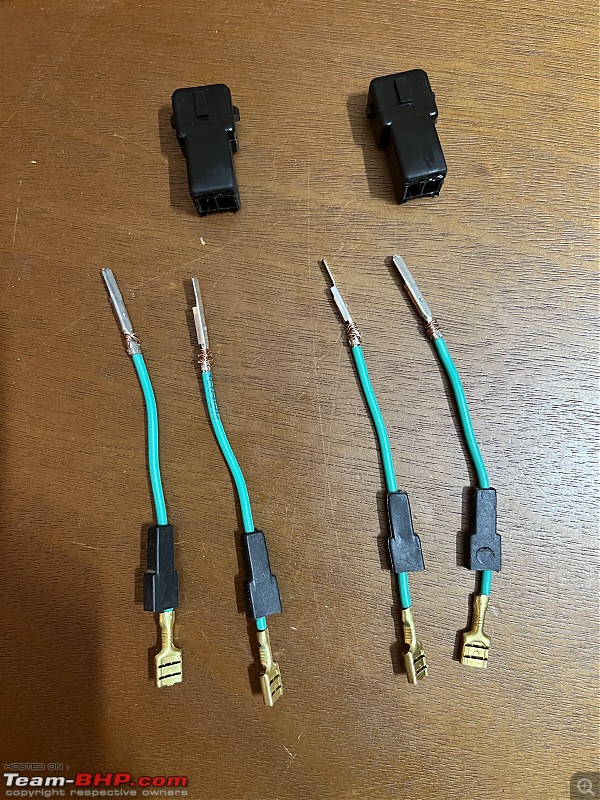 I used solder to make the physical connection at the connector pin more strong but left the Lex pin side with just the crimp. The reason being, if I wanted to swap out the horns for a new set (and let's say the new horn comes with different terminal points), I wouldn't have to desolder the connection for a different Lex pin. But it's a choice that you can make and solder both sides for a nice finish. The connector pin side is soldered. Not the best of soldering work - I am soldering something after 15 years 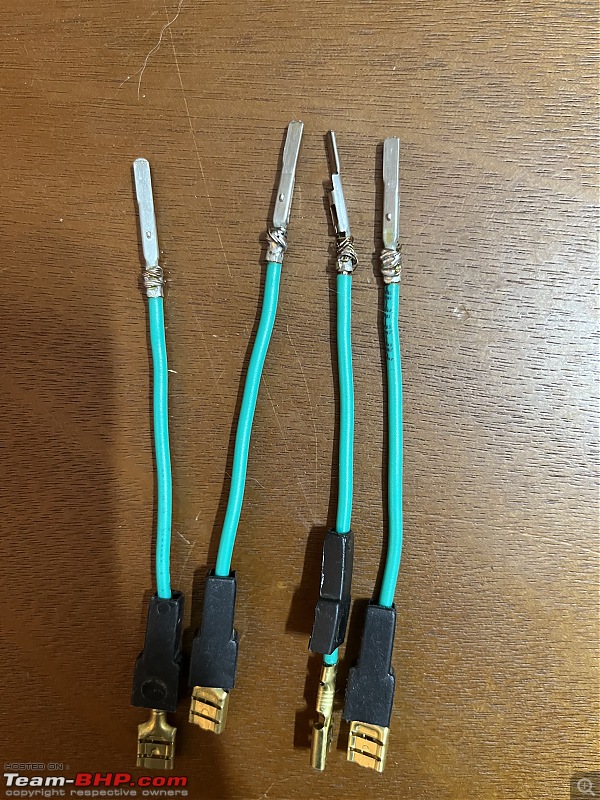 Once that is done, I pushed the connector pin side into the plastic holder (of the male connector) until it clicked into position. Be gentle with all of these steps. And like that, your PTC is ready. Seeing it in this form made me really really happy, it was a sense of great accomplishment - this tiny little bugger!  Important Note: When I was preparing the PTC, I did not have the heat shrink tube with me. So I had ordered it and it was in transit. I went ahead and completed the horn upgrade with the above PTC (without the heat shrink) as an interim solution before I got the heat shrink. Therefore, in the Step 2 of the DIY guide below you may see the PTC without the heat shrink on the PTC. Please do not fix the PTC without securing the points using heat shrink - while insulation tapes do the job, when they are constantly exposed to heat and environmental factors they will easily lose the adhesive over time and fall off. Heat shrink, however, will stay as is and is more resistant to the environment. After completing the upgrade, I did eventually get the heat shrink. All I had to do was remove the PTC (VERY easy because of the effort that went into making something that's plug-n-play) and get them secured with heat shrink. The updated PTC is given below which I have now installed on the horns. I have used the insulation tape to wrap the wires tightly and then put shrink tube over it to fully secure 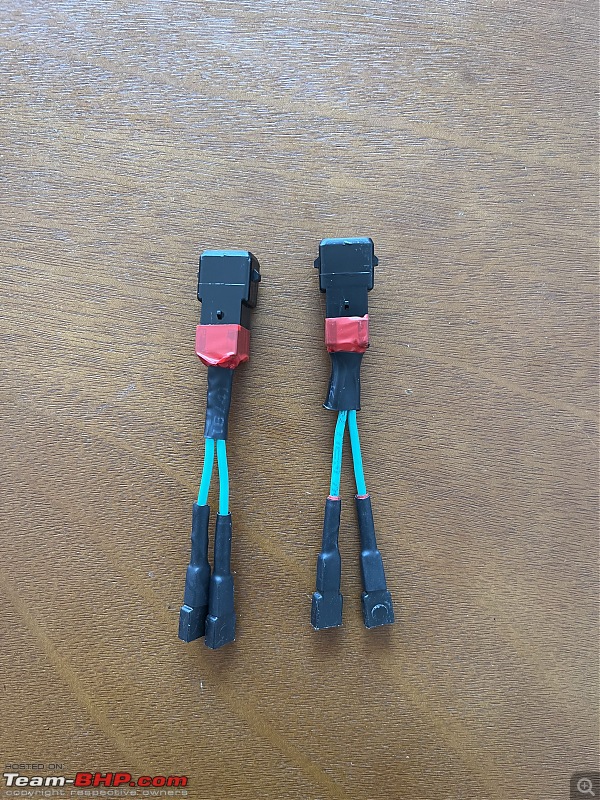 Last edited by krishnakumar : 19th July 2022 at 15:28. |
| |  (11)
Thanks (11)
Thanks
 |
| The following 11 BHPians Thank krishnakumar for this useful post: | AROO7, ashishk29, dailydriver, DevilzzzzOwn, Goandiaries, GTO, neil.jericho, Potenza, Reinhard, theexperthand, vaasu |
| | #3 |
| BHPian | Re: DIY: Upgrading Mahindra XUV300 horn to Hella Chrome Trumpet Step 2: Removing the stock horns and fixing the new horns 2a. High Tone Horns (behind the grill) This is a very easy swap except for 1 catch. The space between the grill and the stock mounting bracket is just about wide to accommodate the Hella Chrome Trumpet horns (other horns may fit more easily). The ideal orientation for this horn is with the trumpet mouth facing downwards, to prevent water ingress and damaging the horn. However, in that position the horn terminal pins will come behind the mounting bracket and it'll not be possible to fix the PTC securely. The only configuration I could work out was with the trumpet facing to the passenger side as shown below.  The trumpet facing horizontal (and not downwards), while might look like a problem is actually a bit more safe (I think) because:
The only slight problem is that the horn almost touches one of the mounting points of the grill (not the grill itself, there is sufficient gap there). As you can see in the red circle, there is a mounting point for the grill that juts inside into the space behind grill. There is a screw there that almost comes in contact with the horn. There is a gap, but less of it, so with minor vibrations there could be physical contact. Notice the yellow arrow mark, where contact may happen 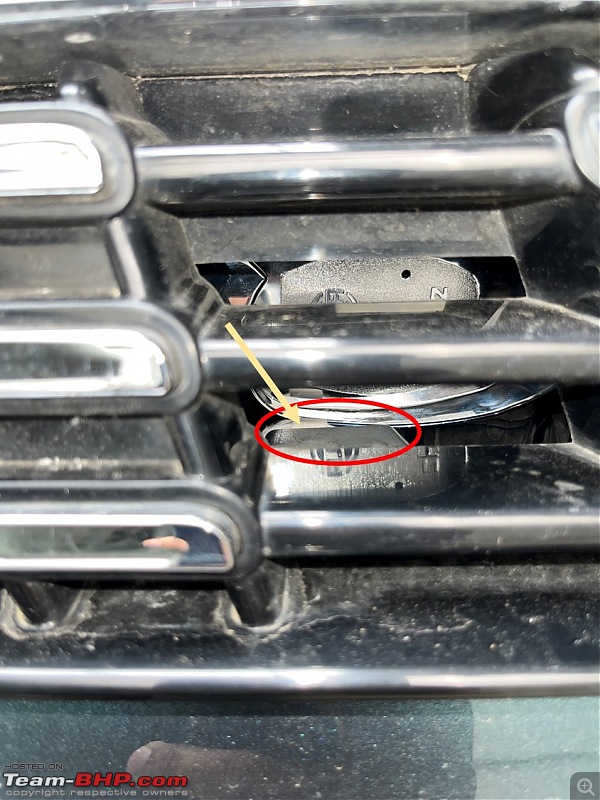 I didn't want this to cause any problem so I stuck some felt tape onto the horn where it was coming close to the mounting point. That way, even with any minor vibrations, it would not rattle and cause damages. This is roughly the area where the contact is likely. Put a felt tape there (there are many options available on Amazon like these). These are primarily used below furniture legs to prevent the screeching sound while dragging. 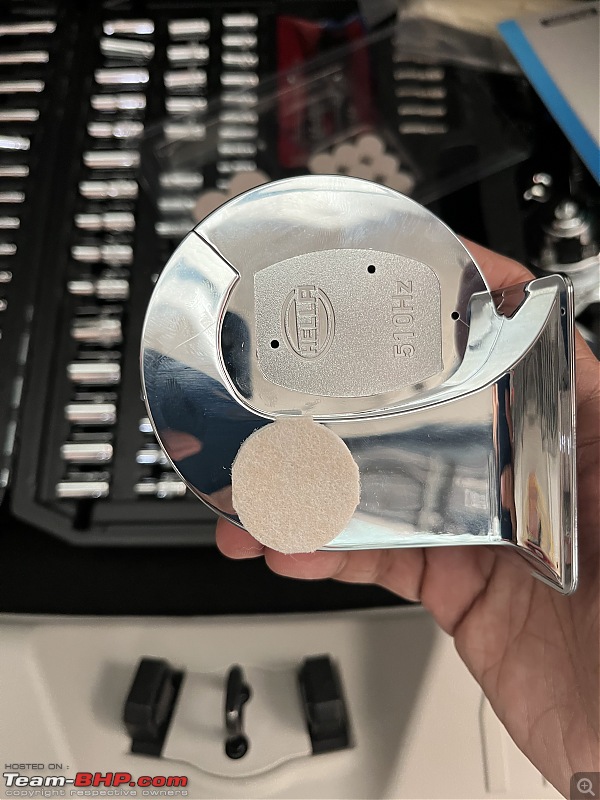 The horn is finally mounted and secured safely as shown below. This looks good and I believe will hold up well. 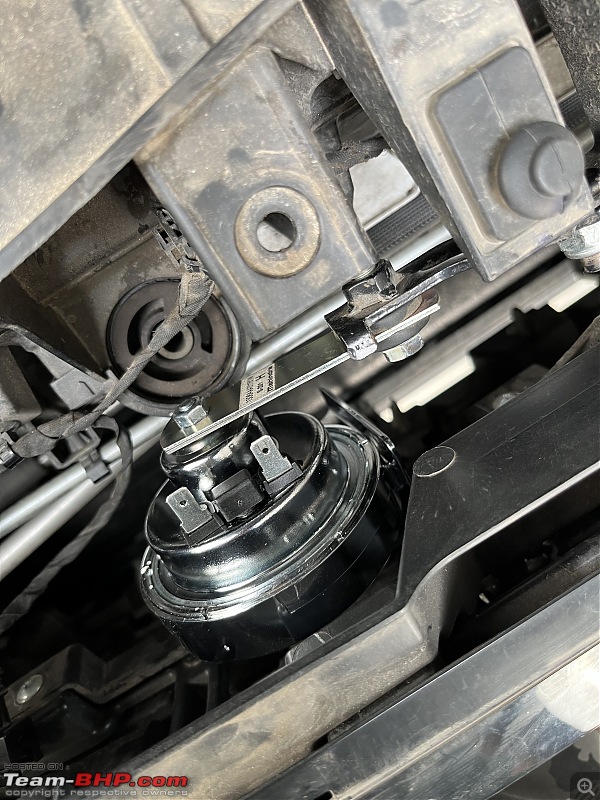 View from the passenger side looking into the trumpet mouth. It’s an enclosed space so I doubt any foreign material/water entry 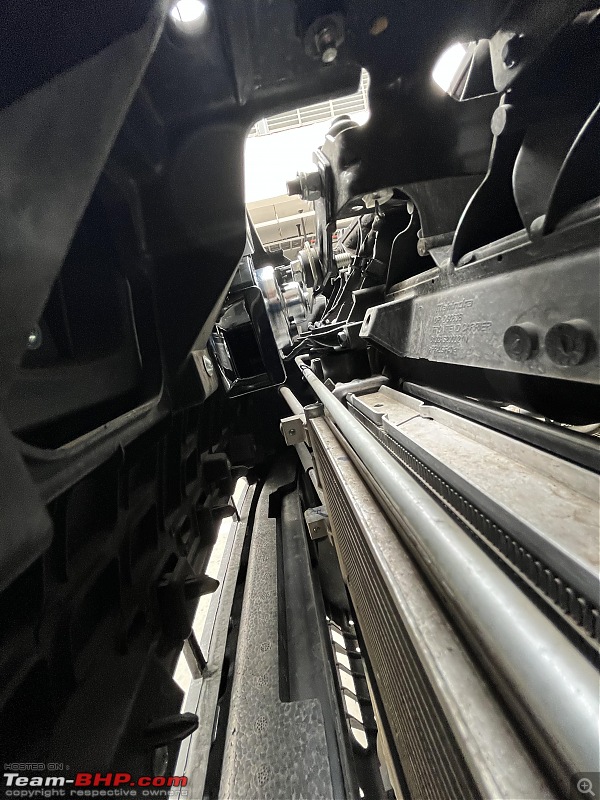 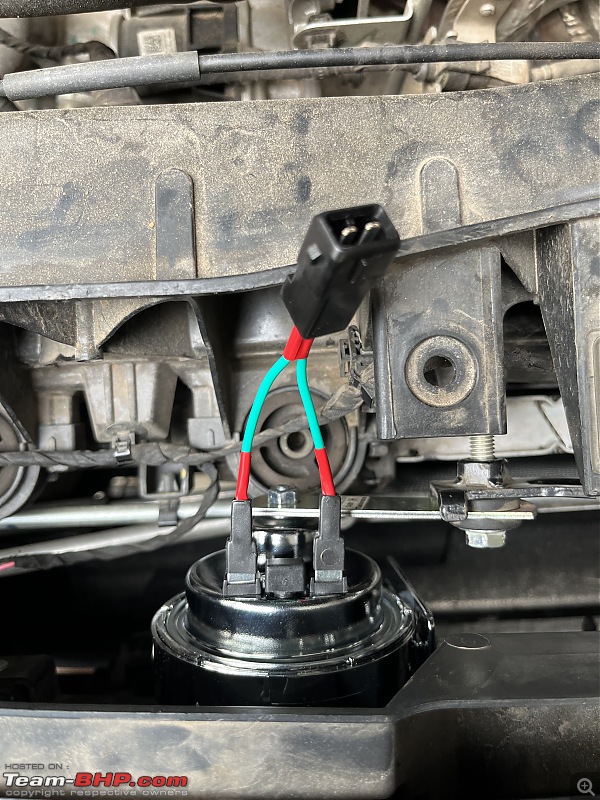 Connected the PTC to hear a good click sound, the connection is very secure! Just like how the OEM horns connect. Tested the horn and works great! Now onto the next step, the big task, fixing the LT horn below the headlight assembly. 2b. Low Tone Horns (below the passenger side headlight assembly) The first step here is to use your hand and get a feel of the horn, mounting brackets, connectors etc. and create a mental picture of how things are looking. Using your phone to take a picture of the horn will definitely help. This is where the LT horn is located, below the passenger side headlight assembly 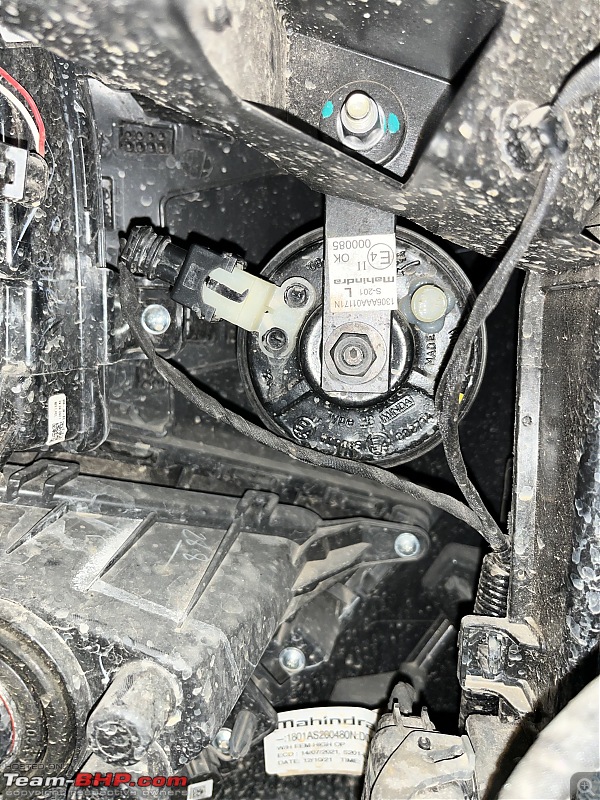 Now using the ratchet (along with the extender) get a good secure grip on the nut. Once you achieve that, slowly unscew the nut. The point is to only get it loose enough until it can be manually removed. Do not attempt to fully remove the nut as it could easily slip and fall down. Go slow here and check as you go. I paused multiple times to check if the nut is loose enough and then proceeded until I reached a point where it felt loose enough to unscrew by hand. This is key. While you unscrew the nut by hand, it's important to use the other hand to support the horn. The horn is mounted on to the bracket with just one nut and hence it'll fall down if you don't hold it securely. There are also 2 metal washers to look out for - you definitely wouldn't want any of these to fall into the engine bay (considering we have an engine guard at the bottom, it'll just stay there and can likely damage other components). Once you have removed the stock horn, the next step obviously is to put the LT of the trumpet horn in place. Unlike the HT, there is enough space for the LT horn to sit there with the Trumpet mouth firing downwards. However, since the space is congested, you'll need to negotiate your way through to get the horn in position behind the bracket. To aid this better, removing the negative terminal of the battery should help in freeing up some space. It's also good to do this since you can prevent something untoward happening (as there is a lot of fiddling around in this method). The correct configuration for the horn is where the face of the horn (circular portion with Hella logo etc.) is facing the front bumper, the trumpet mouth facing down and the backside of horn (with the mounting bolt) facing into the engine bay. Slot the horn into the bracket and once in that position, quickly put the nut and give a couple of rotations to lock the horn in place. This is a crucial milestone. Please note that while you're mounting the horns, remove the PTC if they are hooked up. It'll just make it more difficult and you can easily connect them with touch and feel once the horns are tightly secured to the bracket. There is no polarity for these horns (I tested both ways and it works) so you can just hook them by touch and feel after securing the horn. Tighten the screw with hand for a good feel until the horn is seated well in the bracket. Then use the ratchet to make it fully secure. Keep checking the orientation of the trumpet mouth as that will also rotate as you tighten the nut. In the final configuration, I have the trumpet facing down at an angle slightly towards the corner (towards the fog lamp) and this was intentional. I felt that this configuration has the least chance of water or dirt going in. Since the process for LT is a bit more involved, I felt a video could explain this better to see what I was doing the whole time. A quick caveat that the video still doesn't show what happens below the headlight assembly (because I couldn't get a spot to fix my camera/phone inside the bay) but should give you some idea on how I achieved this. The video below also has the sound test after hooking everything up. After a lot of careful adjustments, the LT trumpet horn is finally hooked up to the stock harness. Sorry for the unclear pictures, this is the best I could manage   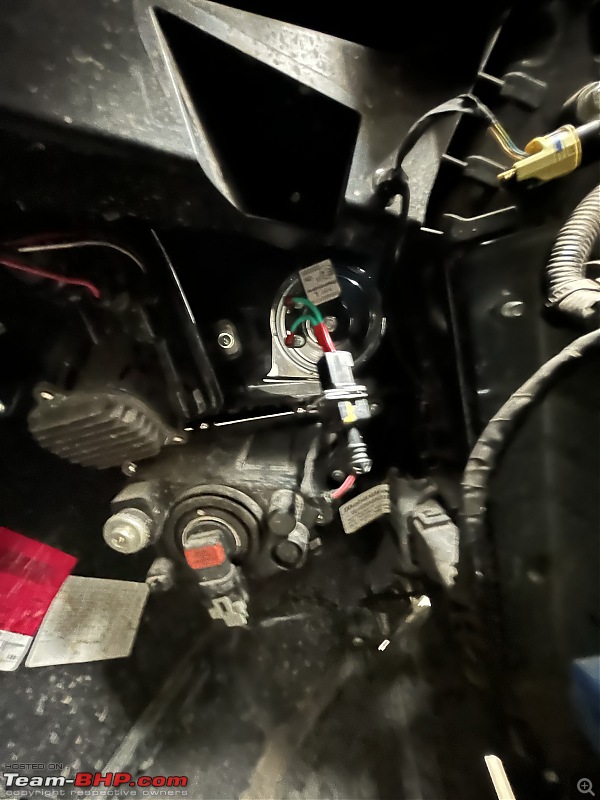 Last edited by krishnakumar : 19th July 2022 at 15:44. |
| |  (11)
Thanks (11)
Thanks
 |
| The following 11 BHPians Thank krishnakumar for this useful post: | AROO7, ashishk29, DevilzzzzOwn, Goandiaries, GTO, InControl, neil.jericho, R2D2, Reinhard, safe_rider, theexperthand |
| | #4 |
| BHPian | Re: DIY: Upgrading Mahindra XUV300 horn to Hella Chrome Trumpet Final Sound Check and Verdict Took the car out for a spin to check if everything was in order. The below video shows the sound check of the horn - finally a horn thatís fitting the character!! Overall, this is a great horn as an upgrade. It sounds premium and loud enough to get attention while also not being obnoxious and sounding like a hooligan. But above all, a weekend very well spent for me personally and it was so satisfying to hear that horn working well. I hope this thread is helpful for folks looking for a horn upgrade in their XUV300, particularly with the fact that the bumper etc. doesnít have to be removed to fix the horn in their stock position with the stock harness. Needless to say, whether you choose to upgrade your horn or not, honk as less as possible.  So thatís all for now! Happy and safe driving. |
| |  (23)
Thanks (23)
Thanks
 |
| The following 23 BHPians Thank krishnakumar for this useful post: | akshye, anantpoddar, AROO7, DevilzzzzOwn, elroydsilva, gb97ce6, gischethans, Goandiaries, GTO, InControl, Kosfactor, lxskllr, neil.jericho, R2D2, Reinhard, ruchiragrawal, sainyamk95, silverado, skyocean, Spinnerr, Sushil Pingua, theexperthand, WhiteSierra |
| | #5 |
| Team-BHP Support  | Re: DIY: Upgrading Mahindra XUV300 horn to Hella Chrome Trumpet Thread moved out from the Assembly Line. Thanks for sharing! |
| |  (2)
Thanks (2)
Thanks
 |
| The following 2 BHPians Thank Aditya for this useful post: | GTO, krishnakumar |
| | #6 |
| BHPian Join Date: Oct 2007 Location: Mohali
Posts: 30
Thanked: 15 Times
| Re: DIY: Upgrading Mahindra XUV300 horn to Hella Chrome Trumpet Neat job! How loud are these? Are the decibels within permitted limit? |
| |  (1)
Thanks (1)
Thanks
 |
| The following BHPian Thanks ~Zombie~ for this useful post: | krishnakumar |
| | #7 | |
| BHPian | Re: DIY: Upgrading Mahindra XUV300 horn to Hella Chrome Trumpet Quote:
The horns are rated at 112dB at a distance of 2m. The legal limit as per the Central Motor Vehicles Rule, 1989 is between 93 - 112dB when measured 7.5m away. I havenít personally checked this but my assumption is that if it is rated at 112dB at 2m distance itíll be street legal as per the current laws. | |
| |  (11)
Thanks (11)
Thanks
 |
| The following 11 BHPians Thank krishnakumar for this useful post: | aniket13, AROO7, gb97ce6, gischethans, GTO, Herschey, lxskllr, neil.jericho, Transmission, VijayAnand1, ysjoy |
| | #8 |
| BHPian Join Date: Nov 2020 Location: Bangalore
Posts: 117
Thanked: 541 Times
| Re: DIY: Upgrading Mahindra XUV300 horn to Hella Chrome Trumpet Thanks for sharing this! I had a thought of upgrading it initially, but got used to the stock. Maybe if time permits, Ill use this thread for upgrade for sure! |
| |  (2)
Thanks (2)
Thanks
 |
| The following 2 BHPians Thank Goandiaries for this useful post: | krishnakumar, neil.jericho |
| | #9 |
| Senior - BHPian Join Date: Sep 2017 Location: KA 01-09
Posts: 1,255
Thanked: 2,457 Times
| Re: DIY: Upgrading Mahindra XUV300 horn to Hella Chrome Trumpet I’ve been using these since 2017. I must agree the horn is certainly loud and makes way for you on the highway. Restrict usage inside city considering the intensity, as it can certainly scare people ahead of you. Use it wisely  |
| |  (1)
Thanks (1)
Thanks
 |
| The following BHPian Thanks gururajrv for this useful post: | krishnakumar |
| | #10 | |
| BHPian Join Date: Apr 2022 Location: Bangalore
Posts: 69
Thanked: 170 Times
| Re: DIY: Upgrading Mahindra XUV300 horn to Hella Chrome Trumpet Quote:
I also like them for the fact that their sound is much less intrusive into the cabin compared to most metallic sounding stock OEM supplied horns. | |
| |  (1)
Thanks (1)
Thanks
 |
| The following BHPian Thanks vijaysrk for this useful post: | krishnakumar |
| | #11 | |
| BHPian | Re: DIY: Upgrading Mahindra XUV300 horn to Hella Chrome Trumpet Quote:
So the stock horns where completely useless because on those critical occasions when I needed the horn, it would just be not loud enough. In fact, my usage on horn was so low that after all the work on upgrading the horn, I excitedly took my wife along for the spin to do a small demo. She asks me, "I thought you changed the horn. It sounds same!". I died a little inside  and looking at my expression she says "You honk so little that I don't even remember how it used to sound." and looking at my expression she says "You honk so little that I don't even remember how it used to sound."Fully agree. And the loudness isn't shrill or painful. It is loud but sounds good to the ears. Also, agree with the point that the sound somehow intrudes lesser into the cabin (or sounds same) despite being much louder. | |
| |  (2)
Thanks (2)
Thanks
 |
| The following 2 BHPians Thank krishnakumar for this useful post: | gururajrv, R2D2 |
| |
| | #12 | |
| Senior - BHPian Join Date: Sep 2017 Location: KA 01-09
Posts: 1,255
Thanked: 2,457 Times
| Re: DIY: Upgrading Mahindra XUV300 horn to Hella Chrome Trumpet Quote:
 looks like we guys are on the same boat. I get the same dialogue from my wife whenever I make changes to the car looks like we guys are on the same boat. I get the same dialogue from my wife whenever I make changes to the car  She will just plainly tell me she canít spot a single difference and Iím just wasting money! Guess wifeís just the same! | |
| |  ()
Thanks ()
Thanks
 |
| | #13 |
| Newbie Join Date: Jan 2023 Location: PUNE
Posts: 17
Thanked: 52 Times
| Re: DIY: Upgrading Mahindra XUV300 horn to Hella Chrome Trumpet |
| |  ()
Thanks ()
Thanks
 |
| | #14 | |
| BHPian | Re: DIY: Upgrading Mahindra XUV300 horn to Hella Chrome Trumpet Quote:
Donít have the dimensions of it. I just visually checked them and it closely matched, hence bought it from the garage. If the cost isnít high try purchasing both for a fitment. | |
| |  (1)
Thanks (1)
Thanks
 |
| The following BHPian Thanks krishnakumar for this useful post: | deepCarLover |
| | #15 | |
| BHPian Join Date: Oct 2021 Location: Bengaluru
Posts: 31
Thanked: 13 Times
| Re: DIY: Upgrading Mahindra XUV300 horn to Hella Chrome Trumpet Quote:
 ) )Where are you purchasing the connectors from? Is it online? If yes, can you pls share the link? I tried procuring these connectors from local automobile shops, but unfortunately I couldn't find them and few stores bluntly said they don't even know what that connector is  | |
| |  ()
Thanks ()
Thanks
 |
 |


