| |||||||

| Search Forums |
| Advanced Search |
| Go to Page... |
 |
| Search this Thread |  33,309 views |
 10th December 2022, 16:52
| #1 |
| Newbie Join Date: Apr 2020 Location: Hyderabad
Posts: 14
Thanked: 50 Times
| DIY functional upgrades to my Hyundai i20 Hope everyone is doing well. Once again, thank you so much everyone for whoever read my first ever post on team bhp and here I am back again with an update and this time I am going to show you about some nifty little tricks with this car and a couple of DIY functional upgrades.  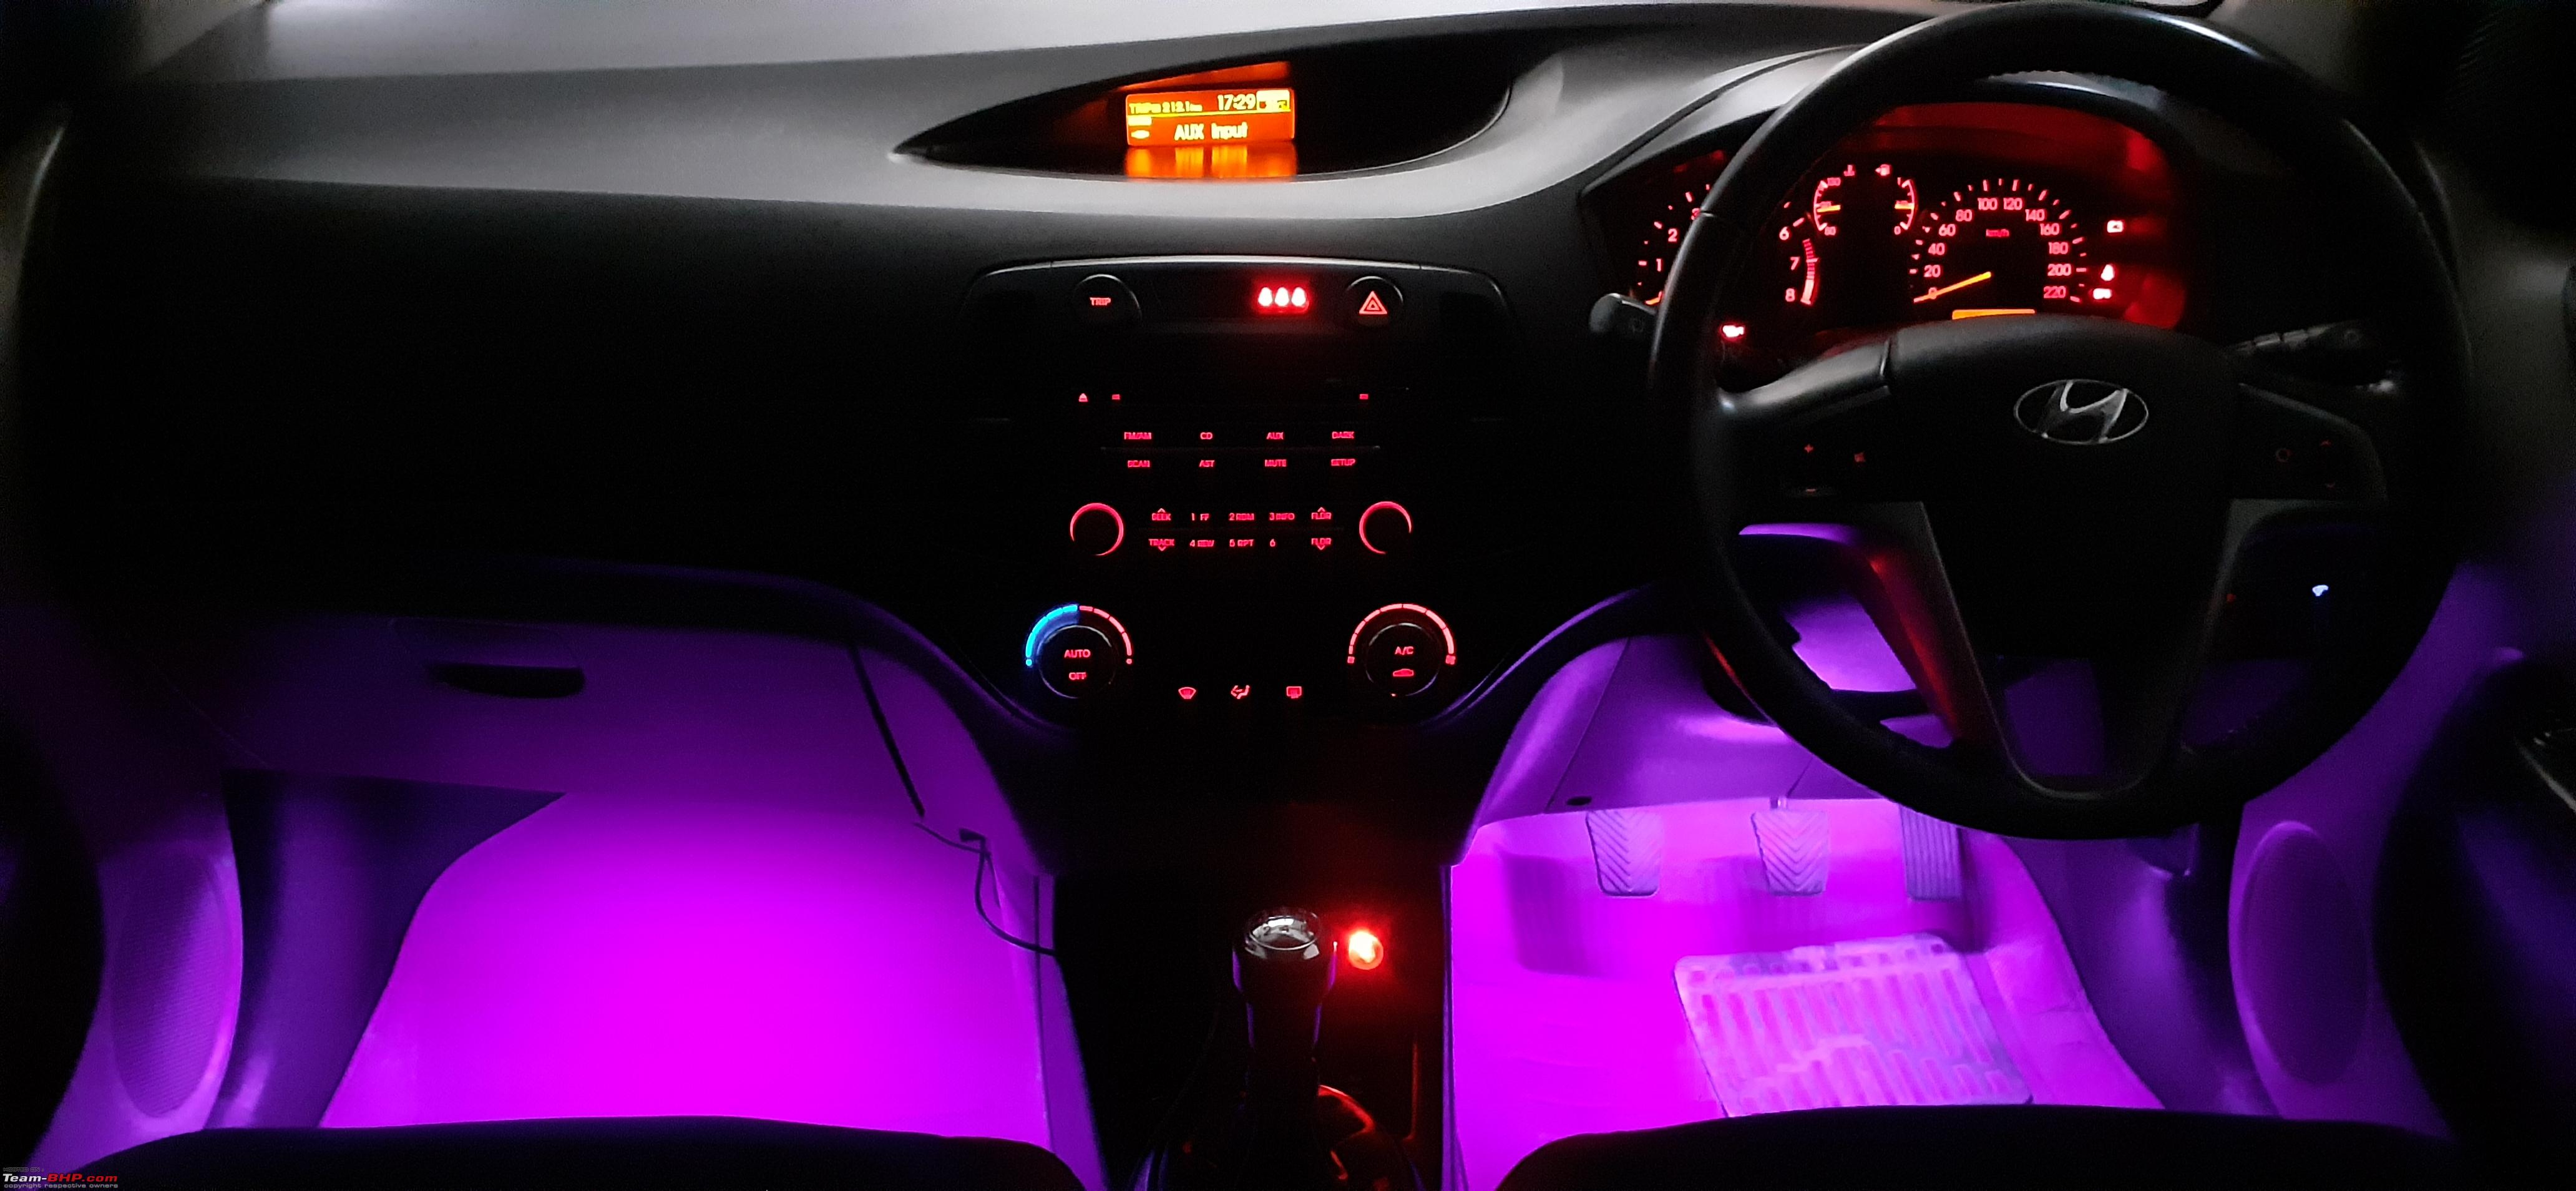 While scrolling through the forum of this amazing website, I randomly stumbled upon a thread by Wildon about some tips and tricks which the first gen Hyundai I20 had which I was totally unaware about. My car is the 1.2 Petrol Asta which is one below the topmost variant (Asta O+). After going through Wildons thread carefully, I figured out my car was missing the glovebox illumination lamp and the rheostat illumination switch. I went ahead and purchased both the parts from Boodmo. The entire process of installation has been documented below and I will be including a video as well to further make it easier to understand. 1.Rheostat Illumination Switch This switch controls the brightness of all the interior dashboard lights. It gets installed right next to the headlamp leveler switch by replacing the dummy with this new switch. It is a totally plug-n-play upgrade which does not require any wire cutting. The socket/wires have all been provided which makes it an easy upgrade. It cost me 580rs. Installation video is given below.  2.Glovebox Lamp This car sorely misses a glovebox lamp and is extremely useful especially at night when you are trying grab stuff from the glovebox. Fortunately, this can be fixed but this addition is not as simple as it sounds. It took a fairly long time for me to understand how to install this which is why I could not make a video for this. Firstly, open the passenger side door and open the glovebox. You will be able to feel and see the plastic cutout for the light on the upper portion of the glovebox. However, the wiring harness/socket has been tucked behind which requires removal of the side trim next to the airbag. To access this the rubber beading must be removed and then you will be able to remove the trim. Once the trim is removed you will be able find the wire which needs to be connected to the glovebox. Remove the wire from the dedicated slot and feed it through the cutout in the glovebox. Then you can test the light to see if everything is working properly. Put everything back in reverse order and then install the light itself by pushing it inside the cutout. It does require an effort to install it as the space is very tight. You should hear a sharp click which confirms it has been set in place. The whole procedure took about an hour and it cost me 130rs. The thing to note is that the glovebox lamp works only when the parking lamps are on. Small clip of lamp in action. 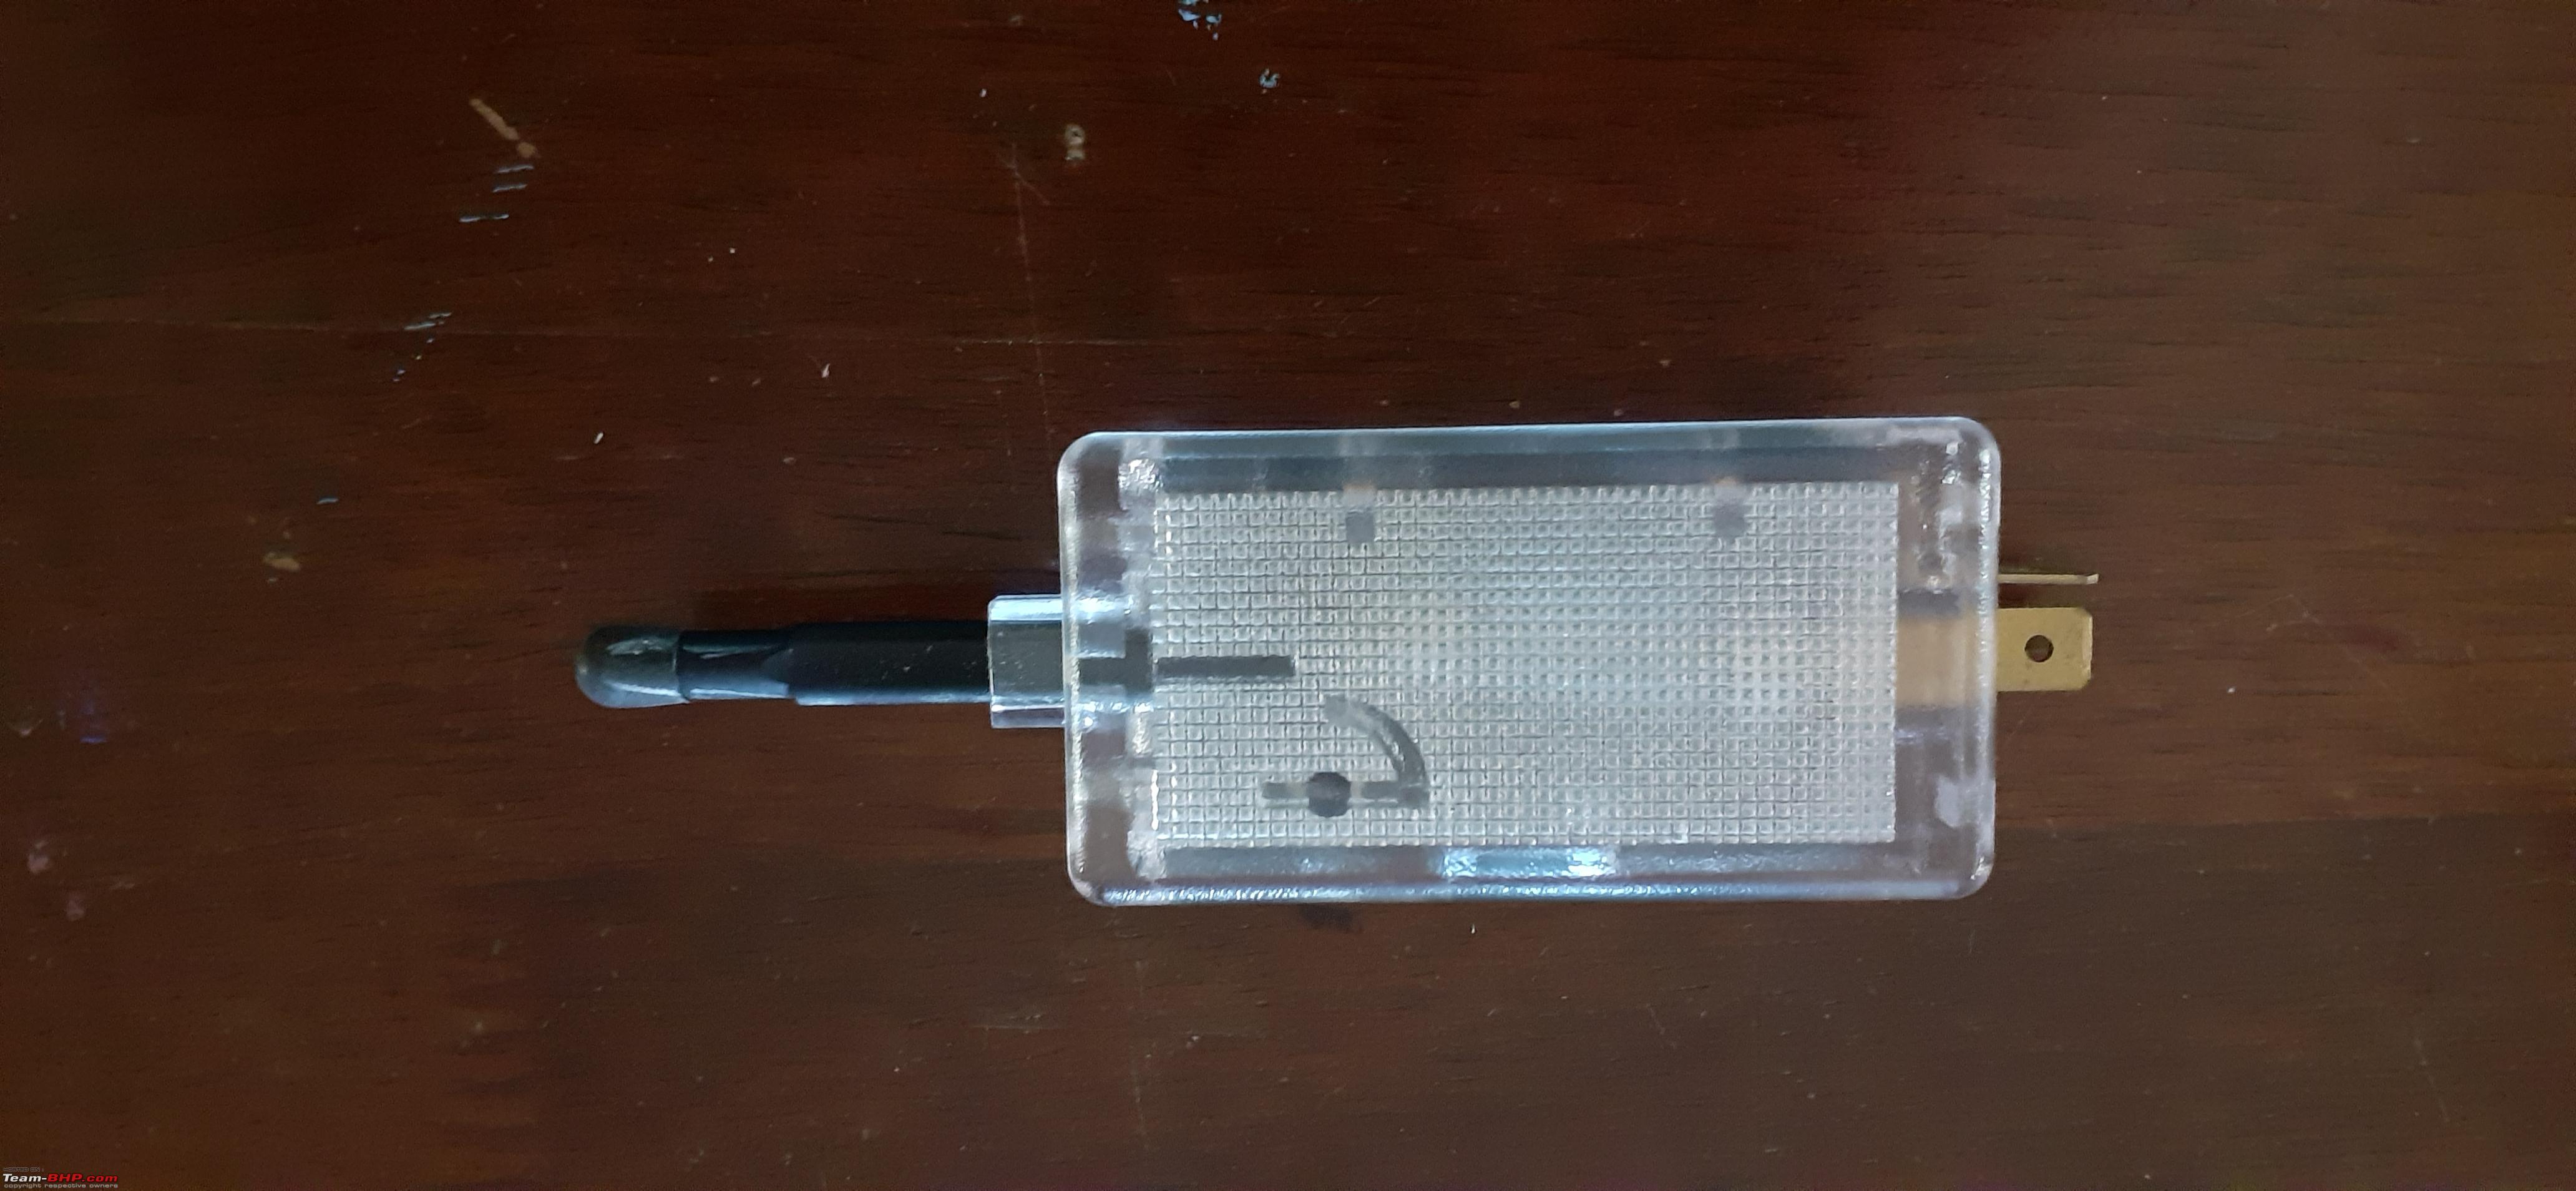 Huge thanks to Wildon for discovering these tricks on the Hyundai i20, else would have not even figured out that these features even exist. I am surprised a company like Hyundai would go to these measures of cost cutting and it is quite unbelievable.  Now I would like to share some repairs partly which I have carried out and the rest that has been done outside. 1.Mirror Actuator I dont remember when this happened but for a long time the driver side mirror actuator which controls the electrically adjustable function wasnt working. The mirror was folding and retracting just fine but inputs to adjust the mirror werent moving the mirror even a little bit. This made me think that the actuator had failed. Although it was left like this for a long time, I was determined to finally fix this and decided to order the part for 1k and got to work. The whole process was lengthy which unfortunately I could not record a video as I was super focused. All efforts paid off and the result was extraordinary. My parents (especially my father) were extremely surprised and proud that I managed to fix this in one day. All in all, I was very happy and pleased that I could do this all by myself and you guys know the feeling of satisfaction when you fix your car by yourself no matter how small or big the repair is. A weekend well spent!  [ [ 2.Door Lock Actuator The LH side passenger door lock actuator which controls the locking/unlocking of the door stopped working. Even though I wanted to fix this by myself, I had to accept that this repair was beyond my knowledge and capabilities. I lacked the requisite tools as well so decided to get this fixed from a trusted mechanic outside my apartment. The actuator was bought for 2k and was installed at the shop outside. He was more than happy to allow me inside to watch what was going on. I was paying utmost attention to what he was doing so that if another actuator fails, I can do it myself next time. The total time taken was only 30 minutes and was achieved without any hassles and problems.  3.Speaker Change & Damping If repairs could be categorized, then this would be my absolute favorite because personally I love listening to music, especially in the car. I am a very big fan of car audio and I try to find out ways to make it better. In the end of 2020, the rear speakers started to make distorting noise whenever deep frequencies(bass) in the music used to play. I instantly knew that the speakers material had torn. Because the rattling noise was manageable, I decided to just patch the area up with fevibond as a temporary fix to both speakers. All was good until the front speakers also began to distort. This time it was much higher and the music could not be enjoyed. I took the plunge and finally decided to replace all 4 speakers. I really wanted to upgrade to better speakers up front but my dad didnt want to fiddle with the stock configuration. I was a little bit disappointed but I got over it quickly. I ordered both sets of speakers for the front and rear for a total of 5k. A thing to note is that the speakers on this car is held in by rivets which is quite unusual. The only way to remove the rivets is by drilling them out and then securing them with screws as once the rivets have been drilled, there is no way of installing them back. Now with the option of upgrading the speakers removed, I was looking forward to improving the sound quality through damping.Since we dont travel with passengers in the rear and front staging was priority, we decided to damp only the front doors from Twisters Car Audio located in Banjara Hills, Hyderabad. Mr. Vinay, the owner of the store was very welcoming and eager to explain everything about damping. Upon his suggestion, we went for 2 layer Vibromax damping on the front doors. It cost me 4k to damp both the doors and the result was very good. I would recommend Twisters Car Audio for all your car audio needs. The benefits of damping include reduced vibrations, noise and rattles inside the car and increased bass frequencies which leads to better sound production. The only drawback is that because of the added weight on the door, it affects the performance of the car just a bit. This is something I was prepared for but the overall experience while driving has become much more peaceful. Money well spent!   4.Caliper Painting Since all the modifications on the car represented sportiness, I decided that painting the calipers in red would be the most prominent highlight. I drove down to Stunnerz Madhapur and they did a great job. The result is neither too bright nor too dull. The finish was achieved with two coats - first silver and then red was applied, giving it a distinctive pop. The calipers were properly masked off from the brakes because of which there was no overspray. It took a total of 30 minutes and cost me around Rs 700 in total.   5.Clock Spring While driving back home, the airbag light turned on suddenly and it would not go away even after restarting the car. I immediately realized that the clock spring on this car has gone kaput which is a quite a big problem with many Hyundai cars manufactured in this time. I hooked the car up to a scanner and the code B1346 Driver airbag resistance high was displayed. My hunch had turned out to be correct; the clock spring needed to be changed. I ordered the part for Rs 1500 and decided to replace this by myself. This is a highly delicate fix which requires removal of the steering wheel and airbag unit. Since I had the tools and the knowhow, I knew the exact steps to follow. If the airbag light remains on after replacement, the scanner should be reconnected to clear the code and then it will disappear. However, if youre not very confident of doing it on your own, I would recommend getting this done from a good mechanic.  Four more small upgrades have been documented below: 1.LED License plate light I personally felt that the stock halogen bulbs for the license plate looked outdated and needed a mild refreshment. Thats when I decided to upgrade these bulbs to Osram LED's. I was well aware of installing led bulbs in halogen casings as they dont disperse the light evenly but in this case it worked fine with no issues whatsoever. It costed me 350rs. Installation video is given below. 2.K@N air filter Even though it was a small upgrade, I was really excited for this because I could finally get permission from my dad to enhance the performance of the car. The goal was to improve the performance of the car without any major alterations. The best thing which I thought could be done was to install a performance air filter which would not require any modification. I zeroed in on K@N for their excellent reputation in the industry and their value pricing. I ordered it on the official K@N website for 25$(Deal) as we had a friend travelling back to India from the US. Installation is very easy and anybody can do this as a DIY within 5 minutes. Although there is no serious improvement in performance, the overall driving experience has become very smooth and the car pulls better at lower rpm's. The installation video can be seen below.  3.Gear Lever Boot Change This is a fairly simple upgrade which can be done in no time. The leather on the gear lever boot had worn out a lot over the last 12 years of usage. I had tried to see if only the leather can be reworked which gives us a choice of colors to choose from but I could not find any stores which do that. Hence I decided to order a new boot for 540rs. All you have to do is remove the actual lever itself by unscrewing it anticlockwise, pulling the trim upwards, install the new boot and screw the lever back on. Make sure that the alignment of the lever is correct with all the numbers positioned straightly. 4.Plastidipping Badges This is the last upgrade I have done on the car and it was definitely a last minute upgrade. I always like to stand out from the crowd and that is true for my car as well which is why I decided to plastidip the badges of the car in black as that would not only look very cool but also stand out otherwise for all the other cars badges in chrome. Plastidip is nothing but peelable paint and this type of paint is mainly used on car badges as you can paint it on the car itself without the need to remove the badges. Peelable paint is difficult to find in India but fortunately my uncle was travelling to India so I requested him to get the Rust Oleum Peel Coat paint. For those who do not know, Rust Oleum is one of the leading automotive spray paints in the market today. They have a variety of paint shades and types for all your car needs and I highly recommend it. Firstly, the badges have to be cleaned well otherwise the paint may not adhere well. You can use a toothbrush and some APC or any degreaser. Once this is done, you need to mask off the required areas(In this car, there are 3 badges to mask). Make sure you take your time with masking because the prep work is the most important. Once that is done, Shake the can for at least a minute and then start painting. Keep the can 15cm from the surface and spray in a steady back and forth motion, slightly overlapping each pass. Dont aim for full coverage on the first coat and make sure its a light coat. Repeat the process again for a total of three coats with the last coat being a heavy coat to achieve total coverage. Allow 5 minutes of drying time between each coat. After the final coat is completed, allow an hour of drying time before the paint can be peeled off. Take your time and do it slowly as the paint is very thin and fragile. Remove the paint at a sharp angle and use a toothpick to peel any paint which cant be removed by your hands. Also, do not wash the car until 24 hours of curing time are done. Finally, after 3 hours of challenging work, I got the result I was looking for and it certainly exceeded my expectations. It was worth the time and money and I think this is the best mod you can do to customize your car badges and any other area of your car as well. There it is guys, thank you for reading my second part on my Hyundai I20 which has been an absolute joy to own and I am looking forward to keeping it till at least the magical number of 1.00,000 kms. Keep Revving! Stay tuned for more updates! |

|  (26)
Thanks (26)
Thanks
|
| The following 26 BHPians Thank Rohan613 for this useful post: | Agarwal_Aayush, ArijitGupte, AROO7, ashking101, Ashtoncastelino, Aveer, catchjyoti, dailydriver, digitalnirvana, Dr.AD, FASTLIFE, fluidicjoy, gischethans, GTO, InControl, Jeroen, keroo1099, Mathan1130, Piyush Kanthak, Rshreyansh, Samfromindia, shubham322000, sridhar-v, sukhbirST, unknownartist01, vaasu |
| |
|
14th December 2022, 18:30
| #2 |
| Team-BHP Support  | Re: DIY functional upgrades to my Hyundai i20 Mod Note: Thread moved to the DIY section, thanks for sharing! Going to homepage tomorrow. |
|
| ()
Thanks
|
|
15th December 2022, 09:41
| #3 |
| BANNED Join Date: Jun 2021 Location: Banglore
Posts: 188
Thanked: 306 Times
| Re: DIY functional upgrades to my Hyundai i20 Welcome to Team bhp Rohan, awsome modifications, you can also install logo projection lights too, they are look very good. |
|
| (1)
Thanks
|
| The following BHPian Thanks Piyush Kanthak for this useful post: | shubham322000 |
|
15th December 2022, 10:17
| #4 |
| Newbie Join Date: Apr 2020 Location: Sunnyvale, CA
Posts: 10
Thanked: 32 Times
| Re: DIY functional upgrades to my Hyundai i20 Thank you Rohan for sharing. To anyone doing door damping for audio upgrade, I would like to caution against removing the plastic door vapour barrier, if present. It keeps moisture away from electric connections like window operation switch/ puddle lamp etc. In the absence of the barrier, eventually you might get electrical gremlins a few years down the line. The application of sound deadening material is usually not waterproof and is bad for long-term car health. |
|
| (1)
Thanks
|
| The following BHPian Thanks guywhoclicks for this useful post: | shubham322000 |
|
15th December 2022, 16:22
| #5 | |
| BHPian Join Date: Aug 2009 Location: Goa
Posts: 418
Thanked: 686 Times
| Re: DIY functional upgrades to my Hyundai i20 Quote:
| |
|
| (1)
Thanks
|

| The following BHPian Thanks lionell for this useful post: | shubham322000 |
|
15th December 2022, 21:09
| #6 |
| Distinguished - BHPian  Join Date: May 2010 Location: Bengaluru
Posts: 4,464
Thanked: 6,847 Times
| Re: DIY functional upgrades to my Hyundai i20 Very functional set of mods. Even we have a 2010 i20 and have done the Rheostat and glove box lamp retrofit which are very useful. Also have upgraded all the Interior lights to LED, especially the boot lamp. The stock boot lamp is barely adequate in providing illlumination. Regarding, rheostat switch, you also get it in Black color incase your interior trim is black |

| (1)
Thanks
|
| The following BHPian Thanks sagarpadaki for this useful post: | shubham322000 |
|
16th December 2022, 10:23
| #7 |
| BHPian Join Date: Jun 2008 Location: KA09
Posts: 276
Thanked: 667 Times
| Re: DIY functional upgrades to my Hyundai i20 Great DIY ideas. I will do both rheostat switch and glove box lamp. I recently changed all six speakers, bought OEM speakers including tweeters from Boodmo, total of Rs 5994. The speakers were 10year old and rattling a lot. Though Sony basic speakers were available at 2000 for a pair, I opted for the OEM speakers, because it comes with a cover and connectors, no extra wooden frames or cutting of the wires were required. Lesson learned: the fuse for central locking and speedometer illumination is the same -10A in the center at the right side of the steering, it had blown off while fixing the speakers. |
|
| (1)
Thanks
|
| The following BHPian Thanks Romins for this useful post: | shubham322000 |
|
21st December 2022, 18:59
| #8 | |
| Newbie Join Date: Apr 2020 Location: Hyderabad
Posts: 14
Thanked: 50 Times
| Re: DIY functional upgrades to my Hyundai i20 Quote:
| |
|
| ()
Thanks
|
|
21st December 2022, 19:20
| #9 | |||
| Newbie Join Date: Apr 2020 Location: Hyderabad
Posts: 14
Thanked: 50 Times
| Re: DIY functional upgrades to my Hyundai i20 Quote:
Quote:
Quote:
 | |||
|
| ()
Thanks
|
|