10 years & 80000 km up!
Theres a lot of stress
but once you get in the car, all that goes out the window. Dan Brown
The fact is, I dont drive just to get from A to B. I enjoy feeling the cars reactions, becoming part of it. Enzo Ferrari
I am quite sure most members on this forum have heard these popular quotes sometime in their lives. I truly feel the same about cars.
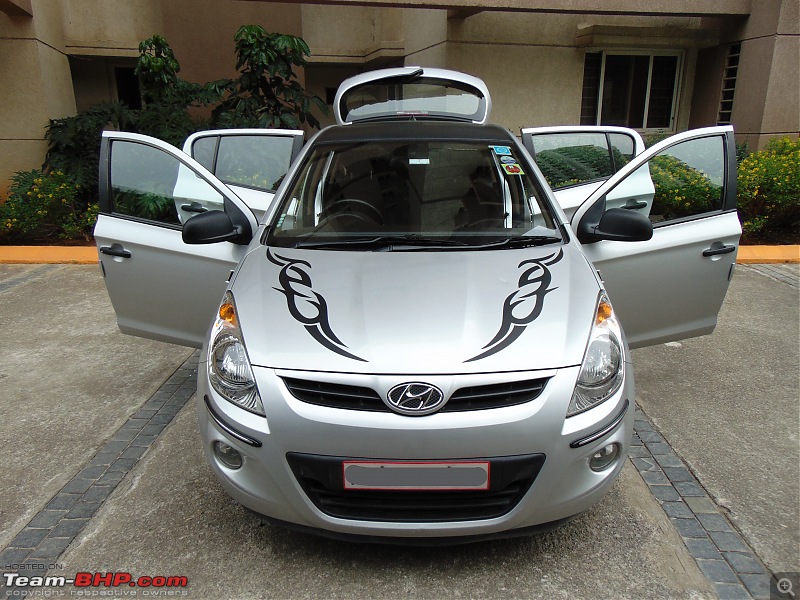
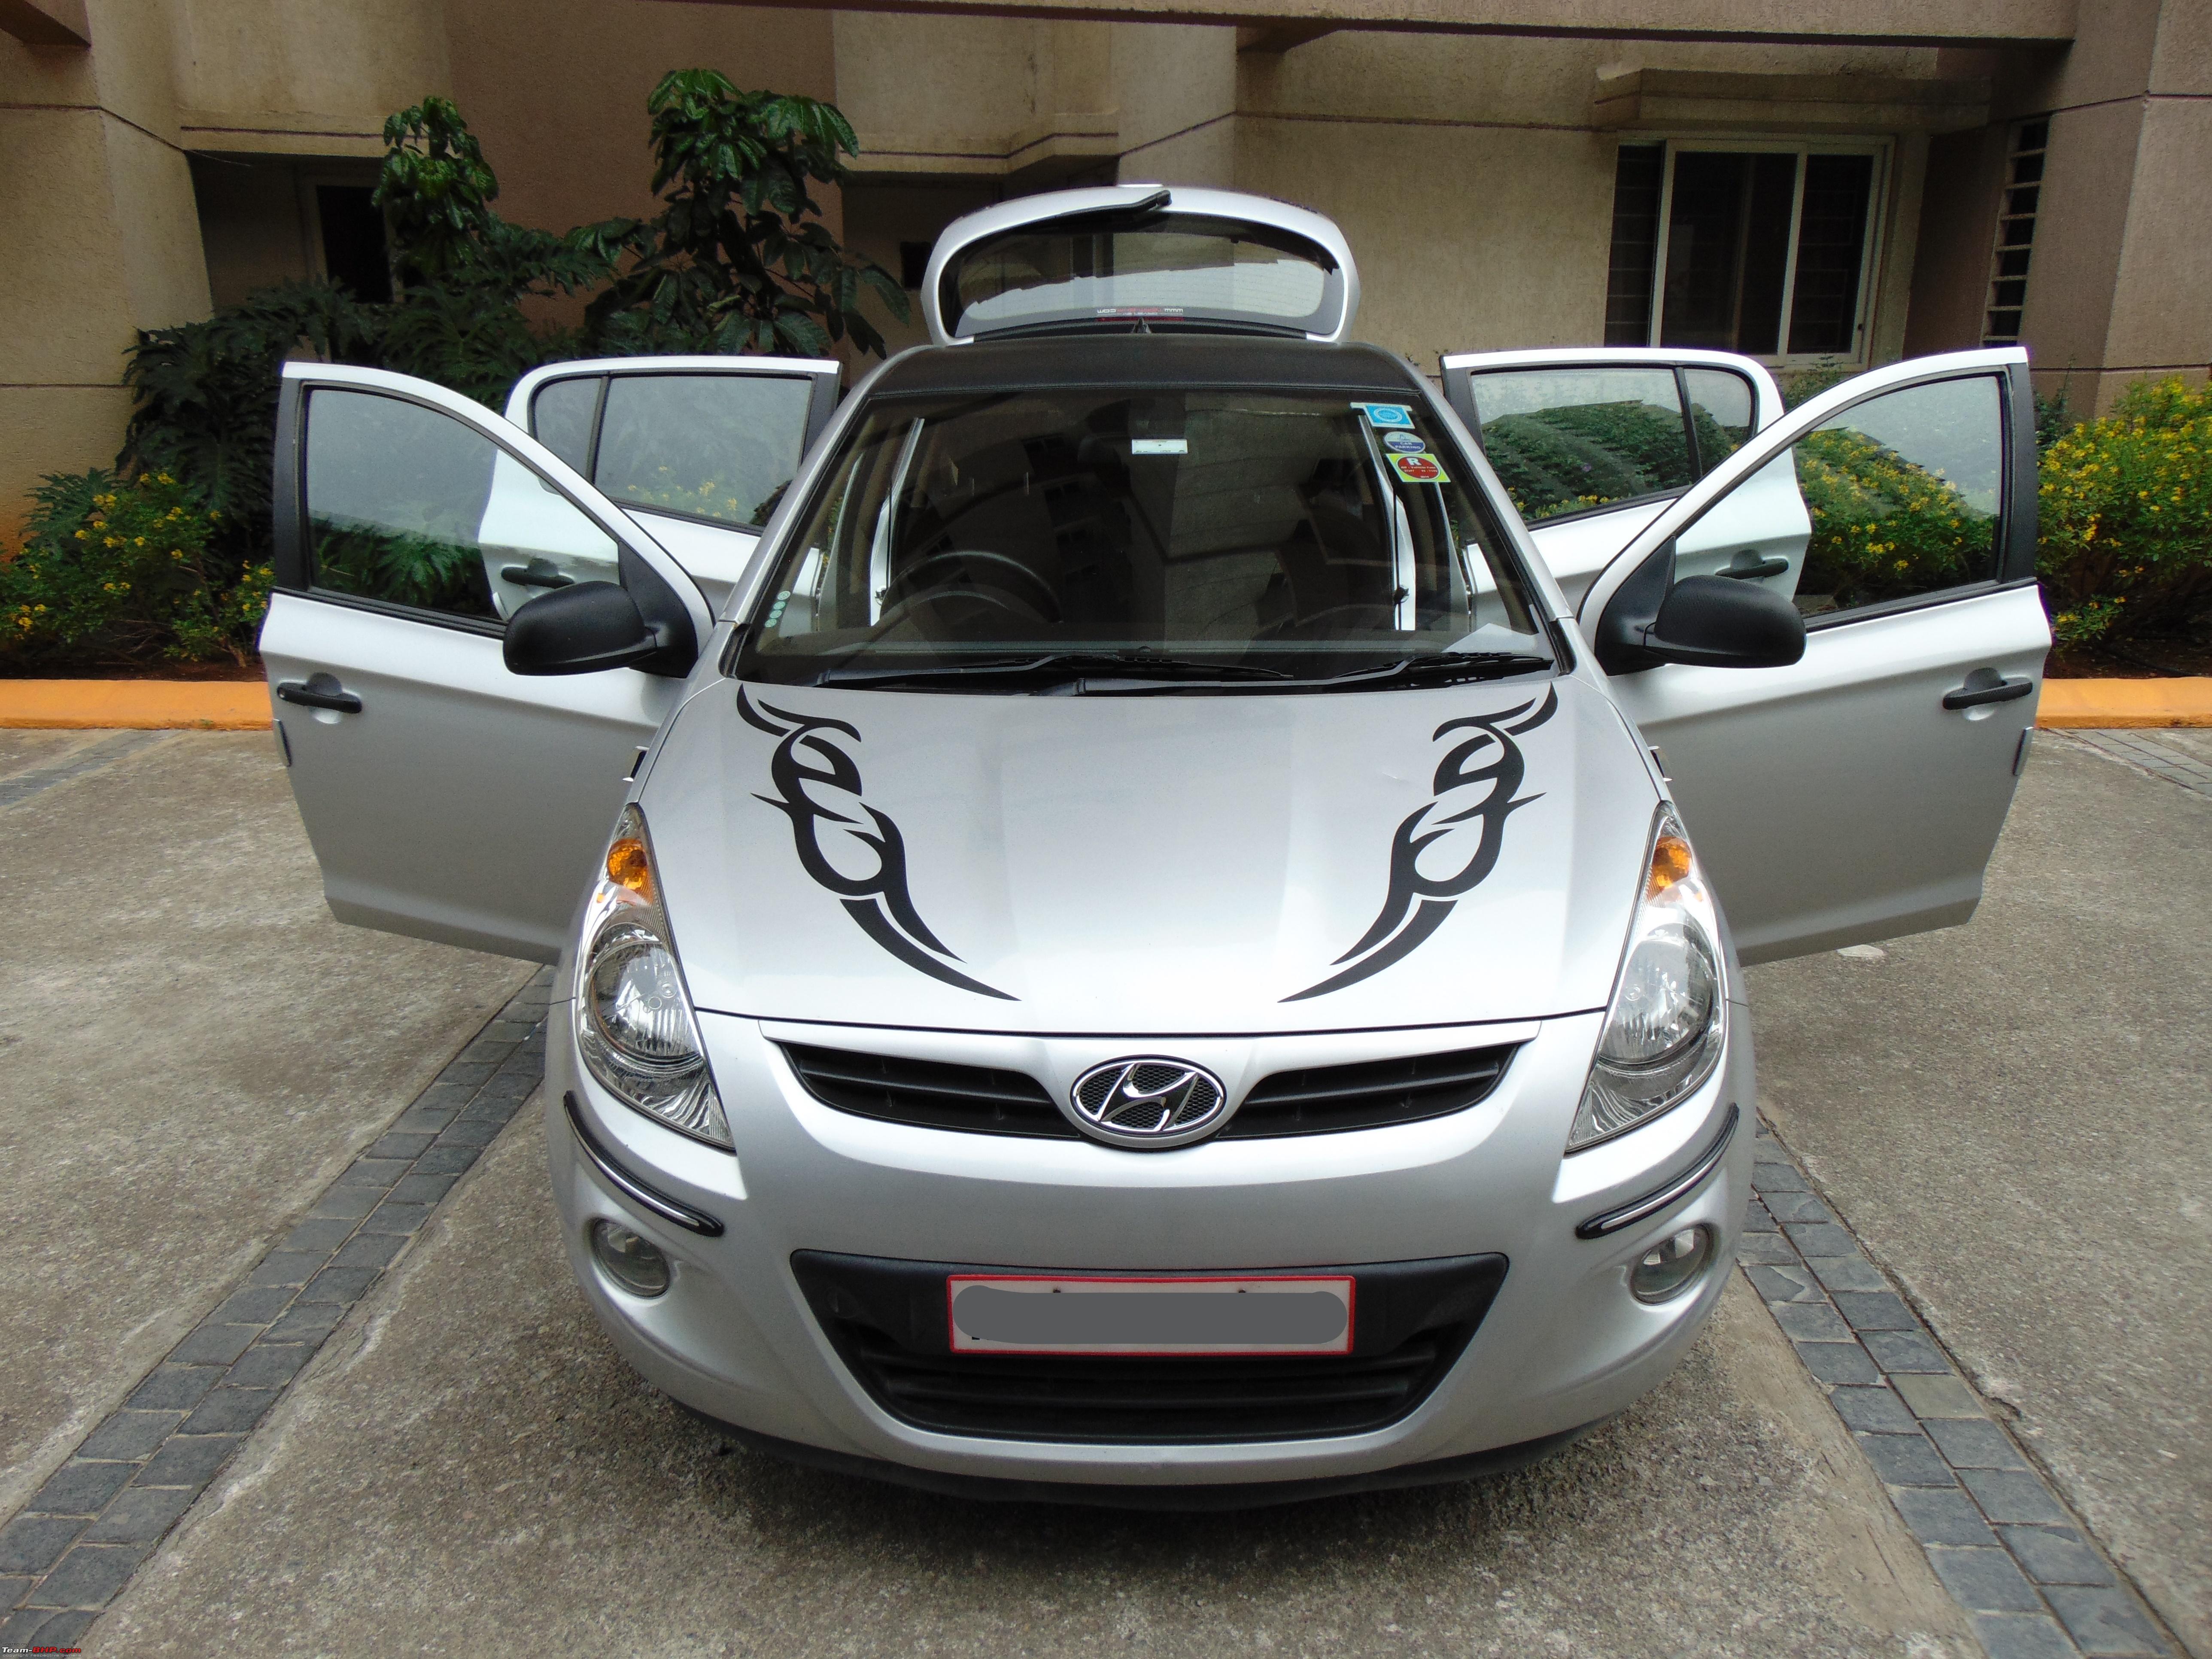
Please welcome my Silver Fox aka Hyundai i20(1st Gen)

After spending hours on this fantabulous forum and reading thousands of ownership reviews, the time has come for me to write one too. My passion for cars is unlimited and I would love to gather more knowledge in every department. I worship every driving trip and long road trips are something out of heaven. I would like to tell you that I am only 18 and I strictly do not promote underage driving at all. With the permission of my parents, I have decided to share this experience with you through this great forum.
Now, I do not want to bore you about the entire ownership experience which has been highlighted by many BHPians on this forum. Instead, I would like to describe the mods done to this car which makes it look nice. So, I teamed up with my good friend Noah Jaffari who lives in the same apartment complex as I, and we began working.
The mods done on this are nothing special. Everything under the bonnet is the same and these are purely cosmetic mods, only for the LOOKS! So, if you are looking to get some power out of your i20, this thread isnt for you. Either way, enjoy this post.
The itch for making the car look better had started during the lockdown last year, when I had loads of free time. I discussed it with my parents, and they gave me the go-ahead to start. I spent hours searching on the internet for what mod to start on and the first thing I saw, which looked pretty good, was a black carbon fiber vinyl wrap which I found on
Amazon for Rs 330. I quickly picked it up as I had an idea to wrap the rear part of the roof to give it a distinct look. I used the remaining part of the wrap to just roll around the door handle.
The car was driven for a couple of months before I decided to completely modify the cars exterior and some bits of the interior which would give the car a unique look. What initially started as a list of 2-3 items quickly turned out to be over 10 modifications which I would like to show you guys on the forum as well as via a YouTube video thats documented the entire modification process.
Here are all the modifications done to the car:
1.Roof Wrap
I had always wanted to wrap the roof of my car in black after seeing a video online. This was the biggest modification I had planned as the rest of them were easy. I was aware of all the good wrap brands in the market including Avery Dennison, 3M etc. But due to budget reasons, I had to settle for lower quality wrap purchased at local car décor shop near my home for Rs. 1500. We decided to wrap the roof in carbon fiber material as we found that the coolest compared to gloss or matte wraps. Materials included a
squeegee,
precision knife, hair dryer(or heat gun), degreaser, wrap material required for your type of car (i20s roof is 5x4 ft.), and the most important part of this job: patience.
Firstly, the roof needed to be prepared for the wrap which included removal of the antenna and the side plastic trims, cleaning the roof using a degreaser and clay bar (optional). The clay bar helps to remove any embedded contaminants in the paint of your car, but it isnt a necessary step.
Then comes the most important part. The first time we tried, we failed miserably and ended up tearing the wrap due to excessive force applied during installation.

We quickly learnt our lesson and drove down and purchased a new one and immediately resumed the work. Due to the nature of this wrap, it tends to stick immediately to the car compared to the better-quality wraps because they feature technology that allows it to readjust once the wrap is applied. We then sprayed the wrap and the roof with soapy water to prevent the wrap from sticking immediately, which gave us some room to play around and adjust the wrap properly. It took us almost four hours to complete this job, but the results were outstanding! Wed never imagined wed achieve such a smooth finish. We worked with what we had, and we made the best use of it. Overall, it was worth the time and effort. We just hope the wrap does not cause any damage to the paint upon removal, which is a problem with the lower quality wraps.
2.Shark Fin Antenna
Once we installed the antenna on the roof, when the wrap was complete, we decided to install a shark fin antenna which we thought would look better than the long cable type one.
Installation took about two minutes to complete and extra double side tape was used to secure the antenna to the roof of the car. It cost Rs. 500 on
Amazon.
3.Racing Vents
The main goal of all these modifications was to make the car look sporty and classy at the same time, which I why I decided to buy lightweight plastic racing vents on
Amazon for around Rs. 400 a pair. We thought the best place of installing it was the front door and because the indicator was on the front fender, we decided to align it the same way on both the sides. It took us five minutes to complete the job.
4.Fake Exhausts
I think I will always have a love-hate relationship with this mod. I really wanted the car to stand out from the rest and thought this would be an extremely useful addition to make the car sporty. Obviously, I would have preferred real exhausts tips but since that was not feasible, this was my next best option. I picked up one straightaway off
Amazon for Rs. 800.
It took us 10 minutes to install this as it is especially important to get the correct placement for it to look symmetrical. Also, it came equipped with superior quality 3M double-sided tape for which no additional tape was required.
5.Flame Decal
After the roof wrap, this was my next favorite mod. It looks aggressive yet classy at the same time.
We wanted to convey the idea of speed on the car, so this was the best thing that came to my mind. A quick Google search led me to this product on
Amazon, which I instantly bought for Rs 200. This was a transfer sticker, which means that once the entire product is applied on the bonnet, the plastic is peeled off the car and the flame material sticks on the paint. This must be done slowly, otherwise you could risk removing the actual material as well along with the plastic so make sure you take your time with this. It took us an hour to make sure both the stickers were matching and symmetrical.
6.Projector Light
This mod is one of the coolest ones available out there and can be done by anyone in less than 15 minutes. Most premium cars get puddle lamps and this is exactly the same with the option of buying the correct logo for your car. Being a Hyundai, I went and purchased a set of Hyundai Logo Projector Lights for Rs 600 on
Amazon. You may wonder why I bought only one pair as you could have installed it on the rear doors as well, but this car is mostly driven with two people, which is why we didnt find the need to install it on the rear doors. However, if you want to install them you can always buy two pairs. It also comes with a variety of other brands logos including Maruti, Toyota, Skoda, VW, MG etc. Some of them even come with superhero logo which I found particularly cool.
What I really like about this product is that it comes with three already supplied AAA batteries and magnet which acts like a switch.
Installation is fairly easy, and it is all about the placement of the light and the magnet. The magnet has to be close to the sensor provided on the light for it to shut off when the door is closed. The light itself is installed on the door and the magnet is installed accordingly on the door sill using double-sided tape. Make sure the light is installed correctly neither too low to scrape the sill every time you open/close the door, nor too high to not be detected by the magnet when closing, causing the light to remain on. (However, there is cool feature of an automatic shut off after three minutes to prevent battery drain.)
7.Painting Alloy Wheel Caps
Since the i20 came with wheel caps for the lugnuts (which I think is a very rare to see on todays cars) we decided to paint them black.
The Hyundai logo in the center was masked off as we didnt want it to be black. We bought
Rust Oleum Painters Touch based on online reviews for Rs. 800. It is a good brand and I highly suggest it to be used on automobiles as it is dedicated for that. It is a primer & paint inbuilt which eliminates the need for priming, saving us time. After the wheel cap was masked, it was sanded with 200 grit sandpaper to allow the paint to really bond well. We applied three coats with five minutes between each coat.
Rust Oleum Clear Coat was finally applied to prevent it from cracking or fading as well as giving a smooth and glossy finish. Total time taken for this whole process was two hours and overall results were extremely satisfactory. Make sure to allow the paint to dry before reinstalling them.
8.Red Number Plate Borders
We all know that red is the color you need if you want your car to be sporty. This mod came out of the blue as we were never planning on doing it. We used a regular small-sized paintbrush and red paint and decided to paint a border of 0.5 cm thickness so that it would not be too thick. We then spray-painted the number plate with clear coat to prevent any paint from chipping away.
9.Car Rules Sticker
I personally dont consider this to be a real mod but I wanted my fellow passengers to have a chuckle whenever they sat in the car. This sticker basically has three short phrases: Sit Down, Shut Up. Hold On. As many of you know, this particular engine (1.2 petrol) is very weak and underpowered, so this car doesnt really warrant this sticker; however, when this engine is revved a bit hard, it doesnt perform all that bad and has a good top end which is quite enjoyable. Installation of this sticker took way longer than expected as each letter had to be stuck individually and they were too small for our clumsy hands. We used some extra Fevicol to stick every letter in place on the passenger side of the dashboard. It cost us only Rs.100 on
Amazon. We managed to finish this in 45 minutes and the result was satisfactory.
10.Wrapping Door Handles
With all the extra wrap we had purchased while doing the roof, we tried to figure out where we could use the rest of it and we looked straight at the door handles to wrap the same in carbon fiber.
We figured out how to remove the handle from the door and got to work straight away. First, the door must be opened; there will be a black cap on the side of the door. Once that is removed, a Philips head screw will be present which has to be loosened just to the point that the smaller part of the handle can come out. Be careful! If you loosen it too much, the screw could fall inside the door, and thats something you dont want to happen. Try to secure it with some tape to prevent it from falling. Remove the smaller part of the handle once you start to see it wiggle. Then remove the handle itself by sliding it outwards till you hear a click. Repeat the same process for all the other handles.A detailed video has been given below to help you understand better. Make sure you watch it!
We have also made a cool cinematic video to sum up all the modifications in fashion. Hope you enjoy the video!
An update of this car at 90,000 km will be posted soon, in which I cover some handy DIYs and a performance upgrade. Stay tuned!
There you go, guys. Thank you so much for reading my first-ever post on Team BHP. I would like to thank the moderators for accepting my request to post on this great forum. This means a lot to me as I have always wanted to do something like this. Huge thanks to my friend (Noah Jaffari) for helping me out with the installation process and without him, none of this would have been possible. He also has a YouTube Channel so make you sure you guys subscribe and like his videos!
Please let me know if you have any queries or suggestions to help improve this thread. Im looking forward to posting as much new content as possible.
Note: Please do the needful and update this thread on the right forum.
Due to some glitch while posting, the cinematic videos were missed out. Please check them out below!


 27th August 2022, 23:25

 .
.
 (8)
Thanks
(8)
Thanks


 .
.
