| |||||||

| Search Forums |
| Advanced Search |
| Go to Page... |
 |
| Search this Thread |  9,679 views |
 18th July 2023, 21:38
| #1 |
| Distinguished - BHPian  | D.I.Y. | Constructing a Car Port for our Bakfietsen (electric cargo bike) You might have come across this post of mine, less than a week ago: https://www.team-bhp.com/forum/diy-d...ml#post5583399 Long story short; we bought ourselves our very first (second hand) EV. In this case, as would be befitting to me, a proper Dutch electric cargo bike. We call them bakfiets. Bakfietsen are hugely popular in the Netherlands. You might still see them being used hauling all sorts of stuff. Students moving apartment, some folks delivering stuff. But these days they are used to haul kids. In our case grand children!! Have a look to get some idea how this bakfiets thing works and looks like in the Netherlands; So I found us a very nice second hand electric bakfiets. Fixed a few small things and we took it for extended testruns last weekend Our daughter Ellen with her daughter (our first grand daugher) Bella going for a ride.  Bella and Panda really liked the new bakfiets.  This coming weekend we have a family dinner with all kids and grandchildren, so it will get some good use no doubt. But with a bakfiets comes the question where to keep i t. These things are huge, very long, very wide and very heavy. I really dont want it in my garage as it would be in the way all the time. We do have a garden shed as well, but it will not fit through a normal 90 cm wide door. (its almost 110cm wide!) But next to the shed is a bit of room. We keep our two of our bins there (plastic and paper/cardboard bins) and a bunch of stuff from the garden.  All cleaned up  I tried it out and the bakfiets would squeeze in fine. Great spot!!   So I decided to build a car port for the bakfiets between our shed and the garden fence. Now, I am not a wood worker or carpenter. Those of you who follow some of my other threads will know I am pretty decent metal working. Even on my hobby lathe and mini mill I can work up to 1-2 thousands of millimeters. People working with wood rarely go beyond a few millimetres. I like these sort of projects, because I dont make a design. For various reason I cant do it anymore. So I have something in my mind and I just wing it. Also, something like this is very functional. As long as it looks good and does the job of protecting the bakfiets from the elements, all is good. You dont need to measure much. Just eyeball most stuff. If it looks good, that is good enough in most cases. I also like to use stuff I have lying around, before going to the DIY store and buy new and more. My idea was to make a very simple wooden frame between the shed and the fence and have it covered with sort of corrugated material. I started by adding a sort of extension to the fence. I had some of these old beams and I just nailed them in place. Made sure the vertical one is buried deep inside the soiled. Banged it in with a sledgehammer. That sucker aint moving anymore!  The length of the shed is just over 4 meters and the bakfiets is about 2.30 m. I had no idea how long the car port (corrugated) roof was going be. Other than it had to well over 2,30m to provide adequate protection, what with rain, snow and wind. So I climbed in my Jeep and drove west for about 20 minutes to Hornbach. The best DIY store in the Netherlands. We have at least three other DIY stores here nearby. They are fine if I am short of something. But for the largest selection of materials, tools and what have you, nothing beats Hornbach. They also have knowledgeable staff and lots of information stands. Like this one, that explains all kinds of different (corrugated) roofs, what materials to use, how to use them etc. 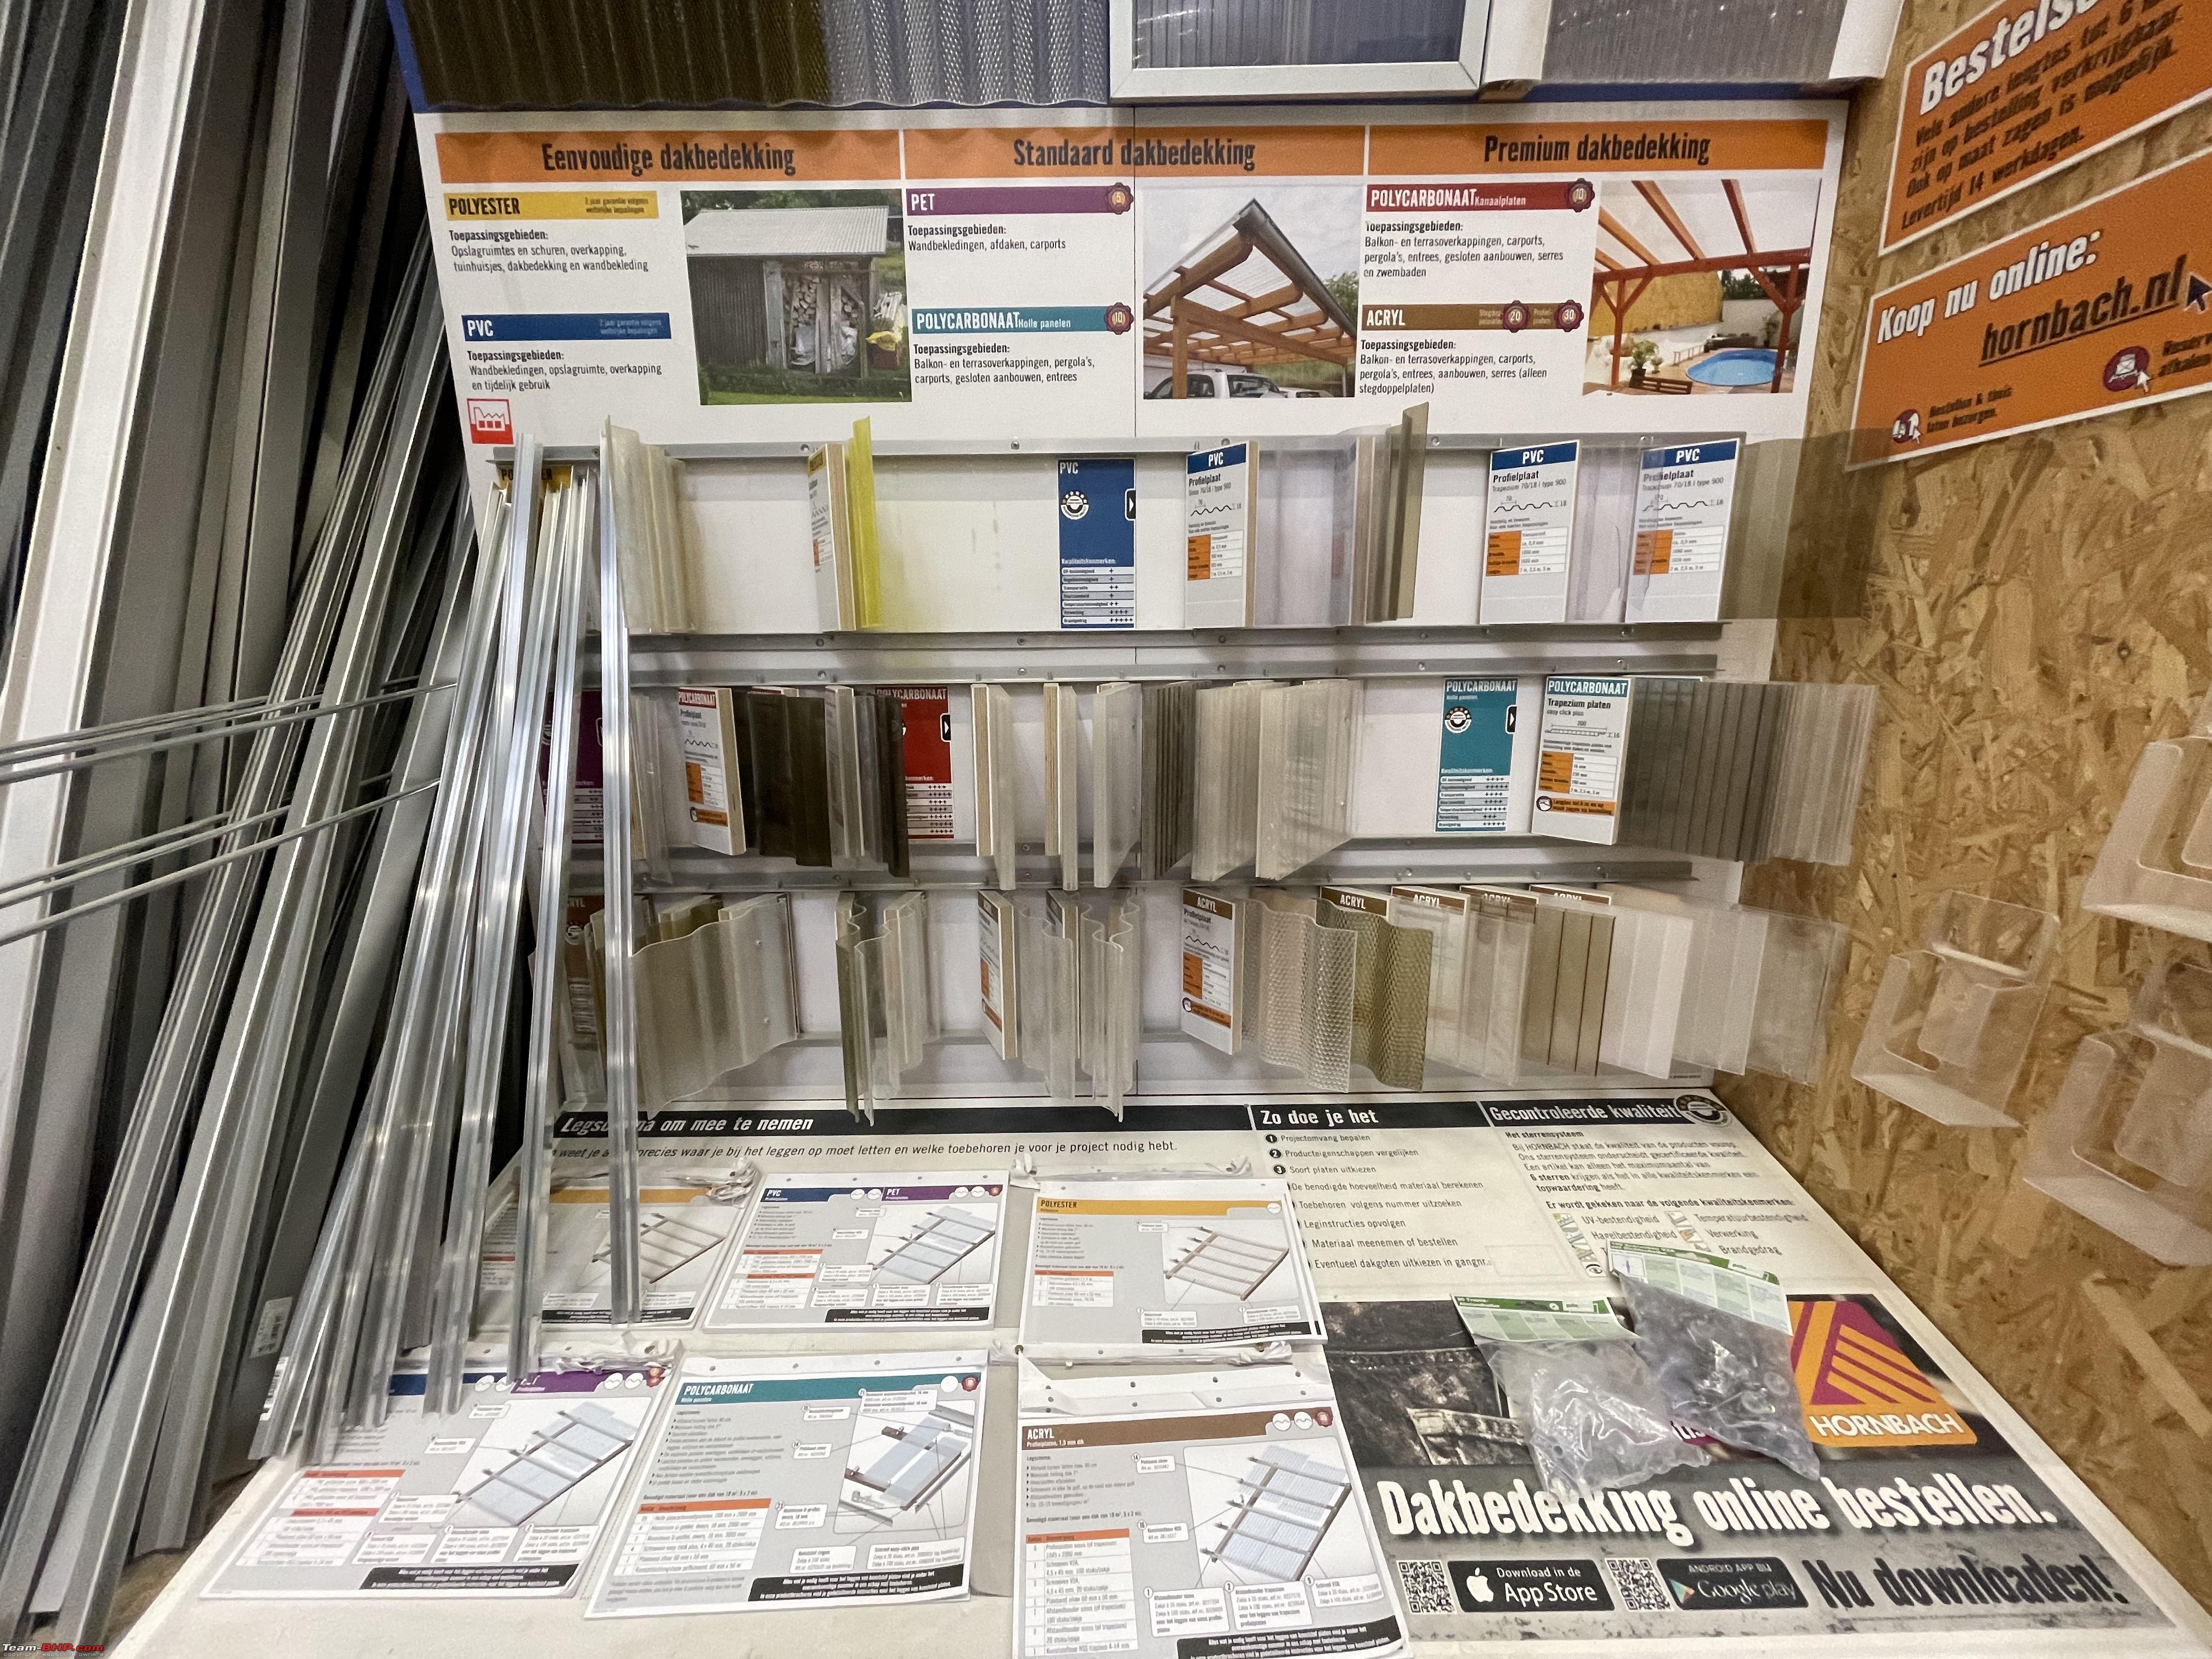 Look at all these different kind of materials.  After checking various things for size and prices I decided to go with PVC Corrugated roof plates. They came in the size that would easily fit my little project. They were 2 meters long and 1,10m wide. Which would mean I would only need two of them. Each type of roof cover comes with one of these very handy information sheets. Which tells you exactly what you need to install everything and how to install it.  Next I walked over to the wood section: Literally wall to wall wood. Any type, shape, finish you would like.  I bought two 3 meter 4x4 beams and some more smaller sized bits. Next a stop at the bolts and screw section. I bought all stainless steel screws.  Each type of screw, bolt, nut had a code. You take how many screws you need, put them on the scale, punch in the code and it will spit out a price ticket!  I also bought myself an electric saw. Never had one before, always borrowed my sons one. In the end I was pleased I had gotten my own. Loaded everything up in the Jeep and drove home.   My idea was to build a very simple type of ladder frame which would we wedged between the shed and the fence. As I had two pieces of PVC corrugated roof material, each 2 meters, I decided to more or less make use of the full length. They need to overlap by at least 10-15 cm. I had an off cut of identical wooden 4x4 beam left from a previous job. So first thing I did was to extend my 3 meter long beams to 3,80m. Our garden tables made an excellent work bench!! I always apply wood glue. I just cut two smaller pieces of wood and glued them on top of the beams. Drilled and screwed in 8 screws. Left everything clamped together over lunch.  Next I wanted to get some idea on how these two 3,8 meter long beams would sit against the fence and the shed. I had already hammered some small blocks of woods that would support the beams whilst fitting.  This is actually where you do need to measure a bit. The roof needs to slant forward by 7o according to the instructions. Which means that across a length of 3,80 it needs to about 6 cm lower on the front side. (As you will see, that is where the plumbing for the gutter is). Also, you want the roof reasonable horizontal. Neither the shed nor the fence is very square along any of its edges. So it is a bit of a fiddle to get the angles correct from a functional point of view (rainwater slant) and it looking nice!  Next I made an improvised depth gauge, which allowed me to determine how far apart the two beams should be. Next I cut the cross beams to length. Very quickly, very easy with my brand new electric saw!!  By the way, this was a gorgeous day to be out and about in our garden fiddling. 23o and blue sky!!  I also needed to ensure the spacing between the cross members would work out alright for the overlap and securing of the two PVC corrugated roof plates. Also, on the front side I wanted a gutter. Which also meant the roof plate had to protrude about 4 cm across the cross members.  Last edited by Jeroen : 18th July 2023 at 21:39. |

|  (33)
Thanks (33)
Thanks
 |
| The following 33 BHPians Thank Jeroen for this useful post: | aeroamit, ampere, Bhalla, blackwasp, carthick1000, chanz2015, dailydriver, digitalnirvana, dkaile, Engine_Roars, FueledbyFury, GTO, HappyWheels, jmjmec, keroo1099, Kkumar, landcruiser123, MotoBlip, Mu009, Nempuguru, Potenza, raptor_diwan, sanjayrozario, Sen, shivraj737, SRISRI_90, SS-Traveller, sukiwa, theexperthand, unknownartist01, v12, vaasu, VivekCherian |
| |
|
18th July 2023, 22:18
| #2 |
| Distinguished - BHPian | re: D.I.Y. | Constructing a Car Port for our Bakfietsen (electric cargo bike) I glued all cross members and put two screws in it, each side. So I think that will be more than adequate. Spacing between the cross members is the recommended 50 cm. I put one extra cross member in, just underneath the overlap of the two PVC corrugated roof plates. Number of testfits and marking where all cross members go  All cross members in place and secured.   Next I decided to paint the wooden frame. It is just spruce wood, so I could do with some protection. I happen to have a can of this wood stain paint. Dark green, looks good too. So I made a make shift paint rig in our garden. Two ladders with a rope in between. Held in place by a tree on one side and two 20 kilogram bags of cat litter. !  It only needed two coats. It is dry to the touch within an hour and after four hours you can put the second coat on.  Unfortunately, it started to rain during the second coat. Messed up the paint, (it is waterbed!) So I had to redo it and for good measure I moved it into my garage to dry overnight.  Some of you will be familiar with what my garage looks like. Our bike shed is quite nice too. And tidy of course, as I am in charge on anything outside the house!!   The next day, the wooden frame was bone dry, looked good. So ready for the next phase of this project. Attaching the PVC corrugated roof plates. Again a bit of test fitting to get them both in the correct position.  I had bought three bags full of these nifty fasteners. A sort of rubber grommer with a stainless steel screw. You just drill a small hole through the PVC and the wood. Screw it in, Bob is your uncle once again. Repeat 60 times.   I was using a 2,5mm metal drill and it broke. Never mind, PVC and spruce wood dont need a sharp drill. This broken drill bit was good till the very end!  Here you can see the first row of this fasteners mounted. Also note that the PVC corrugated roof needs trimming on both (long) sides. I choose to do so, in order to get the fasteners as far out on the main beams as possible. Also note the right corner of the roof plate is somewhat damaged. That is where I did a few test cuts with various tools.  Looking good!  Overhang for the little gutter.  Prior to attaching the roof plates I had experimented a bit to find the best way of cutting of the edges. I tried three different methods. My brand new electric saw with a special plastic saw blade, my sheet metal scissor and my angle grinder.  The electric saw was useless and damaged the PVC badly. I guess it was to thin (1mm) and the blade still too coarse. The sheet metal scissor did well, but that is slow going round both beams 2 x 3.80 meters. The angle grinder was perfect. It took me probably less than two minutes to cut both sides down perfectly!  Time to put this thing in place and see what it looks like!  It took me some time to get it into the correct position, making sure it was horizontal across the width and the 7o downward slope along its length. Next I drilled and screwed in these 70 mm galvanised puppies!! One between each cross member. This thing ain't going anywhere!  Next the gutter. First thing is to glue it all together. Hornbach wants you to use very special, very expensive glue. But Bison glue gel does the trick just as well!  I had also bought all the gutter material at Hornbach. Really easy to use. The (open) gutter itself comes with two end caps, two brackets and one T-connection. Put the brackets on the cross member ensuring it has sufficient downward slope.  Pop the gutter with the T-junction into the two brackets:  Here the piece de resistance de leave catcher:   Looks very nice!!  Last edited by Jeroen : 18th July 2023 at 22:31. |
|
| (26)
Thanks
|
| The following 26 BHPians Thank Jeroen for this useful post: | aeroamit, anandhsub, blackwasp, BoneCollector, dailydriver, digitalnirvana, dkaile, FlashMustang, FueledbyFury, GTO, HappyWheels, Jaisalmeriya, keroo1099, Kkumar, landcruiser123, Lone Ranger, Nempuguru, sainyamk95, sanjayrozario, Sen, shivraj737, sukiwa, theexperthand, unknownartist01, vaasu, VivekCherian |
|
18th July 2023, 22:57
| #3 |
| Distinguished - BHPian | re: D.I.Y. | Constructing a Car Port for our Bakfietsen (electric cargo bike) Time to finish this little project. I drove back to Hornbach one more time. To return a few things I had not used and to get the materials to plumb the new gutter into the existing drainpipe. Because I had no idea how this was all going to look I had waited till the car port roof was up before buying the remaining materials. First thing is to get an ice of where everything will go and mark it accordingly. Because not matter what you will need to cut the drain pipe into two! This is how it looked:  Using the car litter once again to prop up and secure a piece of pipe under the correct angle.  Ready made 45o connection. Just hold it in front of the drain pipe and mark it.  Make your cuts. I used, once again, the angle grinder. This thing goes through PVC like a hot knife through butter!  Had to use a hack saw for the last centimeter.  Test fit, Looking good!!  Cleaned everything up and glued it all together.  I also bought two new brackets to secure the drain pipe to the shed. The old ones were broken. These were a different design, but I just modified them a bit and they will hold.   Finally, I put a steel ring on the wall of the shed. This will allow us to lock the bike not only with the bike lock but also with a big chain lock. Bike theft is a real issue here in the Netherlands. Where we live not so much, but still the other day somebody E bike got stolen from his garden shed. Fortunately, this little car port is virtually invisible from the dike. It is well hidden and we have 24/7 security with all kinds of cameras, alarms etc. 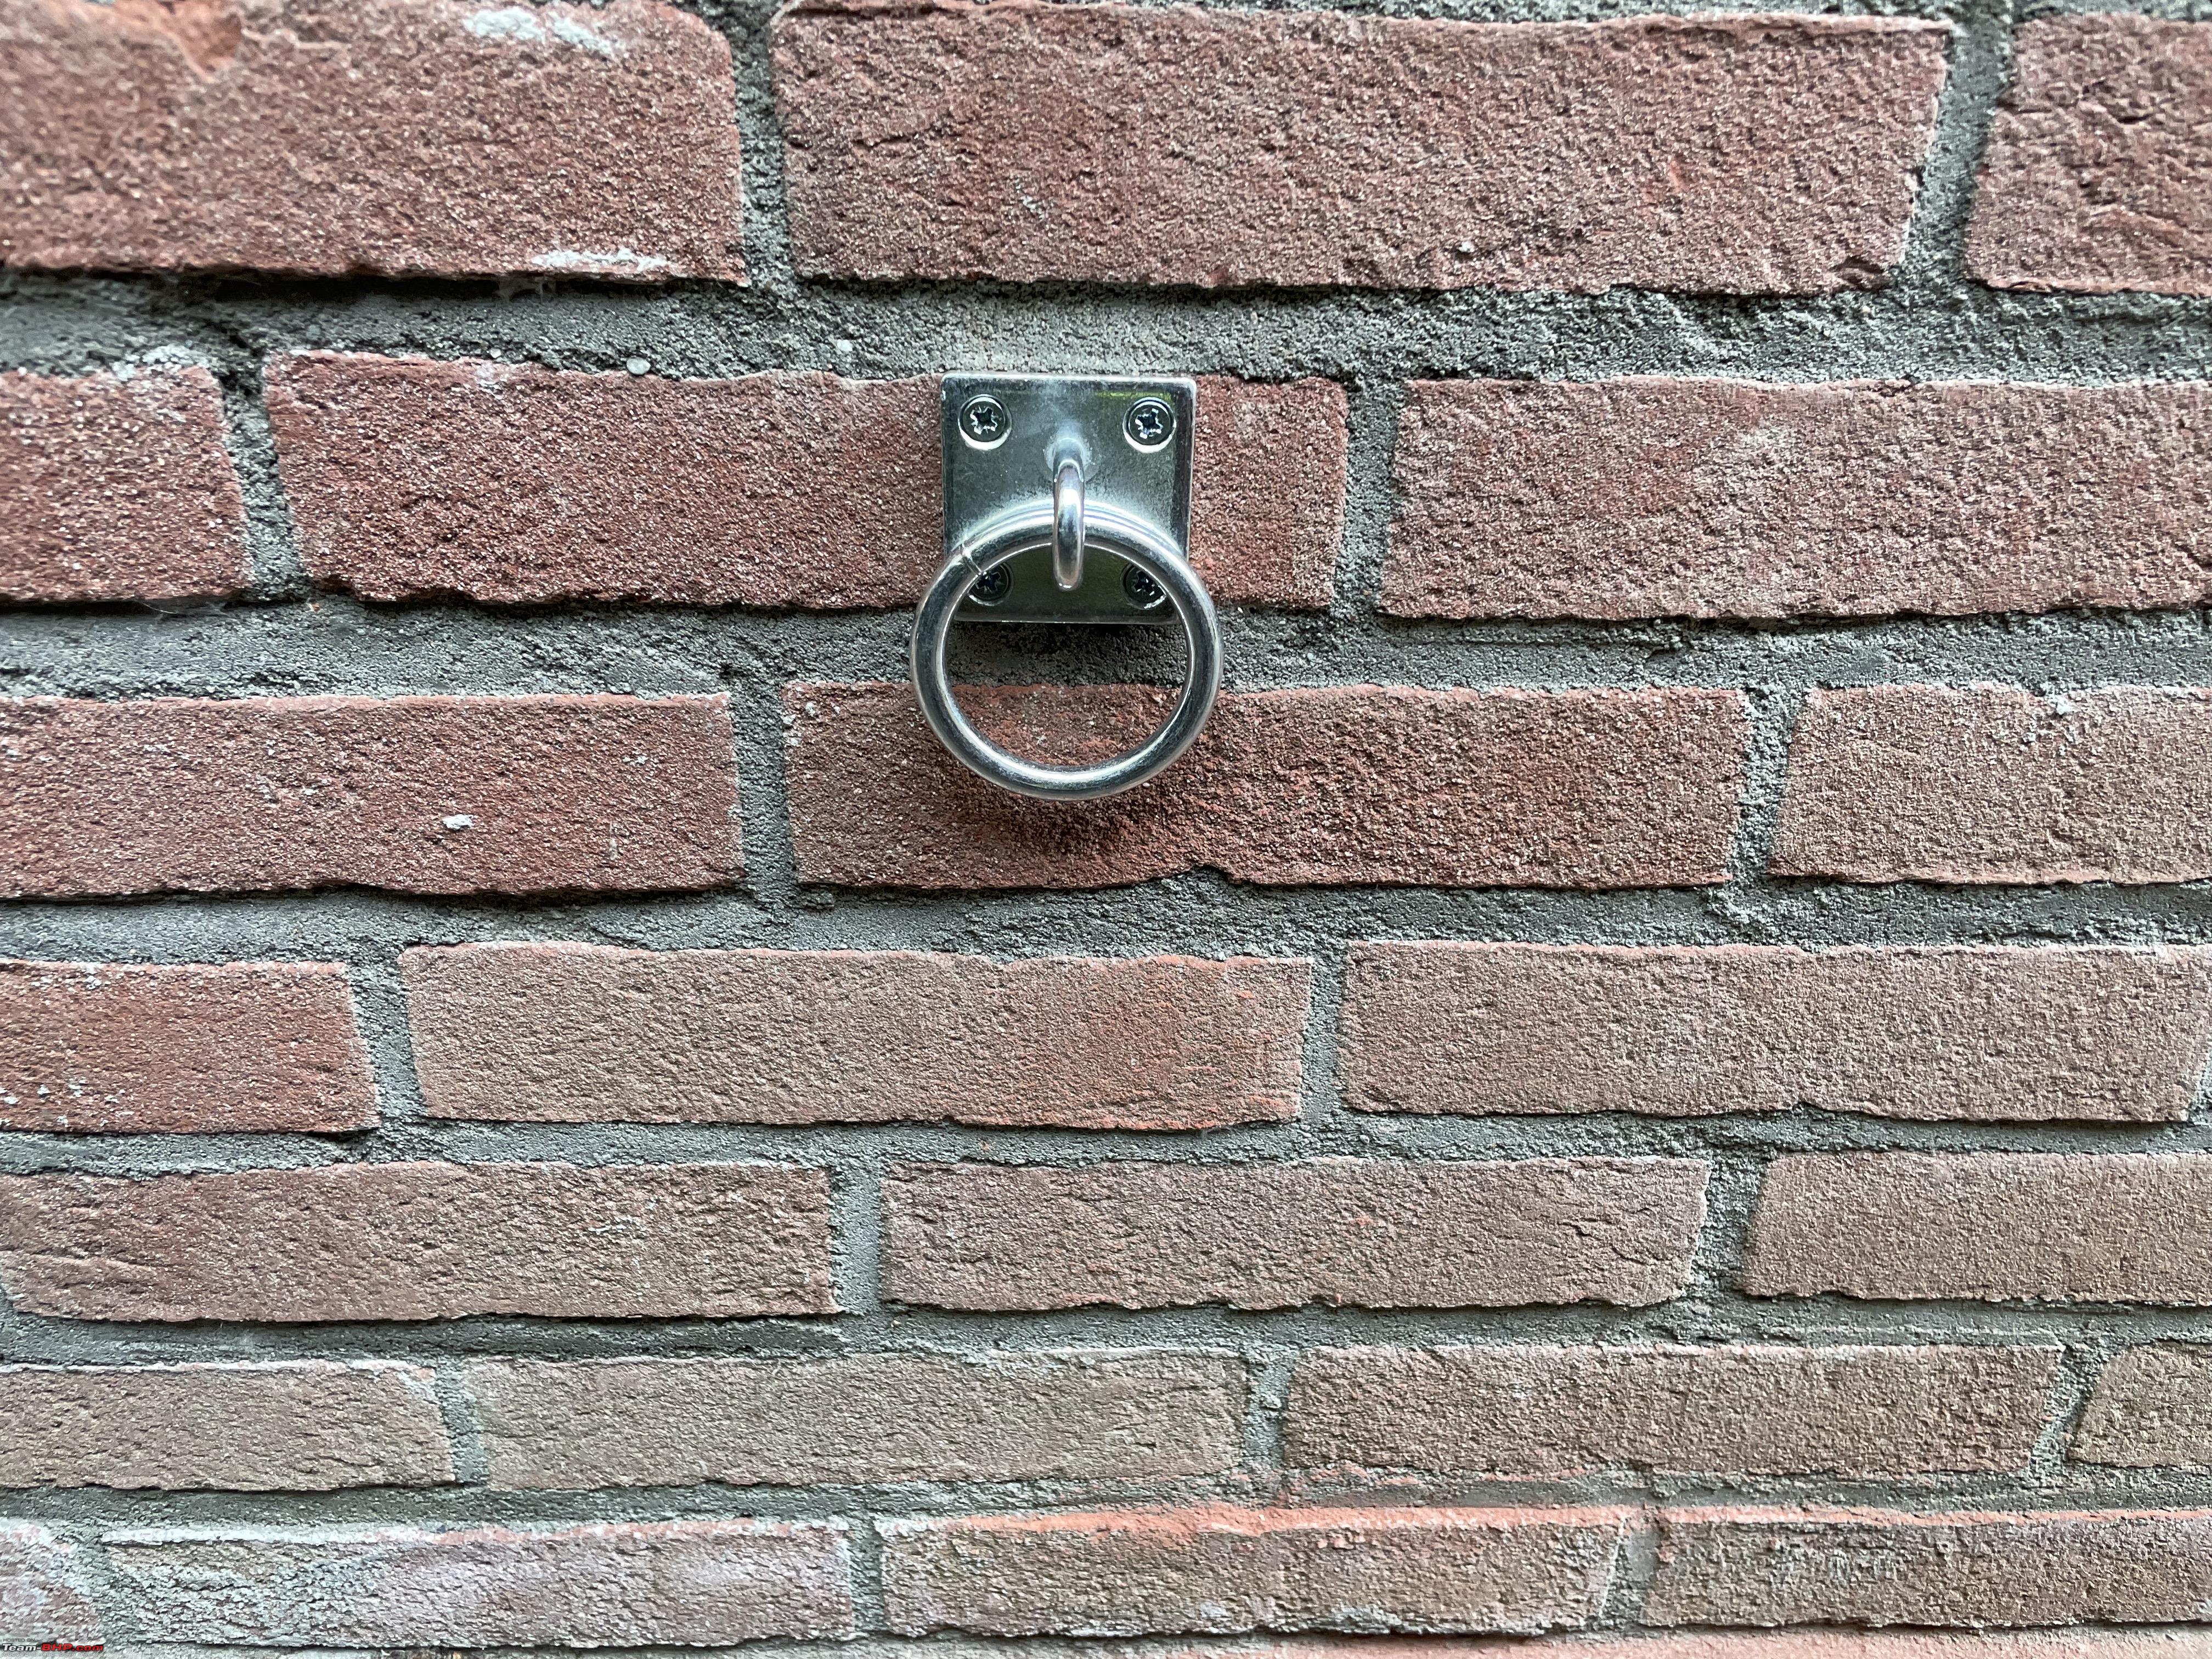 I have a large number of boxes with bolts, screws, plugs, all the stuff you need for typical home DIY.  When I buy materials for a new project I usually buy a little extra of everything, so I build up on stock material myself. Very handy. I rarely need to pop out to the DIY centre for small home DIY stuff.   My car port is all done and I am very pleased with it!! Here you see it from the rear  All done    With the bakfiets in place  From the front, with the bakfiets in place, notice the big lock going through the ring attached to the wall!  Both bins will still easily fit around the shed as well. With the car parked in its usual place, which is more forward, nobody can get the bakfiets out.   I have piled up all the old, half rotten wooden stuff at the back of the car port. Which hides the bakfiets even more.  Nothing to be seen here!   |
|
| (69)
Thanks
|
| The following 69 BHPians Thank Jeroen for this useful post: | Acharya, ADI7YAK, aeroamit, ampere, aqualeo2040, ashis89, Bhalla, blackwasp, BoneCollector, bullock-Car, chanz2015, Comrade, dailydriver, DetectiveMiles, Digital Vampire, digitalnirvana, dkaile, Engine_Roars, FueledbyFury, GJ01, GLAD73, GTO, guyfrmblr, HappyWheels, Harjot37, indivic, jmjmec, KANNURAN, Kashief, keroo1099, Kkumar, Kurrant, landcruiser123, Lone Ranger, maddyg, mobix, Nempuguru, Newtown, NewUser123, ninjatalli, PaddleShifter, Pennant1970, ph03n!x, PraNeel, PreludeSH, raptor_diwan, Rocky_Balboa, s4ch, sainyamk95, Samfromindia, sanjayrozario, Sen, shibujp, shivraj737, Shubhendra, Spinnerr, SRISRI_90, sudeepg, sukiwa, surfatwork, texens, theexperthand, unknownartist01, vaasu, veerubhai, VivekCherian, wheelguy, YD14, yesyeswe |
|
19th July 2023, 07:09
| #4 |
| Team-BHP Support  | re: D.I.Y. | Constructing a Car Port for our Bakfietsen (electric cargo bike) Thread moved out from the Assembly Line. Thanks for sharing! |

| (4)
Thanks
|
| The following 4 BHPians Thank Aditya for this useful post: | digitalnirvana, GTO, Sen, veerubhai |
|
19th July 2023, 07:56
| #5 |
| BHPian Join Date: Aug 2008 Location: bangalore
Posts: 574
Thanked: 1,529 Times
| re: D.I.Y. | Constructing a Car Port for our Bakfietsen (electric cargo bike) Great job. How did you lift the prefab roof into place? Couldn't have been a one man job. The rubber grommet with a cap is a nifty detail to weatherproof the fastening screw. Don't get it here in India and have to make do with a dab of silicone which hardens over time. Last edited by Aditya : 28th July 2023 at 05:53. Reason: Typo |
|
| (6)
Thanks
|
| The following 6 BHPians Thank keroo1099 for this useful post: | digitalnirvana, Jeroen, Nitish.arnold, Sen, SRISRI_90, veerubhai |
|
19th July 2023, 10:13
| #6 |
| BHPian Join Date: Dec 2020 Location: Hyderabad
Posts: 50
Thanked: 183 Times
| Re: D.I.Y. | Constructing a Car Port for our Bakfietsen (electric cargo bike) Fantastic thread! Read through the entire thing like I read a new Team-BHP car review. The tools & equipment you have, along with that garage will always be a dream, for a guy like me. Truly deserves appreciation for the maintenance and upkeep. Also, the usage 'Bob's your uncle again' was new to me. Liked it a lot. |
|
| (1)
Thanks
|
| The following BHPian Thanks brownkaiser for this useful post: | Jeroen |
|
19th July 2023, 11:55
| #7 | |||
| Distinguished - BHPian | Re: D.I.Y. | Constructing a Car Port for our Bakfietsen (electric cargo bike) Quote:
I just popped one long side over the top of fence and pushed the other side up till it got wedged in between the fence and the shed. I also had those blocks of woods nailed into the fence and the wall to help me position it. I found the fit was really tight, so it stayed up easily just being wedged in there. Which was helpful as it allowed me to get it into the exact orientation/position very easily. Quote:
From Wikipedia on Bobs origin: Quote:
| |||
|
| (5)
Thanks
|

| The following 5 BHPians Thank Jeroen for this useful post: | brownkaiser, digitalnirvana, keroo1099, Kkumar, Sen |
|
19th July 2023, 13:07
| #8 |
| BHPian Join Date: Sep 2022 Location: KL-01/MH-16
Posts: 150
Thanked: 213 Times
| Re: D.I.Y. | Constructing a Car Port for our Bakfietsen (electric cargo bike) As usual like all your write ups you never stop amazing me. You seem to be “Jack of all trades”. A great DIY project neatly done, would make a professional run for his money. However was surprised to hear that bike thefts are common in Netherlands. Waiting for your write up on a new DIY project. |
|
| (1)
Thanks
|
| The following BHPian Thanks Kkumar for this useful post: | Jeroen |
|
19th July 2023, 17:45
| #9 |
| BHPian Join Date: Aug 2015 Location: BLR-UD
Posts: 220
Thanked: 856 Times
| Re: D.I.Y. | Constructing a Car Port for our Bakfietsen (electric cargo bike) Very neatly done indeed! Here we don't get DIY materials, tools all under one roof like Hornbach. Thanks again Jeroen for all the educating, inspiring and informative threads, I never miss reading. |
|
| (1)
Thanks
|
| The following BHPian Thanks Nempuguru for this useful post: | Jeroen |
|
20th July 2023, 11:59
| #10 | |
| Distinguished - BHPian | Re: D.I.Y. | Constructing a Car Port for our Bakfietsen (electric cargo bike) Quote:
Many Dutch people will have two bicycles. And old beat up one and a brand new one. People will use the old one to commute and leave it at work/station all day. It will still sport massive locks. Not because it is expensive, but because it is your ride home. The second type of thieve is one in it for profit. And bicycles are expensive these days and electrical bicycles are very very expensive. So they get stolen and sold on. The average price of an electrical bicycle is well over Euro 2000! Electrical bakfietsen are way more expensive. These days burglars can break into any garden shed and find multiple electrical bicycles. Many people will take the battery of their E-bike when they park them in their shed and take the battery inside the house. A few weeks ago friends of ours had their bakfiets stolen from their shed. They had removed the battery. The next day the burglars broke into their home and stole the battery! Everybody will have bicycle insurance just in case. However, that will get you your money back, but depending on brand/model there could be considerable waiting times for a new one. So, there are many worse things in life, but getting your bicycle stolen is a real inconvenience and as upsetting as any break in and or theft. Jeroen | |
|
| (4)
Thanks
|
| The following 4 BHPians Thank Jeroen for this useful post: | dailydriver, Kkumar, sainyamk95, Sen |
|
28th July 2023, 03:22
| #11 |
| BHPian Join Date: May 2020 Location: BLR | HYD
Posts: 331
Thanked: 506 Times
| Re: D.I.Y. | Constructing a Car Port for our Bakfietsen (electric cargo bike) Love reading your DIY adventures related to cars and tinkering Jeroen. Never stop, I typically lurk on Team BHP, but threads like these are a treat! Great job on the DIY project, and great camouflage! Loved the gutter section, everything fitting in like legos is very satisfying. I would typically go to /r/DIY to get my fix, but the quality is dropping there with the whole shenanigans involving third party apps |
|
| ()
Thanks
|
| |
|