| |||||||

| Search Forums |
| Advanced Search |
| Go to Page... |
 |
| Search this Thread |  878,217 views |
 24th July 2021, 18:57
| #781 |
| Distinguished - BHPian  Join Date: Aug 2009 Location: Cochin
Posts: 3,810
Thanked: 19,328 Times
| Installing upgrades at F Motors : Part 2 Im doing some time hopping here as I cover the following 4. Re-routing the accelerator cables 5. Replacing the gear shifter link rod When the mechanics at the Royal Enfield service center in Edapally had replaced my wiring harness, they had not correctly routed the accelerator cables under the tank. Since I didnt want it to hang by the engine, I thought it best to get it routed correctly along with all the other work. I havent taken too many pictures here since this is a standard process. It is time consuming because of the dual cables and lubing them correctly takes time.  Remove seat  Place tank safely 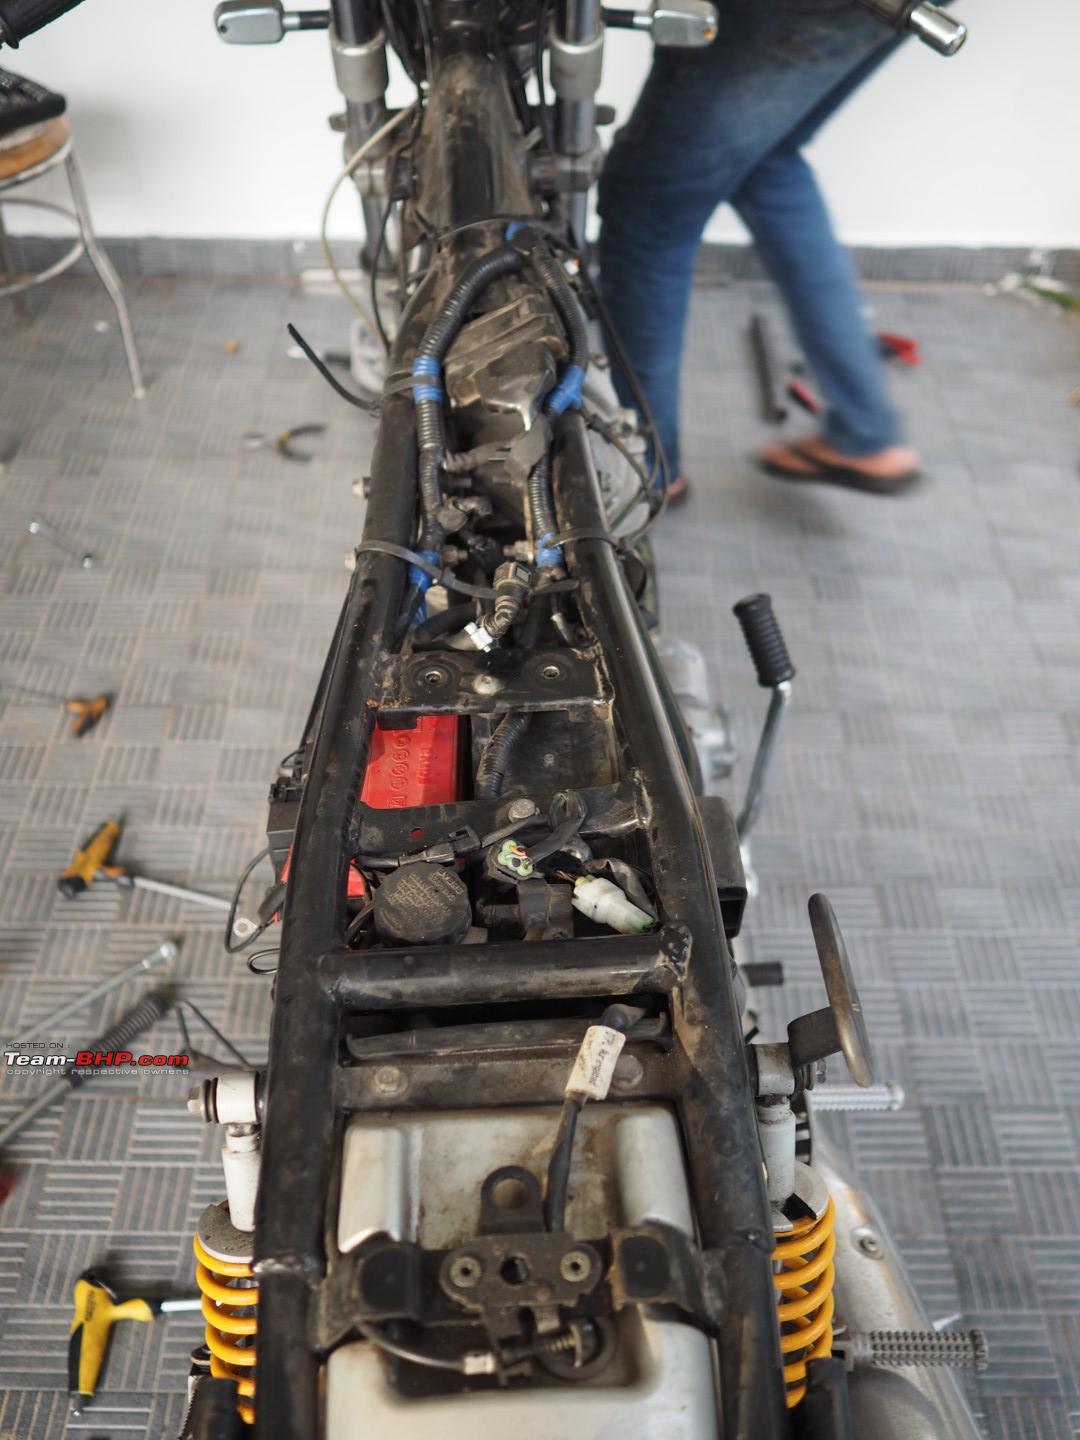 Curse our dusty environs  Check condition of all the rubber hoses while checking the accelerator cables  Loosen the switchgear  Route the cables along with the wiring harness  A clue that I have jumped ahead  Lube profusely  And then some more  Apply silicon grease After removing the seat, we proceeded to remove the tank and then went about routing the cables with the wiring harness and the pre-existing zip ties. The length was just correct and maybe that was the reason why the mechanics RE was trying to give it some play and hence installed it as he did. Replacing the gear shifter link rod assembly proved to be a head scratcher. First off, we removed the assembly, including the footpeg and the foot rest. The play in the existing assembly had come about because the rubber bush had worn out over the years. The part that I had procured did not come with the rubber bush. That would mean that the same problem would re-appear and the whole cycle would be repeated. So we decided to thoroughly cleaned the existing unit and fit it back.  Open up one side  Mission success  Realize that this too has to be removed !  Remove footpeg  All done  Compare old and new side by side  Realize that this is a battle for another day Later on, I checked with other Continental GT 535 owners and got to know that I probably procured the wrong part. The whole linkage assembly comes as one unit that includes the link rod, lever and pivot. So I need to get back to the parts distributor and see if they have the correct SKU based on the part number that fellow Continental GT 535 owners have shared. Once I get that, the replacement should be fairly straightforward. Results 4. No loopy cables for now. The bike looks much cleaner. 5. Its back to the drawing board. Next Steps 5. Cross my fingers that the correct part is available in JR and Sons or one of the other Royal Enfield dealerships. Next up, the exciting addition of the preload adjusters to play around with the front end of the suspension. |

|  (12)
Thanks (12)
Thanks
 |
| The following 12 BHPians Thank neil.jericho for this useful post: | AtheK, chinmaypillay, Cyborg, deepfreak15, KarthikK, R-Six, Roy.S, SnS_12, surjaonwheelz, tchsvy, theexperthand, vaasu |
| |
|
25th July 2021, 20:24
| #782 |
| Distinguished - BHPian Join Date: Aug 2009 Location: Cochin
Posts: 3,810
Thanked: 19,328 Times
| Installing upgrades at F Motors : Part 3 Now for the third part of the work that got done on the bike. Below is what we did 6. Replace the front fork springs 7. Install the preload adjusters Why preload adjusters? I think its important to start here, so that there is context to this post. Though Ive been riding for almost two decades, it is only in recent years that I have started to decipher and grasp, just how important adjustable suspension is to a motorcycle. My Triumph has fully adjustable Ohlins at the rear but doesnt have any adjustment at the front. Playing with the compression, rebound and preload settings on the Ohlins, for the last few years and seeing how it translates onto the road, has given me a fair idea of this black art. I am quite happy with the front end of the Triumph, so I didnt want to spend money on getting a preload adjuster for that bike and then not use it at all. Coming to the Continental GT 535, the bike's suspension setup was somewhere between a soft to medium setting. I had changed the 2 or 3 year old front fork oil to Liqui Moly 5W Light fork oil in December 2020. That had improved things from the previous and thoroughly used Royal Enfield OEM fork oil. But it wasnt a sporty front end. The rear has infinite levels of preload adjustment and was also set to only a few rings from the bottom. With this combination of front and rear, the bike handled Cochins roads very comfortably and the ride quality was very cossetting. I have experimented with stiffening up the rear end at one of the track days that I had gone to and the difference was very prominent. So I knew the rear end could up its game, if needed. Now that the bike is about to hit its 7 year birthday, I wanted to freshen things up and make the bike sportier than before. Replacing the fork oil was an option but it would be a waste of perfectly good, seven month old Motul fork oil. Preload adjusters had interested me for quite some time and I felt that this was the perfect time to invest in one. With the launch of the 650 twins, several Indian players have sprung up (no pun intended) with suspension offerings that can be ported onto the Continental GT 535 as well. Thanks to positive feedback from veteran rider ku69rd, I went ahead and ordered the Marsh preload adjusters. Fork Replacement and Preload Adjuster Installation First things first, we removed the handlebar and took out the fork cap nut and its O ring. Below that was the washer, which had to removed as well. We wont need either of them going forward. Next we pulled out the existing spacer and cleaned it. Then came the washer and the fork spring. The spring was carefully and very slowly removed, to ensure that no fork oil was drawn out along with it. This is the first time that I am replacing the fork springs on the bike. The fork oil was changed in December 2020, so that should be good for another year or year and a half. We replaced the spring and dropped in the washer and spacer. Then we installed the preload adjuster and hand tightened it, as much as we could. It is important to note that the bike was on the center stand and I was sitting on the back of the bike, to take the pressure off the forks. So at least, I contributed something to all the work that was done. The process was then repeated on the other side.  Loosen the handlebar, step 1  Sanju at work  Next loosen these  Handlebar off 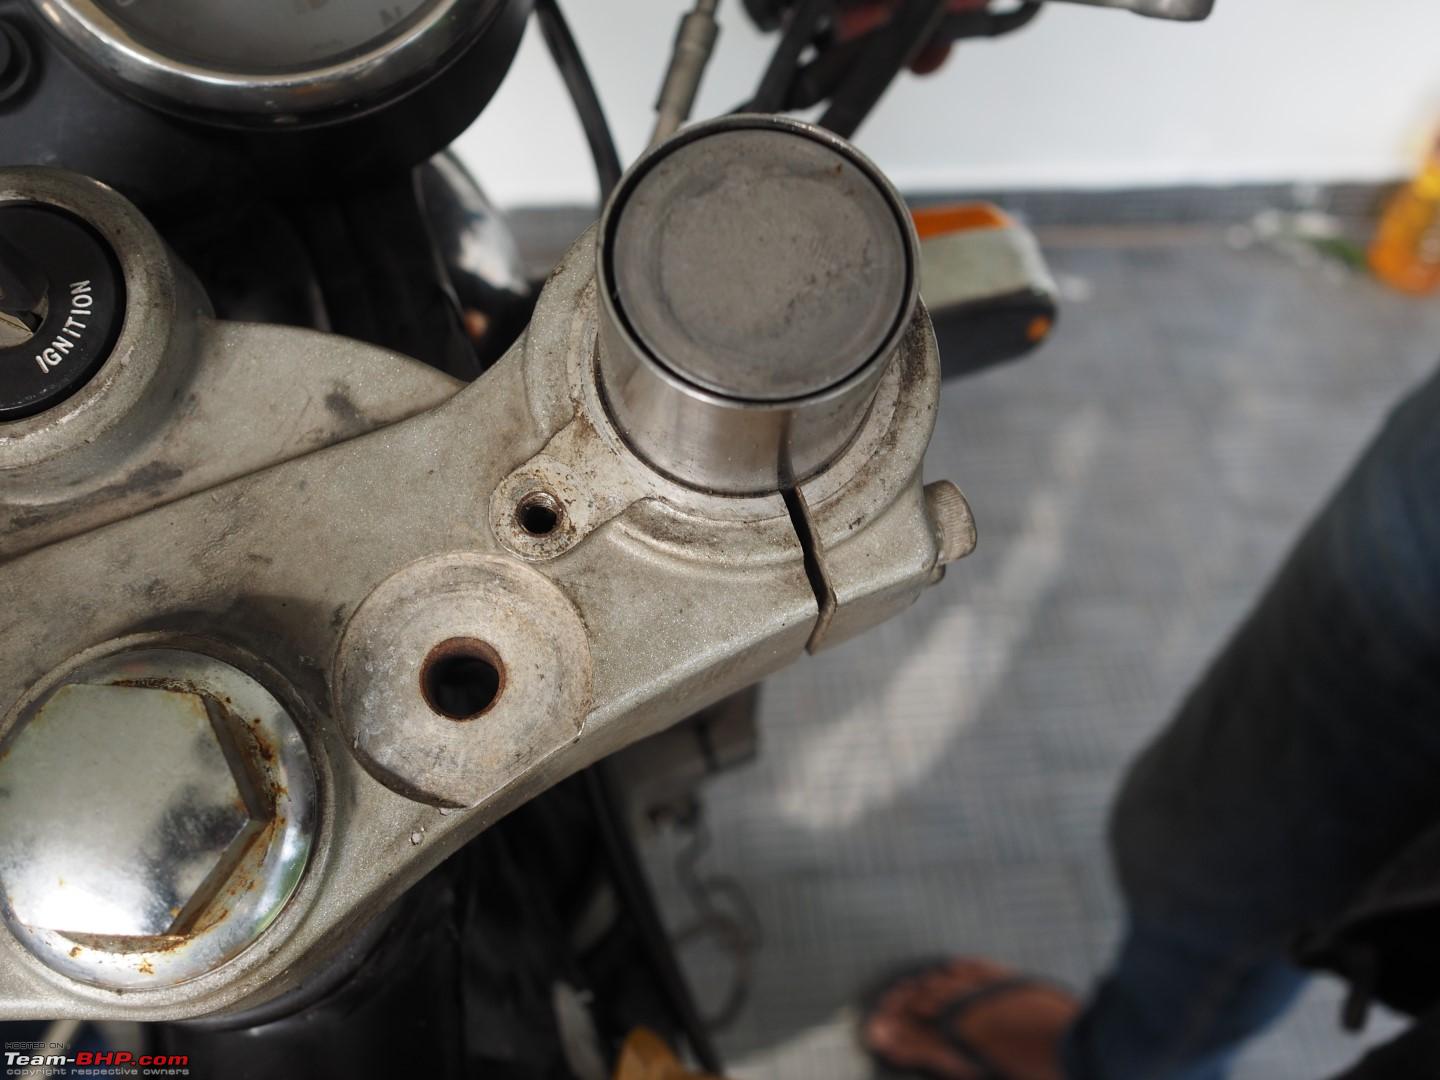 Remove this washer  Remove the spacer  Remove the washer  Helps if you have this  Remove old fork spring carefully...  So that no fork oil drips out  Hand tightening  A little more  Done  Just needs the handlebar to be put back  With the handlebar installed  Installed on both sides More on the suspension setup, initial riding impressions, next steps and final thoughts in the next post. |
|
| (13)
Thanks
|
| The following 13 BHPians Thank neil.jericho for this useful post: | chinmaypillay, crdi, Cyborg, deepfreak15, KarthikK, krishnaprasadgg, Roy.S, shyamg28, SnS_12, tchsvy, tharian, theexperthand, wrongturn |
|
25th July 2021, 21:43
| #783 |
| Distinguished - BHPian Join Date: Aug 2009 Location: Cochin
Posts: 3,810
Thanked: 19,328 Times
| Installing upgrades at F Motors : Part 4 Now for the final part of the work that got done on the bike 8. Setup the suspension for round 1 of real world trials Suspension Setup Time In the midst of all the work that we did, I forgot to take a measure of the sag on the bike, before we changed anything. That would have given us some benchmark data to work with. Also, in a perfectly scientific world, I would have liked to replace only the front fork springs and then ride it for a while to see if there was any noticeable difference after swapping out the 7 year / 28,000 + kilometer run front springs. And I would have measured the sag again, just out of scientific curiosity. Anyways, the first thing I did after we installed the preload adjusters, was to sit on the bike and check how it felt. The difference was immediately noticeable. The front wasnt going down with me sitting on it, like it used to. The back was though, so that meant that there was an obvious imbalance between the front and the rear. Next up, we looked at the front and rear separately. I pushed down on the front end to get a sense of the new compression and rebound. Those of you who watch Dave Moss videos will know what Im talking about. Then I got off the bike and had Vishnu balance it, while Sanju pushed down on it at the rear, and I watched the compression and rebound from a few feet away. This reconfirmed my initial impressions. The front was stiffer than before and the rear needed to catch up to it. We checked the rear to see that both sides were set up equally for our baseline, before we stiffened it. Surprisingly enough, they werent. The locking nut on one side had gotten a bit loose and hence the number of visible threads was different between the left and right side. So we first made them both equal. Then we went through the same process that I described above, to reconfirm that it was still softly setup at the rear. We kept increasing the number of visible threads and rechecking the rear suspension, until we got to 8 visible threads and stopped. Now the rear suspension felt like it was on the same page as the front. Finally, we had a new baseline of a relatively balanced setup (in theory, without any road riding to back it up). We decided to just tweak the front a bit and see the impact of the preload adjusters. The Marsh preload adjusters came with 6 rings visible as stock. After a few turns on both sides, I pushed down again and immediately, the rebound was very evident. The behaviour of the suspension had definitely changed again. Since we were doing this for the first time, we didnt know what to set it to. So we took out a digital scale (God bless the guys at F Motors for being so meticulous and scientific, I was planning to do it based on the visible rings) and set the visible height of the adjuster to 17.5 mm. This corresponds to approximately 5.5 visible rings from the top. So essentially, we had gone down half a ring on the Marsh preload adjuster. Since we have no reference point (I'll come to this later in the post), we could not ascertain whether this was 1. Rightly setup at the front and rightly setup at the rear or 2. Rightly setup at the front and too stiff / too soft at the rear 3. Too stiff / too soft at the front and rightly setup at the rear 4. Too stiff / too soft at the front and too stiff / too soft at the rear My best guess was that the front would have to be dialled back a bit and then we would have to get the rear to be in sync with it. Riding Experience It was finally time to test out the impact of these changes. Doing so many suspension changes and trying to test them out, in the peak of the south west monsoon, is probably not the best idea. Add to that soaked roads and night riding, and the conditions were less than perfect. My initial feedback is only from my tentative half an hour or riding in the above mentioned, less than ideal conditions. For reference, my weight is between 86 - 87 kgs. Below are some notes - Front end dive while braking has come down a lot. - The soft cushy feel of the bike is no longer there. This feels sportier for sure! - There is some harshness when I rode it into potholes and broken tarmac. - No cornering done to test if this has had a positive, or negative impact, on handling. - No high speed riding done to check the composure on uneven roads and if the rebound is too unpleasant. - This feels like I am one step closer to a perfect setup for Sunday morning hard cornering rides to Athirapally. The price to pay is that it currently isnt as comfortable as it used to be. The key is to find the balance between the two, between the front and rear. Results 7 and 8. Game changer. Next Steps I am far from the promised land and I need to do a lot of riding in mixed conditions, followed by a lot of mild tweaking to the setup. This is exciting. Final Thoughts I have said it on the forum before - suspension is the most underappreciated aspect of motorcycling. Even if you dont want to get into adjustability and play with what seems to be complex stuff, just change the fork oil on your motorcycle, if it is 3 years old and find the difference. If you are interested in learning more, dont listen to anything that your local mechanic says. Dont listen to old wives tales and unbox some suspension units at the spares store, push down on it and do a coin flip on whether it is will be good or bad. Instead invest a few weeks in catching up on Dave Moss's excellent Youtube channel. Once you are a few hours in, you will start understanding how the different elements are connected. The reality is that without baseline data from different riders (age of the bike, kilometers run on current fork oil, brand of current fork oil, rider weight, rear suspension setting, riding style etc) of the Continental GT 535, it was difficult to know where to start. But the F Motors team and I had to start somewhere and so we did. Its a learning experience for all of us and I hope by sharing the findings here, it will help others as well. Out of the box, the Continental GT 535 doesnt suffer from a soft front end, like the 650 twins. I wouldnt say that the preload adjusters are a must have for all Continental GT 535 owners. A heavier fork oil than stock should suffice for most owners. Those who want to experiment with their bikes and take it to the next level, should definitely look to get this for the Continental GT 535. I think the preload adjusters are a no brainer for owners of the 650 twins who feel the front end is a bit soft / bottoms out / needs more feel. Between better fork oil and a preload adjuster, owners of the 650 twins should be easily able to hit the sweet spot and greatly improve the front end feel of their bikes. The fact that I can play around with the front end suspension, with this relatively inexpensive mod (Rs 2,599), makes it a value for money investment for me. A big thanks to Sanju and Vishnu from F Motors for being a great team to work with. I have got the part number for the gear assembly and I need to check if it is available at the Royal Enfield dealers or their spares distributors. Also, we have to install the Carberry Vibration Reduction Plate. When will this madness of investing / splurging / wasting money on the Continental GT 535 end, you might ask? I thought I would be done with these mods and a proper paintjob at Motonerdz, later in the year, to get this bike back to factory spec. But that was until I checked out this aftermarket Brembo setup on a Ninja 300. My goodness, the feel of that is unmatched. It isnt cheap but it feels like it is worth every rupee. I think its time to start saving up again!  |
|
| (17)
Thanks
|
| The following 17 BHPians Thank neil.jericho for this useful post: | ashwinprakas, chinmaypillay, deepfreak15, Desmosedici, KarthikK, krishnaprasadgg, ku69rd, RMN, Rocky_Balboa, Roy.S, shan_ned, shyamg28, SnS_12, surjaonwheelz, tchsvy, theexperthand, wrongturn |
|
26th July 2021, 00:17
| #784 | |
| BANNED Join Date: Nov 2016 Location: Kollam
Posts: 2,018
Thanked: 6,636 Times
| Re: Installing upgrades at F Motors : Part 4 Quote:
As I recall a long time back when I spoke about gauging compression by putting load to find out suitable alternate shocks some one threw a tantrum.  | |
|
| (1)
Thanks
|

| The following BHPian Thanks ashwinprakas for this useful post: | deepfreak15 |
|
26th July 2021, 08:13
| #785 | |
| Distinguished - BHPian Join Date: Aug 2009 Location: Cochin
Posts: 3,810
Thanked: 19,328 Times
| Re: Installing upgrades at F Motors : Part 4 Quote:
Your premise of finding alternate shocks was to put load on a potential replacement with your own two hands, while you were standing at a store, to gauge whether it could be a right fit or not. That was a wrong technique and I pointed it out. If you did read my entire post, you will see that I pushed down on the front end to get a sense of the new compression and rebound, while it was still connected to the bike. Just spend 30 minutes of genuine research on the interwebs and you will get to know what I am talking about. I cant believe that I have to type this sentence but there is a world of difference between trying out a suspension by squeezing it between your hands in a store and doing so when it is connected to the motorcycle. As you often say, its just common sense. This forum is a platform for us to exchange ideas and share our motorcycling experiences. That is why I spend time keeping this thread updated, I know it helps other owners of the bike who are and who are not on the forum. If any forum member is wrong, the others will step in and inform him / her that what they have posted is incorrect. This way the person who posted it learns, and others learn. Nobody here is perfect and knows everything. We are here to learn and share our learnings. This system of checks and balances between open minded enthusiasts on the forum, ensures that grossly incorrect information and advice does not get blindly passed onto other forum members and enthusiasts who read these threads. If you felt that someone threw a tantrum when you got corrected, then what can I say? Maybe you should consider the what and why of the reply, instead of how it was said and you interpreted it? Also, if you feel that the earlier post was a tantrum and against the forum rules, please do report it to the mods to get it cleaned up. | |
|
| (16)
Thanks
|
| The following 16 BHPians Thank neil.jericho for this useful post: | aswin ajith, deepfreak15, Desmosedici, Geo_Ipe, krishnaprasadgg, ku69rd, puneet1991, RMN, shan_ned, shyamg28, SnS_12, tchsvy, theexperthand, Urban_Nomad, wrongturn, Xaos636 |
|
27th July 2021, 10:46
| #786 | |
| BHPian Join Date: Nov 2014 Location: Pune
Posts: 846
Thanked: 2,951 Times
| Re: Installing upgrades at F Motors : Part 3 Quote:
- Which spring did you use? OEM or Aftermarket? - Which components were left out from the stock configuration vs the pre-load adjuster setup? - I do feel some amount of fork oil would have stuck to the springs! - Will look forward to your feedback on the long term handling characteristics. - As an INT650 owner this is on my list next, heavier fork oil + pre-load adjusters, after the monsoons. Thanks for sharing this useful info. Yes, for suspension setup you need three folks and each one's contribution is important!  Cheers, surjaonwheelz | |
|
| (2)
Thanks
|
| The following 2 BHPians Thank surjaonwheelz for this useful post: | KarthikK, neil.jericho |
|
27th July 2021, 15:14
| #787 | |||||
| Distinguished - BHPian Join Date: Aug 2009 Location: Cochin
Posts: 3,810
Thanked: 19,328 Times
| Re: Installing upgrades at F Motors : Part 3 Quote:
The international options feel more reliable but as with all good things, they are expensive. I was chatting with ku69rd again on the suspension and he mentioned that Racetech makes excellent custom built springs. He has used their products on his RD350 and he was very happy with it. So that is an option, along with those from Hitchcocks and TEC etc. Quote:
Quote:
Quote:
Quote:
| |||||
|
| (6)
Thanks
|
| The following 6 BHPians Thank neil.jericho for this useful post: | KarthikK, SnS_12, surjaonwheelz, tchsvy, theexperthand, wrongturn |
|
29th July 2021, 22:41
| #788 |
| Distinguished - BHPian Join Date: Aug 2009 Location: Cochin
Posts: 3,810
Thanked: 19,328 Times
| Second impressions of the new suspension setup Thanks to some favourable weather, I managed to squeeze in 50 odd kilometers of riding today. This consisted of city roads, traffic, highways and the one open road that we have, where our vehicles can stretch their legs. As promised, here are some initial impressions of the new suspension setup - On bad roads, I can feel the stiffness in the suspension. It doesnt make my back break and push me to grab the C spanner to dial out the rear preload or unwind the front end. But that soft and cossetting feel has gone. - On slightly imperfect tarmac, where I can only do slow speeds, I do find myself wishing for a bit of comfort in the suspension. - On regular roads with regular commuting speeds, I cant notice the difference between the old setup and this setup in terms of ride quality. - As the speeds pick up towards three digits, the bike feels a lot more planted. At higher speeds, on slightly undulating roads, that old vertical movement / slight bobbing, has now almost completely disappeared. There's a maturity to its high speed behaviour now. Its like going to the gym for 3 months and feeling, well, different. - At certain speeds (I couldnt isolate the exact speed and / or road condition), I feel there is a slight bob from the rear end. That is something to look into and tweak. - I saved the best for the last, but the biggest positive of stiffening up the front end, is the fantastic braking feel. Drop the anchors at 90 kmph and the front end tells you, "Hey, I got this." There is none of the old dive while braking, that I had just got accustomed to. The bike now grabs the brakes without a fuss and the stiffer front end doesnt disturb the dynamics of the ride. Just for the improvement in braking, the preload adjusters feel worth the money that I spent. Next steps - I need to increase the preload in the rear suspension to try and eliminate the slight vertical movement that I noticed on 3 - 4 occasions. - Once Im comfortable with that setup, Ill further increase the preload on the front and the rear, to see where I get the right balance of ride quality and sportiness. While doing my testing today, I was just wondering how such a simple mod would help Interceptor and GT 650 owners. The good news is that one TBHPian has already installed the same preload adjusters on his Interceptor 650 and is experimenting with the setup on his bike. I will wait for him to update the Royal Enfield 650 twins thread with his findings. For anyone interested in the current baseline on my bike (and, equally importantly, for me to look back and track the changes) Rider Weight - 86 - 87 kgs Fork Oil - Liqui Moly 5W Lite Age of Fork Oil - 7 months and ~ 1,250 kms Preload settings on Marsh Auto adjusters - 5 1/2 visible rings above the triple clamp Threads visible on the rear suspension - 8 threads Signing off with a picture from my short ride today. Those preload adjusters do add immensely to the coolness quotient, dont they?  No key chain due to Royal Enfield's poor quality control over their vendor |
|
| (9)
Thanks
|
| The following 9 BHPians Thank neil.jericho for this useful post: | Cyborg, deepfreak15, KarthikK, krishnaprasadgg, Rocky_Balboa, sandeepmohan, SnS_12, surjaonwheelz, theexperthand |
|
4th August 2021, 23:38
| #789 |
| Distinguished - BHPian Join Date: Aug 2009 Location: Cochin
Posts: 3,810
Thanked: 19,328 Times
| Gear shifter assembly obtained + other updates 100+ km impressions of the same suspension setup - I did another 50 odd kilometers of mixed riding. My findings are in line with what I posted in my last update but Im more comfortable with this setup now. - I can feel the rear end bob a bit, when I hit some undulations at higher speeds. In the past this was normal but now that the front end is so well planted, the imbalance at the rear is more evident. - I will measure the sag before and after any more suspension changes. That should help map the numbers to actual road experiences. 100+ km impressions of the Hitchcocks Anti vibration mounts - If I have to press down on the button to switch between the total odometer, Trip A and Trip B, there is a lot more play than before. To be on the safe side, I hold the clamp with one hand and press the button with the other. Without the anti vibration mounts, this was a one handed operation. - The clocks dance and prance around at idle, to the extent that someone who is seeing the bike for the first time, will ask if the clamp is loose! - As speeds increase to 80 kmph, the clocks become rock solid. - At 90 kmph, there is bit of a jiggle. - At 95 kmph, it goes back to being rock solid. - Here is the funny part. When the clocks are absolutely immovable at 80 kmph, the visor flutters a bit and the mirrors have the traditional Royal Enfield vibes errr character. So seeing the clocks not moving, when the other elements are, is actually a bit disconcerting. I need to get used to this. Honestly, I find this modification to be a mixed bag. I understand that it is isolating the vibrations from the clocks but the on road character isnt exactly what I expected. Earlier, the clocks didnt move at idle and lower speeds but had some vibes errr character at higher speeds. As I mentioned before, the anti vibration mounts invert this behaviour. Though I like Hitchcocks products and their quality, this particular item isnt an easy recommend from my experience. Gear shifter assembly obtained For those who werent keeping track, the mechanic at Republic of Bikers had suggested that I pick up a Gear shifter link rod, when he noticed that the current one had some play in it because the rubber bushes at either end had worn out. I went to JR and Sons and looked up the product catalogue and ordered the part number 585248/C. It cost Rs 390. When we tried installing it at F Motors, we realized that something was wrong and so I turned to the very helpful fellow owners on the Continental GT 535 owners group on whatsapp. I was told that I should have got the entire unit as a single piece. The part that I got was just a child part of the whole combined SKU. I had seen that in the catalogue but thanks to a temporary brain freeze, I had ordered just the child part, which we will have a tough time fitting together with the rest. Anways, the correct part number is 585288/E and this gets you the whole assembly, which is what you need. Please dont make the same mistake that I did and also end up with a 400 rupee paperweight on your work desk. Armed with this information, I checked in JR and Sons and fortunately they had the part in stock. It costs Rs 1,700. I was fully prepared to wait for another 3 - 4 weeks for it to be sent from Madras. Thanks to JR and Sons, I didnt have to wait at all!  Child part - 585248/C - DONT ORDER JUST THIS  A closer look at one end  No rubber bushes come with this SKU  This is what you need  Part details and cost  The full assembly  A closer look at one end  ... and the other Next round of upgrades I have finally decided to pull the trigger on the seat upgrade to the Royal Enfield dual seat that I purchased way back when. The problem with this OEM seat is that the padding for the rider is too thin and after long hours in the saddle, it feels as though the seat has sunk a bit. I can still remember being on a full day ride with fellow TBHPians when I was based in Bangalore, and half way through the ride, regretting that I had taken the double seat, instead of the single seat that offers a lot more comfort and cushioning. The current seat has also got scratched, thanks to cats that seem to mistake my bike for a bed to sleep on. I had asked one of my contacts here to get the seat done but they forgot about it for almost 2 weeks. Thanks to a helpful post from aswin ajith, I checked out Classic Seat Makers at Aluva and their work seems to be good. Changing the complete foam and getting a custom design on the same frame, will cost Rs 2,800 all inclusive. I should be getting it done later this week. Last edited by neil.jericho : 4th August 2021 at 23:40. |
|
| (7)
Thanks
|
| The following 7 BHPians Thank neil.jericho for this useful post: | AtheK, deepfreak15, hareshjethwani, KarthikK, krishnaprasadgg, SnS_12, surjaonwheelz |
|
12th August 2021, 00:18
| #790 | |
| Distinguished - BHPian Join Date: Aug 2009 Location: Cochin
Posts: 3,810
Thanked: 19,328 Times
| Quick updates Quote:
Yes, I do feel the front end thudding into some of the new found post peak of monsoon potholes within the city, but its more a reflection of the soft setup from earlier, rather than something that ruins the ride experience. At higher speeds, the confidence that I have while taking on the undulations on the open roads and the irregularities in the bridges, is something else. I can carry speeds of at least 5 to 10 kmph faster, on the same stretches than before, with ease.  Right now the only annoyance is that vibration sound from the front end. Earlier it was evident from between 2,500 to 3,000 RPM. I thought it might be from the clocks but when I would hold onto the clocks (to eliminate / pass on the vibes to my hand), the sound still persisted. But after installing the anti vibration mounts, now the vibration sound appears between the 2,000 to 2,500 RPM mark. So it wasnt related to the clocks, but it actually is? I am not able to figure it out. The only thing to do is to remove the clocks and see if the sound still persists. And from there, I need to narrow it down.  There is nothing much else to report on the bike. I didnt get time to complete the planned seat work, so Ive pushed it out by another few weeks. For my next trip to F Motors, I have planned the following - Gear shifter installation. - Setting up the suspension by measuring sag and stiffening it further. - Annoying front end vibes elimination. Removing this character will take some good old fashioned investigation. - Installing grips on the Continental GT 535. I purchased a pair of grips for my Triumph and those really did help change the feel of riding, quite noticeably. I forget the name of the brand but Ill purchase the same one for the Continental GT 535 as well. Mileage: After hearing some good feedback on the XP95 premium petrol that is sold by Indian Oil, I decided to give it a shot. It costs Rs 106.xx per litre which is a few rupees more than regular petrol. So after several months, I visited the IOCL bunk on the Durbar Hall road. The attendant was shocked that I wanted to put premium petrol in my Royal Enfield and double checked that I hadnt made a mistake! Distance covered : 246.6 kms. Petrol consumed : 8.96 litres. Mileage: 27.52 kmpl which is about par for course. Lets see if the change to XP95 has any impact on the behaviour of the bike and / or mileage. Mileage since day 1 stands at 28.06 kmpl. | |
|
| (6)
Thanks
|
| The following 6 BHPians Thank neil.jericho for this useful post: | deepfreak15, KarthikK, krishnaprasadgg, sandeepmohan, shyamg28, SnS_12 |
|
18th August 2021, 00:05
| #791 |
| Distinguished - BHPian Join Date: Aug 2009 Location: Cochin
Posts: 3,810
Thanked: 19,328 Times
| More short updates I headed to F Motors for the following - Installing the gear shifter - Identifying and eliminating the annoying buzzing sound from the front end - Installing Grab On handlebar grips - Adjusting the suspension after measuring sag The gear shifter replacement was fairly straightforward. Royal Enfield now sells the complete assembly (all details on the part number etc are in the posts above) but strangely the shifter assembly does not come with the rubber sleeve on the shifter. Fortunately we were able to remove the old one with some effort and slide it onto the new one. The only surprising aspect was that they have inverted the position of the shifter, Ive shared a picture of the same. I dont know why but it doesnt make a difference to the riding experience.  Old shifter where the rod is inside vs new shifter where the rod is outside  Full assembly but no rubber sleeve. Just Royal Enfield things!  Had to be taken off the old one I tried replicating the annoying sound from the front end that has moved to between 2,000 to 2,500 RPM and as expected, the sound could not be replicated. Its funny how these vibrations errrr character come and go at will. Later on in the evening, I found it creep back in at only the 2,000 RPM mark. Sigh! All part of the Royal Enfield experience. The handlebar grips were fairly easy to slide on. Since I have adjustable levers, I can adjust the amount of free space that my fingers have and be comfortable. I had picked up a pair of these same grips for my Street Triple from AutoQueen in Cochin and I was quite happy with them. So instead of the popular Grip Puppies, I picked up another one of the same set again. They make quite some difference to the motorcycling experience. I cant believe that Ive been riding for nearly 2 decades and have only now realized how amazing good quality grips can be!     Here is what it used to look like without the grip  Here is what it looks like with the grip The suspension mods and learnings need a whole separate post with tables and what not, so Ill keep that for another day. Signing off with a couple of pictures from my testing of the post suspension tweaking of the Continental GT 535 because, well, this thread can never have enough photos.     |
|
| (12)
Thanks
|
| The following 12 BHPians Thank neil.jericho for this useful post: | ast.ggn, Cyborg, deepfreak15, drrajasaravanan, KarthikK, krishnaprasadgg, sandeepmohan, shyamg28, SnS_12, texmonster, tharian, yesyeswe |
| |
|
18th August 2021, 13:22
| #792 |
| Distinguished - BHPian Join Date: Aug 2009 Location: Cochin
Posts: 3,810
Thanked: 19,328 Times
| Measuring sag + next round of suspension adjustments As I mentioned in my earlier post, in the midst of all the work that we did, I forgot to take a measure of the sag on the bike, before we changed anything. That would have given us some benchmark data to work with. Before we get started, I am listing the current baseline that we have. Rider Weight - 85 - 86 kgs Front Fork Oil - Liqui Moly 5W Lite Age of Front Fork Oil - 8 months Distance covered with current Front Fork Oil - Approximately 1,350 kms Preload settings on Marsh Auto adjusters - 5 1/2 visible rings above the triple clamp Distance covered with current rear Paioli suspension - 5,150 kms (It was replaced in February 2019) Threads visible on the rear suspension - 8 threads Now there are some excellent articles online related to sag and the correct measurements that need to be incorporated on bikes. This article from MCN and especially, this one from Racetech are excellent resources. Please do considering reading them and understanding how to measure L1, L2 and L3. Ari Henning has an easy to follow video based on the Racetech process. Ive created a simple tabular representation below, so that it becomes easy to follow. You will note that there is no universally defined fixed or preordained exact numbers and / or percentages. These are a benchmark to target and then it is up to you to tweak and see what works well in your conditions. My target was to change some of the current settings, get them as close to, if not within, the recommended benchmarks and then ride the bike to test it in different conditions.  Front end suspension adjustments We did three rounds of checking. First we checked the sag based on the current baseline. Then we increased the preload to see how much impact it had on the sag. And lastly we undid all the preload available to see the sag.  Rear end suspension adjustments We did only 2 rounds of this. First we checked the sag based on the current baseline. Then we increased it by 50% and checked the sag.  End Result Front sag - 28 mm. Front sag percentage - 23.14%. Rear sag - 28.5 mm. On the front, there is no further adjustment possible to increase the sag to the suggested window for street riding that is between - 25% of the 121 mm, which is 30.25 mm and - 30% of the 121 mm, which is 36.3 mm on my bike. So right now, this is out of the street riding numbers and lies in the middle of the sporty / road racing side, with zero preload added in. More preload being added will further reduce the 28mm sag. On the rear, there is a lot of room to play with. Since the front end is on the sporty / road racing side, I have set the rear to be the same. Instead of the recommended target of 30 - 35 mm sag for street use, I have gone with the target of 25 - 30 mm for road racing use. This way, the front and rear should be in sync, in theory at least. I will ride the bike for some a couple of hundred kilometers and post my initial impressions on this new setup. Thanks to Sanju from F Motors for being a willing accomplice in all this suspension related analysis and continuous tweaking. Its a learning experience for F Motors and for me. All the theory in the world is one thing, but trying things out on our roads, is a whole different ballgame. Without trying and riding, it is impossible to say what works, what doesnt and what needs to be changed. Signing off with a picture of the Continental GT 535, because this thread can never have enough pictures.  |
|
| (5)
Thanks
|
| The following 5 BHPians Thank neil.jericho for this useful post: | deepfreak15, KarthikK, krishnaprasadgg, SnS_12, sukiwa |
|
20th August 2021, 23:15
| #793 |
| Distinguished - BHPian Join Date: Aug 2009 Location: Cochin
Posts: 3,810
Thanked: 19,328 Times
| First impressions of the revised suspension setup I know a few people are interested in the suspension modifications that a few other Team BHPians and I are experimenting with on our Royal Enfields, so I thought it best to provide a quick update on the latest sporty / road racing side suspension setup. As a quick reminder, with the preload adjusters installed (and not dialled in at all) the sag on the front end can only be set to what is a sporty / road racing setting. To match that, I have set the sag on the rear to be what falls under the sporty / road racing numbers. I was expecting it to be really stiff in the real world.  I didnt do any highway speed testing because I wanted to see how it was in more start stop and mid-range conditions. Given that it is the holidays here, I did a short solo ride to Cherai beach to see how the bike behaves in these sub 70 kmph riding scenarios. I hated riding down to Cherai the last time I went there and despite it being a semi holiday, the loonies were out in full force today as well. I saw at least 8 - 10 near death causing accidents and finally spotted one crash as well. If you are visiting Cochin, just dont head down to Cherai. As lovely as it is, the destination isnt worth putting your life at risk, even if you are in a cab or you are self driving.  Onto the bike, then. The grips have made the riding experience a whole lot better. I cant recommend good quality grips enough. The suspension caught me out only once, when it thudded into a small pothole at around 30 kmph. But other than that, it felt very firm and reassuring. Almost grown up like. The entire suspension and chassis feels so different with the latest changes to the suspension, primarily due to the massive stiffening up at the rear.  Today, I dont think I ever got beyond 65 kmph. I rode on good roads, bumpy roads, sandy roads (where sea fresh sand is thrown up daily), an utterly terrible gravel stretch and everything else in between. So all in all, this was a good test for the suspension. No complaints from the bike and the suspension took it all in its stride. Once I complete a couple of hundred kilometers, I might go down from 12 rings to 11, just to see what the rear sag becomes and if it makes it more compatible for comfortable riding.  Ironically, all the recent modifications and this suspension fixing and sorting out, has inadvertently ended up highlighting the one aspect of the bike that I cant do too much about. And that is the relatively gruff engine. The Carberry vibration reduction plate needs to be installed and that, plus the Amsoil fully synthetic engine oil that I recently picked up, should hopefully help reduce these vibes, err character and smoothen the bike out. Mileage: Last time around, I had filled up the bike with XP95 premium petrol, just to see if it made any perceptible difference. To be honest, I felt like the throttle response was a tiny bit crisper. It wasnt a game changer or anything but someone like me who doesnt ride a lot, I wouldnt mind switching to it more often. On my return from my suspension testing ride, I decided to fill up once again to measure the mileage. I was expecting maybe 31 - 33 kmpl, based on past history of riding on this same stretch. The result was astonishing. Distance covered : 111.2 kms. Petrol consumed : 2.83 litres. Mileage: 39.29 kmpl which is a lot more than what I expected! Im willing to put it down to being a one off. Let me see how well the GT 535 takes to this premium fuel in the long run. Mileage since day 1 goes up to 28.09 kmpl. |
|
| (4)
Thanks
|
| The following 4 BHPians Thank neil.jericho for this useful post: | deepfreak15, KarthikK, krishnaprasadgg, SnS_12 |
|
21st August 2021, 08:18
| #794 | |
| Senior - BHPian | Re: First impressions of the revised suspension setup Quote:
| |
|
| (4)
Thanks
|
| The following 4 BHPians Thank dinu2506 for this useful post: | KarthikK, man_of_steel, neil.jericho, sukiwa |
|
23rd August 2021, 11:56
| #795 | |
| Distinguished - BHPian Join Date: Aug 2009 Location: Cochin
Posts: 3,810
Thanked: 19,328 Times
| Re: First impressions of the revised suspension setup Quote:
| |
|
| (2)
Thanks
|
| The following 2 BHPians Thank neil.jericho for this useful post: | dinu2506, KarthikK |
|