Team-BHP > Motorbikes


Reply
  Search this Thread
3,986 views
Old 18th September 2024, 08:10   #1
Senior - BHPian
 
Viju's Avatar
 
Join Date: May 2006
Location: Tokyo / Cochin
Posts: 1,132
Thanked: 2,894 Times
Royal Enfield Bullet 350 DIY : Adding a Windshield, Crash bar & Heel toe shifter

In my quest to make the Bullet a bit more touring friendly, I made a few more DIY additions.

The export models come with a toe only shifter. I am not sure of the exact reason, but it may be to suit the rider preferences, or to maintain the authentic look and feel of the original Bullet toe shifter. I had no issues with the shifter as such, and the gearbox has a really nice, positive clicking action.

However, I do use the Bullet for short runs to drop the kids off to their swimming classes or pick up some groceries etc. It is painful to wear the riding boots for these 2 km runs. As the toe shifter started scuffing up my favourite Onitsuka Tigers, I decided that I need to add a heel toe lever, fully well knowing that I may be compromising the satisfaction of the positive gear-shift somewhat.

Heel & Toe Shift Lever

Likes:
  • No more scuffed shoes!
  • Positive gear shifts, 90% as good as a toe shifter
  • Makes riding a bit more effortless on an already effortless motorcycle

Dislikes:
  • Does not look as clean as a toe shifter
  • Need to move the foot a bit more around the foot peg

Tools required:
  • Ratchet with sockets (10mm, 12mm, 17mm)
  • Ring spanners (10mm, 12mm, 17mm)

Fitting time: 20 minutes

Difficulty level: Easy

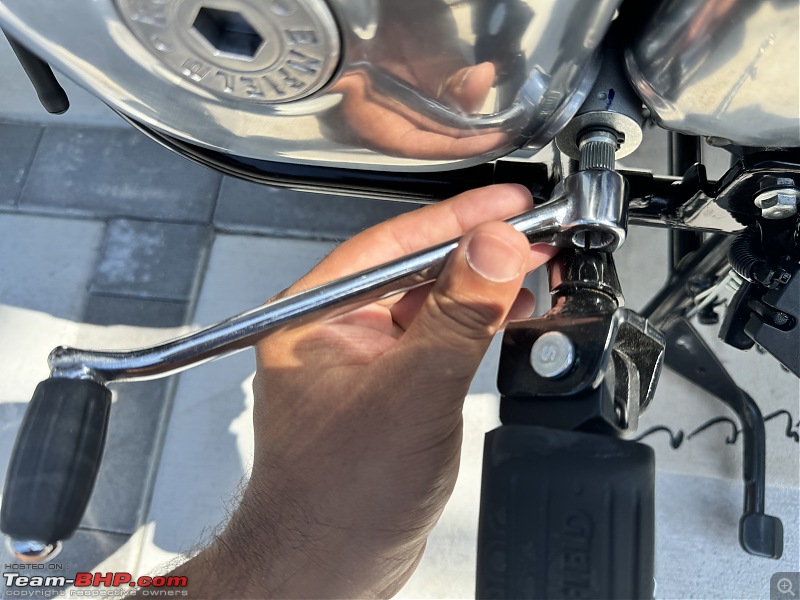
Royal Enfield Bullet 350 DIY : Adding a Windshield, Crash bar & Heel toe shifter-img_2500.jpg
Loosen and remove the retaining nut of the shift lever

Royal Enfield Bullet 350 DIY : Adding a Windshield, Crash bar & Heel toe shifter-img_2501.jpg
Shift-lever cannot be removed due to the LH rider foot-rest mount

Royal Enfield Bullet 350 DIY : Adding a Windshield, Crash bar & Heel toe shifter-img_2502.jpg
Loosen the rear mounting bolt of the sub-frame

Royal Enfield Bullet 350 DIY : Adding a Windshield, Crash bar & Heel toe shifter-img_2503.jpg
Remove the rear mounting bolt

Royal Enfield Bullet 350 DIY : Adding a Windshield, Crash bar & Heel toe shifter-img_2504.jpg
Remove the bolt & retaining nut

Royal Enfield Bullet 350 DIY : Adding a Windshield, Crash bar & Heel toe shifter-img_2506.jpg
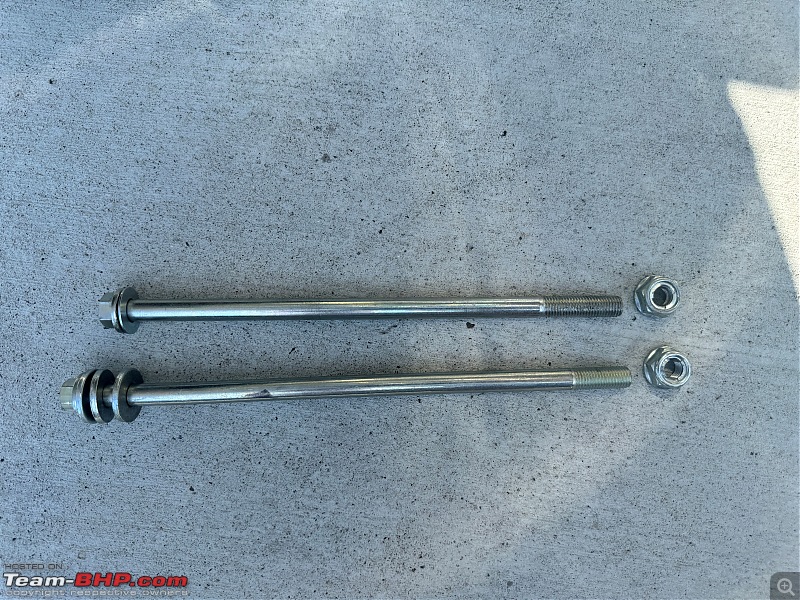
The original bolt & nut holding the sub-frame

Royal Enfield Bullet 350 DIY : Adding a Windshield, Crash bar & Heel toe shifter-img_2507.jpg
Sub-frame & foot-rest down; shift lever can be removed / re-fitted (I stupidly missed to untie the vent hoses before pulling down the sub-frame)

Royal Enfield Bullet 350 DIY : Adding a Windshield, Crash bar & Heel toe shifter-img_2495.jpg
Push this side on to the shifter

Royal Enfield Bullet 350 DIY : Adding a Windshield, Crash bar & Heel toe shifter-img_2496.jpg
This side stays out

Royal Enfield Bullet 350 DIY : Adding a Windshield, Crash bar & Heel toe shifter-img_2498.jpg
Rubber boot assembled

Royal Enfield Bullet 350 DIY : Adding a Windshield, Crash bar & Heel toe shifter-img_2508.jpg
How the two shift levers compare

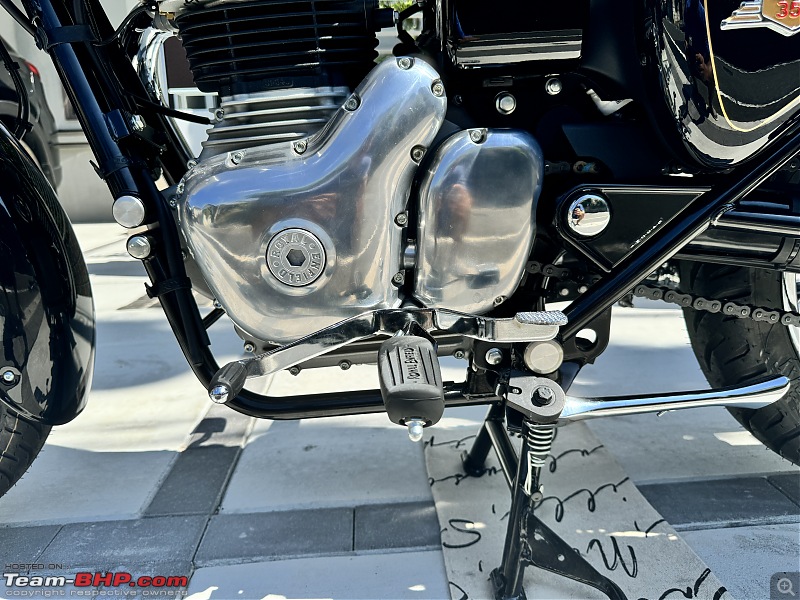
Royal Enfield Bullet 350 DIY : Adding a Windshield, Crash bar & Heel toe shifter-img_2499.jpg
Before

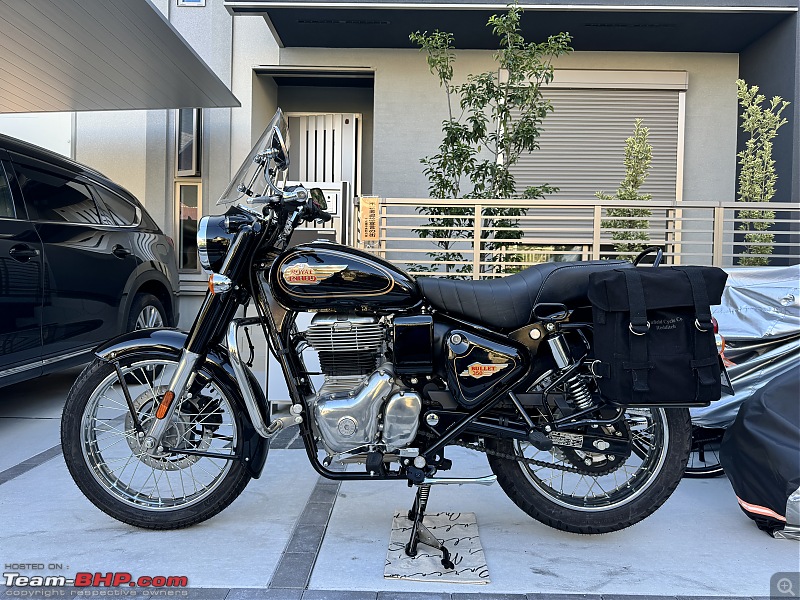
Royal Enfield Bullet 350 DIY : Adding a Windshield, Crash bar & Heel toe shifter-img_2510.jpg
After

Caution:
  • Once the front and rear mounting bolts are fully removed, the sub-frame will may not drop down on its own as it is a tight fit.
  • It needs to be gently pulled down, but please be careful to not drop it to the floor and damage it.
  • Also, the vent hoses from the fuel tank are tied to this sub-frame. Make sure not to damage them.
  • Make sure that the lever is slightly higher on the heel side than the toe side so that it is easy to upshift using the heel.

Last edited by Sheel : 19th September 2024 at 13:20. Reason: Minor typo.
Viju is online now   (11) Thanks
Old 18th September 2024, 10:15   #2
Senior - BHPian
 
Viju's Avatar
 
Join Date: May 2006
Location: Tokyo / Cochin
Posts: 1,132
Thanked: 2,894 Times
Engine Guard

Personally I don't believe that engine guards / crash bars help during normal riding, especially at higher speeds. Having said that, I am a bit paranoid about the possibility of the bike falling over while parked, and I do believe an engine guard can help here to an extent. As the Bullet is really precious to me, I did not want to take a chance.

Engine Guard

Royal Enfield is one of the few manufacturers I know of that offers so many variations of an engine guard for a particular motorcycle. The bigger curved ones look more old-school and have a 1980's vibe to them. But I am not a fan of the aesthetics. I chose to go with the simple trapezium shaped one, also hoping that it suits my trapezium shaped bar-end mirrors.

As my bike has a mix of gloss black and polished metal, I chose to go with the silver one. Being made of stainless steel, I don't think one needs to be worried about it corroding easily.

RE GMA Part No.: KXA00008 Engine Guard, Trapezium, Stainless Steel

Royal Enfield Bullet 350 DIY : Adding a Windshield, Crash bar & Heel toe shifter-img_2513.jpg

Likes:
  • Relatively subtle aesthetic compared to some of the other variations
  • Stainless steel construction should ensure longevity
  • 3 piece design seems to be well thought-out and engineered

Dislikes:
  • Could have been one size smaller
  • Although stainless steel, I found several tiny scratches and a small brownish spot. This is a bit disappointing on a RE genuine accessory.

Tools Required:
  • Ratchet with 14mm & 17mm sockets
  • Ring spanners 10mm - 17mm
  • Allen key #4

Fitting time: 30 minutes

Difficulty: Easy

Installation Guide: https://accessories.hitchcocksmotorc...mpq9U&_xt=.pdf

Royal Enfield Bullet 350 DIY : Adding a Windshield, Crash bar & Heel toe shifter-img_2514.jpg
Remove the clutch cable routing clamp located below the fuel tank

Royal Enfield Bullet 350 DIY : Adding a Windshield, Crash bar & Heel toe shifter-img_2515.jpg
There is a retaining nut at the back

Royal Enfield Bullet 350 DIY : Adding a Windshield, Crash bar & Heel toe shifter-img_2504.jpg
Remove the long bolt, nut and washer from the LH bottom sub-frame

Royal Enfield Bullet 350 DIY : Adding a Windshield, Crash bar & Heel toe shifter-img_2529.jpg
The engine guard comes with a longer bolt, a nut and 3 washers

Sub-assemble the engine guard (four pieces) using the allen key
Royal Enfield Bullet 350 DIY : Adding a Windshield, Crash bar & Heel toe shifter-img_2518.jpeg

Royal Enfield Bullet 350 DIY : Adding a Windshield, Crash bar & Heel toe shifter-img_2519.jpeg

Royal Enfield Bullet 350 DIY : Adding a Windshield, Crash bar & Heel toe shifter-img_2520.jpeg

Royal Enfield Bullet 350 DIY : Adding a Windshield, Crash bar & Heel toe shifter-img_2521.jpeg

Royal Enfield Bullet 350 DIY : Adding a Windshield, Crash bar & Heel toe shifter-img_2523.jpg

Loosely tighten the bolts and retaining nuts at the top / centre of the guard.
Royal Enfield Bullet 350 DIY : Adding a Windshield, Crash bar & Heel toe shifter-img_2528.jpg

Royal Enfield Bullet 350 DIY : Adding a Windshield, Crash bar & Heel toe shifter-img_2525.jpg

Royal Enfield Bullet 350 DIY : Adding a Windshield, Crash bar & Heel toe shifter-img_2526.jpg

Fix the bottom portion of the guard with the longer bolt and the 3 washers. The 2 additional washers go between the guard and the frame on either side.

Royal Enfield Bullet 350 DIY : Adding a Windshield, Crash bar & Heel toe shifter-img_2530.jpg

Royal Enfield Bullet 350 DIY : Adding a Windshield, Crash bar & Heel toe shifter-img_2531.jpg


Caution:
  • There is a high possibility that a tool, fastener or the guard itself is dropped on to the front mudguard and damaging it in the process. I recommend covering it up using a big fluffy microfiber towel.
  • There are subtle differences in the fitment procedure depending on the type of RE GMA engine guard that you choose. These are detailed in the installation guide linked above.
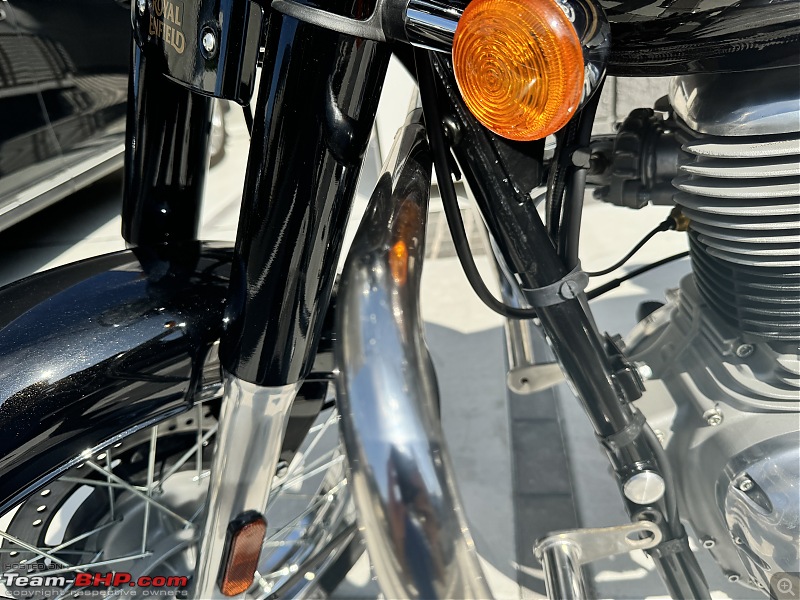
  • Be extra careful about the routing of the clutch cable while installing the engine guard. The cable should not get stuck between the frame and the guard, nor should it be routed in front of the guard.
  • After installing the guard, check for free movement of the clutch cable by rotating the handle from left to right (stopper-to-stopper) and also by moving the front suspension up and down.
  • The cable should also not touch the fuel tank, so so as not to cause paint damage in the long run.

Royal Enfield Bullet 350 DIY : Adding a Windshield, Crash bar & Heel toe shifter-img_2524.jpg
I did not remove this cable guide behind the headlamp nacelle although the fitment guide says so

As per the guide, this plastic clutch cable routing clip needs to be removed. I felt this could make the cable move around too much and damage the paintwork on the tank. Hence I did not remove it.

A final look

Royal Enfield Bullet 350 DIY : Adding a Windshield, Crash bar & Heel toe shifter-img_2533.jpg

Royal Enfield Bullet 350 DIY : Adding a Windshield, Crash bar & Heel toe shifter-img_2534.jpg

Royal Enfield Bullet 350 DIY : Adding a Windshield, Crash bar & Heel toe shifter-img_2535.jpg

Royal Enfield Bullet 350 DIY : Adding a Windshield, Crash bar & Heel toe shifter-img_2536.jpg

Last edited by Viju : 18th September 2024 at 11:53.
Viju is online now   (11) Thanks
Old 18th September 2024, 11:14   #3
Senior - BHPian
 
Viju's Avatar
 
Join Date: May 2006
Location: Tokyo / Cochin
Posts: 1,132
Thanked: 2,894 Times
Touring Screen

I have never had a motorcycle fitted with a large touring screen / windshield before. I was born and brought up in Kerala, and we have no winter down there. Also, high speeds and the resultant wind blast never bothered me when I was younger.

We do have proper winters in Japan though, and for motorcycling, even autumn and spring can get pretty cold. As I am into my 40s, I also thought I could may be spend a bit more time in the saddle on highway rides without tiring myself out, if I kept the wind from directly hitting my chest.

Touring Screen

Aesthetically, the RE GMA touring screen is a love-or-hate affair. Personally, I think it suits a motorcycle like the Meteor / Super Meteor, but not the Classic or Bullet. Having said that, I do feel that it is a subtle design, and hope that it will grow on me over time. At the moment, I don't love it, neither do I hate it. I do expect to receive some flak for doing this though!

RE GMA Part No.: KXA00147 Touring screen with fixings (Meteor uses a different part number)

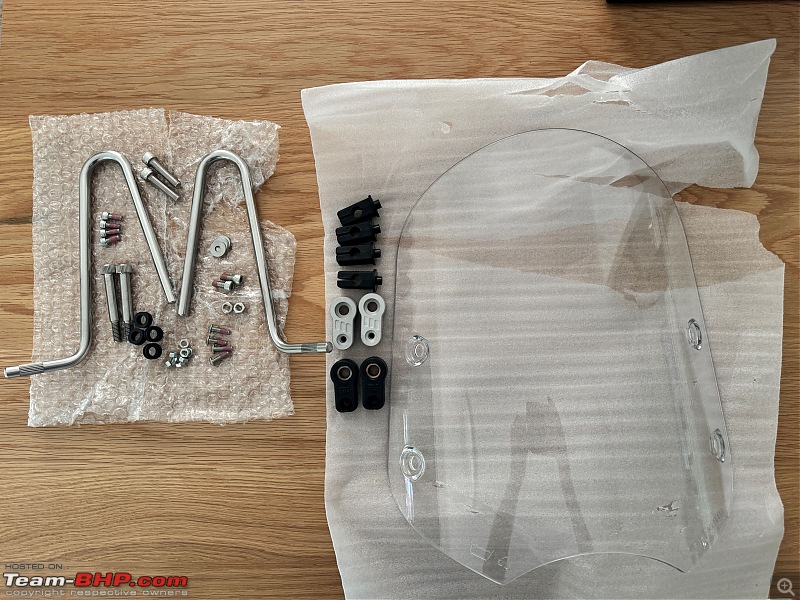
I also got a pair of replacement alloy mounting brackets for a couple of fragile plastic ones that come in the RE GMA kit. Make sure to order two.
Buying link: https://accessories.hitchcocksmotorc...&category=sub3

Likes:
  • Works well at lower speeds (up to 60 km/hr) for my height (167 cm)
  • Height is adjustable (needs an allen key though)
  • Inoffensive design (subjective)
  • Decent build quality, except for a couple of plastic mounting brackets

Dislikes:
  • Potential wind noise at high speeds, especially with full-faced helmets (will update this after a couple of highway rides)
  • Cannot use a regular bike cover (I have a 170cm tall bike tent, so this is ok)
  • Have a feeling the screen could pick up scratches if one is not really careful
  • A bit more adjustability would have been nice (too much gap between the bottom of the screen and the headlight nacelle)

Tools Required:
  • Ring spanners (13mm and 14mm)
  • Allen key set

Fitment time: 30 minutes

Difficulty: Medium (normally easy, but needs extra patience and care not to break anything)

Installation guide:
https://accessories.hitchcocksmotorc...sFap5&_xt=.pdf
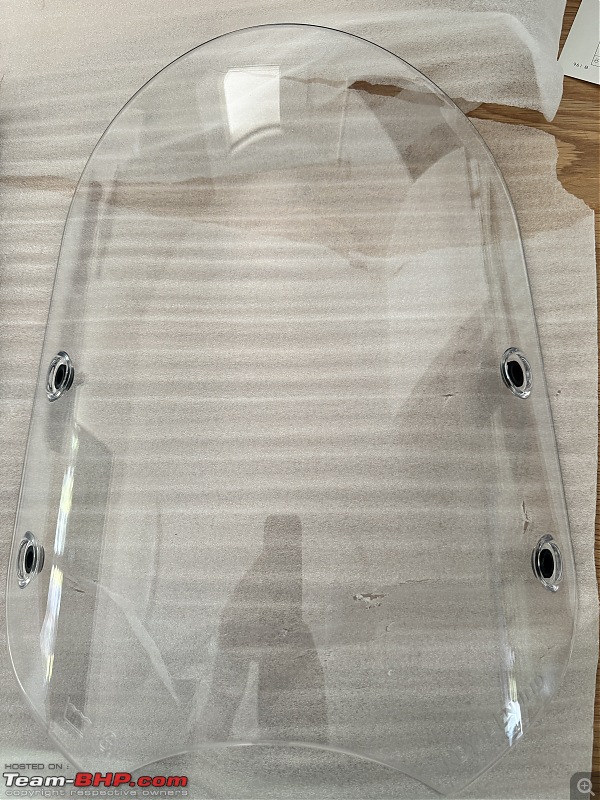

Royal Enfield Bullet 350 DIY : Adding a Windshield, Crash bar & Heel toe shifter-img_2538.jpg
Touring Screen

Royal Enfield Bullet 350 DIY : Adding a Windshield, Crash bar & Heel toe shifter-img_2537.jpg
The complete kit


Alloy mounting brackets in silver from Hitchcocks and the original RE plastic brackets in black can be seen in this picture.

Fitment:
Royal Enfield Bullet 350 DIY : Adding a Windshield, Crash bar & Heel toe shifter-img_2539.jpg

Royal Enfield Bullet 350 DIY : Adding a Windshield, Crash bar & Heel toe shifter-img_2540.jpeg

Royal Enfield Bullet 350 DIY : Adding a Windshield, Crash bar & Heel toe shifter-img_2541.jpeg

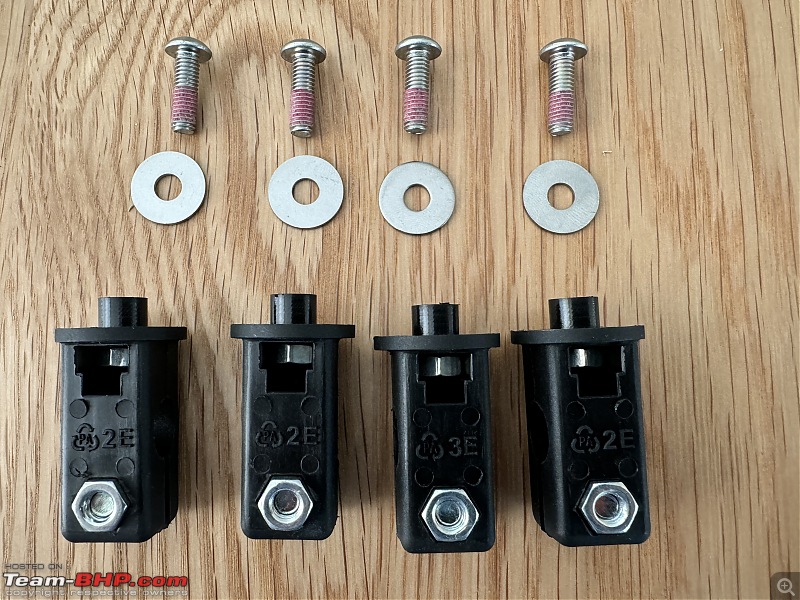
Step 1: Hand assemble the four attachments and fasteners shown above

Royal Enfield Bullet 350 DIY : Adding a Windshield, Crash bar & Heel toe shifter-img_2542.jpg

Royal Enfield Bullet 350 DIY : Adding a Windshield, Crash bar & Heel toe shifter-img_2543.jpg

Step 2: Gently fix the rubber grommets into the mounting holes on the screen and fix the four attachments.

Royal Enfield Bullet 350 DIY : Adding a Windshield, Crash bar & Heel toe shifter-img_2544.jpg

Step 3: Slowly insert the two mounting rods into the attachments.

It is a bit tricky to get the mounting direction correct at this stage. As you can see in the final pictures, I got this wrong the first time.

Royal Enfield Bullet 350 DIY : Adding a Windshield, Crash bar & Heel toe shifter-img_2546.jpg

Step 4: Cover the fuel tank with a fluffy cloth (bath towel in my case, lol) to prevent scratches / dents from fasteners or tools.

On my bike, the dealer had stuck the antenna for the toll collection device on the handle bar top cover. I removed this temporarily and carefully removed the goo from the double-sided sticker using a sticker remover spray.

I could not take too many pictures after this. Apologies in advance. I was doing it alone and the handle-bar and screen were going in all directions. If you have a second pair of hands to help you out, use them by all means!

Caution:
  • At this step, there is a high possibility that the handle bar turns over and something could hit the fuel tank. Be extra cautious!

Royal Enfield Bullet 350 DIY : Adding a Windshield, Crash bar & Heel toe shifter-img_2547.jpg

Step 5: Loosen the two bolts under the handle bar top cover (close to the tank), but do not take them out.

Step 6:Loosen and take out the two bolts on top of the handle bar top cover. These will be replaced with the new allen key bolts in the kit.

Royal Enfield Bullet 350 DIY : Adding a Windshield, Crash bar & Heel toe shifter-img_2548.jpg

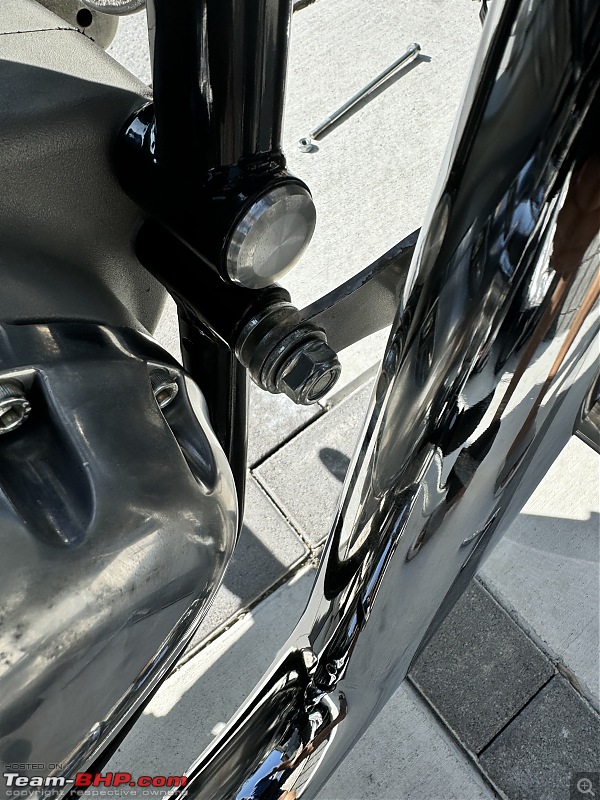
Step 7: Fix the mounting brackets loosely (you will need to adjust the orientation later).

Step 8: Gently insert the rods into the brackets (here I found that the orientation I had chosen was incorrect).

Step 9: Tighten everything up after ensuring that the screen is aligned along the center axis of the motorcycle and its height is as per your requirement. Of course, the height can be adjusted at a later stage.

Royal Enfield Bullet 350 DIY : Adding a Windshield, Crash bar & Heel toe shifter-img_2552.jpg

Step 10: Stand back and admire the fruits of your hard work.

Royal Enfield Bullet 350 DIY : Adding a Windshield, Crash bar & Heel toe shifter-img_2555.jpg

Lovely detailing

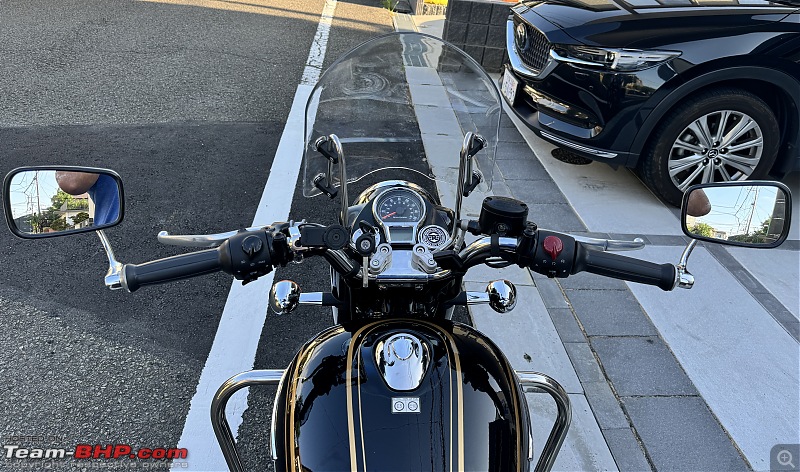
Royal Enfield Bullet 350 DIY : Adding a Windshield, Crash bar & Heel toe shifter-img_2551.jpeg

View from the cockpit


A few parting shots as always

Royal Enfield Bullet 350 DIY : Adding a Windshield, Crash bar & Heel toe shifter-img_2550.jpg

Royal Enfield Bullet 350 DIY : Adding a Windshield, Crash bar & Heel toe shifter-img_2554.jpg

Royal Enfield Bullet 350 DIY : Adding a Windshield, Crash bar & Heel toe shifter-img_2553.jpg

I hope my long-form articles are not becoming too boring!

I am happy to answer any questions.

With these modifications, I think I have finally succeeded in turning my bike into a grandpa's dream. I will be turning 43 this week, and the little Bullet is fast turning out to be my retirement-proof motorcycle.

Cheers and ride safe! See you in the next one!

Last edited by KarthikK : 19th September 2024 at 09:56. Reason: As requested
Viju is online now   (21) Thanks
Old 18th September 2024, 17:49   #4
Team-BHP Support
 
Join Date: Feb 2004
Location: Mumbai
Posts: 18,943
Thanked: 81,687 Times
Re: Royal Enfield Bullet 350 DIY : Adding a Windshield, Crash bar & Heel toe shifter

Thread moved out from the Assembly Line. Thanks for sharing!
Aditya is offline   (2) Thanks
Old 19th September 2024, 03:24   #5
Senior - BHPian
 
Viju's Avatar
 
Join Date: May 2006
Location: Tokyo / Cochin
Posts: 1,132
Thanked: 2,894 Times
Video Tutorial for the Touring Screen

This is a helpful video tutorial on the installation of the RE GMA Touring Screen:

Viju is online now   (1) Thanks
Old 19th September 2024, 12:42   #6
BHPian
 
prakash_ajp's Avatar
 
Join Date: Nov 2008
Location: Bangalore
Posts: 850
Thanked: 1,980 Times
Re: Royal Enfield Bullet 350 DIY : Adding a Windshield, Crash bar & Heel toe shifter

When I started reading, I was skeptical of the appearance of the windscreen on the Bullet, but I must say it's looking admirable.

I have one question: Do you happen to know if the alloy mounting brackets can be bought in India? They are very pricey at 40+ pounds if you are buying from India, which is more than the windscreen itself. I had tried this windscreen on my Honda H'ness, but the plastic brackets gave in and now the windscreen is collecting dust in the shed.
prakash_ajp is offline   (1) Thanks
Old 19th September 2024, 14:58   #7
Senior - BHPian
 
Viju's Avatar
 
Join Date: May 2006
Location: Tokyo / Cochin
Posts: 1,132
Thanked: 2,894 Times
Re: Royal Enfield Bullet 350 DIY : Adding a Windshield, Crash bar & Heel toe shifter

Quote:
Originally Posted by prakash_ajp View Post
When I started reading, I was skeptical of the appearance of the windscreen on the Bullet, but I must say it's looking admirable.
Thank you. I am yet to fall in love with it, although it is slowly growing on me.

Quote:
Originally Posted by prakash_ajp View Post
I have one question: Do you happen to know if the alloy mounting brackets can be bought in India?
Hitchcocks makes these in-house in the UK. Even if there is someone who imports and sells them in India, it will be equally expensive.

Idea 1: Take your broken plastic brackets to a talented machinist and you should be able to get a pair made in aluminium at a fraction of the cost of the Hitchcocks brackets.

Idea 2: Try ordering a windshield mounting kit from an RE dealer. There is a separate part number for it (KXA00062), which means RE must be selling it separately. But it also means you will have a spare set of rods etc sitting on a shelf.

Royal Enfield Bullet 350 DIY : Adding a Windshield, Crash bar & Heel toe shifter-windshield_mounting_kit.jpg

Idea 3: Please DM me your complete name, postal address and phone number so that I can send over my unused plastic brackets via Japan Post. You just need to promise that you will post a pic of your CB once you fix the windshield. Let me know.

Last edited by Viju : 19th September 2024 at 15:01.
Viju is online now  
Old 19th September 2024, 16:15   #8
BHPian
 
Join Date: Dec 2023
Location: Hosur
Posts: 95
Thanked: 933 Times
Re: Royal Enfield Bullet 350 DIY : Adding a Windshield, Crash bar & Heel toe shifter

That's quite a nice solid install. I wanted a strong shield for my bike but did not want to spend a bomb. I also did not want brackets visible in the windshield area so that filtered out a lot of models similar to what you have. I got a Himalayan windshield and made the brackets myself out of 15mm x 3mm steel strips and affixed them to the number plate mount. Maybe not the best looking but rigidity was what I was aiming for. Has served quite well. Wind buffering happens last 75 Kmph.
In your install, the gap at the bottom between the head and the windshield will allow a significant portion of the airflow directly onto your torso. It will be negligible at speeds less than 65 but above it, you will feel the weight of the air. A change to that gap if possible would help.
that_sedate_guy is offline   (1) Thanks
Old 19th September 2024, 16:48   #9
Senior - BHPian
 
Viju's Avatar
 
Join Date: May 2006
Location: Tokyo / Cochin
Posts: 1,132
Thanked: 2,894 Times
Re: Royal Enfield Bullet 350 DIY : Adding a Windshield, Crash bar & Heel toe shifter

Quote:
Originally Posted by that_sedate_guy View Post
That's quite a nice solid install.
Thank you!

Quote:
Originally Posted by that_sedate_guy View Post
I got a Himalayan windshield and made the brackets myself *SNIP* buffering happens last 75 Kmph.
That sounds interesting! Do post a pic or two for reference.

I cannot fabricate something neatly even if my life depended on it, and hence took the easy way out.

Quote:
Originally Posted by that_sedate_guy View Post
In your install, the gap at the bottom between the head and the windshield will allow a significant portion of the airflow directly onto your torso. It will be negligible at speeds less than 65 but above it, you will feel the weight of the air. A change to that gap if possible would help.
I know. This is the biggest limitation of this windshield. I was aware of this before I purchased the windshield as it was clearly visible in the YouTube videos. Not sure why RE designed it like this though. May be they took inspiration from those old trucks with the small openable vents at the bottom of the windshield for 'air conditioning'.

I have set up the windshield at the lowest possible setting. I am yet to take the bike out on the highway as she is just 150 km old. But yes, I do expect a significant amount of buffeting at highway speeds.

I am one of the founding fathers of the 60 kph senior citizen riders club. Hopefully the buffeting is bearable at my riding speed.

Last edited by Viju : 19th September 2024 at 16:50.
Viju is online now   (1) Thanks
Old 19th September 2024, 19:20   #10
BHPian
 
Join Date: Dec 2023
Location: Hosur
Posts: 95
Thanked: 933 Times
Re: Royal Enfield Bullet 350 DIY : Adding a Windshield, Crash bar & Heel toe shifter

Quote:
Originally Posted by Viju View Post
I know. This is the biggest limitation of this windshield
If you observe closely, your windshield does have the profile for sitting flush with the headlamp assembly. It's a matter of having the windshield sitting lower (modifying the mounting rods) and having windblast from the top portion or having the windshield sitting higher and having wind attacking from the bottom gap. IMO, top blasts are more uncomfortable initially but tire you less whereas torso blasts are manageable during the ride but take a heavier toll on the body.

Here is my installation. The strips were not painted. Still are not because I'm very short of time, hence the rust layer but once painted black, I think they'll gel well with the look of the motorcycle. The fabrication involved only cutting to length, drilling the holes and bending with a vise and a wrench which went a bit complicated compared to my plan because my drill bits were blunt

Royal Enfield Bullet 350 DIY : Adding a Windshield, Crash bar & Heel toe shifter-img_20240706_113424.jpg

Here's the view from the cockpit.

Royal Enfield Bullet 350 DIY : Adding a Windshield, Crash bar & Heel toe shifter-img_20240706_063344.jpg

Cheers!
that_sedate_guy is offline   (2) Thanks
Old 19th September 2024, 21:21   #11
BHPian
 
prakash_ajp's Avatar
 
Join Date: Nov 2008
Location: Bangalore
Posts: 850
Thanked: 1,980 Times
Re: Royal Enfield Bullet 350 DIY : Adding a Windshield, Crash bar & Heel toe shifter

Quote:
Originally Posted by Viju View Post
Idea 3: Please DM me your complete name, postal address and phone number so that I can send over my unused plastic brackets via Japan Post. You just need to promise that you will post a pic of your CB once you fix the windshield. Let me know.
That's very kind of you. Truth is, I don't have any trust with those plastic things at all. But I like your Idea 1 very much and worth pursuing. Will see how far I can take it. Thanks!
prakash_ajp is offline   (1) Thanks
Old 21st September 2024, 16:03   #12
Senior - BHPian
 
Rahulkool's Avatar
 
Join Date: Oct 2007
Location: Chennai
Posts: 1,433
Thanked: 1,943 Times
Re: Royal Enfield Bullet 350 DIY : Adding a Windshield, Crash bar & Heel toe shifter

Congrats on the bike and all the mods/accessories look really well done and selected. Riding on the Japanese country side on a bullet would be complete bliss. Hope to see more photographs of the bike and Japan. The Japanese way of life always fascinates me and those spick and span streets are wonderful.

Anyone having trouble with wind blast, please try ear plugs once and make sure no turbulent air around the helmet, you can thank me later. Unless its a cold weather issue, then having a bigger windshield might help.

Edit - i have bought few things for my Interceptor from hitchcocks, paid 10% custom duty and 28% GST on the landed cost. They charge the tax on top of shipping as well.

Last edited by Rahulkool : 21st September 2024 at 16:05.
Rahulkool is offline   (1) Thanks
Old 21st September 2024, 16:33   #13
Senior - BHPian
 
Viju's Avatar
 
Join Date: May 2006
Location: Tokyo / Cochin
Posts: 1,132
Thanked: 2,894 Times
Re: Royal Enfield Bullet 350 DIY : Adding a Windshield, Crash bar & Heel toe shifter

Quote:
Originally Posted by Rahulkool View Post
Congrats on the bike and all the mods/accessories look really well done and selected. Riding on the Japanese country side on a bullet would be complete bliss. Hope to see more photographs of the bike and Japan. The Japanese way of life always fascinates me and those spick and span streets are wonderful.
Thank you, Rahulkool! I am almost done, just a couple more things left to do. Still waiting for the parts to arrive.

I am definitely looking forward to trundling along the Japanese B-roads and going up and down the beautiful Skylines with the Bullet. Will be penning down a proper ownership thread with lot of pictures as well. Hope to see you there!
Viju is online now   (1) Thanks
Reply

Most Viewed
Thread Tools Search this Thread
Search this Thread:

Advanced Search

Copyright ©2000 - 2024, Team-BHP.com
Proudly powered by E2E Networks