Team-BHP
(
https://www.team-bhp.com/forum/)
Quote:
Originally Posted by carboy
(Post 4279426)
When the microwave is run for 3 minutes at a time - the transformer isn't hot to touch.
|
Does it become hot after about 15 minutes ?
If you have a digital multimeter, set it at 10 A @AC setting and connect it in series with the supply to the step-down transformer. Only connect a small load - incandescent bulb 60 W. It should draw a maximum of 0.5 A (allowing for normal losses in the transformer). If it draws less than that and the microwave oven is working normally, chances are your supply line to the unit is wired with thinner wires.
Ideally you should connect this unit with a circuit intended for loads like Air conditioners ( that is circuits capable of supplying 15 A or so).
It may only be the surge current which exceeds the wiring limit. But it can cause problems in future. Not recommended !
Got the rainyfilter FL-100 installed for roof top rain water harvesting. Not too happy with the filtered rain water quantity. I think there is lot wastage of water due to the way its designed. The water has to swirl around and hit the filter. When its raining light, most of the water is wasted. With not much debris on the roof, feels bad to waste lot of water down the drain :(
My cousins got the tiles installed in their kitchen after the wiring was complete. As a result the switch boxes are now inside by a good 1.5 inches or so. Please advise how to handle this preferably as a DIY.
Quote:
Originally Posted by diyguy
(Post 4280225)
My cousins got the tiles installed in their kitchen after the wiring was complete. As a result the switch boxes are now inside by a good 1.5 inches or so. Please advise how to handle this preferably as a DIY.
|
There are panels available in the local hardware/electric shop. These will need screws to be attached to the tile, so drilling will be necessary. However, it is easy and you simply fit the power sockets into the panel and screw it in. Take the picture to the hardware shop and he will give you the required panel, screw and switches.
Quote:
Originally Posted by Nissan1180
(Post 4280230)
There are panels available in the local hardware/electric shop. These will need screws to be attached to the tile, so drilling will be necessary. However, it is easy and you simply fit the power sockets into the panel and screw it in. Take the picture to the hardware shop and he will give you the required panel, screw and switches.
|
Since these are modular switches with a face plate, it may be easier to buy longer screws with some metal or plastic spacers and just fix the plate in line with the tiles. And fix the trim on top.
Quote:
Originally Posted by Nissan1180
(Post 4280230)
These will need screws to be attached to the tile, so drilling will be necessary.
|
Quote:
Originally Posted by N.r.K
(Post 4280243)
... it may be easier to buy longer screws with some metal or plastic spacers and just fix the plate in line with the tiles. And fix the trim on top.
|
Thanks for the replies. If I put a custom plate and fix the modular switches or use longer screws I think the plate will bend when plugging and removing plugs. I have this situation in my home with Roma (but my cousins are Schneider and thicker plastic) . If I fill the gap with 4 reapers along the inside of the tile and all the way to the back, then fix the existing plate on top of the reapers, will that work? Like a picture frame inside, but may have to do some planing to level the reapers with the tile and still be snug and tight against the inside box.
Hello Folks,
Looking to renew the 4 elevator floors in our building, preferably using rubber mats.
Preferences:
1. Not too expensive
2. Durable - should survive usage in typical 10 floor building, 60 flats including large item movement
3. Neat DIY install preferable
Any advise on options and availability in Pune is appreciated.
Ply surface base is ready as in pic below.
Cheers!!
Quote:
Originally Posted by diyguy
(Post 4280225)
My cousins got the tiles installed in their kitchen after the wiring was complete. As a result the switch boxes are now inside by a good 1.5 inches or so. Please advise how to handle this preferably as a DIY.
|
What ever you do, the existing face plate is smaller than the cut in tiles, so there will be a big gap left if you use spacers to bring the plate out.
The only solution is to
. Take the whole box out
. Buy a new box with a larger face plate that will protrude at least 5mm at all the edges
. Fix the new box using cement plaster mix, so that the front edge of the box is in line (or just a mm inside) the tile edges. Let the plaster cure for a day at least.
. Fix the new face plate after wiring up the switches
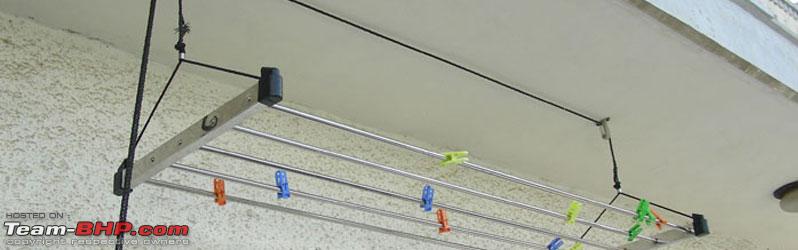
I'm looking for a clothes drying unit for my balcony similar to the one in the picture below:
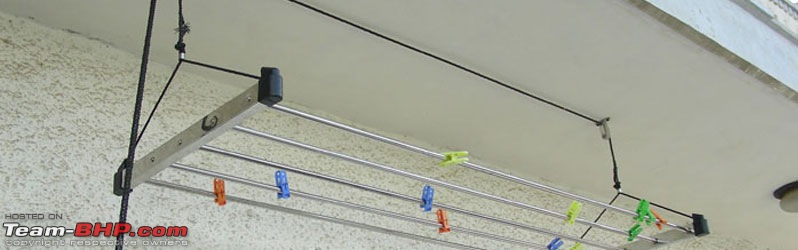
Looking for clues on where to buy such a unit in Bangalore. I inquired in a few shops around in my area, but none of them had such a unit with them.
Quote:
Originally Posted by scorpion_blore
(Post 4280888)
I'm looking for a clothes drying unit for my balcony similar to the one in the picture below: Attachment 1682290
Looking for clues on where to buy such a unit in Bangalore. I inquired in a few shops around in my area, but none of them had such a unit with them.
|
You will get in this most of the stores which sell kitchen appliances. Got a similar one installed in our balcony.
Which are of Bangalore do you reside?
Quote:
Originally Posted by Aroy
(Post 4280689)
What ever you do, the existing face plate is smaller than the cut in tiles, so there will be a big gap left if you use spacers to bring the plate out.
|
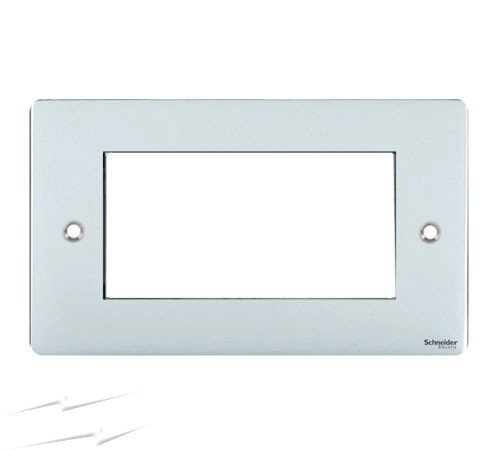
I may have to fill it up and extend the wall out like you mentioned but am hoping that the actual face plate (as per pic below) that sits over the frame will cover the tile cut. I haven't measured it yet though. I mean a face plate like the one below.
Quote:
Originally Posted by scorpion_blore
(Post 4280888)
I'm looking for a clothes drying unit for my balcony similar to the one in the picture below: Attachment 1682290
Looking for clues on where to buy such a unit in Bangalore. I inquired in a few shops around in my area, but none of them had such a unit with them.
|
I have used Pull n Dry in my home at Bangalore. Contact below:
+917204448557
Quote:
Originally Posted by diyguy
(Post 4280225)
My cousins got the tiles installed in their kitchen after the wiring was complete. As a result the switch boxes are now inside by a good 1.5 inches or so. Please advise how to handle this preferably as a DIY.
|
Quote:
Originally Posted by diyguy
(Post 4280924)
I may have to fill it up and extend the wall out like you mentioned but am hoping that the actual face plate (as per pic below) that sits over the frame will cover the tile cut. I haven't measured it yet though. I mean a face plate like the one below.
|
The face plates are usually only slightly bigger than the inner mounting plates. Looking at the pictures you have posted, they will not cover the gap between the switch board and the tiles. And it will not be easy to move the boxes out. There could be wires coming into the box from one side and going out through another side etc. making it a bit difficult to move the boxes out. But if they can be moved out, then you could use that approach and then fill the gaps using cement and then paint it using a matching color.
As you had suggested, if you use wooden strips (reapers), you will not be able to make strong joints at the four corners.
What you can do is to take a piece of rectangular plywood, with a thickness that is close to or equal the gap available between the box and the tile surface. If required, stack multiple plywood pieces of different thicknesses to get to the thickness required to fill the gap. If using, multiple plywood pieces, paste them together with Fevicol or something similar. And then from the plywood boards, cut out rectangular portions from the center, to a size smaller than the insides of the boxes, so that the backsides of the switches, sockets etc. will easily fit in, but will still leave enough room to accommodate the screws required to mount the inner plate on the plywood.
On the outer surface of the plywood, either paint a matching color or add a matching laminate. You can fasten the plywood pieces to the inner box, using the same threaded holes that you would have used to mount the inner plates. And then use a different set of holes on the inner plate to mount them to the plywood. You would get a reasonably good looking finish with this approach. You could of course, think more artistically and come up with even better looking solutions (which will require more time). You could actually get the plywood pieces cut to size from a plywood shop and can get the inner rectangles cut out from any electrical shop that use an electrical fret saw to make wooden switch boards. You will have to mark the holes and the center portion to be cutout quite accurately, matching each of the switch board location and the size of the boxes.
Quote:
Originally Posted by srishiva
(Post 4279806)
Got the rainyfilter FL-100 installed for roof top rain water harvesting. Not too happy with the filtered rain water quantity. I think there is lot wastage of water due to the way its designed. The water has to swirl around and hit the filter. When its raining light, most of the water is wasted. With not much debris on the roof, feels bad to waste lot of water down the drain :(
|
I have the same filter and have observed the same problem too. What i did was to have a valve on the output side that can be closed. I usually close it and this increases the output dramatically. However, since the dirt has no way out, this also means that the filter gets clogged faster. I have seen that usually the filter needs to be cleaned once in 3 to 4 rains in this mode. If you can afford to do that, try shutting the output with a valve.
Quote:
Originally Posted by Rodie09
(Post 4280331)
Hello Folks,
Looking to renew the 4 elevator floors in our building, preferably using rubber mats.
Preferences:
1. Not too expensive
2. Durable - should survive usage in typical 10 floor building, 60 flats including large item movement
3. Neat DIY install preferable
Any advise on options and availability in Pune is appreciated.
Ply surface base is ready as in pic below.
Cheers!!
|
Look for heavy duty Linoleum. It should be available in most shops that also sell wooden flooring. You get them in various thicknesses and quality with more or less padding and also in tiles. installation is pretty quick cheap and easy.
Do we get small towel heating racks in India ? Cannot seem to find them at all. Want to use them for our hand and face towels. Even with using multiple small ones or thinner material ones, all of them develop a musty smell that remains even after washing and comes back after using a couple of times if I do a hot bleach or vinegar wash. Hence I want to install a small napkin heater rack to keep them from being too damp
| All times are GMT +5.5. The time now is 14:37. | |