| |||||||

| Search Forums |
| Advanced Search |
| Go to Page... |
 |
| Search this Thread |  28,639 views |
 19th August 2021, 22:54
| #1 |
| Distinguished - BHPian  Join Date: Feb 2006 Location: NSEW
Posts: 4,022
Thanked: 30,031 Times
| Mitsubishi Pajero Sport | Diagnosing an Ultra-Low Leak in the Aircon System Introduction I’d introduced the subject of car aircons to all of you via Part1 (Aircons! Demystifying the car air-conditioning system) and Part2 (Aircons! Demystifying the car air-conditioning system, Part 2) I have been facing a weird issue – the AC system of a Mitsubishi Pajero Sport was losing refrigerant charge extremely slowly over 16-17 months, and I wanted to get down to find out why this was happening. The next few posts will highlight the diagnosis of this issue and, a) showcase how the front and rear AC units on the Mitsubishi Pajero Sport were removed, inspected and refitted. b) highlight a few precautions to be taken as ignoring these could land one in big trouble c) highlight some upsell and fear-inducing tactics of service providers these days to gain more moolah This is probably the first detailed and illustrated procedure on the net on how to remove and refit the front and rear aircon units on the Mitsubishi Pajero Sport. The same guidelines will apply to the Toyota Fortuner, Toyota Innova and a few other dual AC set ups in other MUVs and SUVs. Front HVAC Unit  Rear AC Unit  Last edited by vigsom : 20th August 2021 at 11:20. |

|  (24)
Thanks (24)
Thanks
|
| The following 24 BHPians Thank vigsom for this useful post: | --gKrish--, 2himanshu, aeroamit, Arnav Vaghela, ashpalio, Big Smoke, BlackPearl, CEF_Beasts, Crow, Fiestaboy, fluidicjoy, gauravanekar, GTO, InControl, jithin23, KuvamBansal, R2D2, Researcher, sridhar-v, t3rm1n80r, universal, vaasu, viXit, vredesbyrd |
| |
|
19th August 2021, 23:01
| #2 |
| Distinguished - BHPian Join Date: Feb 2006 Location: NSEW
Posts: 4,022
Thanked: 30,031 Times
| re: Mitsubishi Pajero Sport | Diagnosing an Ultra-Low Leak in the Aircon System Background I’ve been holding this 2012 Mitsubishi Pajero Sport since 2019. The AC was functioning well at purchase, and went on fine until May-2020. The car was stuck at a remote location, unused, for the full 50 days during the first lockdown last year. I then discovered that the AC system was extremely low on refrigerant, and on inspection found that the compressor clutch magnet was weak plus the compressor oil seal also warranted replacement. After both these jobs were done, the system was leak tested, found holding pressure, and a fresh charge of refrigerant was charged. In the meanwhile, I also installed a cabin air filter as the Pajero Sport doesn’t come with one by default; details here (A/C Air Path clean out + Cabin Air Filter installation - Mitsubishi Pajero Sport) Fast forward to Aug-2021 : The compressor would cycle on and off but the AC would provide mediocre cooling only when the engine was at approx. 1800+ rpm and when the car was at a reasonable speed on highways. At lower speeds in city, the AC was sub-optimal. The refrigerant low side line (compressor suction) would show no sweating. All these symptoms pointed to a lower than normal refrigerant charge – acceptable but not ideal! I estimated that the AC system would return to its May-2020 state in another two months viz. full charge to low charge in 16 months. This was strange, since I know from experience that leaks in the system would mean total depletion of refrigerant charge in a max. of 3 months.  Last edited by vigsom : 20th August 2021 at 22:05. |
|
| (17)
Thanks
|
| The following 17 BHPians Thank vigsom for this useful post: | Arnav Vaghela, ashpalio, Big Smoke, BlackPearl, CEF_Beasts, Crow, Fiestaboy, fluidicjoy, GTO, InControl, krishnaprasadgg, KuvamBansal, R2D2, Researcher, t3rm1n80r, universal, vredesbyrd |
|
19th August 2021, 23:08
| #3 |
| Distinguished - BHPian Join Date: Feb 2006 Location: NSEW
Posts: 4,022
Thanked: 30,031 Times
| re: Mitsubishi Pajero Sport | Diagnosing an Ultra-Low Leak in the Aircon System Why was the refrigerant charge depleting so slowly? Although I have had experiences with HVAC systems on my earlier cars and with AC systems at home, I’ve never come across one in which the charge would deplete this slow. It would either go empty in 3 months, indicating a leak in the Evaporator (Cooling Coil) like in my 2003 Toyota Corolla which had no cabin air filter, or just go on and on for years like in my 2003 Maruti Versa and 2005 Toyota Corolla. (At home, the aluminium condenser in a Samsung AC failed in 3 years in Chennai). It was getting hard to explain this slow depletion of charge, and the only argument I had was – there was a very minor leak somewhere and refrigerant was leaking through these point(s) when a) the system was in operation, b) metal temperatures were going low on the evaporator and, c) pressure and temperature were going high on the compressor discharge side (compressor, condenser, pipe joints, hoses) Decision Making I had to choose between one of the following options: 1. get the complete AC system inspected (although I knew that the earlier owner had it serviced in 2017-2018) OR 2. just top up refrigerant and carry on till the leak gets worse Gone are the days when service providers were happy to top up refrigerant for trial for a small sum of just INR300-600 bucks. In Vadodara, the mantra is to offer some baseless explanations, build fear in their minds about imaginary failures, make simple jobs complex and just fleece customers. My experience in this city has been the worst this far with respect to (un)professionalism in air-conditioning. After a lot of deliberation I decided to go with option#2 for the following reasons: 1. a leak will only get worse with time and short cuts will result in rework 2. refrigerant refill will anyways cost money and this would become a recurring expense Choosing the right service provider was the next challenge, since the guy I’d visited last year had shut down during the pandemic. I did my due diligence by looking at highly rated service providers, and re-confirmed their competence from a few known and repeat customers. Based on the overall positive feedback, I decided to move forward. Last edited by vigsom : 20th August 2021 at 22:06. |
|
| (17)
Thanks
|
| The following 17 BHPians Thank vigsom for this useful post: | aeroamit, Arnav Vaghela, ashpalio, BlackPearl, Crow, fluidicjoy, gauravanekar, GTO, InControl, KuvamBansal, R2D2, Researcher, t3rm1n80r, universal, vaasu, vishy76, vredesbyrd |
|
20th August 2021, 08:13
| #4 |
| Distinguished - BHPian Join Date: Feb 2006 Location: NSEW
Posts: 4,022
Thanked: 30,031 Times
| re: Mitsubishi Pajero Sport | Diagnosing an Ultra-Low Leak in the Aircon System Project Pajero Sport Aircon Benefits of removing the dashboard assembly have been enumerated in both the threads that I've posted on aircons this far. Links to these are in the opening post. The Pajero Sport, however, does not offer the convenience of removing the entire dashboard assembly in one piece. That is because bolts and nuts holding the dashboard metal bar frame can be accessed only after removing the dashboard top, for which the only option left is to remove the dashboard assembly part by part. Day00 evening - Removal of the dashboard assembly We moved on to remove the dashboard assembly. Here are the steps that were followed: 1. Disconnect the battery negative terminal, and wait for a few minutes. 2. Evacuate the unit to recover the refrigerant. 3. Remove the engine turbo boost sensor to create access to the heater core hoses. This is very important to ensure that there is no inadvertent damage to the sensor nozzle when the heater core hoses are disconnected Engine Turbo Boost Sensor(with the blue wiring coupler)  4. Remove the glove box, and the plastic panel behind. Take care to decouple the passenger air bag sensor. 5. Open the plastic covers on the A pillars. This is to help remove the dashboard top later. 6. Decouple and remove the blower assembly. 7. Remove the gear lever knobs on both the main gear lever and the 4WD lever. 8. Remove the necessary bolts and remove the floor console. 9. Open the right side lower dash panel (the beige one, and disconnect couplers to the ORVM control switch, and the headlamp leveller switch. Glove box, lower dashboard, lower console removed  10. Decouple the airbag coupler to the Airbag Control Unit. Airbag Control Unit  11. Decouple the wiring couplers on the right side and left side kick panels. But before that, ensure that every male and female coupler is numbered to tagged so that they are properly matched at the time of re-connection 12. Remove the ECU located above the left kick panel. ECU   13. Take a photograph of the BCM to know the exact routing of all the couplers on the BCM. This will help in seamless cables dressing and reconnection when the BCM is being refitted. Layout of the BCM wiring couplers   Wiring couplers to the top rear of the BCM  14. Remove the covers around the headlamp and wiper controls  15. Decouple the couplers to the headlamp and wiper controls, and remove the control stalks 16. Remove the bolts holding the steering column to the dashboard metal frame, and then lower the steering column with the wheel. Steering column lowered in one piece  17. Remove and decouple the stereo. 18. Open the center console as one unit and decouple the couplers to the AC controls, the rear AC switch, the cigar lighter and the parking sensor switch. 19. Disconnect all couplers to the BCM and remove the BCM. BCM front view  BCM rear view  20. Remove the instrument console cover, then the instrument console. 21. Remove the bolts/screws holding the dashboard top. 22. Remove the dashboard top (the black portion). Dashboard top removed - note the passenger airbag coupler decoupled and the stock USB controller box placed over the HVAC Unit   23. Open all nuts holding the dashboard bar frame to the A pillars and to the base. 24. Remove the dashboard bar frame with attached wiring as one unit. 25. Decouple and mark any coupler that might have been left out Dashboard metal bar frame removed  Last edited by vigsom : 20th August 2021 at 19:26. |
|
| (20)
Thanks
|
| The following 20 BHPians Thank vigsom for this useful post: | aeroamit, Arnav Vaghela, ashpalio, Big Smoke, BlackPearl, CEF_Beasts, Crow, GTO, InControl, jithin23, krishnaprasadgg, manubg92, PM - B, R2D2, Researcher, t3rm1n80r, Turbanator, universal, vaasu, vredesbyrd |
|
20th August 2021, 08:33
| #5 |
| Distinguished - BHPian Join Date: Feb 2006 Location: NSEW
Posts: 4,022
Thanked: 30,031 Times
| re: Mitsubishi Pajero Sport | Diagnosing an Ultra-Low Leak in the Aircon System Day00 late evening - Removal of the HVAC Unit 1. Loosen the bolt on the expansion valve at the engine firewall side. 2. Disconnect the aircon low side and high side piping connections at the expansion valve. 3. Disconnect the hoses to the heater core at the firewall side. 4. Disconnect the rectangular cross section AC ducts at the floor of the HVAC Unit. These ducts feed air to the rear of the car under the driver and co-driver seats. 5 Remove all the nuts fastening the HVAC unit to the frame. 6. Remove the HVAC Unit taking care to disconnect the condensate drain from the unit carefully. Day00 late evening - Inspection of the main HVAC Unit Cabin Air Filter The first bad sign was the presence of rat poop and some foam on the cabin air filter. This was due to the entry of a guest rodent via the fresh air path when the car was shut down for 70 days in the end of 2020. Cabin air filter dirty   Cabin air filter cleaned and disinfected using IPA - note that the filter element is dark by design  New cabin air filter - pic for reference  Blower and air path The blower was clean – I had cleaned the blower and the airpath in Jun-2020, so there was no doubting this. The fresh air intake flap was dirty. This was cleaned  Evaporator Core Evaporator core was removed – this anyways had a dirty inlet side since the unit was running without a cabin air filter until I’d installed one in Jun-2020. The evaporator outlet, however, showed a very minor leak on the outlet side(clean side). The leaky portion can be easily spotted and detected by smell of leaky refrigerant oil. As a double confirmation, it can be tested at 100psig pressure using an adapter instead of the expansion valve. A short clip on a confirmatory test for a leaky Hyundai Xcent evaporator is attached. Here, an adaptor with a hose connection is connected at the evaporator, and the evaporator is pressurized to say 100psig, and dipped in water to check for leaks. HVAC Unit being opened to remove the Evaporator core  Evaporator core - air inlet side partly fouled   Evaporator core installed in 2017-2018 by the earlier owner 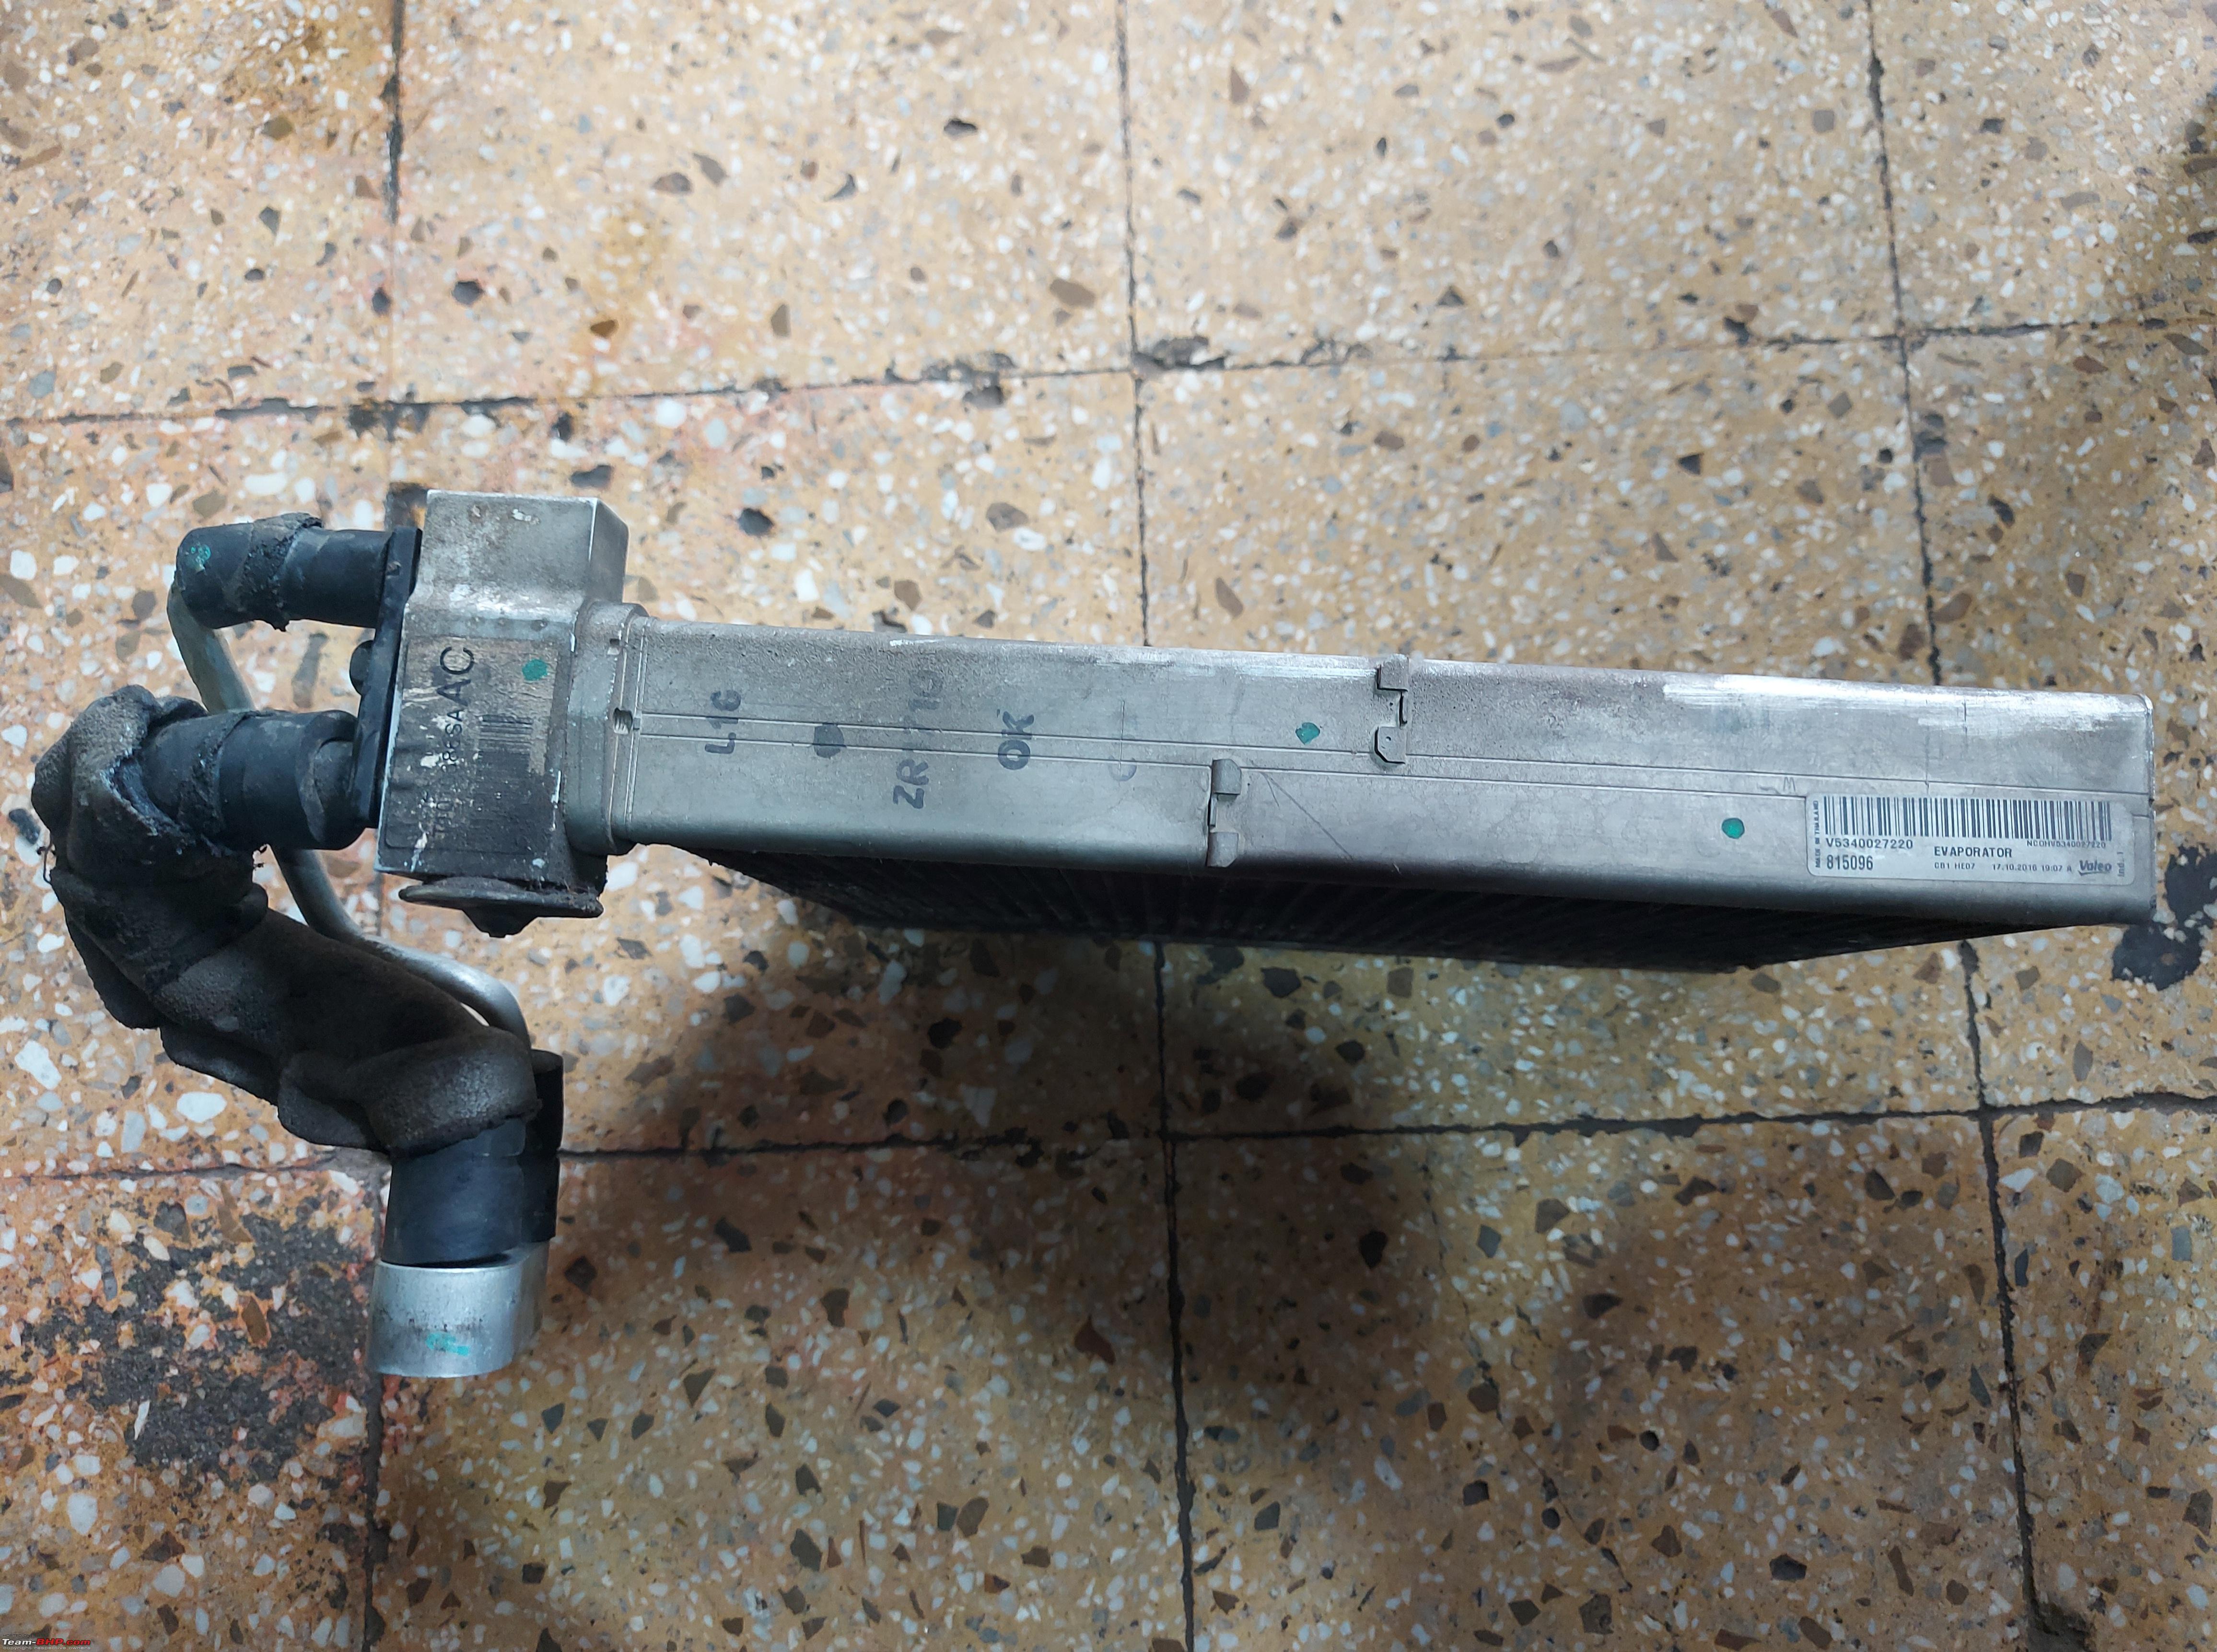 Evaporator core - air discharge side - note the very minor leak on the third row from bottom  As a reference on how a badly leaking evaporator would look like, am attaching a pic from my 2003 Corolla (pic from 2011 archives) 2003 Toyota Corolla evaporator - this system was leaking refrigerant in less than 3 months  A new Valeo evaporator was ordered. Just to be sure that I wasn’t being conned by the service provider's supplier, I’d already checked that the landed cost of the evaporator via the service provider would be just INR300 over the landed cost via boodmo.com. I decided to put the onus of ordering the part on the service provider rather than take the headache myself. The new evaporator was ordered late evening and it came in the next morning. Day01 - Arrival of the new evaporator core and assembly of the main HVAC Unit New Evaporator core made by Valeo   Evaporator core - new vs old  The new evaporator was inspected and installed, and the HVAC Unit made ready for installation HVAC Unit being readied for final assembly  HVAC Unit ready for installation   Last edited by vigsom : 20th August 2021 at 22:10. |
|
| (20)
Thanks
|
| The following 20 BHPians Thank vigsom for this useful post: | aeroamit, Arnav Vaghela, ashpalio, Big Smoke, BlackPearl, CEF_Beasts, Crow, GTO, InControl, krishnaprasadgg, PM - B, PraNeel, R2D2, Researcher, t3rm1n80r, Turbanator, universal, vaasu, vishy76, vredesbyrd |
|
20th August 2021, 09:02
| #6 |
| Distinguished - BHPian Join Date: Feb 2006 Location: NSEW
Posts: 4,022
Thanked: 30,031 Times
| re: Mitsubishi Pajero Sport | Diagnosing an Ultra-Low Leak in the Aircon System Day01(contd.) - Re-fitting the dashboard assembly The HVAC Unit was installed in position, and the dashboard assembly with all connections were done exactly in the reverse order of removal. HVAC Unit in position and bar frame being brought into the car for installation  Dashboard bar frame installation in progress   ECU in position above the left kick panel  Dashboard bar frame installed  Dashboard top installed  Day01 (Contd.) -Scam attempt#1– attempting to upsell services that weren’t needed The service provider mentioned that the unit is old since the car had done close to 1,45,000km, and showed me some fine dark particles in the refrigerant lines. He said that leaving this could clog the evaporator refrigerant side and cause total loss of cooling. He recommended cleaning of all refrigerant pipes with “CTC”, followed by air purging, which I realised was an upsell tactic, for which he quoted INR7,500 extra. He also recommended opening and inspection of the compressor to inspect for wear. I told him that the compressor should not be touched, and at best, I was game for removal of the old refrigerant oil from the compressor and refilling with fresh oil. One should see the look on his face when he realised that his tactic had failed. But he wasn’t done yet.  Last edited by vigsom : 20th August 2021 at 15:07. |
|
| (17)
Thanks
|
| The following 17 BHPians Thank vigsom for this useful post: | aeroamit, Arnav Vaghela, ashpalio, Big Smoke, CEF_Beasts, Crow, gauravanekar, Geo_Ipe, GTO, InControl, lemedico, R2D2, Researcher, t3rm1n80r, universal, vaasu, vredesbyrd |
|
20th August 2021, 09:24
| #7 |
| Distinguished - BHPian Join Date: Feb 2006 Location: NSEW
Posts: 4,022
Thanked: 30,031 Times
| re: Mitsubishi Pajero Sport | Diagnosing an Ultra-Low Leak in the Aircon System Day01 - Surprise element#1 – No lights on the instrument console After installing the dashboard assembly and coupling all connections back, the battery negative cable was connected. All that came on were the lights inside, but no lights on the instrument console. Not just that, the AC blower was coming on even without the switch being turned on, and the Kenwood stereo was indicating some error  . My heart missed a beat, as I'd never ever seen such a thing happening with any car whose AC I’ve got serviced. . My heart missed a beat, as I'd never ever seen such a thing happening with any car whose AC I’ve got serviced.The battery was immediately disconnected and the couplers re-checked. That is when it was noticed than two wiring couplers on the right kick panel are interchangeable. This is why I mentioned in my procedure that it is important to number the male and female couplers appropriately to avoid such surprises. Confused with similar fitting wiring couplers  I eventually rushed to another Pajero Sport, a 2016 manual, whose owner was kind enough to allow me to remove the kick panel trims and take pictures of the couplers. I took relevant pictures for reference, and returned. All that I ensured was proper fitment of the kick panels after my job. The issue eventually turned out to be improper cable dressing on the BCM due to which the contacts weren’t proper. After almost 5 hours, all the lights came on, and the car started up without an issue, and that is when I heaved a sigh of relief. Wiring couplers - left kick panel - from a 2016 Pajero Sport  Wiring couplers - right kick panel - from a 2016 Pajero Sport  Wiring couplers - right kick panel - final layout on this Pajero Sport  Day01 late evening - Inspection of the condenser It was quite late that day, but the grille and the condenser fan were removed just to inspect the condenser - and we discovered that the condenser also had a few refrigerant oil stains, suggesting that even this was having a minor leak. The receiver drier was opened and looked dark and saturated, warranting replacement. Day01 late evening - Removal and inspection of the rear AC Unit Removal of the rear AC unit is much simpler than the main unit. The following steps were followed: 1. Remove the floor plastic panel at the rear right side. 2. Remove the 2nd row right passenger seat belt bolt, and all screws. fastening the plastic body panel on the right rear side. 3. Remove the plastic body panel on the right rear side to reveal the rear AC. 4. Disconnect the connection to the rear AC expansion valve. This can be found under the right side of the car as shown. 5. Remove the nut holding the rear AC expansion valve surround plate 6. Remove the rear AC unit. The rear AC unit needn’t have been opened. It was that clean, as can be seen in the following pictures Rear AC Unit  Pipe connection to the rear AC Unit - can be viewed from the right rear underside 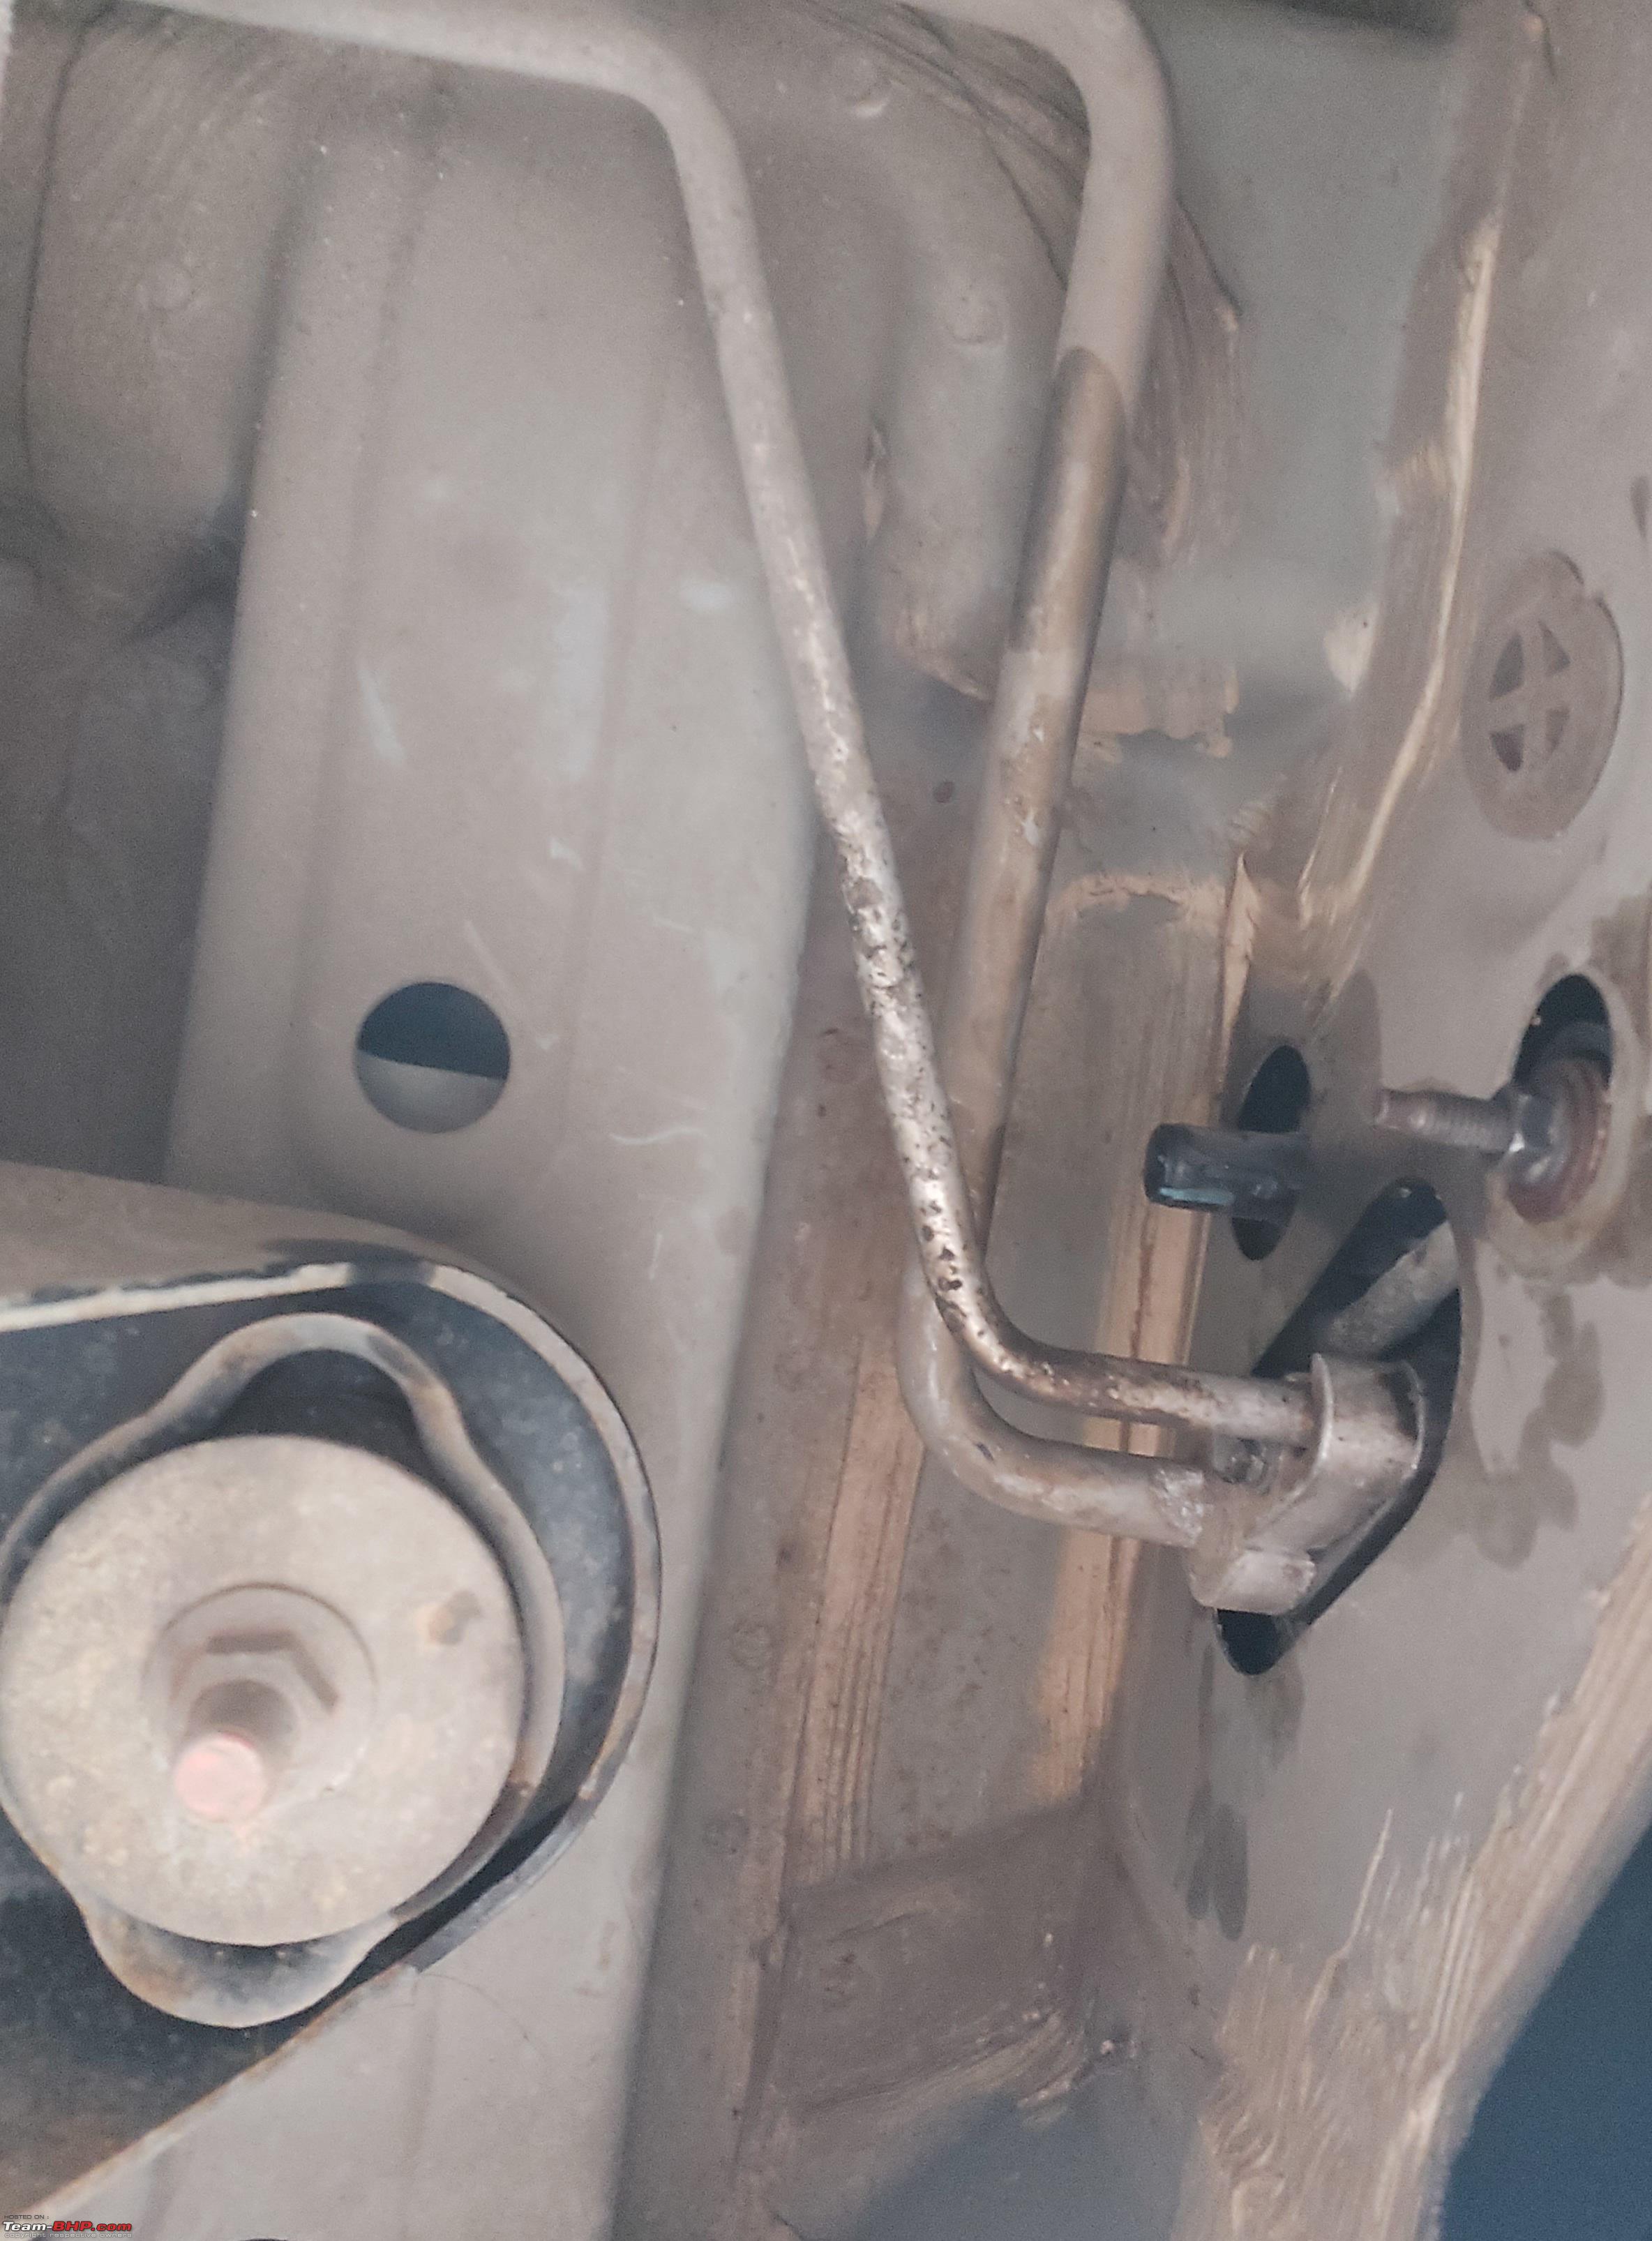 Rear evaporator core - absolutely clean    The unit was re-assembled and fitted back early the next day. Unfortunately, pics of re-assembly aren’t available as this was already done just before I’d reached the garage. Last edited by vigsom : 20th August 2021 at 15:35. |
|
| (17)
Thanks
|
| The following 17 BHPians Thank vigsom for this useful post: | aeroamit, Arnav Vaghela, ashpalio, Big Smoke, BlackPearl, CEF_Beasts, Crow, fluidicjoy, gauravanekar, GTO, InControl, krishnaprasadgg, R2D2, Researcher, t3rm1n80r, universal, vredesbyrd |
|
20th August 2021, 10:51
| #8 |
| Distinguished - BHPian Join Date: Feb 2006 Location: NSEW
Posts: 4,022
Thanked: 30,031 Times
| re: Mitsubishi Pajero Sport | Diagnosing an Ultra-Low Leak in the Aircon System Day02 – Scam attempt #2 That morning, the service provider rang me up to say that the refrigerant lines have been flushed but I didn't reply or acknowledge this message. I went there and discretely inspected all the pipe ends that were still in position. It was clear than no flushing or even purging was done. I didn’t confront him then, but decided to wait for the next day until all the work was done. Meanwhile, while all this was happening, scouting for the AC condenser showed that “imported” condensers were costing in the range of INR5,500 to 6,000 but one Valeo condenser was available 200km away for INR11,000 plus shipping. I know that the Valeo condenser was not available on boodmo, but I did get to know that the MRP was INR10,940. Condensers for this car come with the receiver drier also as part of the package. Some come with the pressure switch while some come without it. Sample pictures of the Valeo Condenser found on the net   Day03 – Action packed ! Sensing that he might introduce more scams, I decided to reach the garage early, and by approx. 11am, another condenser became available just 35km away. This was made by PACO Thailand, and was being offered for a price between the “imported” one and the Valeo. I asked for images from all angles and it turned out to look like good quality. One of the characteristics of a good AC condenser is the dish ends and squarish cross section of the inlet and outlet channels, while cheap condensers have cylindrical inlet and outlet channels (refer pics below) Inlet and outlet channels design - old vs new condenser  The supplier of the Valeo condenser refused to share actual pictures, and therefore I decided to go with PACO since it was like a bird in hand. The PACO condenser was in hand by 4pm, and the project or saga was hopefully coming to an end. The PACO condenser   Condenser - old vs new  Installing the condenser Ideally, the radiator had to be removed for this job, but in this case, the radiator bottom hose was removed, and the radiator, moved back to create just that little opening to remove the old condenser and refit the new one. Needless to mention, because of the low gap due to the radiator being in position, the new condenser was first put in, and the receiver drier installed separately after the condenser was in position. New condenser installed  Purging the AC piping Acting as if I hadn’t understood his scam of the earlier day, I went about inspecting the refrigerant pipes in his presence and said that I still saw signs of oil but no cleaning, and that is when he had the piping from condenser outlet to the front and rear AC units, and the low side pipes (towards compressor suction) also removed. He was about to flush it with “CTC” when I told him just to purge it with air. Some fresh refrigerant oil was injected, and the lines blown clear, and refitted. Removal and refitting of these lines is time consuming since it is a double AC system. Condenser outlet hi side piping purged and ready  Compressor suction viz. low side side piping purged and ready  Compressor suction viz. low side piping and Condenser outlet viz. hi side piping installed in position  Hi side and low side piping branch off towards rear AC - this joint is hard to access since it is just below the steering column bellow in the engine bay  Last edited by vigsom : 20th August 2021 at 19:02. |
|
| (19)
Thanks
|
| The following 19 BHPians Thank vigsom for this useful post: | Arnav Vaghela, ashpalio, Big Smoke, BlackPearl, CEF_Beasts, Crow, fluidicjoy, GTO, InControl, krishnaprasadgg, PraNeel, puneetakhouri, R2D2, Researcher, t3rm1n80r, universal, vaasu, vredesbyrd, vsaravind007 |
|
20th August 2021, 11:00
| #9 |
| Distinguished - BHPian Join Date: Feb 2006 Location: NSEW
Posts: 4,022
Thanked: 30,031 Times
| re: Mitsubishi Pajero Sport | Diagnosing an Ultra-Low Leak in the Aircon System Commissioning the unit These were the steps followed to commission the unit 1.Fix the hoses to the heater core. 2. Reconnect the low and high side piping to the expansion valve, and install the expansion valve bolt. 3. Leak test the refrigerant circuit at 250 psig using nitrogen. Keep the pressure on hold for at least one hour. Leak test and hold test  4. If no pressure drop is observed, evacuate the system (pull vacuum) for at least 30 minutes after full vacuum (-76cmHg) is reached. Evacuation in progress  5. Hold this vacuum for 30 minutes to confirm that the system is leak proof (the vacuum hold test is a better indicator than the pressure hold test). 7. Connect a can of refrigerant to the low side hose. With the valve on the system side closed, purge the blue line with some refrigerant to displace all air in the hose. 8. Switch on the aircon and keep the engine rpm at approx 1500rpm. 9. Open the system side valve. Break the vacuum using refrigerant and gradually add the required quantity of refrigerant. A can of refrigerant is 450g and the specification for the Pajero Sport is approx.850g. A little less than 2 cans of Chemours hi quality HFC134a was added and that corresponded to a low side pressure of 38psig and dew on the surface of the low pressure line. The cabin turned cold in no time. For the first time in my ownership of this car, I found the compressor cycling off and on in style even at idle rpm – indicating that the unit was functioning efficiently. A new condenser made all the difference. Chemours R134a  Last edited by vigsom : 20th August 2021 at 15:16. |
|
| (19)
Thanks
|
| The following 19 BHPians Thank vigsom for this useful post: | Arnav Vaghela, ashpalio, BlackPearl, CEF_Beasts, Crow, fluidicjoy, gauravanekar, GTO, InControl, krishnaprasadgg, R2D2, Researcher, t3rm1n80r, Taha Mir, Turbanator, universal, vaasu, Varun_HexaGuy, vredesbyrd |
|
20th August 2021, 11:05
| #10 |
| Distinguished - BHPian Join Date: Feb 2006 Location: NSEW
Posts: 4,022
Thanked: 30,031 Times
| re: Mitsubishi Pajero Sport | Diagnosing an Ultra-Low Leak in the Aircon System Time and money The time that I spent at the garage for this exercise was as follows. This was necessary to ensure that I got the work done the way I wanted. Day00 – 5 hours Day01 – 12 hours Day02 – 03 hours Day03 – 09 hours The project left me poorer by approx. INR 27,000 ( this included the cost of condenser, evaporator and labour for twin AC opening and reinstallation, lines purging, and for a fresh refrigerant and oil charge) but wealthier in knowledge and experience. Despite thwarting the service provider's scam attempts, I estimate that I was still overcharged approx. INR3,000. However, the AC is at its best performance so far, and that is probably the only saving grace in an otherwise nightmarish experience. Key takeaways 1. Do not always go by Google ratings, number of reviews, or by what people say about a certain service provider. Watch how they do their work before taking a call. 2. The place I went to was rated 4.8 with over 170 respondents; goes to show how naïve people are and/or how ratings can be engineered. This place will not get my recommendation, despite them getting luxe cars, and "great" reviews. That’s because I saw a lot of carelessness in their work and an intent to overcharge the customer. Had it not been for my hawk-eye supervision, many bits and pieces would have remained imperfect, and that could have resulted in rework. Eg. the heater core hoses hadn't been fixed back and clamped properly, the condensor support rubber was loose, and that would have resulted in rattling, gear lever knobs weren't fitted back properly, and so on. 3.Watch out for scams – everybody out there is just interested in making more money. Nothing wrong in making money after doing good work, but trying to make money by not doing even what is basically expected is absolutely wrong. 4. Ripping the dashboard apart can give some sensitive owners heart attacks. See the action only if you can take it, else stay away. 5. Such jobs present the only opportunity to clean the inside of the firewall, and some bits on the central hump. Please ensure proper cleaning before re-installing the dashboard assembly. 6. One can never claim to be an expert at any craft even after many years of experience - every single experience teaches us something. It's all about lifelong learning ! Last edited by vigsom : 20th August 2021 at 22:18. |
|
| (42)
Thanks
|
| The following 42 BHPians Thank vigsom for this useful post: | aeroamit, Agarwal_Aayush, amalji, AntPaul, Arnav Vaghela, AROO7, AShubrah, Big Smoke, bikertillidie, BlackPearl, CEF_Beasts, Crow, discoverwild, Fiestaboy, fluidicjoy, gauravanekar, GTO, InControl, JithinR, Kosfactor, krishnaprasadgg, matchvan, mpksuhas, ndnesh, PM - B, PraNeel, pratik1992, puneetakhouri, puntOOs, R2D2, Researcher, Shanky_1002, speedmiester, t3rm1n80r, Tgo, TorqMaster, Turbanator, universal, Varun_HexaGuy, vishy76, vmathews, vredesbyrd |
|
21st August 2021, 05:44
| #11 |
| Team-BHP Support  | re: Mitsubishi Pajero Sport | Diagnosing an Ultra-Low Leak in the Aircon System Thread moved out from the Assembly Line. Thanks for sharing! |

| (2)
Thanks
|
| The following 2 BHPians Thank Aditya for this useful post: | GTO, Researcher |
| |
|
21st August 2021, 07:57
| #12 |
| Distinguished - BHPian Join Date: Oct 2018 Location: COK\BLR\MYS
Posts: 3,866
Thanked: 11,220 Times
| re: Mitsubishi Pajero Sport | Diagnosing an Ultra-Low Leak in the Aircon System Takes courage to open up stuff like that and then to dig into it, I would imagine the SOP for ASC will be to replace minimum condenser , evaporator, drier and a bill that would make a grown man weep. A good AC mechanic is hard to come by, like a good auto electrician. |
|
| (6)
Thanks
|
| The following 6 BHPians Thank Kosfactor for this useful post: | gauravanekar, Researcher, Tourer, vigsom, viXit, vredesbyrd |
|
22nd August 2021, 09:35
| #13 |
| BHPian Join Date: May 2016 Location: MH03/JH01
Posts: 248
Thanked: 855 Times
| Re: Mitsubishi Pajero Sport | Diagnosing an Ultra-Low Leak in the Aircon System Thanks a lot sir. So my Baleno's ac has been leaking for a couple of years now and a topup would take care of it. But over the lockdown periods I have observed total loss of cooling and even after my last topup in December, the cooling is totally gone now. Had contacted Leoshashi for his help on specifications and steps and he was gracious enough to help me with details of what needs to be done. But this post has shown me what all to watch out for and that is brilliant! |
|
| (3)
Thanks
|
| The following 3 BHPians Thank puneetakhouri for this useful post: | gauravanekar, vigsom, viXit |
|
22nd August 2021, 18:48
| #14 |
| BHPian Join Date: Jul 2005 Location: Bangalore
Posts: 38
Thanked: 102 Times
| Re: Mitsubishi Pajero Sport | Diagnosing an Ultra-Low Leak in the Aircon System The moment I read that you went ahead with the dashboard removal, respect moved to the next level. My little electron muncher e2o has this slow AC gas leak, I have been topping the gas rather than get on a hunting expedition. Not that I don't want to find the leak, it's the workmanship I worry about. Excellent process-oriented approach. Maybe I will take to your process and take the leap someday soon. Thanx for writing this detailed experience. |
|
| (2)
Thanks
|
| The following 2 BHPians Thank ashpalio for this useful post: | gauravanekar, vigsom |
|
22nd August 2021, 19:15
| #15 |
| Newbie Join Date: Jul 2021 Location: Dubai
Posts: 4
Thanked: 5 Times
| Re: Mitsubishi Pajero Sport | Diagnosing an Ultra-Low Leak in the Aircon System Many THANKS for this wonderfully detailed and well illustrated write up. Reminds me of when I had a similar issue with my Toyota Prado. Luckily for me a close friend of mine knew a very good ac mechanic. Point No.4 about sensitive owners was very true - I can still feel it whenever the thought comes to mind. Last edited by Aditya : 23rd August 2021 at 05:13. Reason: Quoted text deleted |
|
| (3)
Thanks
|
| The following 3 BHPians Thank Prasanth Nair for this useful post: | gauravanekar, vigsom, viXit |
|