News
DIY on KTM 200 Duke: Replacing timing chain & tensioner & starter motor


The throttle body was surprisingly clean. My KTM 390 Duke's had much more carbon even with lesser miles.
BHPian SunnyBoi recently shared this with other enthusiasts:
So the work continues. First to come off was the airbox and throttle body.

Throttle body is surprisingly clean; the 390's had much more carbon even with lesser miles


The starter motor and tensioner came off, tensioner mainly to make removing the starter easier

Old vs New starter

One tang from the tensioner was sticking out. Not sure if this tensioner was doomed for failure soon and I caught it on time, or it got messed up when I removed the tensioner. I think it's the latter.

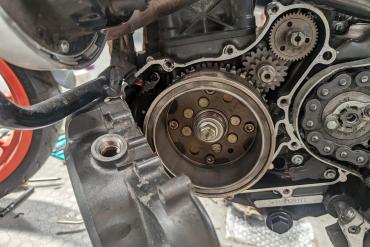
It was very difficult to rotate the engine to TDC from only the clutch side. Took off the magnet cover to make my life easier.

This is how the timing was at TDC. Intake is good, exhaust is slightly retarded.

Couple of days back, I watched Jeet Bhaskar's Duke 200 Engine rebuild video - he stated that Duke 200 chains are a PITA and he took off the sprocket on the inlet cam to align everything.
With the cam bridge removed, the cams wouldn't budge. Started getting second thoughts on actually changing the chain, the old chain looked good so why fix what's not broken?
Sunk cost sinked in, I've come this far, might as well change the chain. Managed to pry off the intake cam and then the realisation hit that this is going to be difficult. There is just no slack at all to move the cams with chain on it, in comparison doing the same on a 390 is order of magnitudes easier.
In for a penny, in for a pound. Old timing chain comes off and the new one put inside.

Huh, I didn't struggle a lot to put the cams back and have them in time. Why did I ever think it would be so difficult?

Notice something off? I didn't. I went ahead and put back the clutch cover with a new gasket. I was showing my apprentice the lined marks, and then it clicked.
The cams don't line up. At All. One of the cams is ahead and one is behind.
Frustrated, I took off the cam bridge. The exhaust cam wasn't in its right position

Then began my real struggle. I tried for over an hour, just couldn't get the cams to sit right, if they sit tight, the cams are out of time.
After one hour. I decided to take off the sprocket on the inlet cam. Taking it off with a normal wrench was impossible so out comes the impact - took off the bolt with me holding the cam in hand no vice jaws needed.
Put back the cam and time it as per Jeet's video. Hmm, I can't put back the bolt holding the sprocket to the cam, the chassis is obstructing. I then ziptied the chain to the sprocket and lifted up the cam at an angle till I was able to access the bolt. Hit with my impact till it wouldn't ugga dugga anymore. Put back the inlet cam.
Job done? NOOOOO IT'S ONE TOOTH OFF. AARGH!
Despair was setting in. Took a break and worked on it later I managed to correct it using the old method of taking off the cam fiddle with the chain to move the cam one tooth back.
Put back the cam bridge with just 2 bolts. Did two rotations of the crank and it was in time. Put back all bolts and tensioner and gave it another 2 rounds. With the tensioner in place all 4 marks were SPOT ON PERFECT! YAY!
Short video of all marks lining up.
With this, I then put back both clutch and magnet covers with new gaskets.

It looks like the valve cover was never removed - it still had the RTV silicone in the corners as per the factory.

Despite having a new valve cover gasket kit (very expensive @ 56x rupees) I'll take a chance and reuse this with RTV added on the corners as it was done already.
Next, I wanted to remove the exhaust for:
- Replace the rusted clamp holding the silencer to the header
- Paint the exhaust
- Replace all exhaust bushes with new ones
Started with the rusted clamp, as expected it broke off

Took off the 2 upper and one lower bolts for the exhaust. The exhaust would not come off the header and it reminded me of this issue faced when I did the same on the 390.
The header pipe had to be slid out. For that to happen, the radiator needs to come out. For that to happen, coolant must be drained and then put back.
Hell NO. I am already getting tired of all these fixes and all the downtime I don't have time for all this.
Put back everything, all the bolts for the exhaust including the new clamp got huge dollops of copper anti-seize so the threads don't rust out the way they did.

So this is how it looks today

Jobs completed :
- Timing Chain +tensioner replacement
- Replace Starter Motor
- Remove airbox and throttle body
Jobs left:
- Clean throttle body
- Fix broken airbox. Especially nuts for the lid
- Replace rear suspension
- Replace cup cone set
- Fill engine with oil
- New stiffer clamp for left horn. Tidy up wiring for horns
I'm hoping to finish everything and have Daisy back on the road Saturday evening. It is going to be two very long days for me.
Check out BHPian comments for more insights and information.
Find Car News
Just News


About Us

Buy & Sell
USED CARS