| |||||||

| Search Forums |
| Advanced Search |
| Go to Page... |
 |
| Search this Thread |  69,873 views |
 26th November 2018, 22:18
| #1 |
| BANNED Join Date: Oct 2011 Location: Hyderabad
Posts: 12,345
Thanked: 21,452 Times
| DIY Install: Hyundai Creta Bi-Xenon Projectors. Morimoto Mini D2S 4.0 Stage III Been a week since the retrofit was done and extremely happy with the output, feel like driving around more at night time nowadays. Also working on two cars collectively was a great experience plus the learning from this DIY for all three of us can't really be put down in words.  The two Creta's that got their eyes operated for Hi-Fi Vision  After a successful operation, looks completely stock but the output is miles ahead 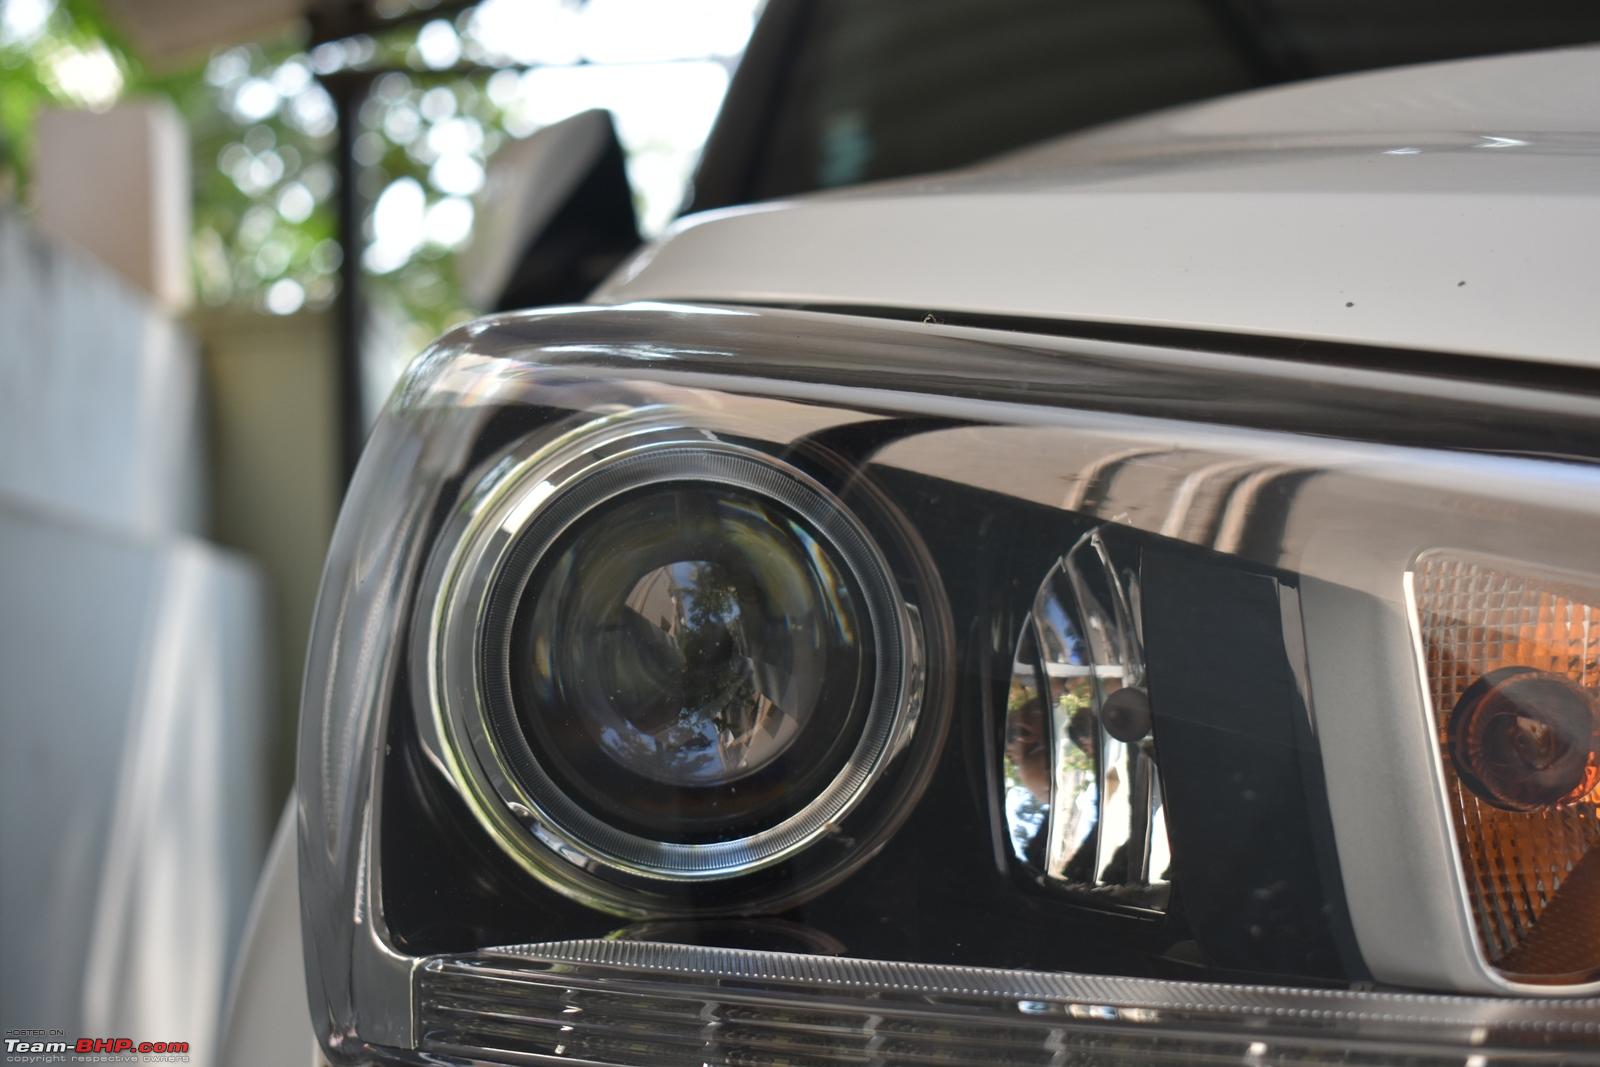 Last edited by SDP : 27th November 2018 at 22:55. Reason: Minor typo |

|  (31)
Thanks (31)
Thanks
|
| The following 31 BHPians Thank a4anurag for this useful post: | 2himanshu, aaggoswami, Akib Khan, Artyom, ashis89, catchdoon, CEF_Beasts, dailydriver, drhoneycake, frankmehta, GTO, harsh79, hmansari, InControl, KingCheeese, kunal_kaushal, lemedico, libranof1987, manjunag, mh09ad5578, Mr.Boss, N33raj, neil.jericho, pritanshchandra, Rshrey22, speedsatya, Tom Sooraj, Varun_HexaGuy, Vik0728, viXit, wadewilson |
| |
|
26th November 2018, 22:24
| #2 |
| BANNED Join Date: Oct 2011 Location: Hyderabad
Posts: 12,345
Thanked: 21,452 Times
| Re: DIY Install: Hyundai Creta Bi-Xenon Projectors. Morimoto Mini D2S 4.0 Stage III Here's the Index for the DIY Mini Intro & Items required for the DIY OEM Projector Setup & Morimoto Mini D2S 4.0 Kit Bumper + Headlight Removal and Readying the bracket for retrofit Mounting the Ballast & Wiring up the HD Relay in the Engine Bay Opening the Clear Lens & Removal of the OE Projector setup from the headlight Preparing the Morimoto Solenoid Connection & Mounting the D2S 4.0 Projector into the headlight Re-sealing the headlight & Alignment of the beams Lighting Output Images - Stock vs Morimoto Issues faced, Mistakes + Learnings from the DIY Future Upgrades & Acknowledgements Last edited by a4anurag : 27th November 2018 at 11:36. |
|
| (9)
Thanks
|
| The following 9 BHPians Thank a4anurag for this useful post: | aaggoswami, Akib Khan, ashis89, GTO, kunal_kaushal, Rshrey22, sandx, speedsatya, Tom Sooraj |
|
26th November 2018, 22:28
| #3 |
| BANNED Join Date: Oct 2011 Location: Hyderabad
Posts: 12,345
Thanked: 21,452 Times
| Re: DIY Install: Hyundai Creta Bi-Xenon Projectors. Morimoto Mini D2S 4.0 Stage III Mini Intro Having burnt my hands twice with the Osram Xenarc HID conversion kit purchased once through PayTM and the other through Amazon.in, I did realize that there was no use in trying anything else and wouldn’t satisfy my hunger for a setup that is not only better in terms of quality but also reliable. When the two terms, 'quality' and 'reliability' are in the same frame, only one name synonymous for lighting expertise comes into my mind which is none other than Morimoto. It was the projector retrofit done by BHPian Sudeepg in his beautiful S-Cross 1.3 got me thinking to attempt the same on my car. The moment I saw the output images shared by him on WhatsApp, it was more or less decided that I’d follow his footsteps. This thread was written in a similar way as he’s done in his thread but I can't match the finesse and skills he possesses in terms of writing skills and attention to detail while working on the car. Any other alternatives rather than going the Retrofit way? Maybe an easy way out would be the current trend of LED’s that many are fitting but I don’t like them for two reasons – First, the colour temperature i.e. 6000-6500K (read bling!) which I believe will not help in terms of overall visibility (including rainy season) and second light output won’t be as good due to bulb : projector mismatch. Nothing substantial was coming my way so I left it at that and continued to use halogens in the projectors. In the meantime, I did a couple of outstation trips and with these 60W halogens making it difficult and tiring for me to drive especially at highway speeds. I am NOT saying they are bad, they are good and designed mainly keeping city usage in mind IMHO. Overall the light spread is good but the intensity (read luminosity) is bad. The major breakthrough for me was when BHPian Dinesh17 posted about the “projector retrofit idea” on the 3rd of October in my ownership thread. In a couple of minutes me reading that post, I send him a PM and a chord was struck. We continue to discuss over WhatsApp on the plan and how to execute it. In the meantime, we start making a list of items needed for the DIY so that procurement is easier and no 'red faces' while doing the DIY. Parallely we also have a conversation running with TheRetrofitSource, USA. After all the doubts were cleared, Dinesh ordered his kit from TRS as he had a colleague returning to India so the kit would be hand carried. By the time I could get on with the making up of my mind on the setup and finally reaching the ordering stage, all of his colleagues had returned to India for Diwali. So without a choice, I placed the order at Morimoto India’s dealer – Retro Rides, Delhi). I sent the payment for the Kit to Retro Rides on the 15th night and it was duly shipped on the 16th through DTDC (next-day delivery) and I received the package on the 17th at 14:40. Thanks for the timely help and quick shipping. Appreciate it! As the saying goes, "more the merrier!", No DIY is complete without my partner in crime, BHPian interc00led who too joined us in this DIY (he was more excited than both of us  ). The initial plan was to leave together to Chennai but due to college-related stuff he couldn’t come with me but joined us the next day. The onward journey was a solo drive (650 kms) where I started off at 15:00 after I received the package from DTDC and reached Dinesh’s house in Chennai at 01:40 am. Was an effortless drive but yes the weak headlights did take a toll on overall speeds maintained. ). The initial plan was to leave together to Chennai but due to college-related stuff he couldn’t come with me but joined us the next day. The onward journey was a solo drive (650 kms) where I started off at 15:00 after I received the package from DTDC and reached Dinesh’s house in Chennai at 01:40 am. Was an effortless drive but yes the weak headlights did take a toll on overall speeds maintained.*************** Items Required for this DIY (adding in no particular order)
Last edited by a4anurag : 27th November 2018 at 11:58. |
|
| (16)
Thanks
|
| The following 16 BHPians Thank a4anurag for this useful post: | aaggoswami, catchdoon, dailydriver, GTO, harsh79, hmansari, KingCheeese, kunal_kaushal, libranof1987, manjunag, neil.jericho, Rshrey22, sandx, self_driven, speedsatya, sunilsoft |
|
26th November 2018, 23:01
| #4 |
| BANNED Join Date: Oct 2011 Location: Hyderabad
Posts: 12,345
Thanked: 21,452 Times
| Re: DIY Install: Hyundai Creta Bi-Xenon Projectors. Morimoto Mini D2S 4.0 Stage III OEM Projector Setup - How it is Here's how the OEM Projector setup is. As we weren't sure if the D2S 4.0 would be a direct for or not, Dinesh bought a damaged headlight for a throw-away price to do all the R&D, measurements before ordering the kit from TheRetrofitSource as well to confirm if the bracket would work for us or not. Over 100 images and hours of discussion on WhatsApp on how the projector will fit, what all places trimming needs to be done etc. Found a damaged headlight for all our R&D, etc  Projector and the frame removed from the headlight housing  Shield & Motor - View from the bulb side  Lens and the OEM bracket that holds the projector unit - Rearview  Side view of the bracket and the lens  Bulb holder  OEM Lens - Not clear (Fresnel type?) hence the not so good cut-off and low intensity from the 60W halogens  OEM DRL that is riveted to the plastic housing  Closeup of the cutoff shield.  Labelling on the shield for identification  Motor with the 2-pin connector  Internals of the headlight levelling motor  ************ Bi-Xenon: Morimoto Mini D2S Stage III kit & it's contents Here's what I have got in my kit: Projector: Morimoto Mini D2S 4.0 Round Lens, RHD Ballasts: XB55 D2S Bulbs: XB (D Series) D2S @ 5500K Adapter: AMP > D2S Ballast adapter (90° bend type) Igniter: AMP type Morimoto XB Wiring Harness: HD Relay 9005 Type Sealant: Black RetroRubber Here's the kit that Dinesh chose to go with from TheRetrofitSource: Projector: Morimoto Mini D2S 4.0 Round Lens, RHD Ballasts: XB35 D2S Bulbs: Osram Night Breaker Xenarc 66240XNL (35W) @ 4200K with upgraded Motoholders Adapter: Not required Igniter: Morimoto D2S type Wiring Harness: HD Relay 9005 Type Sealant: Black RetroRubber His kit gets a D2S type igniter so there is no need for an extra item in the list which I had i.e. AMP>D2S adapter as my igniter was AMP type and not the D2S type. In the D2S type, the igniter fits right on the bulb base and not like a separate unit. The kit  Contents of the kit 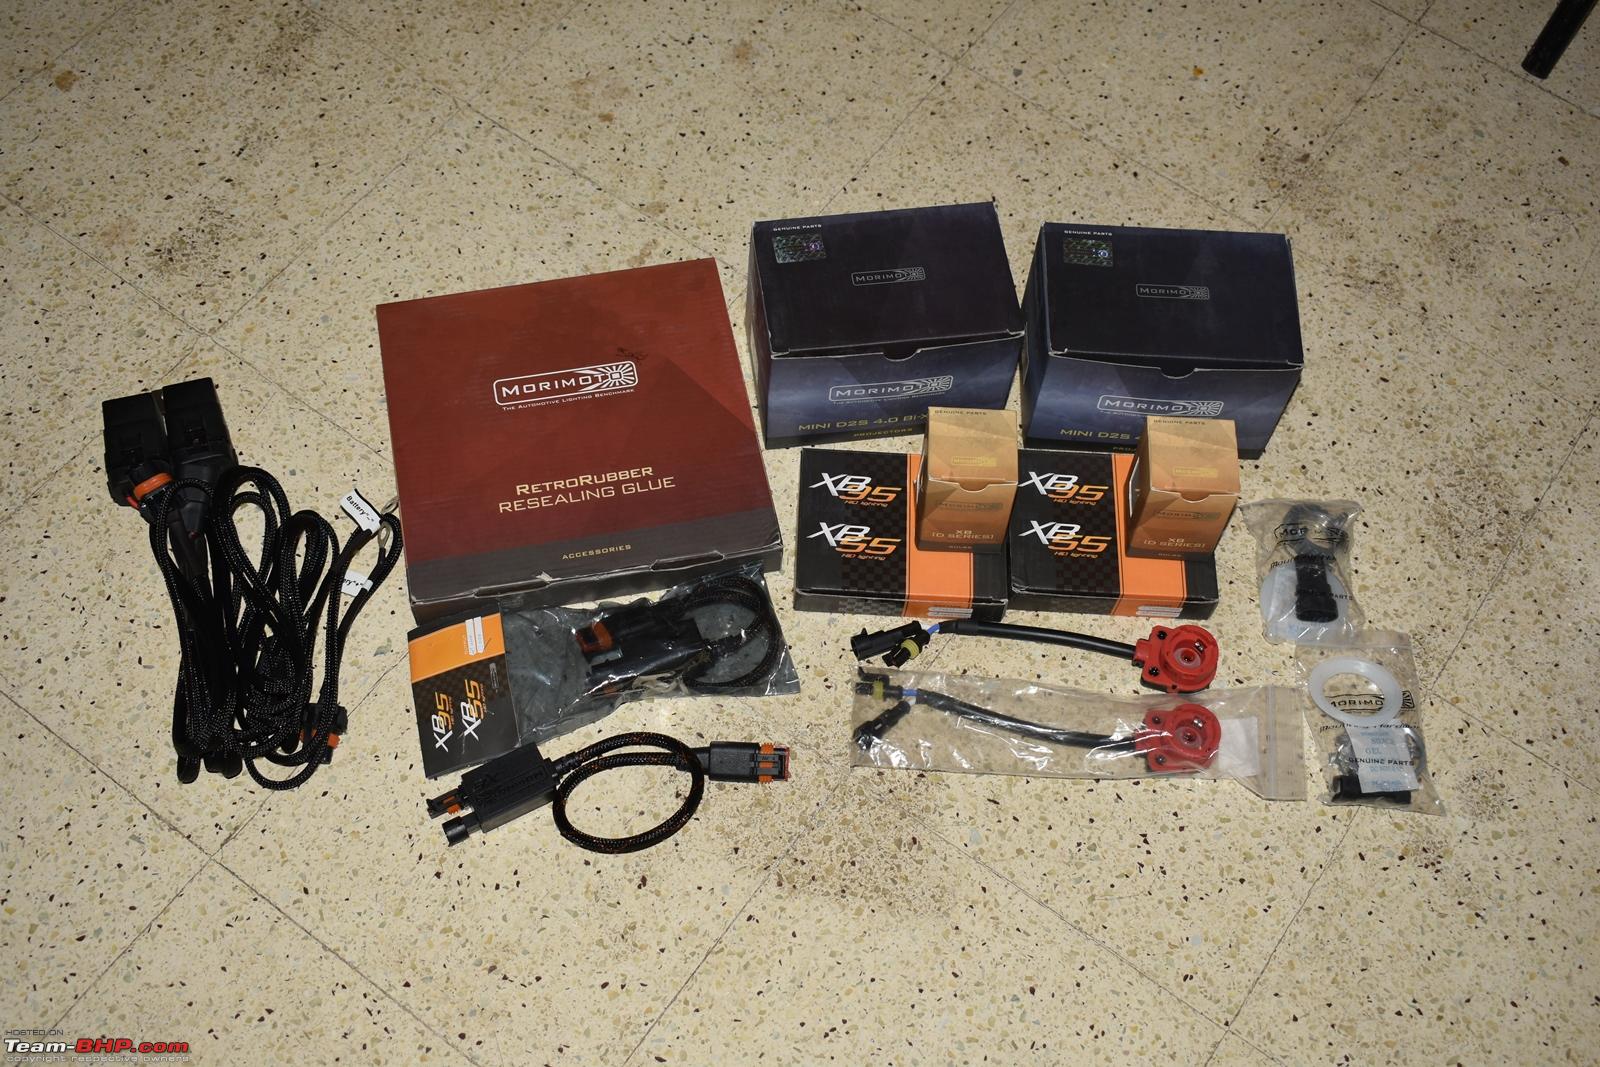 XB55 Ballast  XB (D-Series) D2S bulbs (rated at 5500K)   Bulb installation hardware  AMP Igniter  AMP>D2S adapter (90-degree bend)  HD Relay (9005 Type) with the hole for mounting it in the engine bay  The connections of the relay (labelled clearly which is 'plug-n-play')  Mini D2S 4.0 Projector Box  Mini D2S 4.0 Projector 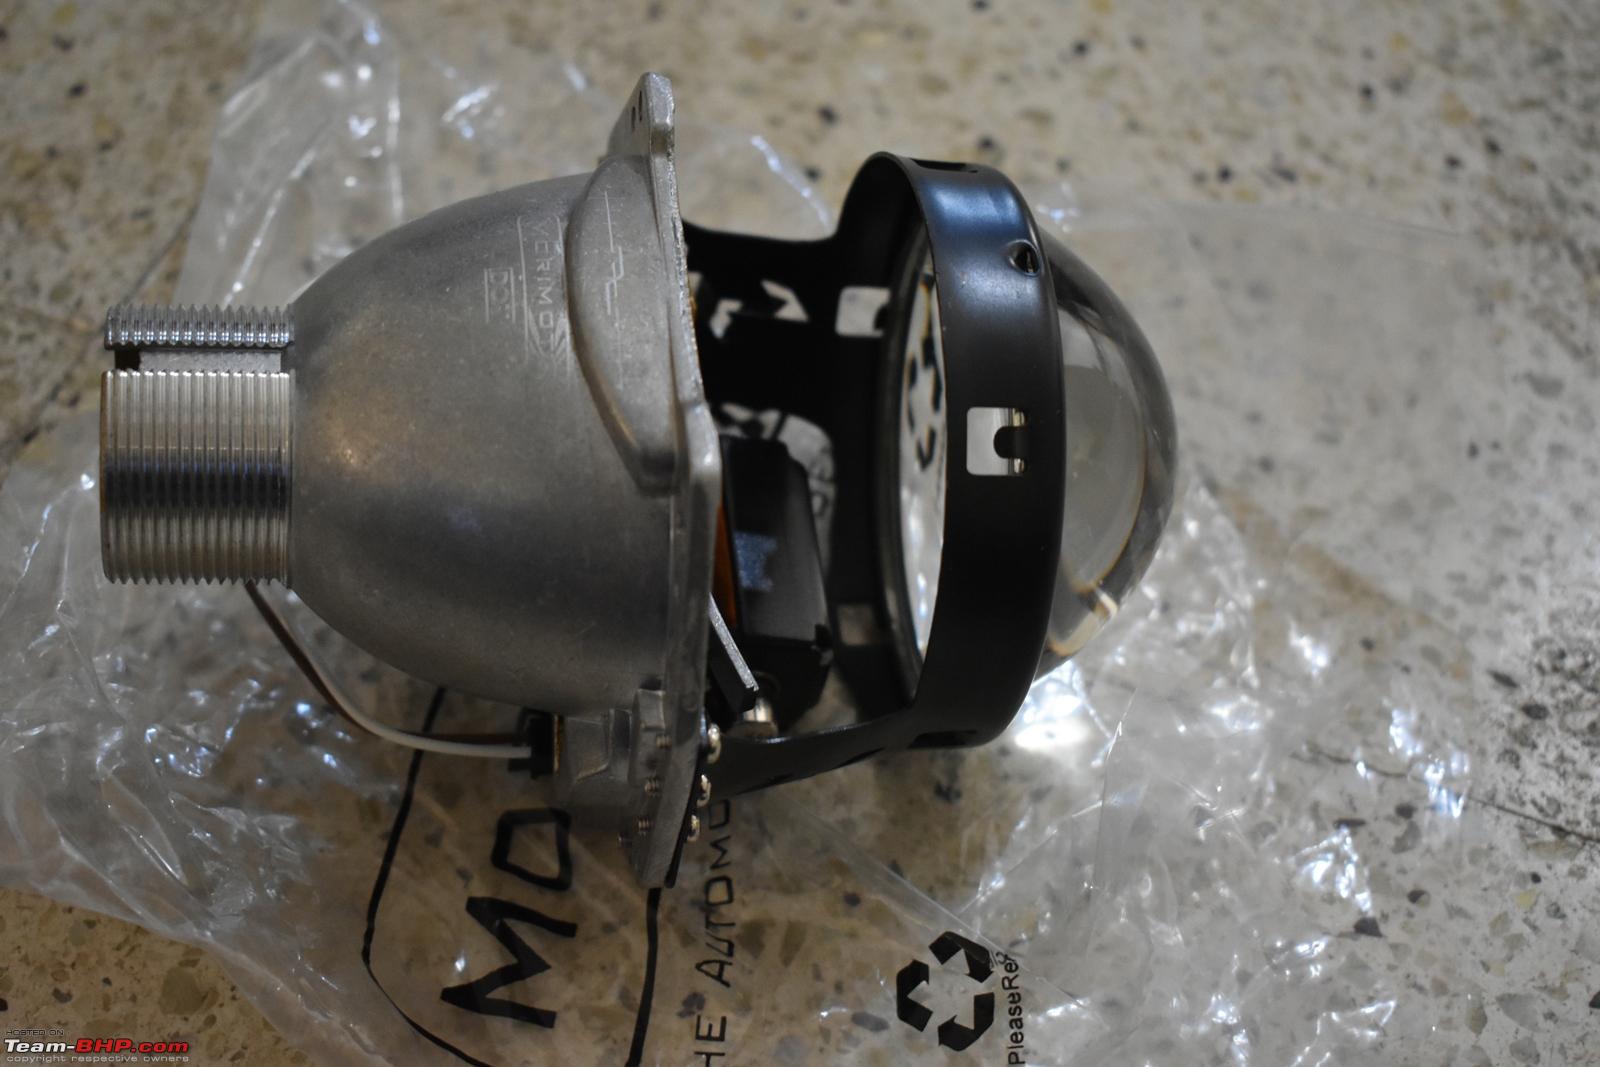 Clear Lens  Shield with cutoff seen  Beam Pattern inscribed on top (tells us if it is LHD or RHD type) plus DOT certified 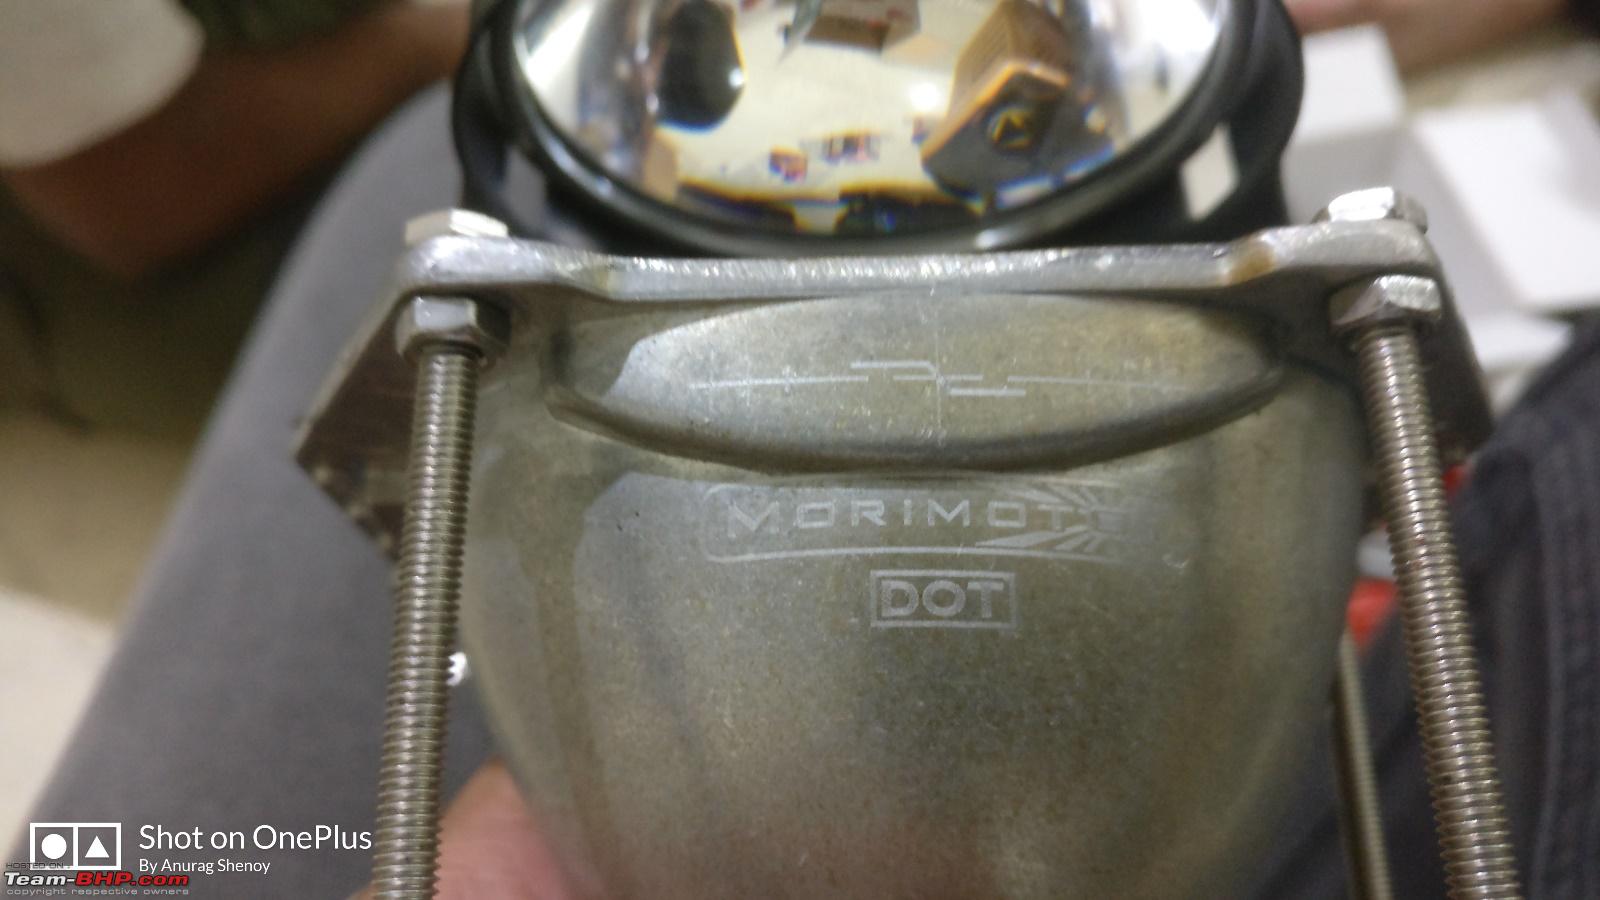 Shield and solenoid 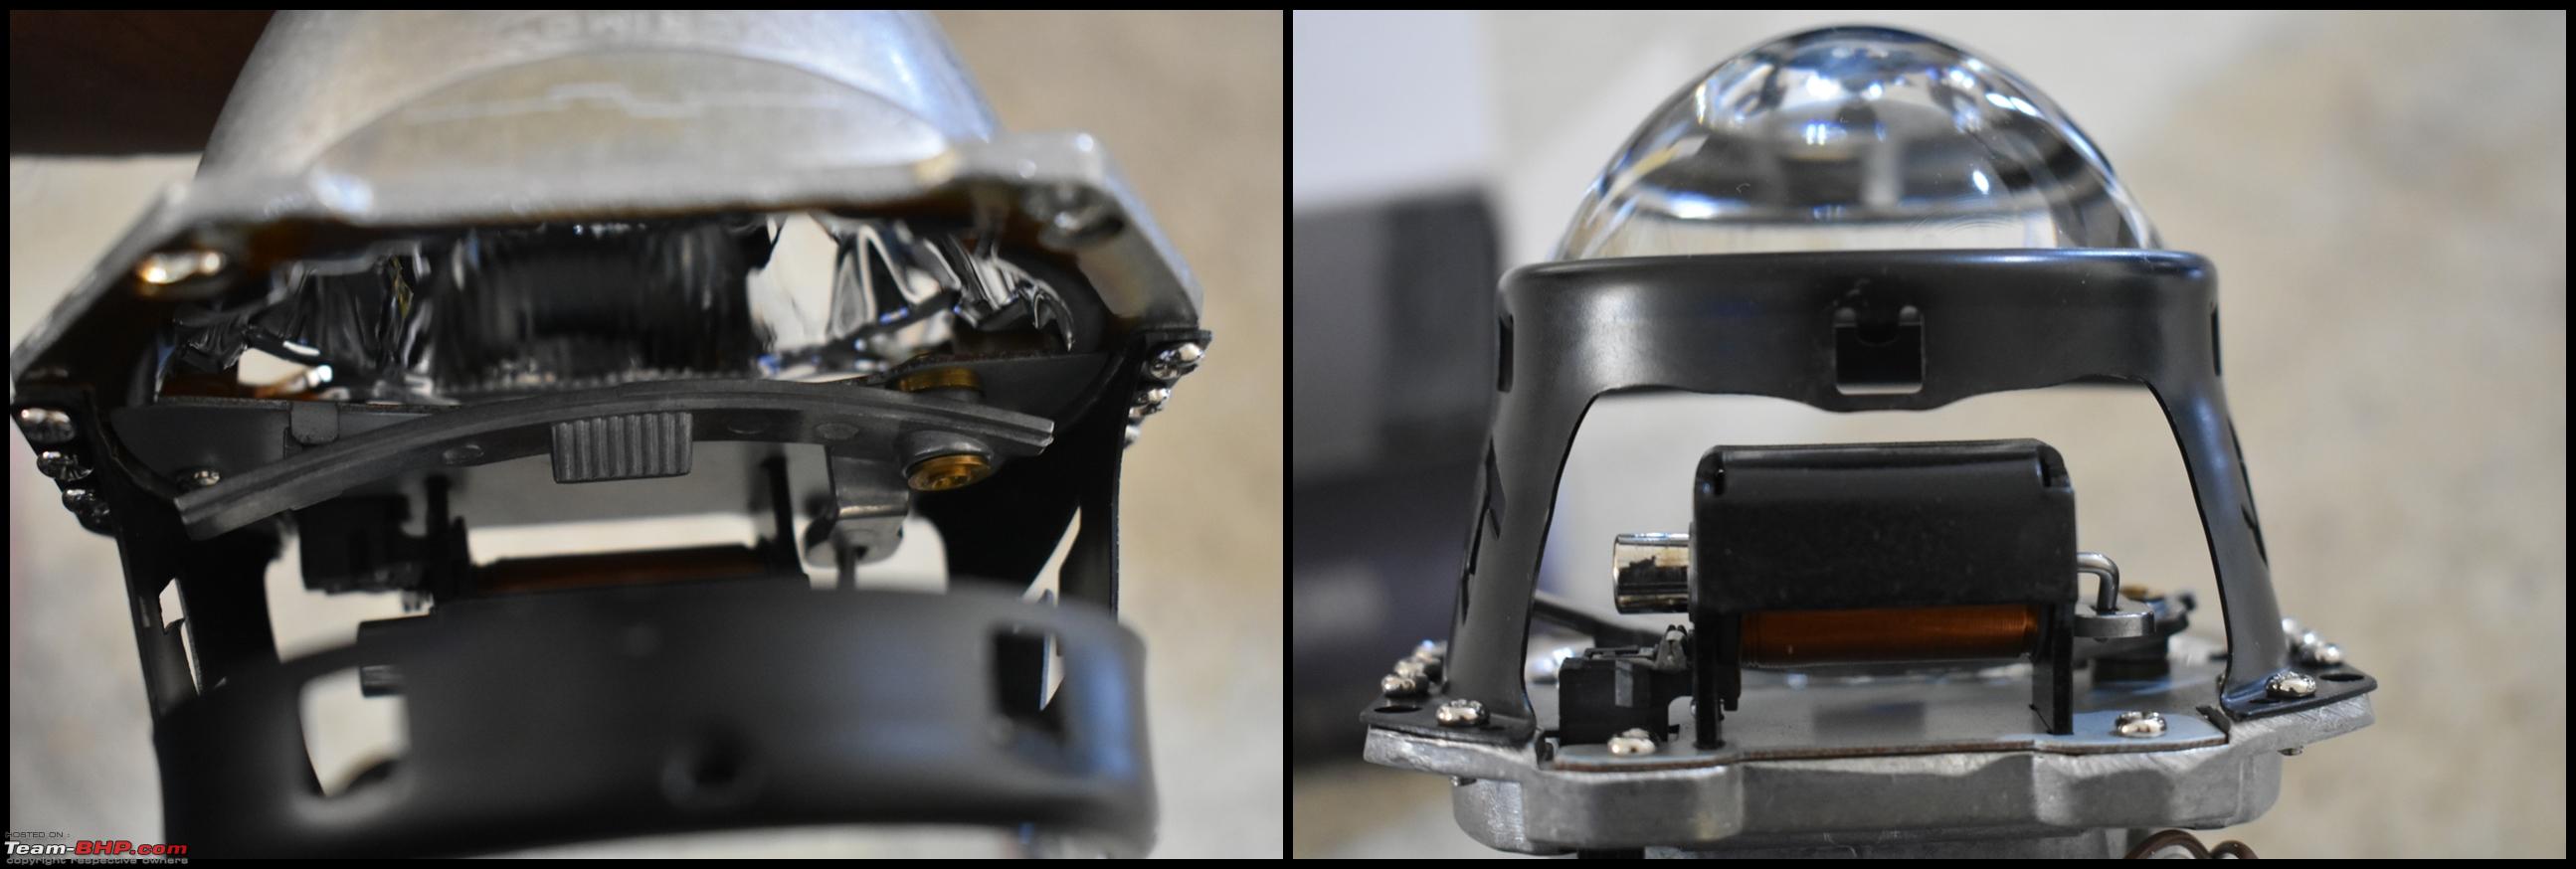 RetroRubber - Housing sealant (Black colour)  Bi-Xenon - Mini D2S Kit specification (Taken from TheRetrofitSource USA website)  Last edited by Aditya : 26th April 2021 at 07:24. Reason: Typo |
|
| (17)
Thanks
|
| The following 17 BHPians Thank a4anurag for this useful post: | aaggoswami, dailydriver, graaja, GrammarNazi, GTO, harsh79, InControl, kunal_kaushal, libranof1987, neil.jericho, PraNeel, sandx, speedsatya, Thermodynamics, vaasu, Varun_HexaGuy, Vikalp |
|
26th November 2018, 23:25
| #5 |
| BANNED Join Date: Oct 2011 Location: Hyderabad
Posts: 12,345
Thanked: 21,452 Times
| Re: DIY Install: Hyundai Creta Bi-Xenon Projectors. Morimoto Mini D2S 4.0 Stage III Bumper Removal Not a difficult step but the pain part are those plastic trim clips located on the lower side of the bumper and on each wheel liner.
Headlight Removal Easy part and takes less than 5 minutes to dislodge the headlights from the mounting position.
Bumper removed  HL Connectors (14-pin) to be removed by pressing on that tab on the top  Screws holding the headlight on the body  Bumper and headlights removed  Took the bumper inside so I could remove the LED + DRL Fog lights and revert to stock ones  Stock fog light assembly back on the car  Had these blue ones that I bought for ₹116 from AliExpress. Used them in the fogs  ************ Readying the bracket for the Retrofit All credits to BHPian Dinesh for finding out the link to a compatible and readymade bracket for Hyundai IX25 that can be used with a 3” projector. As seen on AliExpress listing (Seller Name: TAOCHIS) and item description, this bracket is for a Q5 projector that they are selling where the measurements matched to that of the Mini D2S 4.0 projector (3" size of the projector). Without any further delay, we ordered the brackets and received them in 8 days. What a brilliant find sir. Hats off!! I must say it is a sturdy decent quality bracket and in terms of design, matches our needs without much jugaad to be done or running around the city to find a person who could fabricate a custom bracket for this retrofit. This bracket cleared the only and main speed breaker in the retrofit we had all this while. The only hiccup was, the part of the bracket’s pre-cut hole needed to be enlarged which holds onto the adjustments screws (Up & Down screw + Left and Right Screw) via a plastic clip. Once the filing is done, best is to make it rustproof, a precautionary measure (if it does rust in future). Using a paintbrush, a layer of red oxide was applied and allow it time for drying in the hot sun, say for 30 minutes then place the brackets on a newspaper for giving it a coat of paint. Shake the aerosol can thoroughly and apply a coat on one side, let it dry for 5 minutes and apply another coat till all the areas are covered then turn it around and repeat the process of painting till the whole bracket is done. Leave it overnight for the paint to dry completely. What I paid for the bracket  The brackets 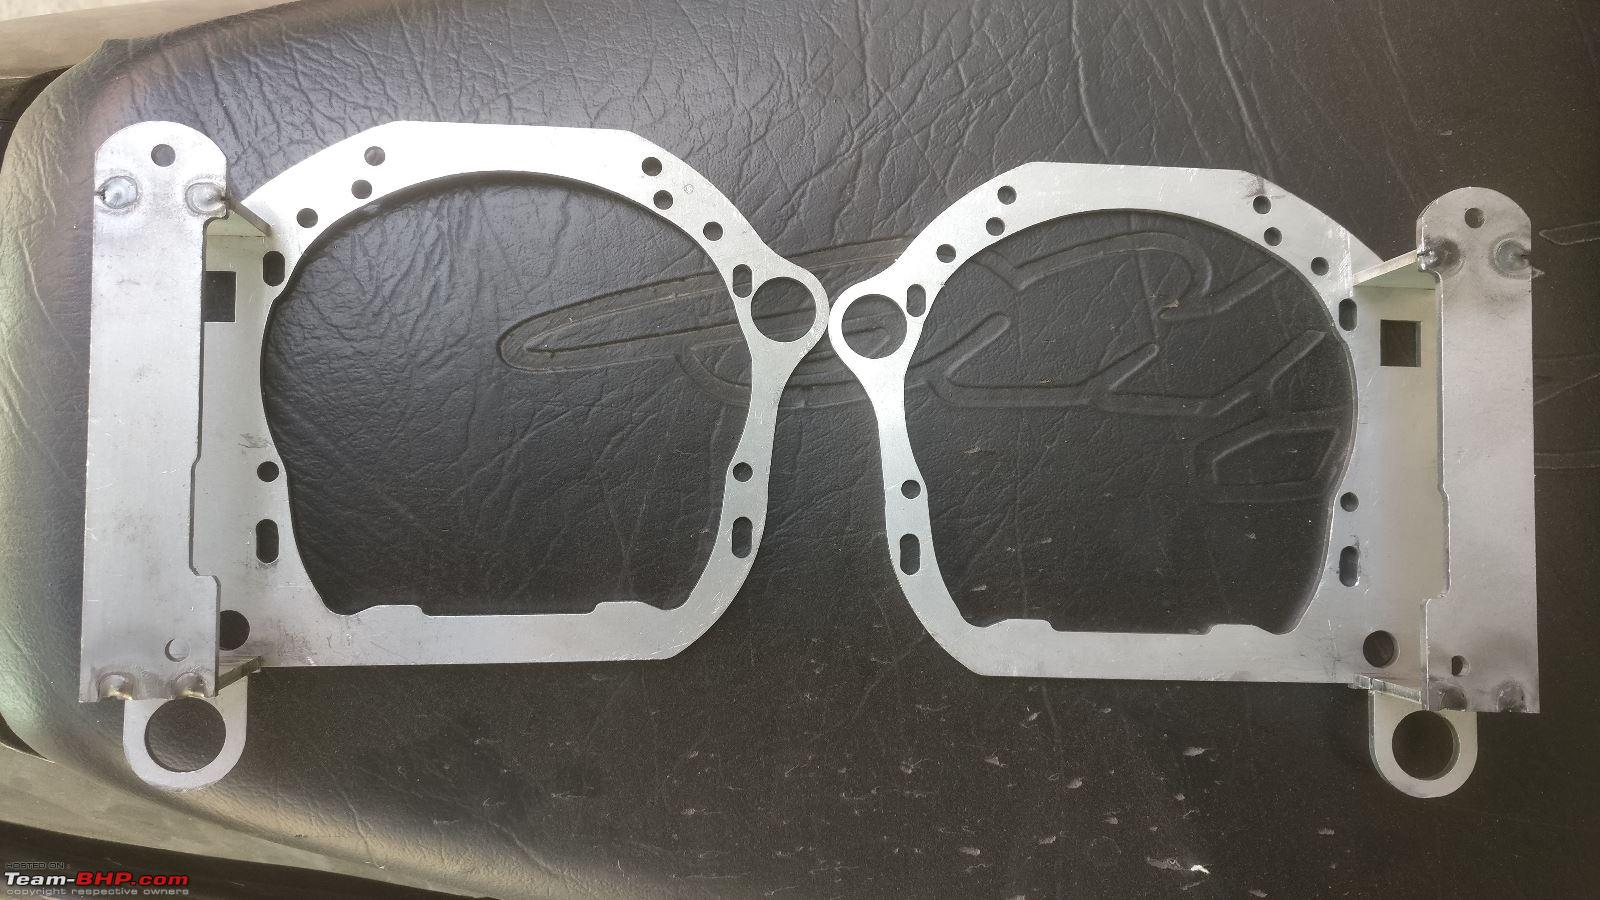 Red oxide  Brushes for application  Black aerosol paint can. Painted black after the red oxide coating dried up  Red oxide applied and left for drying 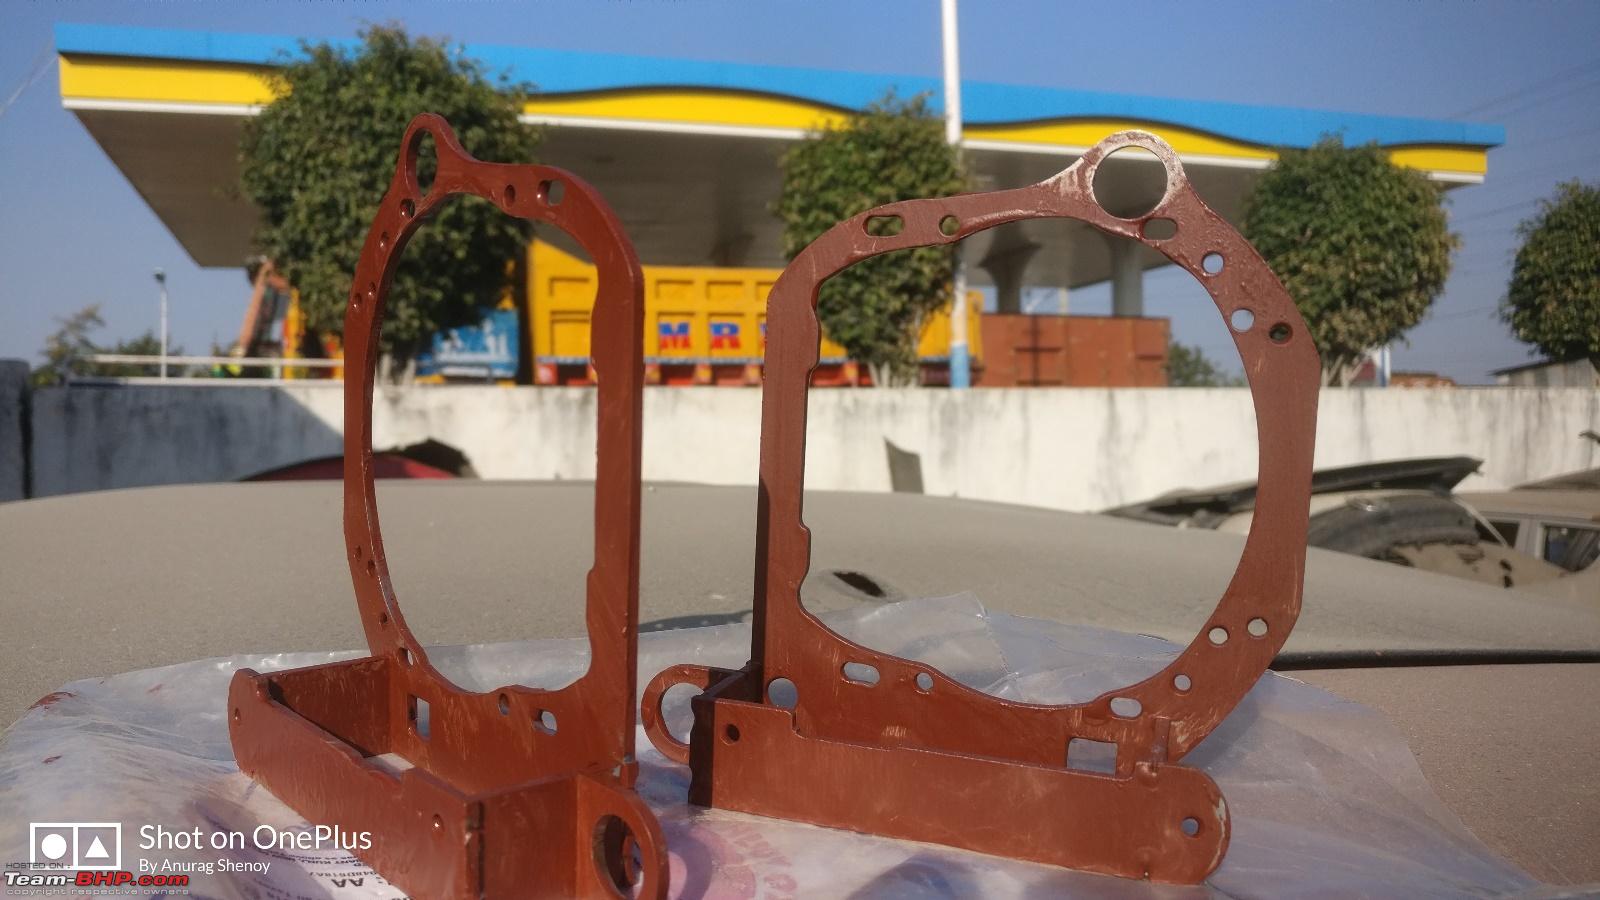 Brackets painted black  Test fitting the brackets prior to the preparation  D2S 4.0 projector test fit before final preparation  Projector with the frame in the headlight assembly - A test fit  Filing to be done to match those figures so the plastic clip fits tight  Some more last minute Filing being done  Last edited by Aditya : 26th April 2021 at 07:25. Reason: Typo |
|
| (20)
Thanks
|
| The following 20 BHPians Thank a4anurag for this useful post: | 2himanshu, aaggoswami, ashis89, CEF_Beasts, graaja, GTO, harsh79, InControl, libranof1987, manjunag, MithunSathianat, PraNeel, Rshrey22, sandx, speedsatya, Thermodynamics, vaasu, Varun_HexaGuy, Vikalp, viXit |
|
26th November 2018, 23:34
| #6 |
| BANNED Join Date: Oct 2011 Location: Hyderabad
Posts: 12,345
Thanked: 21,452 Times
| Re: DIY Install: Hyundai Creta Bi-Xenon Projectors. Morimoto Mini D2S 4.0 Stage III Mounting the Ballast Ballasts must be mounted near the headlights as the wiring length isn’t that long hence finding a good location that is not only fairly accessible but also away from the elements of nature. We found such a location that is almost flat and ideal to mount the ballasts. The metal frame is located behind the headlight mounting hence it is the best in terms of accessibility and for the available length of wiring. Ballast mounting point and secured it in place with M5 nuts, washers and screws  Before drilling the holes for mounting the ballast, pass the wiring to all points where the respective connectors get plugged in so as to ensure no sharp bends and/or no wires are coming in contact with any moving parts. If all is found to be okay, then drill two holes and secure the ballast using two M5 nuts, washers and screws. We’ve used thread locker as a precaution. Wiring up the HD Relay in the Engine Bay Earlier we were in confusion which wiring to go for, HD Relay or Standalone CANBUS type. As the Creta’s doesn’t get a ‘bulb-out’ warning either on the MID or HU, we went ahead with the safest and best option of "HD relay". Creta uses the HB3 9005 type connector for OEM headlamps so this must be specified at the time of placing the order. After the ballast is secured, pass the wiring of the HD relay to all the points and connect them respectively. The HD Relay harness is clearly labelled and plug-n-play type. There's a video on YouTube too on 'how-to wire the HD relay' by TheRetrofitSource guys. The harness consists of:
The HD relay takes startup input from the OEM headlight connector and the wire length for this connection is short so the connection needs to be taken from the passenger side headlight side connector leaving the driver’s side one as is (seal it with insulation tape to avoid any issues in future). The 9005 connector on the HD relay needs to be de-pinned and reversed to match the terminals as on the OE ones. A new 9005 connector pigtail wiring is to be made that extends out from the headlight casing till the battery area. One end of the new wiring plugs into the OE headlight connector and the other end connects to the HD Relay 9005 input connector. Keep in mind the terminal position and match the polarity (test if required before finalizing). After everything is in place and connected, secure the wiring with zip ties see to it that no extra harness is dangling around anywhere. Ring terminal connected to the +ve terminal of the battery, this has an inline fuse too  Ring terminal connected to the -ve terminal of the battery  HD Relay secured to the body  Driver's side ballast wiring zip tied  OEM headlight connector plugged into the 9005 input connector which acts as a trigger for the HD Relay to get activated. As soon as the headlight switch is flicked or flashed, this connector activates the circuit  Extra wiring zip tied  Last edited by a4anurag : 27th November 2018 at 13:06. |
|
| (13)
Thanks
|
| The following 13 BHPians Thank a4anurag for this useful post: | aaggoswami, ashis89, dailydriver, graaja, GTO, harsh79, KingCheeese, lemedico, Reinhard, speedsatya, Thermodynamics, vaasu, Varun_HexaGuy |
|
26th November 2018, 23:47
| #7 |
| BANNED Join Date: Oct 2011 Location: Hyderabad
Posts: 12,345
Thanked: 21,452 Times
| Re: DIY Install: Hyundai Creta Bi-Xenon Projectors. Morimoto Mini D2S 4.0 Stage III Headlight (Clear Lens) Opening for Projector fitment Coming to the most critical part of the DIY where patience is the utmost need of the hour. We’ve used a Blue Star A/C carton packing as a DIY Oven for headlight baking and sealing purpose. Before beginning the process, cover the entire inside of the cardboard box with aluminium foil and secure the foil to the cardboard box with insulation tape so the internals of the box heats up faster and in an even manner. Punch in two holes on either side of the box, one for the heat gun and the other for a digital thermometer. Here’s the process which we followed:
Before beginning the prying, pull out this 3-pin connector which lights up the OEM DRL strip. Do NOT apply a lot of force, the board is delicate and the capacitor on that board is too flimsy. Handle with care!!  Three screws to be removed  Homemade oven for the DIY (Bluestar AC outer carton packing)  Headlight placed in the box for baking. Used the Morimoto projector boxes to hold the headlight in the air and not letting it touch the base  Hot air gun placed to do the heating job 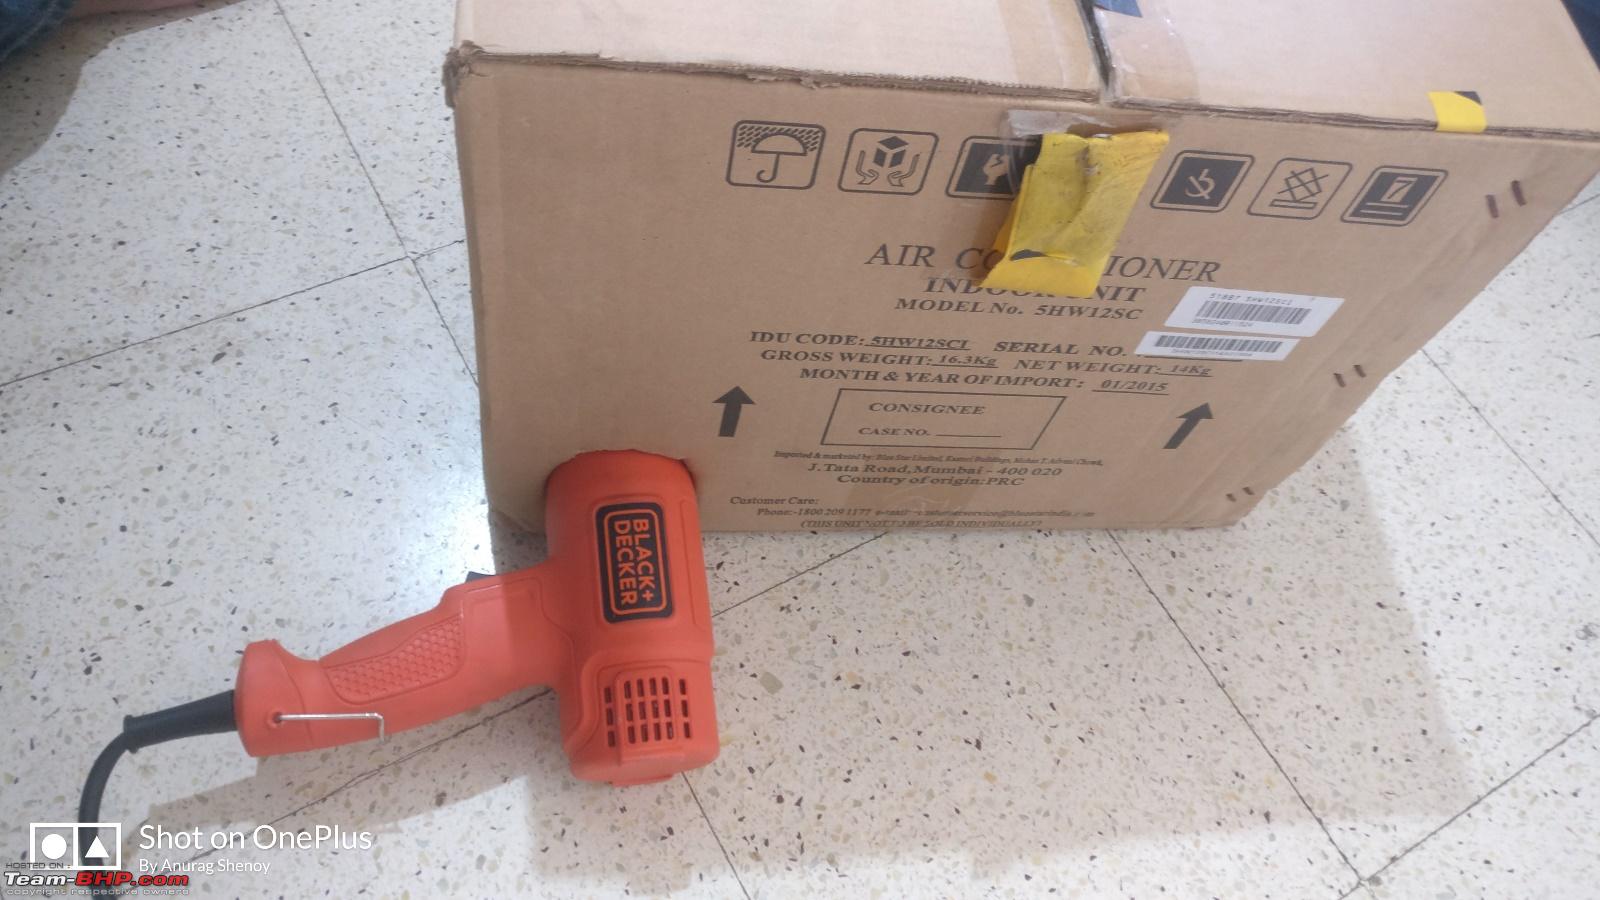 Digital thermometer to keep an eye on the temperatures inside the oven  Prying the headlight while heating simultaneously  Clear lens separated  *********** OEM Projector removal from the casing
OEM projector removed from the casing  Cornering lamp lens removed from OEM projector bracket  Last edited by a4anurag : 27th November 2018 at 13:29. |
|
| (18)
Thanks
|
| The following 18 BHPians Thank a4anurag for this useful post: | aaggoswami, ashis89, dailydriver, graaja, GTO, harsh79, kunal_kaushal, lemedico, libranof1987, manjunag, neil.jericho, Reinhard, sandx, speedsatya, Thermodynamics, vaasu, Varun_HexaGuy, yesyeswe |
|
26th November 2018, 23:57
| #8 |
| BANNED Join Date: Oct 2011 Location: Hyderabad
Posts: 12,345
Thanked: 21,452 Times
| Re: DIY Install: Hyundai Creta Bi-Xenon Projectors. Morimoto Mini D2S 4.0 Stage III Preparing the connection for the High Beam (Read Solenoid) for the D2S 4.0 Projector When the OEM projector was removed, the 2-pin connector was unplugged that controls the shield movement now needs to be connected to the Morimoto projector through the supplied pigtail wiring. For this issue to be addressed, the pigtail provided in the kit didn't help us much so we decided to splice and solder the wiring to the OEM 2-pin connector.
Soldering the connection for the solenoid to work 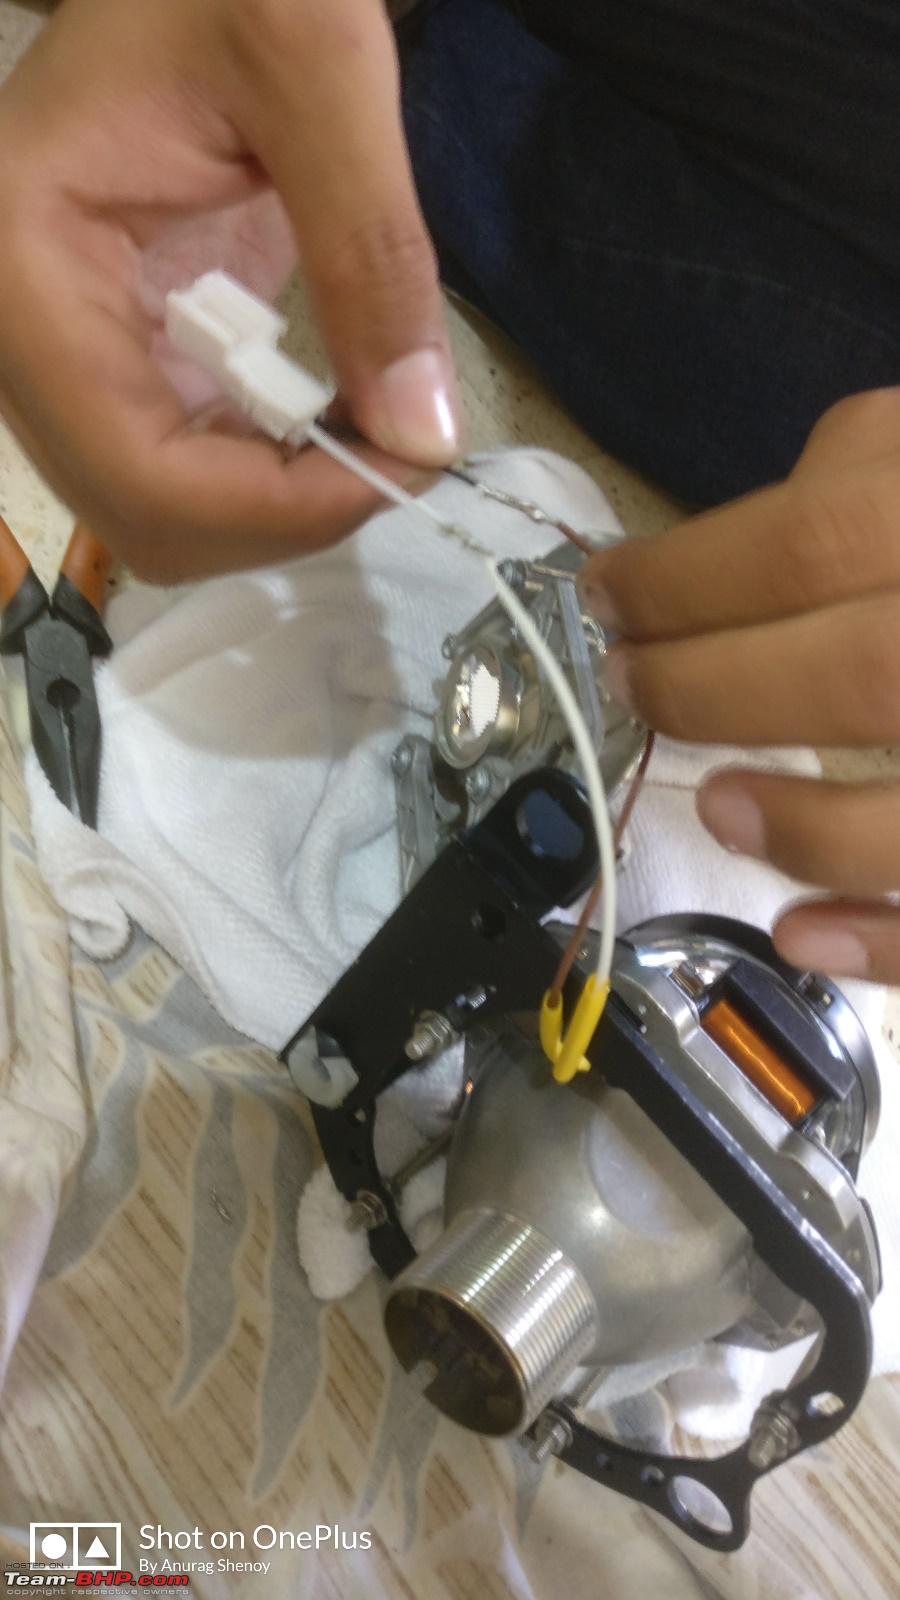 *********** Mounting the Mini D2S 4.0 Projector to the bracket and then into the headlight
Cornering lamp lens mounted on the bracket  Mini D2S 4.0 projector mounted on the new frame and fit into the headlight casing  Another view of how the projector looks along with the bracket in the casing  Last edited by a4anurag : 27th November 2018 at 13:42. |
|
| (16)
Thanks
|
| The following 16 BHPians Thank a4anurag for this useful post: | 2himanshu, aaggoswami, Akib Khan, ashis89, dailydriver, graaja, GTO, harsh79, KingCheeese, kunal_kaushal, lemedico, libranof1987, Prakritij, sandx, Thermodynamics, vaasu |
|
27th November 2018, 00:27
| #9 |
| BANNED Join Date: Oct 2011 Location: Hyderabad
Posts: 12,345
Thanked: 21,452 Times
| Re: DIY Install: Hyundai Creta Bi-Xenon Projectors. Morimoto Mini D2S 4.0 Stage III Re-sealing the headlight If opening the clear lens was a pain, this step is another. No shortcuts work here and if no caution is observed, will cause trouble in future i.e condensation/fogging. Here's the process we followed:
RetroRubber used to reseal the clear lens to the headlight casing  A thin bead of the rubber in the channel  Morimoto Compression Clips that was used  Headlight refit for a test fire  Fired up!  No condensation anywhere so far after 1 week's use plus had one exposure with heavy rain too  ********** Alignment of the beams The other crucial step in any retrofit is the alignment of the beams which will directly impact the light output on the road. Have seen a lot of videos on YouTube on "how to align" etc and also found an easy self-explanatory picture of the same from Morimoto website. For aligning step we need a ratchet with 12mm & 13mm socket, measuring tape and white wall with an area around in silence and peace. Instructions for beam alignment that we followed  The image is self-explanatory so nothing much to write here. We just followed it. We did a rough alignment before wrapping up things as most of the return journey would be in the daytime so final adjustments following the above image would be done in Hyderabad. Two screws for manual adjustment (screw on left is for "Up & Down" whereas the right side one is for "Left & Right" movement of the beam)  What the screws do, labelled on the headlight casing  Cutoff line after retrofitting and refitting everything back (Of my car projecting on Dinesh's car)  Cutoff line after retrofitting and refitting everything back (Of Dinesh's car projecting on my car)  As seen, minimal adjustment was all that was needed, the left side beam had to be lowered to match the right side one  Post rough alignment (this is in Chennai) 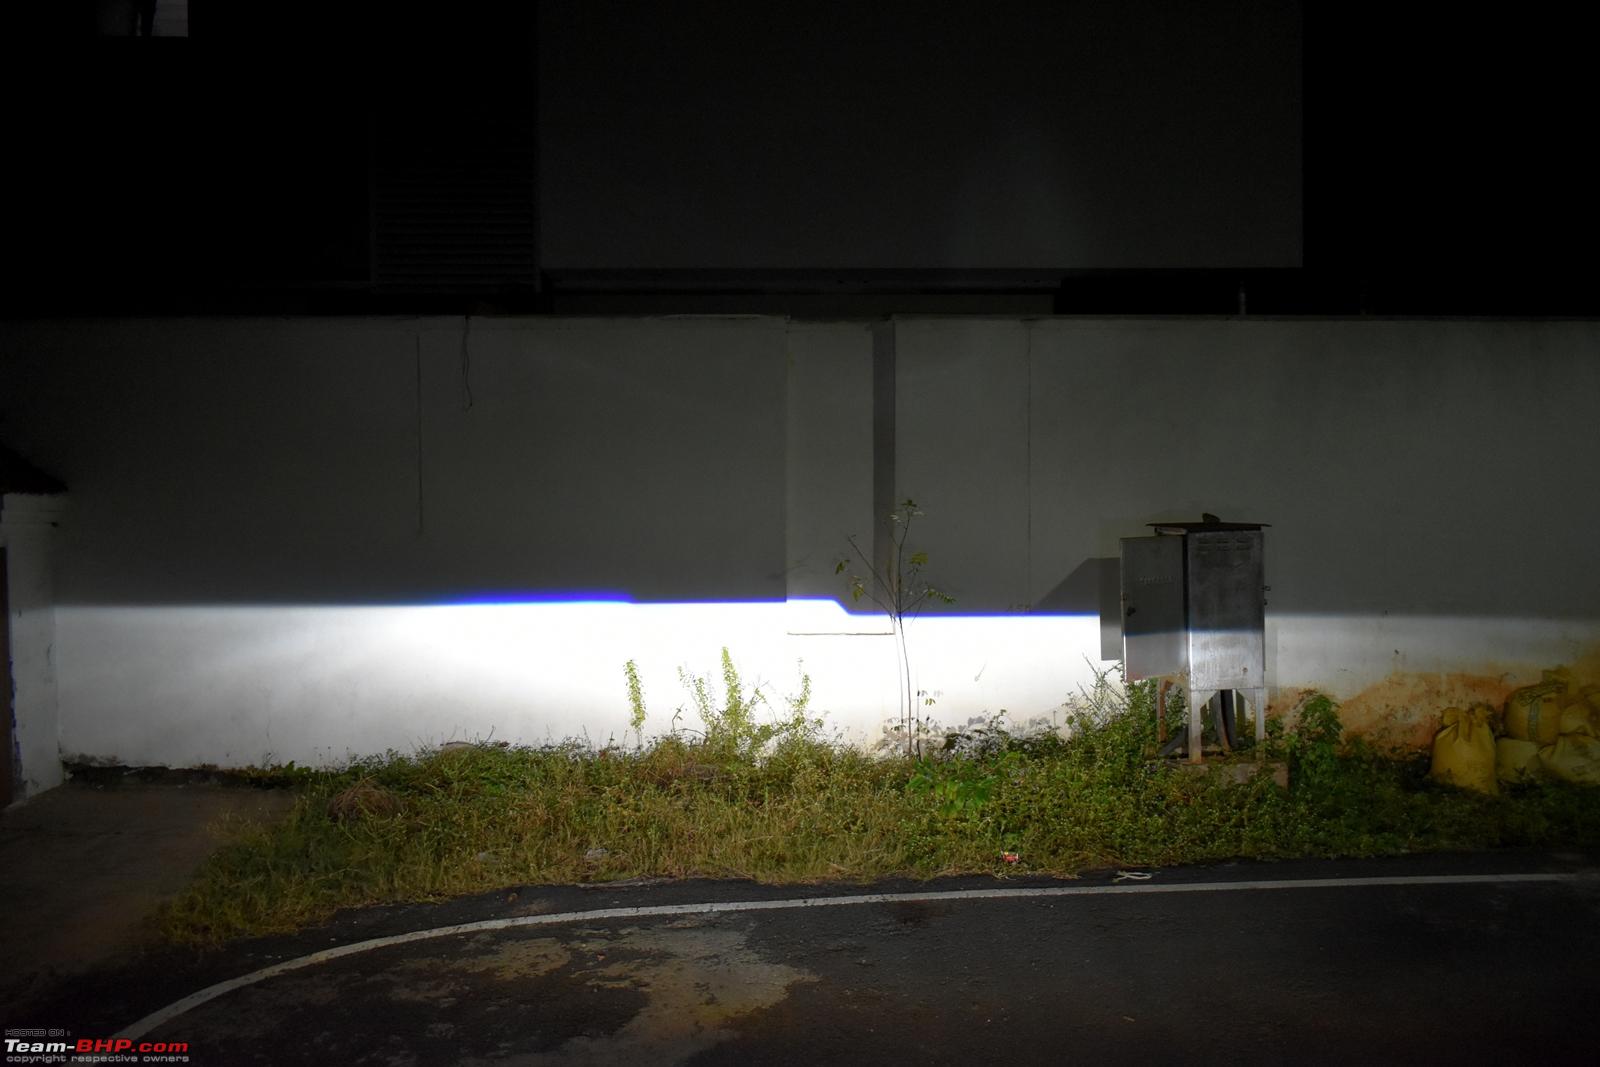 Last edited by a4anurag : 27th November 2018 at 13:59. |
|
| (17)
Thanks
|
| The following 17 BHPians Thank a4anurag for this useful post: | aaggoswami, Akib Khan, gauravanekar, graaja, GTO, gururajrv, harsh79, InControl, kunal_kaushal, lemedico, Prakritij, sandx, speedsatya, Thermodynamics, vaasu, Varun_HexaGuy, yesyeswe |
|
27th November 2018, 00:55
| #10 |
| BANNED Join Date: Oct 2011 Location: Hyderabad
Posts: 12,345
Thanked: 21,452 Times
| Re: DIY Install: Hyundai Creta Bi-Xenon Projectors. Morimoto Mini D2S 4.0 Stage III I'll be posting images of the lighting output and a comparison between the Stock Halogen and Morimoto's. Stock Halogen output shots Low Beam  High Beam  Low Beam as seen on a wall  High Beam as seen on a wall  Pattern (zoom in)  *********** Morimoto Mini D2S 4.0 Output shots Low beam (Level 2)  High Beam 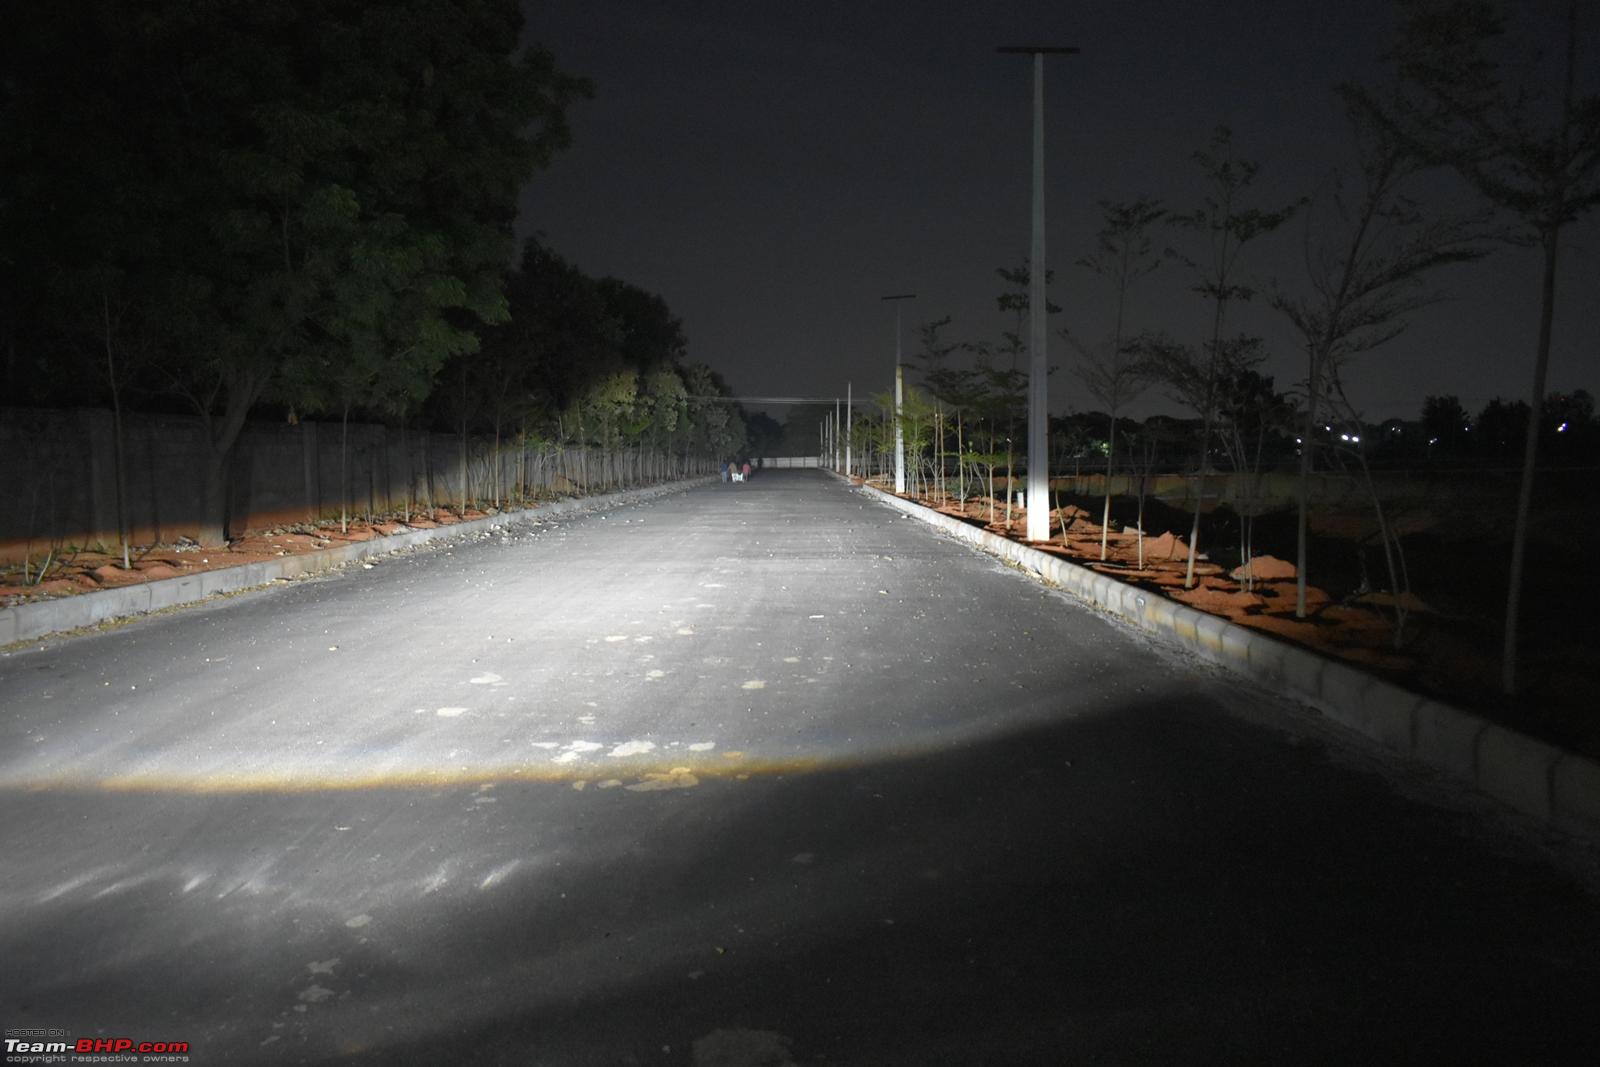 Low beam (Level 0)  High Beam  Closeup of the low beam on a wall  Closeup of the high beam on a wall  Pattern (zoom in)  *********** Comparison for an easy understanding Cutoff comparison (Stock vs Morimoto)  Low beam (Stock vs Morimoto)  High beam (Stock vs Morimoto) 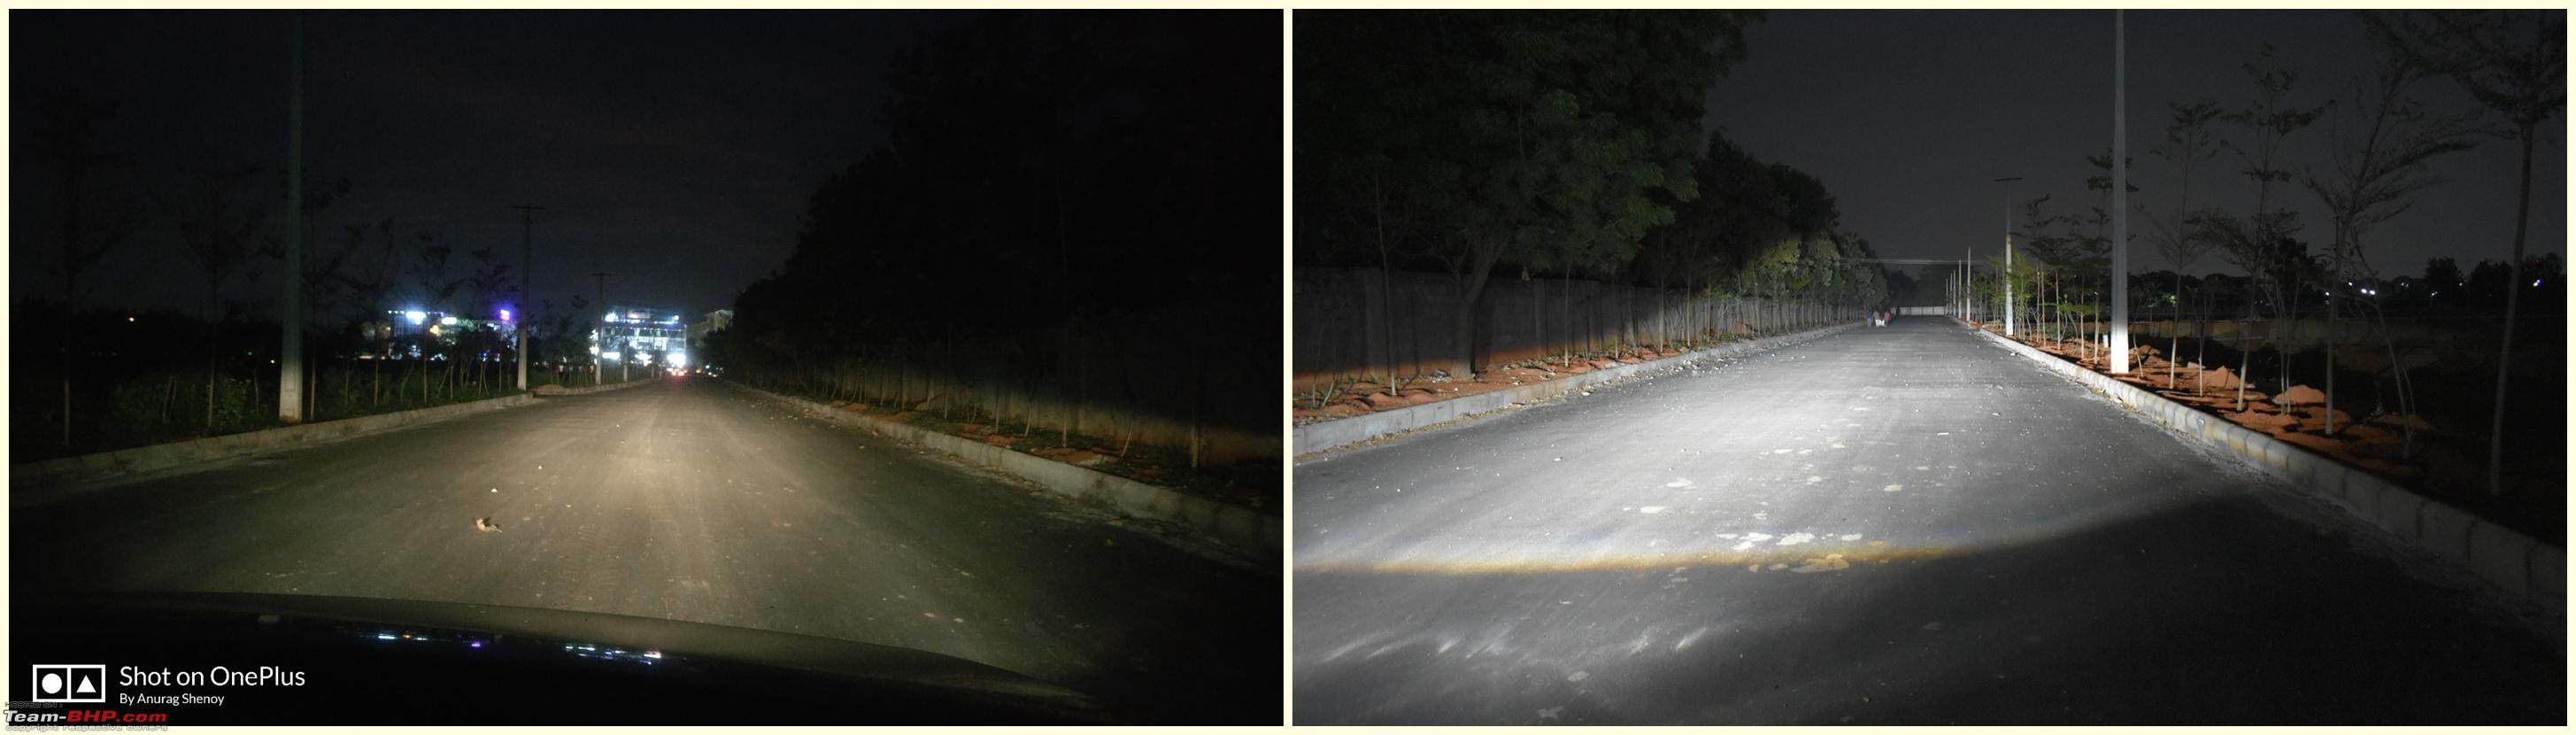 Low Beam as seen on a wall (Stock vs Morimoto)  High Beam as seen on a wall (Stock vs Morimoto)  Zooming in the high beam on a wall (Stock vs Morimoto)  No DIY is complete without videos - Here are some taken. Will upload better quality ones soon Last edited by a4anurag : 27th November 2018 at 02:15. |
|
| (34)
Thanks
|
| The following 34 BHPians Thank a4anurag for this useful post: | aaggoswami, akshay81, Arjan, ashis89, AttyBhai, BoneCollector, CEF_Beasts, gauravanekar, Geo_Ipe, graaja, GSMINC, GTO, harsh79, KingCheeese, kunal_kaushal, lemedico, libranof1987, MithunSathianat, Mr.Boss, nikhn, Prakritij, PraNeel, rbp, Reinhard, sandx, SirJeepsALot, somspaple, speedsatya, sunilsoft, Thermodynamics, vaasu, Varun_HexaGuy, vredesbyrd, yesyeswe |
|
27th November 2018, 01:07
| #11 |
| BANNED Join Date: Oct 2011 Location: Hyderabad
Posts: 12,345
Thanked: 21,452 Times
| Re: DIY Install: Hyundai Creta Bi-Xenon Projectors. Morimoto Mini D2S 4.0 Stage III ***Issues, Mistakes + Learnings from the DIY*** These are some points that I’d put down on the issues faced during the DIY along with some mistakes and key learnings from this DIY by all 3 of us. Some can be corrected and some cannot without a downtime with respect to car usage. Here’s what we have experienced: ISSUES: 1. Adapter type and fitment Q: What is the issue? A: In my case, the adapter supplied is an AMP > D2S type which is at a 90-degree bend. I mean where the bulb plugs in, the output wire from that socket is at a 90-degree bend causing strain on the bulb + projector housing as the headlight casing is not too spacious inside. It was a pain to get the correct fit without disturbing the seating of the bulb. Honestly, in the long run, I am not going to be comfortable with this setup where a bulb change would be dreaded. The issue  The solution  Solution: Available. While browsing TRS website, interc00led spotted the AMP>D2S adapter that has the output wiring straight out and not at a 90-degree bend. Shall be getting the same and rectifying it so there wouldn’t be any strain on the wires due to the bend plus a bulb change in the future would be a breeze. 2. Grommets Q: What is the issue? A: The kit hasn’t come with any grommets to seal the hole made in the dust caps of the headlights to pass the wiring out. Have left it like that for now, I know it is risky but have two solutions in mind to tackle this. Let’s see which one I choose. Solution 1: Order a set of grommets from TRS and use them but I’d need to drill a ~50mm hole in the dust cap for them to fit tight. Solution 2: Use cable glands as used by BHPian Sudeepg. I am inclined to this one as it looks more robust and reliable. I have a pair of spare dust caps that I had ordered from Bodmoo that is yet to be put to use depending on which method I go for. 3. Bulb Retaining Springs Q: What is the issue? A: The kit comes with knurled lock ring, Bulb retaining cap and bulb retaining spring. It is this wretched spring that is worrying me till fixed. While fitting the bulb and tightening it onto the projector, the spring popped out twice from the gap between the retaining cap and bulb holder base. Somehow it got fit tight after a couple of tries. The Issue  The Solution  Solution: Morimoto has released an upgraded version of the D2S bulb holder for the projector that is named as D2S Morimoto Motoholders which are made of injection moulded plastic that is temperature resistance up to 280 degree Celsius. PS: Issues 1, 2 & 3 are specific to my setup as BHPian Dinesh had a D2S type igniter that fits on the bulb directly. Plus his kit came with 43mm grommets and Motoholders (D2S type). I am NOT pointing a finger towards Retro Rides, Delhi for these issues/shortcomings that I am facing as they had clearly made me aware prior to my placing an order. They did not have these in stock Full marks to them for giving prior information to the customer to avoid issues arising later (read blame game). MISTAKES + LEARNINGS 1. Butyl Requirement during re-sealing As discussed in the “Re-sealing the headlight” step, one needs to check the areas that need extra butyl layer for an effective and reliable seal. We did a couple of mistakes while at this step. Call it our stupidity or lack of knowledge; it was rectified while working on the rest of the headlights. When the time had come to seal the first headlight, we foolishly pulled out the bead of butyl and directly placed it in the channel. We covered the whole length without any breaks in the bead. It was a royal pain to get the clear lens in place as the extra butyl that we added along with the OE butyl already present inside made a thick layer resisting any form of compression applied to make the tabs and screw holes match. We had to resort to muscle power plus use of C-Clamps to get things done. Nothing cracked or broke, Thank God!! After this mistake, the next headlight onwards it was a breeze. None of the headlights on my car had an extra large amount of butyl added. We resealed them using the OE butyl layer that was present. If my memory serves me right, maybe 2-3 inches of butyl would have been added especially at the corners of the headlight. Learnings from this Mistake: If the headlight that one is working on is from an older car say 3+ years and the butyl looks weak or improper, ONLY then add an extra layer of butyl to the channel else one can use the same to reseal the headlights. Will not be an issue IMHO. This is our learning and conclusion that is NOT to be used as a rule to be followed while doing the re-sealing step. We may be wrong here but that’s what we could infer after working on 4 headlights. What we actually did was, using the heat gun at low power mode along with the help of a flat head screwdriver, we spread the OE butyl layer evenly first so there are no gaps and the butyl is consistent in the whole channel. At this step, inspect the channel again and see if any extra butyl needs to be added. If required add the butyl strip and re-heat the channel to soften the butyl before placing the clear lens in the channel. This saves time and the effort required to get the clear lens in the actual position without damaging anything. The first headlight re-sealing step took us almost 50 minutes whereas the next ones were done in 5-6 minutes flat. 2. Fingerprints/Smudges Q: Where? A: During resealing of the left projector headlight on my car, it wasn’t getting back into the channel as it should have so halfway through, we decided to re-open and push it back so it goes in seamlessly and in this process of opening, one of our fingers got into contact with the projector housing of the left headlamp (at the bottom part) which we realized only after refitting everything back into the car. While going ahead with sealing step, we ensured that the bulb, the clear lens innards and the projector housing were wiped clean with 100% IPA but missed the same when it was reopened for the second time. Bad Luck and an important lesson I’d say! Solution: Will need to re-open the clear lens to clean it. Will do it but say a few months down the line. Time-strapped nowadays so repeating the whole process of pre-heating the oven, baking prying etc will need half a day at least. Last edited by a4anurag : 27th November 2018 at 14:31. |
|
| (20)
Thanks
|
| The following 20 BHPians Thank a4anurag for this useful post: | aaggoswami, akshay81, ashis89, AttyBhai, gauravanekar, graaja, GTO, harsh79, KingCheeese, kunal_kaushal, libranof1987, Reinhard, Rshrey22, sagarpadaki, Silverfire, speedsatya, Tom Sooraj, vaasu, Varun_HexaGuy, yesyeswe |
| |
|
27th November 2018, 01:24
| #12 |
| BANNED Join Date: Oct 2011 Location: Hyderabad
Posts: 12,345
Thanked: 21,452 Times
| Re: DIY Install: Hyundai Creta Bi-Xenon Projectors. Morimoto Mini D2S 4.0 Stage III **POSSIBLE UPGRADES IN THE FUTURE** 1. HID Bulbs Issue: The HID bulbs in the kit are rated at 35W (I presume) with a colour temperature of 5500K. I am not very fond of these ‘white’ looking lights and prefer the 4200 – 4500K range. Sadly I had to settle for these as what I wanted wasn’t in stock. The current one will do the job but not to my satisfaction. Call it my OCD for stuff that I like the way it should have been in the first place. Solution: Morimoto has developed a set of XB HID bulbs that are rated at 50W to work with the XB55 ballasts. These XB50 D2S bulbs are available in 4800K and 5800K colour temperature so I’ll be picking the 4800K. I am not saying the current bulbs are bad or will fail with the 55W ballast, just that I don't like the 5500K temperature. Things that now need to be addressed are:
************ No DIY is complete without acknowledgements to the ones who have helped throughout the DIY, from start to end. This isn't a formality but heartfelt gratitude to them from my side. 1. BHPian Dinesh17: Without him intervening and writing a post on my thread regarding the upgrade, this DIY wouldn’t have seen the light of the day. Thanks a lot for bearing us both for the two days that we spent at your place sipping cups of tea and making a mess of the whole house. All 3 of us were dead logs by the end the DIY, I know. Mess at home  2. BHPian interc00led: An important part of the whole project, be it planning or execution and finesse that you have my friend is a sight to see and to work with. We are of no match to you. Lots to learn from you my friend and a great companion throughout not only for this DIY but anything that we have taken up. I ain't exaggerating buddy, mean it. PS: Hope to work on your car soon. 3. BHPian Sudeepg: The retrofit performed by you and BHPian Jaunthead together is a pinnacle/guidebook to anyone looking at performing such a retrofit. I'll call your retrofit the main igniter in me that made me do the same on my car. Just that I’m sad as I lost a great opportunity to work along with you. Better luck to me next time. Fingers crossed! 4. My Creta: 1,400 kms round trip with no niggles plus returning an overall fuel efficiency of 18.3 kmpl is a happy feeling altogether for me. It just made me fall in love with the car more after this trip. I had written in one of my posts that a Hyundai would never enter my garage (while finding a replacement for my Swift ZDi), but after living with it for 1+ years and 46,000 kms, I am thoroughly happy with the decision made. No regrets whatsoever. Signing off with an image of the two cars that gave us confidence in attempting DIY's of this type that was never done before by any of us and experience to do the same on other cars too, if required.  Thanks for reading guys. Hope you like it. Last edited by Aditya : 28th November 2018 at 07:58. Reason: Typo |
|
| (50)
Thanks
|
| The following 50 BHPians Thank a4anurag for this useful post: | --gKrish--, aaggoswami, Akib Khan, akshay81, ashis89, AttyBhai, BoneCollector, BopsKA12, CarLoverJosh, catchdoon, catchjyoti, CEF_Beasts, dailydriver, deepfreak15, Dennis, F150, frankmehta, gauravanekar, Geo_Ipe, GSMINC, GTO, gururajrv, harsh79, KingCheeese, kunal_kaushal, lemedico, libranof1987, MalluDude, marutifan, MithunSathianat, Mr.Boss, N33raj, narayans80, PraNeel, pritanshchandra, Reinhard, Rshrey22, Safari_Beast, sandx, SddHnt, sharktale, speedsatya, sujithsidhardha, Thermodynamics, vaasu, VaibhaoT, Varun_HexaGuy, white_vdi, yesyeswe, yoscenario2000 |
|
27th November 2018, 14:56
| #13 |
| Team-BHP Support  | Re: DIY Install: Hyundai Creta Bi-Xenon Projectors. Morimoto Mini D2S 4.0 Stage III Mod note: Thread moved to DIY - Do it yourself section. Thanks for sharing. |
|
| (3)
Thanks
|
| The following 3 BHPians Thank Rudra Sen for this useful post: | a4anurag, GTO, kunal_kaushal |
|
27th November 2018, 17:19
| #14 |
| Team-BHP Support Join Date: Sep 2010 Location: All over!
Posts: 8,196
Thanked: 20,625 Times
| Re: DIY Install: Hyundai Creta Bi-Xenon Projectors. Morimoto Mini D2S 4.0 Stage III That is some lighting; should make night drives on the highway very comfortable. Having fitted the XP Micro on my EcoSport, I can't imagine driving with just stock headlights again. There is quite some gap between the car front end and where the light throw starts; is that a comfortable gap? Hope the throw is not blinding for oncoming traffic. While all these lighting solutions are welcome, too many clowns out there who love driving with these on high beam even within city limits. |
|
| (2)
Thanks
|
| The following 2 BHPians Thank libranof1987 for this useful post: | a4anurag, gauravanekar |
|
27th November 2018, 17:25
| #15 | ||
| BANNED Join Date: Oct 2011 Location: Hyderabad
Posts: 12,345
Thanked: 21,452 Times
| Re: DIY Install: Hyundai Creta Bi-Xenon Projectors. Morimoto Mini D2S 4.0 Stage III Quote:
In real life, the headlamps are enough, even the cornering lights are almost masked by these Morimoto's. Quote:
Last edited by a4anurag : 27th November 2018 at 17:32. | ||
|
| (3)
Thanks
|

| The following 3 BHPians Thank a4anurag for this useful post: | aaggoswami, libranof1987, speedsatya |
|