Team-BHP > Technical Stuff > DIY - Do it yourself


Reply
  Search this Thread
16,339 views
Old 23rd December 2021, 20:23   #1
BHPian
 
dr_TJ's Avatar
 
Join Date: Aug 2021
Location: Dibrugarh
Posts: 474
Thanked: 1,080 Times
DIY: Air-con vents replacement in the 2nd-Gen Mahindra Thar

2nd Gen Thar AC Vents Replacement


DIY: Air-con vents replacement in the 2nd-Gen Mahindra Thar-p_20211221_10160301.jpeg

Introduction


The stock AC vents of the Thar happens to be quite fragile. Especially the knob present in the center of the AC vent, which is used to adjust the Air Flow direction. We also need to use this knob to turn the vent anti-clockwise to stop the airflow.
This knob is known to break off easily, as per other Thar owners, although that does not hamper the functionality of the AC vent in any major way.
Also, the black plastic top of the knob falls off.
Infact, the very next day of delivery of my Thar, I discover the glossy black top of the adjustment knob missing

DIY: Air-con vents replacement in the 2nd-Gen Mahindra Thar-20211017_081828.jpg
Picture is from fellow Bhpian Saugat, I had the same problem

I ended up gluing a black plastic part on top of the knob just to make it look ok and prevent any OCD issue.
Meanwhile, I thought of getting my AC vent replaced under warranty at the service center but was not very sure about their quality of work there. Stock AC vent is also available to buy from Boodmo or m2all but mostly out of stock.

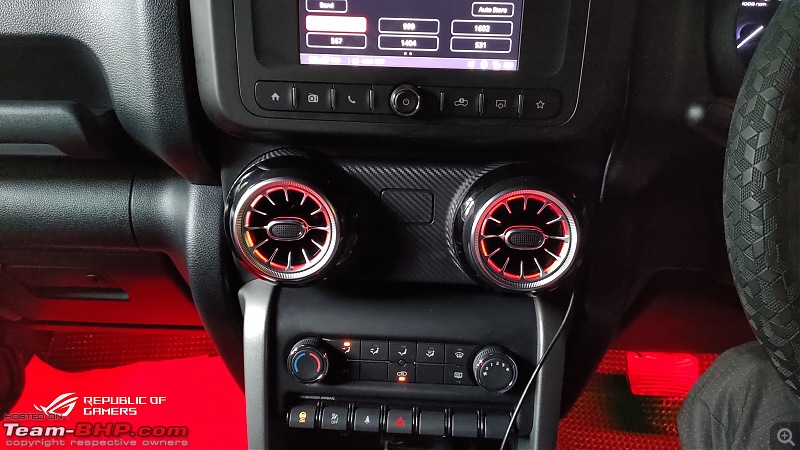
Few days after all this, I came across Mercedes-AMG styled AC vents (In Instagram) being installed on the new Thar, these vents also had App controlled LEDs.
Although I am not a fan of randomly flashing RGB lighting in the car, But a static color is desirable to me.

I finally decided to go for the aftermarket AC vents to replace my stock vents. I searched around the internet for availability of these new vents, mostly sold by the car accessories shop in and around Delhi.
These are also available on Aliexpress but no shipping option.

Installation


Why DIY?

Now comes the hard part. Installation of these vents. I planned for a DIY installation right from the beginning because I generally have a dissatisfied feeling with the aftermarket accessories shop as well as the service center guys' work quality here.
I asked around a few sellers who were selling those vents about the installation procedure.
To which everyone of them replied' "It's easy installation, Plug and Play, buy the vents, we will help you with the installation after you receive the parcel, place the order soon, high demand product"

Got the Vents

So, after lots of research and apprehension, I placed an order for these vents on carplus.in.

DIY: Air-con vents replacement in the 2nd-Gen Mahindra Thar-fb_img_1640623747479.jpg

I received the parcel after a week. I did the unboxing and tested the LEDs for the vents with the 12V output of my 70mai jump starter power bank. The LEDs lit up and this got me excited.
I also checked out the air flow direction adjustment and the air flow control mechanism of the new vents. We can adjust the direction of the air flow easily in any direction by grabbing the center tab. We need to rotate the vents anticlockwise to stop the air flow (Although air leakage is present) and clockwise to open up the vents for full flow. We hear a click when we get to full open or closed position.
Contrary to what the sellers say and I already knew, these vents are not direct plug and play cause we need to get 12V power for the LEDs. And since, I won't be messing with any stock wiring, I decided to use a fuse tap (Thar uses a Mini Low profile fuse).

Meanwhile, I decided to add LED footwell light strips as well to complete the interior lightning ambience. Got footwell light kit from Amazon.
I wanted to add a common switch for LED AC vents and footwell lights. I don't like to have only app or IR Remote controlled on-off functionality.

Yes, my bad, I could have got a whole kit which would work in sync with the LEDs of the vents cause there is the option on the control module of the vents. The one available were very expensive, so skipped it.

Coming to the switch, I decided to use the 12V power adapter of the footwell lights which have a on-off button.

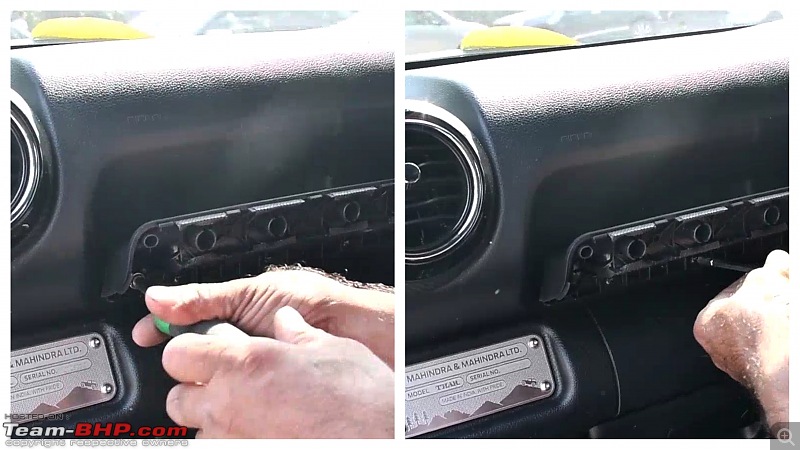
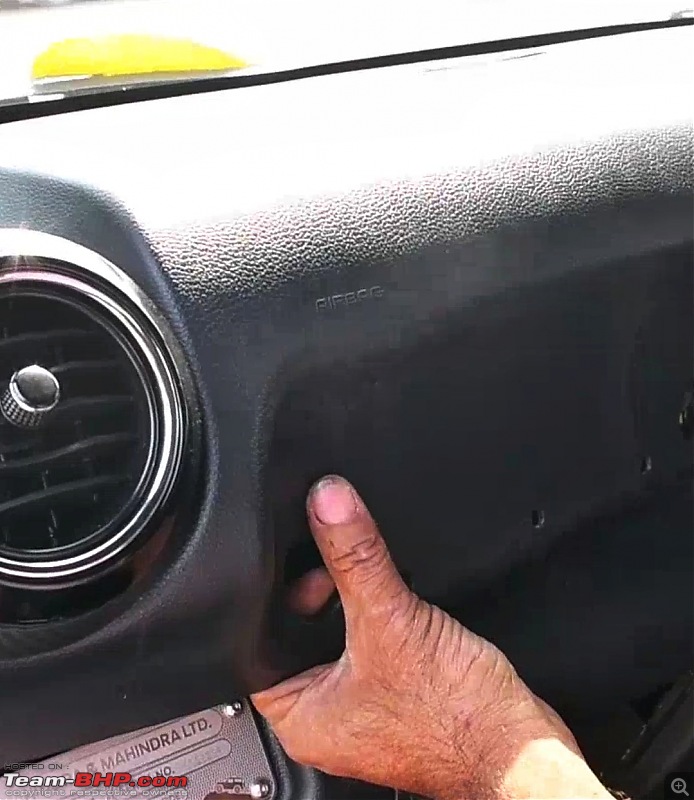
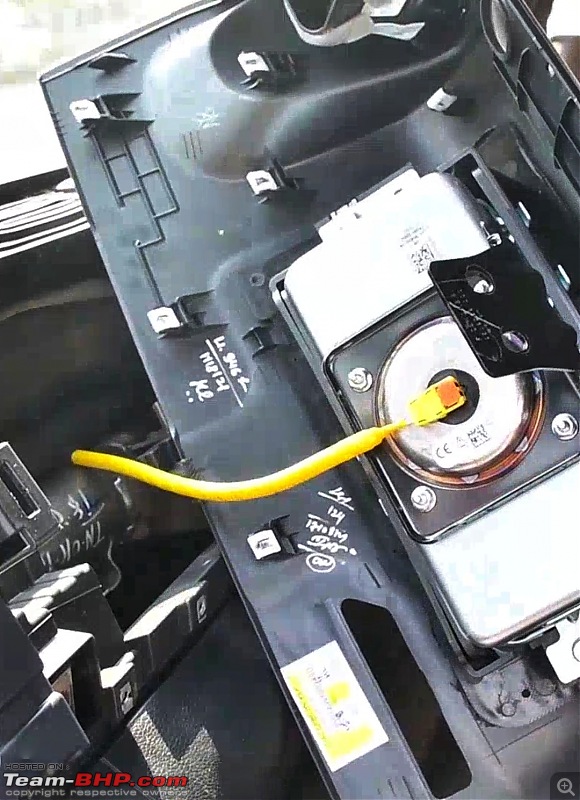
Now, it was all upto the seller to fulfill his promise of help for my DIY installation process. Few pictures shared here are compiled from the seller provided video because I was not able to click pictures of every step of my DIY installation process as I was doing it all alone and was nervous about the outcome.

After a few days, the seller sent me a video of the installation process on a new Thar. I was excited but as I got through the video, I realised, the installation is a bit complex.

The Driver side installation part is fairly simple compared to the Passenger side, where we have to unscrew the Passenger side airbag mount and the Passenger grab handle before we could pull off the trim. The central 2 vents are the easiest of the lot for removal and replacement.

Disclaimer:- If anyone wants to do a DIY installation or replacement of the AC vents of the Thar, Do it at your own risk. Even if getting the installation done from any aftermarket shop or replacement from the service center, Take the decision knowing it might cause damage and make things look worse than before. I shall not be liable for any damage claims. I would highly advise to have the proper armamentarium and DIY skills to attempt this mod. Also, if done in the Aftermarket, make sure to have a close observation during the installation steps, as described in my thread because they might miss to re-fit stuff and very rarely do they use a fusetap. Thank You


Armamentarium


1. Plastic pry tools or trim removal tools
2. Good quality tool kit
3. Mini Low Profile Fuse tap and extra Mini LP fuse, 5A is good enough.
4. Good quality wires
5. Butt connectors (If you don't want to or can't go for soldering) and Crimper
6. Ring terminal connector (Insulated is better) for grounding the circuit
7. Multimeter or 12V tester
8. Insulation tape or Heat shrink insulation tube
9. Zip ties
10. 3M Double sided tape
11. 12V power adapter with on off switch or just any on off switch suitable for car (Just in case if you want to add a switch)
12. Some Cloth gloves or some Nitrile gloves (not a must have, but saves the hands from minor cuts from sharp plastic edges inside the dashboard trims. Don't use powdered surgical gloves as it will leave white powder marks on the interiors.

DIY: Air-con vents replacement in the 2nd-Gen Mahindra Thar-incollage_20211226_173229758.jpg

Let's get started


Driver's Side

So, I decided to start the installation process from the driver's side and kept the Passenger side for the last.
Firstly, we need to remove car door seal beading, and pry out the side trim of the dashboard.

DIY: Air-con vents replacement in the 2nd-Gen Mahindra Thar-p_20211226_101344.jpg

Once removed, we need to remove this screw.
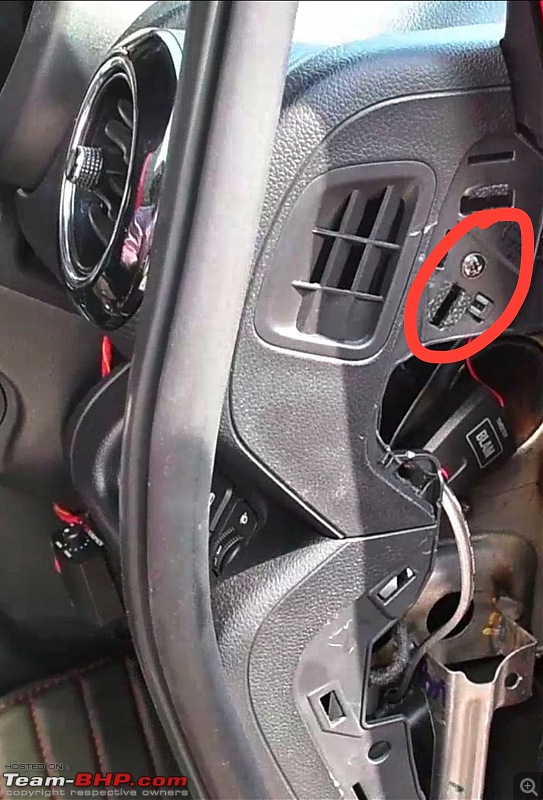
DIY: Air-con vents replacement in the 2nd-Gen Mahindra Thar-164053454821801.jpeg

Now, We need to remove the shroud over the Driver's instrument cluster. I was nervous to open up the dashboard of my new Thar. But, I mustered the courage to start this DIY.
For more accessibility, adjust the steering column to the lowest height with the rake adjustment lever.
Now, we grab the shroud and apply some controlled pulling force, excessive force is not required. The shroud will come off fairly easily. It is held together with few clips, do inspect for any fallen clips.

DIY: Air-con vents replacement in the 2nd-Gen Mahindra Thar-incollage_20211226_214731324.jpg

With the shroud removed. Now, we grab the dashboard trim around the instrument cluster and the extreme right and pull. This time, we do need to apply some more force. And the dashboard trim shall come off from the right side and followed by a slight pull required to separate the trim near the center part.
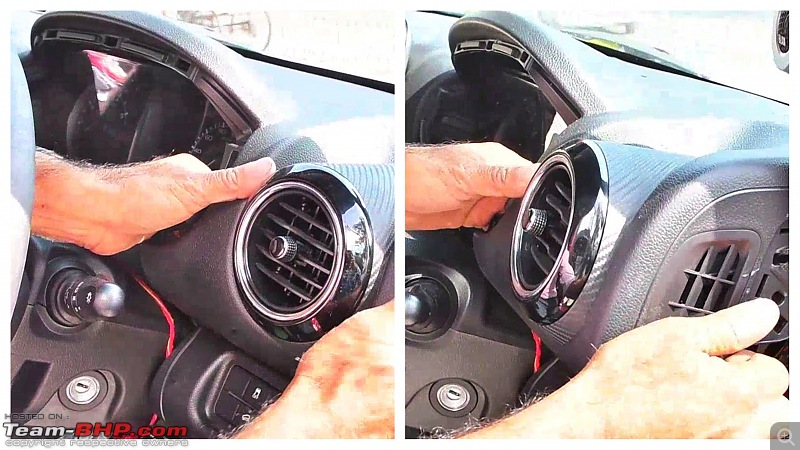
DIY: Air-con vents replacement in the 2nd-Gen Mahindra Thar-incollage_20211226_215221053.jpg

Luckily the Thar has a modular dashboard, the Passenger side and driver side have separate upper trim pieces, and a central piece which houses the HU.

So, now that the right side dashboard trim piece is removed. We need to remove the stock AC vent. AC vent is held in place by two Phillips head screws on either side at positions 8 and 4.
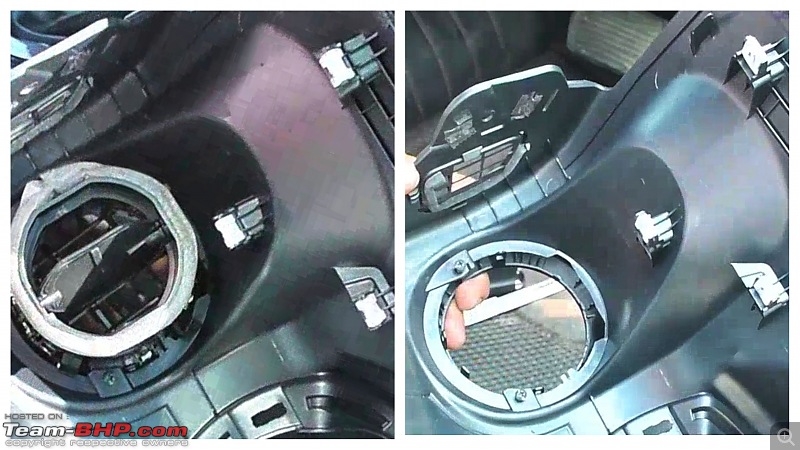
DIY: Air-con vents replacement in the 2nd-Gen Mahindra Thar-incollage_20211227_204122180.jpg

After this, we need to press on a plastic tab which holds the AC vent in place and we push out the AC vent from behind the Dashboard.
We need to retain the piano black circular outer trim for the new AC vent installation.
Few more plastic clips/tabs needs to be pryed to remove the black circular trim.
Once removed, we screw back just the circular trim on to the dashboard by the help of those two phillips head screws.

DIY: Air-con vents replacement in the 2nd-Gen Mahindra Thar-incollage_20211227_213652881.jpg

Now, we can install the new vents but do remember to pass the wiring required for the LED to work.
No sweats here, there is quite a lot of space behind the dashboard panels to route the wiring easily. The control module of the Led should be placed below the dashboard in the Driver's footwell. Wire length provided in the kit is good enough to reach the Passenger side vent easily. Placing the controller in this location will make it easy to get 12V power from the fuse board.

For installation of the new AC vent, we have to look for the "Top" marking on the new vent and align it accordingly so as to get proper vertical and horizontal alignment and we press it in place. No screws are present to hold the new vent in place, so for added retension, I placed few strips of 3M double sided tape and the fitting is firm and tight.
Do route the LED wire and plug it in place before pushing the AC vent in.
Additionally, we can salvage the foam around the stock AC vents and stick it to the new AC vent in order to prevents air leakage around the tubing.

DIY: Air-con vents replacement in the 2nd-Gen Mahindra Thar-incollage_20211227_220440902.jpg

DIY: Air-con vents replacement in the 2nd-Gen Mahindra Thar-p_20211108_122556.jpg

Place the dashboard back in place but don't refit the dashboard back fully. Wait for the final test.

Center Vents

The Center AC vents are the easiest to replace, although it requires some brute prying force for removal. The center two vents are housed inside this carbon fiber patterned trim piece. We need to remove the full trim piece.
Better to use two trim removal tools for added leverage.
Place the pry tool and carefully dig deep and apply some force. The trim piece shall pop out there after.

DIY: Air-con vents replacement in the 2nd-Gen Mahindra Thar-incollage_20211229_094031325.jpg

If applying too much force is a concern, remember , I being the owner of my fairly new Thar, I was very nervous but the aftermarket guys or even the service center guys will be applying a lot more force in a remorse less, brute way. Few BHPians and Thar owners who have got there AC vents replaced will find some marks left on the plastic of the dashboard.
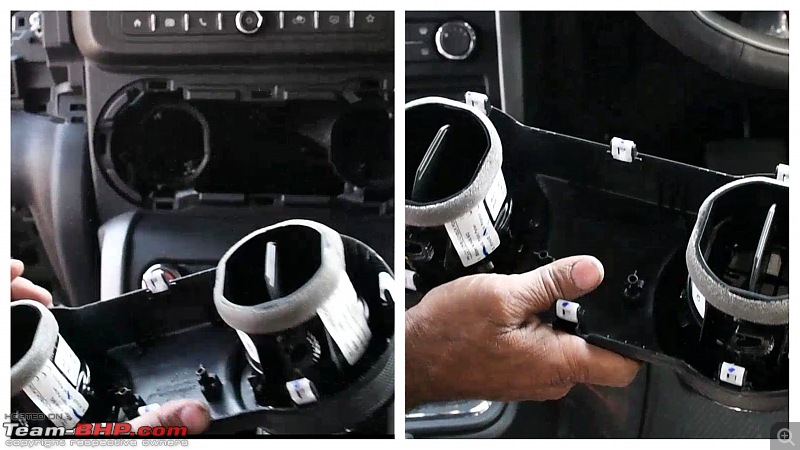
DIY: Air-con vents replacement in the 2nd-Gen Mahindra Thar-incollage_20211228_204823112.jpg

Once removed, follow the similar steps of removing the stock AC vents, unscrew and pry the vent out. Then salvage the circular black outer trim out, screw it back in place. Now, grab your new AC vents, route the wires for the LEDs and connect those. Or, you can just keep the wires ready to connect and leave the trim unattached so that we can do a final test before re-installing the trim piece back.

Last edited by dr_TJ : 2nd January 2022 at 18:56.
dr_TJ is offline   (23) Thanks
Old 24th December 2021, 12:14   #2
BHPian
 
dr_TJ's Avatar
 
Join Date: Aug 2021
Location: Dibrugarh
Posts: 474
Thanked: 1,080 Times
re: DIY: Air-con vents replacement in the 2nd-Gen Mahindra Thar

Passenger Side

Now comes the complex part (Relatively speaking).
So, in order to remove the Passenger side of the dashboard, first few steps are similar to the driver's side. Remove the body rubber beading, pry out the side plastic trim, unscrew the phillips head screw.
Now, we need to remove the Passenger grab handle mounted on the dashboard.
We need to pry out the outer trim of the grab handle.

DIY: Air-con vents replacement in the 2nd-Gen Mahindra Thar-incollage_20211228_205033497.jpg

Once removed, we are welcomed by a total of 5 Phillips head screws.

Once all of these are removed, we need to remove two more M10 Hex bolts which holds the Passenger side airbag.

For this, we need to remove the Tiny glovebox for better accessibility. Its a very easy process, just squeeze the glovebox from either side and pull it out.

Once removed, we find a rectangular space in the plastic trim to access those screws.
You will need socket extension in order to reach those screws. Need to be slow and steady to place the socket over the bolt. Once placed propely, remove the bolts.

DIY: Air-con vents replacement in the 2nd-Gen Mahindra Thar-p_20211228_170622.jpg

DIY: Air-con vents replacement in the 2nd-Gen Mahindra Thar-p_20211228_170545.jpg

DIY: Air-con vents replacement in the 2nd-Gen Mahindra Thar-incollage_20211228_205127939.jpg

Now that the hard part is over, We need to apply force to remove the dashboard trim. Grab from the extreme left and under the plastic at the middle portion and pull hard. Once left side is removed, pull again towards the center part and the dashboard trim shall come off.
Do keep in mind, it has the airbag unit attached, so it is considerably heavy in comparison to the driver's side trim piece. Also wire is attached to the airbag so don't pull too hard.

DIY: Air-con vents replacement in the 2nd-Gen Mahindra Thar-screenshot_20211225210846772_com.mxtech.videoplayer.ad01.jpeg

DIY: Air-con vents replacement in the 2nd-Gen Mahindra Thar-screenshot_20211225210908393_com.mxtech.videoplayer.ad01.jpeg

Now we can either remove the airbag connector and detach the trim completely or just place the dashboard on your lap and complete the AC vent removal and new AC vent installation process.
Do remember to route the LED powering wire. And to plug it to the vent before fitting the dashboard back firmly in place. Same steps of removal of the old and installation of the new as above.
As Chris Fix would say, Out with the old and In with the new

Place the dashboard trim back in place and before Re-fitting, let us do a final test.

Use any 12V power source and check the LEDs. They should light up by now. In case, they don't, do check for any loose connections or damage to the wires.


Powering the LEDs

So, we need to supply 12V power to the LEDs. The AC vent LEDs have a App based bluetooth controller module, we need to supply 12V power to this module.
I choose to use a fuse tap for this purpose. Mini Low profile fuse is used in the Mahindra Thar.

As mentioned earlier, I also installed LED Footwell light strip (which has a 12V power adapter and separate controller module, which has a IR remote and IR signal receiver)

DIY: Air-con vents replacement in the 2nd-Gen Mahindra Thar-screenshot_20211226163328195-1.jpg

I decided to supply 12V power from a fuse tap to the positive end of the 12V adapter and negative of the 12v adapter will be connected to ground with any metal surface of the car. Luckily there is a screw present and I used it for Ground.

DIY: Air-con vents replacement in the 2nd-Gen Mahindra Thar-p_20211226_102502.jpg
Ring terminal connector is used to connect the ground of the circuit to this screw in the driver side footwell


I did solder the positive wire from the fuse tap to the 12V adapter positive wire. 12V adapter had a 5A tube fuse but I did not need that because my fuse tap already has a fuse for this new circuit.
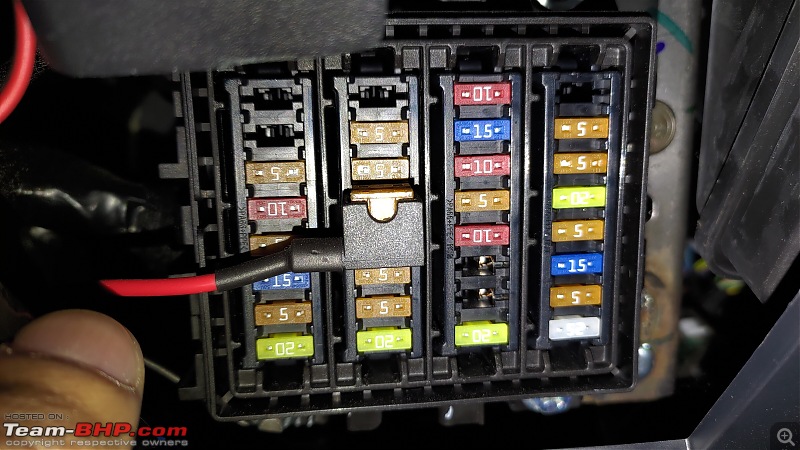
As for the fuse tap, it has slots for two fuses. The one nearer to the connector which plugs in to the fuse board is the slot which will act as the stock fuse, the one which we have used to tap power. And the other slot is for the fuse of the new circuit. I used a 5A fuse for the new circuit.
We also need to determine the flow of current in the fuse board. And place the output of the fuse tap accordingly. We need a 12V tester or Multimeter for this.

DIY: Air-con vents replacement in the 2nd-Gen Mahindra Thar-p_20211226_101610.jpg
Lower Driver side Dashboard panel removed to access the Fuse box

DIY: Air-con vents replacement in the 2nd-Gen Mahindra Thar-p_20211226_101633.jpg
Fuse Tap installed

Just in case, you don't plan to add any On-Off switch or any Footwell lights, all you need to do is connected the LED controller module's positive to the wire of the fuse tap and negative to a grounding source.
Or if you need just the on-off switch, you can source a 12V power adapter with on-off switch or a plain car switch and connect to the positive wire to act as a switch and mount the switch in a good place.

DIY: Air-con vents replacement in the 2nd-Gen Mahindra Thar-p_20211226_101650.jpg
DIY: Air-con vents replacement in the 2nd-Gen Mahindra Thar-p_20211226_101706.jpg
DIY: Air-con vents replacement in the 2nd-Gen Mahindra Thar-p_20211226_101749.jpg
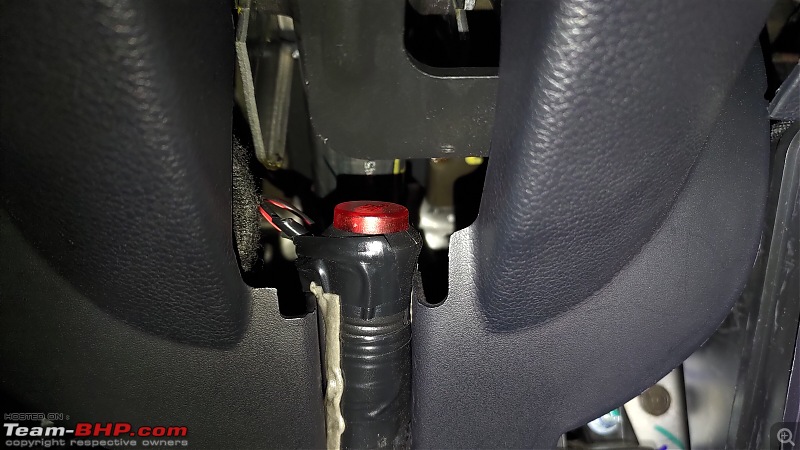
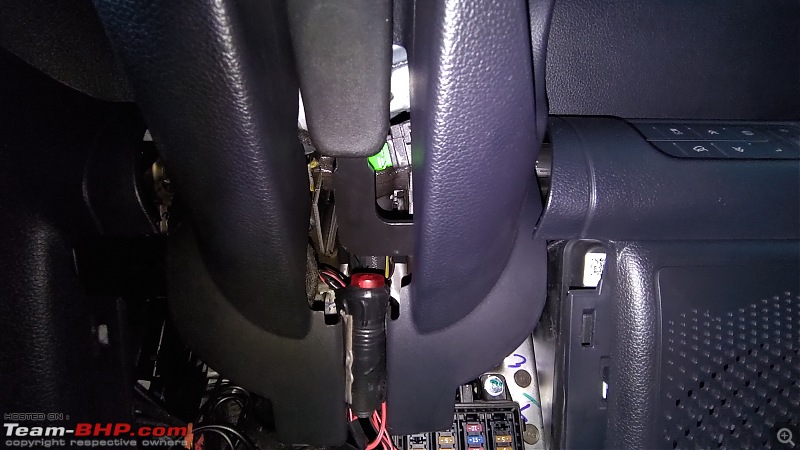
I placed my switch in here. I liked the placement cause it is relatively hidden and no ugly aftermarket switch is needed to be drilled in place

For the footwell led strips, it is an easy process, just route the wires and use the 3M adhesive behind the strips to attach it to the desired locations.
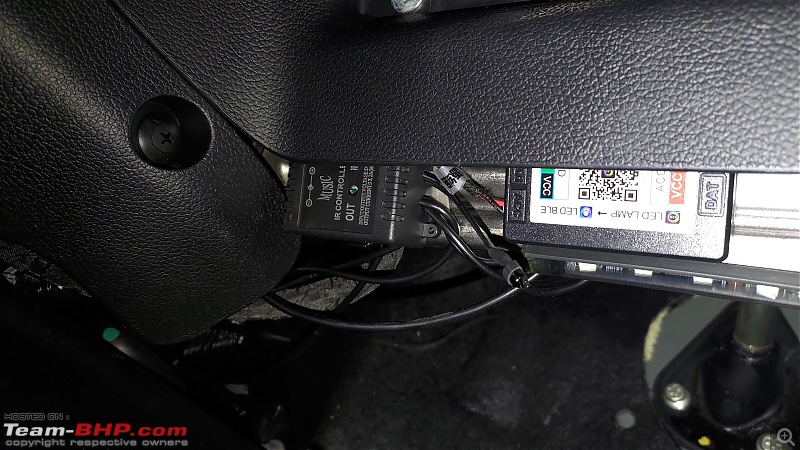
I placed both the controller modules below the dashboard trim in my driver's side footwell.

DIY: Air-con vents replacement in the 2nd-Gen Mahindra Thar-p_20211226_101926.jpg
On the left we have the controller module with IR receiver of the footwell LED Strips and on the right, we have the controller module of the LED AC vents

Once the wiring connections and routing is complete, we do one final test. If its all good, its now time to re-fit the dashboard trims back in place.

Last edited by dr_TJ : 31st December 2021 at 10:08.
dr_TJ is offline   (16) Thanks
Old 29th December 2021, 11:52   #3
BHPian
 
dr_TJ's Avatar
 
Join Date: Aug 2021
Location: Dibrugarh
Posts: 474
Thanked: 1,080 Times
re: DIY: Air-con vents replacement in the 2nd-Gen Mahindra Thar

Re-fitting

Once all systems check is complete. We can go ahead with the re-fitting. Re-fitting wise, center vents are the easiest of all. Line up the trim tabs and push it firmly back in place. We will hear a reassuring click when the clips lock back in place.

Its a bit tricky to get the trim clips or tabs lock back in place properly for the Right and left Dashboard trims. So advise will be to line up the tabs on the center part first, bang it back to place, followed by the outer part of the dashboard trim.
For reference, we need the dashboard trim to properly interlock with the central dashboard trim plus properly fall in place around the windshield defogging vents.
This final step was the most complex for me.

DIY: Air-con vents replacement in the 2nd-Gen Mahindra Thar-p_20211226_102708.jpg

DIY: Air-con vents replacement in the 2nd-Gen Mahindra Thar-p_20211226_102736.jpg

It is really tricky to get just the right alignment of the clips and lock them in place. Took me some repeated attempts and finally, it was back in place.
I was really very happy with the DIY installation outcome. And having driven 1000+ kms after the installation, I can happily report of no rattles from the dashboard or any niggles from the LED vents or the footwell lights.

It took me a whole day to get the installation done.
But if I need to do the same DIY on any other Thar, I would be able to complete the installation much quicker.

Summary

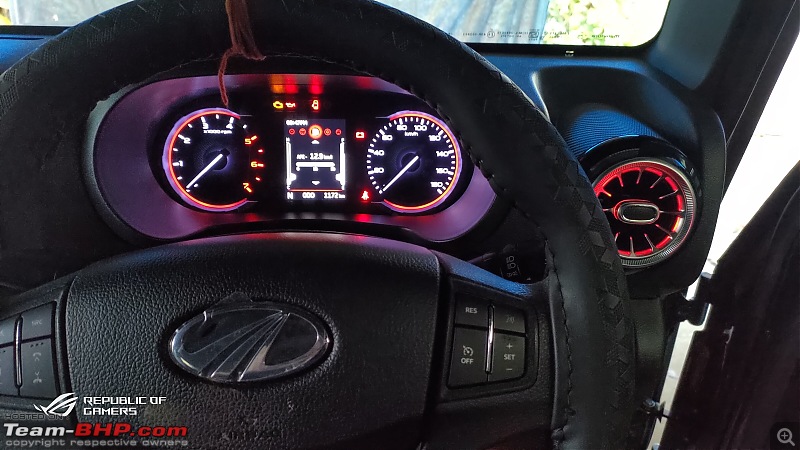
Nothing is more satisfactory like a successful DIY on my new car. The vents with the red LED lights (I mostly keep the color constant at Red) and footwell light matches with the red accents on instrument cluster.
Cost of the LED AC vents was Rs 15000, Fuse tap was Rs 25 (Bought a couple of fuse taps from Aliexpress few years ago), LED Footwell lights was Rs 360 (Bought from Amazon).
Stanley Tool kit was Rs 2000. And few miscellaneous items were required.

If anyone is interested in doing this DIY on their Thar, can surely PM me here.

DIY: Air-con vents replacement in the 2nd-Gen Mahindra Thar-p_20211111_154721.jpg

DIY: Air-con vents replacement in the 2nd-Gen Mahindra Thar-p_20211111_154728.jpg

Name:  YouCut_20211112_185526025.gif
Views: 1243
Size:  1,006.9 KB

Hope you guys like this DIY

Last edited by dr_TJ : 31st December 2021 at 10:14.
dr_TJ is offline   (43) Thanks
Old 3rd January 2022, 04:56   #4
Team-BHP Support
 
Join Date: Feb 2004
Location: Mumbai
Posts: 17,801
Thanked: 76,765 Times
re: DIY: Air-con vents replacement in the 2nd-Gen Mahindra Thar

Thread moved out from the Assembly Line. Thanks for sharing!
Aditya is online now   (3) Thanks
Old 3rd January 2022, 10:02   #5
BHPian
 
Prakritij's Avatar
 
Join Date: Aug 2018
Location: Dibrugarh
Posts: 140
Thanked: 307 Times
Re: DIY: Air-con vents replacement in the 2nd-Gen Mahindra Thar

Great thread. Will definitely help Thar owners with broken knobs or those who want to upgrade the vents. Even if one is scared to DIY the process on their new cars, he/she can get it done outside with the help of this thread.
Prakritij is offline   (3) Thanks
Old 3rd January 2022, 10:59   #6
BHPian
 
dr_TJ's Avatar
 
Join Date: Aug 2021
Location: Dibrugarh
Posts: 474
Thanked: 1,080 Times
Re: DIY: Air-con vents replacement in the 2nd-Gen Mahindra Thar

Quote:
Originally Posted by Prakritij View Post
Great thread. Will definitely help Thar owners with broken knobs or those who want to upgrade the vents. Even if one is scared to DIY the process on their new cars, he/she can get it done outside with the help of this thread.
Considering the reckless nature of few aftermarket accessories installers, knowing the process is important. I never had a pleasant experience with the aftermarket installers. Few owners would be shocked to see what and how their accessories were installed in their car.
dr_TJ is offline   (2) Thanks
Old 3rd January 2022, 11:44   #7
Newbie
 
jehangir's Avatar
 
Join Date: Apr 2010
Location: Bombay~
Posts: 14
Thanked: 5 Times
Re: DIY: Air-con vents replacement in the 2nd-Gen Mahindra Thar

Nice post!
I wonder if this wold fit on the swift?
jehangir is offline   (1) Thanks
Old 3rd January 2022, 12:07   #8
BHPian
 
dr_TJ's Avatar
 
Join Date: Aug 2021
Location: Dibrugarh
Posts: 474
Thanked: 1,080 Times
Re: DIY: Air-con vents replacement in the 2nd-Gen Mahindra Thar

Quote:
Originally Posted by jehangir View Post
Nice post!
I wonder if this wold fit on the swift?
We will need the measurements of the Swift's AC vent and also the procedure to remove the stock AC vent.
dr_TJ is offline  
Old 3rd January 2022, 19:42   #9
BHPian
 
batish's Avatar
 
Join Date: Jan 2017
Location: -
Posts: 822
Thanked: 2,367 Times
Re: DIY: Air-con vents replacement in the 2nd-Gen Mahindra Thar

Great DIY sir! Although the price of vents seems a little steep but the look they give does cover that up.

Can you please post a gif after changing the lights to white?

Also, can any switch be installed near the hazard light switch? I see three blanks there. A push switch like hazard one with different symbol would look completely OEM there.
batish is offline   (2) Thanks
Old 3rd January 2022, 19:51   #10
BHPian
 
dr_TJ's Avatar
 
Join Date: Aug 2021
Location: Dibrugarh
Posts: 474
Thanked: 1,080 Times
Re: DIY: Air-con vents replacement in the 2nd-Gen Mahindra Thar

Quote:
Originally Posted by batish View Post
Great DIY sir! Although the price of vents seems a little steep but the look they give does cover that up.

Can you please post a gif after changing the lights to white?

Also, can any switch be installed near the hazard light switch? I see three blanks there. A push switch like hazard one with different symbol would look completely OEM there.
Sure, I will share a gif with LEDs in white.
Well, I could not find any OEM switch which I can replace the blank switches near the Hazard light switch. OEM switch would have been a great option.

With no Aliexpress now, these items are expensive here. Lowest price I heard of these vents were Rs 12000.

Last edited by dr_TJ : 3rd January 2022 at 19:53.
dr_TJ is offline   (1) Thanks
Old 3rd January 2022, 21:59   #11
BHPian
 
Join Date: Feb 2021
Location: Nahan (HP)
Posts: 294
Thanked: 401 Times
Re: DIY: Air-con vents replacement in the 2nd-Gen Mahindra Thar

Its an amazing mod, one that is aesthetic and functional too, I wonder how can there be such a bad quality issue from Mahindra. Hats-off to you for sharing the steps and doing it with a brand new car but the price is a bit steep. Is the build quality of these vents superior to what you get from Mahindra or can they be compared to what you would get in the expensive cars like Mercedez.
swunkjyn is offline   (1) Thanks
Old 3rd January 2022, 22:41   #12
BHPian
 
dr_TJ's Avatar
 
Join Date: Aug 2021
Location: Dibrugarh
Posts: 474
Thanked: 1,080 Times
Re: DIY: Air-con vents replacement in the 2nd-Gen Mahindra Thar

Quote:
Originally Posted by swunkjyn View Post
Its an amazing mod, one that is aesthetic and functional too, I wonder how can there be such a bad quality issue from Mahindra. Hats-off to you for sharing the steps and doing it with a brand new car but the price is a bit steep. Is the build quality of these vents superior to what you get from Mahindra or can they be compared to what you would get in the expensive cars like Mercedes.
Mahindra should have implemented a simpler AC vent design with less chances of any breakage, the stock vent is too complex and flimsy.

The aftermarket vents is more or less same or slightly better in quality compared to the stock vents, but atleast the aftermarket ones have less fragile moving parts. I found the aftermarket vents better in terms of build quality but air flow direction control is not as precise as the stock vents. But still, we have to be careful not to be too harsh with the new aftermarket vents as well.
I would have preferred a simple Maruti Suzuki Swift like circular vents which is very much adjustable for directions and easily opened and closed. I was used to those easy circular Maruti Suzuki vents on my Celerio.

I guess the real Mercedes ones are made of aluminum. Even if not made of metal, they are way superior to any Indian manufacturers vents.

As for the price, a set of 4 vents should be at most priced at Rs 8-9K. Aliexpress (also available Audi like circular vents) has them listed at lower prices but no shipping option like before. This is where the sellers in India are happily selling these vents for a premium especially for a lifestyle vehicle like Thar.

Last edited by dr_TJ : 3rd January 2022 at 22:48.
dr_TJ is offline   (2) Thanks
Old 3rd January 2022, 23:16   #13
BHPian
 
LONG_TOURER's Avatar
 
Join Date: Feb 2021
Location: CCU/GAU
Posts: 113
Thanked: 957 Times
Re: DIY: Air-con vents replacement in the 2nd-Gen Mahindra Thar

Waiting to see this Thar in person. Awesome mods. Keep the thread updated if you happen to do some crazy DIY like this one ��. I am yet to see another Thar with such interior mods.
LONG_TOURER is offline   (1) Thanks
Old 4th January 2022, 01:35   #14
BHPian
 
Join Date: Feb 2021
Location: Nahan (HP)
Posts: 294
Thanked: 401 Times
Re: DIY: Air-con vents replacement in the 2nd-Gen Mahindra Thar

Quote:
Originally Posted by dr_TJ View Post
Mahindra should have implemented a simpler AC vent design with less chances of any breakage, the stock vent is too complex and flimsy.

As for the price, a set of 4 vents should be at most priced at Rs 8-9K. Aliexpress (also available Audi like circular vents) has them listed at lower prices but no shipping option like before. This is where the sellers in India are happily selling these vents for a premium especially for a lifestyle vehicle like Thar.
Thar is selling like Hot-cakes right now and so are its after-market accessories. I have booked one myself and it like counting drops in an ocean if I were to compare the wait. I agree with you, with there were no restrictions to imports goods from Alibaba/Aliexpress or Bangood, this would have been under 10k easily but I really like the upgrade.
Plus your thread also gives me a head-up on not to fiddle with the AC Vents that much.
swunkjyn is offline   (1) Thanks
Old 4th January 2022, 08:52   #15
BHPian
 
dr_TJ's Avatar
 
Join Date: Aug 2021
Location: Dibrugarh
Posts: 474
Thanked: 1,080 Times
Re: DIY: Air-con vents replacement in the 2nd-Gen Mahindra Thar

Quote:
Originally Posted by LONG_TOURER View Post
Waiting to see this Thar in person. Awesome mods. Keep the thread updated if you happen to do some crazy DIY like this one ��. I am yet to see another Thar with such interior mods.
Thanks for your appreciation.
Will surely keep my ownership thread updated
dr_TJ is offline   (1) Thanks
Reply

Most Viewed
Thread Tools Search this Thread
Search this Thread:

Advanced Search

Copyright ©2000 - 2024, Team-BHP.com
Proudly powered by E2E Networks