Team-BHP > Shifting gears > Gadgets, Computers & Software
Register New Topics New Posts Top Thanked Team-BHP FAQ


Reply
  Search this Thread
42,353 views
Old 13th June 2020, 03:36   #61
Senior - BHPian
 
Mortis's Avatar
 
Join Date: Mar 2011
Location: Mumbai
Posts: 1,322
Thanked: 1,402 Times
Re: DIY: Laptop hardware upgrades

Is it possible to clone only the partition of the HDD with the Windows installation on it to a new SSD and then swap it, using the old HDD in place of the DVD drive (after formatting the old C drive) ?

Want to breathe dome new life into an older laptop which has a 500gb HDD of which windows is on a 100gb partition. This way it would be enough for me to get just a 120gb or 240GB SSD instead of a 500GB one, saving some cash for a RAM upgrade.

BTW any source for 8GB DDR3L sticks ? Can't seem to find them
Mortis is offline  
Old 17th June 2020, 17:32   #62
Tgo
Senior - BHPian
 
Tgo's Avatar
 
Join Date: Apr 2011
Location: Calgary|Jaipur
Posts: 1,289
Thanked: 3,789 Times
Re: DIY: Laptop hardware upgrades

Quote:
Originally Posted by Mortis View Post
Is it possible to clone only the partition of the HDD with the Windows installation on it to a new SSD and then swap it, using the old HDD in place of the DVD drive (after formatting the old C drive) ?

Yes, it is possible. You can choose the partition you want to copy and the software will do just that.

I bought my RAM from amazon and didn't think too much about the price. Just went with the seller offering an exact match to the already existing 4GB module in my laptop to put in the empty slot.
Tgo is offline   (1) Thanks
Old 18th June 2020, 01:32   #63
Senior - BHPian
 
Mortis's Avatar
 
Join Date: Mar 2011
Location: Mumbai
Posts: 1,322
Thanked: 1,402 Times
Re: DIY: Laptop hardware upgrades

Quote:
Originally Posted by Tgo View Post
Yes, it is possible. You can choose the partition you want to copy and the software will do just that.

I bought my RAM from amazon and didn't think too much about the price. Just went with the seller offering an exact match to the already existing 4GB module in my laptop to put in the empty slot.
Thanks for the info. I'll just clone the Windows partition then onto a smaller SSD to get a bit of a boost.
Do you have any advice on upgrading the screen to a better quality one too ?
Mortis is offline  
Old 6th July 2020, 12:21   #64
Tgo
Senior - BHPian
 
Tgo's Avatar
 
Join Date: Apr 2011
Location: Calgary|Jaipur
Posts: 1,289
Thanked: 3,789 Times
Re: DIY: Laptop hardware upgrades

Quote:
Originally Posted by Mortis View Post
Do you have any advice on upgrading the screen to a better quality one too ?
Related thread, however, no recommendations from my side.
Tgo is offline  
Old 6th July 2020, 15:22   #65
Senior - BHPian
 
Join Date: Nov 2009
Location: Bengaluru
Posts: 1,003
Thanked: 634 Times
Re: DIY: Laptop hardware upgrades

Quote:
Originally Posted by Mortis View Post
Thanks for the info. I'll just clone the Windows partition then onto a smaller SSD to get a bit of a boost.
Do you have any advice on upgrading the screen to a better quality one too ?
I think if you have Windows licensed laptop without key, you can install a fresh windows in SSD, then if you choose, i don't have the key option while installing, it will detect the machine details and install, provided you install same version of Windows you had installed in HDD. This is what i read in forum, as new windows installation will be faster than copying image and moving to new SSD, unless you really want to old windows set-up in your SSD also.
shamanth is offline   (1) Thanks
Old 6th July 2020, 17:20   #66
BHPian
 
Join Date: Sep 2014
Location: Jalandhar
Posts: 270
Thanked: 382 Times
Re: DIY: Laptop hardware upgrades

Quote:
Originally Posted by Mortis View Post
Do you have any advice on upgrading the screen to a better quality one too ?
Quote:
Originally Posted by Tgo View Post
Related thread, however, no recommendations from my side.
Unless we are talking about external monitor being hooked with existing laptop, i am yet to see a DIY for screen "upgrade". However if it is regarding screen replacement with same part then its a different ball game.
roamer012 is offline  
Old 6th July 2020, 19:34   #67
BANNED
 
Join Date: Mar 2010
Location: Hyderabad
Posts: 491
Thanked: 589 Times
Re: DIY: Laptop hardware upgrades

So I did hardware upgrade in my laptop last weekend. It is a 5 years old HP Pavilion 15 p077tx.

Upgrades done till now
  • Replaced HDD to SSD: Got Samsung 860 QVO 1TB. I read a lot about copying HDD contents to SSD and all (had bought sata to usb adapter for getting SSD transferring the data). But finally just went with
    a fresh install with latest windows 10 media creation tool. The activation was automatic and I didn't have to do any manual windows key entry etc. It originally had windows 8 and was upgraded to windows 10 as part of Microsoft free upgrade.
  • Wifi The current internal wifi card is broadcom mini pcie 2.4ghz card. Terrible card and really terribly slow speed. Went ahead with external USB wifi card (TP-Link T3U). Was looking for internal wifi card but couldn't find anything online that has AC compatibility and prices look inflated for some which are available.
Pending Upgrades
  • Installing HDD in CD Caddy: Had ordered the 9.5 mm caddy already. But they sent 12mm ones. A little work for upcoming weekend and this should be done hopefully.
  • Battery Current battery has died from last 2 years may be and major reason could be that I had put this laptop plugged in with TV and it has been always powered. It serves as multimedia purpose (Browsing/shopping/movies/gaming etc). So thinking of buying a new battery for occasional portability reasons.
  • RAM: Thinking of adding 8 GB of additional RAM. May be will wait for 1-2 more months and will go with upgrade if I feel like I need some more RAM for some random video/photo editing needs.
Observation with HP Pavilion. One of the most difficult laptop to disassemble. Involves removing tons of screws from back and removing the whole keyboard (uni- body design and hence back doesn't come off). Cable connectors have flimsy feel after opening and require a lot of care.

Last edited by ottocycle : 6th July 2020 at 19:38.
ottocycle is offline   (2) Thanks
Old 6th July 2020, 21:55   #68
Senior - BHPian
 
Sebring's Avatar
 
Join Date: Apr 2011
Location: Dubai/Bengaluru
Posts: 3,590
Thanked: 11,095 Times
Re: DIY: Laptop hardware upgrades

Go for 8 GB RAM. I had this HP Envy sleek laptop with Beats audio. Put in the SSD (512 GB, original HP) and 8 GB RAM. Fresh install of Windows, and the Laptop flies.
Quote:
Originally Posted by ottocycle View Post
RAM: Thinking of adding 8 GB of additional RAM. May be will wait for 1-2 more months and will go with upgrade if I feel like I need some more RAM for some random video/photo editing needs. Observation with HP Pavilion. One of the most difficult laptop to disassemble. Involves removing tons of screws from back and removing the whole keyboard (uni- body design and hence back doesn't come off). Cable connectors have flimsy feel after opening and require a lot of care.
Sebring is offline  
Old 6th July 2020, 23:23   #69
BANNED
 
Join Date: Mar 2010
Location: Hyderabad
Posts: 491
Thanked: 589 Times
Re: DIY: Laptop hardware upgrades

Quote:
Originally Posted by Sebring View Post
Go for 8 GB RAM. I had this HP Envy sleek laptop with Beats audio. Put in the SSD (512 GB, original HP) and 8 GB RAM. Fresh install of Windows, and the Laptop flies.
The laptop already has 8 GB RAM. I am thinking of 8 GB of additional (total 16 GB) RAM. Before I take the plunge, just want to observe how the current upgrades are doing. Also, will have to check if the motherboard supports 16 GB.
ottocycle is offline  
Old 7th July 2020, 10:31   #70
Senior - BHPian
 
Sebring's Avatar
 
Join Date: Apr 2011
Location: Dubai/Bengaluru
Posts: 3,590
Thanked: 11,095 Times
Re: DIY: Laptop hardware upgrades

I think this particular model goes up to 12GB
Quote:
Originally Posted by ottocycle View Post
Also, will have to check if the motherboard supports 16 GB.
Sebring is offline   (1) Thanks
Old 7th July 2020, 12:03   #71
BANNED
 
Join Date: Mar 2010
Location: Hyderabad
Posts: 491
Thanked: 589 Times
Re: DIY: Laptop hardware upgrades

Quote:
Originally Posted by Sebring View Post
I think this particular model goes up to 12GB
That is a bummer then. 4GB+8GB combination will feel weird and the laptop might work in single channel mode.
ottocycle is offline   (1) Thanks
Old 14th July 2020, 18:34   #72
Senior - BHPian
 
Join Date: Nov 2009
Location: Bengaluru
Posts: 1,003
Thanked: 634 Times

So finally jumped the gun and upgraded my Super slow Lenovo laptop, earlier every operation used to take 1-2 mins to open, Hard disk performance was showing 100% always. So thought it's time to move to SSD and see if it works.

Ordered Crucial SSD(Most popular) in Amazon for around ₹3000 and also ordered a 4GB RAM in Flipkart, since it came with 4 GB, and had empty slot and supports up to 16 GB upgrade. Since 4 GB DDR3 was around ₹1500 and 8 GB around ₹4000, decided to go for 4 +4 GB upgrade. Might has costed less in electronic markets like SP road but not worth due to covid issues.

First the SSD came, Removed HDD and replaced with SSD, it was a perfect fit, booted with windows 10 Bootable installer, Installed Win10, did not ask for any keys as this laptop had come with pre-installed windows I guess. Once the installation was done i could see the difference in speed, it was lightning fast, win 10 was Bootable in seconds. Also upgraded the RAM to 8 GB later with additional 4 GB, so the laptop which was laying wasted is back to life and fast.
Attached Thumbnails
DIY: Laptop hardware upgrades-1594729751312.jpg  

DIY: Laptop hardware upgrades-1594729766504.jpg  


Last edited by shamanth : 14th July 2020 at 18:36.
shamanth is offline   (3) Thanks
Old 26th July 2020, 01:17   #73
Tgo
Senior - BHPian
 
Tgo's Avatar
 
Join Date: Apr 2011
Location: Calgary|Jaipur
Posts: 1,289
Thanked: 3,789 Times
Re: DIY: Laptop hardware upgrades

Ant Attack - No Upgrades - Only Jugaad this time.

I have a Thinkpad E440 for the last 5 years, the same one in the opening post of this thread. It had been working well all this while. In the beginning of May, we had a severe ant infestation in our house. The ants didn't spare the laptop either. Since the laptop was being used only for streaming video to the TV, it seemed like it was functioning well. Only recently did I realize that the ants would follow it anywhere I tool it (in my bag, on the bed) and randomly after a day or two I would find some ants crawling out from within the keyboard. It was time to give it a good look.

DIY: Laptop hardware upgrades-img7031.jpg
Opened the shell and removed the components to see everything better. I wanted to see if they had built a nest inside

DIY: Laptop hardware upgrades-img7032.jpg
The first casualty were the two speaker mount rings. These rubber rings were chewed away slowly and the dust you see is minced rubber from these rings.
Didn't find a nest but had to clear out at least 10-15 dead ants from the nooks and crannies of the chassis. Gave it a thorough cleaning with a brush and a blower with hopes that this would solve the keys that were misbehaving. Put everything back together, new paste on the processor and all. I should have been thorough with my cleaning, since the keys were still not functioning. A second attempt at it was required. This time I focussed on the keyboard.


DIY: Laptop hardware upgrades-img7119.jpg
At first I removed the key-faces thinking I would find something lodged under them which is preventing a full press. However the full press mechanism felt normal and even on removing the key hinges (for delete) everything seemed normal.

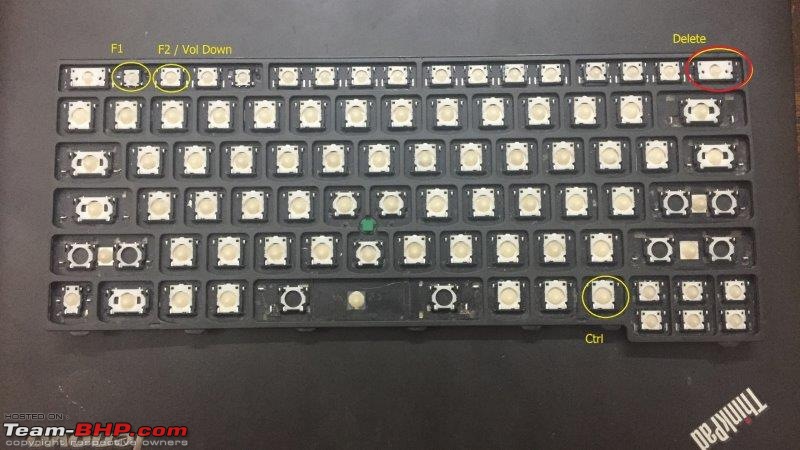
DIY: Laptop hardware upgrades-img7120.jpg
It wasn't even remotely so. The rubber cups had similarly chewed out rubber. The cuttings were found to be strewn around them and in a few even inside them. I suspected that the cuttings might be preventing the circuit on the board from closing and registering a key-press. Took all the key-faces off and patiently tried to shake up each rubber cup while blasting it with air from a blower to remove any stray cuttings. Half an hour later, I had cleaned up the keyboard as much as possible without stepping up the game and using solvents.

Did a test run without the key-faces and every key was working. Installed the key faces back in excitement and found that the "Delete" key stopped working. I removed the key-face and pressed the rubber cup and it was working. It turned out, that the rubber on the cup was not sufficiently high enough anymore so that the normal key travel would push it against the electronic circuit.

DIY: Laptop hardware upgrades-img7128.jpg
I put together a jugaad to raise the thickness of the key in the middle where it would rest against the rubber cup. A simple dimple made by a drop of quick-fix at first which wasn't quite enough. Backed it up with a tiny paper ball and the key now works fine.
At the back of my mind I had already made up my mind to get a replacement keyboard for the laptop. Was deciding between a wireless one or an OEM replacement from Aliexpress which were in the range of 2.5-3.5 thousand rupees. Quite happy with my ingenuity in tackling the problem.

The laptop lives on into the 6th year of ownership. It now accompanies a newer Thinkpad E14 (which I couldn't resist opening even though it was a week old) since the screw-driver kit was begging to me to put it to use. Have noted the hardware required for upgrade, it will only be the RAM for now.
Tgo is offline   (15) Thanks
Old 2nd August 2020, 23:39   #74
BHPian
 
Hammer & Anvil's Avatar
 
Join Date: Feb 2008
Location: Mumbai
Posts: 377
Thanked: 1,199 Times
Re: DIY: Laptop hardware upgrades

1. Mix carrom boric powder with rosogolla syrup and make balls and leave in path of ants.
2. make only as many balls you need to make.
3. throw out old balls after a week, and replace with freshly made ones...

Best remedy for ants and cockroaches.
Hammer & Anvil is offline   (2) Thanks
Old 3rd August 2020, 07:20   #75
BHPian
 
rahulskumar's Avatar
 
Join Date: Apr 2016
Location: All Over
Posts: 373
Thanked: 686 Times
Re: DIY: Laptop hardware upgrades

Quote:
Originally Posted by Hammer & Anvil View Post
1. Mix carrom boric powder with rosogolla syrup and make balls and leave in path of ants.
2. make only as many balls you need to make.
3. throw out old balls after a week, and replace with freshly made ones...

Best remedy for ants and cockroaches.
One can even use powdered sugar with ghee along with boric and follow the steps mentioned by Anvil. The ants take the bait back to their nest and usually complete nest is destroyed. This is better than using Hit or Baygon that kill the ants confined to where we spray, make sure kids are not around and keep the bait high around the window or door frames.
rahulskumar is offline   (1) Thanks
Reply

Most Viewed


Copyright ©2000 - 2024, Team-BHP.com
Proudly powered by E2E Networks