Team-BHP > Motorbikes
Register New Topics New Posts Top Thanked Team-BHP FAQ


Reply
  Search this Thread
68,349 views
Old 11th April 2010, 09:56   #1
Senior - BHPian
 
Gordon's Avatar
 
Join Date: Feb 2004
Location: Mumbai
Posts: 2,549
Thanked: 496 Times
DIY Service: Royal Enfield

Is anyone of you going to service your Royal Enfield yourself or by a mechanic? It'd be great if one could post detailed pictures of the procedures. Please post the following details:

Model: (Standard / Electra / Machismo / Thunderbird / 535)
Engine: (Cast Iron / AVL / UCE)
Gearbox Type: (4speed / 5speed)
Year:

Engine Oil check / change
  • Do this
  • And this
  • then this
  • and finally that.
Fork Oil check / change
  • Do this
  • And this
  • then this
  • and finally that.
Likewise for the following:
  • Check / Replace Oil Filter
  • Spark Plug check / clean
  • Clutch Casing Oil Change
  • Clean Carb Float Bowl
  • Clean / Check Air Filter
  • Gearbox Oil Change
  • Battery Check / Maintainence
  • Brake pads
  • Points to apply grease and oil
Additional tasks could be:
  • Replacing accelerator cable
  • Replacing clutch cable
  • Replacing decompressor cable
Yes I know that the service manual covers these. But when you actually work on the bike you'll notice there are minor things to be done too that aren't listed in the manual.

(Please reply ONLY IF you are posting the service procedures with detailed pictures)
Gordon is offline   (1) Thanks
Old 7th November 2010, 11:03   #2
Senior - BHPian
 
jeepster's Avatar
 
Join Date: Oct 2008
Location: MH24 aka LATUR
Posts: 1,705
Thanked: 1,983 Times
DIY Royal Enfield Repairs

DISCLAIMER : I am not expert in engine mechanics or royal enfield. The steps are based on my actual experience on my enfield. If you damage your bull, get kicked out of your home or got laughed by your friends, its your problem.


the thread-
  • DIY royal enfield repairs.
the job-
  • head gasket change.
the tools-
  • spanners no 10-11, 12-13, 14-15, 16-17, 18-19, 19-20 (2 sets of each).
  • adjustable spanner.
  • 14 no box spanner (for head removal) (comes with hero honda).
  • spark plug spanner.
  • WD40, kerosene, tooth brush.
  • hammer, mandrel, wooden cube.
  • hacksaw blade.
  • gasket rs 50/-.
  • gasket sealant m-seal 12/-.
  • rocker stud rs 5/- per piece.
  • a mechanic in case you mess up your bull.
more tools collection here http://www.team-bhp.com/forum/4x4-te...ls-thread.html
(i used some alternatives like maruti wheel spanner instead 19 no spanner)
DIY Service: Royal Enfield-dsc02158-small.jpg
DIY Service: Royal Enfield-dsc02159small.jpg
the man-
Nikhil aka jeepster. http://www.team-bhp.com/forum/introd...n-finally.html
DIY Service: Royal Enfield-scan0010-25.jpg
the machine-
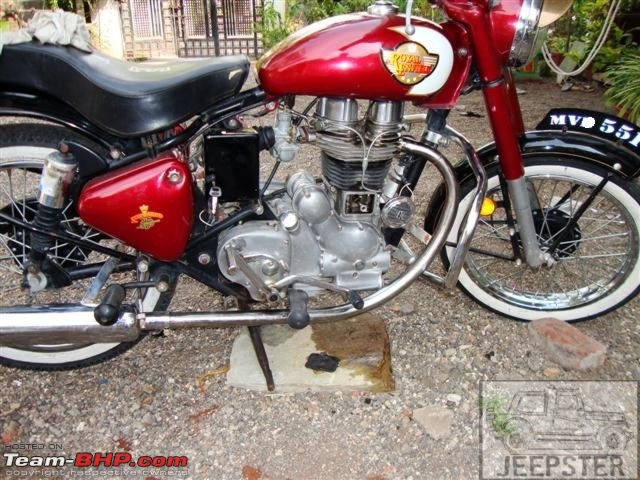
royal enfield ci std 1988. http://www.team-bhp.com/forum/1719523-post420.html
DIY Service: Royal Enfield-dsc02155-small.jpg
the process-
  • first of all remove tank (mine needed 15 no spanner).
  • remove silencer assembly (all).
  • remove oil pipe (only at head & refit bolts with washer so they don't lost).
  • remove spark plug.
  • remove carb (just remove the cap & keep the cables as they are).
  • remove the decompression cable from dont remove decompression assembly from head.
  • now remove the rocker covers.
  • here dont mess with rockers lol (i did & paid the price too).
  • there are 6 bolts that hold the head, marked with H.
  • only this step needs box spanner.
now you can try to remove the head.
i used hammer to loosen the head. (dont hit directly on fins use wooden cube)
then insert a small pipe at carb port & big one at exhaust port.
apply force alternately to them up words. (took me 1 day to figure out this step)
DIY Service: Royal Enfield-dsc02160-small.jpg
DIY Service: Royal Enfield-dsc02160-small2.jpg
DIY Service: Royal Enfield-dsc02162-small.jpg
DIY Service: Royal Enfield-dsc02164-small.jpg
DIY Service: Royal Enfield-dsc02165-small.jpg
Attachment 449997
DIY Service: Royal Enfield-dsc02168-small.jpg
DIY Service: Royal Enfield-dsc02169-small.jpg
DIY Service: Royal Enfield-dsc02171-small.jpg
DIY Service: Royal Enfield-dsc02172-small.jpg
DIY Service: Royal Enfield-dsc02176-small.jpg
DIY Service: Royal Enfield-dsc02180-small.jpg
stored for next day (best if you keep tank on bike)
DIY Service: Royal Enfield-dsc02182-small.jpg
DIY Service: Royal Enfield-dsc02183-small.jpg
DIY Service: Royal Enfield-dsc02185-small.jpg

NEED points for tappets settings.

to be continued

Last edited by jeepster : 7th November 2010 at 11:23.
jeepster is offline   (4) Thanks
Old 7th November 2010, 11:47   #3
BHPian
 
Join Date: Oct 2009
Location: RJ 14
Posts: 599
Thanked: 141 Times

As the material will be added, it may be a great thread. On suggestion form me:

When we bought any part, there is part no mentioned on packing. Please do mention if you bought/ replace any.
Thanks
(Alok) is offline  
Old 7th November 2010, 11:52   #4
Senior - BHPian
 
TaureanBull's Avatar
 
Join Date: Jun 2010
Location: New Delhi
Posts: 1,071
Thanked: 329 Times

Thats a really detailed explanation with pics. Its a delight to keep an enfield if one knows how to maintain it. I had one but never got anywhere near to what you have explained.

One common problem I faced was the engine oil leaking. The oil would attract lot of dust and bike would look dirty. I had some problems with wiring too. But it was a delight to ride it! Hope to see more of your explanation.

I would be more interested in the tappet setting. This has a different approach by different mechanics. I dont know why. Some one even told me that the sound of tappets tell you how well the engine has been maintained. Not sure about this though.
TaureanBull is offline  
Old 7th November 2010, 16:06   #5
BHPian
 
Join Date: Aug 2009
Location: Dehradun
Posts: 304
Thanked: 96 Times

Great thread to start with !

@jeepster : you did a commandable job and a very brave one. I did change with Accellerator & Cluch cables a few days back. Will be servicing my bull in a few days. Will post full report.

Just asking out of curiousity, @jeepster : how many gaskets are there in the head region, actually i suspect a few droplets of leakage on the left side of head, near to the bottom of the head.

Any ideas ?

Regards
shan2129 is offline  
Old 7th November 2010, 16:45   #6
Senior - BHPian
 
Join Date: Oct 2008
Location: Bangalore/Goa
Posts: 1,319
Thanked: 2,147 Times

Shantanu,

On your STD350 CI, you will find five gaskets in contact with the cylinder head. Two gaskets, one each on the rocker cover. One gasket between the engine head exhaust manifold and the silencer joint, also called silencer gasket. One gasket between the the intake manifold and the head, where the carb attaches. Finally, the cylinder head gasket between the cylinder head and the cylinder itself. Hope this helps.

For your oil leak, I would first check the rocket gaskets to see whether oil is trickling down to the head-cylinder region. If you find the result of this check in the negative, you should look at the head gasket. Replacement of the head gasket is better left to a mechanic if you aren't well versed in readjusting/refitting the tappets in relation to the rocker arms.

If you have the Snidal manual and can follow instructions and have the requisite tools, then it can be attempted.

Cheers,

Jay
JayPrashanth is offline  
Old 7th November 2010, 16:51   #7
Senior - BHPian
 
Join Date: Oct 2008
Location: Bangalore/Goa
Posts: 1,319
Thanked: 2,147 Times

Jeepster,

Nice work there. The best way, imho, to separate the head from the cylinder block is by slight tapping with a wooden mallet. The wooden block gets difficult to hold. Also, did you first park the engine a TDC before removing the head? This, imho, makes it easier for aligning the rocker and tappets.

Cheers,

Jay
JayPrashanth is offline  
Old 7th November 2010, 18:20   #8
BHPian
 
Join Date: Aug 2009
Location: Dehradun
Posts: 304
Thanked: 96 Times

hi JAY,

The oil leak ( more like one or two drops of blackish oily deposit ) sits out just above the clutch cover on the cylinder head. I clean my bull ones in two or three days and i find that kind of deposit everytime. Rest all points with gaskets seems ok, but i am unable to find the cluprit here. :(

Want to DIY this.

Regards
shan2129 is offline  
Old 7th November 2010, 18:28   #9
Senior - BHPian
 
jeepster's Avatar
 
Join Date: Oct 2008
Location: MH24 aka LATUR
Posts: 1,705
Thanked: 1,983 Times

(Alok)
TaureanBull
shan2129
JayPrashanth

thanks for your support.

shan2129 please post a picture of the troubled area?
jeepster is offline  
Old 7th November 2010, 19:33   #10
Senior - BHPian
 
jeepster's Avatar
 
Join Date: Oct 2008
Location: MH24 aka LATUR
Posts: 1,705
Thanked: 1,983 Times
DIY Royal Enfield Repairs 2

IMP: if the head refuses to be removed spray WD 40 in all 6 bolt holes.

part 2
  • remove old gasket & clean with kerosene & afterwords spray WD 40. (make sure that dirt & kerosene dose not go in cylinder, keep piston to TDC)
  • clean head with kerosene & tooth brush (carbon deposits)
  • after cleaning spray WD 40 on gasket resting area of head.
  • now apply a small layer m-seal gasket sealant on cylinder & head. (very thin layer)
  • now place the gasket evenly on cylinder.
  • insert the tappets before the fitting the head. (smaller on inlet valve & longer on exhaust valve)
  • now fix the head.
  • make sure that tappets are on their desired positions before tightening the nuts. (or be ready to re move the rockers)
  • & if you remove rocker be extra cautious when re fitting them.(threads may get damaged )
  • tighten the bolts opposite to each other. (again be cautious ,head may get bent)
  • apply force to bolts slowly & evenly.
  • re check all the nuts & bolts. check tappets.
  • & fit rocker covers, spark plug, carburetor, decompression cable.
  • fit oil pipes with washers (if copper use new if they are aluminum you can use old)
  • & you are done.
DIY Service: Royal Enfield-dsc02187-small.jpg

DIY Service: Royal Enfield-dsc02188-small.jpg

Name:  DSC02191 Small.JPG
Views: 18721
Size:  97.8 KB

DIY Service: Royal Enfield-dsc02194-small.jpg

DIY Service: Royal Enfield-dsc02195-small.jpg

DIY Service: Royal Enfield-dsc02196-small.jpg

DIY Service: Royal Enfield-dsc02197-small.jpg

DIY Service: Royal Enfield-dsc02199-small.jpg

DIY Service: Royal Enfield-dsc02200-small.jpg

DIY Service: Royal Enfield-dsc02275-small.jpg

do you see any thing odd here. (yes the studd)

DIY Service: Royal Enfield-dsc02276-small.jpg

DIY Service: Royal Enfield-dsc02277-small.jpg
DIY Service: Royal Enfield-dsc02278-small.jpg

DIY Service: Royal Enfield-dsc02279-small.jpg

DIY Service: Royal Enfield-dsc02280-small.jpg

DIY Service: Royal Enfield-dsc02282-small.jpg

DIY Service: Royal Enfield-dsc02283-small.jpg

DIY Service: Royal Enfield-dsc02284-small.jpg


BTW this is my lightning post (535th)
& dont forget to fit fuel tank lol.

Last edited by jeepster : 7th November 2010 at 19:45. Reason: add fuel tank
jeepster is offline   (1) Thanks
Old 8th November 2010, 05:06   #11
BHPian
 
madhkris's Avatar
 
Join Date: Mar 2010
Location: Bengalur
Posts: 292
Thanked: 83 Times

@ Jeepster great DIY session! Thanks for the detailed report. Superb thread and very useful
madhkris is offline  
Old 8th November 2010, 15:12   #12
Senior - BHPian
 
jeepster's Avatar
 
Join Date: Oct 2008
Location: MH24 aka LATUR
Posts: 1,705
Thanked: 1,983 Times
help wanted

help .
  • CB point adjustment
  • tappet setting
jeepster is offline  
Old 8th November 2010, 22:26   #13
BHPian
 
iron's Avatar
 
Join Date: Nov 2009
Location: Bombay
Posts: 260
Thanked: 56 Times

Quote:
Originally Posted by jeepster View Post
help .
  • CB point adjustment
  • tappet setting
1)Tappet Setting
''


2)Tappet Setting


1)CB Point Adjustment
Attached a file from hitchcock's

2)CB Point Adjustment
The post below has been taken from rddreams.com posted by a member with the handle 'vivu'


Quote:
To set the points GAP:
take the plug out... still attached to HV Wire,
increase plug gap a lil bit.

step1.
Make the point gap very close,

step2.
now kick and see the spark
it would be very weak(maybe yellow coloured),
step3.
increase the gap gradually till a blue spark is seen,
step4.
At this point decrease the gap just a bit.
Your Points Gap should be Done.

put the plug back in the cyl.head.
close your pilot screw all in, then turn it back one+half turn.
also revert the plug gap back to its orignal gap before putting it back.

Setin your spark timing.
step1.
Turn the points plate all the way to clockwise
step2.
increse your throtle by turning in the screw four or so turns.
step3.
start the bike
step4.
it would idling very slowly.
step5.
now put a screwdriver vertically at the capacitor screw(its on the left side)
step6.
gently hammer the screwdriver so that it rotates the points plate anticlock wise
step7.
keep listening to the sound of your engine.
it wud start reving faster gradually,
keep rotating anti clock wise
step8.
then at a certain point there will be a sudden jump in its reving charachter.
step9.
now rotate just a lil bit more anticlockwise.
step10.
tighten up the plate holding bolts.

this should set your spark timing.
Attached Files
File Type: pdf BULLET+IGNITION+TIMING+(POINTS).pdf (194.4 KB, 4943 views)
iron is offline  
Old 8th November 2010, 22:44   #14
Senior - BHPian
 
jeepster's Avatar
 
Join Date: Oct 2008
Location: MH24 aka LATUR
Posts: 1,705
Thanked: 1,983 Times

thanks iron!

i saw second video couple of hours ago.
will try to set them tomorrow with above tips.
jeepster is offline  
Old 9th November 2010, 10:50   #15
Senior - BHPian
 
jeepster's Avatar
 
Join Date: Oct 2008
Location: MH24 aka LATUR
Posts: 1,705
Thanked: 1,983 Times

problem solved. (thanks to iron)

(i had dismantled CB point so original setting was lost)
  • carburetor setting adjusted
  • CB point adjusted
  • tappets adjusted
i will take a ride & re torque all nuts tomorrow.
enjoy videos.


BTW i also relapsed all rocker stud's & serviced carburetor. (will post details soon)

Last edited by jeepster : 9th November 2010 at 10:53.
jeepster is offline  
Reply

Most Viewed


Copyright ©2000 - 2024, Team-BHP.com
Proudly powered by E2E Networks