Team-BHP > Technical Stuff


Reply
  Search this Thread
18,604 views
Old 
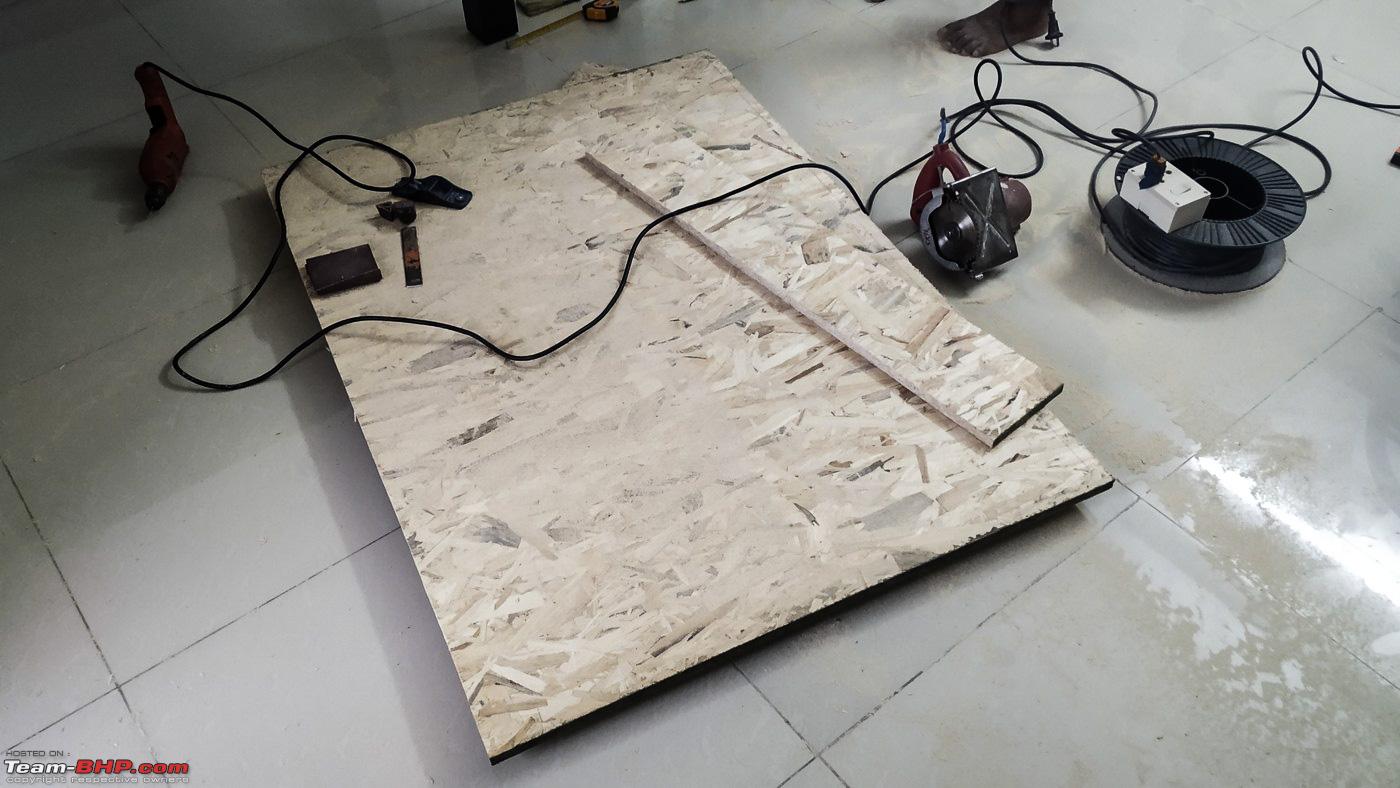
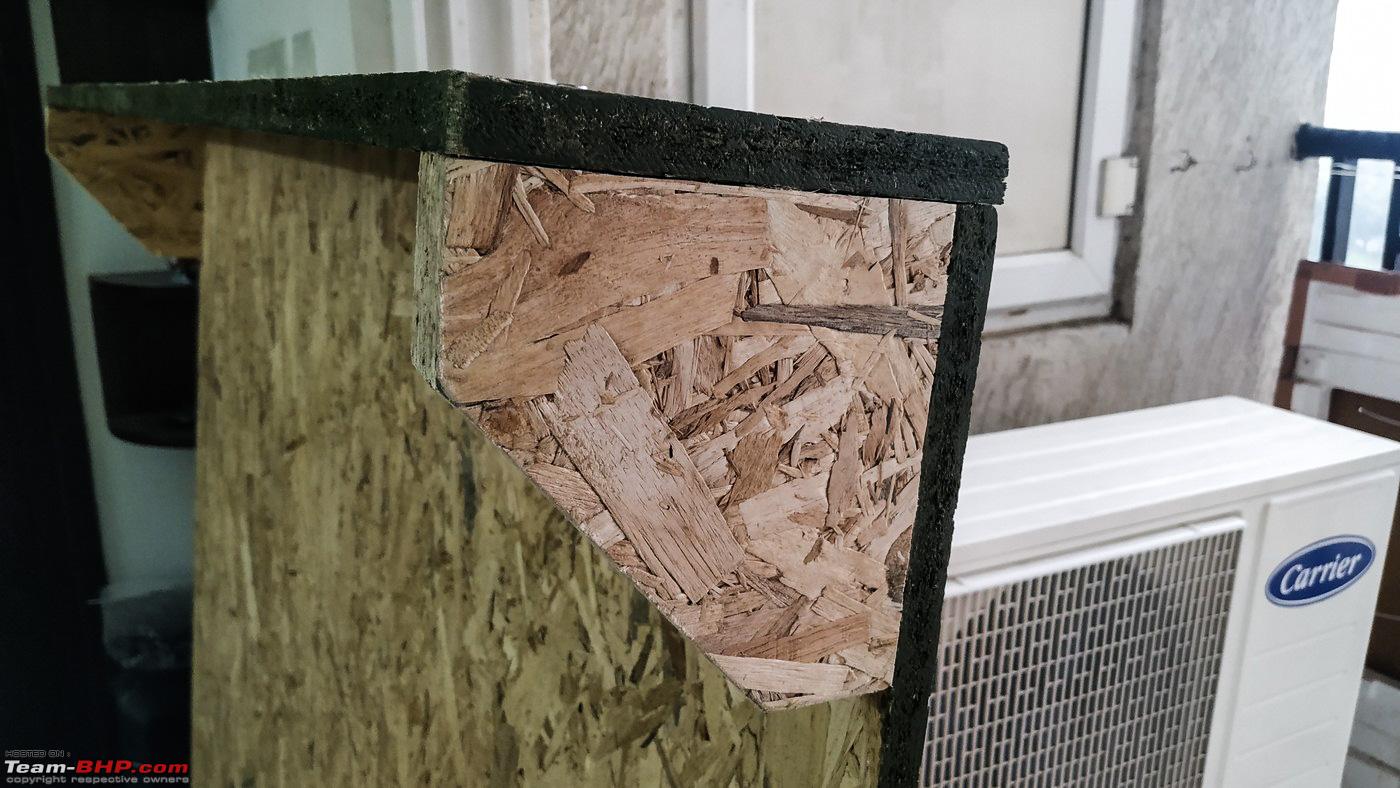
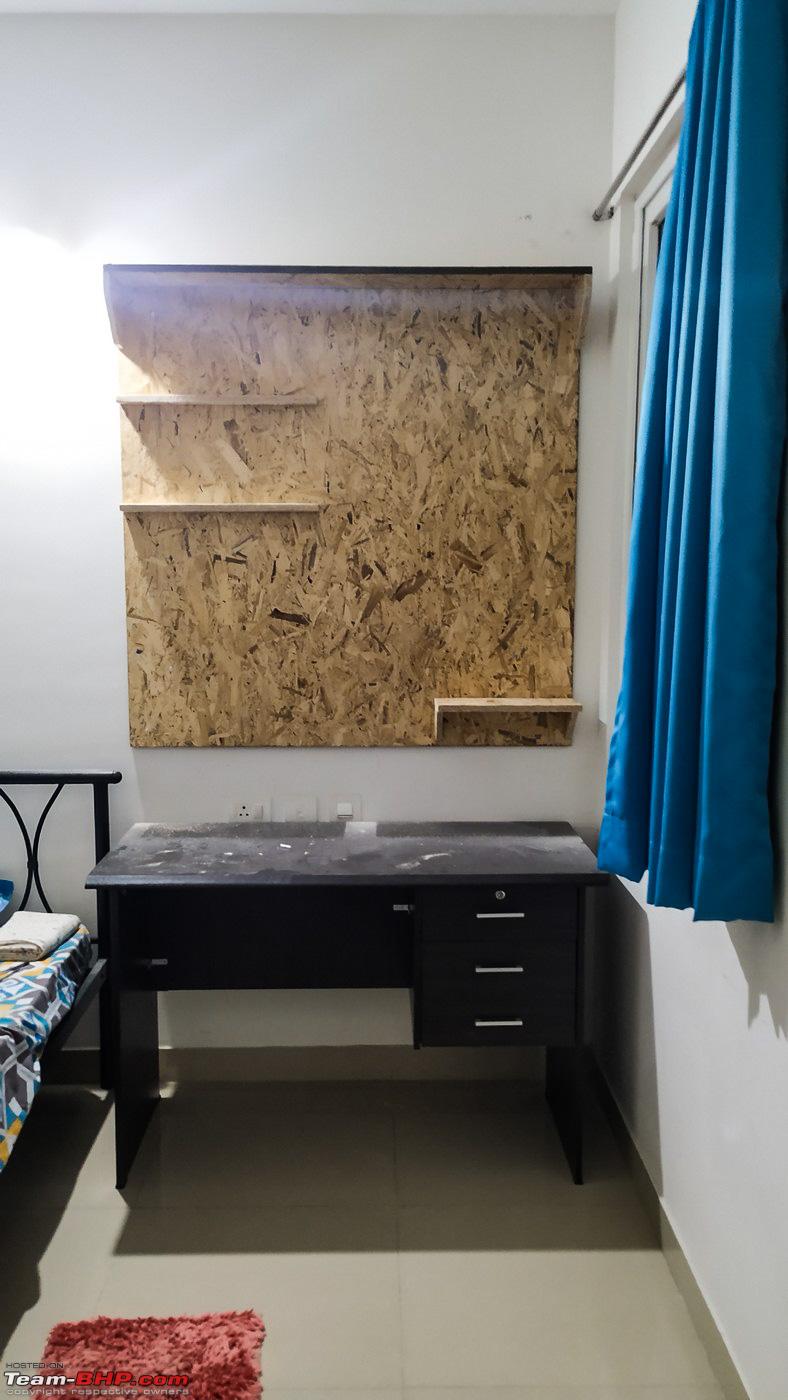
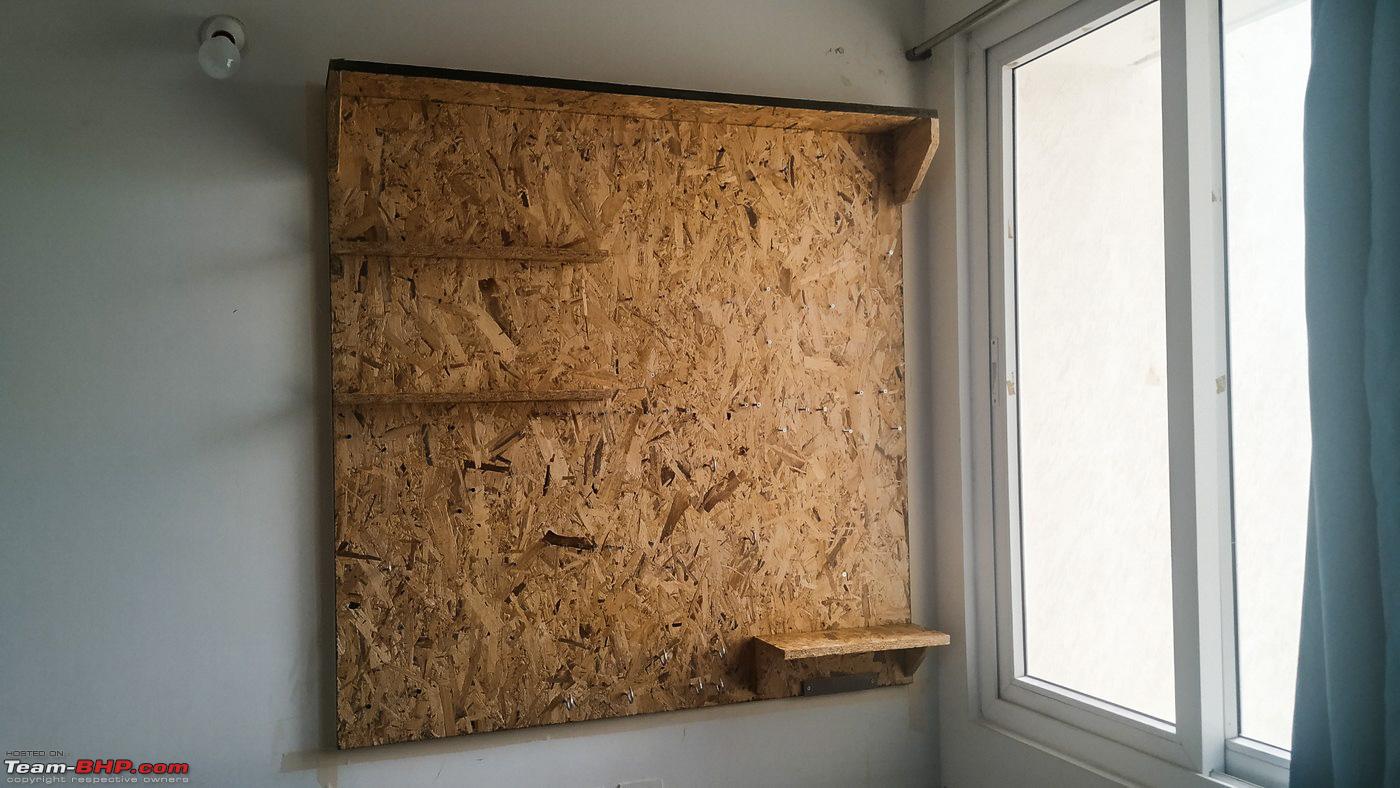
28th September 2020, 22:37   #1
Team-BHP Support
 
Gannu_1's Avatar
 
Join Date: Apr 2013
Location: Madras
Posts: 7,169
Thanked: 20,185 Times
Pics: My Wall Tool Organiser

Weekend project done and dusted - a wall tool organiser in the bedroom of my tiny 1 BHK apartment. As Rehaan puts it, this is now a 1 BWHK (Bedroom - Workshop - Hall - Kitchen).

Pics: My Wall Tool Organiser-img_20200927_104037.jpg

Pics: My Wall Tool Organiser-img_20200927_103851.jpg

I had this in mind for quite some time now and I am glad it came out just the way I wanted! Reasonably well planned and executed too. It was an interesting weekend for sure. Since I live alone in this apartment, I could have such a setup without worrying about anything else. Of course, my son is growing up and he's going to be spending some time here when his mum visits me for her vacations but that's not a worry. We'll take care of that aspect.

All the hand tools that I had accumulated over the years were dumped in two cantilever tool boxes:

Pics: My Wall Tool Organiser-img_20200920_092407.jpg

Pics: My Wall Tool Organiser-img_2070.jpg

Pics: My Wall Tool Organiser-img_2061.jpg

Pics: My Wall Tool Organiser-screenshot_20200928205210.jpg

Pics: My Wall Tool Organiser-screenshot_20200928205229.jpg

Pics: My Wall Tool Organiser-screenshot_20200928205251.jpg

Pics: My Wall Tool Organiser-screenshot_20200928205306.jpg

Pics: My Wall Tool Organiser-screenshot_20200928205317.jpg

I had sourced these tool boxes from eBay India and Industrybuying.com some 4 years back. Well built and very convenient for storing the tools in different compartments. I used to keep them locked just for the sake of security (although I do trust my maid). But then, the boxes became heavier over time! One of them weighed in at nearly 15+ kg:

Pics: My Wall Tool Organiser-screenshot_20200928212918.png

I had also prepared a hand-written index to see which tool was stored in which box and the boxes were numbered so I could retrieve the tool quickly:

Pics: My Wall Tool Organiser-screenshot_20200928212806.png

Pics: My Wall Tool Organiser-screenshot_20200928212838.png

The boxes were stored in a slotted angle rack in the kitchen, covered to protect the belongings from the oily stains which settles down (my landlord wasn't generous enough to provide a kitchen exhaust hood). All said and done, this was a tedious process. And that's when I decided to build the wall tool organiser so all the hand tools can be neatly hanged on the board and I could retrieve them and put them back easily.

I am rather poor at woodworking and have no experience except for a couple of inexpensive ramps that I had fabricated some 6 years back. You can read about that here - DIY: Inexpensive home-made Car Ramps. Well no experience? No problem! I decided to source all the materials and call a carpenter from UrbanCompany.

Name:  UC.png
Views: 6844
Size:  495.8 KB

Next - which board do I get for the job? I decided to get a 19 mm thk oriented strand board (OSB, read about it here). I liked the raw, flaky looks of the board which I had come across in the packing crates at our shipyard:

Pics: My Wall Tool Organiser-img_20200928_123322.jpg

So I got a 19 mm thk, 8 ft x 4 ft marine OSB for Rs. 2500 (paid Rs. 600 to the rickshaw guy who transported it from the vendor to my apartment). Occupied nearly the entire hall of my apartment:

Pics: My Wall Tool Organiser-img_20200920_085347.jpg

In the bedroom, I had a king-sized bed at the corner and a table adjacent to it next to the window. I wanted to put up the board right above the table. Would be the perfect location IMO. I decided the size to be 4 ft x 4 ft. I even made a quick sketch on Autocad and took a print of it:

Pics: My Wall Tool Organiser-img_20200925_183707.jpg

From the UrbanCompany app, I clicked on the 'Carpenters' option and under that, 'Something Else'.

Pics: My Wall Tool Organiser-screenshot_20200928213028.png

Name:  Screenshot_20200928213040.png
Views: 6530
Size:  77.7 KB

Fixed up an appointment on a Sunday and the security folks did not let him take the power tools inside since the society doesn't permit power-tool works on Sundays due to the loud noise. What a bummer! But he visited me and checked up what had to be done. I explained everything and he requested me to reschedule this appointment to another weekday. I decided on the upcoming Friday afternoon, 4 PM.

He promptly showed up but with all the tools this time! I decided to help him out too and had already made all the necessary markings on the board. He got onto the job quickly, took out the circular saw and began cutting the board. I understood one thing - I would never be able to use that power saw the way he sliced the board like a hot knife through butter with arrow straight accuracy!

Pics: My Wall Tool Organiser-img_20200925_163550.jpg

Pics: My Wall Tool Organiser-img_20200925_163543.jpg

Pics: My Wall Tool Organiser-img_20200925_164614.jpg

Finally different planks were screws to the main board with pieces of brackets to support them. Fevicol adhesive was also applied to the planks before they were screwed to the board as also the edges and corners. And, after it was completed, the entire setup was lifted and placed atop the 2 tool boxes, marked and screwed to the wall using five 3-inch screws - 4 at each corner and one at the center. So that was it. The carpenter charged me Rs. 700 and I happily paid him Rs. 1000 - I felt he deserved it as he did the job properly with all the necessary tools, observing safety precautions. He smiled and left.

Pics: My Wall Tool Organiser-img_20200925_183615.jpg

Next up - hanging all the tools. Unloaded everything from the tool boxes to the bed and the table. Started from the top-right corner and worked towards the left and bottom. Place the tool, mark the point with a marker, drill a pilot hole, drive a screw. Wash, rinse, repeat. The entire home was a complete mess at the end of all this - fine saw dust was everywhere (luckily, we were wearing masks all the time thanks to covid!). I was not sleeping that night with all that saw dust strewn around. I took out the broom, dust pan and the vacuum cleaner to suck out every last bit of the saw dust. Replaced the bedsheets and pillow covers. At the end of all this, it was almost 11 PM, I was completely exhausted and just crashed.

Next - a coat of varnish to prevent the board from sucjing up moisture from this humid Chennai climate. Plus, I had to sand the board before applying varnish. Sigh! Removed all the tools and sanded the complete board using a 220 grit sandpaper folded. Took me about half an hour. More saw dust in the bedroom! Cleared all that up, cut open a 600 ml empty Coke bottle, poured some wood varnish (decided not to add any thinner to keep the coat thicker) and used a 2 inch paint brush to apply the varnish on the board. Gave it a coat, waited an hour for the first coat to dry and gave it a second coat. After about 4 hours, the varnish had dried up and the board had a nice light-yellow lustre to it.

Pics: My Wall Tool Organiser-img_20200927_093705.jpg

Pics: My Wall Tool Organiser-img_20200927_100325.jpg

Hanged all the tools back, some consumables on top of the shelf and I was staring at the board for some time like a small kid with all the joy.

Click image for larger version

Name:	IMG_20200927_103851.jpg
Views:	1534
Size:	1.80 MB
ID:	2060482

I've also decided to get some spare planks of wood to learn some basics of woodworking. Should be interesting!

All in all, a weekend well spent I say!

Check out these clips where I explain in detail about the setup and how it took shape:


PS: My wife loved the setup (she thinks I should start a workshop after my retirement while she can run a mini-restaurant by the side) and my parents think I am crazy.

Last edited by Gannu_1 : 21st November 2021 at 09:15. Reason: Added clips at the end.
Gannu_1 is offline   (134) Thanks
Old 28th September 2020, 23:47   #2
BHPian
 
WhiteSierra's Avatar
 
Join Date: Jul 2020
Location: Hyderabad
Posts: 429
Thanked: 2,249 Times
Re: Tools for a DIYer

Hi Gannu_1, you have nice collection of tools. Loved the board for hanging all the tools, also just now read your thread on DIY low cost car ramps. Well planned and executed.

How did you hang all your tools there? Looks like you use multiple nails on the board to hang each tool. Very well done and the wall looks like a professional workshop now.

Since it is right next to your bed, I suggest you to avoid hanging any sharp and heavy tools on the board, those might fall and injure you in case of any earthquake (0.0001% possibility), but still consider it on a safety point of view.

Overall, it looks superb, loved the idea and I plan to do similar thing for my tools soon.
WhiteSierra is online now   (6) Thanks
Old 29th September 2020, 01:22   #3
Distinguished - BHPian
 
Thad E Ginathom's Avatar
 
Join Date: Jun 2007
Location: Chennai
Posts: 10,956
Thanked: 26,119 Times
Re: Tools for a DIYer

Quote:
Originally Posted by Gannu_1 View Post
Weekend project done and dusted - a wall tool organiser in the bedroom of my tiny 1 BHK apartment. t while she can run a mini-restaurant by the side) and my parents think I am crazy.
That is fantastic, well done!

Long ago, in two of my homes I had a jewellery workshop in the corner of my bedroom. One was very tiny, like the space you have there; the other was more spacious being 1/4 of a main bedroom. It was never neat and tidy like that, though. A workshop in the bedroom? Or a bed in the workshop? Either way is possible! Perhaps your second stage might be to replace the desk with a small workbench?
Thad E Ginathom is offline   (8) Thanks
Old 29th September 2020, 12:06   #4
Senior - BHPian
 
blackasta's Avatar
 
Join Date: Aug 2009
Location: WB 26
Posts: 3,405
Thanked: 2,916 Times
Re: Tools for a DIYer

Quote:
Originally Posted by Gannu_1 View Post
Weekend project done and dusted - a wall tool organiser in the bedroom of my tiny 1 BHK apartment. As Rehaan puts it, this is now a 1 BWHK (Bedroom - Workshop - Hall - Kitchen).

And, after it was completed, the entire setup was lifted and placed atop the 2 tool boxes, marked and screwed to the wall using five 3-inch screws - 4 at each corner and one at the center. So that was it.
Considering the weight of that items on that pegboard, try using the french cleat system to hang it to the wall. 5 screws may not be enough in the long run.

https://en.wikipedia.org/wiki/French_cleat

I normally use this method to hang heavy racks / kitchen wall cabinets.
blackasta is offline   (8) Thanks
Old 29th September 2020, 13:55   #5
GTO
Team-BHP Support
 
GTO's Avatar
 
Join Date: Feb 2004
Location: Bombay
Posts: 70,335
Thanked: 298,732 Times
Re: Pics: My Wall Tool Organiser

Gannu, this is too good to be buried in the DIY Tools thread! Moving to new thread, will go to homepage this week. Thanks for sharing .
GTO is offline   (7) Thanks
Old 29th September 2020, 14:05   #6
BHPian
 
Join Date: Mar 2015
Location: pale blue dot
Posts: 580
Thanked: 2,806 Times
Re: Pics: My Wall Tool Organiser

I love this Gannu! Have always wanted to do something similar with my dad's and my tool sets.

Now build on this and take it to the next level like Casey Neistat and his office.


Last edited by digitalnirvana : 29th September 2020 at 14:07.
digitalnirvana is online now   (6) Thanks
Old 30th September 2020, 10:07   #7
Distinguished - BHPian
 
Reinhard's Avatar
 
Join Date: Nov 2010
Location: Pune
Posts: 4,841
Thanked: 17,639 Times
Re: Pics: My Wall Tool Organiser

My word, thats wonderful. Not just great utility - its a superb wall ornament too at the same time. Well done Gannu.

I have almost all tools identical. Including their brands! Looks like the "good" options for DIY folk are limited. Thrice so far I have almost made a board like this. But my clumsy grip & tendency to drop items makes me nervous of mounting heavy tools above something. So far they are occupying shelves in wall units. I get an earful for that often at home. So one day or the other I have to make a wall mount like this OR a separate cabinet with small compartments & a door.

Thanks for sharing this with pictures. Gives a fantastic template reference of the layout. You've designed the layout meticulously & very well. Kudos.

Last edited by Reinhard : 30th September 2020 at 10:19.
Reinhard is offline   (2) Thanks
Old 30th September 2020, 11:35   #8
BHPian
 
Drive Head's Avatar
 
Join Date: Mar 2016
Location: Faridabad/Delhi
Posts: 45
Thanked: 76 Times
Re: Pics: My Wall Tool Organiser

This is something all DIY people's dream..Having this in a garage portion is like "Heaven"..

Many couldn't execute it due to various reasons but the ones who did this is a pure dedicated DIY enthusiast..

Keep up the spirit.. You set an example, which many will follow..
Drive Head is offline   (1) Thanks
Old 30th September 2020, 12:11   #9
BHPian
 
Join Date: Jun 2020
Location: Mirzapur(U.P.)
Posts: 61
Thanked: 131 Times
Re: Pics: My Wall Tool Organiser

Hi Gannu, I'm huge fan of your threads. Your posts are one of the reason I decided to join Team-BHP and I really appreciate DIY jobs.
If someone gets inspired from this post and but can't build something like because of any reason, they can buy pegboard which looks like this.
Pics: My Wall Tool Organiser-91ar0bln7bl._sl1500_.jpg

This is basically a board with pre-drilled holes and one can use hooks or other accessories to customized it as per the need. This one is a generic product hence it might not look good but one can find other pegboards on IKEA or other stores which are quite aesthetic and not just for organizing tools, it can be setup in home offices to enhance productivity.
Image Source: https://www.amazon.in/Generic-30-WGL.../dp/B002LZSWFW
100Rabh is offline   (13) Thanks
Old 30th September 2020, 12:19   #10
BHPian
 
Join Date: Dec 2014
Location: Bangalore
Posts: 385
Thanked: 590 Times
Re: Pics: My Wall Tool Organiser

Quote:
Originally Posted by Gannu_1 View Post
Weekend project done and dusted - a wall tool organiser in the bedroom of my tiny 1 BHK apartment.
Beautifully done!

Could you please share few more closer pictures of the screws/nails used for hanging spanners, hammers etc. Did you get those filers handles customized with holes for hanging?

Also, I feel having two simple doors could provide better aesthetic view and safety.
LoneRidder is offline   (1) Thanks
Old 30th September 2020, 12:23   #11
Distinguished - BHPian
 
Reinhard's Avatar
 
Join Date: Nov 2010
Location: Pune
Posts: 4,841
Thanked: 17,639 Times
Re: Pics: My Wall Tool Organiser

Quote:
Originally Posted by 100Rabh View Post
This is basically a board with pre-drilled holes and one can use hooks or other accessories to customized it as per the need. This one is a generic product hence it might not look good but one can find other pegboards on IKEA or other stores which are quite aesthetic and not just for organizing tools, it can be setup in home offices to enhance productivity.
Image Source: https://www.amazon.in/Generic-30-WGL.../dp/B002LZSWFW
The ready-made ones available online are pretty costly though. Sufficiently sized ones are all above 10k INR. The one you shared tips the scales over 20K. I think thats a bit too much for what it does. In that amount one can get custom made storage units with shutters etc to also prevent dust accumulation when not used.
Reinhard is offline   (4) Thanks
Old 30th September 2020, 12:45   #12
Newbie
 
Join Date: Apr 2019
Location: MUMBAI
Posts: 3
Thanked: 8 Times
Re: Pics: My Wall Tool Organiser

HI! Nice DIY, As a mariner my suggestion for improvement- Use a thick permanent marker pen and draw the outline of all the tools hung at the respective location, on the board. Very handy to replace back multiple tools when used together. White top-coat paint will help.
CaptRP is offline   (7) Thanks
Old 30th September 2020, 14:29   #13
BHPian
 
Join Date: Mar 2020
Location: Chennai
Posts: 45
Thanked: 79 Times
Re: Pics: My Wall Tool Organiser

Excellent DIY, this looks like something the furniture stores would charge over 10,000 rupees for.

If you don't mind me asking, Where did you source the wood from? I'm in Chennai and would like to understand things like who to approach, what to ask. I may sound stupid asking this, but this has been the largest hurdle to start working on a project which needs wood.

Thanks, Subbu
asbshyam is offline   (2) Thanks
Old 30th September 2020, 14:45   #14
BHPian
 
Join Date: Jun 2020
Location: Mirzapur(U.P.)
Posts: 61
Thanked: 131 Times
Re: Pics: My Wall Tool Organiser

Quote:
Originally Posted by Reinhard View Post
The ready-made ones available online are pretty costly though.
Yes, you are right. These are imported hence they are costly. I found another pegboard on Amazon made of Galvanized Steel sized 32×32 inches and with 50-piece hook and other attachment set, it would cost about ₹10,000. There are some pegboards made of Fiberboard at IKEA of similar dimensions priced between ₹1100-2000, delivery location of IKEA is limited though. While Fiberboard may not be strong enough to hold heavy equipments but it can hold small tools and knick-knacks of home/office.
Again custom-made board has no match but I suggested the idea of getting pegboard who can't get custom-built.
Product link on Amazon https://www.amazon.in/Control-30-P-3.../dp/B001J6FSDS
100Rabh is offline   (2) Thanks
Old 30th September 2020, 16:13   #15
BHPian
 
avinashsg's Avatar
 
Join Date: Apr 2006
Location: Bangalore
Posts: 43
Thanked: 45 Times
Re: Pics: My Wall Tool Organiser

Amazing DIY. An apt idea for my next project.
Really loved the design of the board material.
avinashsg is offline   (1) Thanks
Reply

Most Viewed
Thread Tools Search this Thread
Search this Thread:

Advanced Search

Copyright ©2000 - 2024, Team-BHP.com
Proudly powered by E2E Networks