Team-BHP > Team-BHP Reviews > Test-Drives & Initial Ownership Reports
Register New Topics New Posts Top Thanked Team-BHP FAQ


Reply
  Search this Thread
89,304 views
Old 1st April 2019, 20:49   #31
BHPian
 
Viraat13's Avatar
 
Join Date: Mar 2010
Location: New Delhi
Posts: 787
Thanked: 3,364 Times
Re: My pre-worshipped Volkswagen Polo GT TSI with lots of DIYs

Just save some money and upgrade to the GTI.

Great job. Love how you're compiling and linking to every possible resource. Makes for a 100% complete DIY guide.
Viraat13 is offline   (1) Thanks
Old 2nd April 2019, 13:03   #32
BHPian
 
TheLizardKing's Avatar
 
Join Date: Jul 2013
Location: Mumbai
Posts: 428
Thanked: 1,321 Times
Some updates

Quote:
Originally Posted by antardaksh View Post
Hi,
Did you check with service center, I got the same installed from service center for INR 2900(approx).
Regards.
Thanks for the information. I never bothered to check with the VW workshop since I generally look online first. I paid around Rs 3300 for them, so thankfully the difference is not much. I always find it more satisfying to source and install parts myself.

Quote:
Originally Posted by JoshMachine View Post
Thanks, the dead pedal looks fab.
How long you have been using it? Does dirt/mud accumulate on the dead pedal inside edges?
Well. That really depends on how dirty your shoes are, right? The cover gets as dirty as the A and B pedals, and is as easy to clean. Hope this helps.

DIY Pipeline updates:
  1. Rear Dome Light (OEM)
    I am not particularly satisfied with the LED dome light I installed in the rear. Since I am more confident about electrical DIYs after having completed a couple of them, I have decided to install the OEM rear dome light. I am using this excellent thread as reference. Parts already ordered and on their way.
  2. Air-box/Filter and Air Intake Channel
    Inspired by the ownership threads of Philip.Mathew and mod suhaas307, I am swapping out the stock air-box and Pipercross filter with the K&N 57S-9505 kit. I am also replacing the stock air intake channel with the Euro spec one. Parts already ordered and on their way.
TheLizardKing is offline  
Old 12th April 2019, 16:15   #33
BHPian
 
TheLizardKing's Avatar
 
Join Date: Jul 2013
Location: Mumbai
Posts: 428
Thanked: 1,321 Times
Purchase: Emergency Kit

Source: CeaseFire Online Shop
Price: Rs 700, with free shipping

Ever since Viraat13 mentioned how his father insists on keeping a fire extinguisher and emergency kit in every car they own, it had been on my mind to buy both for the GT TSI. While searching online, I ended up on the online shopping website of CeaseFire, a well-known name in fire safety systems. And this was the first listing in their catalog:

My pre-worshipped Volkswagen Polo GT TSI with lots of DIYs-img20190411wa0004.jpg

My pre-worshipped Volkswagen Polo GT TSI with lots of DIYs-img20190411wa0006.jpg

Feedback: The shipment was delivered in 7 days to Mumbai. The workmanship and materials used are both top class, and it is amazing that they have managed to pack in a hammer, an axe, a pair of pliers, saw, wire cutter, needle nose pliers, head screwdriver, hexagonal screwdriver, AND a can opener (though I can't think of an emergency that would require one ) into one handy package. And though the listing doesn't say so, I was pleasantly surprised to find that they have included a carry pouch as well. And in case you are wondering, the handle is made of REAL wood.

Conclusion: All in all it is a VFM purchase, and a must-have for every safety-conscious car owner. Recommended purchase.
TheLizardKing is offline   (2) Thanks
Old 13th April 2019, 00:18   #34
BHPian
 
Viraat13's Avatar
 
Join Date: Mar 2010
Location: New Delhi
Posts: 787
Thanked: 3,364 Times
Re: Purchase: Emergency Kit

Quote:
Originally Posted by TheLizardKing View Post
Ever since Viraat13 mentioned how his father insists on keeping a fire extinguisher and emergency kit in every car they own, it had been on my mind to buy both for the GT TSI. While searching online, I ended up on the online shopping website of CeaseFire, a well-known name in fire safety systems. And this was the first listing in their catalog:

....

Conclusion: All in all it is a VFM purchase, and a must-have for every safety-conscious car owner. Recommended purchase.
What's the weight of this thing? I ask because I'm wondering if it is possible to use this hammer to break the glass, if required in an emergency.
Viraat13 is offline  
Old 18th April 2019, 16:02   #35
BHPian
 
s4ch's Avatar
 
Join Date: Mar 2012
Location: Pune; Wales
Posts: 389
Thanked: 641 Times
Re: My pre-worshipped Volkswagen Polo GT TSI with lots of DIYs

Some great mods, thanks for sharing. The car looks great.

Quote:
Originally Posted by TheLizardKing View Post
When you browse aimlessly on AliExpress, you often end up buying items you don't really need. This mod was the result of one such impulse purchase. I bought these blinkers for two reasons: 1. the smoked effect which complements the color of my car; and 2. the progressive action of the LED.

Source: AliExpress
Price: $18.89
Are these direct plug and play replacements for the original lights? Is it easy to pry off the OEM lights and fit these?

Quote:
Originally Posted by TheLizardKing View Post
As already mentioned in the 'Particular Dislikes' section of my review, I was really irritated to find out that VW replaced the leather handbrake grip with a plastic one. My 2013 MPI Highline has a leather grip, and I wanted the same on my GT TSI. So I went ahead and got this:


Source: AliExpress
Price: $25.80
How do you install the handbrake cover? Does it just clip on or is some stitching required?

Many thanks again for sharing.
s4ch is offline  
Old 18th April 2019, 16:50   #36
BHPian
 
TheLizardKing's Avatar
 
Join Date: Jul 2013
Location: Mumbai
Posts: 428
Thanked: 1,321 Times
Re: My pre-worshipped Volkswagen Polo GT TSI with lots of DIYs

Quote:
Originally Posted by Viraat13 View Post
What's the weight of this thing? I ask because I'm wondering if it is possible to use this hammer to break the glass, if required in an emergency.
I know that automotive glass is pretty tough, but it is definitely heavy enough to do the job, I think. I'll let you know for sure if I am ever in an emergency of the window-breaking kind.

Quote:
Originally Posted by s4ch View Post
Are these direct plug and play replacements for the original lights? Is it easy to pry off the OEM lights and fit these?
My pre-worshipped Volkswagen Polo GT TSI with lots of DIYs-side-blinker.jpg
(Image Credit: YouTube)

Yes. The OEM lights pop off easily. All you have to do it is insert the tip of a flat-head screwdriver underneath the rear end and lift up.

Quote:
Originally Posted by s4ch View Post
How do you install the handbrake cover? Does it just clip on or is some stitching required?

It is an OEM replacement. You need to remove the stock cover (part #2) by lifting a tab on its underside and then pulling it off. Please place a cushion in between the handbrake and the HU while attempting this, to prevent any accidental damage. Also, note that the chrome knob (part #1) is designed to come off along with the cover, and you will have to stick it back using FeviKwik. If you stuck the knob in the past (like in my case), it is a little difficult to get the replacement cover on. I had to use a soft-faced hammer, and ended up with a couple of marks on the front edge.
TheLizardKing is offline   (2) Thanks
Old 12th August 2019, 11:24   #37
BHPian
 
TheLizardKing's Avatar
 
Join Date: Jul 2013
Location: Mumbai
Posts: 428
Thanked: 1,321 Times
New tools

A couple of DIYs in the pipeline required me to add the following tools to my collection:
  1. DC Electrical Circuit Tester
    Model: Generic Car Motorcycle Truck DC 6V/12V/24V Electrical Circuit Tester Car Motorcycle Voltage Gauge Test Light Lamp Detector Tool
    Source: Amazon for Rs. 360
  2. Wire Cutter
    Model: Taparia 1405 Side Cutting Mini Plier
    Source: Amazon for Rs. 139
  3. Terminal Extractor Set
    Model: 11 Pieces Car Wire Terminal Removal Tool Release Extractor Puller Wiring Connector Pin for Ford Honda BMW Audi VW Mazda Nissan
    Source: AliExpress for $5.31 (tracked shipping)
    Notes: This is an indispensable tool for any DIYs requiring terminal extraction.
  4. Crimping Pliers
    Model: Crimping pliers set SN-48B SN-48BS 8 jaw kit for 2.8 4.8 6.3 VH2.54 3.96 2510/tube/insulation terminals electrical clamp tools
    Source: AliExpress for $15.5 (tracked shipping)
    Notes: Another indispensable tool for crimping VW terminals. Comes with a standard die for 0.5, 1.0, and 1.5 mm2 terminals.

I also purchased the following consumable items:
  1. Scotch Lock type Quick Connectors
    Model: Wire Cable Connectors Terminals Crimp Scotch Lock Quick Splice Electrical Car Audio 22-10AWG 0.5mm-6mm Kit Tool Set
    Source: AliExpress for $6.27 (tracked shipping)
  2. Cloth Tape (x 3 rolls)
    Model: Heat-resistant Wiring Harness Tape Looms Wiring Harness Cloth Fabric Tape Adhesive Cable Protection 19mm x 15M
    Source: AliExpress for $5.33 (tracked shipping)
TheLizardKing is offline  
Old 12th August 2019, 12:38   #38
BHPian
 
TheLizardKing's Avatar
 
Join Date: Jul 2013
Location: Mumbai
Posts: 428
Thanked: 1,321 Times
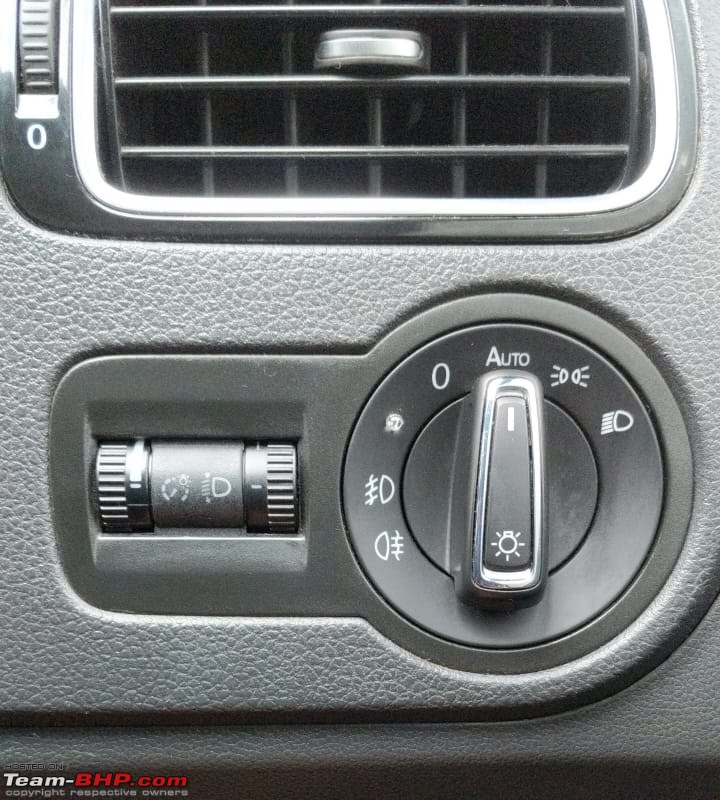
DIY #7: Instrumentation Dimmer Switch

My pre-worshipped Volkswagen Polo GT TSI with lots of DIYs-switch-installation.jpg

Inspired by Gannu's post, I went ahead and executed this DIY yesterday, taking advantage of a slight break in the incessant Mumbai rains. I haven't worked on my car in a while, so it felt great to get down and dirty (literally, because this DIY involves a lot of crawling under the dashboard).

Scope of Work: This DIY involves replacing the stock headlight leveling switch with another switch which included an instrumentation backlight illumination adjuster, and the associated electrical connections. In the stock setup, the license plate lights (on the rear bumper) are a part of the same "target" circuit as the backlights. Therefore, while installing the new switch, they need to be isolated from the target circuit by supplying power to them from the driver side taillight.

Parts Required
  1. Headlight Adjustment & Dashboard Brightness Switch (Part Number 6Q0 941 333 C)
    Source: AliExpress for $18.98, including tracked shipping
  2. Female Terminal x 2 (Part Number N 906 844 05)
    Source: AliExpress for $7.48 (10 pieces), including tracked shipping
Consumables Required
  1. 1 mm2 insulated electrical wire
  2. Scotch Lock type Quick Connectors* (x 2)
  3. Zip ties
  4. Cloth tape*
Tools Required
  1. Terminal Extractor Set*
  2. Crimping Pliers*

* Refer this post (My pre-worshipped Volkswagen Polo GT TSI with lots of DIYs) for details.

Since the clouds were threatening all the time, and also because there is a detailed thread on the UK-POLOS.NET forum for this DIY, I didn't take pictures. I will only list out the steps along with additional useful information here:
  1. Harness Preparation
    Crimp one terminal (N 906 844 05) each to either end of an appropriate length of 1 mm2 electrical wire using the crimping pliers. Wrap cloth tape around the wire for a professional look and finish.
  2. Disconnect the car battery.

  3. Switch Installation

    1. Remove the front footwell AC vent (required to remove the fuse box in the next step).
    2. Remove the fuse box. Use the terminal extraction tool to remove the stock wire from the SB7b slot. Tape and isolate the loose end once removed. Insert one end of the harness (prepared above) into the now empty SB7b slot.
    3. Remove the stock switch, and pull out its connector. Insert the other end of the harness into the empty slot no. 3 of the connector.
    4. Plug the connector into the new switch.
    5. Reassemble the new switch, fuse box, and AC vent in their respective slots.

  4. License Plate Lights

    1. Remove the centre trim on the boot lip (the one around the hatch door lock).
    2. Identify the wires carrying power in the taillight harness (grey/red in my car) and the license plate light harness (grey/blue in my car). Run a wire (preferably wrapped in cloth tape) from the taillight harness to the license plate light harness, using the Scotch lock quick connectors to splice into the OEM wires. Use zip ties to hold the wire together with the stock harness running across the boot lip.
    3. Clip the centre trim back in place.

  5. Reconnect the car battery.

Result:
My pre-worshipped Volkswagen Polo GT TSI with lots of DIYs-switch-setting.jpg

This is a pretty useful DIY, because keeping the backlight illumination dimmed really helps reduce eye strain, especially during long night drives. I have kept the setting at around 50% currently.

Last edited by TheLizardKing : 12th August 2019 at 12:42.
TheLizardKing is offline   (4) Thanks
Old 20th August 2019, 11:07   #39
BHPian
 
TheLizardKing's Avatar
 
Join Date: Jul 2013
Location: Mumbai
Posts: 428
Thanked: 1,321 Times
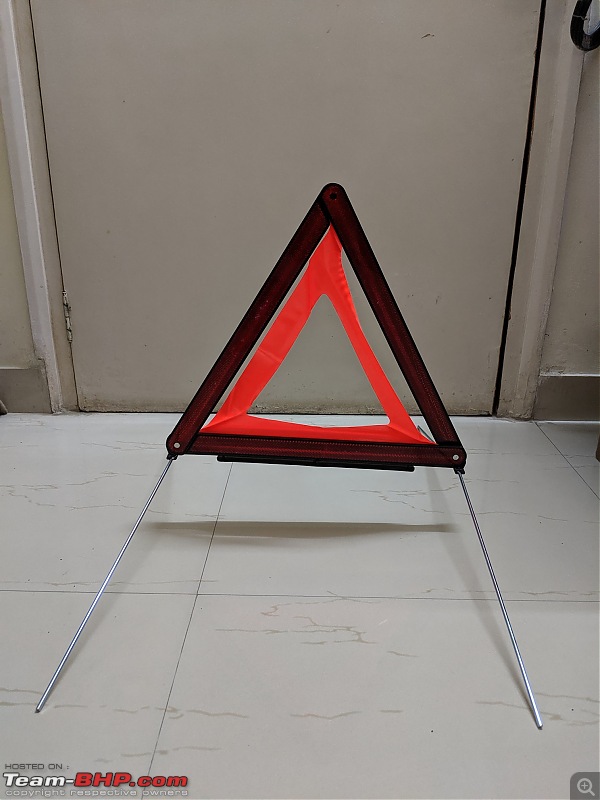
Purchase: Warning Triangle

My pre-worshipped Volkswagen Polo GT TSI with lots of DIYs-mvimg_20190820_090329.jpg

I have always wondered what this symbol on the trim stood for. It became clear once I read Gannu's recent update in his ownership thread. I immediately went to the eBay listing, and bought one. My DIY partner Viraat13, who is a safety freak, picked up the last remaining one.

Part Number: 7L0860251
Source: eBay
Price: £8.40 (inclusive of shipping)

My pre-worshipped Volkswagen Polo GT TSI with lots of DIYs-mvimg_20190818_001304.jpg

My pre-worshipped Volkswagen Polo GT TSI with lots of DIYs-mvimg_20190818_001400.jpg

The order reached me in 11 days from Latvia in Europe. It is a used item, but like new.

My pre-worshipped Volkswagen Polo GT TSI with lots of DIYs-mvimg_20190820_090652.jpg

The box fits perfectly in the recess designed to hold it. The two locking clips though have completely lost their spring action, and one of them comes out at the slightest pull. There are no rattles however.

My pre-worshipped Volkswagen Polo GT TSI with lots of DIYs-img20190818wa0001.jpg

While I was at it, a prompt from Viraat led me to dig this First Aid Kit up from deep inside my cupboard. It belongs to my MPI. I have kept it in the boot of my GT TSI now. The only safety-related item missing in my car is a fire extinguisher.
TheLizardKing is offline   (3) Thanks
Old 20th August 2019, 13:08   #40
BHPian
 
Viraat13's Avatar
 
Join Date: Mar 2010
Location: New Delhi
Posts: 787
Thanked: 3,364 Times
Re: Purchase: Warning Triangle

Quote:
Originally Posted by TheLizardKing View Post

I have always wondered what this symbol on the trim stood for. It became clear once I read Gannu's recent update in his ownership thread. I immediately went to the eBay listing, and bought one. My DIY partner Viraat13, who is a safety freak, picked up the last remaining one.

....

While I was at it, a prompt from Viraat led me to dig this First Aid Kit up from deep inside my cupboard. It belongs to my MPI. I have kept it in the boot of my GT TSI now. The only safety-related item missing in my car is a fire extinguisher.
I am super satisfied with the new warning triangle too. If you recall, we had wondered about this slot almost 8 months ago!

The first aid kit from your MPI is exactly what I had in my 2006 Skoda Octavia. I've found the Euro spec first aid kit part number. It is 6R0093108. Now, if only I can find one at a reasonable price, that ships to India.

EDIT: Super excited about the small, but rewarding mods coming up next!

Last edited by Viraat13 : 20th August 2019 at 13:09.
Viraat13 is offline  
Old 9th September 2019, 12:27   #41
BHPian
 
TheLizardKing's Avatar
 
Join Date: Jul 2013
Location: Mumbai
Posts: 428
Thanked: 1,321 Times
Update: DIY #7 (Instrumentation Dimmer Switch)

Quote:
Originally Posted by TheLizardKing View Post
This is a pretty useful DIY, because keeping the backlight illumination dimmed really helps reduce eye strain, especially during long night drives. I have kept the setting at around 50% currently.
The dimmer switch operation has one small constraint when coupled with the stock BCM. When the headlight switch is in the side lights mode, the backlights in the instrument cluster, HU, and AC display turn off completely after rotating the dimmer scroller to about 50%, and remain off for the rest of the range up to the minimum brightness position. This problem disappears in the headlight mode. The other lights (e.g. cigarette lighter, DSG gear selection, window switches) work perfectly in all modes. In fact, over a small range of dimmer switch travel, the backlights actually start blinking. Disco effect, anyone?


The reason, according to ciclo from the UK POLOS forum is this:

Dimmer IN, T6/3 = 58 signal
Dimmer OUT, T6/5 = 58d signal.

With BCM Max, signal 58 is supplied by the BCM, T73b/1 or T73b/4. (with BCM control, and modifiable)
With BCM High, signal 58 is supplied by the light switch. (without BCM control)


The only way to solve the problem then is to upgrade the BCM and put in the necessary wiring.
TheLizardKing is offline   (2) Thanks
Old 19th January 2020, 21:27   #42
BHPian
 
BlueEyes's Avatar
 
Join Date: Mar 2014
Location: Driving around
Posts: 137
Thanked: 196 Times
Re: In the pipeline

Quote:
Originally Posted by TheLizardKing View Post
For the Hatch Pop Kit, I am using this ECS Tuning design as the reference. I have already ordered the bump stops from eBay, and they are in transit. I intend to install them first and check how much they are able to push the hatch out. If it looks promising, I plan to replace the OEM struts (which have a rating of 325N) with compatible gas struts of 550N rating.
Did you pursue this? I could not find any update on this. Just wondering if those bump stops did the trick
BlueEyes is offline  
Old 19th January 2020, 21:33   #43
BHPian
 
TheLizardKing's Avatar
 
Join Date: Jul 2013
Location: Mumbai
Posts: 428
Thanked: 1,321 Times
Re: In the pipeline

Quote:
Originally Posted by BlueEyes View Post
Did you pursue this? I could not find any update on this. Just wondering if those bump stops did the trick
Hi BlueEyes. I have been a bit caught up, and all DIYs have gone on the back burner. I'll update this thread whenever I install the bump stops. They need a fair bit of grinding/cutting in order to close the hatch door properly, so I'll take pictures as well. Stay tuned. Just don't hold your breath, because it will take a while.
TheLizardKing is offline  
Old 20th January 2020, 15:15   #44
BHPian
 
DeKay's Avatar
 
Join Date: Oct 2011
Location: Mumbai
Posts: 670
Thanked: 1,033 Times
Re: My pre-worshipped Volkswagen Polo GT TSI with lots of DIYs

Hey TheLizardKing,

Could you please give an update on the Bilstein B6s? It’s been a while since you installed them, how much have you driven since? How’re they holding up? My Vento has done ~26,000km and while my stock dampers are holding up well, I’m not satisfied with the ride and “thud” noises on Mumbai’s roads.
DeKay is offline  
Old 8th April 2020, 13:10   #45
Newbie
 
alen_yc's Avatar
 
Join Date: May 2019
Location: Mumbai
Posts: 1
Thanked: Once
Re: My pre-worshipped Volkswagen Polo GT TSI with lots of DIYs

Hey TheLizardKing, Amazing thread buddy!
The efforts and enthusiasm are clearly visible through your posts.
I have a Carbon Steel Polo GT TSI 2016 as well, I live in Powai, I'd love to check your car out sometime in flesh, hit me up.
Hope you have many more Happy Miles with your car !
alen_yc is offline   (1) Thanks
Reply

Most Viewed


Copyright ©2000 - 2024, Team-BHP.com
Proudly powered by E2E Networks