News
12 motorcycle accessories that helped me on my solo Ladakh ride


The first time I used these aux lights on my KTM Duke 200 was during my night ride from Pune to Bangalore.
BHPian dwanderlustdrv recently shared this with other enthusiasts.
Hi guys!
I hope you are doing absolutely fine.
I have been wanting to share an article on this subject ever since I completed my very successful solo ride all the way from Pune to Ladakh. An article covering all the upgrades that I got for my KTM Duke 200 BS6 which helped me successfully complete the ride. Finally took out the time to get around to it.
I've covered this in my video on YouTube but for those of you who love to read, you can continue and check out the video later.
So, let's get started!
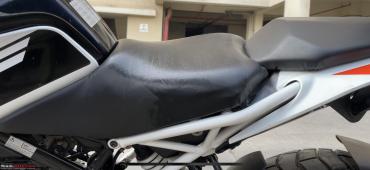
No# 1: Memory Foam Seat
- Upgrade Level: Cloud Nine
- Source of Wisdom: YouTube University
Did you guys know? The seat of the Duke 200 is very uncomfortable. Even on short 10 km rides, it gets very sore and in fact, any slight road undulation sends shockwaves all the way up the spine! I tried to get used to it over the first months after I bought the bike, I even completed my first 300+ kms ride. But ultimately I had to accept that something had to be done. So I checked a few videos online on YouTube. I love using YouTube, it's a great source of information and that's basically why I started making videos as well. Because I know that there's a lot of information that as a rider I can also share.
So anyways, getting back to my seat. I went to a nearby seat shop which had good reviews for modifying the seat. And what you see here is a 1" thick memory foam. I have installed it only on the rider seat. On the pillion seat, I have only installed a matching seat cover but it's still the stock seat inside.
This 1" foam is stuck with epoxy on top of the base seat so that it can be removed if required. It's been very comfortable since then. The difference it makes after adding this 1" foam is phenomenal!

To deal with this uncomfortable seat, I purchased an air seat as well and I've used it on a few occasions. I had carried it with me to my Kolli Hills ride back in March which was a 3000 kms ride. But I didn't use it even once.
Learning from that experience, I didn't take it at all to my Ladakh trip which was 6000 kms long. And I can tell you, with this foam seat and with the tips and tricks that I have learned as a rider, I was able to complete the ride comfortably... well, as comfortably as possible!
So if you also have a KTM Duke and are suffering from the hard seat the way I was, here's the way to go!
No# 2: Grip Puppies Rs. 1899
- Upgrade Level: Palm Heaven
- Gripping Issue Solved: No more gloveless discomfort!
Another thing that is uncomfortable about the Duke 200 and in general, the KTMs, the grips are really hard and over a period of time, they get uncomfortable. It feels fine as long as you are wearing riding gloves. But who wears gloves all the time, right?
I certainly don't wear them when I'm going to the office or am riding within the city. So I really needed something that would make my day-to-day rides more comfortable.

These grip puppies are imported from the UK. They cost almost Rs. 1900. But I can tell you, they make a big difference and I can ride all day very comfortably without any issues. Definitely recommended if you want to make your rides more comfortable!
No# 3: Bar End Weights
- Upgrade Level: Handlebar Nirvana
- Hidden Talents: Extended handlebar bliss and guardian angel during non-speedy falls
The stock KTM Duke 200 does not come with these bar end weights. I don't know why KTM and Bajaj stopped installing them on the Duke 200. I got these from the parts bin at the KTM workshop at Planet Bajaj and they cost just Rs. 200 so it's not like Bajaj is going to achieve a big saving by not providing them on the stock bike! A big advantage that you get from installing these is that your handlebar length increases and you get a lot more space to hold onto the bar. Very useful when you want to stretch a bit on long rides! Additionally, these bar end weights help to save your bike's body in case of a fall.

I've had about 2 or 3 falls on the bike so far. Each time the speed of the bike was zero. I lost my balance in tricky situations and I just dropped the bike. Now when that happens, these bar ends keep the body away from the ground. So it's a really simple but useful upgrade and I recommend getting them installed if your bike doesn't have them.
No# 4: Bobo Mobile Mount with Quick Charge 3.0 Rs. 1799
- Upgrade Level: Charge Master 3000
- Map Lover's Delight: Navigate the twists and turns of multi-day epics with ease!

Previously I had installed a regular BOBO mobile mount. It didn't have any charging facility. It was fine for doing day trips where I didn't need to charge my mobile all the time. But when I was planning my ride to Kolli Hills which was a multi-day ride, I realised that I would need something that would help me to charge my mobile phone as well. And that's when I got this installed.

This one comes with Quick Charge 3.0 and it's really useful... it quickly charges the mobile phone which helps to keep me continuously updated about my ride stats like the ETA, live traffic, alternate routes etc. Since I ride solo, I like to keep the maps on all the time whenever I'm riding. So if you're planning a long ride at any point in time, I would definitely recommend installing this one.
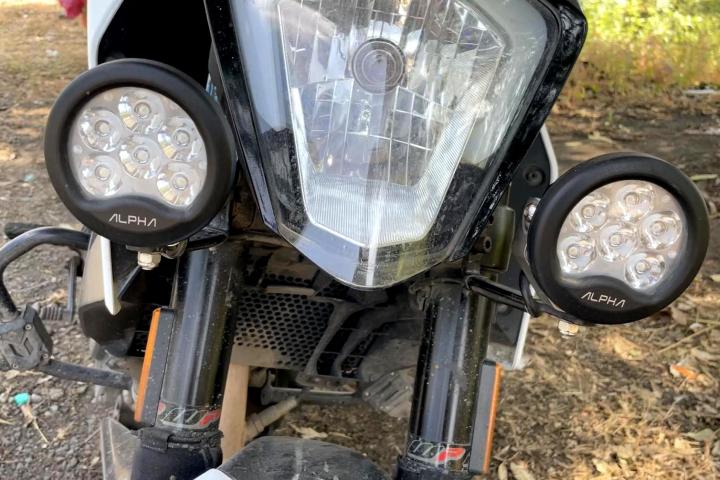
No# 5: Maddog Alpha Performance Aux Headlights (Switch, Harness and Lights): Rs. 12847
- Upgrade Level: Illumination Overlord
- Life Saver: Turns night into day, especially on those "oh-my-gosh-where-am-I" Ladakh trails
These are the top-of-the-line LED aux lights from Maddog. I got them installed just before my Kolli Hills ride back in March 2023. I wanted to test them locally before I planned any rides to Ladakh. They are powered by 9600 Lumens per pair at just 40 watts each. They are configured in a combination of 70% spot and 30% flood with a beam distance of upto 300m.

The wiring is done by an expert mechanic and it is completely internal. It is completely parallel to the original wiring and does not require any of the original wires to be cut. It will not void your bike's warranty. Here's the link to the video that I published when I installed these lights.
As far as the review goes, guys, if you're going to do any kind of night riding, these lights are highly recommended!
The first time that I used these was on my Kolli Hills ride when I set out on a complete night ride from Pune to Bangalore, 900 kms. Here's the link to that ride so you can check out the performance of these lights as well.
The second time I found them useful was in Ladakh. And I think that if I didn't have these lights, I would never have dared to plan this kind of ride. On the Ladakh ride, most of the time I was riding during the day, however, there's a section where I rode from Hunder in Nubra Valley to Thang village which is ahead of Turtuk. It takes almost 2-2.5 hours to get there from Hunder and an equal amount of time to come back. The thing is that I reached around 2 o'clock at Hunder and checked into my hotel, had lunch and at about 3, I set out again. It was going to be sundown pretty soon as it got dark early in the mountains. It took me around 2-2.5 hours to reach Thang which is the last village of India (before the POK border). On the way back, it was pitch dark! Imagine me on a mountain road, with hardly anybody else around. When I publish the vlog you will see the seriousness, the gravity of the situation I was in. I wouldn't have dared to do this ride without the lights, that's for sure!

But these lights powered my ride, they kept me going at a very decent amount of speed and very safely, I completed the ride!
So again, highly recommended from my side if you're a serious biker and you like to do long-distance riding.
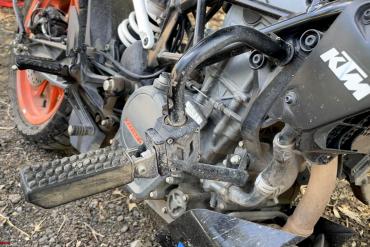
No# 6: ProSpec Highway Footpegs Rs. 2000
- Upgrade Level: Legroom Symphony
- Fold and Forget: Give your knees a break on endless highways and keep that crash guard scratch-free.
So the thing with the KTM Duke is that it's a sports bike. It is not like a cruiser or an adventure bike. What that means is that when I sit on the bike, my leg is bent at the knee at a very sharp angle. You can't sit all through your ride like this, it gets very tiring, you need to stretch your legs from time to time a bit. And that's where these ProSpec Highway Footpegs prove to be useful. Especially on long highways, where you're just going to keep going in top gear without downshifting. It really gives a good break.

They're foldable so you can fold them up when you're not using them. I've installed them at home by myself. They're very easy to install. I would recommend them for you guys to use as well but it's completely upto each and every individual. If you're not comfortable with having these, then I don't think you need to install them.

But an additional benefit that you get from them, when they're folded up, they're keeping the ground away from your actual crash guard. Now I did have a small fall when I was coming back from Ladakh. Just before crossing Baralacha La pass at Sarchu Bridge, which is under construction. There's a section with a water crossing. It's pretty complicated and that's where I had the fall. Combined with these footpegs and the bar end weights, there is not a single scratch on the body of my bike and I think that definitely is a useful reason why someone would want to install these highway footpegs.
No# 7: Blind Spot Mirrors Rs. 399
- Upgrade Level: Rearview Revolution
- Mirror, Mirror: A must-have for Duke's less-than-awesome mirrors on the highway dance floor.

Blind spot mirrors are easily the cheapest must-haves especially if you ride a lot on the highways! There's a sticky pad behind so you just stick them onto your existing mirror. And they're very useful because especially the KTM Duke's mirrors, their coverage is not very good. So you need to keep moving forward and backward to be able to see who exactly is behind you. On the highways throughout the ride, these are what I've been primarily using, and I found them very useful. Highly recommended from my side especially if you do a lot of highway riding.
No# 8: Zana Tail Rack Rs. 4000
- Upgrade Level: Luggage Platform Deluxe
- Back-Saving Secret: Avoid the tail bag back-push annoyance; let the rack do the heavy lifting!
When I started my Kolli Hills ride back in March 2023 I didn't have this rack at that point in time. I had a tail bag with me then and it would come right upto the edge of the pillion seat and it would keep pushing my back. You will see me talking about it on my vlog when I start my ride from Pune to Ladakh. On the first day, I had installed my tail bag like that and it kept pushing my back a little bit from time to time which gets very annoying! What the rack does is that it gives you a very strong and stable surface. So you can install the bag half on the seat and half on the rack. That way, you get a lot of space behind you. The Duke 200's seat is not very lengthy, it is not like Adventure bike seats. And so it doesn't get very comfortable on a long ride if you have a bag continuously pushing your back. So, definitely highly recommended from my side to have a Zana rack.
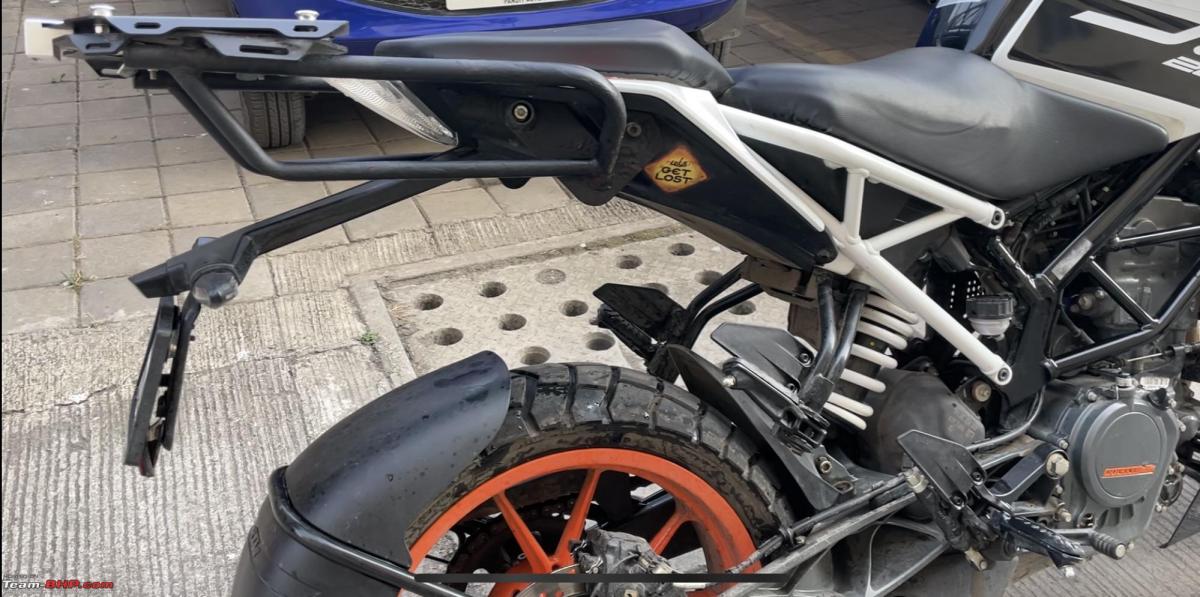
Why I went for Zana because it was available readily for the KTM Duke. There are other racks available as well. They're more expensive as well. This is one of the cheapest but sturdy ones available out there. One thing I didn't like about this rack is that the paint keeps chipping off and then whatever surface is exposed keeps getting prone to rust. So I have to maintain it from time to time. I've bought a can of black colour spray paint which I use to touch up the surface and to keep the rust away, I also spray WD-40 from time to time. So there is a little bit of maintenance involved to keep this rack rust-free. But apart from that, I think that it is a very robust upgrade.
No# 9: Radiator Grille from Zana Rs. 2300
- Upgrade Level: Radiator's Bodyguard
- Slim Yet Mighty: Safeguard your radiator through Ladakh's rugged trials.
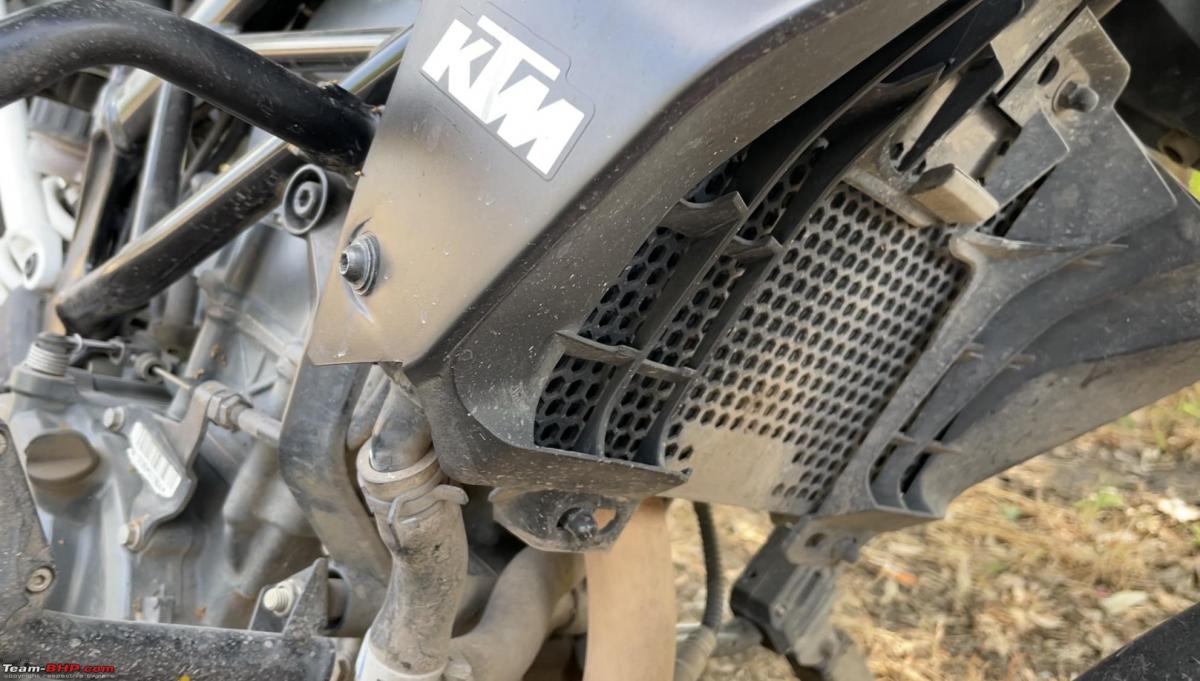
The next upgrade: going into the mountains, going into off-roads, there's a very high chance, especially on this kind of a bike that a stone or a pebble can hit your radiator and cause it to leak. To address that, I purchased and installed this radiator grille from Zana. I installed it at home myself and here's the link to the video I made of the installation.
It was pretty easy to install, not too difficult. When you hold it, it is so thin and light that I had doubts about whether it would really protect the radiator or not. But I am back from Ladakh and I had no issues at all with any portion of the bike!
Protection is definitely good whenever you're planning a long ride, especially if you're planning a solo ride where there would be no one else to help you. So again, a highly recommended upgrade from my side!
No# 10: Fork Covers from Mototrendz Rs. 800
- Upgrade Level: Dirt Repellent Guardians
- Terrain-Proof: Shield those upside-down forks from Ladakh's dust storms and rocky escapades.
The thing with upside-down forks is if the seal cover breaks, the oil is going to leak down right away. It's not like your regular forks, right?
A fork cover keeps the seal and the surrounding area clean. It doesn't let dirt and dust and grime get inside. I found it useful when travelling to Ladakh. When you see my Ladakh vlogs, you will see that there are all kinds of terrain over there! So the bike has to deal with bad roads, rocky roads, muddy, dusty, sandy roads! I feel that the life of my fork seals definitely gets increased when I'm using these to protect them.

They're highly recommended by experienced bikers. I think I have barely started my journey right now with my first trip to Ladakh. Sometimes it is good to take advice from more experienced riders. It definitely helps to keep your bike safe and enhance your experience as well. And they don't cost that much, they cost just 800 Rs and they're very easy to install. I installed these myself and it's in the same video in which I've installed the Zana Radiator Grille.
No# 11: Apollo Tramplr XR Tyres Rs. 12600
- Upgrade Level: Road Warriors' Choice
- Terrain Versatility: Conquer Ladakh with 70% on-road and 30% off-road mastery.

Coming to the biggest upgrade of my bike, these are the Apollo Tramplr XR tyres. They're specifically made for bikes like the KTM Duke 200 and the KTM Duke range. These have a 70/30 on-road/off-road bias which means that you can use them for 30% off-road and 70% on-road. I specifically got these installed for the Ladakh trip. You can see the video over here.
In all, they cost around 12600 Rs for both the tyres. They helped me with all kinds of terrain that I spoke about in Ladakh and not a single puncture throughout my 6000 kms trip. I think that's an additional bonus I would say, for installing this kind of tyres. I had the stock MRF RevZ on this bike before. And I can tell you, I was not at all confident when I used to corner the bike. It used to feel as if the rear end was slipping. With these tyres, the wet grip and the cornering grip have enhanced dramatically! Considering that, my confidence in cornering has also improved. I don't really think twice before I go through a tricky section of the road. It's all about the tyre compound that they've used. It's hard in the centre and soft at the edges, so that gives all the cornering grip that you need.
So if you are looking for an upgrade for your tyres these are a great option. Also, they're made by an Indian company so they're not as expensive as some of the imported tyres out there. Apollo says that they've benchmarked these tyres against the Pirelli Scorpion Rally STR tyres and have exceeded their performance. After my very successful Pune to Ladakh ride, I believe them!
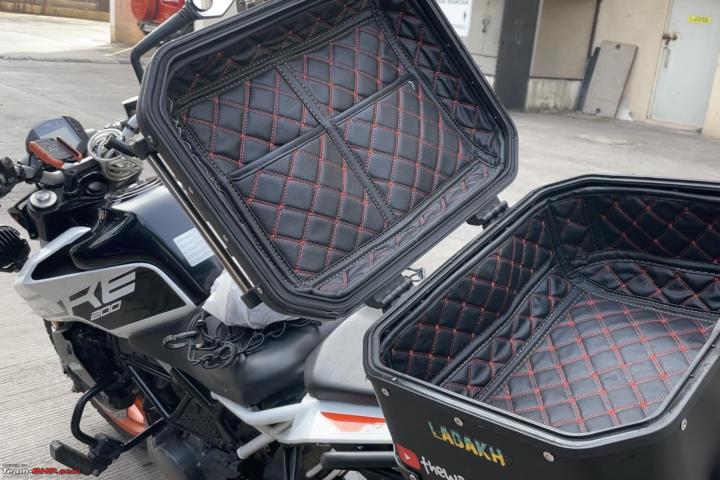
No# 12: Carbon Racing 36 Top Box Rs. 13999
- Upgrade Level: Stylish Storage Master
- Mounting Confidence: Four-point stability and sleek looks – because a delivery bike look wasn't on my wishlist!

Coming to the last one. I have installed a Carbon Racing 36 top box. Carbon Racing is a company in Bangalore which manufactures accessories for all kinds of bikes, but specifically for KTM, BMW, Honda and now Triumph as well. They have come up with this very robust top box. This one's a 36 litre, they come up in a range of 36/42 and 46 litres.

The KTM Duke is a very sleek-looking bike and I didn't want to add something that would look out of place on the bike like a huge square-looking box making it look like a delivery bike!
And as long as I can keep my laptop bag in here whenever I'm going to the office, it serves my purpose perfectly.
So the thing is that earlier I had a Shad 29 top case. The thing with the Shad 29 is that it has only 2 mounting points. As opposed to, the Carbon Racing one has 4 mounting points as you can see in the pic below.

The Shad top box is made of a kind of tough plastic. It's really hard plastic, but plastic can break and that's what I've seen happening in some review videos on YouTube. This box is great for riding on excellent roads but in our country suddenly you can have a very bad stretch of road. Because of this, I was not confident going out on long rides with the Shad box. So I installed this one. So far my experience with this box has been really good. The best thing is that if you have a box like this, wherever you go on a ride, you can put all your stuff inside the box and lock it up and then you are free to explore without worrying about your luggage on the bike!
So that's it guys, I hope you liked this article and found it useful. You can check out the video and other videos that I've put up on my channel.
Check out BHPian comments for more insights and information.
Find Car News
Just News


About Us

Buy & Sell
USED CARS