News
How I built a carbon-fibre bicycle from scratch as a winter project

For this project my inspiration was Cannondale Topstone or a bike like that which usually starts at INR 2.4L roughly with low end Shimano components.
BHPian amol4184 recently shared this with other enthusiasts.
A while ago I had free time and decided to build a bike in my patio as a winter project. After reading forums, watching YouTube videos I started looking up carbon frames made by Chinese companies and sold directly or via AliExpress like sites. Primary reason was cost and secondly the custom painting they offered - I could have any color like I wanted! The second option was of course to buy a used bike and perk it up but where is the fun in that? I deferred buying a readymade bike in favor of open-mold CF frame from China. Lot of folks scoff at Chinese goods. I did too. In fact I still do in some cases like those chintzy scooters that are spawning pan India.
With apprehension, I went into rabbit hole called open-mold carbon frame manufacturing. Like the name suggests, open mold basically means the design is open-source like in software world. Anyone can take the source or mold in this case and modify per their liking and produce a new frame with some variations. And then sell. And profit.
What that means is small boutique bike manufacturers can simply pick up a frame design from vast catalogues, fine tune the geometry, dial in all adjustments and get it manufactured from, where else but China. Once these frames have been manufactured per the requirements of name brand company, they are QC'd, labeled and sold - at astronomical prices in some cases.
For this project my inspiration was Cannondale Topstone or a bike like that which usually starts at US$2700 + tax (INR 2.4L roughly) with low end Shimano components and goes upto US$8k.
By now surely many of you have guessed how the name for project came to be
Obligatory disclaimer: I am not proposing everyone should build a bike from ground up. If you do and bike breaks in half while going down the hill at 70kmph you are kindly on your own, thank you…please assume the risks with such projects. Not that it WILL break but if does...the warranty on these frames (and wheels) is iffy at best from what I have read.
To make myself feel better I dug up instances of Specialized and other top slot bike makers' CF frames breaking up. Its not common but it happens and same for wheels.
With that out of the way, lets get into frame and component selection. One of the MOST exciting parts of the build! I mean who doesn't like to spend money online?
Frame selection
Core of the build. The most important part of the bike and also the most exciting to hunt because you have SO many choices and custom paint options - its nearly limitless. Like the new Specialized S-Works STR paint job but is vastly out of budget? No worries, just find out the color codes and pattern and send it to custom paint shop. Like a particular bike's geometry? Most probably some frame with same geometry will be available at these shops. When I say shops, I mean various manufacturers and their websites selling open mold frames. I have consolidated all such shops that I considered while purchasing my own frame and put them in the excel sheet below for convenience along with all other parts needed for build and tidbits.
I will continue updating it as I make changes and upgrade parts.
The frame I ordered is the one highlighted in yellow.
The second page has list of all bits and pieces that I ordered along the way. I realize that to open most of those links, you may need a VPN since its mostly AliExpress stuff.
Geometry
I was personally looking into a frame that would allow comfortable geometry and clearance for wide, thick tires. Which meant it had to be a gravel frame. Since last few years, gravel is a surging trend with companies bowing to market and launching gravel specific products like GRX by Shimano and XPLR by SRAM. How much difference it makes to get gravel specific components over road components? Short answer - not much. Long answer? We will see later, as I found out from my personal experience. Majority of gravel components is marketing gimmick and you should be fine with road components for most use cases.
Back to the frame, apart from lazy angles and tire clearance I also wanted a frame that allowed multiple bottle holder mounts, fender mounts, and disc brake compatibility. Disc brake caliper mounting is another pain point as I later found out and if you are looking to build a bike, pay attention to whether the caliper mount is flat or post or IS. Most new frames now a days are coming with flat mount while just a few year ago most frames were post mount. There are plenty of calipers in the market for post and flat mount each. Not only that, since flat mount calipers are the new thing, companies have come out with adapters that let you mount any caliper to any type of mount. Theoretically it is all supposed to work out smoothly but it doesn't. More details about this in component selection.
Bottom Bracker Dilemma
Then comes the biggest pain of them all, the bottom bracket standard and cranksets that go with them. Another problem that should not have existed if companies didn't try to "innovate" something that was already working fine. Like they say "if it ain't broke..." but biking industry is not the one to think logically. One of the best BB standards guide is here. Its mind boggling. When you purchase a frame, pay special attention to this mess. Ironically, after many standards evolved over last 2 decades, the industry is going back to age old standard called the English BB or threaded BSA. Take my word and look for something with BSA or T47 BB. Refer to above URL for more information.
With that said, I ended up with a frame that is BB386 which comes with its own loopholes and pitfalls besides allowing only certain type of cranksets. Of course if you are really willing - there are adapters to allow incompatible cranks fit into it. Of course.
Wheel dropout type
Wheel dropouts is also something you may want to keep an eye on. The quick release (QR) standard is fast being going out of fashion for gravel/CX frames and being replaced by thru-axle (TA) for more rigidity on harsh terrain. Not all wheels are compatible with these styles. Some companies do allow converting QR wheels to TA but many don't. If you have old set of wheels that you plan on using like me, be cautious. As I found out later, assuming things can be very frustrating. More on this in wheels section!
Price
And then there is the price. Top notch race spec CF frames by name brand can cost up to $8k to $10k while most consumer spec frames fall into $2k to $4k or thereabouts. Still a top dollar amount, just for the frame. You can save some bucks by going to smaller manufacturers like Bombtrack, IBIS for example. Or you can save some real moolah by going to Chinese open mold frames which is the topic of discussion here. Most of the frames fall into price range of $500 to $800 + shipping and if you decide to paint the frame, that is another $80-100 bucks. The painting costs vary largely per the seller and costs increases per your customization. You also have choice of matter or gloss finish. The ultimate saving comes from keeping the paint raw or UD finish as they call. In that case, it is just the frame and shipping cost.
I was tempted to keep it raw but I am not really a black color person and generally try to avoid purchasing anything in black if I have the choice. Decided to get it painted in some "earthly tones" and did a Google search for inspirations. That search led to me to some interesting frame makers. I simply downloaded a picture of one of the frames that I liked and kept for reference.
Sizing
While looks are important, even important is the sizing. Most of these websites do not have sizing guide like you will find on Cannondale or Specialized. So what I did is this. Went onto Cannondale's website and acquired a size that would suit me. To confirm, I did that on many other websites. Almost all confirmed that I needed a bike in size L or 56 in most cases. Next, I looked at geometry of 8 to 10 different gravel bikes from Cannondale, Marin, Specialized, Trek in size 56 and collected the reach and stack numbers. On average, I needed a reach of 380 to 390mm and stack of 580-595mm. With that finalized it became easy to choose a size since all the Chinese websites do have geometry charts for every frame they sell (thank god). In general I have seen that none of the frame have crazy geometries and stick to mainstream numbers. What that means is if you are size 54 in Trek, you should be good to go with 54 in most of these frames. With that said, still, don't assume and verify numbers. Sometimes those frames are sized according to Asian markets and their size L can very well be M or S for rest of the world.
If you do mess up sizing, all is still not lost. Bike feels too upright and short? Add a longer, negative angle stem. Still short? Add angled seatpost and further push the seat on rails. Bike feels too big? Oh well, now you are in real trouble. Pretty much only thing you can do now is add a short 70-80mm stem and hope it works.
When in doubt, go for a shorter size.
Painting the frame
Now we come to colors. Like I said it is entirely optional. If you are one of those "stealth" look guys go for UD matte finish. If not, then find a sample picture of the frame like I did and send it over to sales rep you are talking to. The color accuracy and pattern matching is about 90 to 95%. In my case I would say they came very close to what I had sent. The colors they use are called Pantone or RAL. What you have to do is pick exact color code from the chart and send it over.
I found out that eyeballing correct color from huge chart is near impossible and used a website that allows you to pick a color from the image and gives closest matching RAL or Pantone code. Pretty cool! Here is that website.
Purchasing
The actual purchase of the frames isn't as straight forward as adding stuff to cart and paying it like on Amazon. Most of these companies have archaic websites looking like they were made in early 2000's with very clunky UI, bad grammar, many clerical mistakes, poor color representation, just plain wrong information in some cases and lastly many of them don't even have prices mentioned anywhere. So the way it works is, you have to find email ID or Skype ID of the sales rep and send them a mail with all your queries. With luck you will get a satisfactory answer in first go but chances of that happening are slim. Basically you keep mailing back and forth until all your questions are answered.
If you do this, I urge you to ask all basic questions even if it is mentioned on the website like what kind of BB is supported, which calipers I can mount, is the frame full internal or semi internal etc. Don't leave any stones unturned - you will thank me later. Most importantly as I learnt slowly is to keep the language in the mails as simple as possible. I also found out that Skype is better than emailing them but not all reps have Skype. If you go email route be very, VERY patient. It can be a frustrating experience trust me. When in doubt ask for actual pictures of the frame.
Internal cable routing or not
Before I forget - industry is leaning heavily towards full internal cable routing (ICR) and most if not all open-mold frames are full ICR. The ICR can be a major, MAJOR pain point not only while building the bike but for future maintenance too. Since I am a sucker for pain, I decided to pucker up and went with full ICR unknown of the hell that was going to be unleashed on me later. The ICR can be achieved in two ways a) fully integrated handlebar where stem and handle are molded together. The angles are fixed and cannot be changed later. b) Separate handle and stem with matching holes on both to route the cables. Regardless of option, both of these can be super frustrating.
But, things we do for clean look!
Most of the sellers do give you option of semi-ICR which to me sounds like a much better compromise. Looking back I should have gone with semi ICR but its too late now. When time comes I will build the bridge and cross it. The ICR also warrants using expensive compressionless cable housing and preferably PTFE coated inner cables. The more I think about it, the more pointless it seems to me. This particular article explains perfectly the perils of ICR.
Any way. After color, pattern, size, pricing (and discounts if any) everything was discussed with the vendor I chose (Velobuild) I was presented three different options to pay. Two of them non-fee and one with fee. I chose the fees option (PayPal G&s) for a nominal fee. If anything went wrong, I wanted some support by my side. For a few bucks, the peace of mind that PayPal provides is invaluable. Again, its not like Amazon. So after payment is done, I sent a mail to sales rep with payment details and order ID. Since each order is highly customized there is a need to associate your payment with the order. Once payment was done, I sent again the frame picture all the Pantone codes and list of other accessories I paid for.
Warranty? 2 years - which I hope I never have to claim.
Here is what I ordered:
1. Frame in size L/56.
2. Carbon fiber bottle cages 2 pieces.
3. Rear derailleur hanger 2 pieces extra.
4. Headset spacer set 1 piece extra. (set of 5 spacers)
5. Seat post clamp 1 piece extra.
6. Painting fee for 3 colors.
One RD hanger, spacer set, seat clamp is all included in the price of the frame but I ordered extras just in case. And it was an excellent decision as I found out later.

Mock up that I sent.

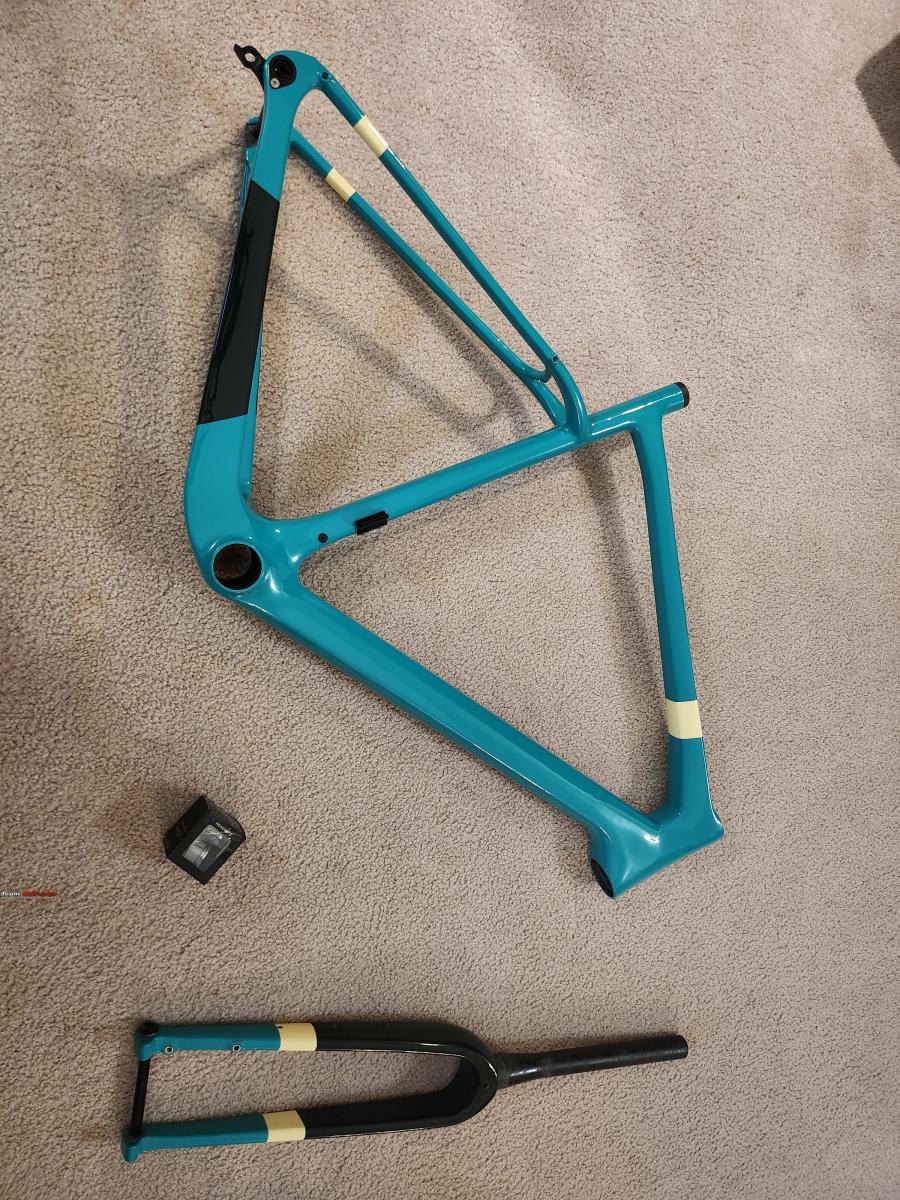
Actual frame I received. Pretty close to mock up I say.
As you can see, the frame was done up nicely. The payment to painting took exactly 2 weeks as communicated. After receiving the mock up in the mail, frame was shipped by FedEx in two days and tracking number sent to me. For the records, China to my home in Seattle the frame took 5 days. By 3rd and 4th day I was giggling like kid going to Disneyland. On 4th day I could not wait for delivery and called FedEx local delivery center to put a hold on delivery so that I could pick it up myself - I did not want to keep circling and looking out the window whole day. The next day I reached FedEx center 745AM, about 15 minutes before they opened their doors to impatient customers like me. With a beaming smile I received my package at 805 and drove back home as fast as I could. Boy o boy, I do not remember when was the last time I was THIS excited
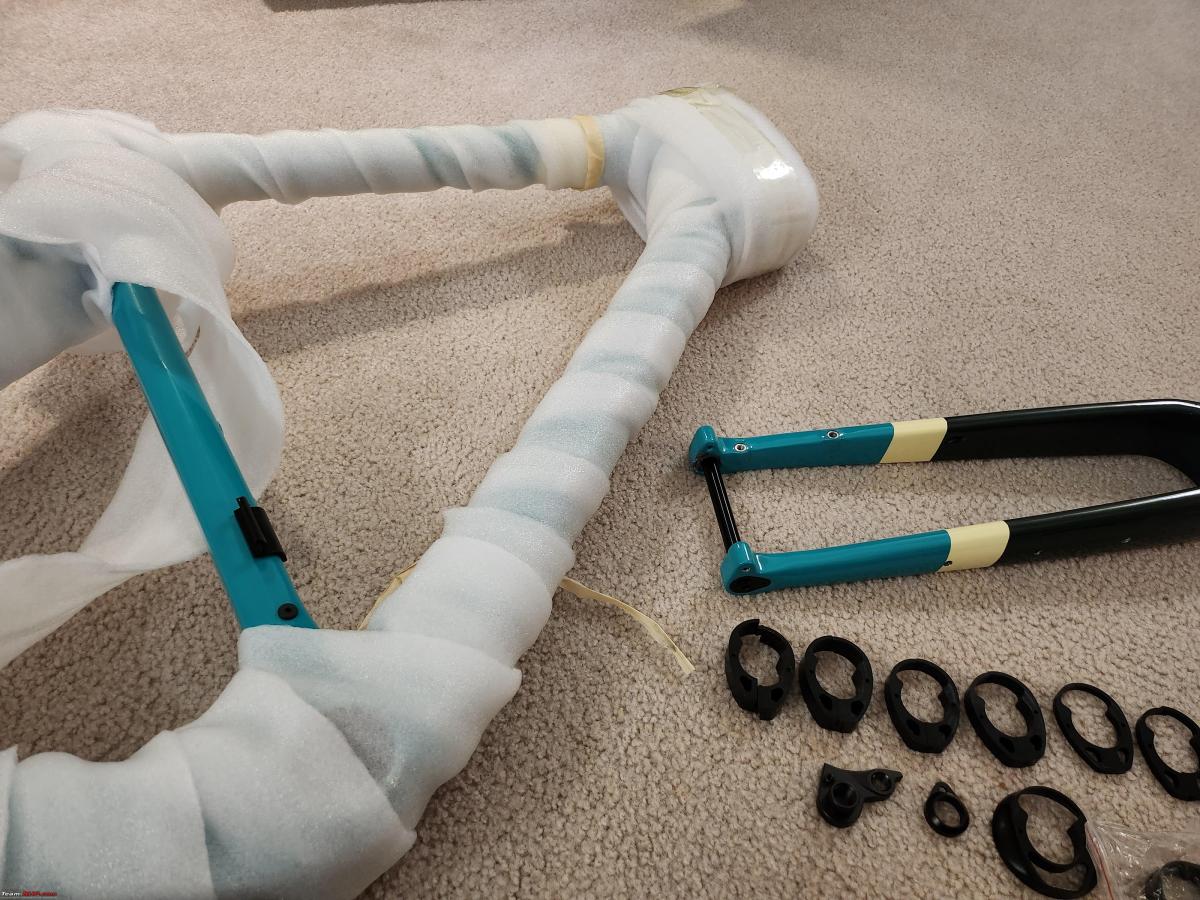
Reached home in 15 minutes, carried the surprisingly light box in living room and carefully took pictures of the box from all the angles without opening. Then came the big moment while the wife looking at me questioningly. With shivering hands I cut the tape and opened the box only to be greeted by massive wads of thick foam.
Oh, that is a good sign I said to myself. You want as much foam as you can humanly want around your frame. Slowly pulled out everything from the box, and without unwrapping foam strips, took pictures of everything. Then, I unwrapped, made sure my order was fulfilled 100% and went on to proceed with frame for any damage and cracks. Thankfully, there was nothing worth panicking about the frame itself but one of the parts - the bottom bracket was missing. Not a big deal but worth noticing. As I inspected everything there was one more thing missing. The cable guides within the frame for routing. These guides help you push cables into correct outlets. I was bummed a little but couldn't help it. I had seen pictures where the frame came with cable route guides.


After I was satisfied with the paint quality, frame quality and parts I sent a mail to sales rep informing of the receipt and also of the missing bottom bracket. He apologized and promised to send the BB immediately. The BB came to me in about 2 weeks uneventfully by which time I had already acquired a good bottom bracket the details of which will be discussed in next section.
Continue reading BHPian amol4184's thread for more insights and information.
- Tags:
- Indian
- Member Content
- Bicycle
Find Car News
Just News


.jpg)


About Us

Buy & Sell
USED CARS