News
Mahindra XUV300 rear seat: Installing safer 3-point seatbelt

A torque wrench with sizes 10 and 14 hex sockets and an adjustable spanner are mandatory. A flat head screwdriver and a strong tweezer for plastic clips are optional.
BHPian Goandiaries recently shared this with other enthusiasts.
When I purchased the XUV300 late last year, their top of the line variant [W8 (O)] had undergone several cost-cutting surgeries. One of the main features that was axed was the 3-point seat belt for the rear centre passenger! I was annoyed when their brochures and website were still showing this as a feature when my vehicle was delivered. And shockingly, their website still features this under the "safety" section at the time of writing this post.
M&M hasn't updated their website

The irony is that M&M obviously knows that "the 3-point seat belt on the 2nd row ensures enhanced safety for all occupants". They still decided to silently remove this feature from the actual car and not from the website. The website still shows this as an existing safety feature long after its deletion has been widely discussed, including in Team-BHP. I am still trying to understand how the M&M management cordinates information between various teams of theirs. In this instance – the marketing team/web management team is caught sleeping. Or do they deliberately false advertise?
Disclaimer: This post may be specific to XUV300 since the rear seat steel panel and the seat foam were designed to mount the seat belt assembly.
Replacement parts: I looked into boodmo for details – the centre seatbelt assembly (Part No: 0120AS200031N, Cost: Rs. 1454 incl. delivery) and the plastic seat belt guide (Part No: S2402A110031C, Cost: Rs. 20, from Mahindra). Like I mentioned in my earlier post, it is hard to get help from the service folks. I talked to another manager in a different state – again, with no leads. My guess is that the service teams do not have time / do not bother much to think about stuff like this that do not come under serviceable parts. I placed the order through boodmo in January and received only the seatbelt assembly by mid-April. The guide was not available till mid-May. Meanwhile, I realised that I missed another part – a mini buckle assembly (Part No: 0120AS200171N, Cost: Rs. 605) – which clips the seatbelt near the lower seatback. By then, my 10, 000 km service was due, and the service manager was kind enough and very helpful in procuring the mini buckle and the seat belt guide through their parts division – and these two arrived within the next 10 days! However, he was clear before purchase that they have no authorisation / liability for doing such work in their station. I assured him that I will do it myself! All parts, including the one from boodmo, arrived in genuine OEM boxes. I purchased a size 14 fine-threaded locknut (Cost: Rs. 20) from a local hardware store. Also, a strong double-sided tape is required to fix the plastic guide.
The seatbelt assembly and the plastic seatbelt guide

Mini buckle assembly

Main tools required
A torque wrench with sizes 10 and 14 hex sockets and an adjustable spanner are mandatory. A flat head screwdriver and a strong tweezer for plastic clips are optional. Following were the steps I followed. I did not take as many pictures as I thought I should during this process. I did go through several videos on seat belts and seats in general.
Remove backrest assembly: the original seat covers in w8o are provided with zippers on the side facing the boot. A hexalobular bolt at each bottom corner holds the backrest in place with the pivot brackets. Use size 10 hex sockets to remove these bolts and pull out the backrest from the brackets.
Remove the lap belt: use the size 14 hex socket to remove the bolt holding the lap belt in place. Secure this bolt.
Fit the mini buckle: The mini buckle assembly comes with its own bolt, which fits precisely in the same position as the lap belt.
Mini buckle assembly in its slot

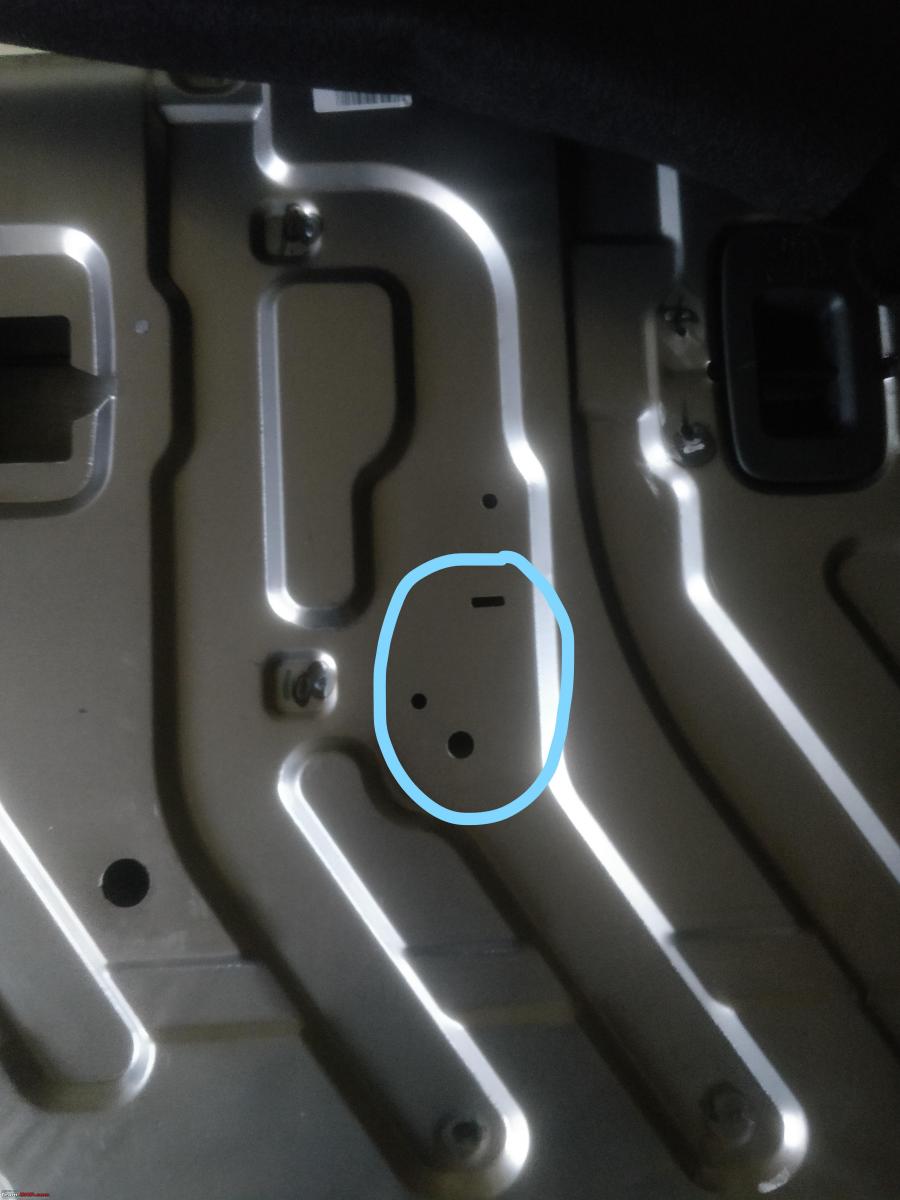
Fit the seat belt assembly: The leather seat cover cannot be removed from the foam side as it is pinned from the inside. However, the fabric on the side facing the boot is held using a rigid plastic sleeve. Additionally, a plastic clip holds this cover to the steel seat frame at the bottom centre (this clip is right in between one of the ISOFIX mounts). Pry it out using a screwdriver. Another plastic cover secures the fabric in place near the tether anchor. Remove this plastic cover (use tweezers to pull out the clips), and the seat cover moves away freely, exposing the steel sheet ‘welded’ to the seat frame! This welding was a significant setback as I thought I could remove this sheet entirely to fit the seat belt assembly. A word of caution: the edges of this steel sheet are pretty sharp – make sure you protect your hands while working. I covered the edges with microfiber towels. The foam on the right side (wheel side) separates without effort while the centre portion (with armrest assembly) does not move. There’s enough access through the wheel side to insert the seat belt assembly into the slot. There’s only one way the belt goes into the seatbelt slot. Once in place, use the secured bolt from step 2 and the locknut to tighten the seatbelt assembly.
Seatbelt slot highlighted
Route the belt: This was a bit tricky. I made sure the belt runs straight to the top of the seat and exits between the steel sheet and the seat frame. This gap actually is a tad too small for the buckles to enter freely. This was a bummer, and I used pliers and a screwdriver to squeeze the buckles through. One can even cut out a small portion of this sheet around this area, depending upon convenience.

Seat belt guide: the plastic guide fits on top of the seat between the two headrests. I aligned the belt assembly straight and cut out slits in the leather cover and the foam for the belt to pass through. Stuck a plastic sleeve along the foam slit to avoid disintegrating the foam whenever the seatbelt is pulled out. The plastic guide on top was attached to the seat using strong double-sided tape (I used silicon tape).

Latch the mini buckle assembly with the seat assembly. And voila, the 3 point seatbelt assembly is ready!

Check out BHPian comments for more insights and information.
Find Car News
Just News


.png)


About Us


Buy & Sell
USED CARS