Team-BHP > 4x4 & Off-Roading > 4x4 Vehicles
Register New Topics New Posts Top Thanked Team-BHP FAQ


Reply
  Search this Thread
592,878 views
Old 16th February 2017, 14:43   #91
BHPian
 
KkVaidya's Avatar
 
Join Date: Nov 2008
Location: Ahmedabad
Posts: 931
Thanked: 760 Times
Re: Mitsubishi Pajero SFX - Project Overland Conversion

Quote:
Originally Posted by Tejas@perioimpl View Post

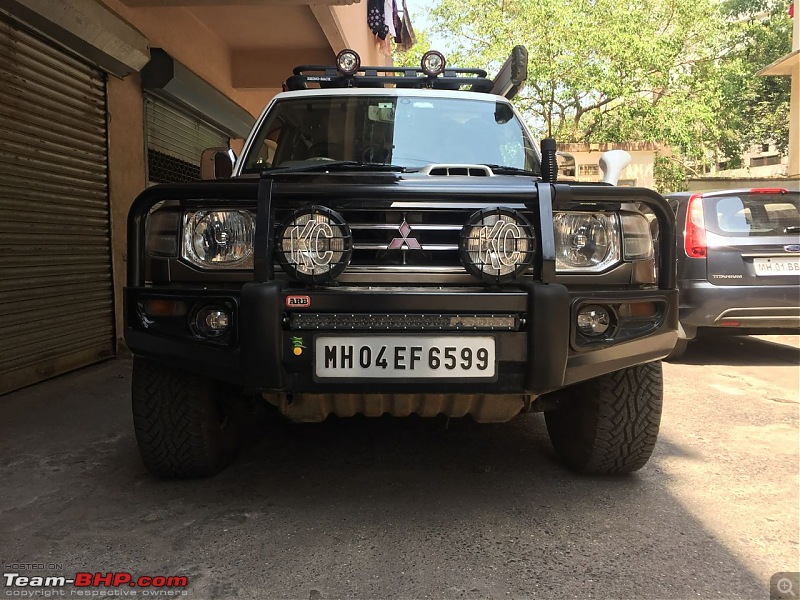
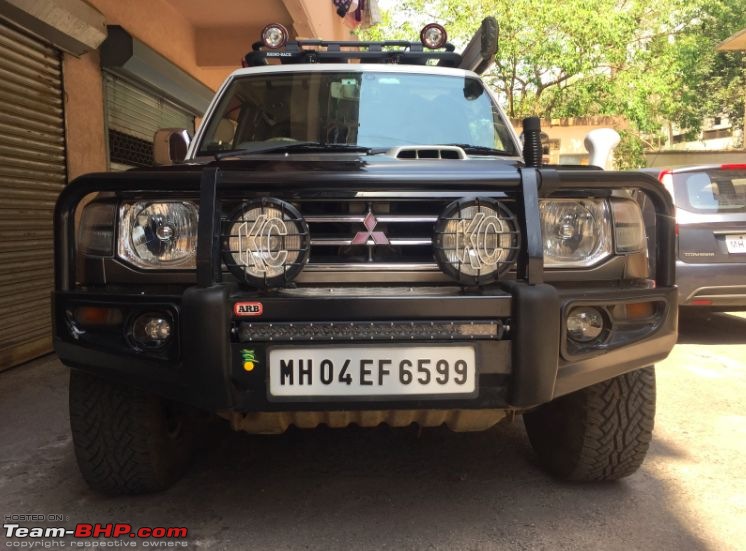
Customary pic of the Pajero at it's parking spot:

I still have to mount the other add on accessories. Will take out time over the weekend to do that.
Your Pajero looks Lovely. Hats off to you for the dedication and the quality of stuff you buy. It would look Gaudy if you deviate from quality parts.
KkVaidya is offline   (1) Thanks
Old 16th February 2017, 14:55   #92
Distinguished - BHPian
 
karan561's Avatar
 
Join Date: Aug 2006
Location: Mumbai
Posts: 5,068
Thanked: 22,246 Times
Re: Mitsubishi Pajero SFX - Project Overland Conversion

Well done Tejas

Honestly i have never liked the idea of roof racks (as in India they shout out TAXI) & aesthetically also i kinda believe they disturb the looks etc but at the end of the day looking at the Rhino Rack on your Pajero i truly believe it is looking good and will revamp the way people look at roof racks

Last edited by karan561 : 16th February 2017 at 14:57.
karan561 is offline   (1) Thanks
Old 16th February 2017, 21:08   #93
Senior - BHPian
 
sourabhzen's Avatar
 
Join Date: Jun 2012
Location: GURGAON
Posts: 1,591
Thanked: 1,401 Times
Re: Mitsubishi Pajero SFX - Project Overland Conversion

Quote:
Originally Posted by Tejas@perioimpl View Post
Finally got the roof rack fitted after a long wait and deliberation.

Their new range of roof racks is called the Pioneer system which is like a modular system and you can keep attaching various mounts to it via their patented slot system. Additionally its an all aluminium alloy that is extremely strong and light weight.

Thus, decided that Rhino Rack would suit my needs the best.
Your Project Overland is shaping up very well. This thread will become a bible for many who would like to take up overlanding in India.

I saw this roof rack on Safari Storme in Auto Expo 2016. They distributed a handout with price list too but it is not available with them now.
(image courtesy: indianautosblog.com)
Attached Thumbnails
Mitsubishi Pajero SFX - Project Overland Conversion-tatasafaristormetufffrontquarterattheautoexpo2016.jpg  

sourabhzen is offline   (2) Thanks
Old 23rd February 2017, 20:32   #94
BHPian
 
Join Date: Jun 2016
Location: Frankfurt
Posts: 32
Thanked: 56 Times
Re: Mitsubishi Pajero SFX - Project Overland Conversion

Great Work Tejas!

The SFX has been my dream vehicle ever since I was a school going kid!

It is it really a treat to see your overland vehicle take shape! And the amount of effort you have put in the vehicle is genuinely commendable!

Looking Forward to the next update!

Regards

Ishan
ishankpatel is offline   (1) Thanks
Old 24th February 2017, 06:36   #95
Team-BHP Support
 
benbsb29's Avatar
 
Join Date: Nov 2006
Location: Brisbane
Posts: 9,968
Thanked: 13,227 Times
Re: Mitsubishi Pajero SFX - Project Overland Conversion

Rhino rack is definitely held in high regard here in Australia. It's the default choice as far as roof racks are concerned.
benbsb29 is online now   (2) Thanks
Old 24th February 2017, 12:44   #96
Distinguished - BHPian
 
Tejas@perioimpl's Avatar
 
Join Date: Sep 2008
Location: Bombay
Posts: 4,423
Thanked: 9,582 Times
Re: Mitsubishi Pajero SFX - Project Overland Conversion

Quote:
Originally Posted by benbsb29 View Post
Rhino rack is definitely held in high regard here in Australia. It's the default choice as far as roof racks are concerned.
That's true. Did a lot of research and spoke to some Aussie mates before finalising one.

The best part is the modular bit where you can remove stuff and securely add mounts by simply slotting things and tightening the bolts.
Tejas@perioimpl is offline   (2) Thanks
Old 15th March 2017, 15:43   #97
Distinguished - BHPian
 
Tejas@perioimpl's Avatar
 
Join Date: Sep 2008
Location: Bombay
Posts: 4,423
Thanked: 9,582 Times
Re: Mitsubishi Pajero SFX - Project Overland Conversion

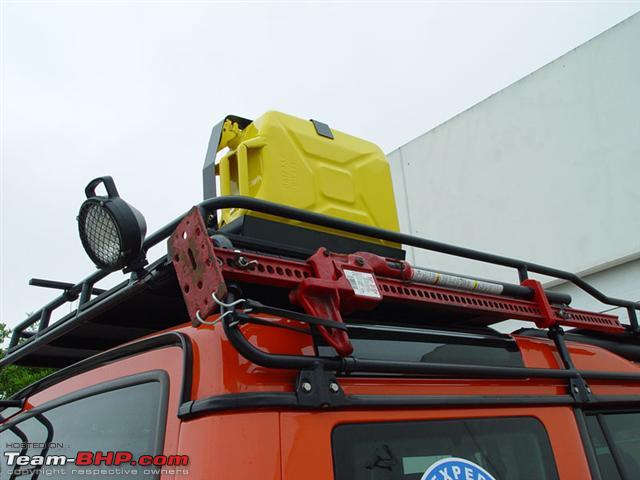
Fitted the hi lift jack to the roof rack.

The mounting option is wonderful. Secure and no rattle.

Mitsubishi Pajero SFX - Project Overland Conversion-img_0133.jpg

The jack is now nearly 7 years old and needs essential maintenance.

I will soon dismantle, strip the paint, sandblast and repaint it.

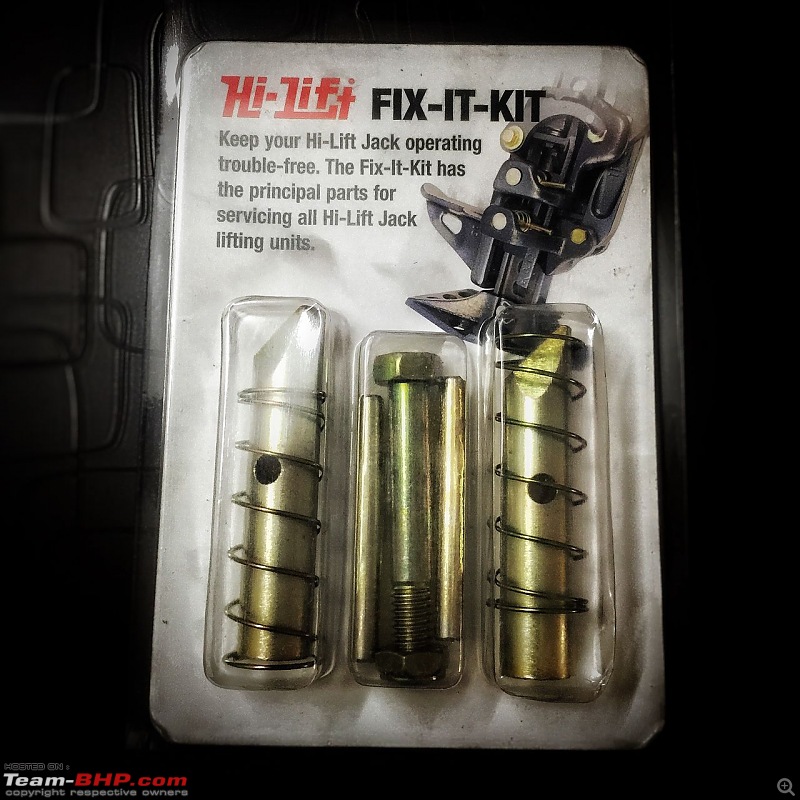
Got a fix it kit from Swastic Fabs for replacing the climbing pins and springs which are the most important and critical components of the jack.

Most jack mishaps happen when these pins get stuck and someone tries to jimmy when under load and murphy strikes!

Mitsubishi Pajero SFX - Project Overland Conversion-img_9870.jpg

Car is at 97000~kms currently.

When i went for alignment, they showed me a slight play in the front right wheel.

I also noticed a very slight shudder/judder on first and reverse gear indicating a flywheel problem. Since this would eat into the clutch if not rectified, i decided to change the fly wheel and sort the front suspension. Clutch was brand new and i didn't want to take a chance.

The biggest problem with Mitsubishi was the lack of a good service centre in Mumbai.

A new one called Sanjayraj Autolink has opened in Marol, Saki Naka, Mumbai and a few people recommended it on Facebook. Even Byram who has a yellow Pajero (mentioned earlier in this thread) had a good experience.

This was good enough for me and i took an appointment for getting this fixed and also told them to do the 1 lakh kms service.

The shock absorbers were good all round and didn't need changing currently.

The front upper and lower arm ends and tie rod ends needed to be replaced and parts were in stock.

Took 4 days for the flywheel. They flew it down from Chennai for me at no extra cost instead of regular ground transport. The owner of the service station who is on the Facebook Pajero group helped here.

Ofcourse as with most service centres, there are a few niggles. Balancing is not right and they missed putting back a couple of bolts on the door panels while they were replacing door bushes.

Have told them i'll be back in a couple of days.

Overall very nice experience and would recommend this place to anyone.

Mitsubishi Pajero SFX - Project Overland Conversion-img_0081.jpg

Mitsubishi Pajero SFX - Project Overland Conversion-img_0085.jpg

Mitsubishi Pajero SFX - Project Overland Conversion-img_0087.jpg

Mitsubishi Pajero SFX - Project Overland Conversion-img_0088.jpg

Last edited by Tejas@perioimpl : 15th March 2017 at 15:45.
Tejas@perioimpl is offline   (12) Thanks
Old 3rd April 2017, 15:20   #98
Distinguished - BHPian
 
Tejas@perioimpl's Avatar
 
Join Date: Sep 2008
Location: Bombay
Posts: 4,423
Thanked: 9,582 Times
Re: Mitsubishi Pajero SFX - Project Overland Conversion

Updates.

The missus was very apprehensive about how everyone loves the car and that i must do something to prevent "nazaar".

She suggested nimbu mirchi! I honestly don't like it hanging from the car so found a nice rubberised keychain of the same and stuck it using 3M tape.


Mitsubishi Pajero SFX - Project Overland Conversion-01-lm.jpg

Mitsubishi Pajero SFX - Project Overland Conversion-02-lm.jpg

Few friends and companies sent in stickers that i've proudly displayed on the rear glass:

(Don't miss the 'evil eye' stickers!

Mitsubishi Pajero SFX - Project Overland Conversion-03-st1.jpg

Mitsubishi Pajero SFX - Project Overland Conversion-04-st-2.jpg

Mitsubishi Pajero SFX - Project Overland Conversion-05-st-3.jpg

Next was a light bar install. It was clear in my mind that i didn't want a light bar on the roof, since, in the rain i would have a mirror effect in front of me. Chose a thin low profile light bar that i could tuck into the bumper.

Procured it from Jeep Tyres India from their Mumbai showroom.

Note: i have no financial or otherwise similar relation with them to promote their products.

Mitsubishi Pajero SFX - Project Overland Conversion-06-lb.jpg

It's a 5W each LED bar, 25" in length. The number plate had to be moved down a bit.

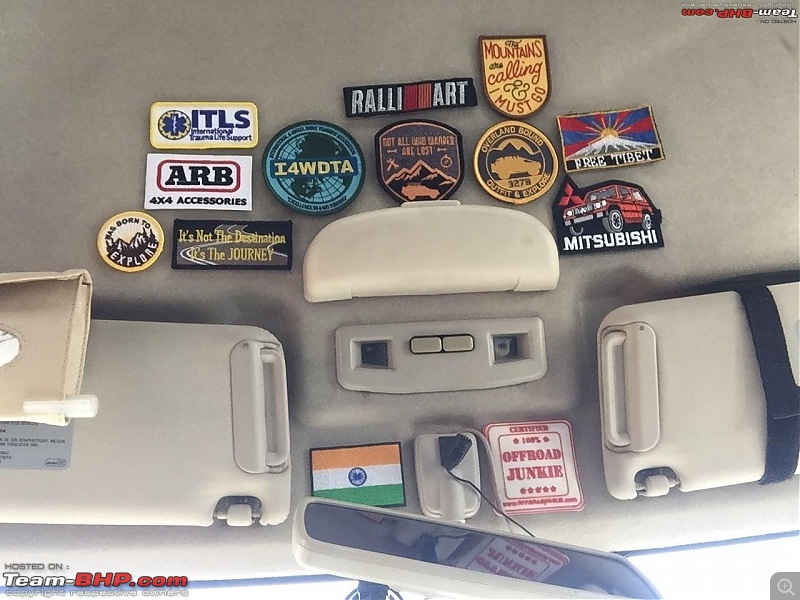
I have a small collection of embroidered patches that i've put on the headliner. They are velcro backed so they just 'stick' to the headliner.

Mitsubishi Pajero SFX - Project Overland Conversion-07-patches.jpg

A little vanity item from eBay India. A working compass:

Mitsubishi Pajero SFX - Project Overland Conversion-08-compass.jpg

Next thing to decide was lights on the roof rack.

I'm going to be using HIDs here. 4" ones. Chinese. These are primary offroad use and expressway use where you do not blind oncoming traffic. Sparse use.

HIDs will give me distance throw whereas the low mounted LED is for closer lighting.

Still figure how many to mount and where.

Options:

Option 1:

Mitsubishi Pajero SFX - Project Overland Conversion-h1.jpg

Option 2:

Mitsubishi Pajero SFX - Project Overland Conversion-h2.jpg

Option 3:

Mitsubishi Pajero SFX - Project Overland Conversion-h3.jpg

Option 4:

Mitsubishi Pajero SFX - Project Overland Conversion-h4.jpg

Option 5:

Mitsubishi Pajero SFX - Project Overland Conversion-h5.jpg

These are photoshopped on the vehicle. Will most probably go with Option 4 with proper even spacing between them.

Still have to mount the rear lights. Will go with a pair of 20W (4 x 5W each) LED cubes here.

Once this is done, i shall get the wiring sorted.

Last edited by Aditya : 3rd April 2017 at 17:43. Reason: Correcting image orientation as requested
Tejas@perioimpl is offline   (13) Thanks
Old 6th April 2017, 14:51   #99
Distinguished - BHPian
 
Tejas@perioimpl's Avatar
 
Join Date: Sep 2008
Location: Bombay
Posts: 4,423
Thanked: 9,582 Times
Re: Mitsubishi Pajero SFX - Project Overland Conversion

Went on a small offroad excursion last tuesday and tried out the Foxwing Awning!

A very important piece of kit during the summer!

The Foxwing awning is very easy to use.

Mitsubishi Pajero SFX - Project Overland Conversion-17759801_1302470449834096_5154929831551204308_n.jpg

The vanity compass that i had installed (see previous post) came in handy. We reached the site before sunrise and it was easy to know which side was east so that we could park the vehicle to maximise the shade using the awning. Ofcourse we could just wait for the sun to rise and then set up.

See this video about set up and pack up:


Last edited by Tejas@perioimpl : 6th April 2017 at 14:57. Reason: typos corrected
Tejas@perioimpl is offline   (10) Thanks
Old 7th April 2017, 22:49   #100
AAD
BHPian
 
Join Date: Dec 2011
Location: Mumbai
Posts: 166
Thanked: 197 Times

Hi Tejas,

Can you upload the video again as it doesn't seem to load and each time I try to run it on my iPhone, the app simply quits
AAD is offline  
Old 10th April 2017, 14:49   #101
Distinguished - BHPian
 
Tejas@perioimpl's Avatar
 
Join Date: Sep 2008
Location: Bombay
Posts: 4,423
Thanked: 9,582 Times
Re: Mitsubishi Pajero SFX - Project Overland Conversion

Quote:
Originally Posted by AAD View Post
Hi Tejas,

Can you upload the video again as it doesn't seem to load and each time I try to run it on my iPhone, the app simply quits
Can you try to follow the youtube link and view it on the youtube app on your iPhone, since this video is uploaded to youtube and the link shared here.
Tejas@perioimpl is offline  
Old 10th April 2017, 21:08   #102
AAD
BHPian
 
Join Date: Dec 2011
Location: Mumbai
Posts: 166
Thanked: 197 Times
Re: Mitsubishi Pajero SFX - Project Overland Conversion

Quote:
Originally Posted by Tejas@perioimpl View Post
Can you try to follow the Youtube link and view it on the Youtube app on your iPhone, since this video is uploaded to Youtube and the link shared here.
Thanks Tejas. Was able to view it on my Laptop. Have seen this with Ravi as well while we went on the Snow Drive together in Feb this year.

Wishing you the best of times under the awning.

Cheers,
AAD is offline   (1) Thanks
Old 11th April 2017, 12:39   #103
Distinguished - BHPian
 
Tejas@perioimpl's Avatar
 
Join Date: Sep 2008
Location: Bombay
Posts: 4,423
Thanked: 9,582 Times
Re: Mitsubishi Pajero SFX - Project Overland Conversion

A friend of mine had a couple of spare Proquip Jerry cans that he graciously gave away to me.

So i decided to start building a mount for the same which could be attached to the roof rack.

First step is to get the measurements correct:

(i always use the My Measures App on the iPhone, easy to mark things out)

Mitsubishi Pajero SFX - Project Overland Conversion-can.jpg

I have a lot of aluminium extras left over from previous window works, etc which i plan to use. So first was to cut some strips of sun board (again left over from past events) to make a mock up:

Mitsubishi Pajero SFX - Project Overland Conversion-img_0465.jpg

While doing this, i casually thought, let me browse teambhp if someone has ideas on a jerry can holder and i chanced upon this thread:

http://www.team-bhp.com/forum/4x4-te...jerry-can.html


And more importantly, i saw this pic there:


On seeing this pic, i think to myself, this is so brilliant and then chastise myself for not thinking of the same!

What am i talking about?

The way the base of the jack is tensioned by the bungee cord.

In the high lift jack, the base is just attached to the climbing bar by a cotter pin (https://en.wikipedia.org/wiki/Cotter_pin) and the base is free to move slightly. This is a design element so that the base can level with slight gradients on the ground. However, it rattles on bad roads.

Before i saw this pic, i had stuffed strips of rubber in the gap and after a while they would fall out.

Thus, this pic was a godsend!

However, i knew that the bungee rope would not last a few minutes on a car parked on the road and would be flicked immediately.

So, instead, i attached zip ties and they are holding the base firmly. When the jack is to be used, cut the ties and put new ones later! The jack is anyways rarely used and thus there will not be too much wastage of zip ties.

Now i have the rubber wedges and the zip ties both!

Mitsubishi Pajero SFX - Project Overland Conversion-img_0477.jpg


I still have to get time to refurbish the jack.

Even the jerry can holder hit a road block. The planned holder design in my mind was keeping the jerry can vertical along it's side. However, at that height, it would hit a beam in the garage. The clearance issue is just a matter of an inch!

So now back to the drawing board to make a flat holder.

Last edited by Tejas@perioimpl : 11th April 2017 at 12:45. Reason: added matter after the last pic.
Tejas@perioimpl is offline   (1) Thanks
Old 19th May 2017, 13:20   #104
Distinguished - BHPian
 
Tejas@perioimpl's Avatar
 
Join Date: Sep 2008
Location: Bombay
Posts: 4,423
Thanked: 9,582 Times
Re: Mitsubishi Pajero SFX - Project Overland Conversion

Some updates:

Finally got some time for DIY (slowly over few weekends).

First up was fitting the Jerry can.

I wanted to use whatever material i had at home and not go and buy new stuff. Scavenging and making use of what is there is also fun and stimulating to the grey brain cells

Materials used:

2mm thick aluminium strip
Rivets
Tie down cargo strap
Sandpaper
Primer and paint


Tools:
Hammer
Hack saw
Metal punch (spring loaded)
Metal files
Drilling machine and metal drill bits
Scissors
Lighter
Piece of black rubber (Thin)


Step one:

Measure and cut a length of aluminium strip for the can support. Bent it using a vice for support. If you want right angle bends then you need to heat the aluminium. Else for a small radius you can do it without heating. But can't do it for thicker gauges, else it will break.

Made the first support:

Mitsubishi Pajero SFX - Project Overland Conversion-01-side-bracket-.jpg

Mitsubishi Pajero SFX - Project Overland Conversion-02-side-bracket.jpg

Mitsubishi Pajero SFX - Project Overland Conversion-03-side-bracket.jpg

Once satisfied with the bending, made the other side support, and riveted the entire thing together:

Mitsubishi Pajero SFX - Project Overland Conversion-04-cross-riveted.jpg

Mitsubishi Pajero SFX - Project Overland Conversion-05-cross.jpg

Next was to make holes for the strap which would secure the jerry can to the holder. Drill holes and join them together. Using a spring loaded metal punch makes it easier to drill and the drill doesn't slip. Once the holes are joined, take a file and smoothen the holes:

Mitsubishi Pajero SFX - Project Overland Conversion-09-strap-hole.jpg

Since the roof rack is modular, i just need to make two holes in the bracket and bolt it to the notches in the roof rack bed. The holes in the bracket coincide with the grooves on the jerry can and thus accommodate the bolt heads:

Mitsubishi Pajero SFX - Project Overland Conversion-06-mounting-hole.jpg

Mitsubishi Pajero SFX - Project Overland Conversion-07-mounting-hole-2.jpg

With the bolt and the flat nut that will slide in the channel in the roof rack and eventually tightened:

Mitsubishi Pajero SFX - Project Overland Conversion-08-mounting-hole-bolt.jpg

With the strap:

Mitsubishi Pajero SFX - Project Overland Conversion-10-strap.jpg


Testing with the strap and jerry can:

Mitsubishi Pajero SFX - Project Overland Conversion-11-test-strap.jpg


Once all ok, sand it down, apply primer and then paint:

Mitsubishi Pajero SFX - Project Overland Conversion-12-paint.jpg

Mitsubishi Pajero SFX - Project Overland Conversion-13-paint.jpg

Two zip ties (eventually cut the tails) to keep the strap in place while inserting the jerry can in the holder:

Mitsubishi Pajero SFX - Project Overland Conversion-14-zip-tie.jpg

Jerry can in place:

Mitsubishi Pajero SFX - Project Overland Conversion-15-fixed-jerry-can.jpg

Straps:

Mitsubishi Pajero SFX - Project Overland Conversion-15a-strap-through-hole.jpg

Mitsubishi Pajero SFX - Project Overland Conversion-15b-strap.jpg

Cut the excess of the strap with a scissor and use a lighter to lightly burn the edges so that they do not fray.

Then attach a velcro to the strap tail using a 3M thin double sided tape so that the tail doesn't flap in the wind:

Mitsubishi Pajero SFX - Project Overland Conversion-16-velcro-tail.jpg


I'll mount it later today and thats when i'll use the small thin strip of rubber in between so that i do not scratch the rack.

Last edited by Tejas@perioimpl : 19th May 2017 at 13:23. Reason: corrected some typos
Tejas@perioimpl is offline   (5) Thanks
Old 19th May 2017, 13:43   #105
Distinguished - BHPian
 
Tejas@perioimpl's Avatar
 
Join Date: Sep 2008
Location: Bombay
Posts: 4,423
Thanked: 9,582 Times
Re: Mitsubishi Pajero SFX - Project Overland Conversion

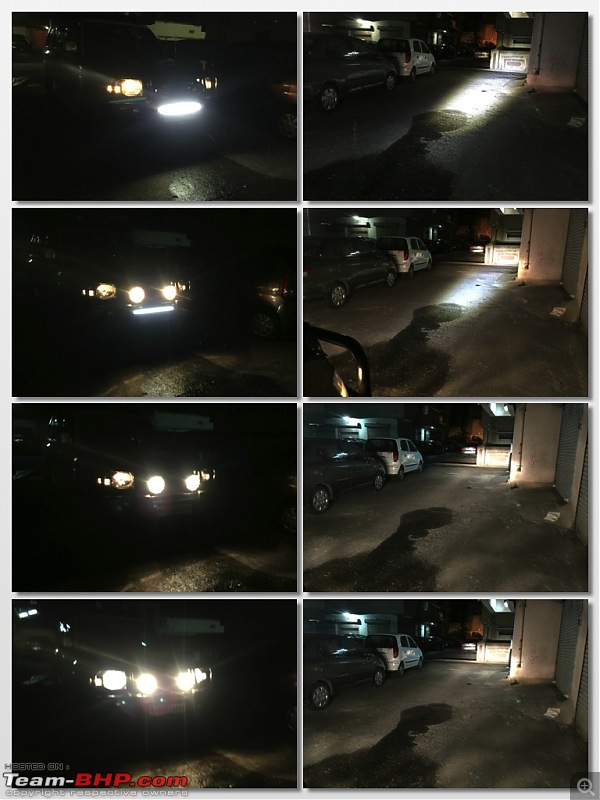
After nearly 6 months of fixing the KC lights, finally got some time to wire them.
Just wired the KC Hilites and the LED bar.

The internal rocker switches are too bright. Need options to cut down the light intensity. Either using a resistor or a black marker on the LED bulb itself.

Mitsubishi Pajero SFX - Project Overland Conversion-04-internal-switch-lights.jpg

The lights:

Mitsubishi Pajero SFX - Project Overland Conversion-grid2.jpg


Not too happy with the spread of the light bar as i had hoped.

The KC's are brilliant as driving lights though.

Still have to wire the HID lights on the roof rack.
Tejas@perioimpl is offline   (2) Thanks
Reply

Most Viewed


Copyright ©2000 - 2024, Team-BHP.com
Proudly powered by E2E Networks