Team-BHP > Technical Stuff > DIY - Do it yourself
Register New Topics New Posts Top Thanked Team-BHP FAQ


Reply
  Search this Thread
56,605 views
Old 12th March 2012, 14:48   #31
BHPian
 
benzinblut's Avatar
 
Join Date: Apr 2010
Location: New Bombay
Posts: 516
Thanked: 878 Times
Re: Optra Magnum 2.0 TCDI - DIY Projects

Contratulations on the installation of the Racing Chip. Do post your experience as you clock miles with it. I had my eyes on it but the fuel pump failure has set me back by 24K, so the racing chip will have to wait for a while.

I was just wondering if you have ever tried draining the fuel tank as a DIY to remove all the rust and other impurities. Did you or anyone ever try this?
benzinblut is offline  
Old 13th March 2012, 14:57   #32
BHPian
 
Join Date: Jul 2011
Location: Pune
Posts: 471
Thanked: 396 Times
Re: Optra Magnum 2.0 TCDI - DIY Projects

Quote:
Originally Posted by benzinblut View Post
Contratulations on the installation of the Racing Chip. Do post your experience as you clock miles with it. I had my eyes on it but the fuel pump failure has set me back by 24K, so the racing chip will have to wait for a while.

I was just wondering if you have ever tried draining the fuel tank as a DIY to remove all the rust and other impurities. Did you or anyone ever try this?
Hey, did your car complete 3 years? If not, they (Chevy) have the Chevrolet Promise. (not CPCO).
If you end up spending more than 30K in 3 years on spares / labour / servcing, they pay back the difference. Now that your pump is 24K, and your servicings will have cost a few more Ks, you should keep all your bills and get the refund!


No, haven't tried draining the tank. But will keep that in mind as a possible future DIY
keyur is offline  
Old 13th March 2012, 17:29   #33
BHPian
 
optimist's Avatar
 
Join Date: Sep 2009
Location: Bangalore
Posts: 221
Thanked: 82 Times
Re: Optra Magnum 2.0 TCDI - DIY Projects

Quote:
Originally Posted by benzinblut View Post
I was just wondering if you have ever tried draining the fuel tank as a DIY to remove all the rust and other impurities. Did you or anyone ever try this?
Quote:
Originally Posted by keyur View Post
Hey, did your car complete 3 years? If not, they (Chevy) have the Chevrolet Promise. (not CPCO).
If you end up spending more than 30K in 3 years on spares / labour / servcing, they pay back the difference. Now that your pump is 24K, and your servicings will have cost a few more Ks, you should keep all your bills and get the refund!


No, haven't tried draining the tank. But will keep that in mind as a possible future DIY
The CPCO for Magnum is for 2 years only, not 3 years. Had it been 3 years it would have been really useful.

And on the topic of the fuel pump failures, I spoke to a service head of an ASC. Most of the failures were with the overheating of the pump and subsequent electrical failure or with connector problems. Tallies well with "no fuel pump sound" description in the failures.

There was also a possibility of mechanical failure due to impurities but i don't think it was any significant percentage due to the filter. But I guess there is no harm in cleaning the tank ocassionally. Any drain plug/nut? Will look today evening when i reach home.
optimist is offline  
Old 13th March 2012, 18:02   #34
BHPian
 
Join Date: Jul 2011
Location: Pune
Posts: 471
Thanked: 396 Times
Re: Optra Magnum 2.0 TCDI - DIY Projects

Quote:
Originally Posted by optimist View Post
The CPCO for Magnum is for 2 years only, not 3 years. Had it been 3 years it would have been really useful.
Hey Opti,

I am talking about the Chevy Promise. (Link)
This is for 3 years 45000kms for every vehicle.

The CPCO is where you pay upfront.
keyur is offline  
Old 13th March 2012, 18:14   #35
BHPian
 
optimist's Avatar
 
Join Date: Sep 2009
Location: Bangalore
Posts: 221
Thanked: 82 Times
Re: Optra Magnum 2.0 TCDI - DIY Projects

Quote:
Originally Posted by keyur View Post
Hey Opti,

I am talking about the Chevy Promise. (Link)
This is for 3 years 45000kms for every vehicle.

The CPCO is where you pay upfront.
Yes i'm wrong and you'r correct. I had confused it with warranty.
optimist is offline   (1) Thanks
Old 14th March 2012, 09:47   #36
BHPian
 
benzinblut's Avatar
 
Join Date: Apr 2010
Location: New Bombay
Posts: 516
Thanked: 878 Times
Re: Optra Magnum 2.0 TCDI - DIY Projects

Quote:
Originally Posted by keyur View Post
Hey, did your car complete 3 years? If not, they (Chevy) have the Chevrolet Promise. (not CPCO).
.......
No, haven't tried draining the tank. But will keep that in mind as a possible future DIY
CPCO for diesel Magnum is 2 years and 45K km, if Im not wrong. My car is 4 years 3 months old.


Quote:
Originally Posted by optimist View Post
.......
And on the topic of the fuel pump failures, I spoke to a service head of an ASC. Most of the failures were with the overheating of the pump and subsequent electrical failure or with connector problems. Tallies well with "no fuel pump sound" description in the failures.

There was also a possibility of mechanical failure due to impurities but i don't think it was any significant percentage due to the filter. But I guess there is no harm in cleaning the tank ocassionally. Any drain plug/nut? Will look today evening when i reach home.
Yes, this is a possibe reason. But my tank is filled around the quarter mark. The tank was full when the pump failed. The mechanics also made a mess of all that diesel spill inside that I got cleaned during the service two days later.


Im sure in my case the pump failed because it was a faulty part. There was nothing wrong in the fuel quality or levels ever.

PS: I can confirm that the old pump had a blue sticker and the new one has a yellow one.
benzinblut is offline  
Old 14th March 2012, 10:24   #37
BHPian
 
Join Date: Jul 2011
Location: Pune
Posts: 471
Thanked: 396 Times

Quote:
Originally Posted by benzinblut
CPCO for diesel Magnum is 2 years and 45K km, if Im not wrong. My car is 4 years 3 months old.
.
The Chevrolet Promise is 3 years 45k km for the diesel (see link in my reply to opti above). The warranty is 2 yrs 45k km.
But your car is 4+ so that does not matter anyways.
Also, see my post in the Too many problems thread
keyur is offline  
Old 9th April 2012, 23:33   #38
BHPian
 
Join Date: Apr 2010
Location: Pune, Bahrain
Posts: 450
Thanked: 85 Times
Re: Optra Magnum 2.0 TCDI - DIY Projects

Quote:
Originally Posted by keyur View Post
INDEX

Head Lamp Assembly removal
(Removing and fitting the head lamps, bulb change)
Race Chip Installation
(Installation of the Race Chip tuning box)
Steering Wheel Removal
(Instructions for removing the steering wheel) ...done, writeup coming soon
Steering Wheel Horn Mod
(Fitting horn pads / buttons on the steering spokes) ... done, writeup coming soon
Brake Pad Replacement (Replacement of the front disc brake pads) ... done, writeup coming soon
Multi Charging Socket Mod (3 cigarette lighter sockets + 1 USB charging socket fitment) ... done, writeup coming soon
Dome Light (1+2 LED) Mod (Ugly yellow to cool white LED lights for front dome light) ... done, writeup coming soon
LED Angel Eyes Mod (Cool LED angel eyes for the fog lamps) ... done, writeup coming soon

---
Jumped here from the HID/Projector thread and was stunned to see the list of Mods done...

Read through this whole thread and I have to Thank you without just pressing that Thanks button/icon!!!

Also its really commendable the way you have made the DIY look so easy for the rest of us, through the detailed pictures and write up!

Now eagerly waiting to see the DIY of all the others that you've said are done... awaiting the writeups!
kevinephraim is offline  
Old 16th April 2012, 00:13   #39
BHPian
 
Join Date: Jul 2011
Location: Pune
Posts: 471
Thanked: 396 Times
Replacing the Brake Pads - Part 1: Removing the brake pads

At the 15K servicing, I was told that my car’s front brakepads needed to be replaced as they had been worn out. Initially, I said OK but then the DIY worm crept in and I told them to let it be for now.

The OEM Optra brake pads cost around Rs.3500 for the front wheels, so I decided to look around and see if I could get some aftermarket options like Bosch or TVS Girling etc. Talked to a few dealers and regional offices of Bosch and TVS and realized that they do not make Optra’s brake pads. Finally after searching around I found 2-3 Taiwanese replacements. After comparing the quality, material etc decided on a brand called Atrica. The cost for the front set was Rs.750, so decided to take the gamble.

(Logic : Had checked that the pads were of the same size, tried to file them off and saw that they were not too hard, were wearing off well and would not harm the disc. The only thing that could happen was that they would wear of sooner – in which case, I could still replace it 5 times in Rs.3500.
Worst case scenario : The brake pads might turn out to be really bad and I might have to throw them away – Rs.750 loss is OK)

I had taken detailed pics of the brake pads, but am not able to find them now :( . Will edit this post and add the pics if I do find them!

Now, to the DIY.

Tools required :

Optra Magnum 2.0 TCDI - DIY Projects-dsc_0672.jpg

Surprisingly, this requires a very limited set of tools and
1. Car jack (to lift the car)
2. Wheel nut socket wrench (part of the jack kit) (to remove the wheel)
3. Socket wrench / ring spanner / open ended spanner – (to remove the calliper bolt (pin), usually size 12,14,16)
4. Pliers
5. Strong screw driver
6. Steering remover / calliper tool (optional – you can do this using the screw driver as well) (for pushing the brake piston back)
7. Grease (optional) – for lubricating the calliper pins

Level of complexity :

Fairly easy.
Pre-requisites : You should be able to lift your car using the jack and remove the wheel. That would be the toughest part in this job. (Well not entirely – pushing the piston back can be a bit tricky.. more on that later)

Time taken :

30 minutes for both wheels (but this is not a race, so do the job well – keep atleast a hour in hand)

Procedure :

Old Brake Pad Removal

1. Lift the car up on the jack and remove the wheel.
(If you are not sure what this means or how this is done, it is best that you back off now itself. Having a car topple from the jack onto you (any part works) is not a very pleasant situation for either you or your car. It would be better to call in your mechanic and let him do the job while you chill out in front of the TV).

Optra Magnum 2.0 TCDI - DIY Projects-dsc_0673.jpg

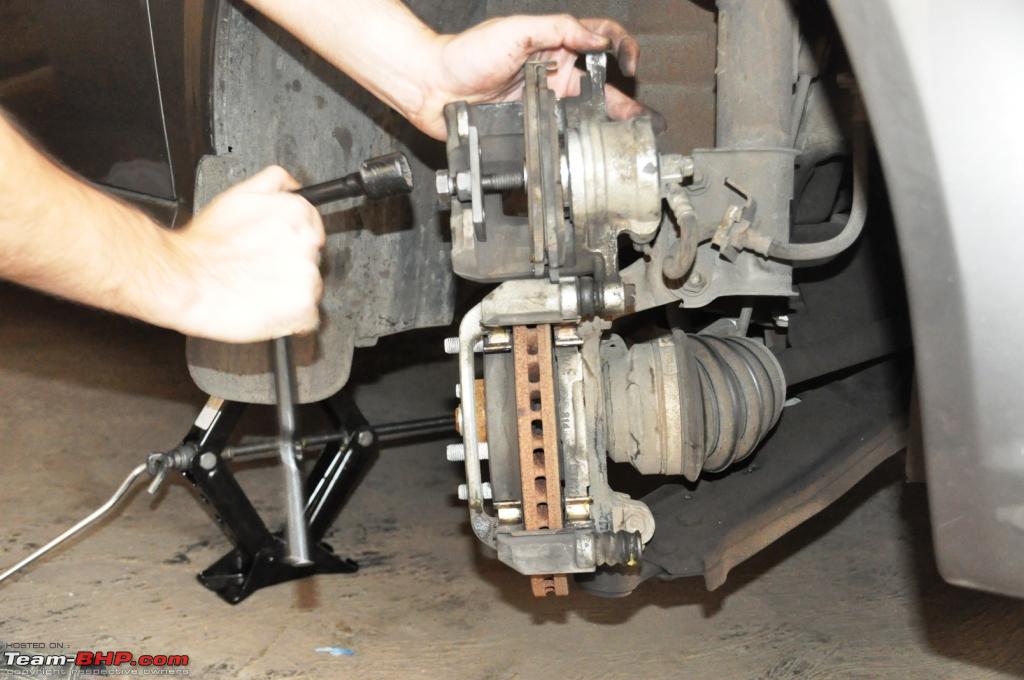
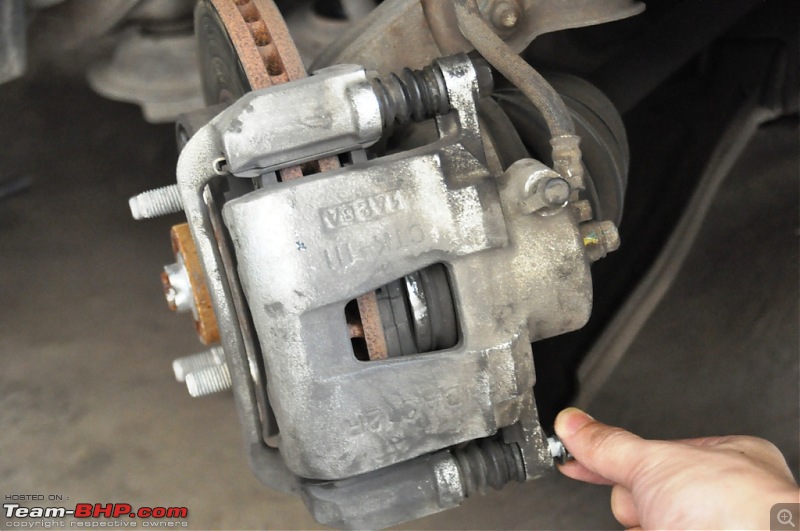
2. After the wheel is removed, lower the car slightly so that it is not raised too much. Then very very gently (start the engine and) turn the steering wheel so that the calliper turns out towards you (right for right wheel, left for left wheel). This makes the job much easier as you get easy access to all the parts.

Optra Magnum 2.0 TCDI - DIY Projects-dsc_0674.jpg

Optra Magnum 2.0 TCDI - DIY Projects-dsc_0676.jpg

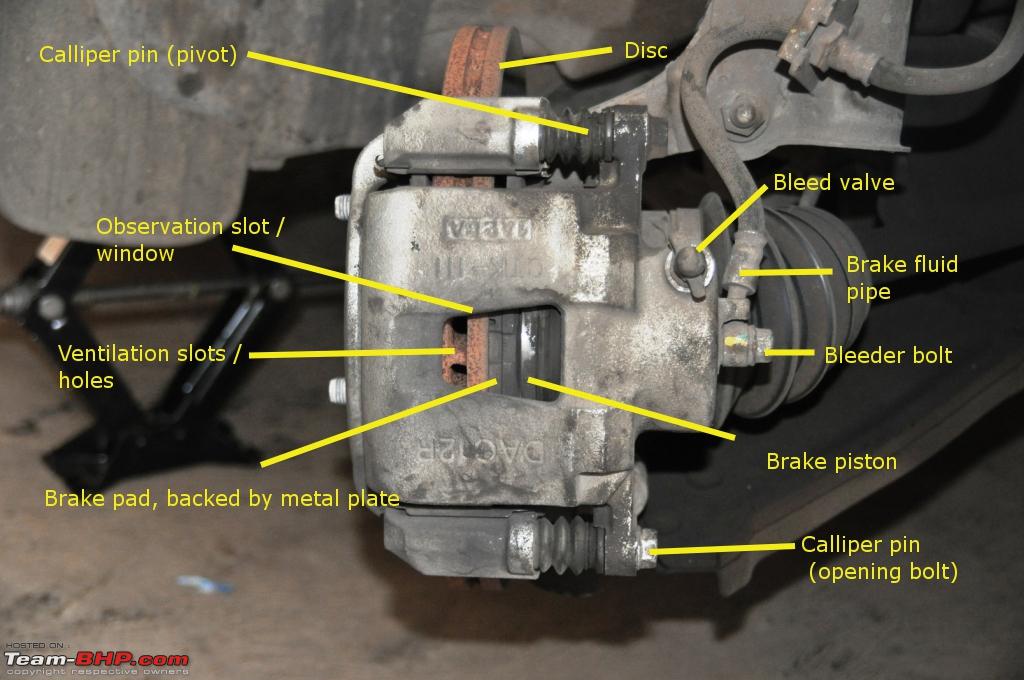
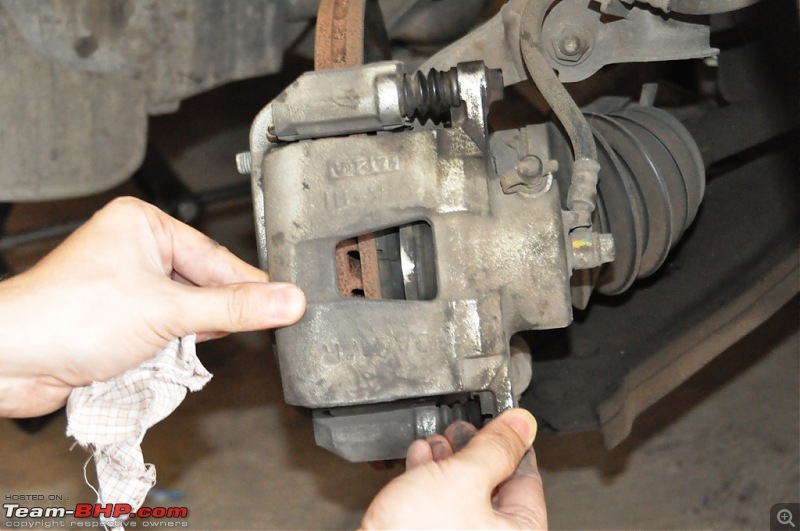
You can see the observation slot on the callipers and the upper slit (see the highlighted sections) from where you can see the thickness of the brake pads).

Optra Magnum 2.0 TCDI - DIY Projects-dsc_0677.jpg

Optra Magnum 2.0 TCDI - DIY Projects-dsc_0683.jpg

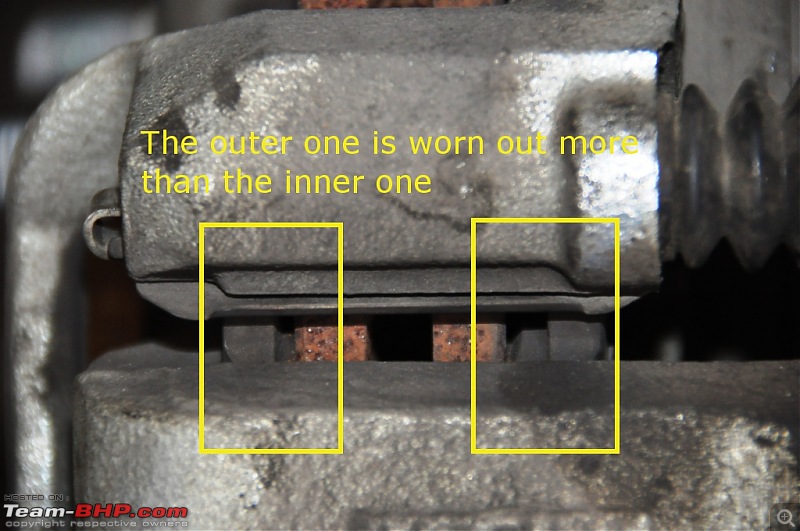
The pads on one side have worn out and will soon touch the plate!


Optra Magnum 2.0 TCDI - DIY Projects-dsc_0680.jpg

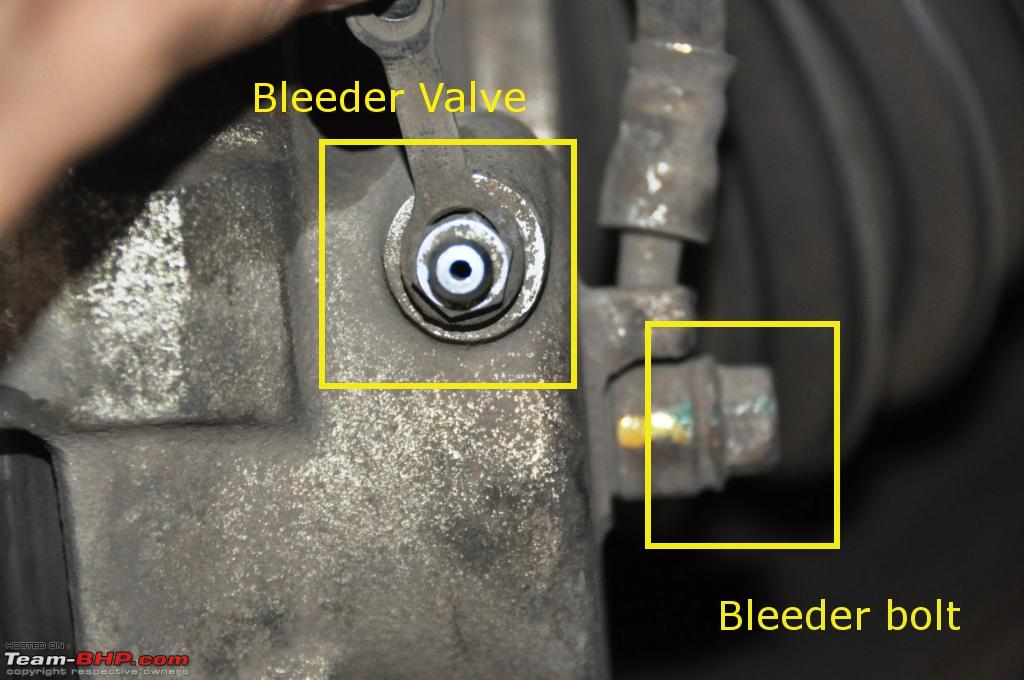
In this pic, you see the brake line bleeder outlet. Use this to bleed the brake fluid. To do so, attach a pipe to the nozzle and collect the fluid in a bottle. The brake fluid is paint unfriendly, so do not let the two meet! Use the bolt shown in the picture to bleed at a steady pace – do not remove it completely! AGAIN –THIS IS ONLY FOR YOUR GENERAL KNOWLEDGE. DO NOT DO THIS AS A PART OF A NORMAL INSTALLATION.

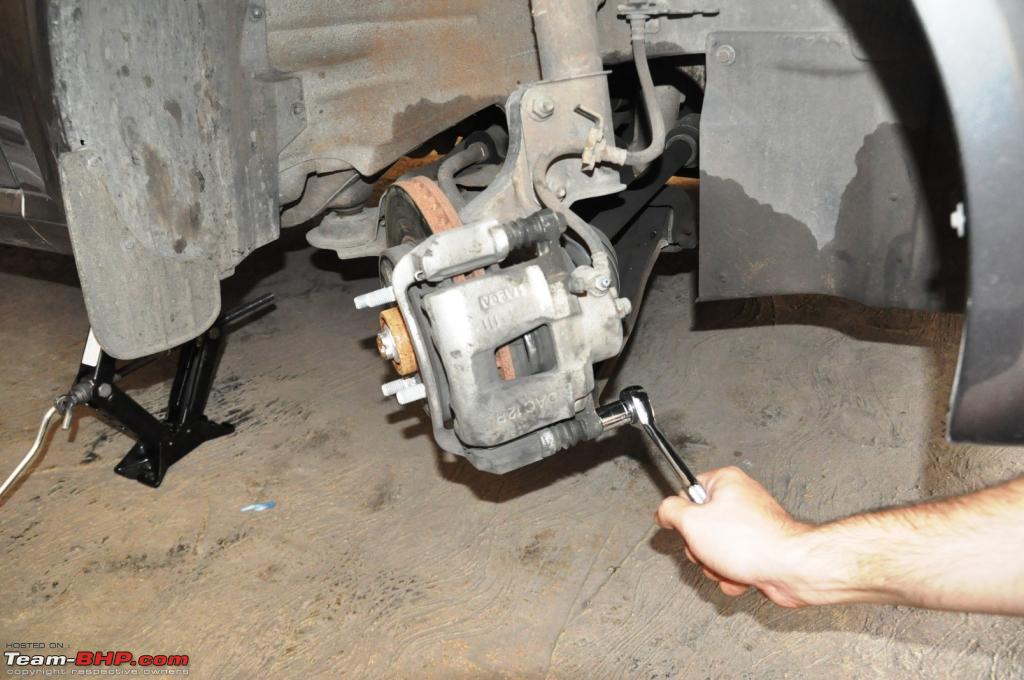
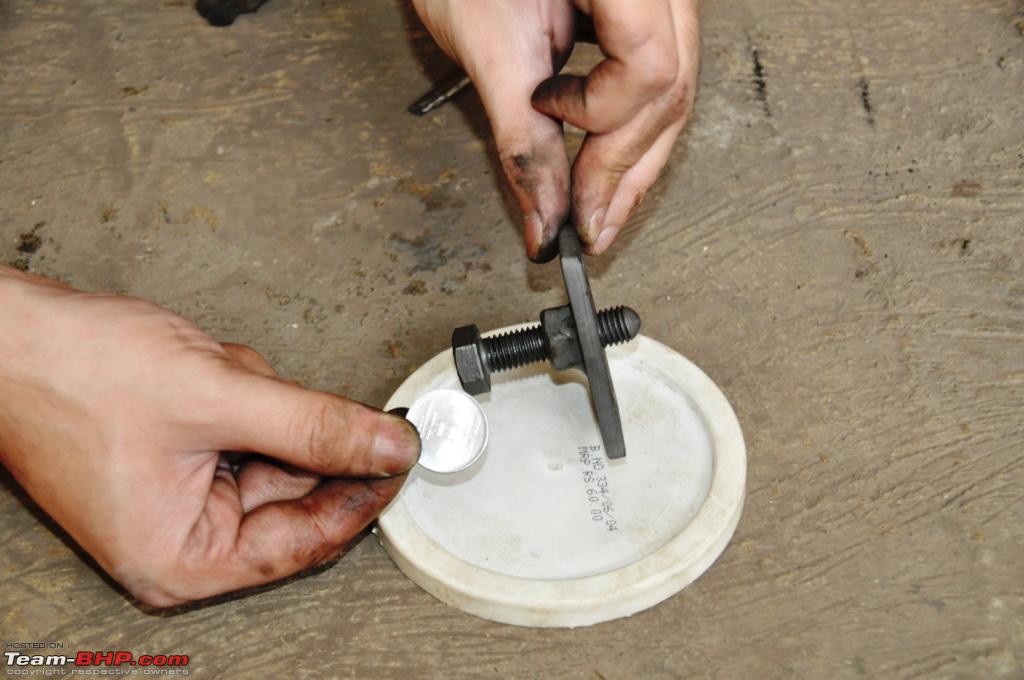
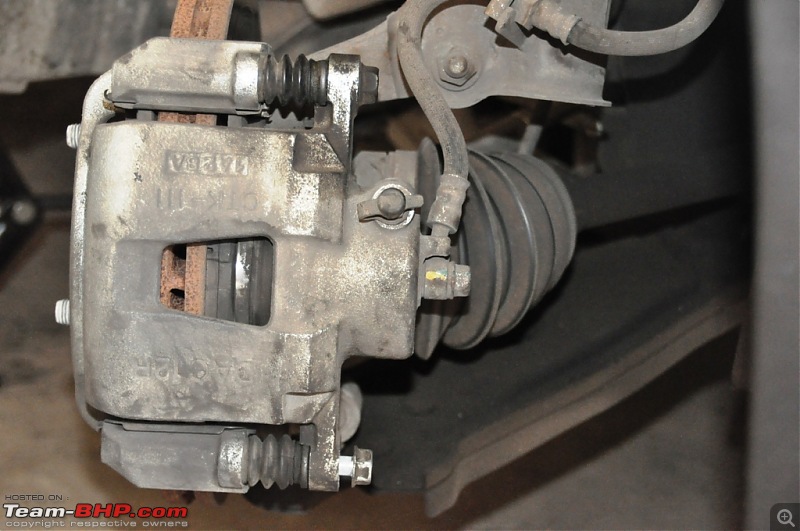
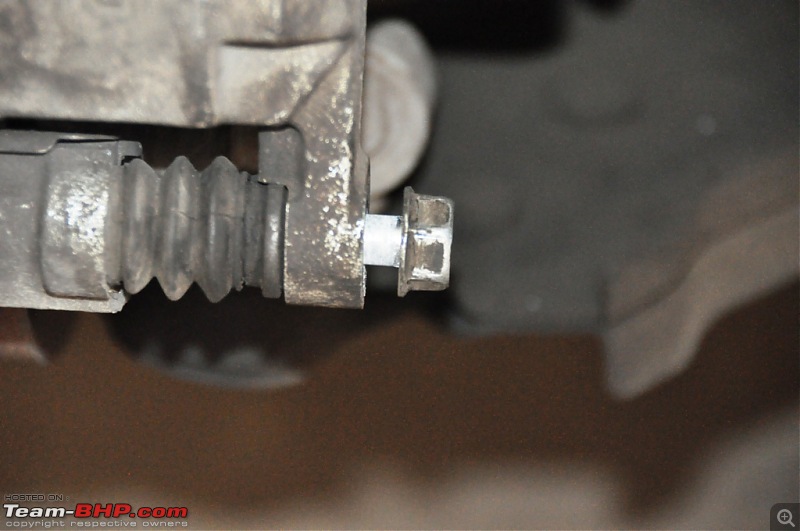
3. Now, see the bolt shown in the picture. This needs to be opened so as to release the calliper. Take the correct sized socket wrench / spanner and open the bolt. Unscrew the entire bolt and take it out completely.
Note that this bolt is greased, so place it in a location where it does not gather any debris.

Optra Magnum 2.0 TCDI - DIY Projects-dsc_0686.jpg Optra Magnum 2.0 TCDI - DIY Projects-dsc_0687.jpg

Optra Magnum 2.0 TCDI - DIY Projects-dsc_0688.jpg Optra Magnum 2.0 TCDI - DIY Projects-dsc_0689.jpg

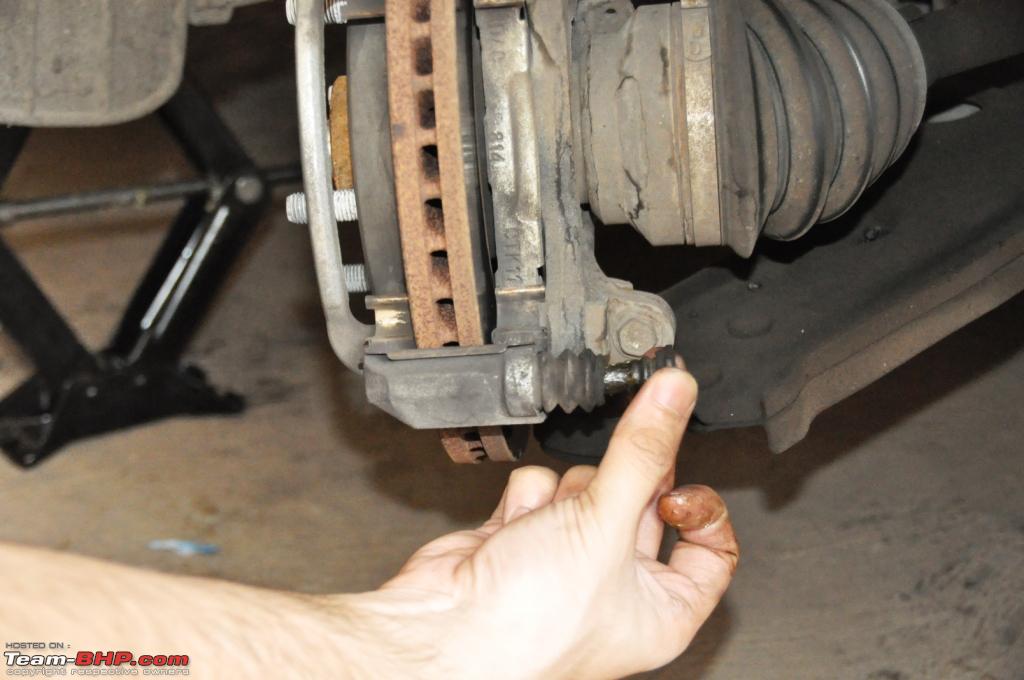
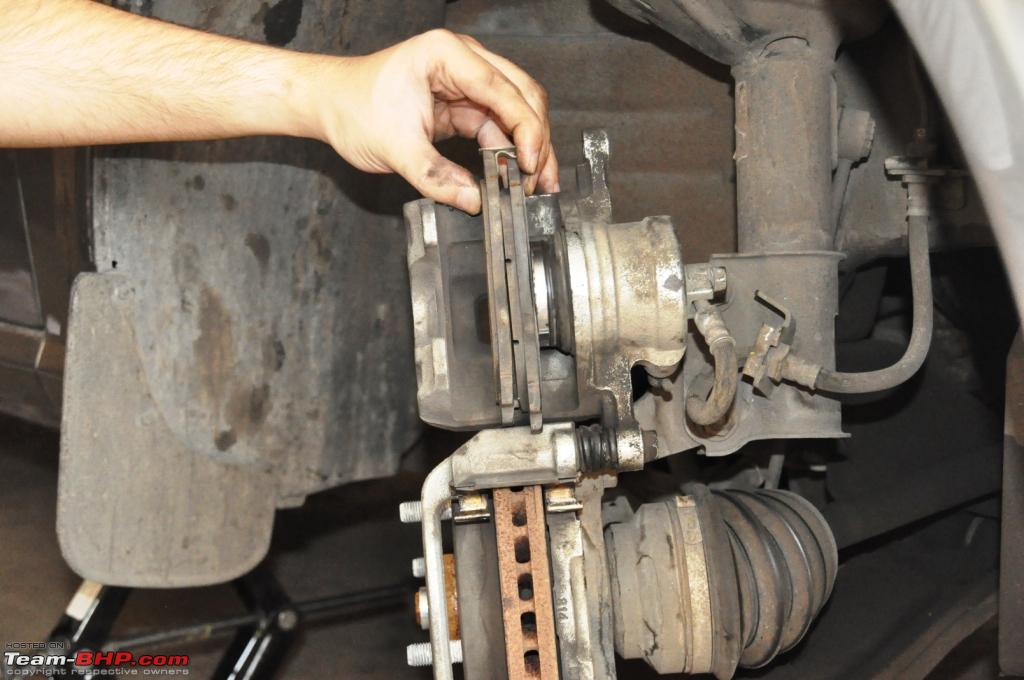
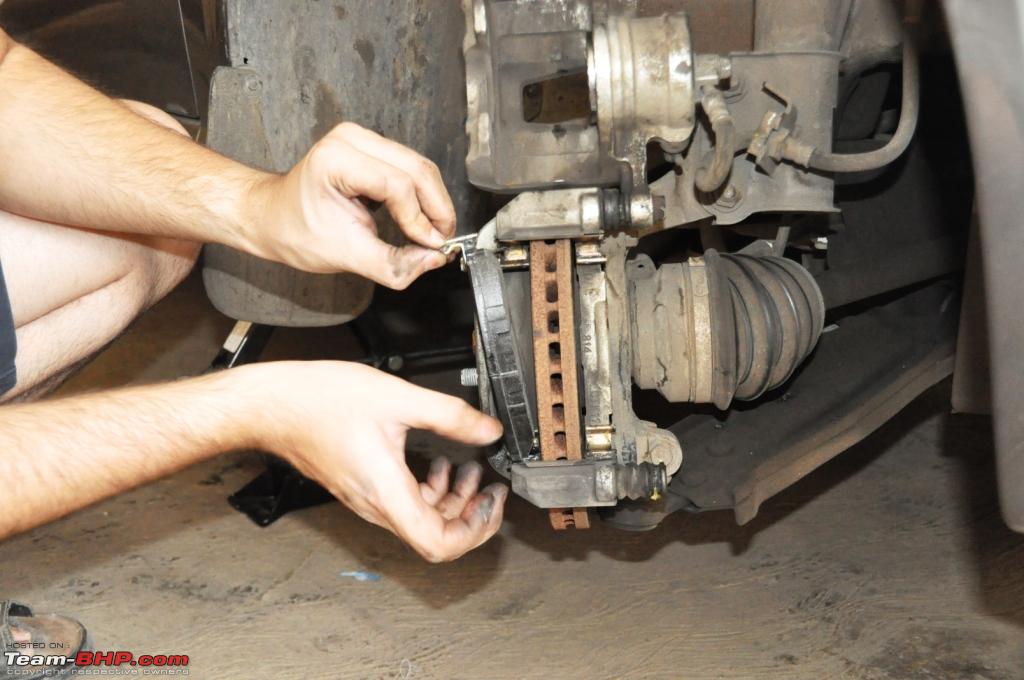
4. Now, you need to swivel the calliper in the upward direction. Follow the photos to see how to open the calliper upwards. There is a possibility of the calliper being jammed or obstructed by the surface of the pads. You may use a flat screwdriver to slightly push the brake piston back (if this is to be done, open the brake fluid reservoir to allow the pressure to be released – shown in step ahead)

Optra Magnum 2.0 TCDI - DIY Projects-dsc_0690.jpg Optra Magnum 2.0 TCDI - DIY Projects-dsc_0691.jpg

Optra Magnum 2.0 TCDI - DIY Projects-dsc_0692.jpg Optra Magnum 2.0 TCDI - DIY Projects-dsc_0693.jpg

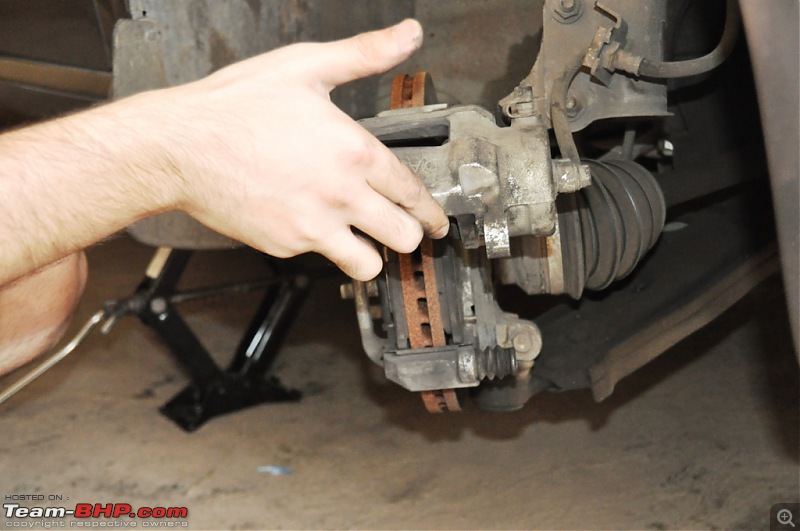
5. The brake pads are now exposed and can be easily removed. Pull the brake pads out.

Optra Magnum 2.0 TCDI - DIY Projects-dsc_0694.jpg

Optra Magnum 2.0 TCDI - DIY Projects-dsc_0695.jpg

Optra Magnum 2.0 TCDI - DIY Projects-dsc_0696.jpg

Optra Magnum 2.0 TCDI - DIY Projects-dsc_0697.jpg

This marks the end of the process till the removal of the old brake pads!
keyur is offline   (4) Thanks
Old 16th April 2012, 10:31   #40
BHPian
 
Join Date: Jul 2011
Location: Pune
Posts: 471
Thanked: 396 Times
Optra Magnum 2.0 TCDI - DIY - Brake Pad Replacement

Replacement of the brake pads
  1. Before replacing the brake pads, it is a good idea to clean and grease the callipers. If the grease of on the bolt looks very dirty or flaked or non-existent, wipe it clean. Then apply fresh grease (ball bearing or general purpose) to the bolt and insert/take it out a few times in the housing to ensure that the grease spreads in.

    Optra Magnum 2.0 TCDI - DIY Projects-dsc_0701.jpg Optra Magnum 2.0 TCDI - DIY Projects-dsc_0702.jpg

    Also, pull out the entire calliper assembly by gently pulling near the upper pivot pin. Clean and grease the pivot pin and insert and take it out a few times in it’s housing.

    Optra Magnum 2.0 TCDI - DIY Projects-dsc_0705.jpg Optra Magnum 2.0 TCDI - DIY Projects-dsc_0706.jpg


    You may also clean any part that looks dirty (especially the slots where the brake pads fit in). Ensure that the disc is clean and does not have any undulations or deep scoring marks (you may have to get it machined or turned if you see uneven wear on the surface

    Sometimes, putting in the new brake pads results in a squeaking sound, so you may grease the places on the housing where the brake pads slide in and out.
  2. We are ready for putting the new pads in! Once, by visual comparison, ensure that your replacement brake pads are identical to the original ones.
    We will need to push the brake piston in, so to compensate for the pressure or rather to release the pressure, open the cap of the brake fluid reservoir.

    Optra Magnum 2.0 TCDI - DIY Projects-dsc_0709.jpg
  3. Now comes the slightly complicated part – and that is of pushing the piston in. To do so, take both the used brake pads and place them in front of the piston in the calliper (see the pic). If need be, use one of the newer pads as well – this is to provide some padding as we will be using the same to provide leverage to push the piston in.

    Optra Magnum 2.0 TCDI - DIY Projects-dsc_0711.jpg

    Optra Magnum 2.0 TCDI - DIY Projects-dsc_0712.jpg Optra Magnum 2.0 TCDI - DIY Projects-dsc_0713.jpg

    If you have the steering puller or calliper tool, place it as shown in the gap between the calliper body and the brake pads that we just placed. Put a coin or any flat metal surface in between the bolt and the pad to prevent damage to the pad.


    Optra Magnum 2.0 TCDI - DIY Projects-dsc_0716.jpg

    Optra Magnum 2.0 TCDI - DIY Projects-dsc_0717.jpg Optra Magnum 2.0 TCDI - DIY Projects-dsc_0718.jpg

    Tighten the bolt so that the piston gets pushed in.


    Optra Magnum 2.0 TCDI - DIY Projects-dsc_0721.jpg Optra Magnum 2.0 TCDI - DIY Projects-dsc_0723.jpg

    Optra Magnum 2.0 TCDI - DIY Projects-dsc_0724.jpg


    If you do not have the puller, you may need to use the extra brake pad mentioned above to reduce the gap so that a screwdriver can be used to do the same. Insert the screwdriver in the gap, and slowly, try to apply equal pressure and push the brakepads in, thus pushing the piston in.

    Optra Magnum 2.0 TCDI - DIY Projects-dsc_0715.jpg

    NOTE : Pushing the piston in pushes the brake fluid up in the reservoir. This fluid is pretty abrasive, so keep a watch that it does not spill from the reservoir. If it spills on the paint, the results will not be pretty!! If you feel the oil is going to spill, remove some by means of an ink dropper, suction pump etc..

  4. The main part is done. Now just insert the brake pads in (keep in mind the direction and the location of the original pads and make sure that you put them in the same way). Before putting them in, slightly greasing the locating pins will be helpful.

    Optra Magnum 2.0 TCDI - DIY Projects-dsc_0725.jpg Optra Magnum 2.0 TCDI - DIY Projects-dsc_0726.jpg

    Optra Magnum 2.0 TCDI - DIY Projects-dsc_0729.jpg

    DO NOT SAND OR FILE THE BRAKE PADS. THE BEDDING IN PROCEDURE WILL TAKE CARE OF THIS!

  5. Once the pads are in place, close the calliper and screw in the bolt, and tighten it.

    Optra Magnum 2.0 TCDI - DIY Projects-dsc_0731.jpg Optra Magnum 2.0 TCDI - DIY Projects-dsc_0733.jpg

    Optra Magnum 2.0 TCDI - DIY Projects-dsc_0735.jpg
  6. We are done! Don’t forget to fix the wheel back on before moving to the next wheel!
Once all the wheels are done, close the brake fluid reservoir. Start the car and apply the brakes a few times to allow the pistons to self adjust. If you have removed any brake fluid, you may check and top up the reservoir of required.

Now get ready to take a drive - for bedding in or breaking in the brake pads!

Next : Bedding in the Brake pads

Last edited by keyur : 7th May 2012 at 13:47.
keyur is offline   (10) Thanks
Old 7th May 2012, 13:44   #41
BHPian
 
Join Date: Jul 2011
Location: Pune
Posts: 471
Thanked: 396 Times
Optra Magnum 2.0 TCDI - DIY - Bedding in the Brake pads

Bedding in the Brake Pads

Once the brake pads are replaced, you need to bed them in. This wears out the surface of the brake pads and ensures that a thin film of the same material is spread evenly over the discs for optimum braking.

(Taken from here )
  1. From 90-100 kmph, gently apply the brakes a couple of times to bring them up to operating temperature. This prevents you from thermally shocking the rotors and pads in the next steps.
  2. Make eight to ten near-stops from 90-100 kmph to about 20 kmph. Do it HARD by pressing the brakes firmly, but do not lock the wheels or engage ABS. At the end of each slowdown, immediately accelerate back to 100 kmph and then apply the brakes again. DO NOT COME TO A COMPLETE STOP! If you stop completely and sit with your foot on the brake pedal, you will imprint pad material onto the hot rotors, which could lead to vibration and uneven braking.
  3. The brakes may begin to fade after the 7th or 8th near-stop. This fade will stabilize, but not completely go away until the brakes have fully cooled. A strong smell from the brakes, and even some smoke, is normal.
  4. After the last near-stop, accelerate back up to speed and cruise for a while, using the brakes as little as possible. The brakes need only a few minutes to cool down. Try not to become trapped in traffic or come to a complete stop while the brakes are still very hot.
After the break-in cycle, there should be a slight blue tint and a light gray film on the rotor face. The blue tint tells you the rotor has reached break-in temperature and the gray film is pad material starting to transfer onto the rotor face. This is what you are looking for. The best braking occurs when there is an even layer of of pad material deposited across the rotors. This minimizes squealing, increases braking torque, and maximizes pad and rotor life.

After the first break in cycle shown above, the brakes may still not be fully broken in. A second bed-in cycle, AFTER the brakes have cooled down fully from the first cycle, may be necessary before the brakes really start to perform well. This is especially true if you have installed new pads on old rotors, since the pads need time to conform to the old rotor wear pattern. If you've just installed a big brake kit, the pedal travel may not feel as firm as you expected. After the second cycle, the pedal will become noticeably firmer. If necessary, bleed the brakes to improve pedal firmness.
keyur is offline   (9) Thanks
Old 27th January 2013, 11:06   #42
BHPian
 
deepeshh's Avatar
 
Join Date: Feb 2012
Location: Kochi
Posts: 110
Thanked: 63 Times
Problem with my Horn

My horn has been showing issues for the past 1 week. Mine is an LT model and so does have air bags. The horn sounds only if the steering wheel is turned to the extreme right, or else it does not sound. As per the ASC its due to the faulty clock spring and will cost around 4k, that too the part needs to be ordered as they are not carrying stock. Could somebody pl share your thoughts.
deepeshh is offline  
Old 27th January 2013, 12:10   #43
BHPian
 
deepeshh's Avatar
 
Join Date: Feb 2012
Location: Kochi
Posts: 110
Thanked: 63 Times
Re: Optra Magnum 2.0 TCDI - DIY Projects

[quote=keyur;2423087]INDEX

Steering Wheel Horn Mod (Fitting horn pads / buttons on the steering spokes) ... done, writeup coming soon


Hi Keyur, is it possible to fix new horns for the LT model as the OEM are just two buttons on either side which is very unpractical and cumbersome. Many a times the horn buttons needs to be searched when required. Since LT comes with airbags is it possible in installing additional horns with better accessible options?
deepeshh is offline  
Old 27th January 2013, 15:00   #44
BHPian
 
Join Date: Jul 2011
Location: Pune
Posts: 471
Thanked: 396 Times
Re: Optra Magnum 2.0 TCDI - DIY Projects

Quote:
Originally Posted by deepeshh View Post

Hi Keyur, is it possible to fix new horns for the LT model as the OEM are just two buttons on either side which is very unpractical and cumbersome. Many a times the horn buttons needs to be searched when required. Since LT comes with airbags is it possible in installing additional horns with better accessible options?
It could be possible, but we would need to find the appropriate location. And as a worst case scenario (if we end up spoiling the leather cover), we may need to get the steering re-wrapped.
keyur is offline   (1) Thanks
Old 27th January 2013, 15:02   #45
BHPian
 
Join Date: Jul 2011
Location: Pune
Posts: 471
Thanked: 396 Times
Re: Problem with my Horn

Quote:
Originally Posted by deepeshh View Post
My horn has been showing issues for the past 1 week. Mine is an LT model and so does have air bags. The horn sounds only if the steering wheel is turned to the extreme right, or else it does not sound. As per the ASC its due to the faulty clock spring and will cost around 4k, that too the part needs to be ordered as they are not carrying stock. Could somebody pl share your thoughts.
Remove your steering wheel, and check the contacts below the steering. Maybe, cleaning them up could do the job.
keyur is offline   (1) Thanks
Reply

Most Viewed


Copyright ©2000 - 2024, Team-BHP.com
Proudly powered by E2E Networks