Team-BHP > Technical Stuff > DIY - Do it yourself
Register New Topics New Posts Top Thanked Team-BHP FAQ


Reply
  Search this Thread
56,577 views
Old 9th July 2011, 03:21   #1
BHPian
 
Join Date: Jul 2011
Location: Pune
Posts: 471
Thanked: 396 Times
Optra Magnum 2.0 TCDI - DIY Projects

INDEX

Head Lamp Assembly removal
(Removing and fitting the head lamps, bulb change)
Race Chip Installation
(Installation of the Race Chip tuning box)
Steering Wheel Removal
(Instructions for removing the steering wheel) ...done, writeup coming soon
Steering Wheel Horn Mod
(Fitting horn pads / buttons on the steering spokes) ... done, writeup coming soon
Brake Pad Replacement (Replacement of the front disc brake pads)
Multi Charging Socket Mod (3 cigarette lighter sockets + 1 USB charging socket fitment) ... done, writeup coming soon
Dome Light (1+2 LED) Mod (Ugly yellow to cool white LED lights for front dome light) ... done, writeup coming soon
LED Angel Eyes Mod (Cool LED angel eyes for the fog lamps) ... done, writeup coming soon


Please note that in this Optra, the High and Low Beam headlights are integrated into a single lamp (H4) as against the previous (H1, H7).


Required tools :
  1. Star screwdriver
  2. Spanner / Socket Wrench (Size 10)
  3. A ‘jimmy’ or rod of atleast 8 inches (you may use a screwdriver with a thin long shaft)
  4. Clean gloves / cloth
Optra Magnum 2.0 TCDI - DIY Projects-0001tools.jpg


Note : Do not touch the glass part of the bulbs with your bare hands. It will damage the bulbs!!


The actual procedure starts now. It is very very easy. The actual job took me 10 minutes, the photos and the writeup took me bloody 110 minutes.
  1. Open the hood of your Optra. To do so, pull the hood release handle located at the lower right side of the instrument panel.

    Optra Magnum 2.0 TCDI - DIY Projects-0002bonnetlever.jpg
  2. Then reach under the front edge of the hood and lift hood release clip up. You will have to slide your fingers in the gap as shown in the photo and feel for the release clip.

    Name:  0003BonnetClip.jpg
Views: 10962
Size:  76.9 KB
  3. Keep the hood open by means of the support rod. The support rod (right end) needs to be released from the retaining clip and inserted into the socket in the open bonnet lid as shown.

    Optra Magnum 2.0 TCDI - DIY Projects-0004bonnetopen.jpg
  4. To remove the headlamp assembly, you need to remove the front grill. This is the total area we will be working on :


    Optra Magnum 2.0 TCDI - DIY Projects-0005grillscrews.jpg


    Follow the following steps for the same.
    1. There are a total of 4 star headed screws that need to be removed. The positions are shown in the pics. (You can also see the slots for the rod to be inserted for disengaging the clamps. )


      Optra Magnum 2.0 TCDI - DIY Projects-002grillscrew2.jpg Optra Magnum 2.0 TCDI - DIY Projects-001grillscrew1.jpg
    2. Unscrew the screws with the screwdriver. Place the removed screws in a safe location.


      Optra Magnum 2.0 TCDI - DIY Projects-003grillscrewdriver.jpg
    3. Now insert the rod into the slots shown in the pic. Refer to the accompanying pics for finding the exact location for releasing the clamps. The second pic shows the side view for the exact placement of the rod or screwdriver point.


      Optra Magnum 2.0 TCDI - DIY Projects-004grilllockrod1.jpg Optra Magnum 2.0 TCDI - DIY Projects-005grilllockrod2.jpg

      Optra Magnum 2.0 TCDI - DIY Projects-006grilllockrodsideview.jpg
    4. On pressing the red tab on the clamps, you will feel a slight release of the lock. Gently (very gently) pull the grill outwards. This will disengage the clamp. Repeat the same procedure for the other side as well to completely remove the grill.
      Refer the attached photos for understanding the mechanism of the clamps.


      Optra Magnum 2.0 TCDI - DIY Projects-009grilllockcombi.jpg

      Optra Magnum 2.0 TCDI - DIY Projects-008grilllockmale.jpg Optra Magnum 2.0 TCDI - DIY Projects-007grilllocksocket.jpg
    5. Once the grill is removed, you may place it on the engine cover and arrange it so that it looks good 
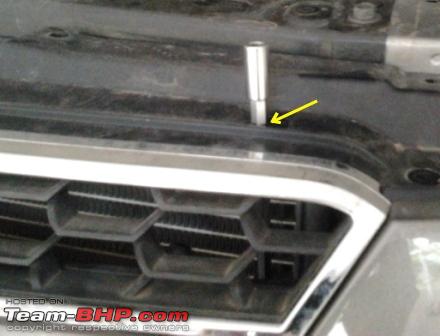
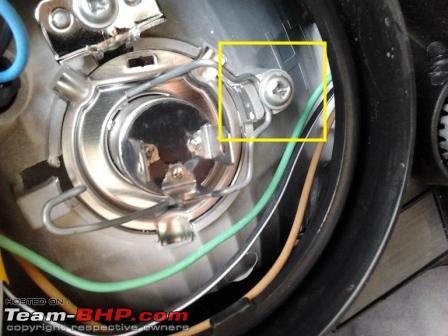
. Here is a pic I could not resist taking


      Optra Magnum 2.0 TCDI - DIY Projects-010grillremoved.jpg
  5. Now that the grill is removed, locate the 3 bolts that hold each headlamp in place. (Refer pic)


    Optra Magnum 2.0 TCDI - DIY Projects-011headlightbolts1.jpg


    Optra Magnum 2.0 TCDI - DIY Projects-013headlightfrontbolt.jpg Optra Magnum 2.0 TCDI - DIY Projects-012headlighttopbolts.jpg
  6. Once the bolts are removed, you need to gently ease out the assembly towards yourself. The assembly is connected to the harness by means of 2 electrical clamps / clips. You need to reach behind the assembly to locate the clamps.


    Optra Magnum 2.0 TCDI - DIY Projects-014headlightremoved1.jpg
  7. Each clamp has a release plate that needs to be pressed as shown to release the lock and pull out the clamp.


    Optra Magnum 2.0 TCDI - DIY Projects-017headlightturnindclamp.jpg Optra Magnum 2.0 TCDI - DIY Projects-018headlightmainclamp.jpg

    Optra Magnum 2.0 TCDI - DIY Projects-015headlightremoved2.jpg Optra Magnum 2.0 TCDI - DIY Projects-016headlightconnectors.jpg
  8. With the clamps removed, the assembly is now in your hands. Turn it over as that is the place where the bulbs are located.


    Optra Magnum 2.0 TCDI - DIY Projects-019headlightremoved.jpg Optra Magnum 2.0 TCDI - DIY Projects-020headlightback.jpg
  9. The round cap has Open and Close clearly marked on it. Twist the cap in the Open direction to expose the headlamp bulb assembly


    Optra Magnum 2.0 TCDI - DIY Projects-021headlightheadlampcap.jpg Optra Magnum 2.0 TCDI - DIY Projects-022headlampcapremoved.jpg


    Name:  023HeadlampWiring.jpg
Views: 10264
Size:  95.9 KB
  10. Once the cap is removed, remove the electrical clamp as shown by pulling it out


    Optra Magnum 2.0 TCDI - DIY Projects-024headlampconnectorremoval.jpg
  11. Now, press the U- shaped end of the clip and slide it out of the lock / bracket / retainer that can be seen on the reflector (in the pic, the clip has just been removed from the locking bracket that can be seen just beside the U part of the clip) .
    In case the clip does not loosen after this and still ends up holding the bulb, very very slowly, loosen the screw indicated in the pic below - don't loosen by more than half a thread. DO NOT completely remove the screw. Make sure that you study the way the clip has been positioned and pressed in place to hold the bulb down. You will require to do this during reassembly.


    Optra Magnum 2.0 TCDI - DIY Projects-025headlampconnectorremoved.jpg
  12. Once the clip is released, the bulb can be easily pulled out without any force. Ensure that you do not touch the glass. You may use clean oil-free gloves for this part. Keep the bulb safely.
This concludes the major part (mainly because I have reached the 30 pic limit). The remainder is in the next post.


---

Last edited by keyur : 17th April 2012 at 12:18. Reason: Index added
keyur is offline   (12) Thanks
Old 9th July 2011, 04:04   #2
BHPian
 
Join Date: Jul 2011
Location: Pune
Posts: 471
Thanked: 396 Times
re: Optra Magnum 2.0 TCDI - DIY Projects

Part 2 : Lamps Comparison

The whole purpose of this activity was to replace my Optra's stock lamps with something that would give me a better visibility, i.e. a better light throw with decent cutting power even in the rains. Looks, white lights etc.. were nowhere in consideration.

I also wanted a direct replacement without installing cutouts and relays, so the standard H4 60/55 watt lamps were what I was looking for.

Here is a link about the various options that I tried


Anyways, I decided on the Vision Plus from Philips as I wanted yellow lights with increased throw and power. But after enquiring at various Philips outlets, i was told that Vision Plus (+50% light) has been discontinued.
So my choice went to the next available Xtreme Vision (+100%)

Now, all this was going on based on my previous knowledge that Optra stock lamps are Halonix (The spare lamps provided with the car are Halonix, so it was a logical conclusion too).

But when I removed the lamps, I saw that the stock lamps were actually Philips with a marking of HP+. (Vision Plus is VP, Xtreme Vision is XV, Ecovision is EV and so on, so I assumed that HP+ is High Power Plus -- but there seems to be no product by that product code or name -- any info as to what HP+ stands for and what the product name is would be appreciated)

Here is a picture showing the comparison of the stock lamps, the spare lamps and the replacement Xtreme Visions.

Optra Magnum 2.0 TCDI - DIY Projects-026headlampcomparison.jpg

These are the original stock lamps (Philips HP+)

Optra Magnum 2.0 TCDI - DIY Projects-027headlampoemphilipshp.jpg

The spares provided by GM (Halonix)

Optra Magnum 2.0 TCDI - DIY Projects-028headlampoemsparehalonix.jpg

The Philips Xtreme Vision lamps that I chose

Optra Magnum 2.0 TCDI - DIY Projects-029headlampphilipsxv.jpg

** If you want to see the detailed markings on the lamps, please take a look at the higher res image below.


The fact here is that GM has replaced the default Halonix lamps with Philips HP+ (whatever they are). That means that the light should be better than that of the previous ones. But I still find that insufficient and the Xtreme Visions seem to solve my problems!

I have currently put the stock lamps back in to take comparative pictures of the light beams. Will post a link here when that is done.
Attached Thumbnails
Optra Magnum 2.0 TCDI - DIY Projects-026headlampcomparisonx.jpg  

keyur is offline   (5) Thanks
Old 9th July 2011, 04:16   #3
BHPian
 
Join Date: Jul 2011
Location: Pune
Posts: 471
Thanked: 396 Times
re: Optra Magnum 2.0 TCDI - DIY Projects

Part 3 : Replacing the lamps

Till now, we have removed the lamps, done the comparisons and decided on the replacements. Now we need to fit the new bulbs (or the same ones) back in.
I have not provided detailed pics of the reassembly as you need to go back in the exact reverse order. Hope you paid attention while dismantling it.
  1. To replace the bulb, remove it from the packaging (again without touching any glass surface). Insert it into the headlight assembly.The bulbs can go in only one way due to the 3 slotting plates meant to ensure unambiguous positioning - i.e. to ensure that they do not go in wrongly. The bulbs go in smoothly, and are NOT a snug fit, they fit rather loosely (the retainer clip maintains the pressure and keeps them in place) Fit the retainer clip back in place, and tighten the screw to lock the clip in place. This might be a bit difficult, but have patience and do it in a calm way so as not to damage anything.
  2. Reverse the entire procedure to reassemble the lamp.
  3. Before reassembly, test out the new bulbs. Check for low beam, high beam, Dipper and indicator functioning.
keyur is offline   (1) Thanks
Old 9th July 2011, 04:24   #4
BHPian
 
Join Date: Jul 2011
Location: Pune
Posts: 471
Thanked: 396 Times
re: Optra Magnum 2.0 TCDI - DIY Projects

Part 4 : Replacing the indicator lamps

For this, you need to have reached step #8 in the instructions explained for the Headlamp Assembly removal. The entire headlamp assembly should have been removed.
  1. Refer the following photos. The indicator housing can be seen here.

    Optra Magnum 2.0 TCDI - DIY Projects-030headlampindsocket.jpg
  2. Twist the indicator socket anticlockwise to release the bulb as shown.


    Optra Magnum 2.0 TCDI - DIY Projects-031headlampindremoval.jpg Optra Magnum 2.0 TCDI - DIY Projects-032headlampindremoved.jpg
  3. Remove the bulb and replace it and follow the reverse procedure to fit it back in.
With this, we have covered the replacement of all the electrical components in the head lamp assembly.

Coming up next - Horn replacement!
keyur is offline   (3) Thanks
Old 11th July 2011, 11:04   #5
BHPian
 
brraj's Avatar
 
Join Date: Feb 2006
Location: bangalore
Posts: 913
Thanked: 1,280 Times
re: Optra Magnum 2.0 TCDI - DIY Projects

This is what i was searching for my car though i had options like light force. What was the cost involved in replacing head lights? Post the before and after pictures of the light throw. Did you check when its fog, raining conditions?
brraj is offline  
Old 11th July 2011, 13:16   #6
BHPian
 
Join Date: Jul 2011
Location: Pune
Posts: 471
Thanked: 396 Times
re: Optra Magnum 2.0 TCDI - DIY Projects

Quote:
Originally Posted by brraj View Post
This is what i was searching for my car though i had options like light force. What was the cost involved in replacing head lights? Post the before and after pictures of the light throw. Did you check when its fog, raining conditions?
The lamps cost Rs.900 for the pair. Bright yellow light. Cuts nicely through rain and fog!

Have to take the new pics of the XVs. Will post them soon! (Raining heavily here, so not taking the cam out)
keyur is offline   (1) Thanks
Old 11th July 2011, 15:10   #7
Newbie
 
Join Date: Jun 2011
Location: Mumbai
Posts: 23
Thanked: Once
re: Optra Magnum 2.0 TCDI - DIY Projects

I'm just about to buy an Optra 2.0 LT, and have been reading a lot about the stock headlamps being inadequate. The dealer's offering a Hella relay+wiring harness and 100/90 bulbs for Rs 1500.
Do you think this would be the best option, or should I get Philips XV or Osram NightBreakers at 60/55?
I'm ok with whitish light (blue is definitely out), and I don't want HIDs. Should I replace the bulbs in the fogs as well?
roadtrip is offline  
Old 11th July 2011, 16:14   #8
Senior - BHPian
 
thedreamcatcher's Avatar
 
Join Date: Mar 2009
Location: Dubai
Posts: 1,204
Thanked: 66 Times
re: Optra Magnum 2.0 TCDI - DIY Projects

Useful info there.

A thread already exists for such DIYs.

http://www.team-bhp.com/forum/techni...ial-guide.html

Mods. Please move this post to the DIY thread
thedreamcatcher is offline  
Old 11th July 2011, 23:09   #9
BHPian
 
Join Date: Jul 2011
Location: Pune
Posts: 471
Thanked: 396 Times
re: Optra Magnum 2.0 TCDI - DIY Projects

Quote:
Originally Posted by roadtrip View Post
I'm just about to buy an Optra 2.0 LT, and have been reading a lot about the stock headlamps being inadequate. The dealer's offering a Hella relay+wiring harness and 100/90 bulbs for Rs 1500.
Do you think this would be the best option, or should I get Philips XV or Osram NightBreakers at 60/55?
I'm ok with whitish light (blue is definitely out), and I don't want HIDs. Should I replace the bulbs in the fogs as well?
There is no need to go for the cutouts or the 100/90s. The XVs do a fab job.
If you do it yourself, it takes 15 mins max! I would suggest the XVs.
Avoid white or blue light because it gets absorbed by black surfaces, and the actual cutting power is reduced in the rains/fog etc.

I would suggest that you try the original headlights as well as the fogs before you go for any changes - get a feel of the lights and see what you need. I don't think you would need to replace the fogs if you put in XVs. Rather, you won't have to start the fogs!

Last edited by keyur : 11th July 2011 at 23:12. Reason: forgot reply
keyur is offline  
Old 11th July 2011, 23:14   #10
BHPian
 
Join Date: Jul 2011
Location: Pune
Posts: 471
Thanked: 396 Times
re: Optra Magnum 2.0 TCDI - DIY Projects

Quote:
Originally Posted by thedreamcatcher View Post

A thread already exists for such DIYs.

http://www.team-bhp.com/forum/techni...ial-guide.html

Mods. Please move this post to the DIY thread
Hey DC, and Mods,
I have started this thread series primarily for Optra mods and DIYs that I am planning for my car. Please do not move it as I do not wan't to generalize it and mix up the topics!
keyur is offline  
Old 15th July 2011, 17:08   #11
BHPian
 
raj.barcode's Avatar
 
Join Date: Jun 2008
Location: Bangalore
Posts: 706
Thanked: 273 Times
re: Optra Magnum 2.0 TCDI - DIY Projects

Now i don't see any relay kit being fixed; does it work on the stock setup but my electrician told me that i need a relay kit like roots etc to make it work right
raj.barcode is offline  
Old 15th July 2011, 21:39   #12
BHPian
 
Join Date: Jul 2011
Location: Pune
Posts: 471
Thanked: 396 Times
re: Optra Magnum 2.0 TCDI - DIY Projects

Quote:
Originally Posted by raj.barcode View Post
Now i don't see any relay kit being fixed; does it work on the stock setup but my electrician told me that i need a relay kit like roots etc to make it work right
The stock lamps have a wattage of 60/55. The new lamps also have a wattage of 60/55. As the power rating is same, you don't require a relay.
A relay is required if you plan to put in 100/90W lamps.

These lamps are a direct replacement for the stock lamps. Your electrician does not understand the intricacies - all he knows that brighter light or white lights means more power, so fit a relay!
keyur is offline  
Old 15th July 2011, 21:48   #13
BHPian
 
raj.barcode's Avatar
 
Join Date: Jun 2008
Location: Bangalore
Posts: 706
Thanked: 273 Times
re: Optra Magnum 2.0 TCDI - DIY Projects

Oh ok just missed out on the specs. I was looking at 90/100 bulbs as it might be better at nights
raj.barcode is offline  
Old 15th July 2011, 22:19   #14
BHPian
 
Join Date: Jul 2011
Location: Pune
Posts: 471
Thanked: 396 Times
re: Optra Magnum 2.0 TCDI - DIY Projects

Quote:
Originally Posted by raj.barcode View Post
I was looking at 90/100 bulbs as it might be better at nights
The XVs are very good! You might want to try them before you get into changing the wiring.
I got my XVs from JC Road when I had been to Bangalore, for Rs.900 (pair)

I will be posting the comparative pics of both the lights soon - just waiting for the rains to reduce.
keyur is offline  
Old 5th August 2011, 23:39   #15
BHPian
 
Join Date: Jul 2011
Location: Pune
Posts: 471
Thanked: 396 Times
Re: Optra Magnum 2.0 TCDI - DIY - Steering Wheel Mod

Here is a teaser for something I am doing!

The steering wheel - removed and dismantled

Optra Magnum 2.0 TCDI - DIY Projects-dsc_7061.jpg

Optra Magnum 2.0 TCDI - DIY Projects-dsc_7062.jpg

Optra Magnum 2.0 TCDI - DIY Projects-dsc_7063.jpg

Stripped off the aftermarket steering cover.

Optra Magnum 2.0 TCDI - DIY Projects-dsc_7065.jpg

Optra Magnum 2.0 TCDI - DIY Projects-dsc_7064.jpg


What am I going to do? Any guesses?
(Probably something to resolve the issue of the center horn maybe .... )


Details coming soon...
keyur is offline  
Reply

Most Viewed


Copyright ©2000 - 2024, Team-BHP.com
Proudly powered by E2E Networks