| |||||||

| Search Forums |
| Advanced Search |
| Go to Page... |
 |
| Search this Thread |  103,148 views |
 24th September 2019, 12:07
| #1 |
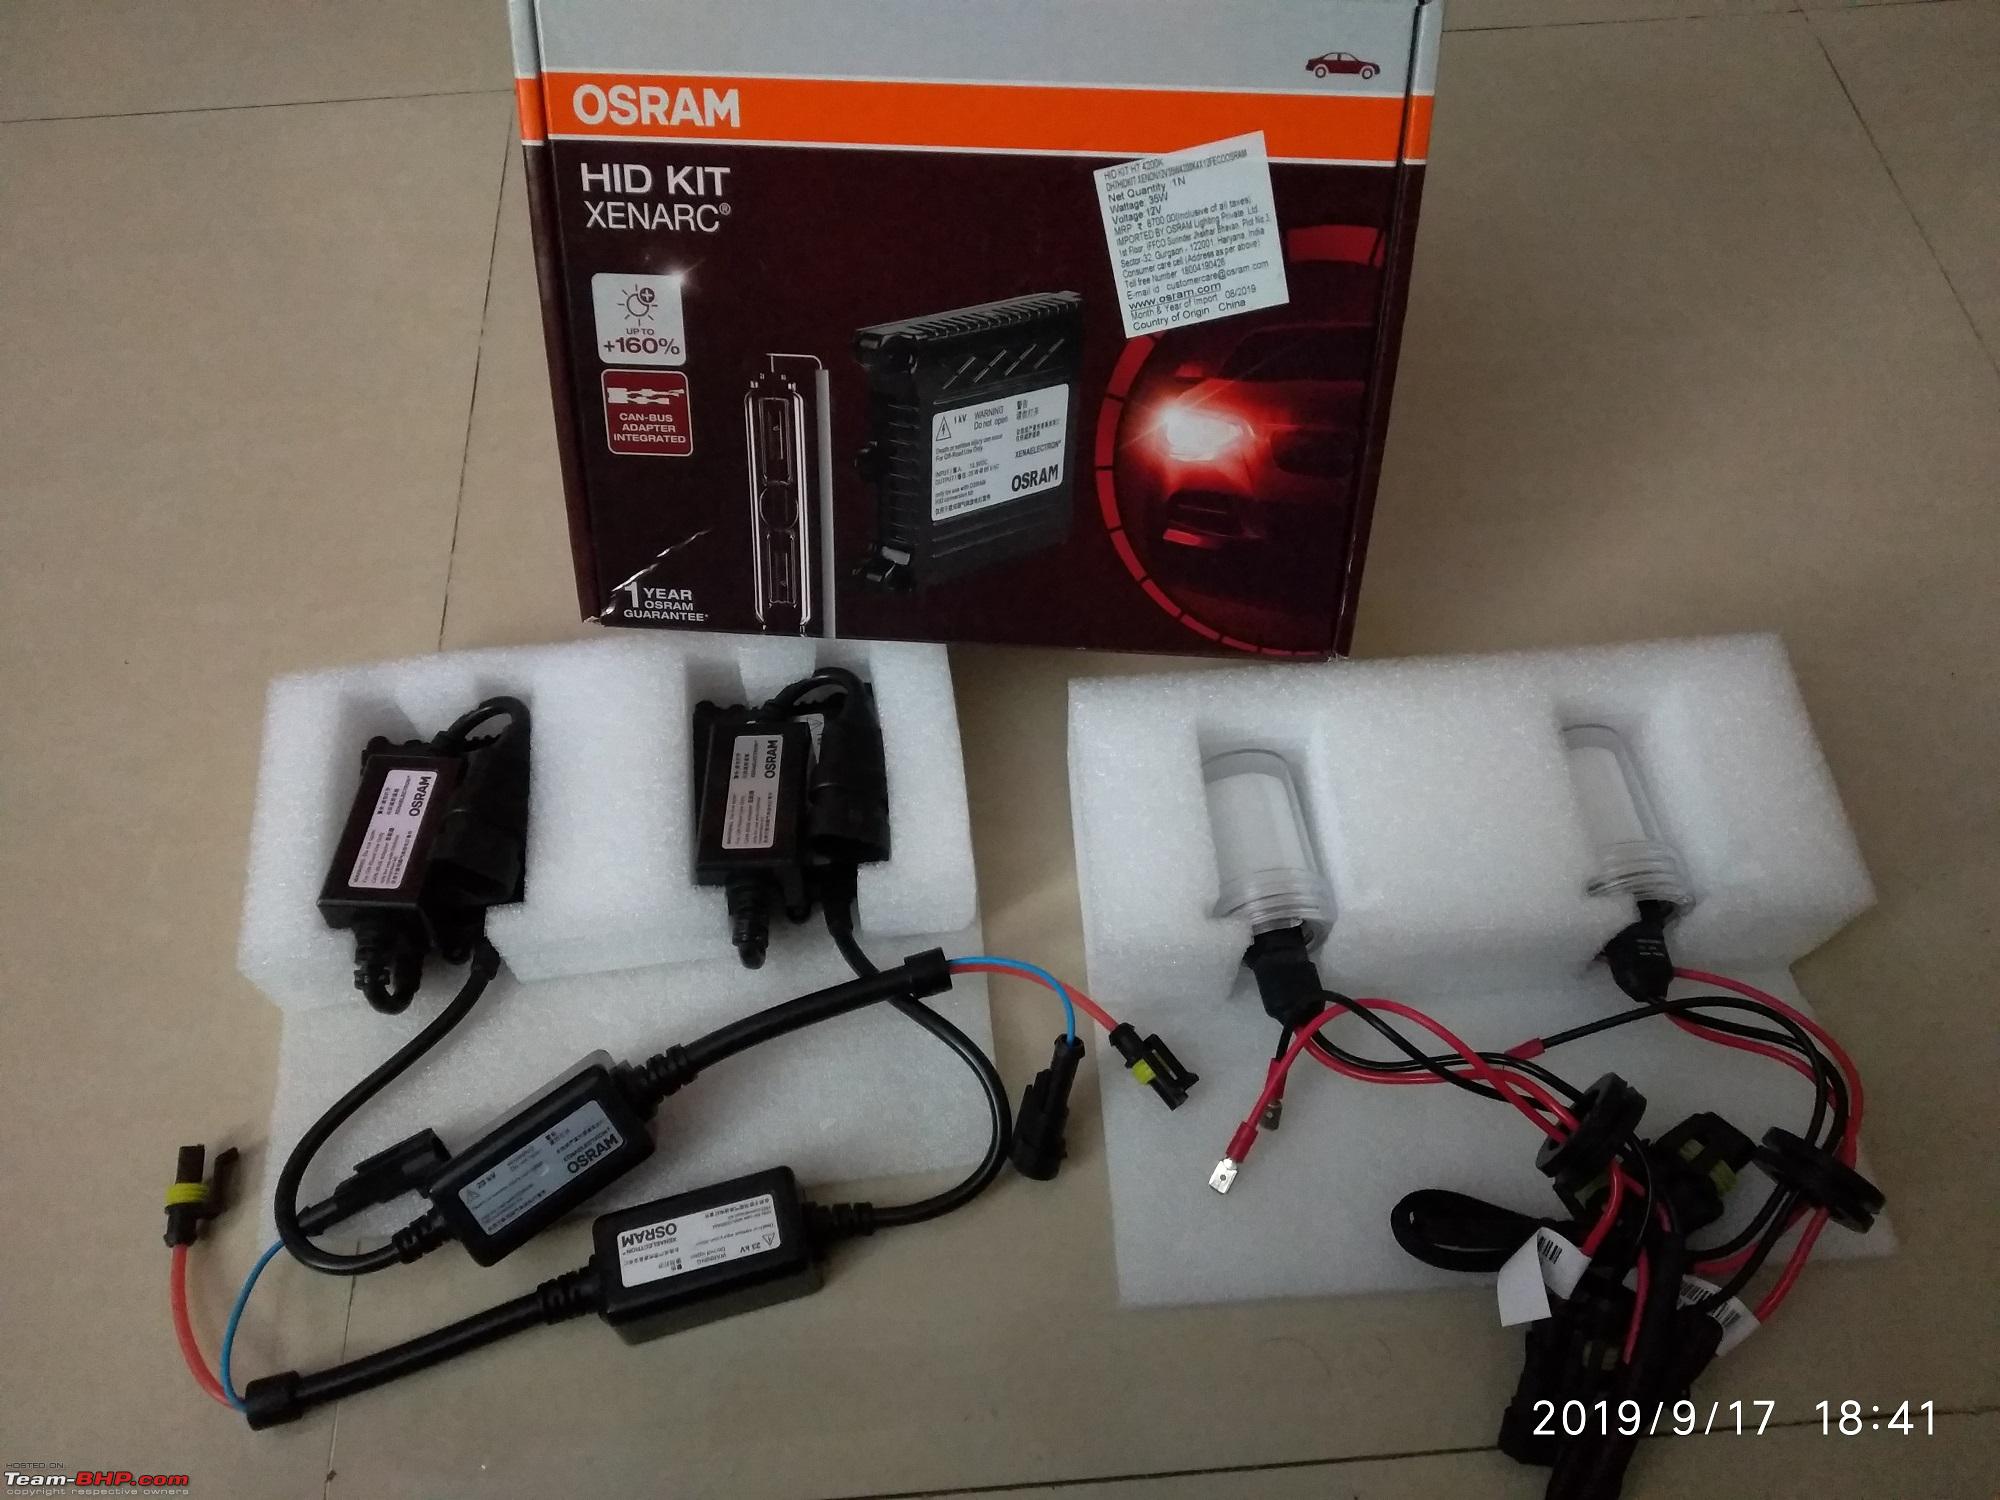
| Distinguished - BHPian  | DIY - Tata Nexon XZ+ - Osram 35W HID conversion kit Credits first! Got a truck-load of information from fellow BHPians. On their detailed threads, posts with pictures & instructions. Big shout out to @paragsachania for his DIY information on Ciaz upgrade & for whole hearted personal query resolution for the questions I asked him. Knowing that someone has done this, gives extra confidence for a DIY  . .Background - The Car & the universal problem of low illumination with stock halogens! I replaced my 9 year old Tata Vista (Aura ABS 1.3 MJD) with a Tata Nexon (XZ+ Diesel) in August. While on a positive note the Nexon came with projector low beam headlamp setup, it still comes with 4x 55W H7 halogens (2 each for low and high beams) which are really nothing more than power consuming candles; especially in rains. An upgrade was on top priority even before the booking was made. I hate accessory store folks prying apart things on my car. So DIY was the call of the hour for sure.  Solution As you can see in ParagSachania's threads, a really good OSRAM H7 HID conversion kit is readily available on Amazon.in in a couple of colour temperature options. I prefer yellow light for our weather & road conditions. So picked the 4200K variant. Kit is available here - Link - Amazon.in - Osram H7 HID conversion kit 4200K  I got the kit for 6250INR. As on 24 Sept 2019 it seems to be retailing at 6100INR. So a very reasonable pricing for what the product offers. Can't get better value for money. Note that the compatibility list isn't properly updated. So it says "Not compatible" for many cars - including the Nexon, Ciaz. But as long as your car has an H7 halogen with projector & sufficient space to run the wiring around, it will fit. Ignore the non-compatibility message on Amazon in such cases like I did. This is a 35W kit. Includes a canbus adapter. Since stock harness is for a 55W setup, I decided not to use a separate relay harness. (Osram documentation also provides for only direct installation, not a relay harness.) The canbus adapter plays with the BCM test signals & will ensure the BCM doesn't pop a blown bulb error code due to a different specification bulb in place OR due to the start up surge of power. The Celebrity - OSRAM H7 HID Conversion Kit Package Contents -
 Deciding your Ballast Installation Method Since this is a PnP kit, the wiring takes about 5 minutes to connect. The actual vital part is safely mounting the 2 ballasts, canbus adapters & igniter modules such that they don't touch any moving parts, don't move around & don't cause rattles by resonating with moving items, engine etc. The igniter & canbus adapter are pre-molded inline with the wiring & can be easily secured with zip tags at suitable places. Ballasts are tricky. You need to decide on one of the 2 approaches for securing them -
Tools & Items you need
 The Installation - Summary The installation overall can be broadly categorized into the following steps.
Last edited by Reinhard : 24th September 2019 at 15:43. |

|  (28)
Thanks (28)
Thanks
|
| The following 28 BHPians Thank Reinhard for this useful post: | aah78, Abhinav V, AGwagon, Bala02, digitalnirvana, graaja, GTO, HappyWheels, Keynote, manjunag, N33raj, PapaKiloSierra9, paragsachania, Pulse500, racsaxen, samay300, silverado, Simat, smuniswami, SpideyBoy, sukiwa, theexperthand, thesidmania, The_Outsider!, vaasu, Vmv, vsrivatsa, wheelguy |
| |
|
24th September 2019, 12:24
| #2 |
| Distinguished - BHPian | Re: DIY - Tata Nexon XZ+ - Osram 35W HID conversion kit Installation Step 1 - Prepare the dust cap, Install the bulbs & Test run Preparing the dust cap - Open the hood & look at the back of both headlamps. You'll see 2 circular caps with a pull-flap on each side. Thats a dust cap on the back of the bulb housing. 4 in total on the Nexon. 2 each for low beam & high beams. The outer ones are for the low beams. Thats what we are interested in. Pull the flap on those & remove it. In my case - I did all the assembly and fiddling at home upstairs & brought down everything for actual fitment in car. You'll have to do the same unless you have a good covered private parking in your apartment block/bungalow where there is no disturbance from curious people. There are standard 1 inch drill bits with saw-teeth available for purposes like this. If you can source one, excellent. Just drill a hole in the center with it If you can't source one - use the largest wood/metal drill bit at your disposal & make a hole at the center of the dust cap. Then use normal wire cutter/nipper to cut a circular hole around it measuring about 1 inch. I used the nipper. Takes 10 minutes to complete both caps. Now - take the bulb from the kit. It has 2 a rubber grommet dangling with 4 holes in the wiring. This grommet is going to plug the hole we just drilled & will ensure no water/dust enters the headlamp. Ensure you have the correct orientation of cap direction (i.e. bulb should be on the "inner" side of the dust cap). Now carefully insert all the plugs, couplers, wires through the hole in the dust cap. 2 bare wires with PINs should remain on the side of the bulb. Carefully insert the dust cap's cut lining into the grommet's fissure to make a snug tight fit. (In case you drilled the hole too wide & the grommet isn't fitting tight - fill the gap a bit with some silicone sealant & leave it to set dry for a couple of hours.) This is how the outcome of this step should look like - 
The other two individual connectors on the left of the dust cap are colour coded & latch-coordinated with the incoming power from the igniter via the ballast. You'll see their matching counterparts hanging from the ballast. Red connects to Red, Black connects to Blue. Even for a person challenged in colour identification, it can't go wrong since the connectors are reversed on each electrode. Male-Female on 1 wire, Female-Male on the other. Excellent attention to low level design. Installing the Bulbs - Now take this whole assembled set to the car. Carry out the following steps on 1 side at a time. Do not run any of the steps in parallel to avoid damage / dust intrusion into headlamps. Patience is the key for any DIY. TIP for RHS - On RHS, the wiper washer tank inlet sits right behind the headlamp. I highly recommend that it is unfastened (single nut-bolt right around its neck). Its a flexible pipe. Just push it aside & accessibility to the headlamp's internals is much easier. Fix the pipe back once the below steps are complete. Don't forget fixing it back though!
 (The bulb was installed out of place here. Notch not aligned properly. It was causing a slight shadow. I have corrected it since. Picture is for reference of the clip only.) Connections -
Now repeat all the above steps for the other side headlamp.  Test -
This is where I closed the hood & locked the car for the day. Things were working, bulbs were secured in place & I was not tired. Good to take a brake at this step. We do the remaining part with a fresh mind on the next day! Last edited by Aditya : 26th September 2019 at 08:07. Reason: Missed word |
|
| (26)
Thanks
|
| The following 26 BHPians Thank Reinhard for this useful post: | aah78, Abhinav V, digitalnirvana, graaja, GrammarNazi, GTO, HappyWheels, InControl, manjunag, N33raj, PapaKiloSierra9, paragsachania, racsaxen, samaspire, samay300, Simat, smuniswami, SpideyBoy, sukiwa, theexperthand, thesidmania, The_Outsider!, vaasu, Vmv, vsrivatsa, wheelguy |
|
24th September 2019, 13:44
| #3 |
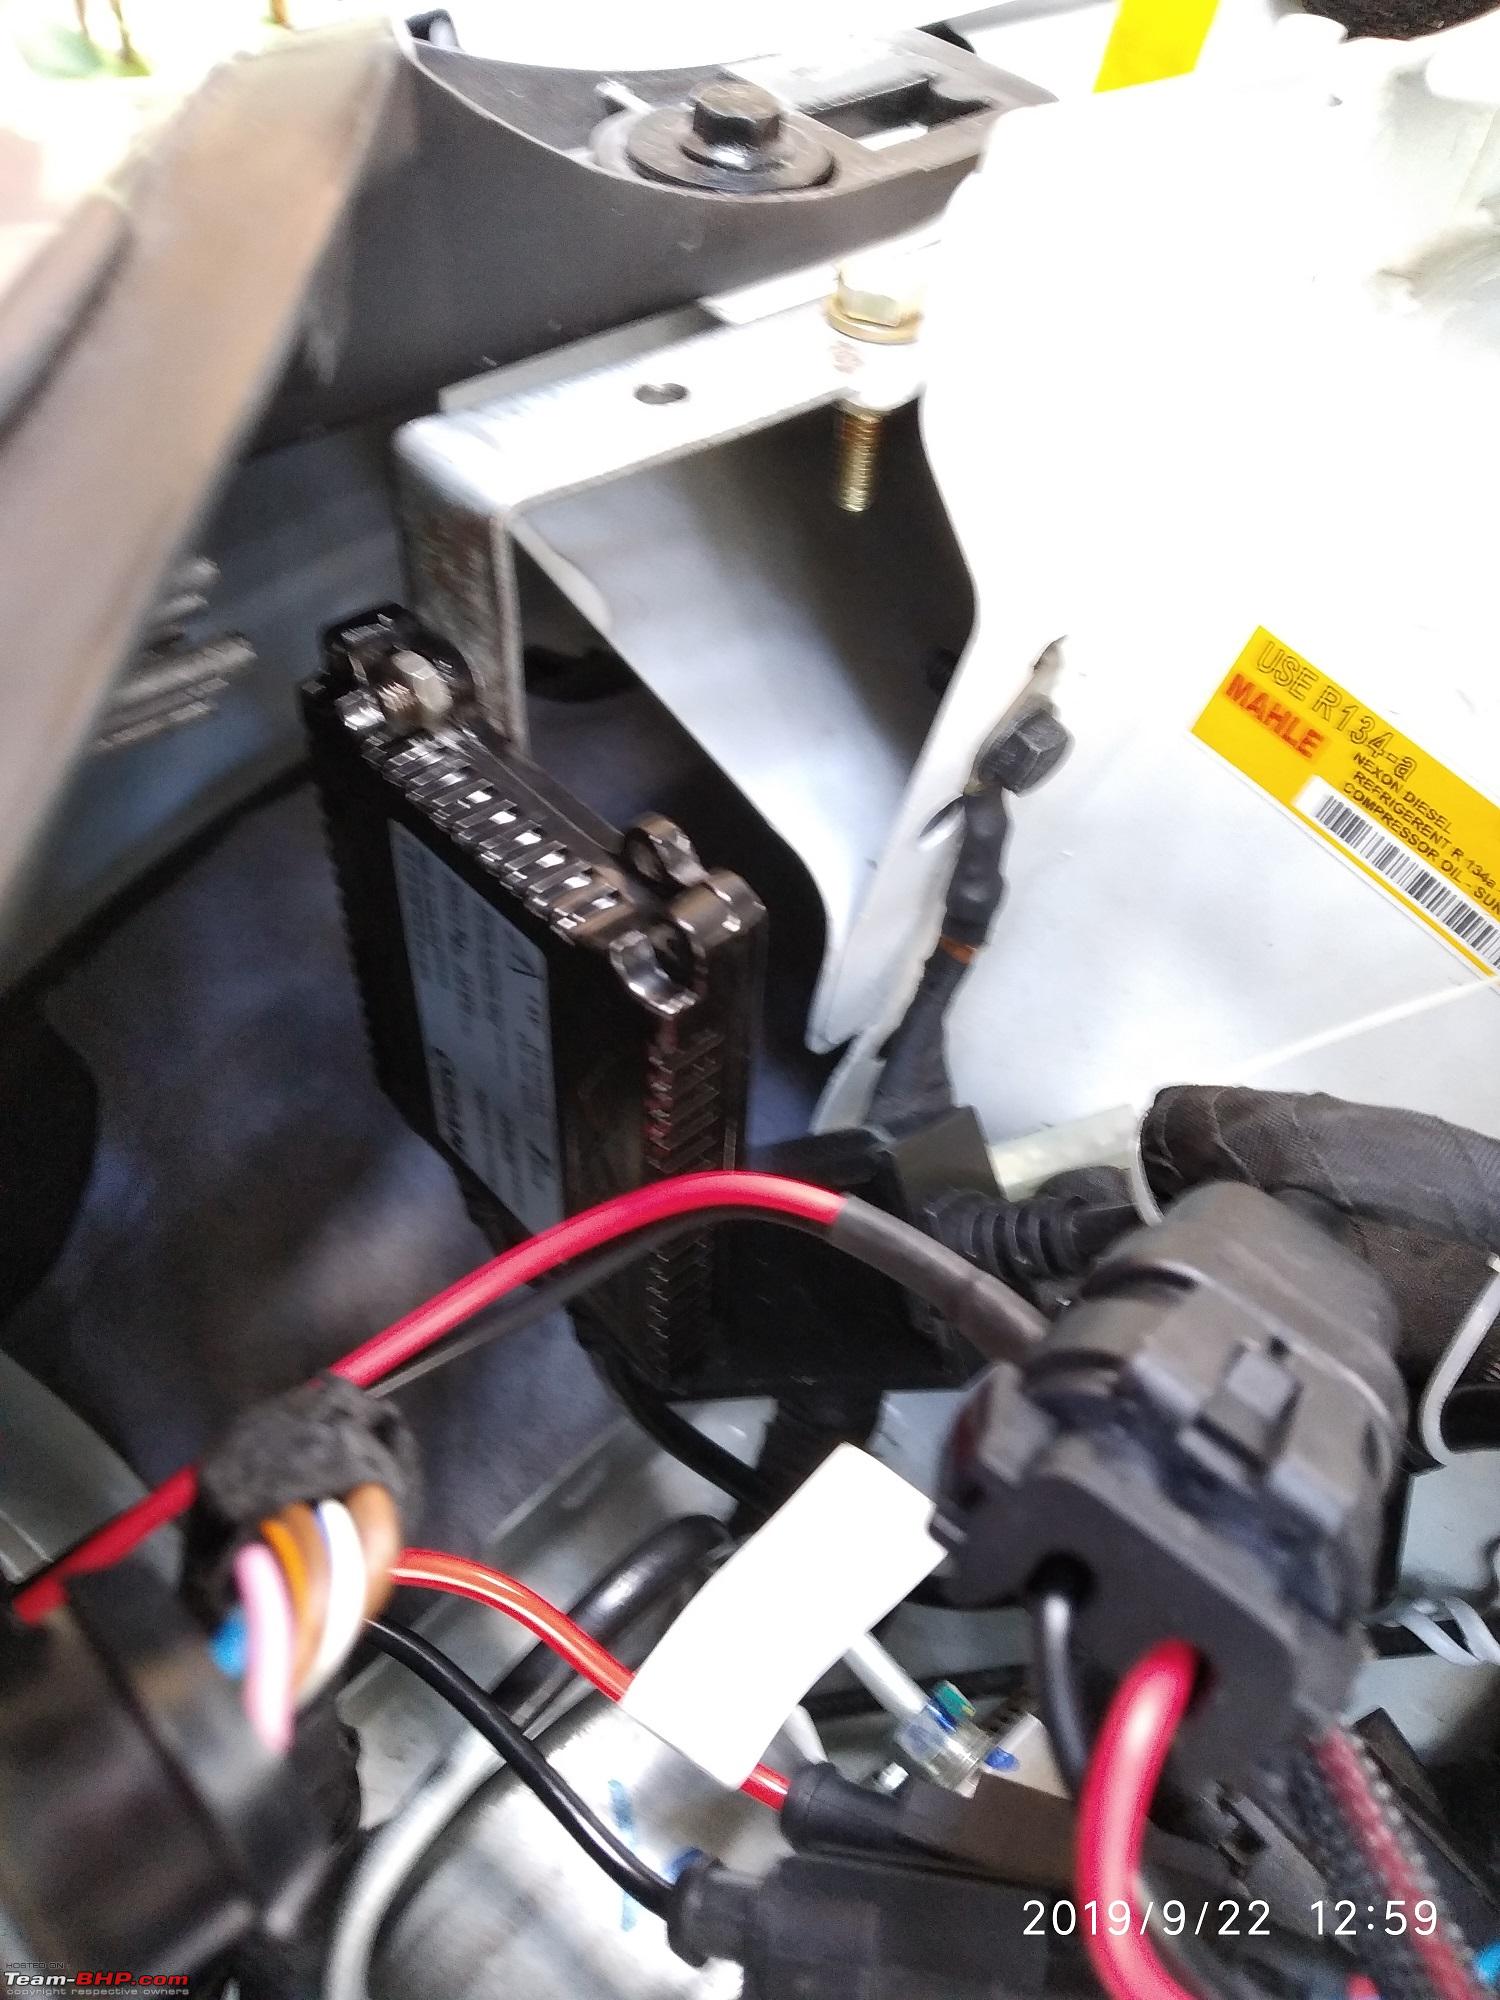
| Distinguished - BHPian | Re: DIY - Tata Nexon XZ+ - Osram 35W HID conversion kit Installation Step 2 - Finding the right ballast mounting location - Now that the things are working fine, its time to go ahead and secure them for a long run.
There are 3 very handy readily available mounting spots in the engine bay. Thanks Tata!!
At the end of this step - disconnect all 3 couplers between the bulb & ballast. Now we assemble the bracket back home. Last edited by Reinhard : 24th September 2019 at 23:12. |
|
| (21)
Thanks
|


| The following 21 BHPians Thank Reinhard for this useful post: | aah78, ashis89, digitalnirvana, graaja, GrammarNazi, GTO, HappyWheels, N33raj, PapaKiloSierra9, paragsachania, Pulse500, samay300, Simat, smuniswami, SpideyBoy, sukiwa, theexperthand, thesidmania, The_Outsider!, Vmv, wheelguy |
|
24th September 2019, 13:59
| #4 |
| Distinguished - BHPian | Re: DIY - Tata Nexon XZ+ - Osram 35W HID conversion kit Installation Step 3 - Prepare the mounting bracket for final installation
Obviously - this needs to be done for each ballast individually. Last edited by Reinhard : 24th September 2019 at 15:15. |
|
| (17)
Thanks
|


| The following 17 BHPians Thank Reinhard for this useful post: | aah78, digitalnirvana, graaja, GTO, HappyWheels, N33raj, PapaKiloSierra9, paragsachania, samay300, Simat, smuniswami, sukiwa, theexperthand, thesidmania, The_Outsider!, vaasu, wheelguy |
|
24th September 2019, 14:14
| #5 |
| Distinguished - BHPian | Re: DIY - Tata Nexon XZ+ - Osram 35W HID conversion kit Installation Step 4 - Complete the install & secure wiring We are now ready to complete the installation! All that remains is to permanently fix the ballast brackets, channel the wires safely & to tidy them up safely. Here we go -
Last edited by Reinhard : 24th September 2019 at 15:22. |
|
| (21)
Thanks
|


| The following 21 BHPians Thank Reinhard for this useful post: | aah78, Dennis, digitalnirvana, graaja, GrammarNazi, GTO, HappyWheels, manjunag, N33raj, omranga98, paragsachania, samay300, Simat, smuniswami, SpideyBoy, sukiwa, theexperthand, thesidmania, The_Outsider!, Vmv, wheelguy |
|
24th September 2019, 14:48
| #6 |
| Distinguished - BHPian | Re: DIY - Tata Nexon XZ+ - Osram 35W HID conversion kit Conclusions -
Now that this DIY is complete, moving on to STAGE 2 lighting upgrade. I plan to replace the rudimentary stock fog lamps. They are just 19W! Duh. Plan is to replace with 55W bi-Xenon projector fog lamps soon. Will post the detailed DIY for that when done. Do PM/post for any queries with the install. Happy to share my learning! Happy motoring. Cheers! Last edited by Aditya : 26th September 2019 at 08:08. Reason: Typos |
|
| (45)
Thanks
|


| The following 45 BHPians Thank Reinhard for this useful post: | 2himanshu, aah78, arjithin, arvindmanju, ashis89, badboyscad, condor, damodar, Dennis, digitalnirvana, discoverwild, dr_anil_nexon, Enobarbus, frankmehta, graaja, GrammarNazi, GTO, HappyWheels, ilangop, iloveboost, jithin23, JKBKS, Keynote, lemedico, Leoshashi, manjunag, N33raj, paragsachania, PraNeel, samay300, samschenker, ShivrajG, Simat, smuniswami, spdfreak, SpideyBoy, sukiwa, theexperthand, thesidmania, The_Outsider!, Varun_HexaGuy, Vik0728, Vmv, vsrivatsa, wheelguy |
|
24th September 2019, 23:17
| #7 |
| Team-BHP Support  | Re: DIY - Tata Nexon XZ+ - Osram 35W HID conversion kit Note from Support: Thread moved to the DIY section. Thanks for sharing! |
|
| (3)
Thanks
|
| The following 3 BHPians Thank aah78 for this useful post: | digitalnirvana, GTO, Reinhard |
|
25th September 2019, 07:05
| #8 | |
| Distinguished - BHPian | Re: DIY - Tata Nexon XZ+ - Osram 35W HID conversion kit I guess one of the first DIYs on the forum for a Nexon for headlights. Please share some output shots against a wall from some distance and also in an alley. What I've read is that halogen based projectors are not good for HIDs as they cause more of glare. So I would like a first hand experience from you especially with long shots.  This is a reflection coming out of the setup and could glare the incoming traffic. Do check from front also. Quote:
Well, I'll show you the first case where it failed. But it maybe a one off case of mine as the handling of retrofit was not good.  Still I'll suggest that you use a couple of zip ties to tie the ballasts to the mount itself. Last edited by BoneCollector : 25th September 2019 at 07:16. | |

| (8)
Thanks
|

| The following 8 BHPians Thank BoneCollector for this useful post: | digitalnirvana, Leoshashi, racsaxen, Reinhard, samay300, Simat, smuniswami, The_Outsider! |
|
25th September 2019, 08:57
| #9 | |||
| Distinguished - BHPian | Re: DIY - Tata Nexon XZ+ - Osram 35W HID conversion kit Quote:
Quote:
Quote:
And I'll PM you with queries when I start work on Stage 2 .Last edited by Reinhard : 25th September 2019 at 09:01. | |||
|
| (4)
Thanks
|
| The following 4 BHPians Thank Reinhard for this useful post: | digitalnirvana, racsaxen, samay300, Simat |
|
25th September 2019, 09:53
| #10 |
| Distinguished - BHPian | Re: DIY - Tata Nexon XZ+ - Osram 35W HID conversion kit Finally managed to upload the video of a quick test I did after the install. Here it is - (Note that there is a slight shadow on LHS. It has since been corrected. Had misaligned the bulb while fixing the clip back.) Fog lamps and high beams in the video are stock halogen bulbs. Haven't touched them. |
|
| (14)
Thanks
|
| The following 14 BHPians Thank Reinhard for this useful post: | Abhinav V, ashis89, condor, digitalnirvana, GrammarNazi, irajput, N33raj, Nitish B Shetty, pritanshchandra, samaspire, samay300, Simat, smuniswami, Varun_HexaGuy |
|
25th September 2019, 10:10
| #11 | |
| Distinguished - BHPian | Re: DIY - Tata Nexon XZ+ - Osram 35W HID conversion kit Quote:
 | |
|
| (9)
Thanks
|
| The following 9 BHPians Thank BoneCollector for this useful post: | audioholic, digitalnirvana, Reinhard, revvharder, sainyamk95, samay300, Simat, smuniswami, wheelguy |
| |
|
25th September 2019, 11:58
| #12 |
| Newbie Join Date: Sep 2019 Location: Bhubaneswar
Posts: 10
Thanked: 27 Times
| Re: DIY - Tata Nexon XZ+ - Osram 35W HID conversion kit I am planning to do the same kind of set up in my brezza..Thanks for demonstrating the installation process. It was very informative. But my main concern comes after installation. How would I align the throw of light. I have never done anything like this before. If possible someone please demonstrate the light alignment process in a nexon or brezza or any other car with low beam as projectors and high beams as halogen reflectors. And if possible please suggest in steps as I will be doing this for the first time. Thanks in advance. Samay Last edited by samay300 : 25th September 2019 at 12:10. |
|
| (1)
Thanks
|
| The following BHPian Thanks samay300 for this useful post: | Reinhard |
|
25th September 2019, 12:03
| #13 | |
| BHPian | Re: DIY - Tata Nexon XZ+ - Osram 35W HID conversion kit Quote:
. I am not much of a DIY guy when it comes to car so I will try to purchase and get it installed with a local/ or a Tata service guy. Coupled with the high Beam I think this should produce a good result at nights on highways. The stock projectors are totally useless. | |
|
| (1)
Thanks
|
| The following BHPian Thanks ShivrajG for this useful post: | Reinhard |
|
25th September 2019, 12:11
| #14 |
| BHPian Join Date: Nov 2009 Location: Pune
Posts: 96
Thanked: 35 Times
| Re: DIY - Tata Nexon XZ+ - Osram 35W HID conversion kit Does Nexon comes with Auto light setup ? I am looking for an answer where the H7 setup comes with auto light setup. Basically XUV500 auto light function turns on the low beam ( with projector setup) the moment its dark enough to use lights. And if you flash the lights, the high beam comes up momentarily without touching the low beam. This case can be ideal for HID since once they are powered on they are not disturbed. However, when lights used in manual mode, while flashing the low beam cuts off showing only high beam unless you put on high beam which will lit up both low and high beam until moved to low beam. I was wondering how HID works in manual mode since it may take some time to get fully lit after you flash the lights. Is this so ?  Experts your view please. This is the reason I am yet to try HID on my XUV. |
|
| ()
Thanks
|
|
25th September 2019, 12:29
| #15 | |||||
| Distinguished - BHPian | Re: DIY - Tata Nexon XZ+ - Osram 35W HID conversion kit Quote:
Quote:
If there is a need to adjust the focus, its also not too tough. There are 2 screws located around the headlamp housing. One adjusts horizontally and the other vertically. Spend 10 minutes around the headlamp housing with a keen eye. You'll be able to locate those. Aren't exactly right in the face. You'll need to search carefully. And beam adjustment can be done afterwards at any accessory store. They can do it in 5 minutes. Quote:
Quote:
Quote:
HID should not be used in a scenario where lights turn on/off often. Not only do they have a "start-up" time, frequent power cycles are also harmful for the ballast, igniter & bulb's lifetime. | |||||
|
| (2)
Thanks
|
| The following 2 BHPians Thank Reinhard for this useful post: | samay300, vsrivatsa |
|