Team-BHP
(
https://www.team-bhp.com/forum/)

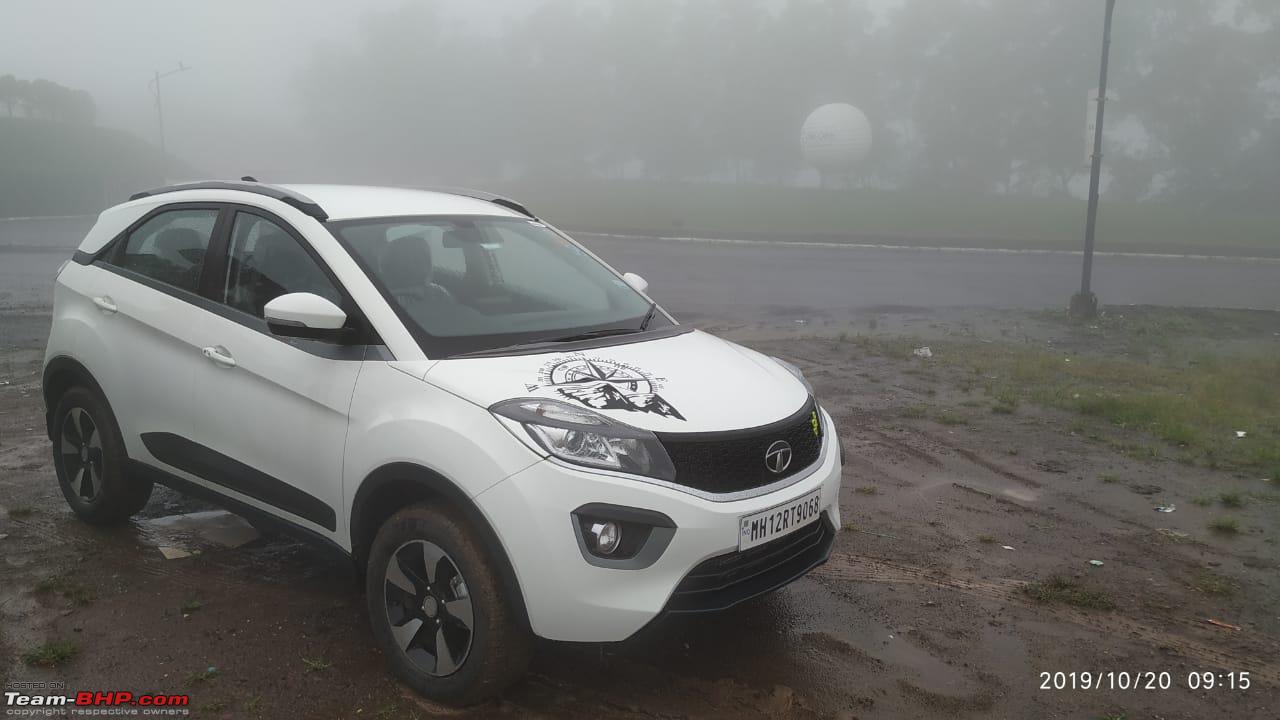
I have a 2019 Nexon. I thoroughly enjoy this ride & find excuses to go driving all the time. (Covid19 really threw a spanner in this though, so just surviving). The ownership thread is here -
My Nexon Ownership thread
As you can see in the ownership thread's first part - there is a rather elaborate list of features that I had in my previous car (a Tata Vista that costed less than half the money in 2005) and are / were missing in the Nexon that costs double the price after a decade. So as many as possible of them - I have brought into the Nexon by the way of DIY projects (documented on the DIY sub forum already). One more such item was illuminated power window switches on all doors. This was present in the Nexon till early 2018 and removed. Something that kept on pricking me since day 1. I knew a DIY project would happen for it too & here it is now.
So far all my DIY projects with car, at home or elsewhere, tend to be completely driven by necessity, utility & safety. I give little value to looks & aesthetics if the utility purpose is addressed with a robust long lasting implementation. This probably is the first one that is driven by some bling & premium quotient. Other contributors are a bit of good utility + that tick mark against an item that had gone missing in what is a newer car as mentioned above. Given the skewed cost vs benefits equation, I'm not sure if many people will actually go ahead to implement this project. But I'm documenting it anyway. (Another benefit of posting it on TBHP is that - if something goes south in future, I have a ready reference of what I had done. No need to remember!)
The Tata door harnesses are pretty much the same for Tigor, Tiago, Nexon. So the same implementation process & products will work on all these cars without any difference.
Products / Tools Required
- 1 x Illuminated Driver side power window control switch
- 3 x Single power window controllers for othe 3 doors with illumination
- Some good quality Polycab or similar copper wires (2 colours)
- Trim remover kit (or flat head screw driver with taping done over the metal head.
- Needle/Safty pin (for unlocking the connector pin locks)
- Steelgrip / similar insulation tape
- Some zip ties
- Standard screw driver set. Nothing special required.
Illumination Wiring Approach Options
- With Headlight Control
- This is how it ideally is in cars that have illumination in the window switches.
- The LEDs turn ON, when headlamps are in position lamp / ON mode. The stock illumination on driver side window is linked this way.
- Do check once - if your car has the 2 extra pins in the door harness socket already - it will be just a plug-n-play. In my 2019 car, the harness does not have the illumination wiring anymore. Cost cutting has reached its optimum level. The socket is same in my car, but the pins and wires are missing. It has only 3 wires. "UP", "DOWN" and "GROUND".
- To implement this - you need to run a wire to each door with a tap into the head-lamp control fuse.
- That's a bit of a hassle & the time required would be too much for what is really a small goal.
- I thought about it for a while - but decided against. Didn't want to open the complete door panels on all 3 doors (other than driver door).
- Simpler but "Always ON"
- This is a rather crude but very effective & simple way to get the job done.
- All you need is 3 pairs of 2 inch copper wires & 1 hour maximum.
- In this implementation - we simply hook up the +ve of the LED with either UP or DOWN pin of the window switch & the -ve of the LED with the GND wire in the stock connector.
- This way - the LEDs will be ON - when the car is in ACC mode (or above) AND the master power window switch is in "UNLOCK" mode - i.e. passengers have control over the windows.
- If the driver disables the power windows for passengers - the LEDs will switch off. Which is great. So when there are no passengers - you can simply switch off the master control & the LEDs won't glow unnecessarily.
- So - the 3 door LEDs will work a bit out of sync with the driver door since driver's switch illumination is still hooked up to the headlamp mode in stock FR door harness.
- And - the LED switches off when the switch is used for the direction (UP or DOWN) to which you have linked the LED +ve. I think thats due to the current running towards the motors via the relays.
- Hence it would be better to link the LED +ve to the "DOWN" pin. Because when rolling the window down with a "push", the finger anyway blocks the LED from view. :uncontrol
- Sadly - I realized this after completing the installation of the co-driver side door. I wired it such that the LED turns off when pulling the window UP. But I didn't find much value in undoing all the trim-work just for this. Its all plastic locking into each other afterall. So to maintain uniformity - I retained the same wiring in all 3 doors.
- This is a very small nuance. Afterall the purpose of the illumination is to find the switch easily in the dark. Once its found, I don't mind if it goes dark during operation that much.
Now - let's get on with the implementation. In 2 groups - Driver door and the other 3.
Note - In case of the 2 front doors - no other panels / plastic trims need to be touched at all. Just the single panel that holds the switches needs to be removed & it comes out easily. For the rear doors - we need to undo 3 clips on the piano black trim panel since the switch assembly actually locks into it.
Driver Door Switches
- This is a rather simple one as long as your car has the 1 (driver side) switch illuminated.
- Its a simple replacement of the switch assembly since the stock harness has the illumination wires for that single LED. Pinouts remain the same.
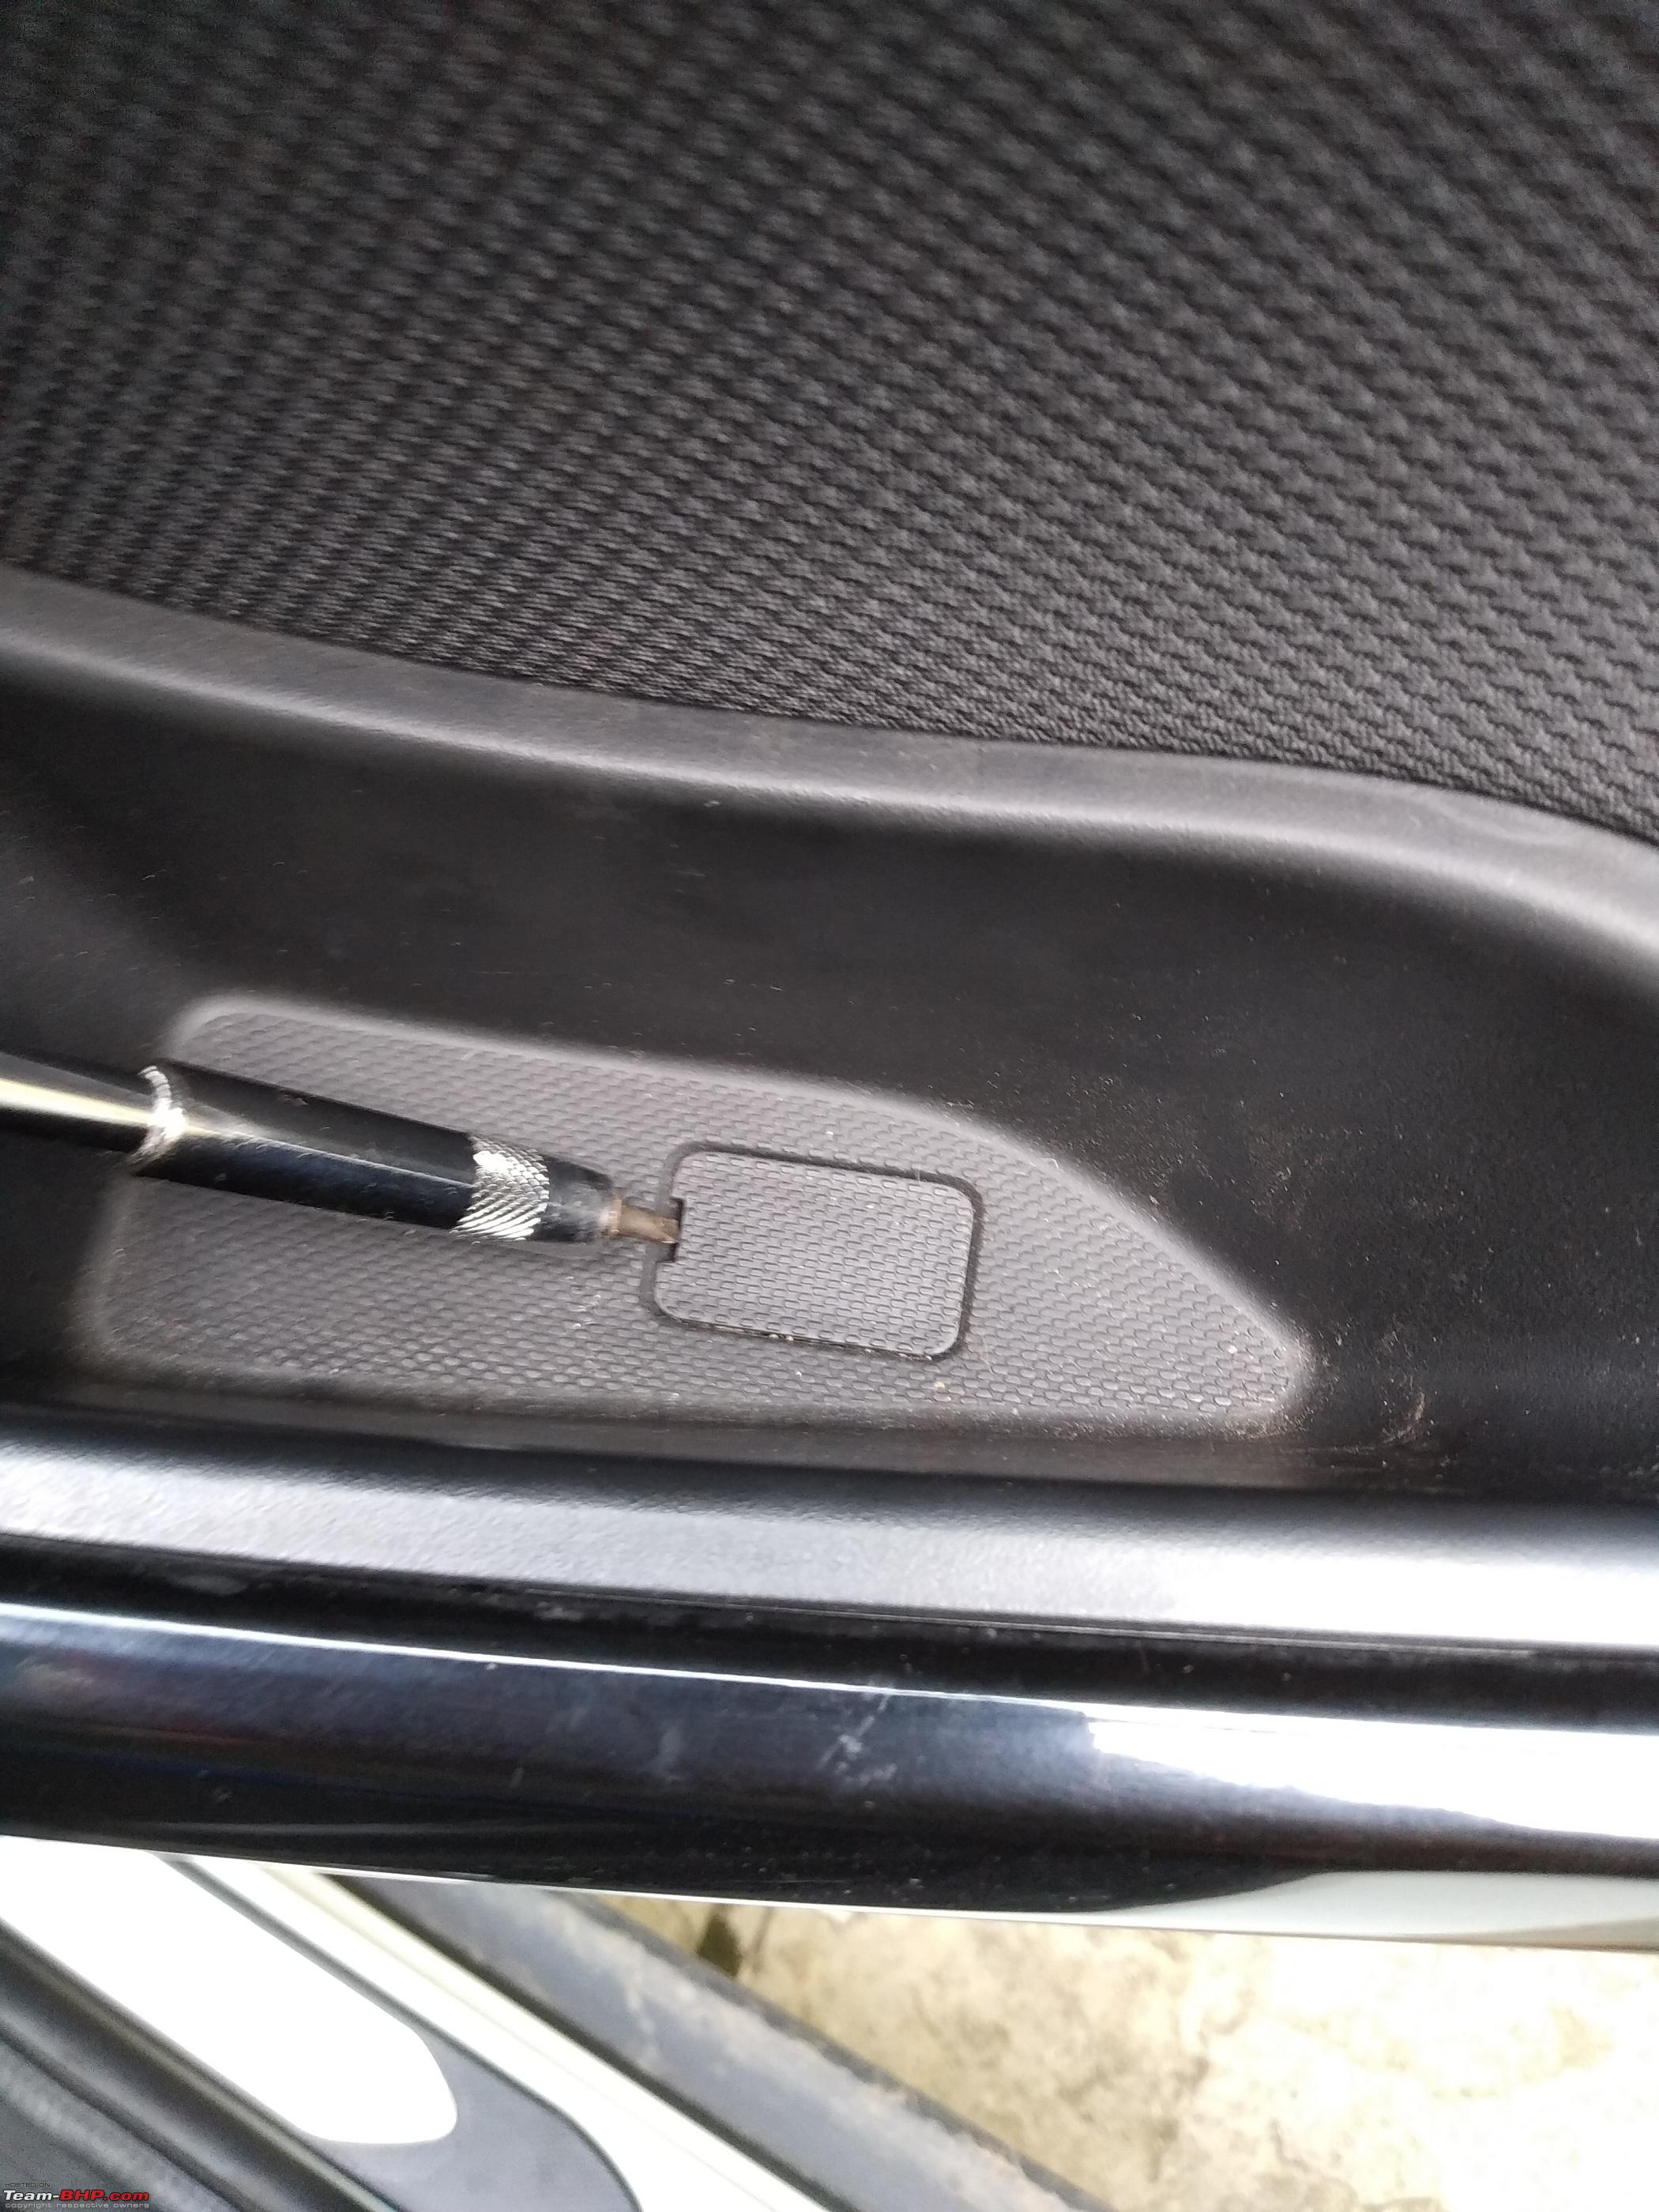
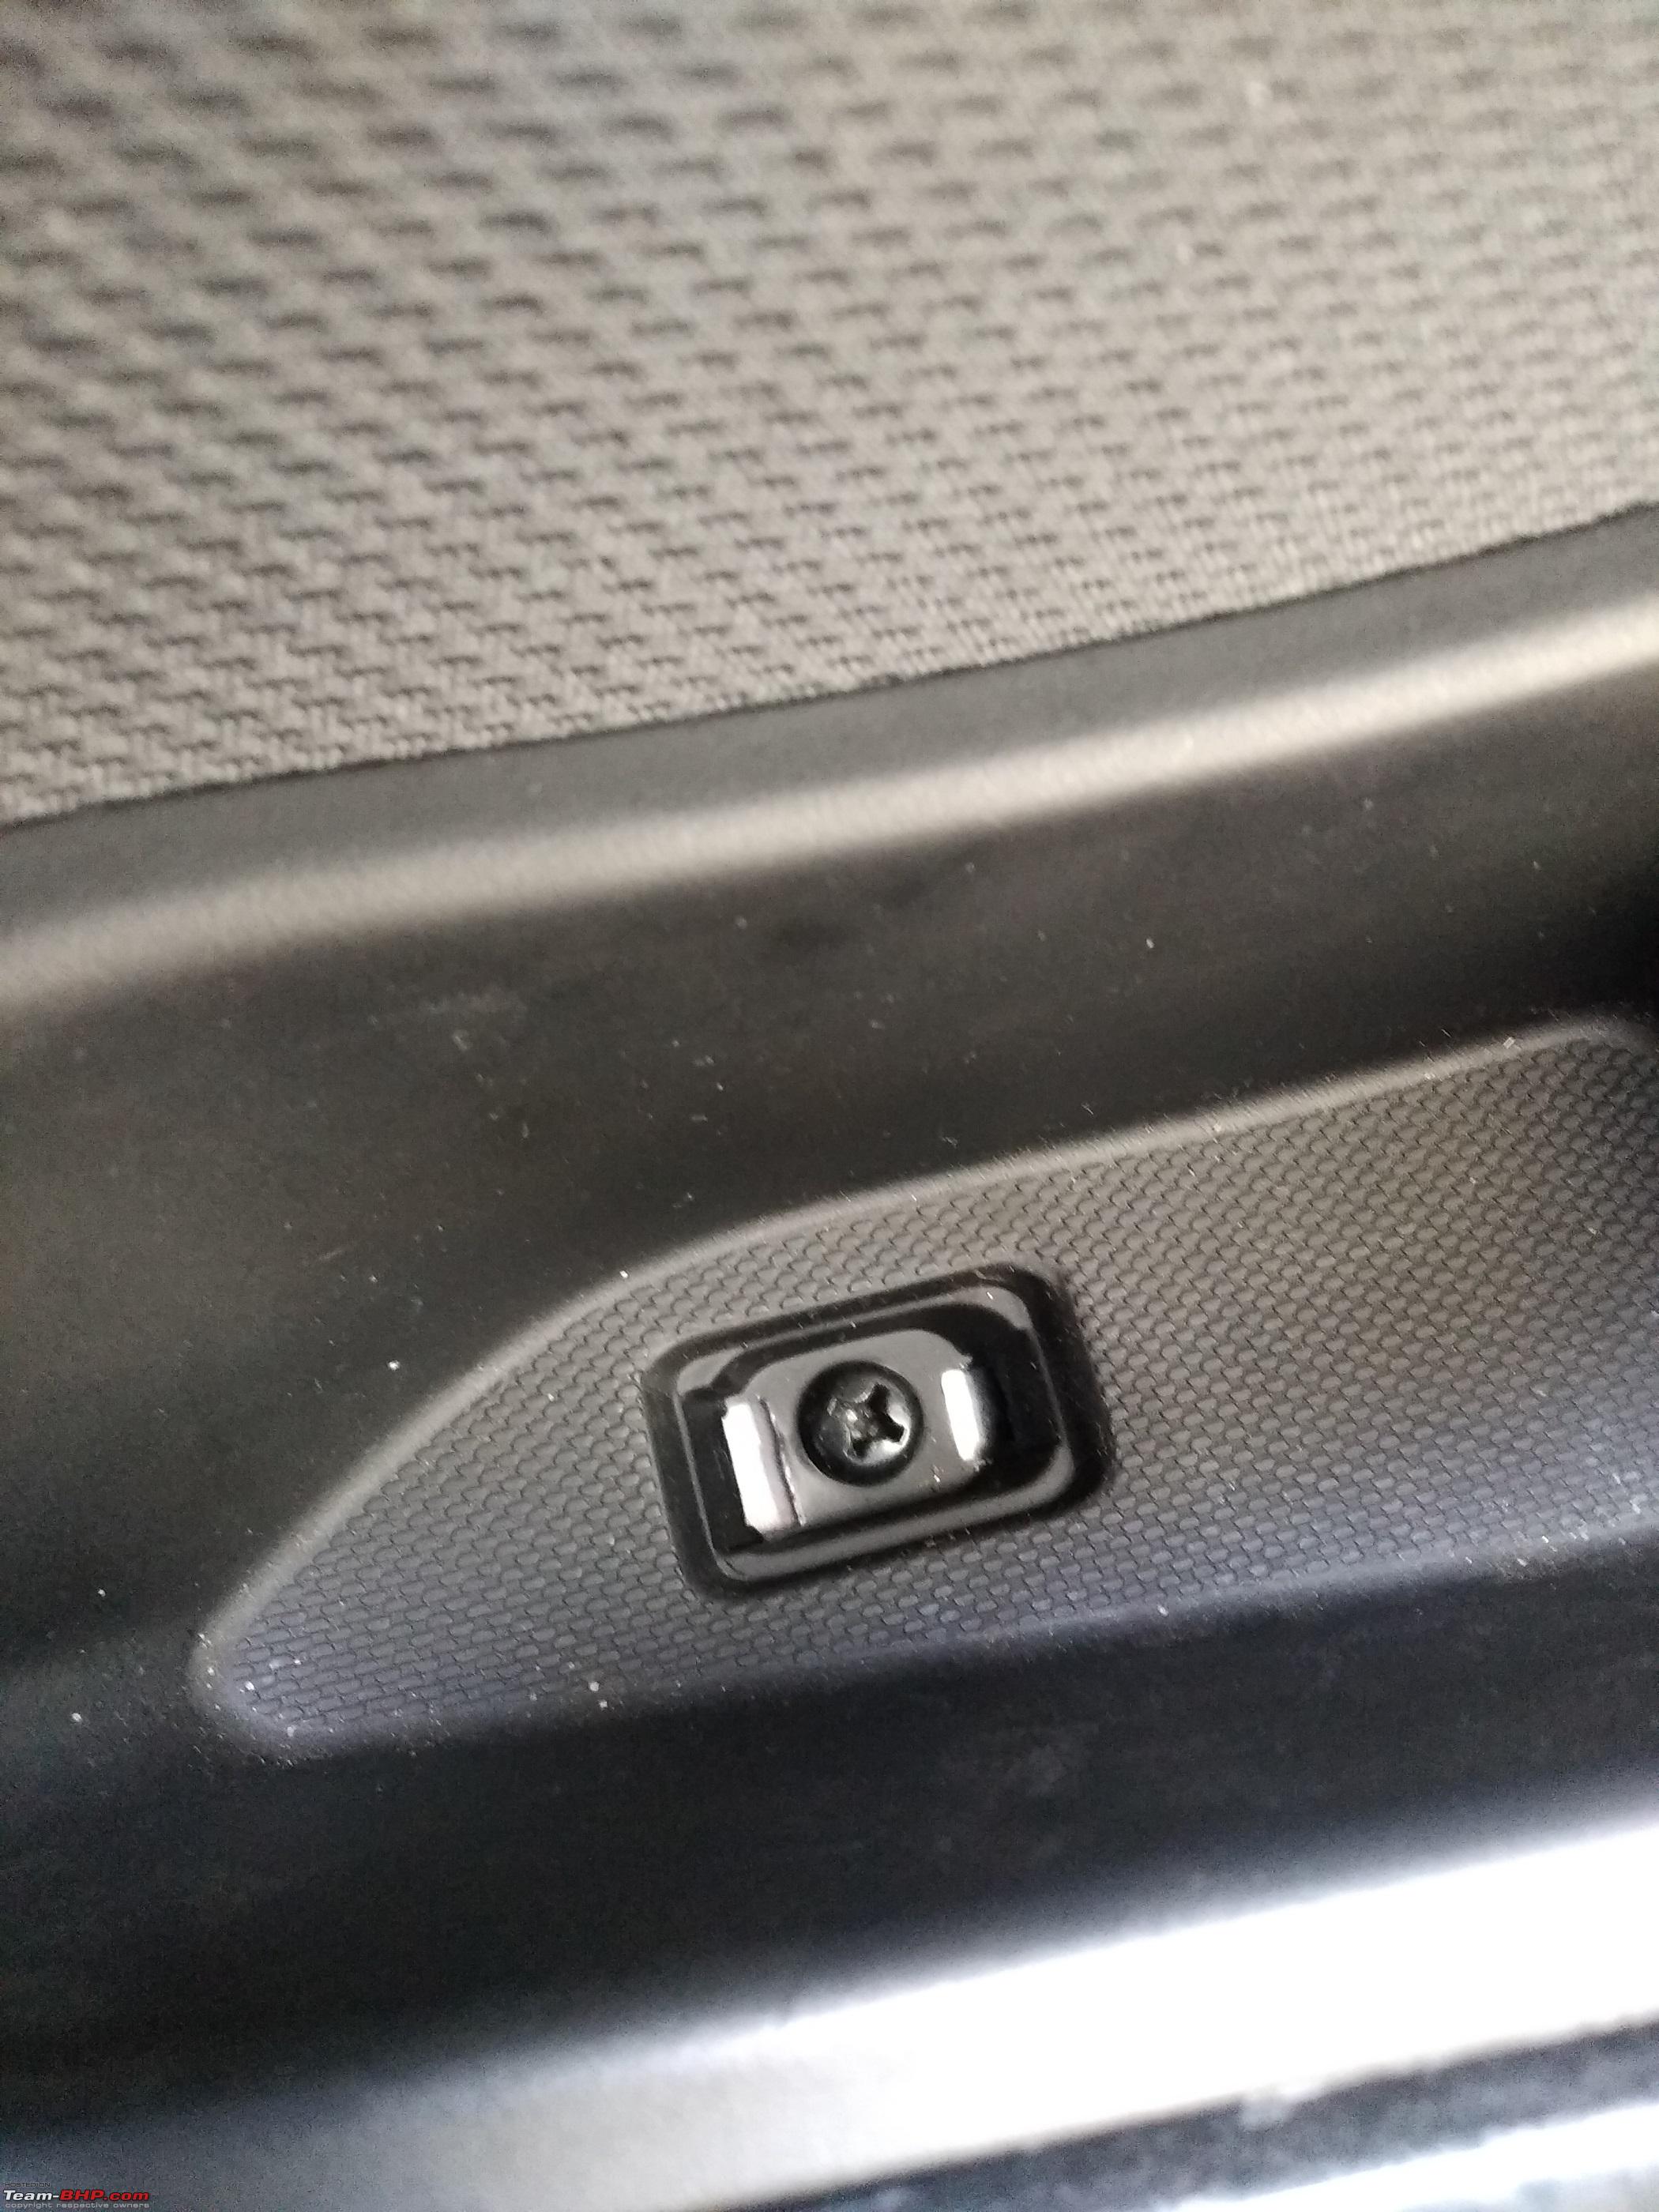
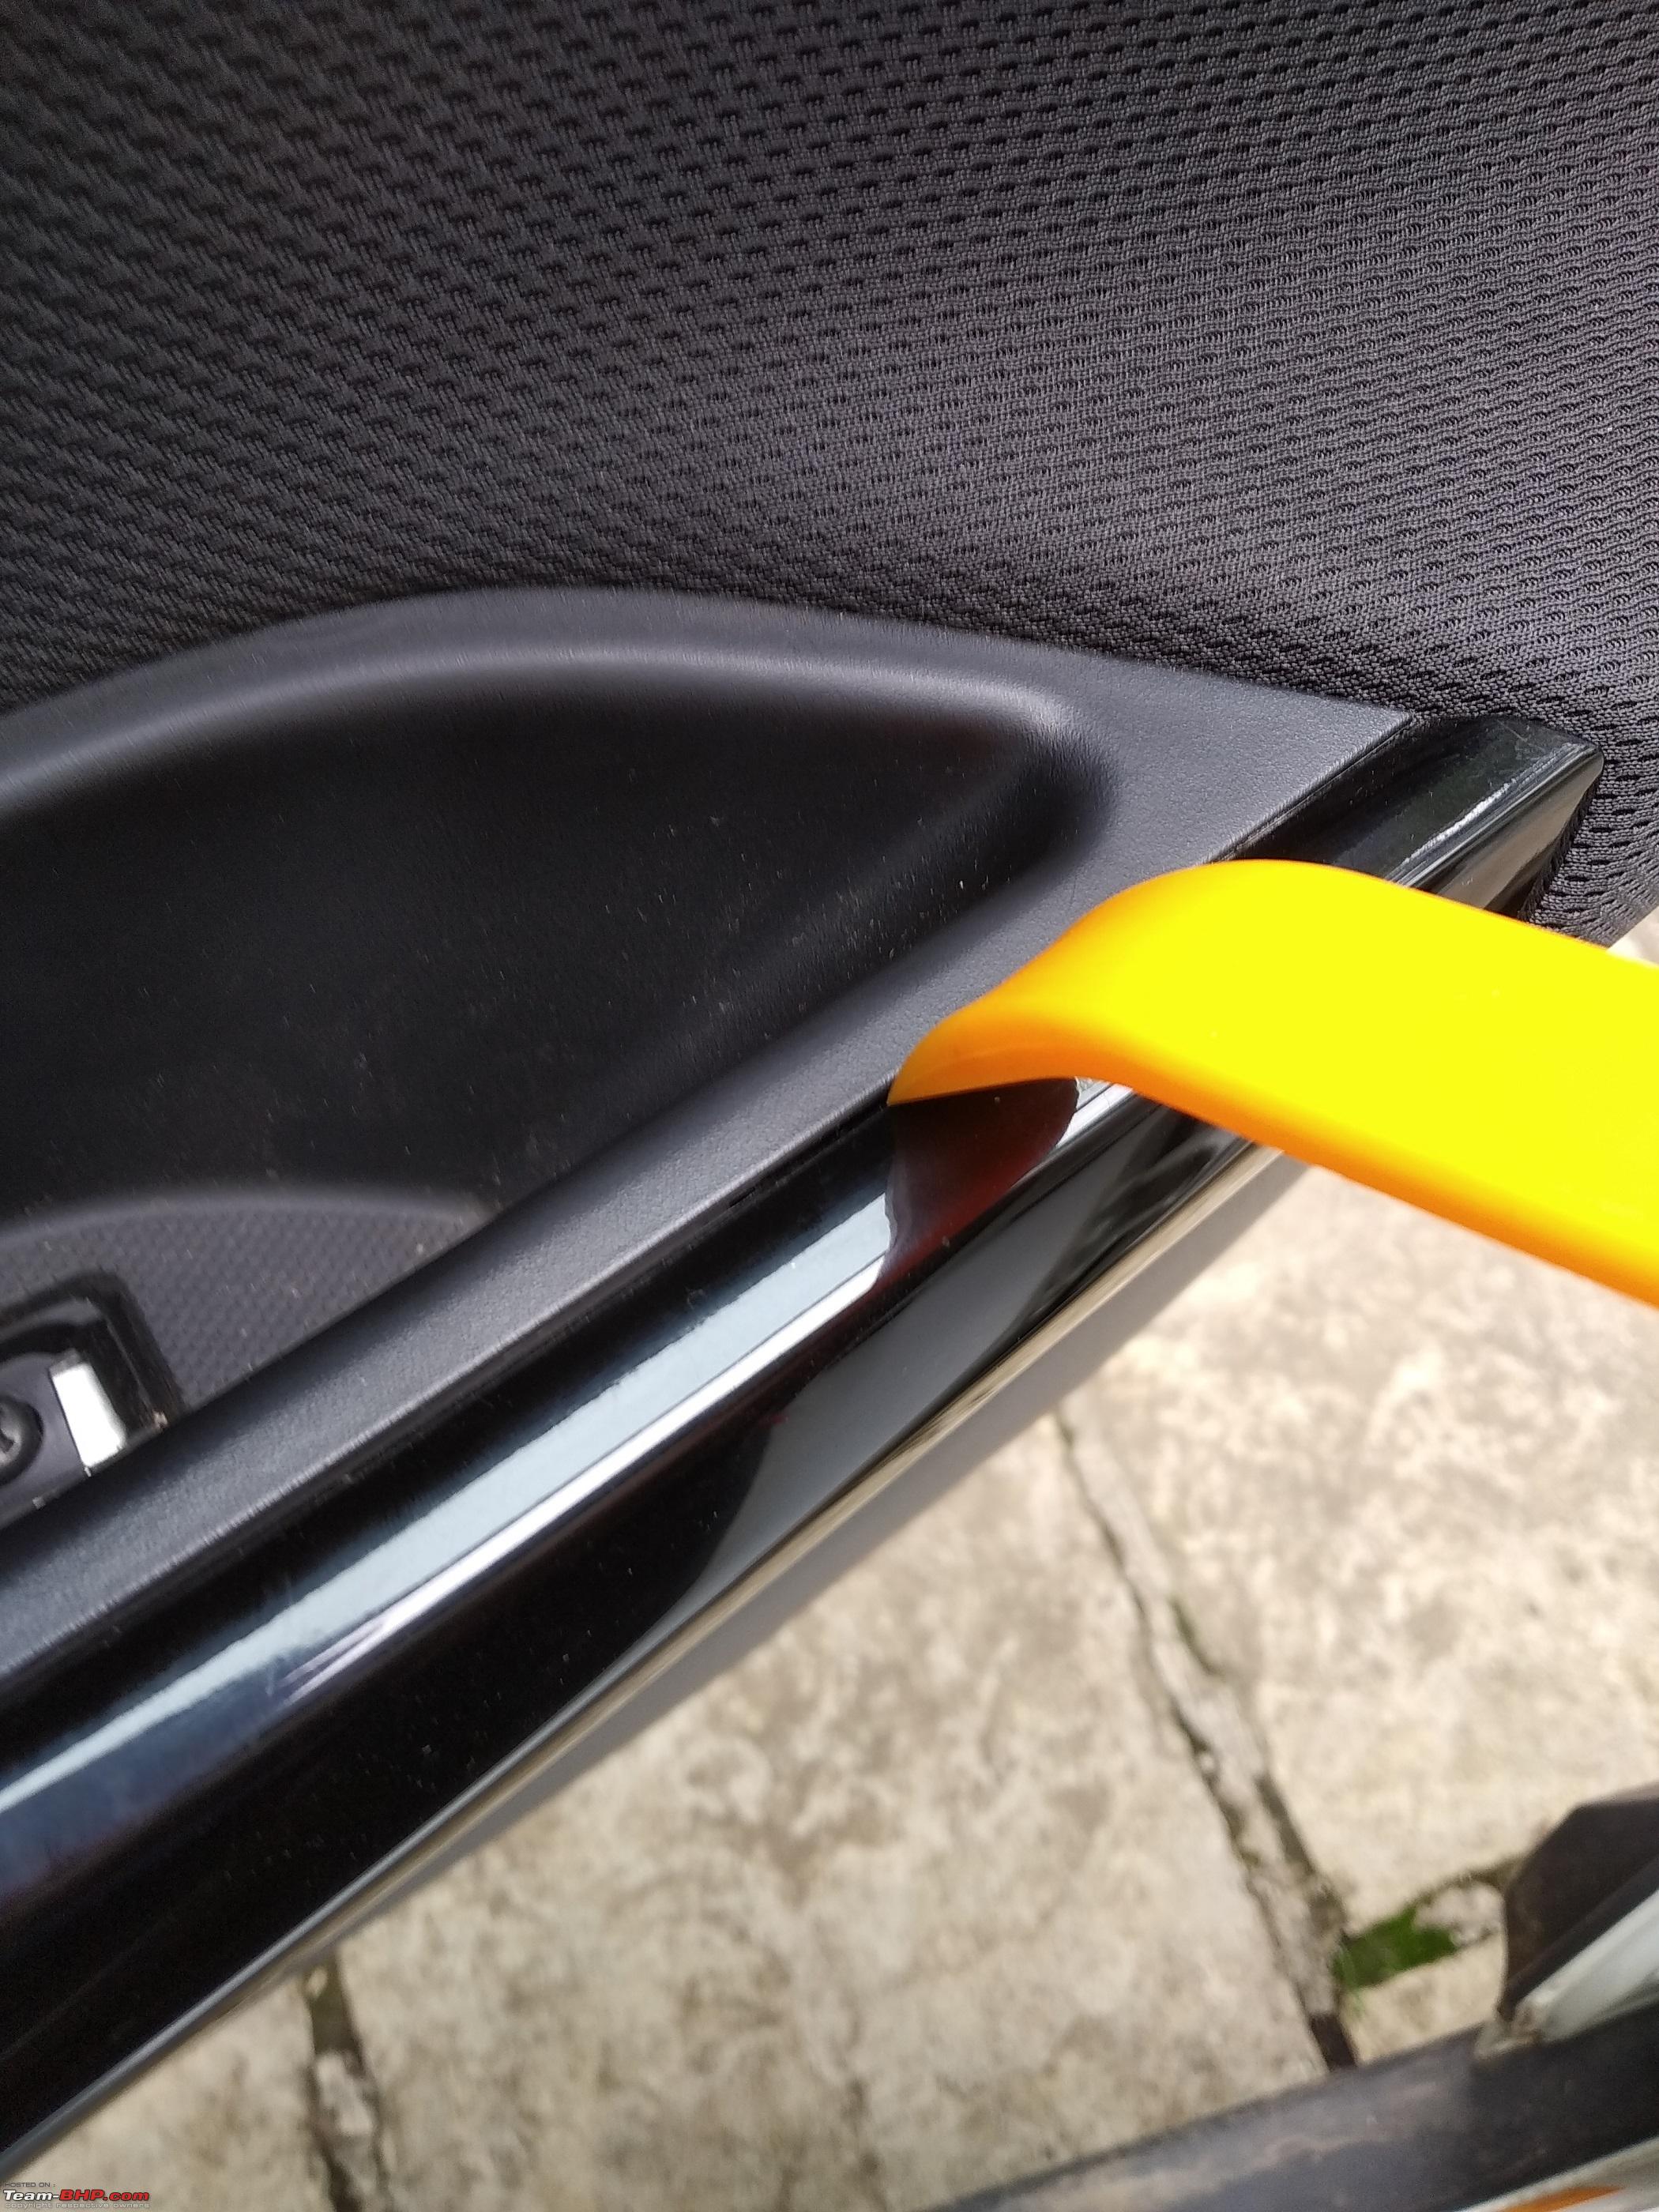
- Remove the small plastic cover to expose the screw at the base of the inside door handle pit. It pops out with a screw driver. No fuss. Don't lose it though!

- Undo the screw, keep it away safely.

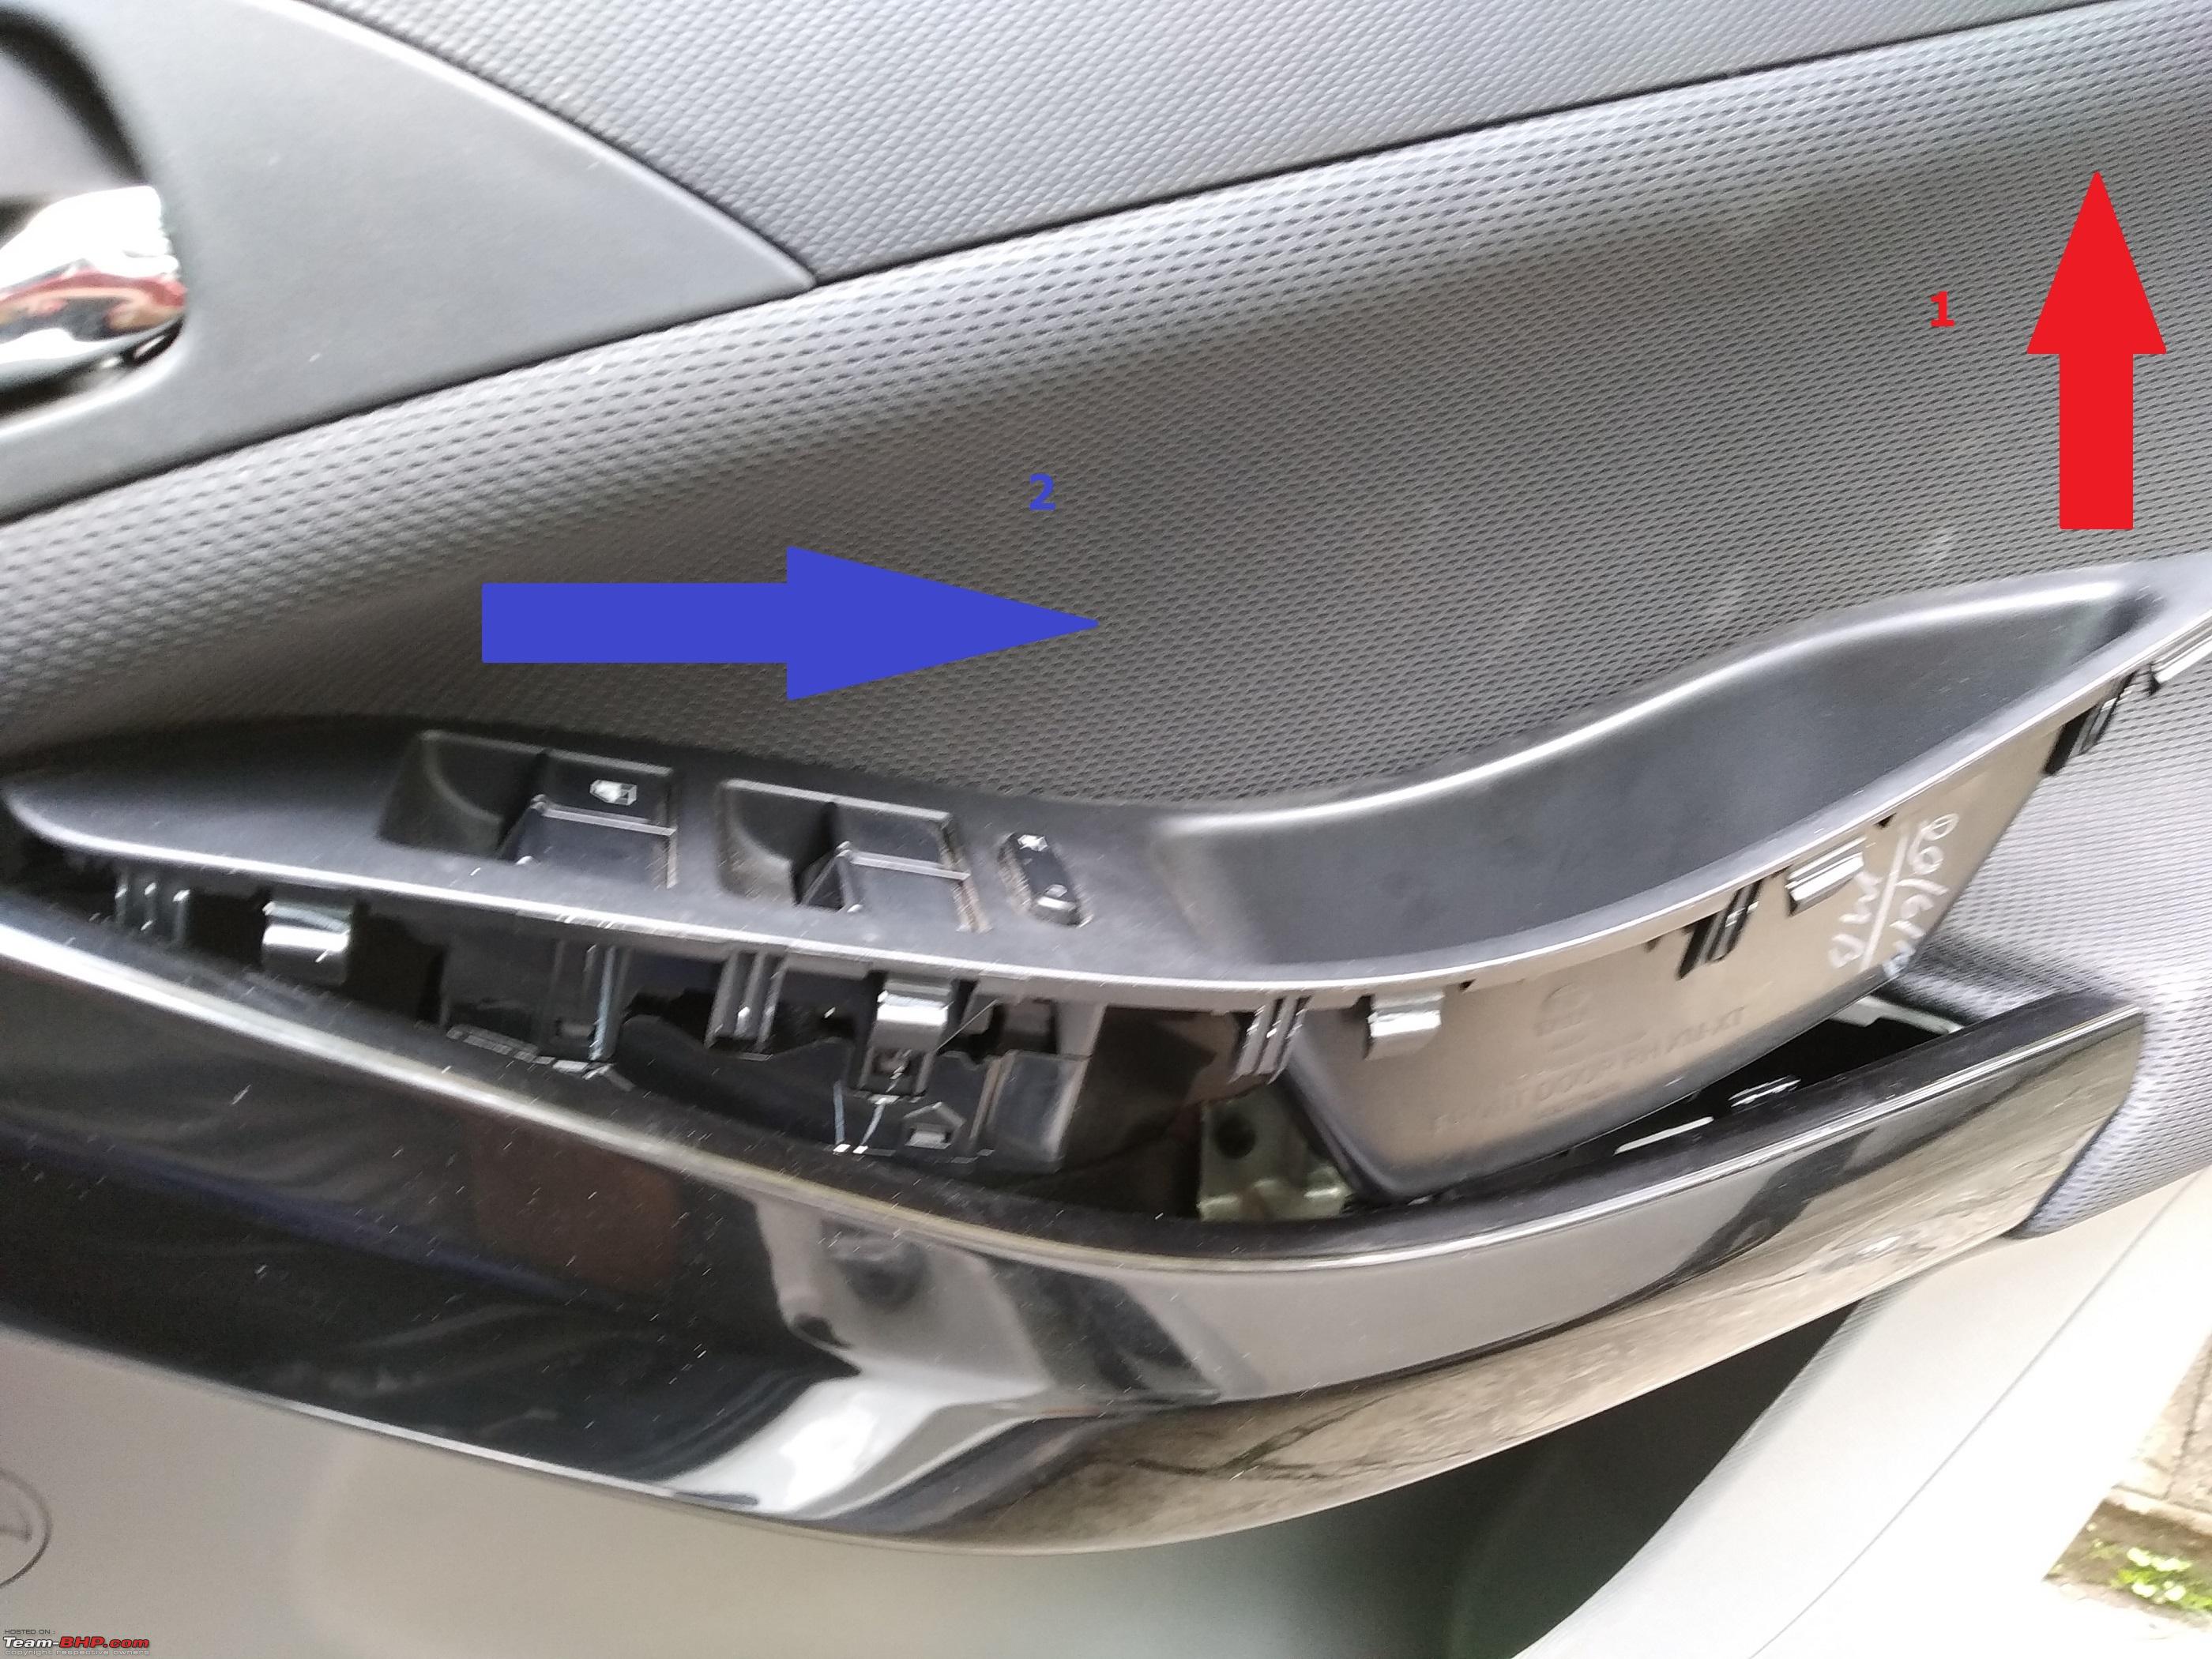
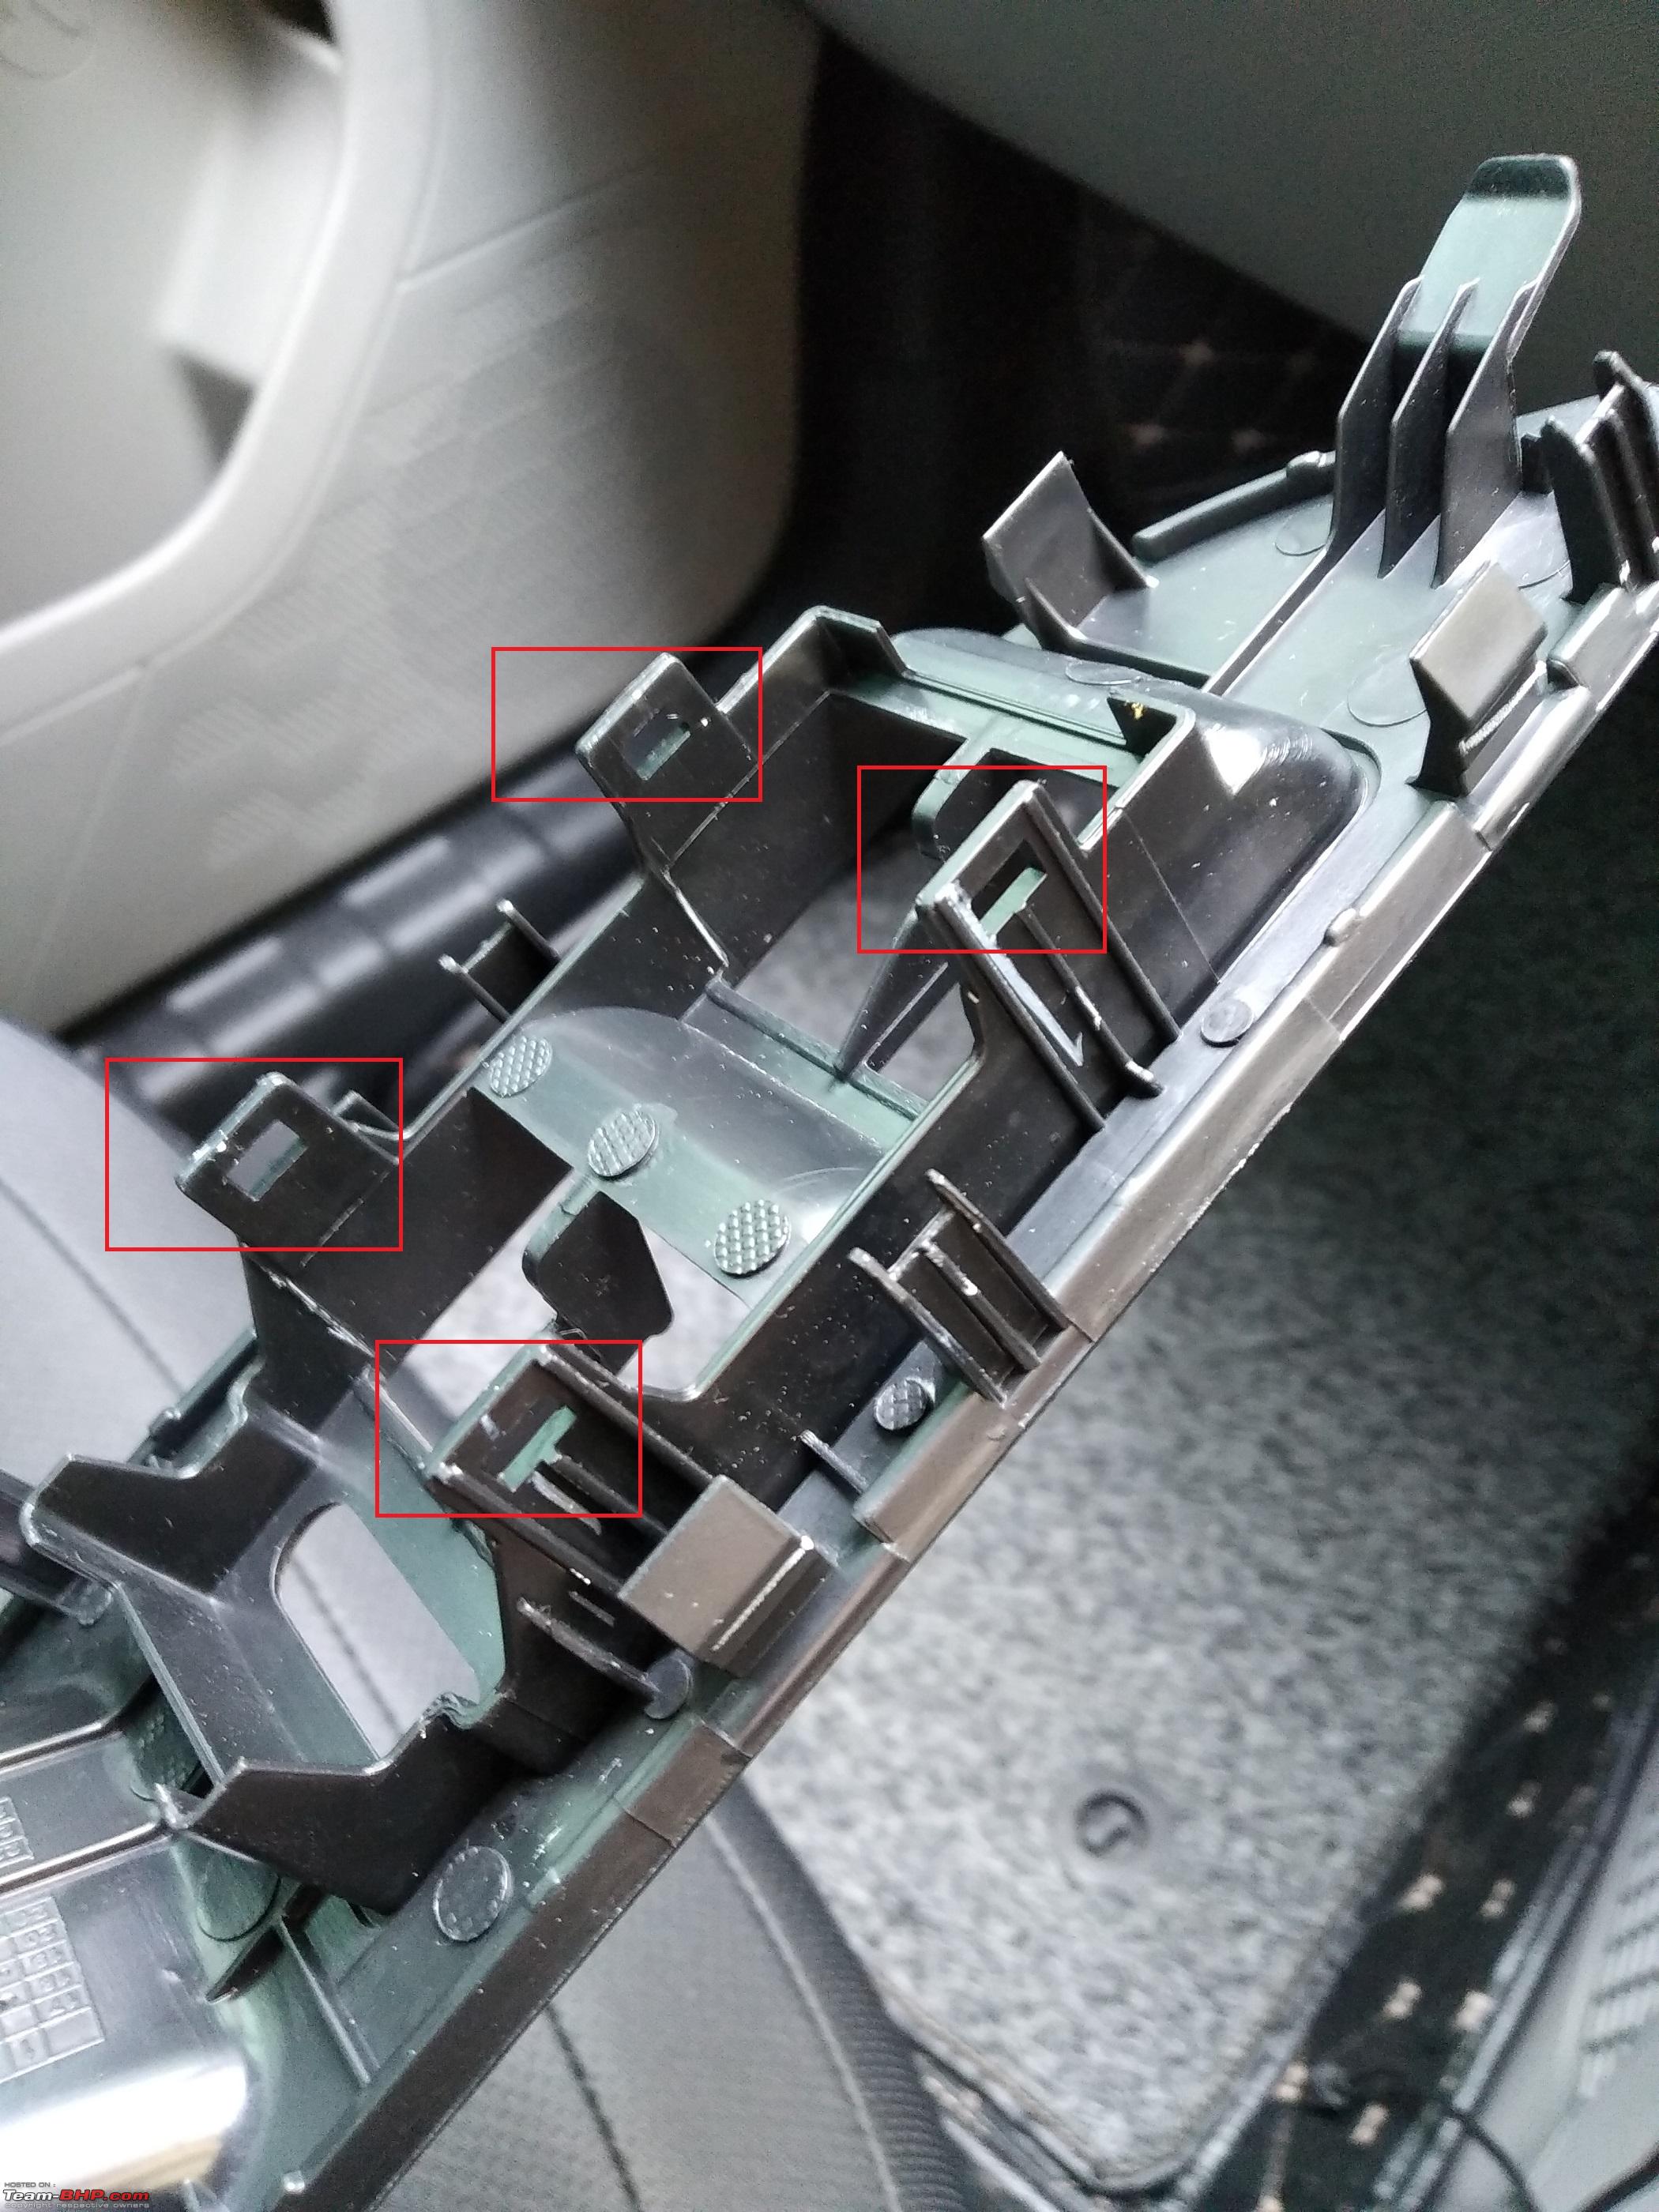
- Now as per the image below - first lift up the elbow side edge of the assembly using a trim remover & simply slide the whole unit outwards towards the B pillar. Slowly - don't tug the stock connector & harness.

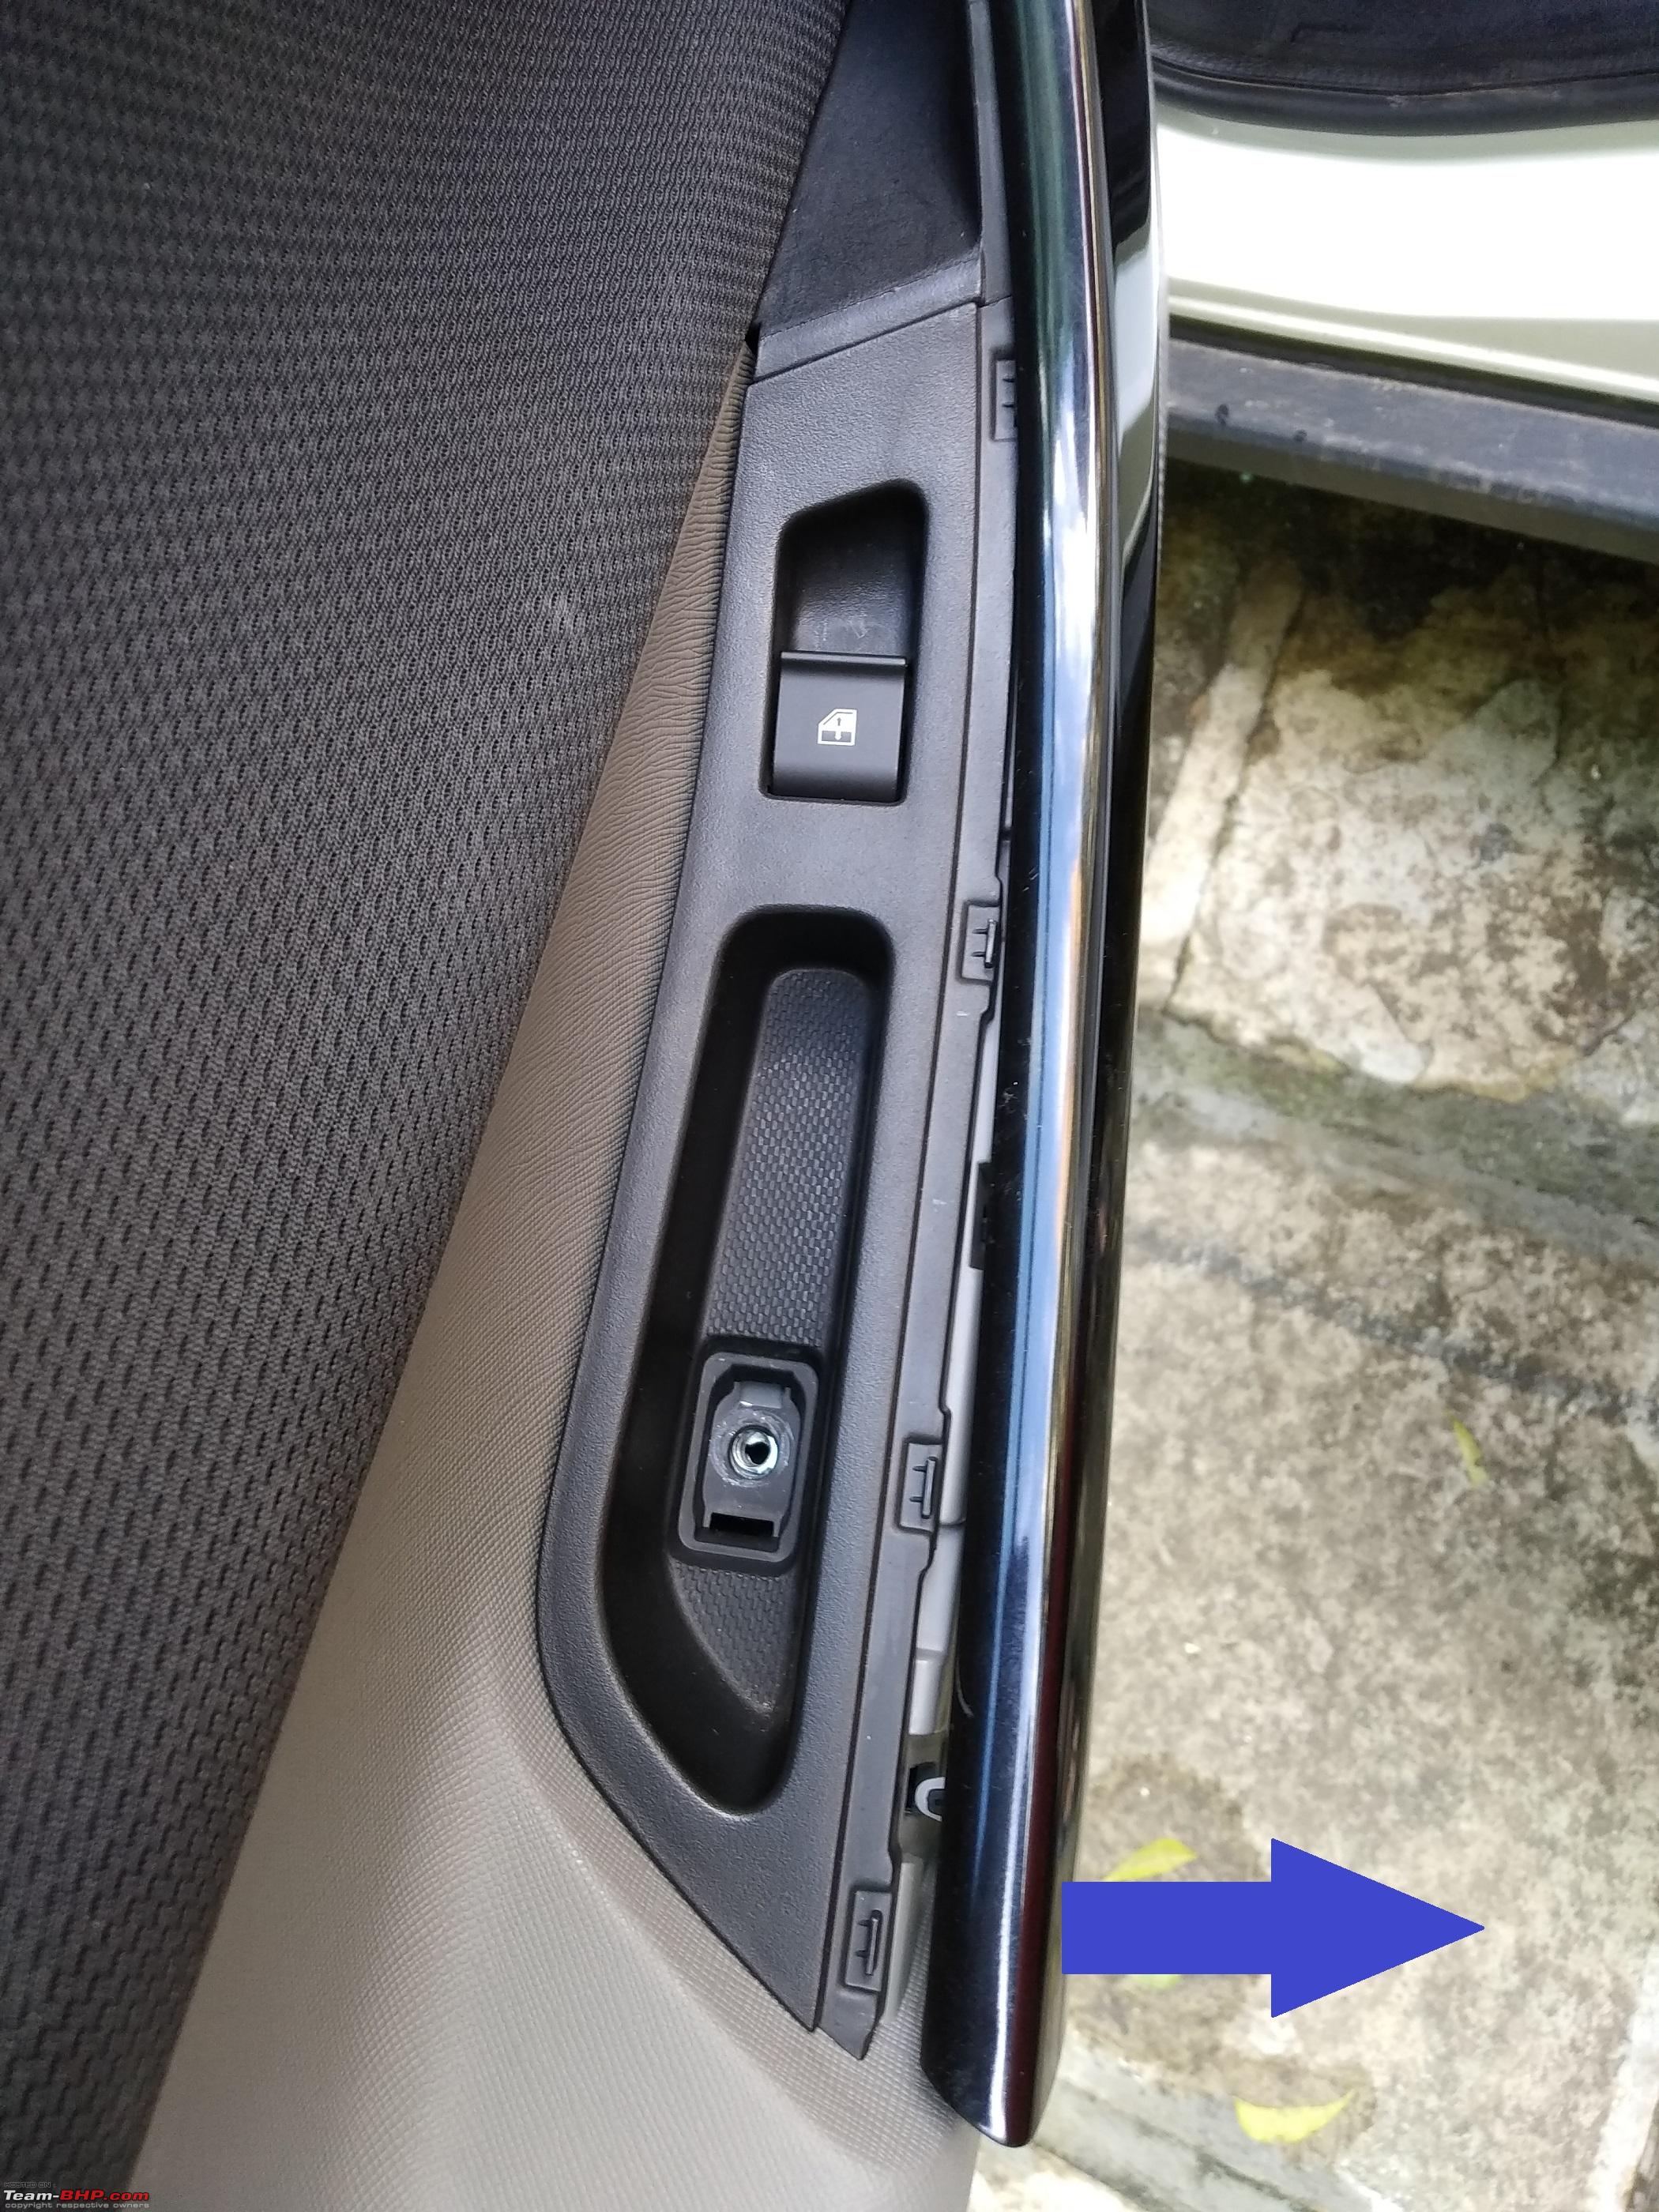
- Disconnect the connector & take away the whole panel along with window switch unit.

- The switch set is held in the panel simply with 4 clips/latches.

- Undo them carefully with a flat head screw-driver & pull out the switch unit.
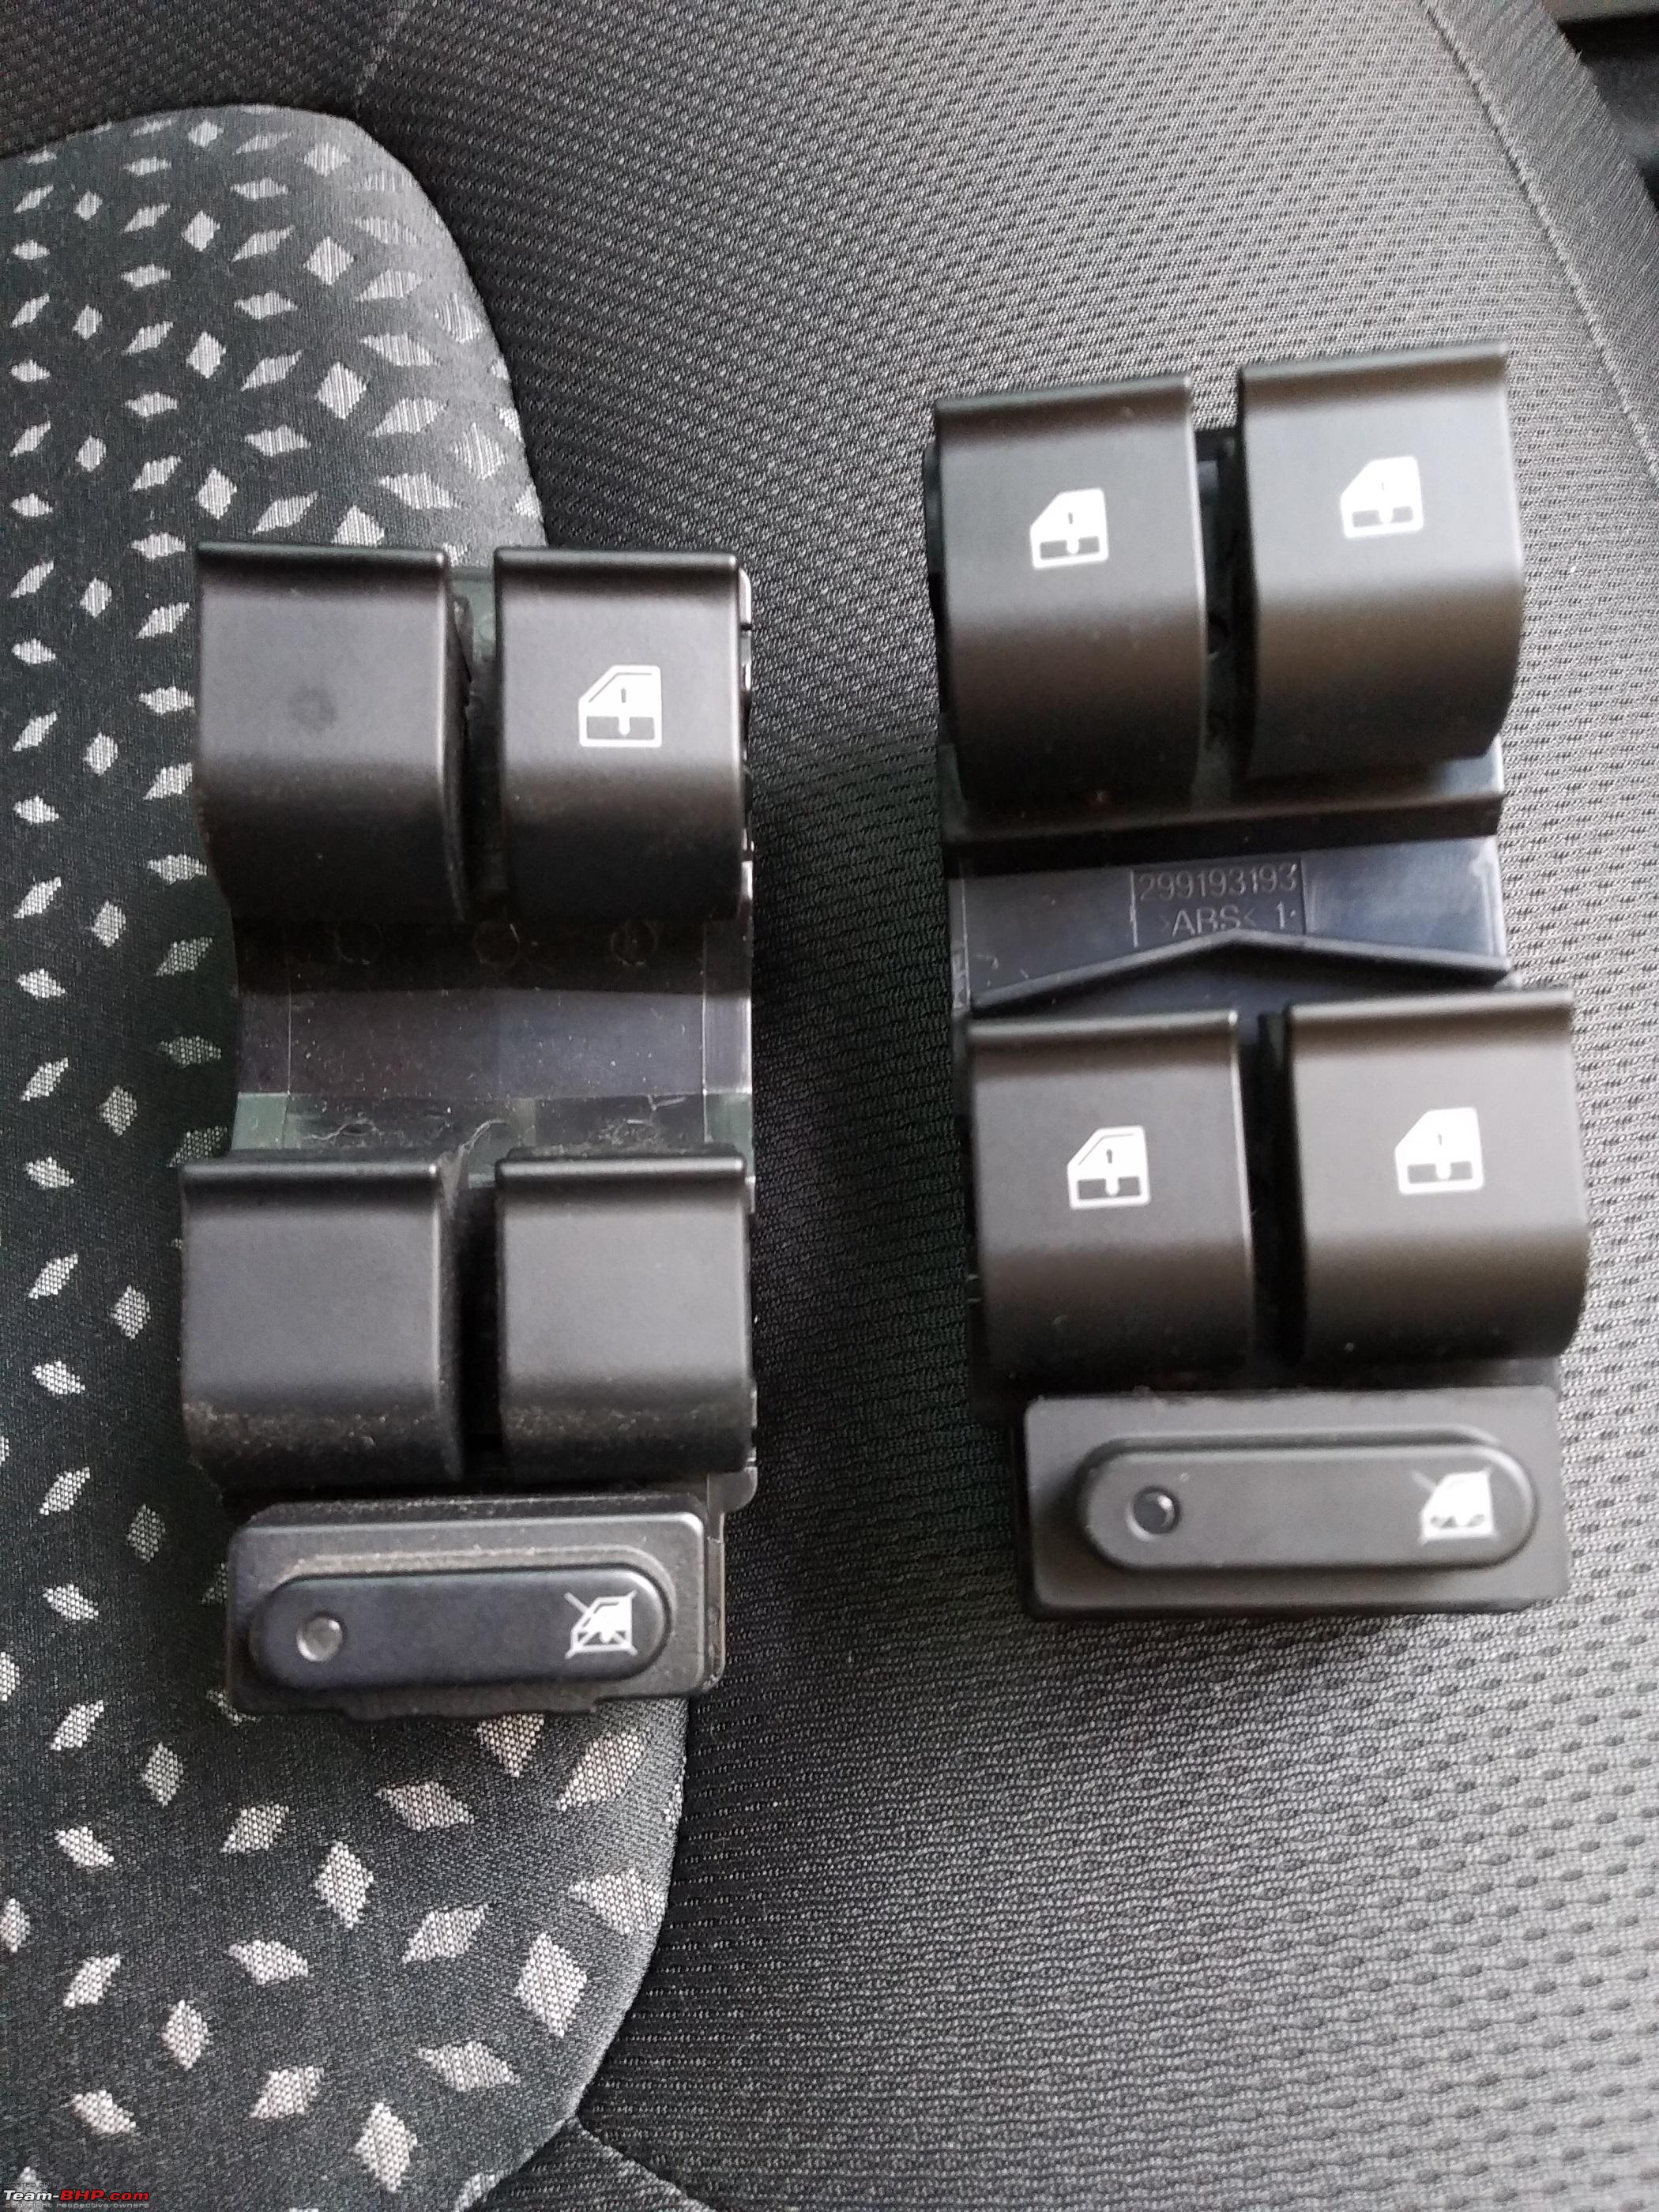
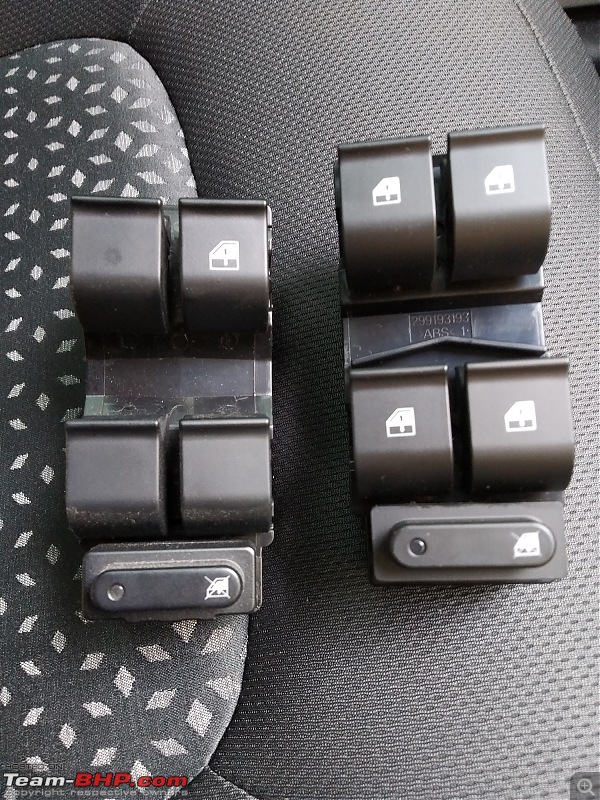
- Here is a comparison of the two (old & new).
- Simply plug the switch unit to the harness & test that all window controls, up/down, master switch & illumination with headlamps is working. Just a test. Unplug afterwards.
- Now plug in the new switch set into the same 4 latches by aligning & pushing it in.
- Connect the stock harness pin into the new switch unit.
- Reinstall the door panel in the reverse order from above. Slide it in & then push it downwards.

- Align it properly, leave no gaps, ensure all clips are properly clicked.
- Tighten the screw back in the panel. Cover up the screw with the plastic cap.
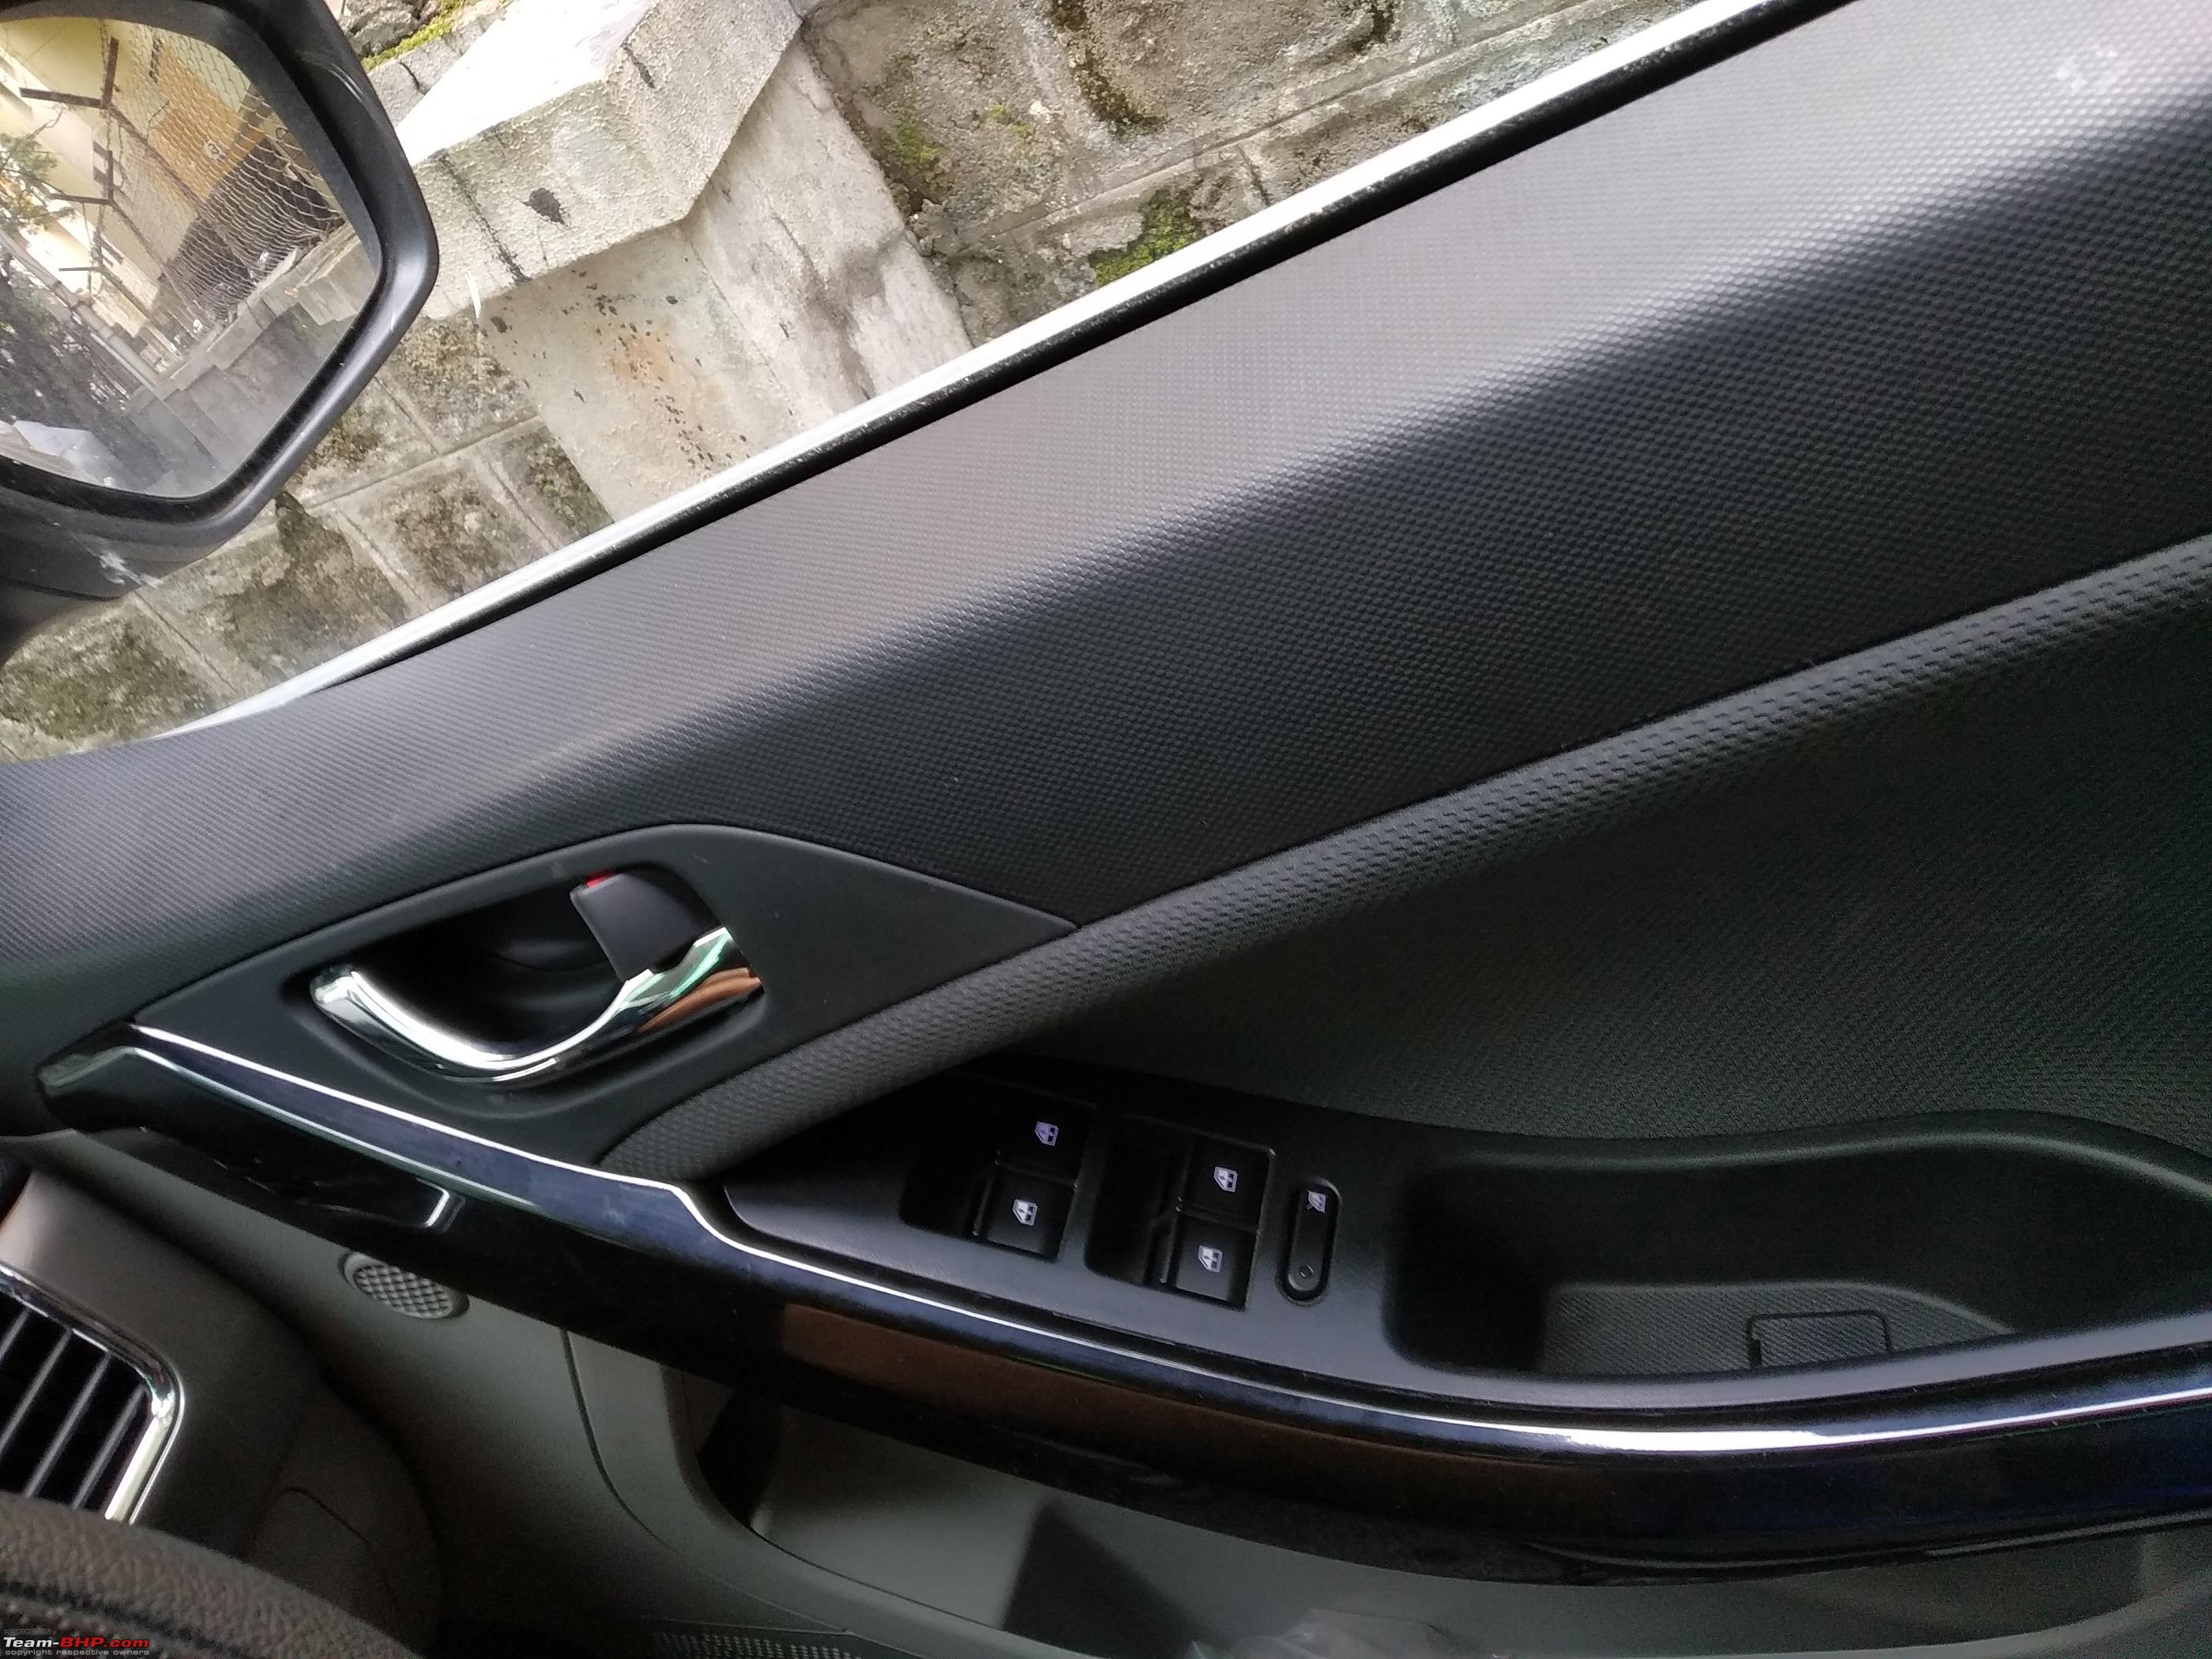
- Here is how it looks now. I took the picture during the noon, so the illumination is hardly visible. Sorry about that.

Other 3 Doors
- As mentioned earlier - these 3 doors in my car, don't have the illumination wiring in the stock harness.
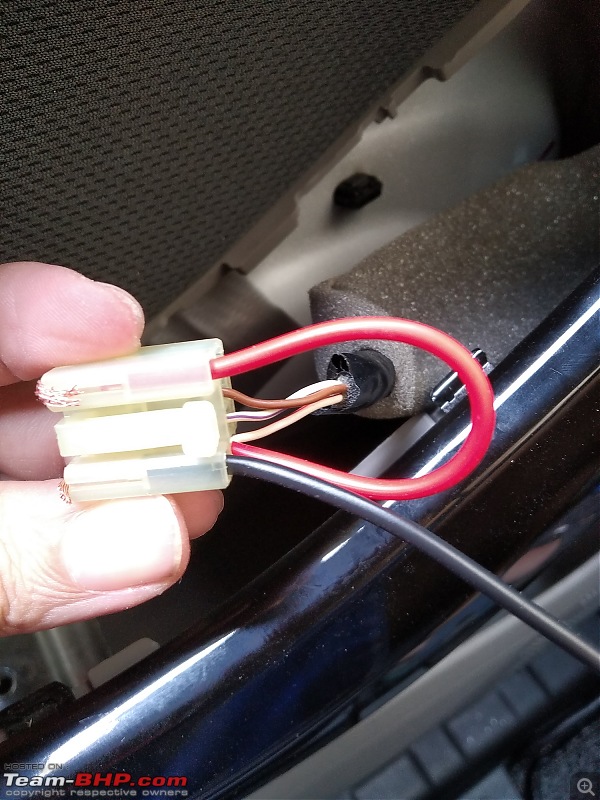
- So - I have piggy-backed the LED +ve & -ve pins in the switch with the existing UP and GND wire of the stock connector.
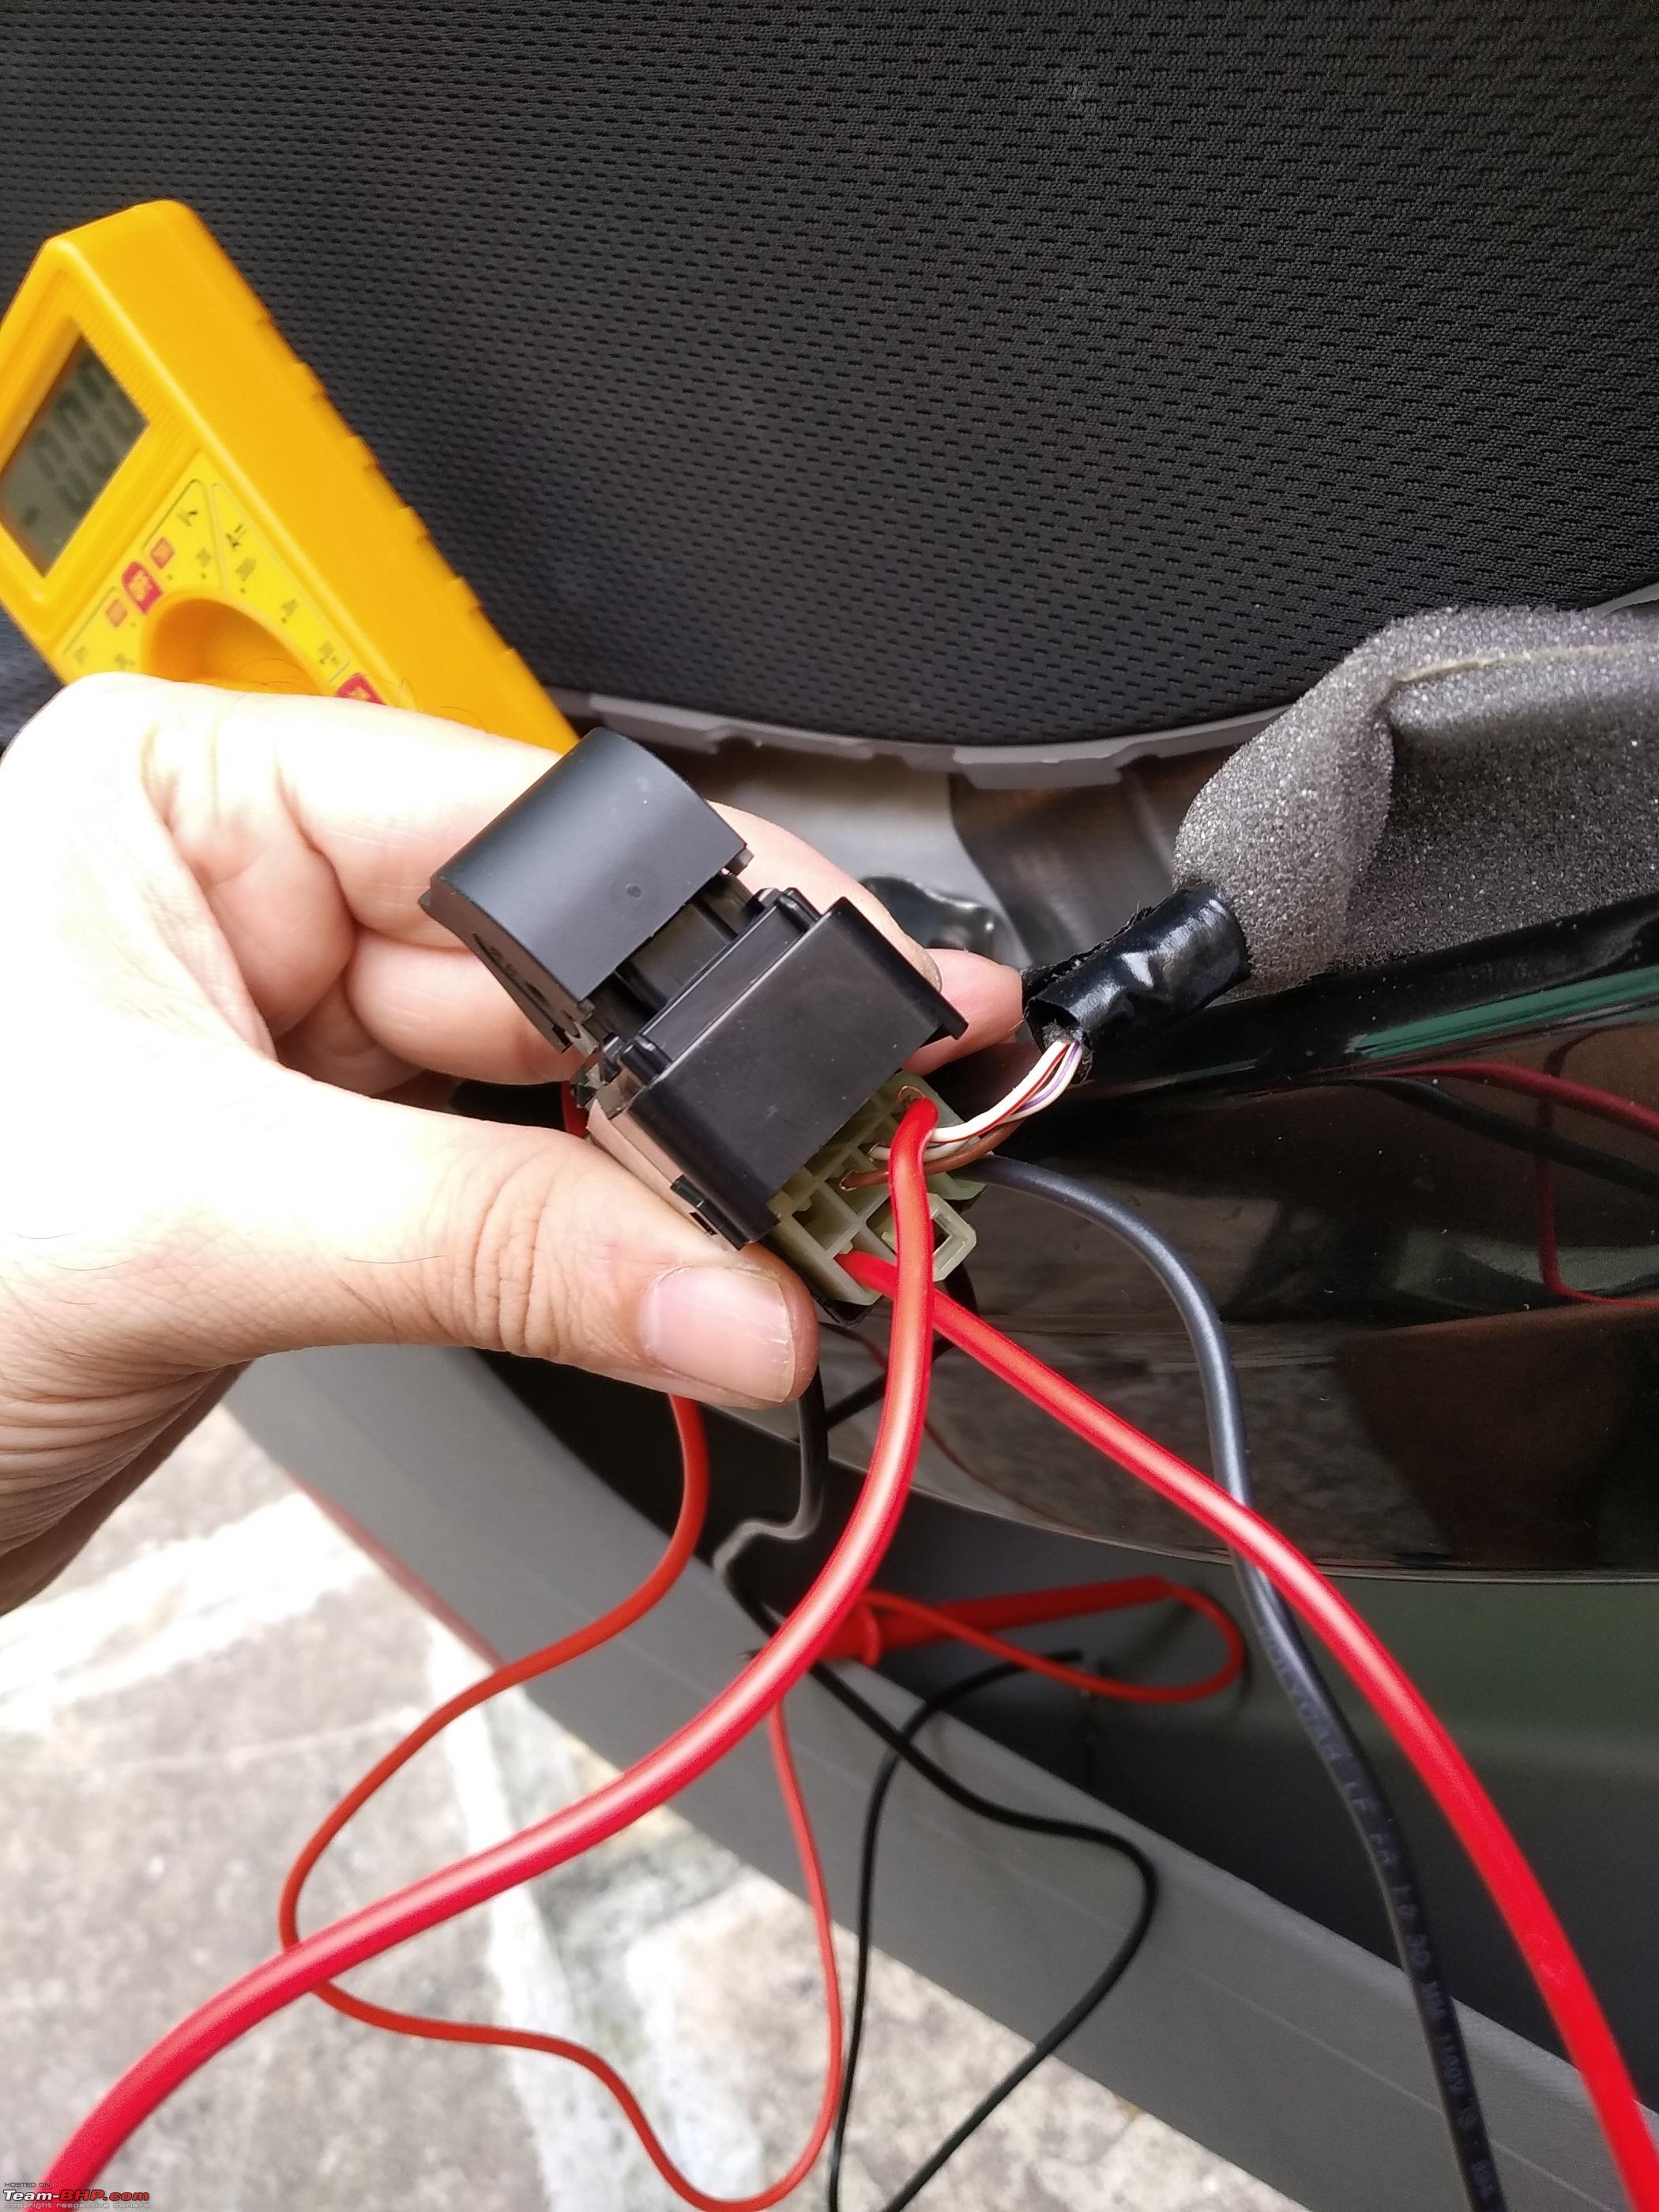
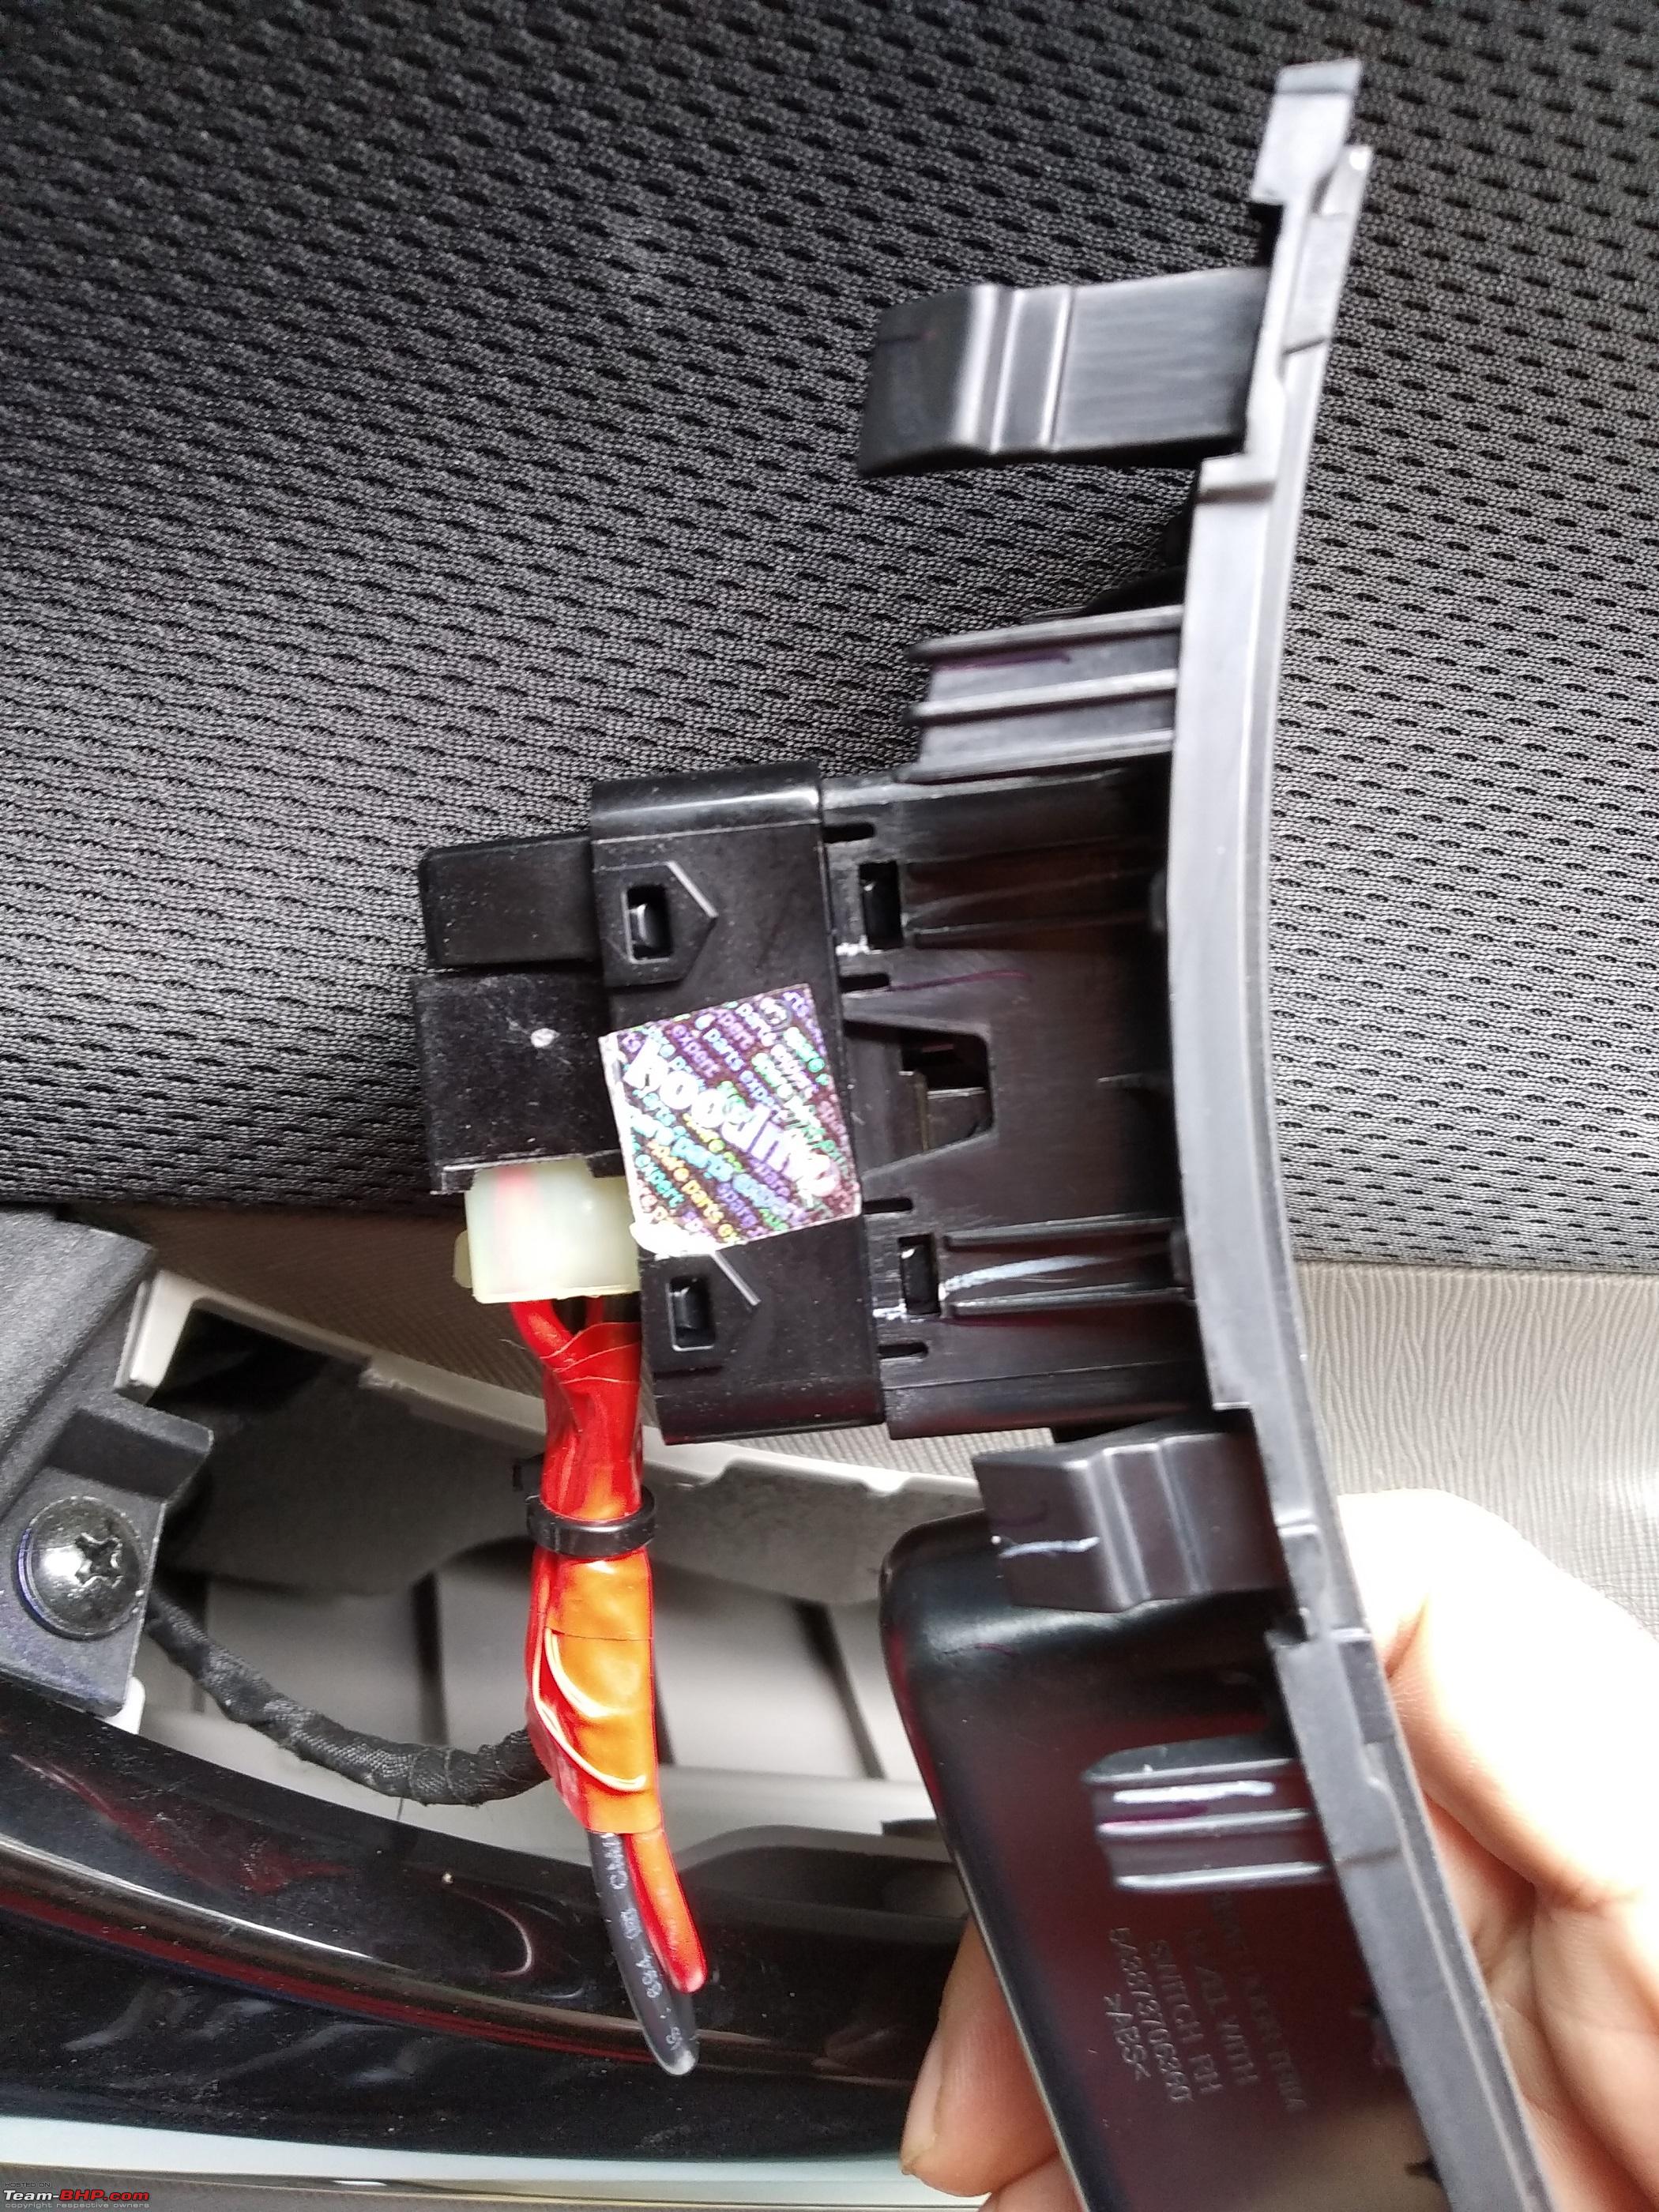
- Brown wire is Ground. The one in the middle is DOWN. The one on the side is UP. This picture is from when I was testing them to find pins.

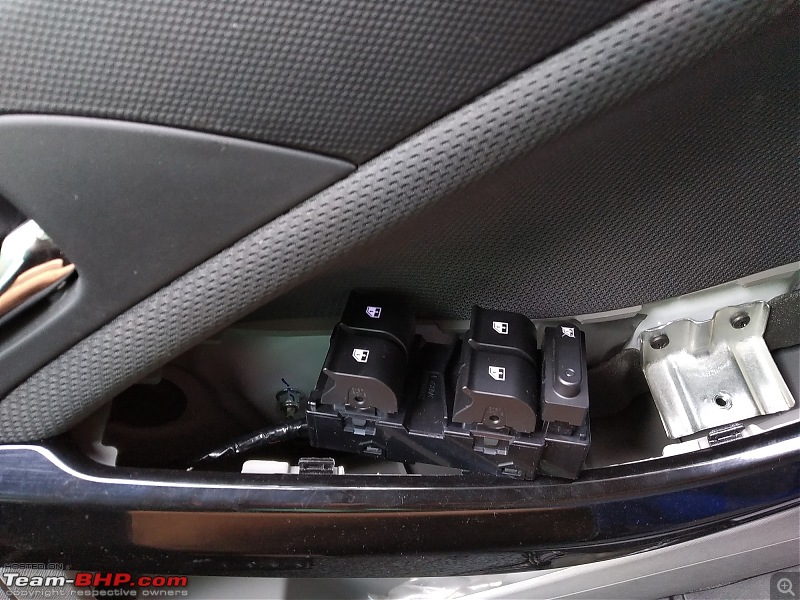
- Primarily, the trim removal process is identical for all doors. Just in case of the rear 2 doors - you need to pop out the lower horizontal part of the piano black trim also.


(Yes you caught me - this picture is actually taken during putting things back together, after the new switch was already installed in place.)
- This is a sample of how I have added my +ve LED wire into the existing pin for "UP" in the connector. Do this & click the pin back into position.
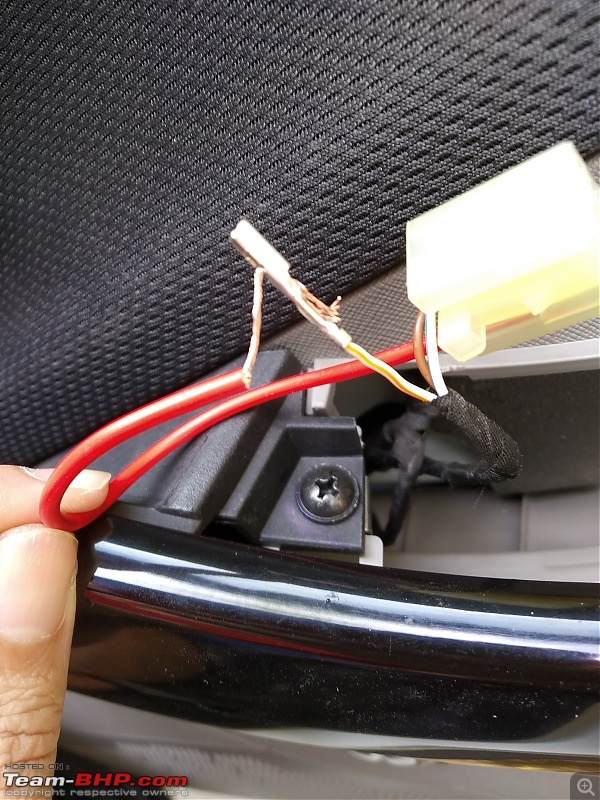
- Ensure that no exposed copper part of the wire remains outside the connector. Strip the wire to the correct length to get all covered by the connector housing.
- Due to the pandemic, its near impossible to source these little pins to add into the connectors. Hence - I have done it a bit crudely by inserting a stripped end of the wire itself through the connector & folding it away safely in the gaps where the male connector of the switch slides in. The male pin in the switch tightens the grip on the wires & the switch itself also holds it in place. No chance of this ever going loose.
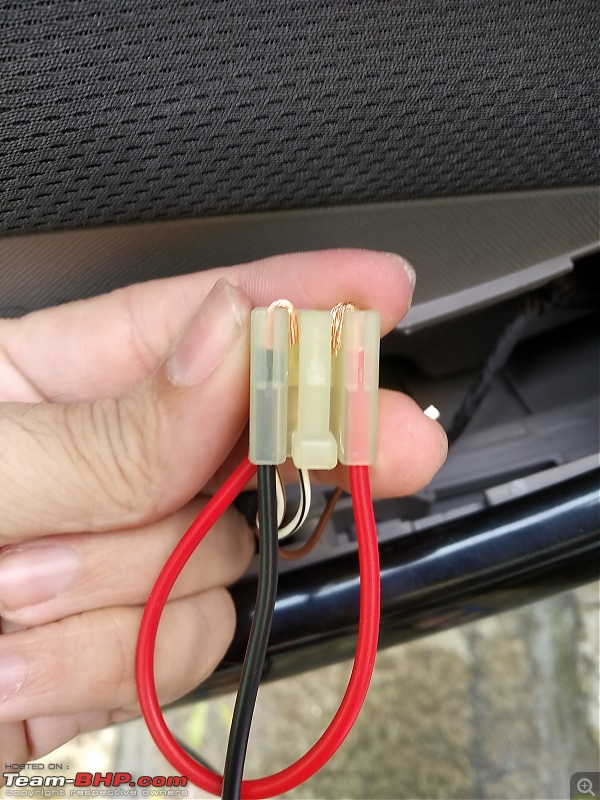
These 2 wires actually meet the + and - pins of the switch's connector. Note the orientation besides the connector's latch. RED is for +ve and BLACK is for -ve.
Polarities will matter for the LED to work.
- After testing this once - Use insulation tape over the wiring together with the stock harness. Then add a zip tag over the last edge of the tape. This will secure it to near eternity & will also avoid any rattles in the door getting induced.

- Snap the switches into the assembly just like the way we did on the driver door.

- Reinstall the switch panel back after testing, tighten the screw & place the plastic cap back. Snap the piano black trim back into place.


Some More Details - Switch Internals
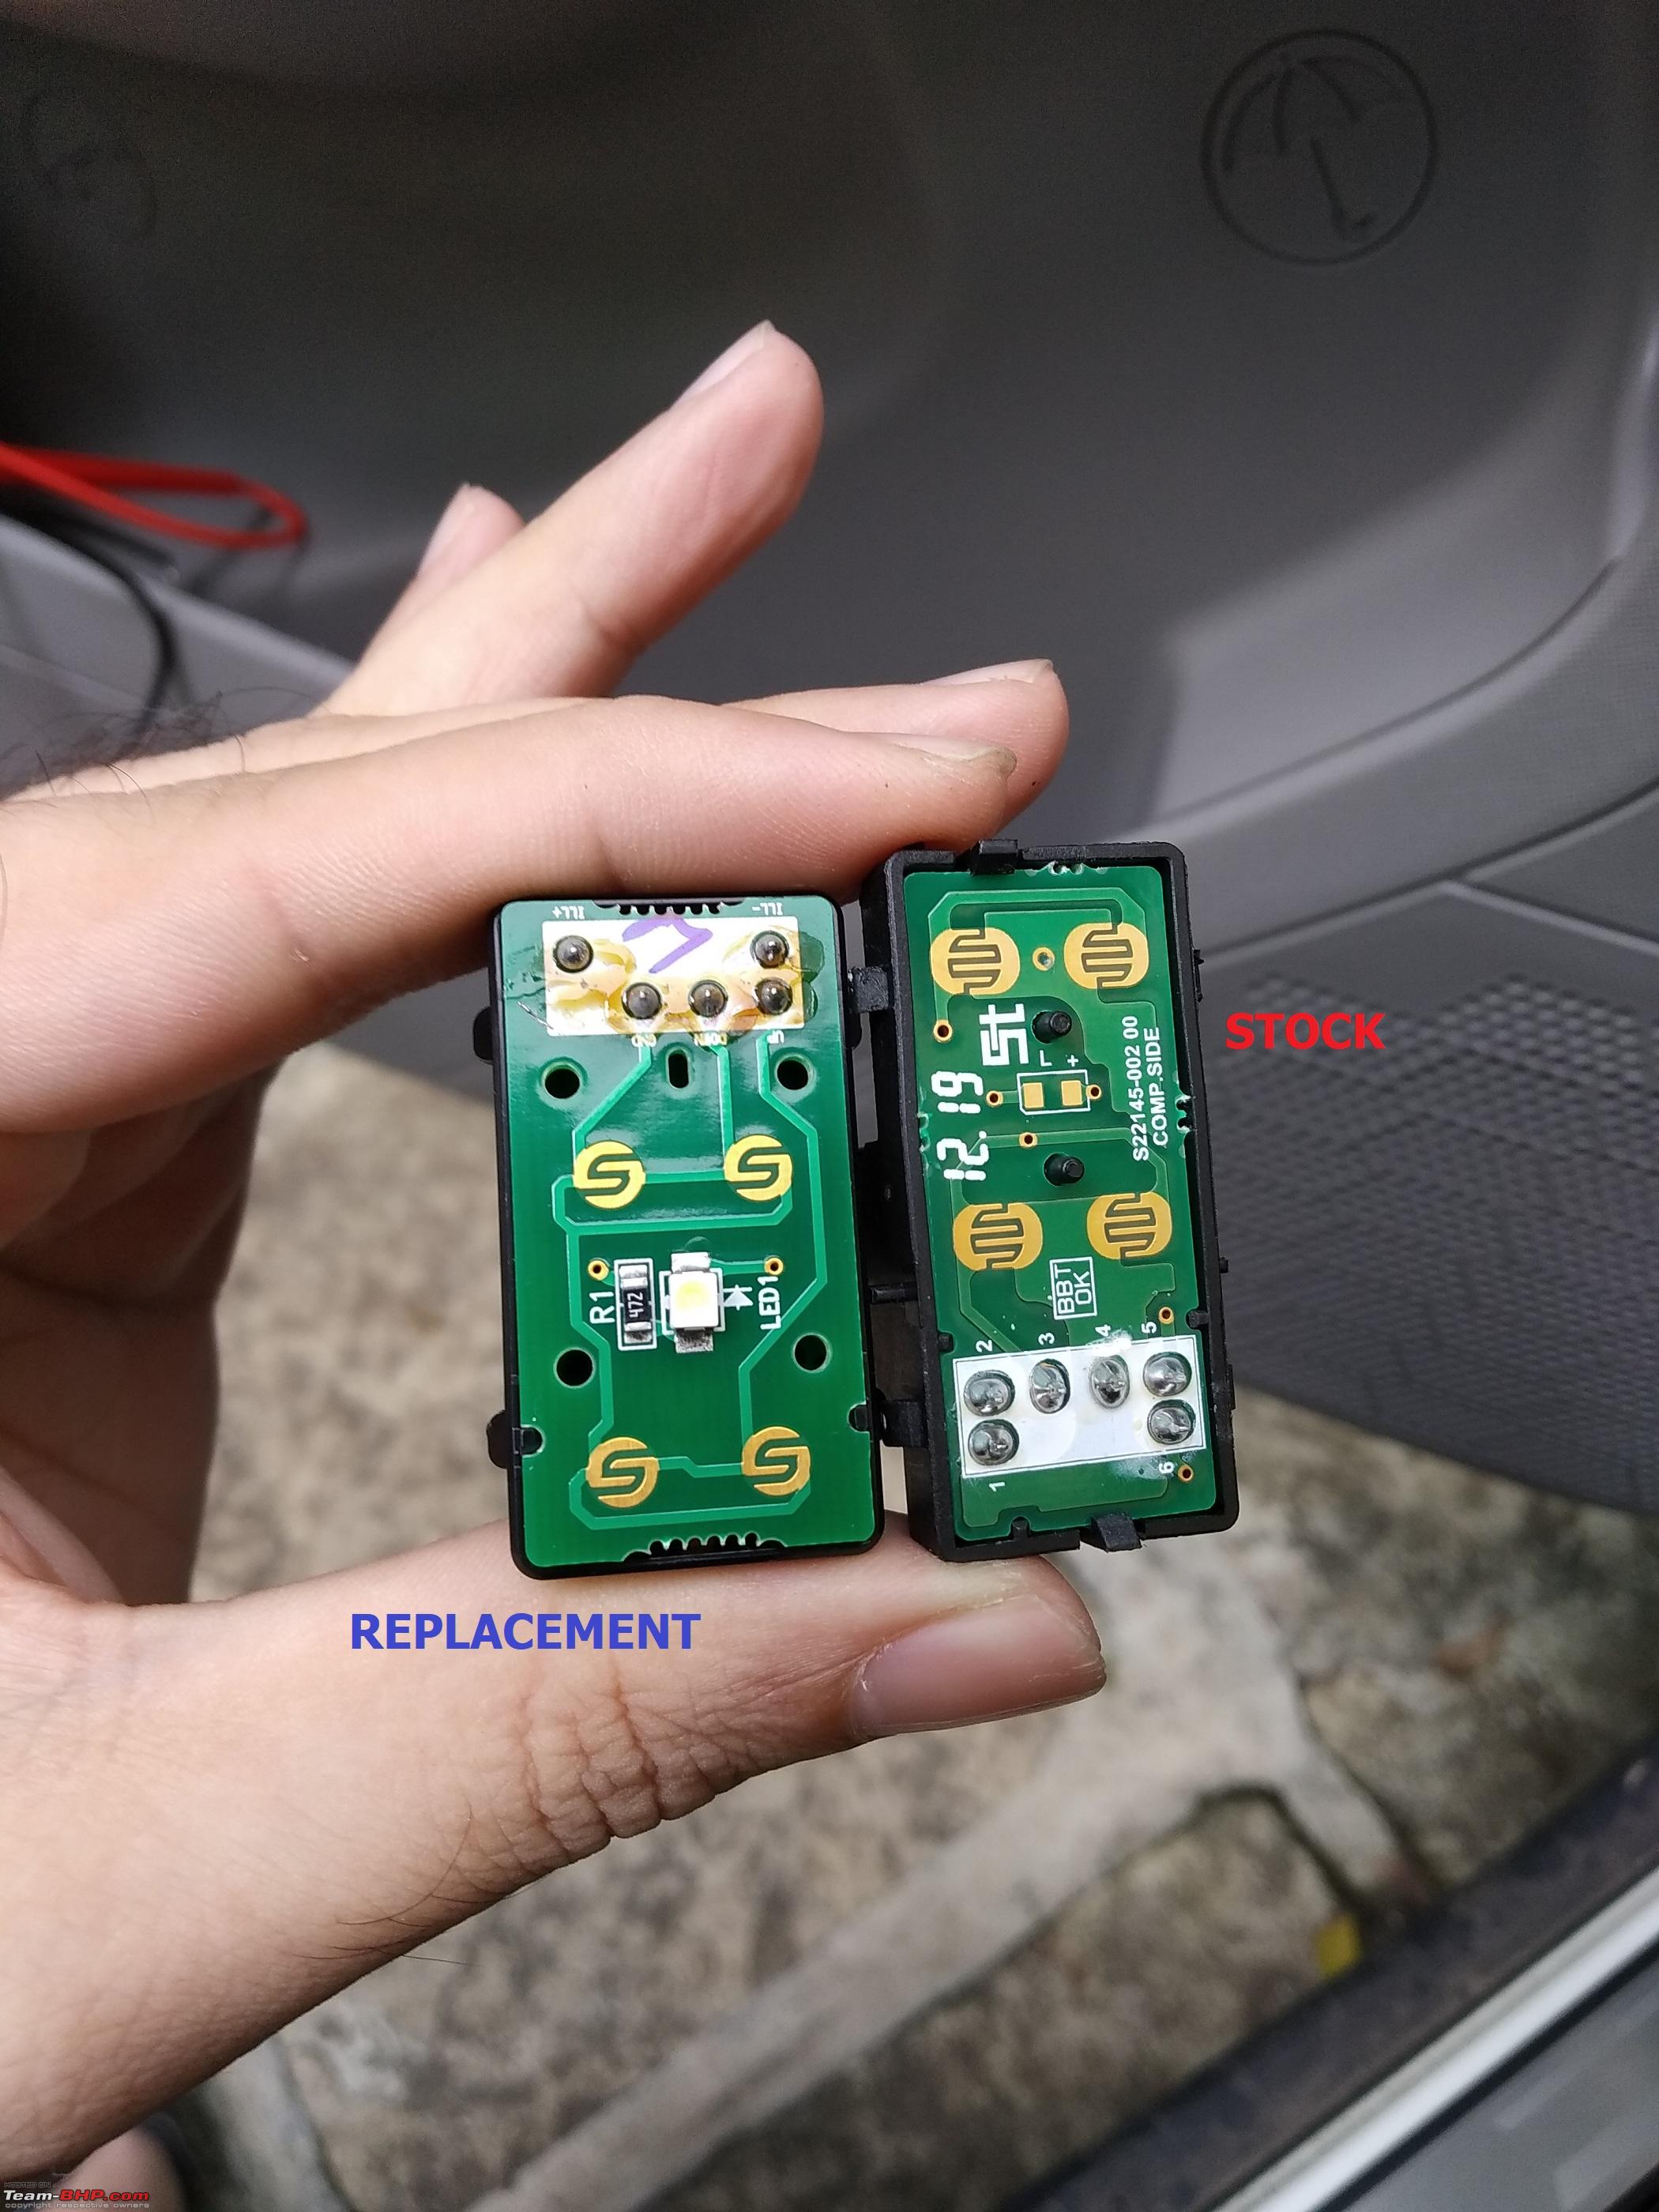
Just out of curiosity - I opened the OLD and NEW switch assemblies (single switch units). And I managed to also put them back together without breaking anything.
Here is how the internals of the switch are. Typical membrane push button contacts for circuit completion.
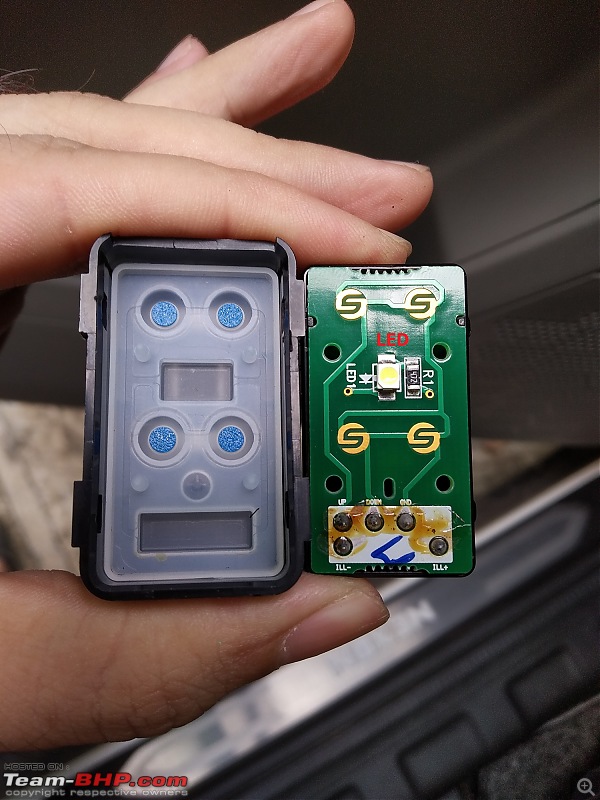
Worth noting that there are
twin contact points per action (2 each for UP and DOWN). Setup in parallel - these will give a good redundancy and longer problem free life.
Things like this make a part "Automotive Grade".
Side by side view of the new & old PCBs inside the switches.

Here are my findings from this investigation -
- The stock switch PCB is very high quality compared to the new ones. (The new ones are not bad at all & will work fine. Nothing to complain.)
- The "St" logo on the stock board actually refers to the "Shogini Technoarts". One of the premier PCB suppliers in India. I remember it vividly it since my dad used to procure custom designed PCBs made to order for his projects from this firm - decades ago. As a child I grew up seeing these boards lying about at home! It is reassuring to see that Tata motors uses very high quality components even in places that are absolutely out of sight forever.
- The stock PCB also has the placeholders & connections for LED placement. Which is pretty much standard for mass produced modular electronics. The same PCB would be used by the OEM with LED soldered on it when the illuminated batches are manufactured. Simpler supply chain!
- The internals on the switch sourced from Boodmo.com use a different and not so premium PCB. While the packaging appeared to be authentic TOP (Tata Original Parts) with hologram - there was no seal on the box openings. So I'm curious now if I sourced the same part from TASC - how would the internals look like.
Video Test
It also shows how the LED turns off when pulling the window up due to the way I have wired it. (I have used a card-board shade to create darkness under the afternoon Sun. It slipped away during the shoot, apologies for that!)
The squeaking krreeerrr sounds are my toddler playing with a box in the back seat! He didn't agree with my proposal of being quiet for 1 minute. Please ignore.
Power Window Switch Illumination Test Closure Comments
- Is it a must have mod? No not really. But then - most of the other visual appeal mods aren't. Illuminated scuff plates for example. Its just about personal preference & liking.
- Does this look good once done? Absolutely yes. I have tried it in the night & it looks fab.
- Is it useful? Certainly. Passengers can easily spot the button without having to hunt in the dark for it. And it looks quite premium too!
- Is it worth the money? Mostly not. The cost is quite high - nearing INR 4k. Most folks will not find it justifiable.
- Am I happy - Certainly. The car reclaims one more deleted feature. And I have one less item to miss from my beloved previous car! And then - it was a quick little DIY project. I like to fiddle with things & if I'm happy with the way it goes, I consider it as worth the money. There is little to do under lock-down conditions other than office & house afterall!
- There is also a good amount of foam, damping material inside the door panel at places. Good to see that!
5* rated detailed DIY.
I'm surprised XZ+ doesn't have illuminated window switches, my 2018 XMA has it. OT my 2016 Nano XTA has it too.
Tata oh Tata.
Great DIY. This is something which should be provided in all cars. Sadly it's skipped by almost all. You have an Alto, planning this on it? Then I can do it for my Brezza. stupid:
Quote:
Originally Posted by Reinhard
(Post 4876961)
One more such item was illuminated power window switches on all doors. This was present in the Nexon till early 2018 and removed.
|
Lovely DIY
Reinhard clap:
Although this is now the
Must Have post for all the Nexon owners, IMO this will probably be the
GO TO post for all the Seltos/Creta/Venue/Sonet owners, unless of course the parts are available.
I can imagine manufacturers not offering one touch up/down windows, but not providing illumination for powered window switches on cars costing over one million INR is just blatant extortion.:Frustrati
Fantastic guide! I have a noob question - would be possible to just stick some 'glow-in-the-dark' radium strips for the desired illumination?
Quote:
Originally Posted by Vinod_nair
(Post 4886490)
5* rated detailed DIY.
I'm surprised XZ+ doesn't have illuminated window switches, my 2018 XMA has it. OT my 2016 Nano XTA has it too.
Tata oh Tata.
|
Thanks. Glad you liked it. Yes - like I said, a 10 year old 5 Lakh OTR diesel Vista had them in all doors. But then, nobody else was giving it & Tata made no better sales by adding features. With time - they are now simply giving what the peers are giving & saving money in the process at least.
Quote:
Originally Posted by BoneCollector
(Post 4886494)
Great DIY. This is something which should be provided in all cars. Sadly it's skipped by almost all. You have an Alto, planning this on it? Then I can do it for my Brezza.
|
Thanks! Happy to know you enjoyed the post. Well in the Alto - I have only 2 power windows at the front & the switches are near the gear lever. Generally don't have to search for them. Don't think I'm going to illuminate them. Also - these switches are not standard MSIL parts either. I don't think I'll get the illuminated version of these.
Quote:
Originally Posted by Vik0728
(Post 4886598)
Lovely DIY
Although this is now the Must Have post for all the Nexon owners, IMO this will probably be the GO TO post for all the Seltos/Creta/Venue/Sonet owners, unless of course the parts are available.
I can imagine manufacturers not offering one touch up/down windows, but not providing illumination for powered window switches on cars costing over one million INR is just blatant extortion.
|
Thanks for the praise! True - I think the only reasons for this are some little cost cutting + trying to have something left out to justify the "premium" next segment offering. Already with these sub4m cars offering features by the tonnes, hard to give any distinguishing premium features in the segments above. Sales numbers show - customers are least bothered about these things while signing the cheque anyway. I think I saw illuminated switches in the Sonet in one of the reviews. Or at least the switches have the white window image on them. Not sure if there is an LED under them though.
Quote:
Originally Posted by iamitp
(Post 4886629)
Fantastic guide! I have a noob question - would be possible to just stick some 'glow-in-the-dark' radium strips for the desired illumination?
|
Of course it would be possible. The reasons for which I never ever wanted to do it -
- The Phosphor based luminescence lasts for some duration which is directly proportional to the size, thickness of the material. Smaller the item, lesser the duration. My touring often starts during the night, by which time the glow is already less than useful.
- It just doesn't look good enough in a car that costs over a million bucks. I have been stupid enough to spend a million rupees on a depreciating asset standing out on the road. Illogical to then try to skimp on a few k more for something that I like in it.
- Its a sticker afterall. It has its own limited life - especially with the car standing under hot sun for most of the day. The adhesive leaves smear marks & sticker also slides around after time. Too messy for my taste.
- It would be too simple! I have a bit of a German taste in this area. I don't like the simple way to do things. No fun in it! :D
Excellent mod. I will right away order the part on Boodmo for the Driver side power window console. I will verify if the other door wiring harness has the provision ready and based on that i will purchase the other power window switches. Mine is 2018 June manufactured Tiago
I always wanted the illuminated switches. However, the TASS said the part has been discontinued.
Any regarding your doubt on the quality of switches purchased on Boodmo vs TASS, I do not think there would be any difference in quality as long as it is a genuine Tata part .
Super DIY , love the details. Showing us what is missing and what is there.
Great work. Like others have mentioned 5 star DIY.
I don't have a Nexon let alone a TATA car but i go through your every DIY thread, they are really good and i'm a DIY person as well. Maybe in future when i get a TATA car i'm preparing myself for it stupid:
Only if my polo came with round fog lamps I would have already installed bi xenon projectors in it(got inspiration from your thread ofcourse)
A DIY after my own heart....
Reinhard, is it possible to source the LEDs and solder them onto the stock PCBs?
If the connectors and logic is in there, we can solder LEDs and power them using your technique or some other way, but saving quite a bundle in the process.
Quote:
Originally Posted by sagarpadaki
(Post 4886642)
Excellent mod. I will right away order the part on Boodmo for the Driver side power window console. I will verify if the other door wiring harness has the provision ready and based on that i will purchase the other power window switches. Mine is 2018 June manufactured Tiago
|
Thanks. And good luck! Makes it worthwhile to know the thread was useful as a reference to fellow members. Yes - there is a small possibility that during the specification changeover - some car batches in 2018 would still have the original harness in other 3 doors with illumination wires, just the top switch without LEDs. If that works out - nothing like it! Pure plug & play for all doors. To check - just open the panel on the co-driver seat. Its easy to remove.
Quote:
Originally Posted by yajaman99
(Post 4886681)
Super DIY , love the details. Showing us what is missing and what is there.
Great work. Like others have mentioned 5 star DIY.
|
Thank you very much for the kind words yajaman99.
Quote:
Originally Posted by yesyeswe
(Post 4886700)
I don't have a Nexon let alone a TATA car but i go through your every DIY thread, they are really good and i'm a DIY person as well. Maybe in future when i get a TATA car i'm preparing myself for it
Only if my polo came with round fog lamps I would have already installed bi xenon projectors in it(got inspiration from your thread ofcourse)
|
Ah so glad to read this. Thank you. Yes it takes quite a spiritual preparation to take the plunge for a Tata car. But once you are one of us, its a charming experience. lol:
Quote:
Originally Posted by sagarpadaki
(Post 4886642)
I always wanted the illuminated switches. However, the TASS said the part has been discontinued.
|
Quote:
Originally Posted by Ravi Parwan
(Post 4886702)
A DIY after my own heart....
Reinhard, is it possible to source the LEDs and solder them onto the stock PCBs?
If the connectors and logic is in there, we can solder LEDs and power them using your technique or some other way, but saving quite a bundle in the process.
|
Absolutely it is possible to source the LED. The compatible ones are available literally at penny prices on AliExpress. You can solder it on the PCB with the necessary resistor inline. You can find the resistor on AliExpress too.
Guess what - the stock switches without the illumination - are still using the common assembly base. They also have the pins for + & - terminals of the LED. :D.
Another solution - if you have a good relationship with your service advisor at TASC - just talk to him/her once. The workshops often get totaled cars that are insurance write off. They salvage / scavenge parts from these cars. Often wire harnesses, switchgear etc for cheap fixes for cash strapped customers. Hunt a bit in their parts graveyard somewhere in the farthest dark corner of the workshop. High possibility that you'll find these switches with illumination feature in one of the bins. You'll get them far cheaper than original new part from Boodmo. I didn't bother about it just to avoid visiting a workshop during the pandemic unnecessarily. Pune has quite a surge of Covid19 right now & I'm staying home.
A truly wonderful DIY!
I was surprised at that a many cars do not have it.
Even the Seltos doesn't come with illuminated window switches.
I have the Ecosport Trend(Base) mode and it has illuminated window switches.
Moreover, the rear switch illumination is based on weather the window is operation is enabled (illuminated) or disabled(illumination off).
Even though this is a minimal feature, I personally feel its important.
Quote:
Originally Posted by Reinhard
(Post 4876961)
... - Is it a must have mod? No not really. But then - most of the other visual appeal mods aren't...
- There is also a good amount of foam, damping material inside the door panel at places. Good to see that!
|
Good share - thank you! I'd say this is a bare minimum feature we should have in vehicles. My Swift never had this feature and always struggled during the night drives - the saving grace was one of the buttons on the driver side panel next to power window had an illumination and hence easy to reach out for power window buttons too.
Also, seem like TATA puts on a lot of money on parts which are not easily visible (like the PCB you mentioned). Sadly, the mass population doesn't bother (and we have such numerous examples).
Amazing DIY !!!
My favourite feature is that the backlight goes off when then child lock deactivated the rear switches.
NO light=NO service.
I love it
When I saw all of safari's doors getting illuminated switches with auto down on all switches on driver's door and each door. I thought tata would never skimp.
| All times are GMT +5.5. The time now is 00:23. | |