Team-BHP
(
https://www.team-bhp.com/forum/)
Quote:
Originally Posted by SunnyBoi
(Post 4190840)
I borrowed a hydraulic jack from my mechanic and told myself I'll take off the wheels and fix it the next day.
|
Next day came in and I jacked up the rear wheels.
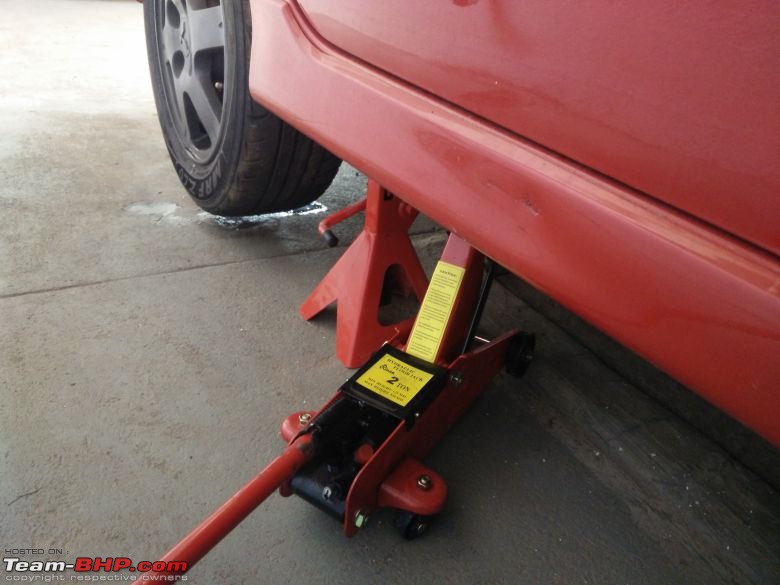
Its one of the generic 2 ton mini trolley jacks. It lifted barely enough to get wheel off the ground and just one notch on the jack stand. Whenever I released the pressure, car came down immediately with a thud. I wouldn't buy this jack, instead spend money and get a proper trolley jack.
Once the car was jacked, I started thinking of overhauling the rear brakes as well since I have taken the trouble of getting a jack and lifting both wheels. I have been having issues with rear brakes, the whole car would make a low frequency WHURRRR noise and shake a bit when braked at "high speeds".
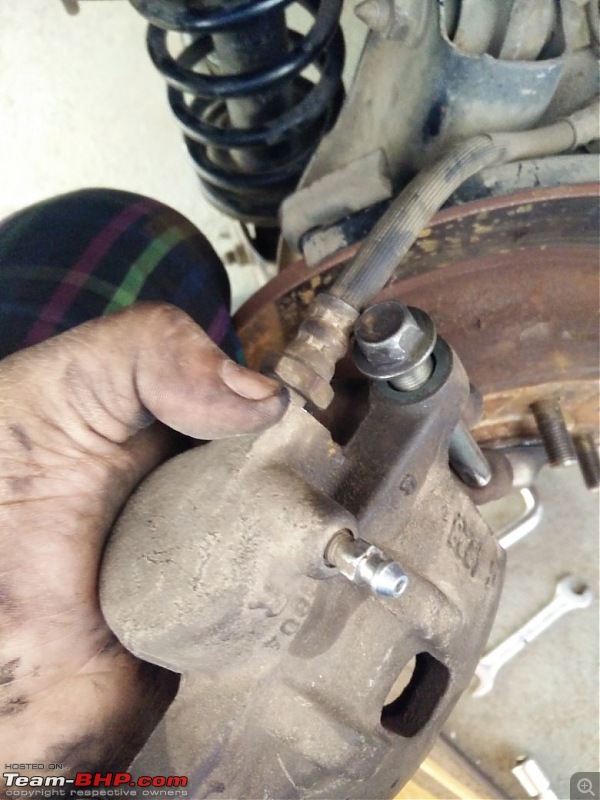
I had tried overhauling the brakes earlier; it isnt possible to use a socket or ring spanner to remove the top caliper bolt since the brake hose is in close proximity. I had tried using a C spanner, that ended up in rounding off the bolt.
This time I wanted to remove the carrier's bolts, then try to dismantle the caliper once its off the mount. Access to the carrier's bolts were also tight and they were properly stuck. Broke out the one meter breaker bar and came out. Took off the pads and separated the carrier, the sight wasn't good.

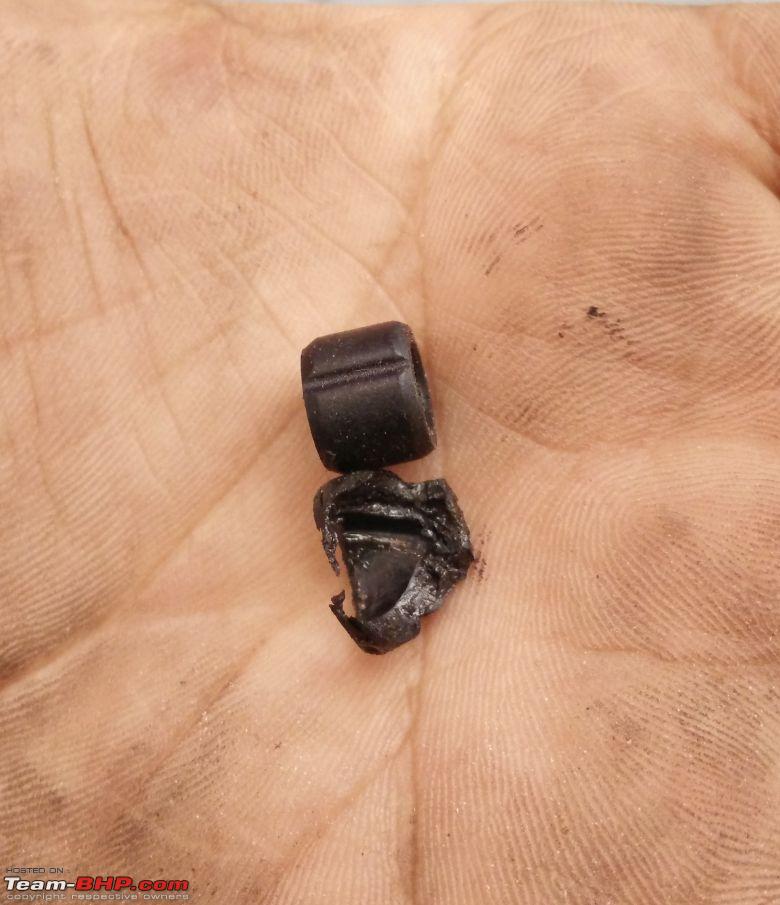
The rubber bush on one of the pins was badly damaged. Comparison with a new bush :

Everything cleaned and properly lubed. Ready to be fixed back

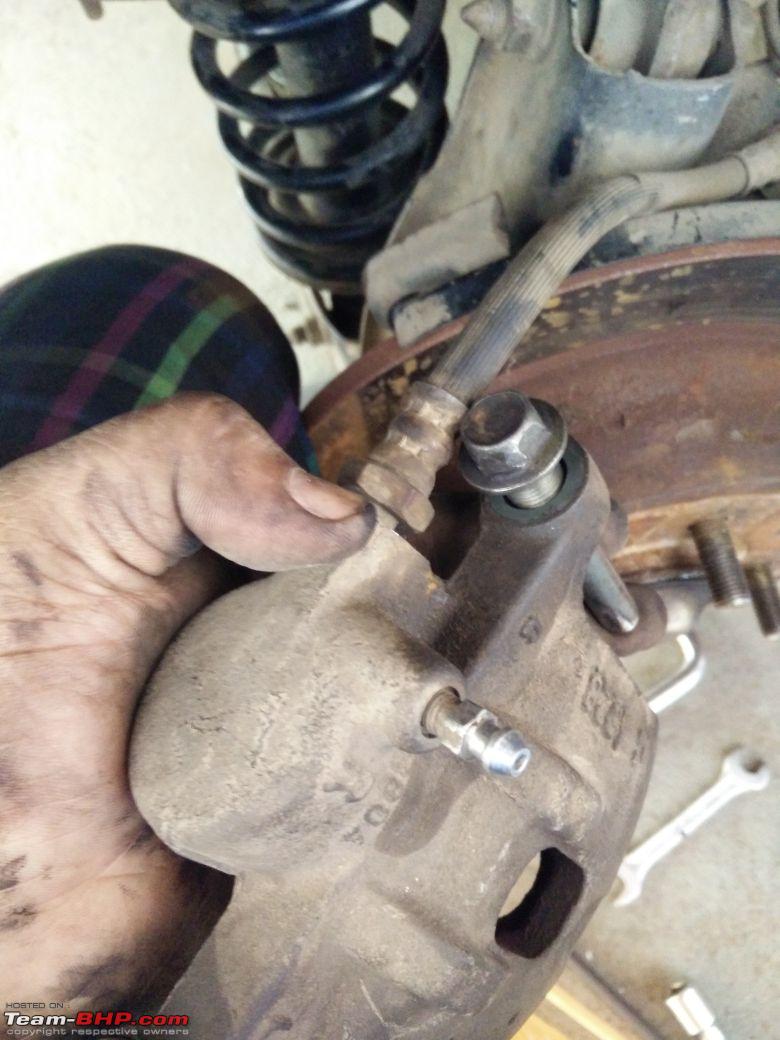
Moving onto the right wheel, access was even tighter, for some reason the spring prevented the socket and rod from sitting flush with the top carrier bolt. Plus add the fact I have to loosen the bolt by twisting upwards, it was very difficult to get the L rod in place AND slip on the breaker bar.
After 20 minutes of incessant cursing, I got the caliper out
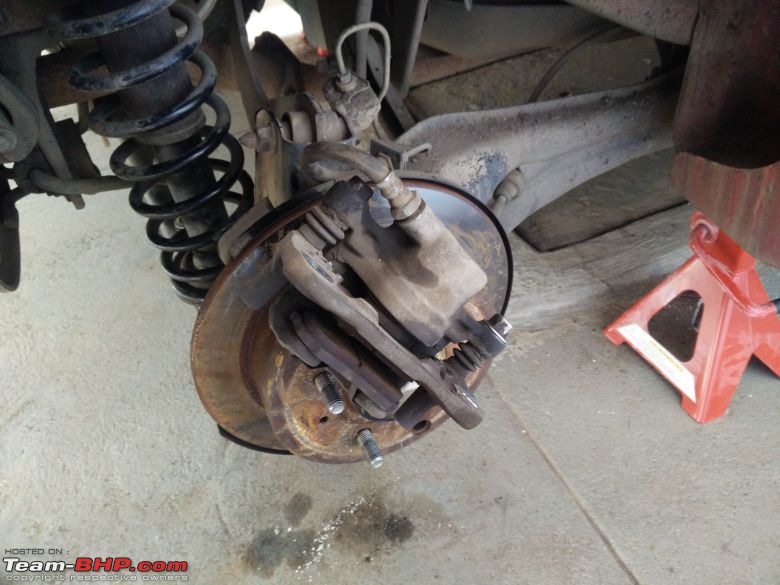
I managed to loosen the top caliper bolt but I cannot remove it without removing brake hose and in turn have to bleed the brake system! What a terrible design decision by Mitsubishi, I wonder what that moron was smoking when he designed this.
I had to return the jack before our mechanic opened his shop so I had to hurry and wrap up everything. I hate to see rusty rotors but it has to wait.
Quote:
Originally Posted by SunnyBoi
(Post 4183240)
I can always top up the car with a good quick detailer or wax if I ever want the car to look like it did on day one.
|
I wanted to test this and see how much shine I can get back just with a coat of wax, so I washed my car and gave it one coat of wax!
It had been more than a year since I had hand waxed my car. The wax I chose to apply was possibly the worst to apply and take off.
I'll let the results speak for themselves :


After a trip with the parents, dropped them home and set off to test how the Evo ECU behaved. I wasnt disappointed, I had raised the rev limit from 6200RPM to 6500RPM and its clearly working. I can finally touch 100 with one gear less so my 0-100 times will be faster? Not that I care. Anyway..
https://www.youtube.com/watch?v=LdyzYQEugsM
After the testing session, came back home, parked the car and took this video. Do watch this in HD.
https://www.youtube.com/watch?v=FPRlVFigVn4
So the boots on my driveshaft failed again. This time got it fixed by a professional with good quality boots and metal clips to hold them in place.
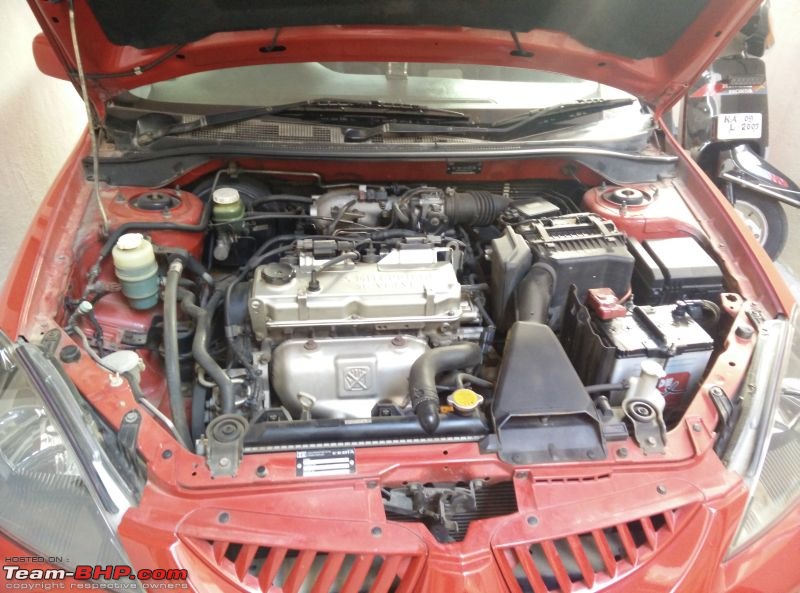
The mechanic who took out the driveshaft told me its rare to see a car with such a neat engine, no oil drips anywhere. My chest immediately swelled up clap:

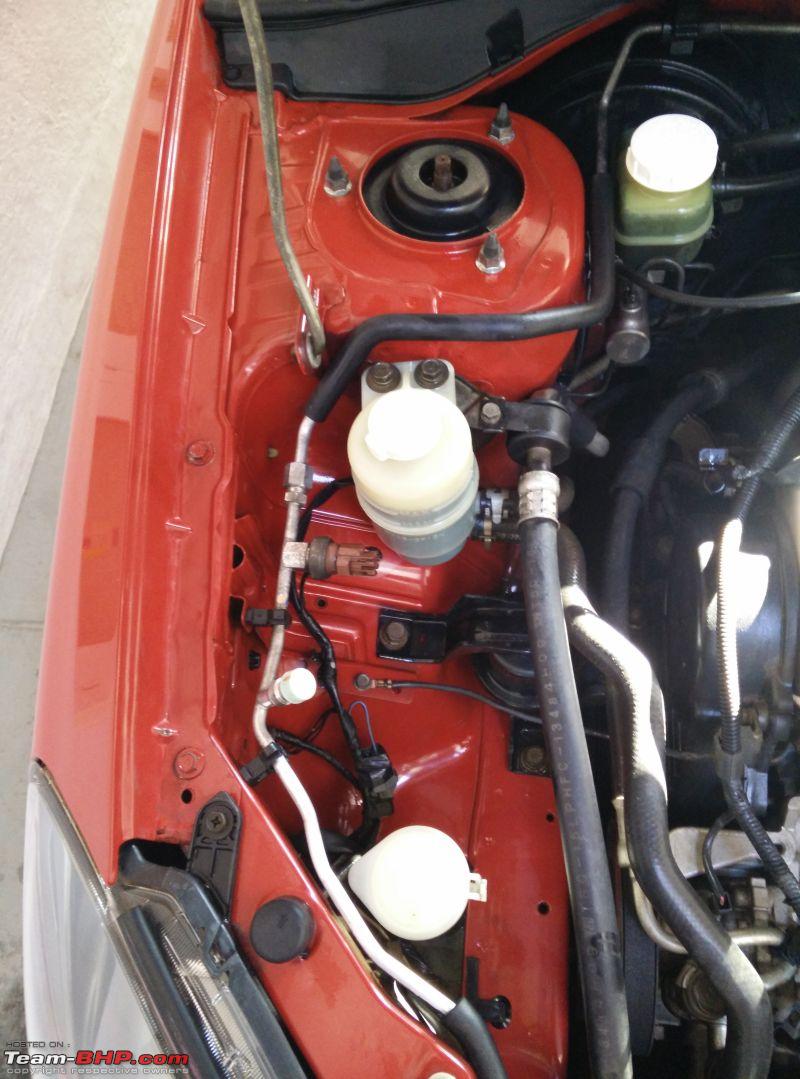
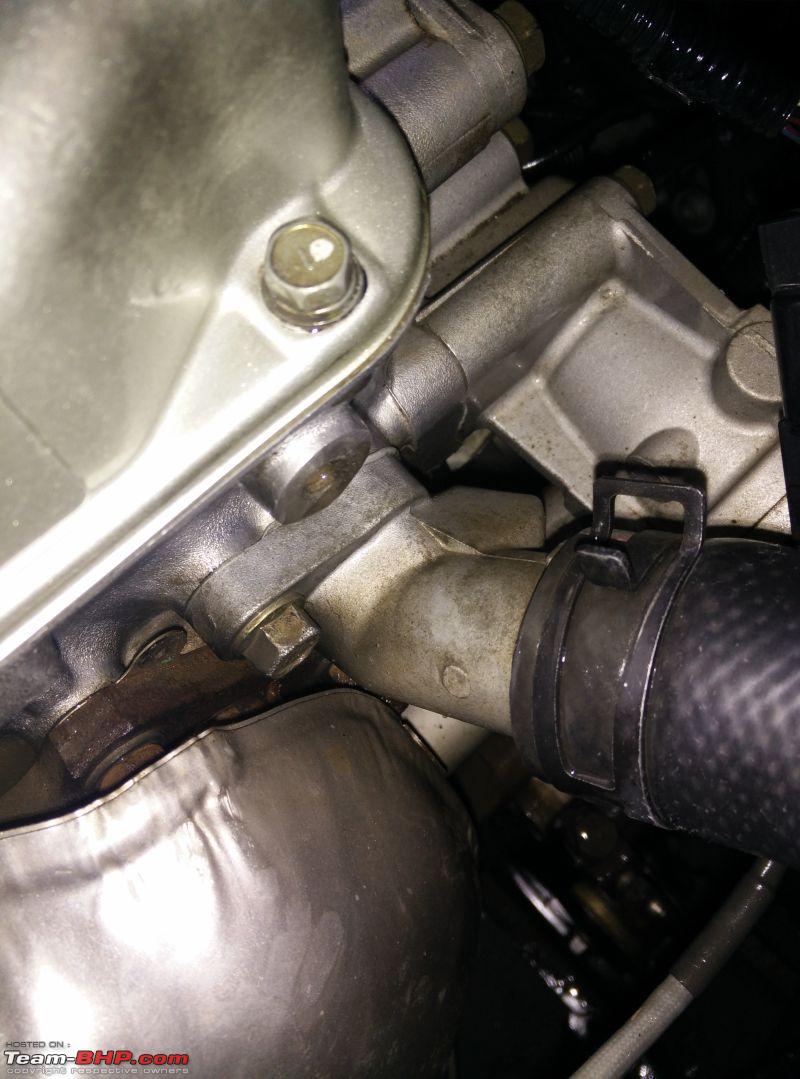
Bouyed by the mechanic's comments, decided to give the engine a proper clean up. It had been over 9 months since I had cleaned my engine, it looked quite dirty to me.
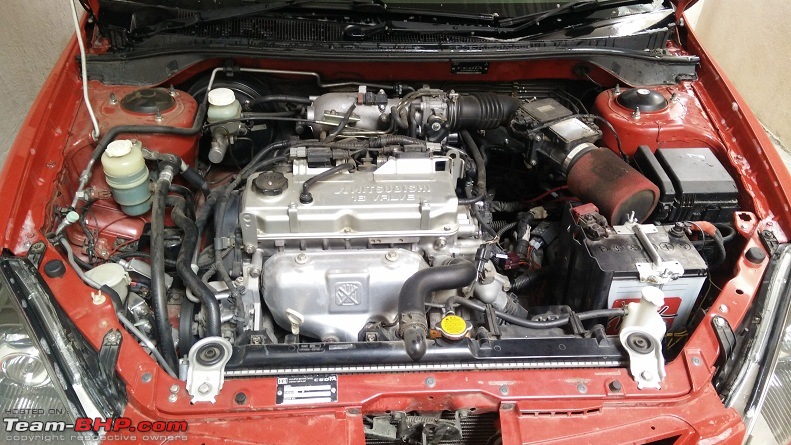
During

After. Mmm so clean

A friend got me Mintex brake pads from the UK. Thanks to Brexit, got them pretty cheap. Woohoo!

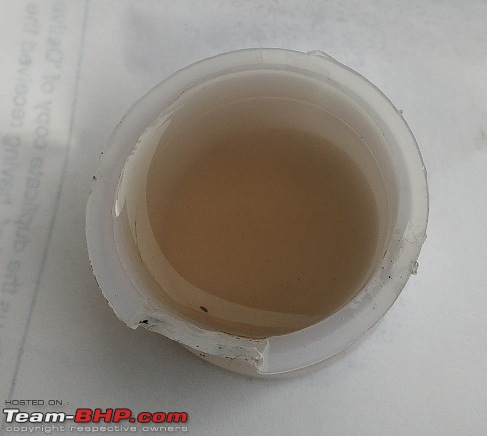
While cleaning the engine, I took out a bit of coolant from the overflow tank; it looked like brown curds..the sight and even remembering it now makes me want to throw up :deadhorse
Opened the radiator cap, the coolant inside was clear. Not taking a risk, got a few bottles of Glysantin G30 for a killer price! Both the coolant and brake pads will go on the car early next week with few other parts.

Parting shot :

It was the D-Day for the major service! Instead of doing it by myself, I went to Blackworks and get it done.
Arriving early hehe

I got a new Front O2 sensor from a Mitsubishi Evo 9. Replacing the O2 sensor helped remove the problematic engine response below 1K rpm. Result!

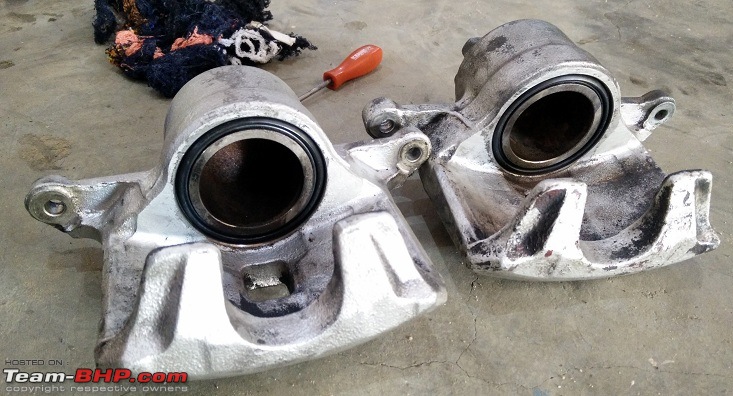
Last year when I took apart the front brakes to paint the calipers and grease everything, I had noticed that the piston dust seals were damaged. I procured a new set of front caliper rebuild kit and it was time to replace them. Since the rebuild kit also had new piston seals, decided to tear apart the whole caliper and rebuild everything on it.
Piston as it is. there is light corrosion which is common for a 10 year old car.

Piston after cleaning. There is light pitting but it shouldn't affect the piston operation since the pitted portion does not come in contact with the seals. I'm glad to say I cleaned up all the mess without having to use any emery paper/ abrasives.

Insides of the caliper also showed some corrosion; the body of the caliper is aluminium and technically there should not be any rust!

Cleaned off everything, using techniques to safely remove all embedded iron/rust without he use of any abrasives. Any rust on the surface next to the piston will accelerate corrosion and reduce life of the brake fluid.

My front left wheel barrel was covered in grease since the driveshaft boot failed. It looked like a mess alright

Cleaned the wheel. Its not 100% perfect but there were other higher priority things on the car to tackle that day.

Both calipers rebuilt with fresh seals
The calipers were reinstalled with Mintex Brake pads. The front brake pads had completely worn out; the wear indicator line wasn't visible on 2/4 pads heh. The rear brake pads had life but swapped them out to an all Mintex pad setup. Reused the brake pad shims from the Brembos since the Mintex pads didn't come with any. Anyone who sees my front brakes will be fooled to believe I still run Brembo pads :p
Next was the coolant flush and replace. We drained the radiator to begin with. The quantity of coolant that came out was less; only around 2.5-3L. I had asked Chandru to get about 15L of distilled water since I wanted to do a thorough flush and drain. Since we couldn't drain the whole system, we filled up the radiator and bled the system and thought of tackling it another day. Chandru also noticed some "rust" and other crap sitting on the top of the radiator and recommended I use a radiator flush.
Somewhat dejected, I came back home then headed to JC road to buy a radiator flush. No one had it; I saw Xado/Very Lube radiator flush at JK Automobiles, waited around 10 minutes at the shop, no one was interested to sell anything to me. Frustrated, I went back home empty handed and this just reinforced my decision not to buy anything ever for the car from local shops. Buying stuff from USA is easier than getting parts from JC road. Ordered Liqui Moly Radiator Flush from amazon and it showed up two days later. Drained 200ml coolant and replaced it with the flush, ran the car for about 10 minutes till the thermostat opened and the flush was circulated everywhere.
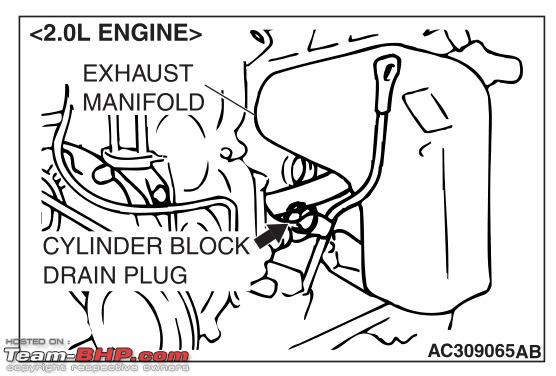
I was reading upon the service manual on the process of draining the coolant, there was one step where the cylinder block drain plug had to be taken out. The sad thing is nowhere on the manual, or even the engine rebuild manual the location of the drain plug is given!!!
Drain coolant by removing the plug. but where??

I found a reference in the parts catalog. We looked around the block in that area and could not find such plug
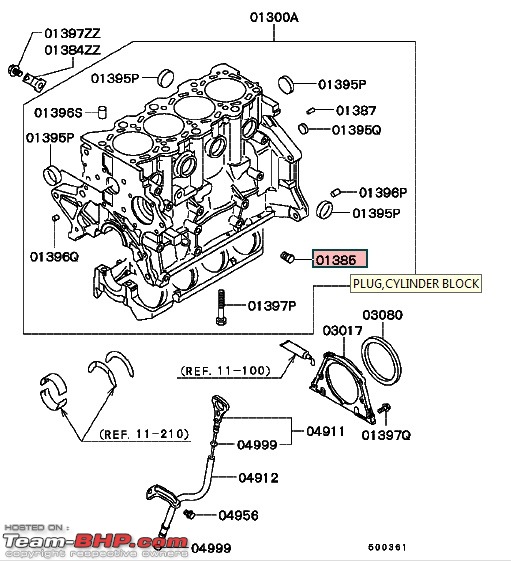
Next day, drove back to Blackworks. This took about 45 minutes giving the flush enough time to work. We looked around the block and couldn't find any drain plug. Chandru had the idea of taking out the thermostat and draining the coolant from the passages, we gave it a try.

It was a resounding success! Using his proprietary techniques, he drained out most coolant. I was pleasantly surprised to see no corrosion on any of the coolant passages I could see, which is also an excellent result. We replaced the thermostat and I set to work cleaning the overflow bottle.
The contents of coolant overflow bottle had the color and consistency of chocolate milk shake, YUCK! I managed to clean it fairly okay.

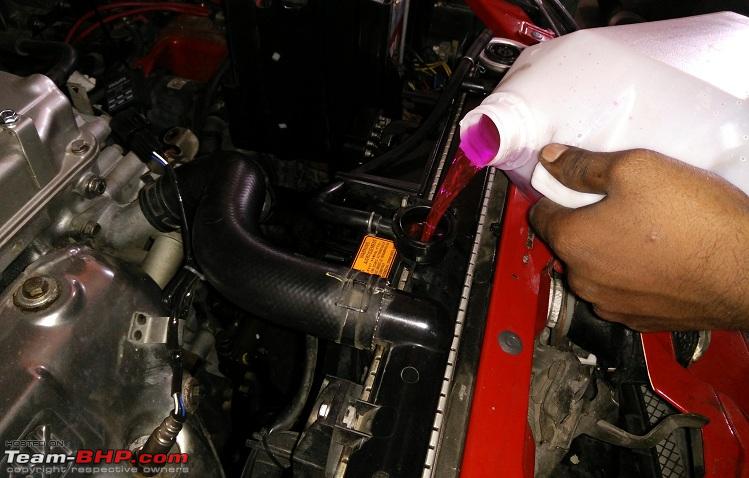
Pouring the new coolant mixed with distilled water @ 1:1. Love the reddish violet color! The car took in ~5.9L of coolant, which is very close to the Mitsubishi recommended quantity of 5.96L. So I have another 100ml of coolant left with me if I ever needed to top it up.

A sample of the drained coolant. It looks murky and looks like the flush did its job.
The next day I finally found a document where the location of the drain plug was mentioned. We couldn't find anything there, if anyone is changing their coolant, they can check up and let me know.

Last item of the job was to replace the tie rod ends. The boots of the ones on the car were damaged; although they were working OK, didn't want to take a risk and replaced them with OE tie rod ends.

Somewhere on the way back home I crossed the 90K milestone. It has been a very slow 1000KMs, I should be racking more miles soon with couple of trips including a TBHP drive to Ooty!

Last but not least, I managed to connect the AEM wideband to the Evo ECU. Now the ECU can read the AFR from the wideband and I can log it using Evoscan without using any serial cable. Next upgrade for the ECU will be a patch for a narrow band simulator based on the wideband signal. If it works, I can replace the front O2 sensor with the wideband and get more accurate fueling.

Special mention of thanks to the mechanikitties of Blackworks. They can be a pain in the butt sometimes but cant help adore them!

Brilliant job!! clap:
Sir how do you clean your engine bay?? I also love shiny engine bays, and hence would love to know about the procedure and products you use to clean the grime. :)
Regards,
Shashi
Quote:
Originally Posted by Leoshashi
(Post 4225884)
how do you clean your engine bay?? I also love shiny engine bays, and hence would love to know about the procedure and products you use to clean the grime. :)
|
Dear Shashiji,
I'm afraid I cannot elaborate on the products and techniques because this is not the right forum to discuss these topics. I can only share before/after pictures. Most of the techniques are unique to me, many products used are dangerous if not handled carefully by someone experienced in such products.
I guess you take pleasure in seeing an engine bay, here are some pictures on how my engine bay started. It took me two whole days, 8 hours a day working on cleaning just the engine bay to get these results. This is not for everyone, not everyone appreciates this much detail, unfortunatey I am one of them and I will go to pretty long lengths to get the results I want :)
When I got my car
Heavy mineral deposits everywhere. These wont go with an engine cleanup/degreaser etc.


Cleaned up

Engine degreased

Upper radiator hose before restoration

After

Stained and rusted aluminium

After

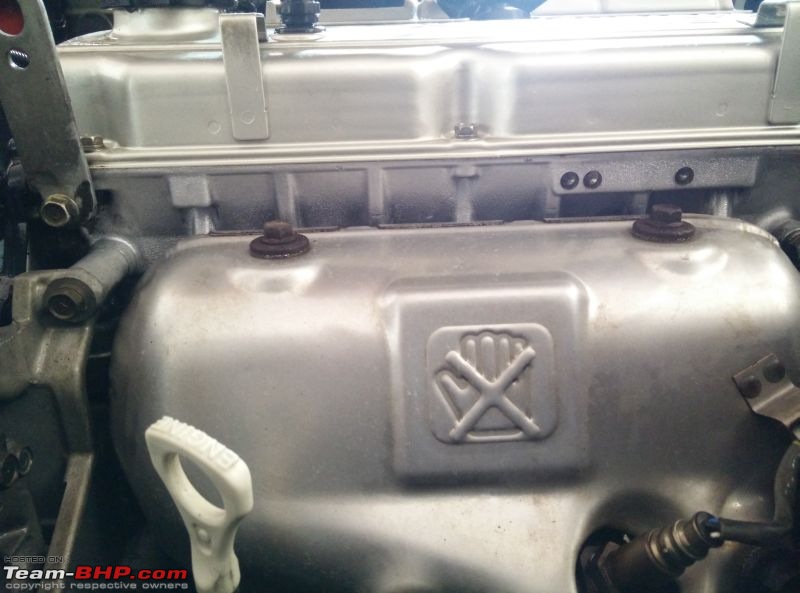
Head (below the rocker cover restored. At this point I discovered the valve cover gasket was leaking. I soon replaced it with a Fel-Pro kit from USA
Stains on the intake manifold
After
Power Steering pulley full of minerals and crud

After

Cleaning A/C pipes. Left side cleaned, right side shows the before condition.

Cleaned

Oh wait, I see spots!

Another round of cleaning and its truly pristine

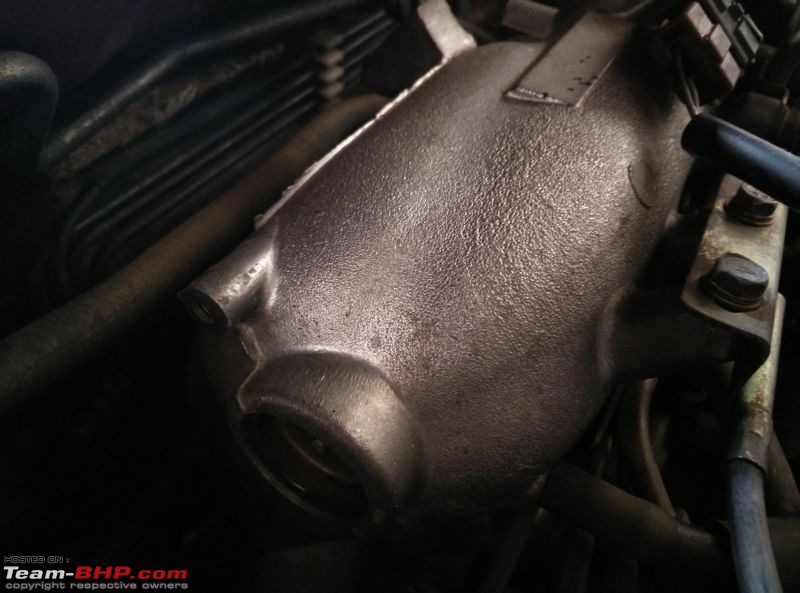
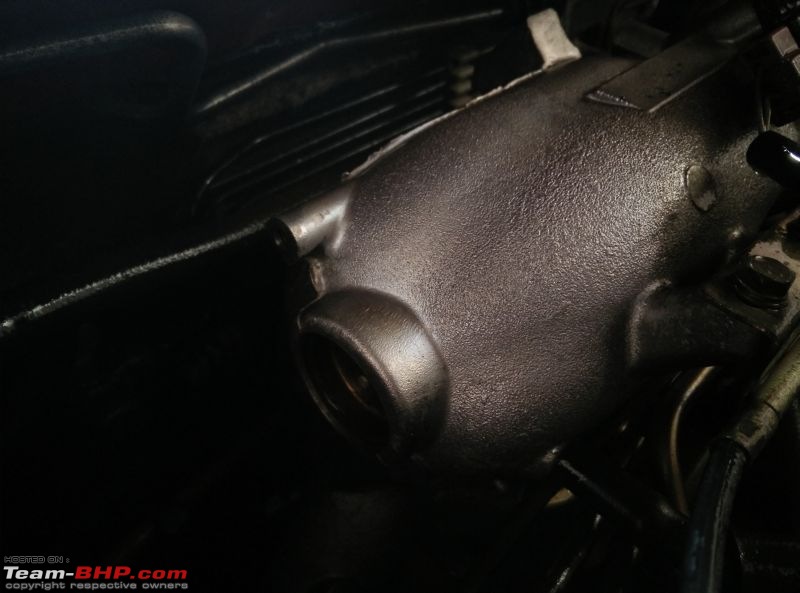
Manifold heatshield post polishing

Some after pictures


These pictures are 1.5 year old; lot more work has gone into the engine but I wouldnt want to bore the good folks here with more engine spam :)
Quote:
Originally Posted by SunnyBoi
(Post 4225888)
These pictures are 1.5 year old; lot more work has gone into the engine but I wouldnt want to bore the good folks here with more engine spam :)
|
Here's at least one vote to getting a generous second serving of engine work pictures and narration. Please keep the updates coming. The pictures are 'petrolicious' and the storytelling is instructive and inspirational. :thumbs up
SunnyBoi: Thanks for sharing! Hat's off to the way you keep your car man. As requested, moving posts from your ownership period to a new thread.
Just Wow SunnyBoi ! Kudos to your dedication in taking care of every nerves and joints of the car. Its simply great to see these kind of works on bringing a old gem vehicle back strong on their wheels and make them younger again. I I I Just admire the work. :thumbs up
Can you share info regarding those magnetic mounts holding the tablet? I want to have similar Setup in Fiesta.tia!
True labor of love Sunny. Love the way you have maintained your ride especially when most of it was DIY ! My personal opinion:I do not think the beige key fob goes well with your interiors, black would look much better.
Quote:
Originally Posted by SunnyBoi
(Post 4225888)
These pictures are 1.5 year old; lot more work has gone into the engine but I wouldnt want to bore the good folks here with more engine spam :)
|
Bored? :eek:
This is THE best detailing work of the engine bay I've seen, by far! Some of those aluminium pipes shine as if it's some piece of silver jewelry. Jaw dropping stuff.
Please post the recent ones. clap:
My Cedia's engine bay also needs cleaning.. :)
Are you polishing with hand? Or using some tools/ machines?
What about the plastic and rubber parts?
Do you happen to know the part number for the black outside door side plastic trims just above the door handles? Mine has got faded badly and the plastic seems to be changing properties.
Rating this thread a 5. Sunny you are a very involved owner. Can you elaborate on the Rare engine roll-stop mount, what purpose does it serve?
Quote:
Originally Posted by akshay380
(Post 4229261)
Can you share info regarding those magnetic mounts holding the tablet? I want to have similar Setup in Fiesta.tia!
|
The mount I was using is called GKZ Magnetic Phone Mount. I used two of them since I would mount a tablet on them. I took them off since they would cause the GPS on tablet to not work; reverted to a velcro based mounting. Gave them to a friend and he's using them on his OnePlus 3 without issues.
Quote:
Originally Posted by deepfreak15
(Post 4229277)
My personal opinion:I do not think the beige key fob goes well with your interiors, black would look much better.
|
I hate black leather accessories :p I was tormented enough during school days into wearing black shoes and belts, I dont want anything black now hehe. I was hoping they'd be tan but they're more brownish Orange. Its tie to change the fob since its days are neared, will look at other colour options.
Quote:
Originally Posted by S_U_N
(Post 4229388)
My Cedia's engine bay also needs cleaning.. :)
Are you polishing with hand? Or using some tools/ machines?
What about the plastic and rubber parts?
|
Did you mean the engine bay? If yes, its all by hand. Using pressure washer/machines to clean is seriously not recommended. Plus this level of detail can only be achieved by hand.
Quote:
Originally Posted by S_U_N
(Post 4229388)
Do you happen to know the part number for the black outside door side plastic trims just above the door handles? Mine has got faded badly and the plastic seems to be changing properties.
|
Here you go

Quote:
Originally Posted by CrAzY dRiVeR
(Post 4229299)
Bored? :eek:
This is THE best detailing work of the engine bay I've seen, by far! Some of those aluminium pipes shine as if it's some piece of silver jewelry. Jaw dropping stuff.
Please post the recent ones. clap:
|
Thank you! Will compile few more photos and post them soon.
In the meanwhile, managed to get 3 cans of Liqui Moly Petrol Injector cleaner upon recommendation by sagarpadaki for just Rs 597! MRP of each can is Rs 432.

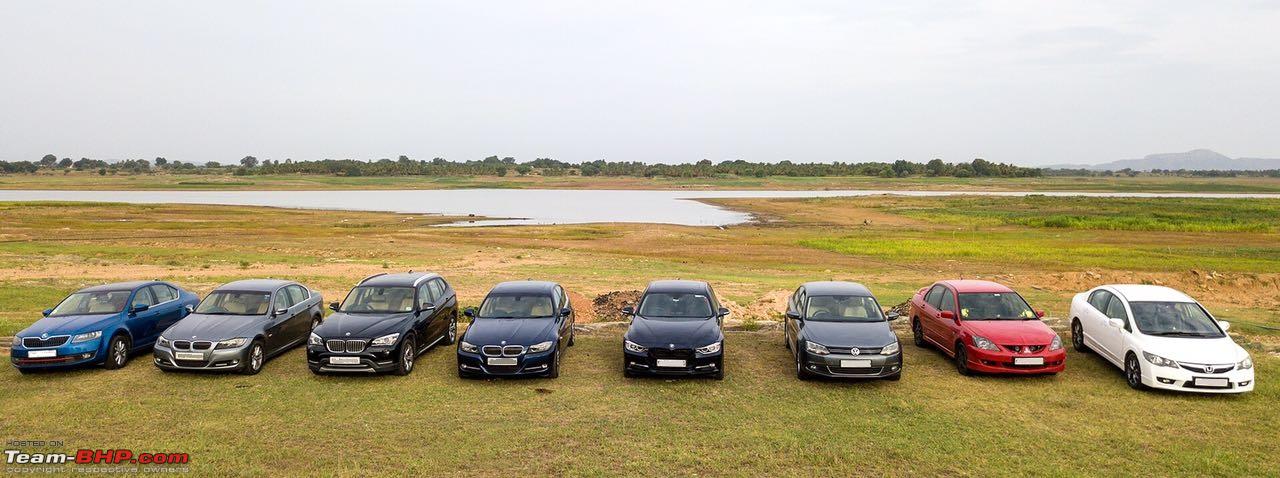
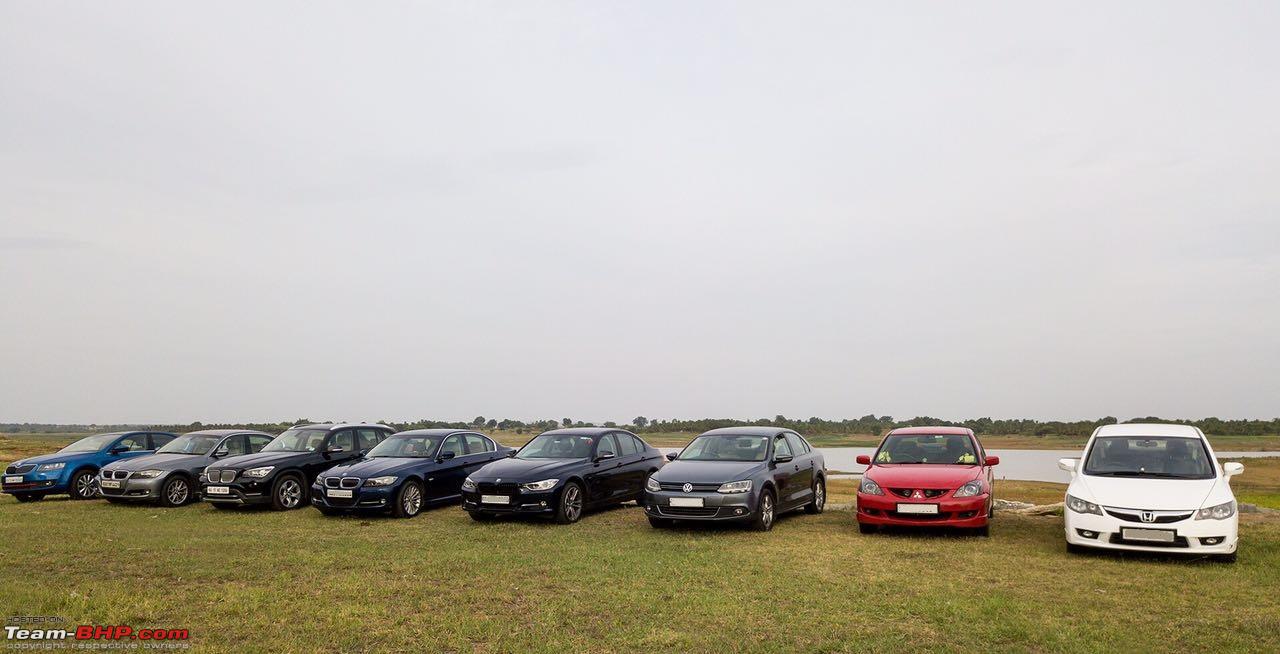
Late saturday evening, few BHPians decided on going on an early morning breakfast drive and photoshoot @ Markonahalli Dam. I arrived late in the evening and had to do a simple car cleanup at 11PM. Poured two cans of the petrol injector cleaner into the fuel tank and hit the sack.

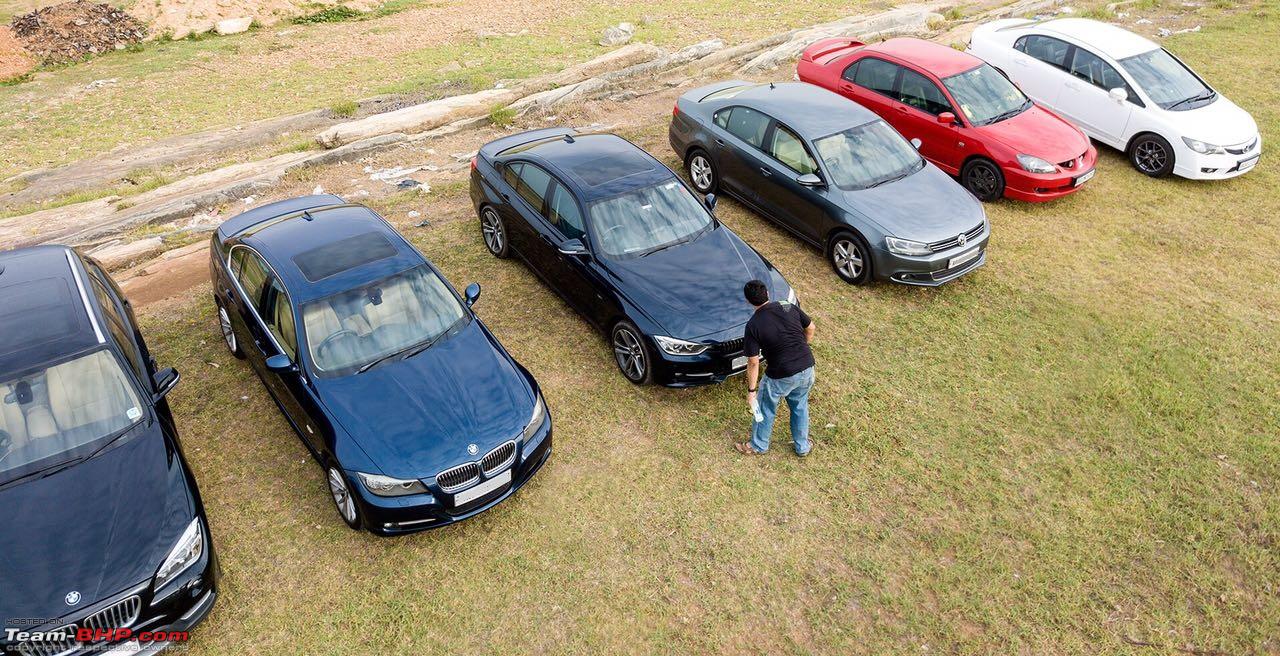
Despite having the least power, slowest car and the only NA car I managed to reach first :p took this celebratory pic before the others arrived!

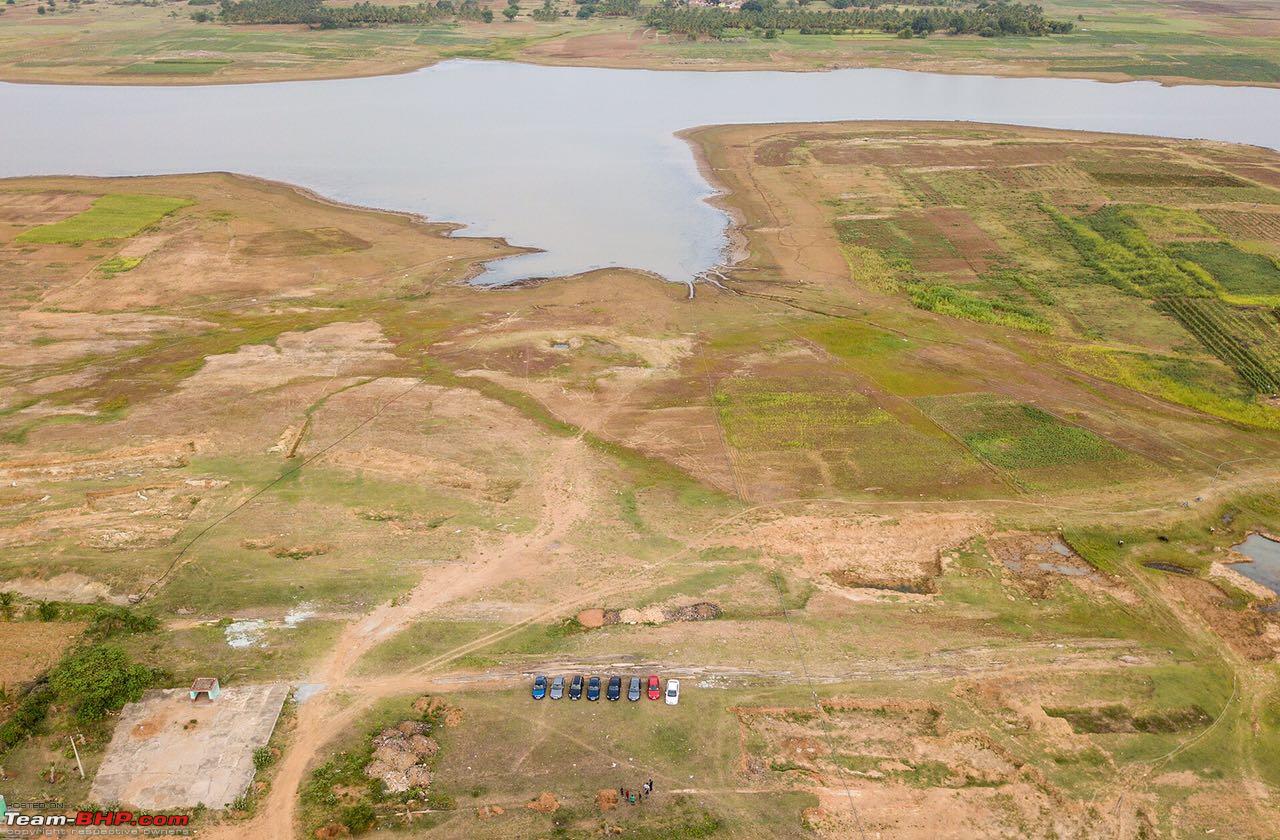
Let the professionals take over! These pictures are courtesy of Robi using his drone.
The gang


The bimmers and the photobombing octy

Thats me sprucing up the cars prior to the photoshoot

Eye in the sky

My Cedia again! Pic courtesy KarthikK

Breakfast time @ Swati

After about 230KMs of hard driving, The injector cleaner has made a small but noticeable difference. I'd recommend it as well.
Next day, went to Tyre Professionals for a routine Wheel Alignment and Balancing.

Road force balancing helped reduce pull to the right.

Quote:
Originally Posted by SunnyBoi
(Post 4190870)
Once the car was jacked, I started thinking of overhauling the rear brakes as well since I have taken the trouble of getting a jack and lifting both wheels. I have been having issues with rear brakes, the whole car would make a low frequency WHURRRR noise and shake a bit when braked at "high speeds".
|
A small update; the WHURRR noise under hard braking did not go away post rear caliper rebuild. I was convinced that the rear brake rotors were warped.
However after sunday's drive, I did couple of hard braking maneuvers and the noise did not appear! It appears the Brembo brake pads were the cause. They still have 40% life in them but I am so glad I swapped them out early!
The brakes have sharpened a LOT post front caliper rebuild and Mintex pads. I'm not sure if the cause was new seals on the calipers or new pads, a friend helped get me new rear caliper rebuild kits as well as few other goodies from USA. Rear caliper rebuild will happen soon!

| All times are GMT +5.5. The time now is 01:00. | |