Team-BHP > Modifications & Accessories
Register New Topics New Posts Top Thanked Team-BHP FAQ


Reply
  Search this Thread
43,879 views
Old 30th January 2020, 18:13   #1
Senior - BHPian
 
dkaile's Avatar
 
Join Date: May 2011
Location: Meerut, India
Posts: 3,397
Thanked: 7,899 Times
Mods, tweaks & upgrades for my Maruti Baleno Sigma

Few Updates on the Baleno Sigma and 1st Servicing

Have done a few updates to the Baleno purchased on 01-01-2020 which are briefed here for the common knowledge.

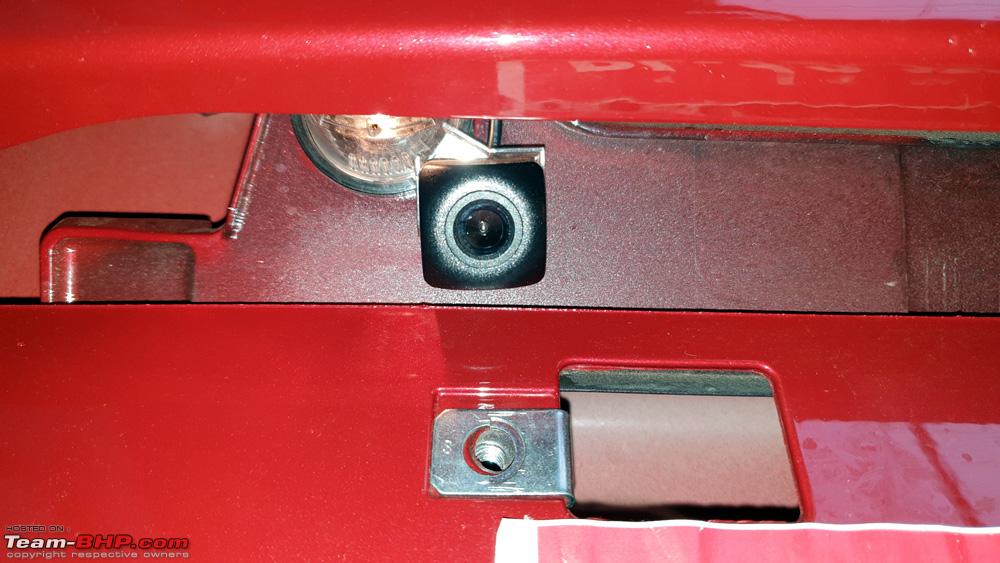
Someone was asking as to where the reversing camera had been fitted. Here's the picture of the camera module fitted without cutting on the rear registration plate light.
Mods, tweaks & upgrades for my Maruti Baleno Sigma-baleno-reverse-camera-08012020_1.jpg

A view of the output on the JVC
Mods, tweaks & upgrades for my Maruti Baleno Sigma-baleno-reverse-camera-08012020_2.jpg

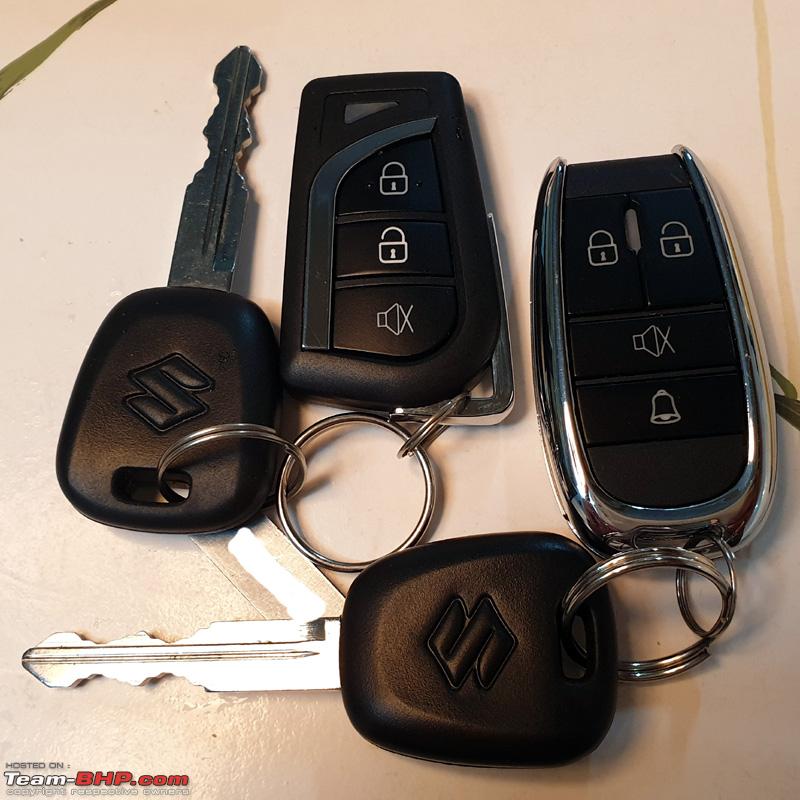
Also had fitted the Autocop Remote Locking for 2500/- as mentioned in my previous post.
Mods, tweaks & upgrades for my Maruti Baleno Sigma-baleno-autocop-remotes-08012020.jpg

--------------------------

Now, was planning to install DRL and Fog Lights. Did not like the cheap designs on the aftermarket DRL's and was looking for something classy like this Osram unit. But it was quite exorbitant at around 16-17k
Mods, tweaks & upgrades for my Maruti Baleno Sigma-baleno-osram-ledfog101.jpg

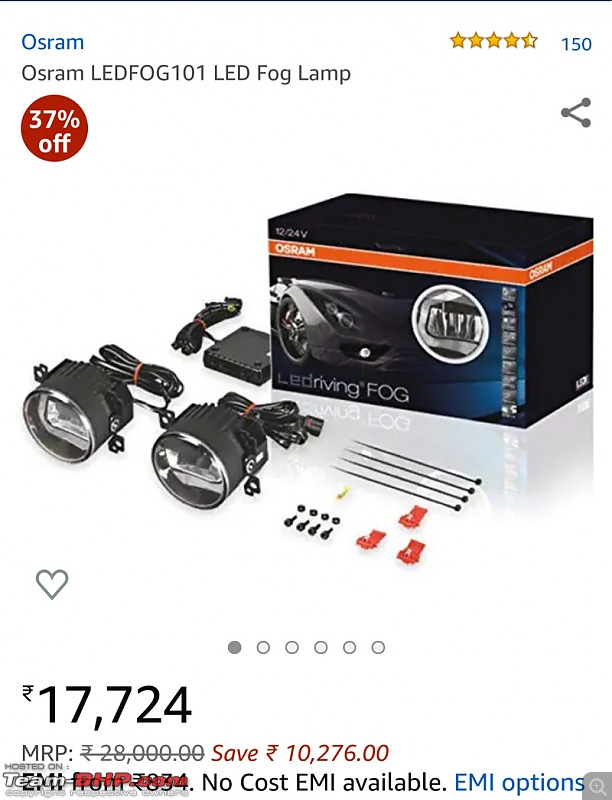
Found a rip off of this design from Volmax and the reports were quite good for this unit. Costed only 2200/- bucks. Also purchased some additional fog lamp wiring kits from Volmax from my friendly neighborhood accessory wallah for 500 bucks including a fog lamp illuminated switch.
Mods, tweaks & upgrades for my Maruti Baleno Sigma-baleno-volmax-fd399l-drl-fog-lamps-24012020.jpg

Here's the model number in case anyone's interested - FD-399L from Volmax
Mods, tweaks & upgrades for my Maruti Baleno Sigma-baleno-volmax-fd399l-drl-fog-lamps-24012020_01.jpg

Also upgraded the headlight and parking bulbs to LED from Philips. These Ultionon Essentials were some latest upgraded sets according to the dealer which costed me 3900/- for the pair of H4's and 500/- for the 2 parking bulbs (W5W/T10)
Mods, tweaks & upgrades for my Maruti Baleno Sigma-baleno-philips-led-bulbs-24012020.jpg

This is the wiring diagram that I made and used along with 2 sets of relays and 2 separate switches to independently control both the DRL's and the Fog Lights. I took the switching input directly from the fuse box in the engine bay and I used the Ignition on source so that it supplies power only when the ignition is turned on (white wire in the main fuse box was tapped for this)
Mods, tweaks & upgrades for my Maruti Baleno Sigma-baleno-drl-fog-lamps-wiring-diagram-24012020.jpg

Here's how these fog lamps look with - Only DRL on
Mods, tweaks & upgrades for my Maruti Baleno Sigma-baleno-volmax-fd399l-drl-fog-lamps-24012020_1.jpg

Only Fog Lamps on
Mods, tweaks & upgrades for my Maruti Baleno Sigma-baleno-volmax-fd399l-drl-fog-lamps-24012020_2.jpg

Both DRL and Fog Lamps on
Mods, tweaks & upgrades for my Maruti Baleno Sigma-baleno-volmax-fd399l-drl-fog-lamps-24012020_3.jpg

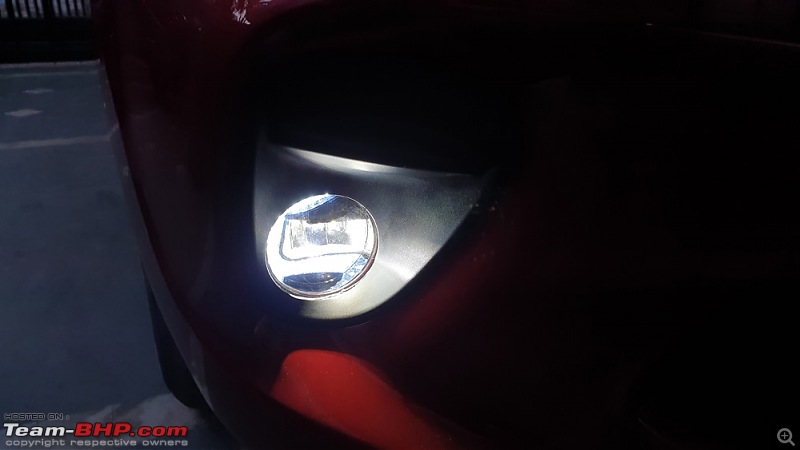
With the LED Headlights also on
Mods, tweaks & upgrades for my Maruti Baleno Sigma-baleno-volmax-fd399l-drl-fog-lamps-24012020_4.jpg

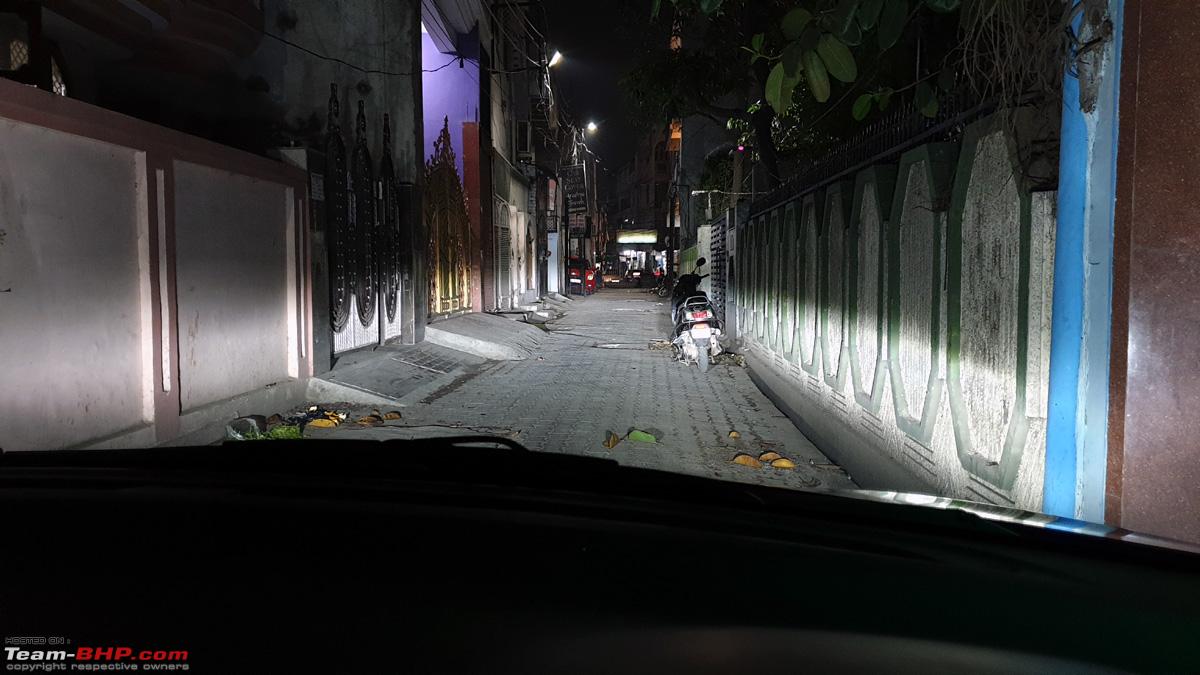
Here's a look at the throw of light. Only the Fog Lamps on
Mods, tweaks & upgrades for my Maruti Baleno Sigma-baleno-volmax-fd399l-drl-fog-lamps-24012020_5.jpg

Fog Lights and Low Beam
Mods, tweaks & upgrades for my Maruti Baleno Sigma-baleno-volmax-fd399l-drl-fog-lamps-24012020_6.jpg

Fog Lights and High Beam
Mods, tweaks & upgrades for my Maruti Baleno Sigma-baleno-volmax-fd399l-drl-fog-lamps-24012020_7.jpg

Here's how the white wire (power only on ignition on) was tapped from the main fuse box with a wire tap
Mods, tweaks & upgrades for my Maruti Baleno Sigma-baleno-volmax-fd399l-drl-fog-lamps-24012020_8.jpg

Here's a look at the waterproof ballast and wire fitting for the Philips LED headlight bulb
Mods, tweaks & upgrades for my Maruti Baleno Sigma-baleno-philips-led-bulbs-24012020_1.jpg

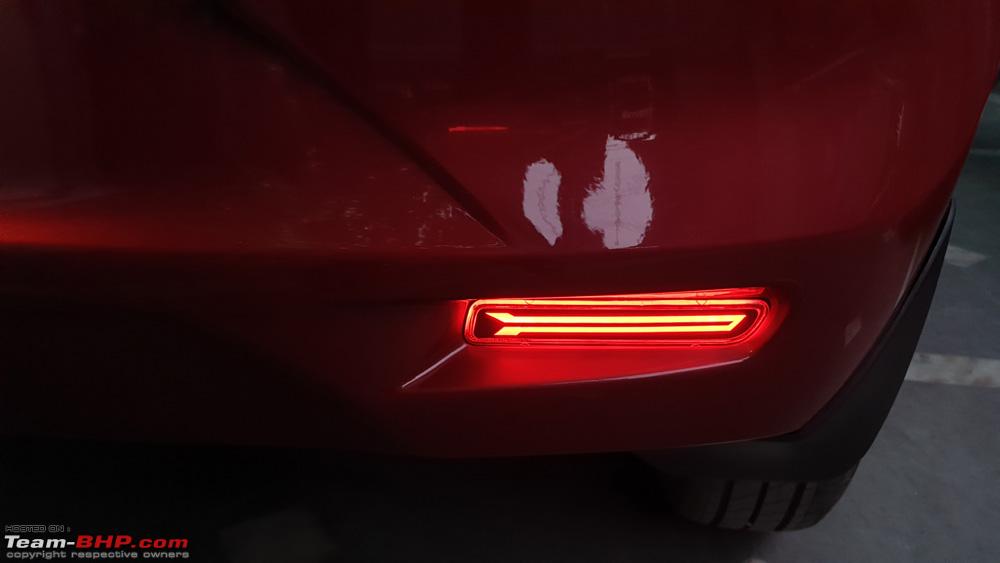
Also self fitted LED lights in the rear bumpers in place of the reflectors (350/- from Amazon). These were wire tapped to the the rear brake light assembly and has twin intensity functionality on parking (dim intensity) and brake light (full intensity). Here's a look at parking light settings
Mods, tweaks & upgrades for my Maruti Baleno Sigma-baleno-rear-bumper-lights-24012020_1.jpg

A full view of the rear
Mods, tweaks & upgrades for my Maruti Baleno Sigma-baleno-rear-bumper-lights-24012020_2.jpg

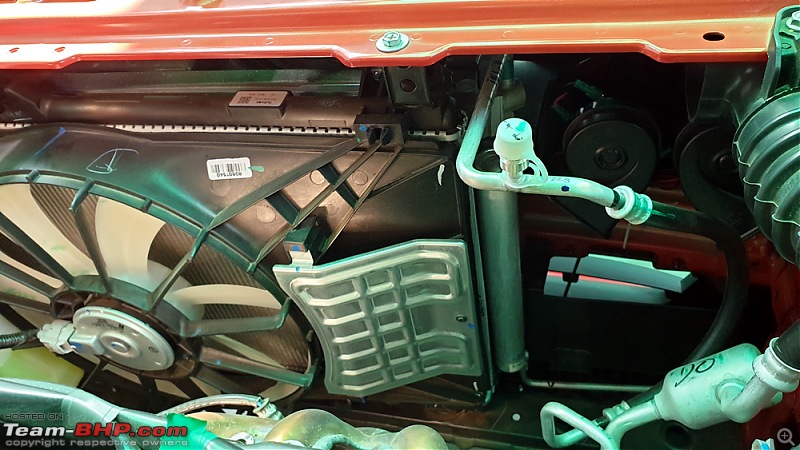
Additional Hella Trumpet Horns were also installed in the empty space besides the radiator. I did not remove the original horns. Only the wiring sockets were removed from the OE horns and tapped with new plug and play wiring into these new horns without any wire cutting. A relay for driving these twin horns already existed in the main fuse box in the original wiring. These sound much better for Meerut traffic.
Mods, tweaks & upgrades for my Maruti Baleno Sigma-baleno-hella-horns-24012020_1.jpg

A wider look as to their placement (look into the top right of the picture)
Mods, tweaks & upgrades for my Maruti Baleno Sigma-baleno-hella-horns-24012020_2.jpg

-----------------------

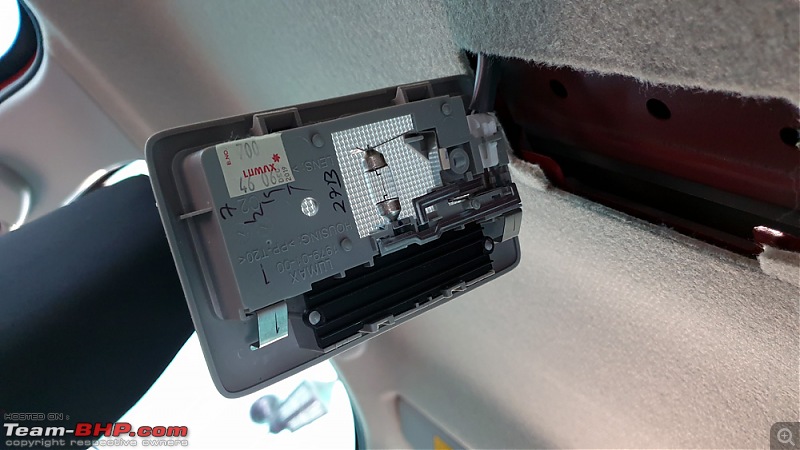
Trunk Boot LED Light / LED Footwell and Interior Cabin Lights install

With inspiration from this thread - https://www.team-bhp.com/forum/diy-d...-lighting.html (D.I.Y. Install: LED Footwell Lighting) and also this one - https://www.team-bhp.com/forum/diy-d...boot-lamp.html (VW Polo DIY: Adding a boot lamp!) . What started as a desire to add a trunk boot light as the same was not present in this variant, I ended up adding also the footwell light. The interior cabin light was opened to tap into the wiring
Mods, tweaks & upgrades for my Maruti Baleno Sigma-baleno-interior-cabin-led-29012020_1.jpg

The original is a normal C10W and is 31mm in length in case anyone is interested
Mods, tweaks & upgrades for my Maruti Baleno Sigma-baleno-interior-cabin-led-29012020_2.jpg

A LED light with a adapter for C10W was purchased (50 bucks) and the same was tapped with Finolex 0.75mm pure copper speaker wire. This wire is ideal for auto electrical fittings also.
Mods, tweaks & upgrades for my Maruti Baleno Sigma-baleno-interior-cabin-led-29012020_3.jpg

Here's how the Interior light looks with the new LED Bulb
Mods, tweaks & upgrades for my Maruti Baleno Sigma-baleno-interior-cabin-led-29012020_4.jpg

The wire was pulled from the roof lining onto the trunk area where the original boot light cover was existing. This cover is removable with a flat head screw driver. A small hole was made in the cover to pull out the wire and attach another of those cabin led lights (again 50 bucks) with 3M tape. Here's how it looks after installation
Mods, tweaks & upgrades for my Maruti Baleno Sigma-baleno-interior-cabin-led-29012020_5.jpg

Here's how it looks switched on. The colour has come out bluish in the photo but it is quite white to the naked eye.
Mods, tweaks & upgrades for my Maruti Baleno Sigma-baleno-interior-cabin-led-29012020_6.jpg

Now for the footwell lights please refer to the link that I have posted for details. Another wire was tapped to this boot/trunk light that we had just installed and the wire was pulled to the front through the side panels right upto behind the glove box. A separate switch was also added for the footwell light circuit so that I could switch them off if I did not want them on.These all lights, i.e. the interior cabin light, boot/trunk light and the 4 footwell lights work with the door switches and the dimming function also works perfectly with all of them as with the original interior cabin bulb. Here's a look of the rear footwell lights
Mods, tweaks & upgrades for my Maruti Baleno Sigma-baleno-interior-cabin-led-29012020_7.jpg

And the front footwell lights
Mods, tweaks & upgrades for my Maruti Baleno Sigma-baleno-interior-cabin-led-29012020_8.jpg

Here are the 3 additional switches installed for the Fog Light, DRL and the Footwell Light. The footwell and the DRL Light switches will be swapped with original Maruti Fog Lamp switches which I have ordered and are awaited. These make do the purpose in the meantime.
Mods, tweaks & upgrades for my Maruti Baleno Sigma-baleno-interior-cabin-led-29012020_9.jpg

cont... as 30 photo limit/post reached

Last edited by dkaile : 30th January 2020 at 18:22.
dkaile is offline   (37) Thanks
Old 7th February 2020, 12:00   #2
Senior - BHPian
 
dkaile's Avatar
 
Join Date: May 2011
Location: Meerut, India
Posts: 3,397
Thanked: 7,899 Times
Re: Maruti Baleno : Official Review

Further to my previous posts, got hold of the Maruti original Fog Light Switch and installed it myself -


The switch (300 bucks)

Mods, tweaks & upgrades for my Maruti Baleno Sigma-baleno-interior-cabin-led-07022020_1.jpg


Also got wire attachment terminals for seamless install (10 bucks each)
Mods, tweaks & upgrades for my Maruti Baleno Sigma-baleno-interior-cabin-led-07022020_2.jpg


The final install
Mods, tweaks & upgrades for my Maruti Baleno Sigma-baleno-interior-cabin-led-07022020_3.jpg


Cheers...
dkaile is offline   (28) Thanks
Old 9th February 2020, 10:31   #3
BHPian
 
puneetakhouri's Avatar
 
Join Date: May 2016
Location: MH03/JH01
Posts: 225
Thanked: 773 Times
Re: Maruti Baleno : Official Review

Quote:
Originally Posted by dkaile View Post
Also got wire attachment terminals for seamless install (10 bucks each)
..
I also purchased this fog lamp switch but boodmo did not send me a wire harness and now the local garage says he cant fit it without harness.

Where did you prepare the harness from? Also does the green light on the switch work?

Thanks
puneetakhouri is offline   (1) Thanks
Old 9th February 2020, 12:20   #4
Senior - BHPian
 
dkaile's Avatar
 
Join Date: May 2011
Location: Meerut, India
Posts: 3,397
Thanked: 7,899 Times
Re: Maruti Baleno : Official Review

Quote:
Originally Posted by puneetakhouri View Post
Where did you prepare the harness from? Also does the green light on the switch work?
I got the wire terminal attachments as shown in my previous post from the local spare parts shop for Rs. 10 each, so 5 terminal attachments for each of the 5 contact points on the switch, who also provided me the fog light switch (300/-). The on/off green light and also the ambient light in the switch works perfectly after wiring it properly. Kindly refer to the links provided in my previous posts for the exact wiring diagram of the switch.

Cheers...

Last edited by dkaile : 9th February 2020 at 12:21.
dkaile is offline   (7) Thanks
Old 11th February 2020, 12:16   #5
Senior - BHPian
 
dkaile's Avatar
 
Join Date: May 2011
Location: Meerut, India
Posts: 3,397
Thanked: 7,899 Times
Re: Maruti Baleno : Official Review

Quote:
Originally Posted by puneetakhouri View Post
Also does the green light on the switch work?
Here are some photos of the switch lights at night to show the working green light on the switch -


Here's with the ambient light on, the switches are in off position (which switches on with the ignition switch, in my case)
Mods, tweaks & upgrades for my Maruti Baleno Sigma-baleno-lighting-effect-10022020_1.jpg


With the switches in on position, the green light on the switches turns on
Mods, tweaks & upgrades for my Maruti Baleno Sigma-baleno-lighting-effect-10022020_2.jpg


-------------------


The night view of the LED's. With just the LED Parking Lights on and the DRL on
Mods, tweaks & upgrades for my Maruti Baleno Sigma-baleno-lighting-effect-10022020_3.jpg


With Parking on, DRL on and Fog Light on
Mods, tweaks & upgrades for my Maruti Baleno Sigma-baleno-lighting-effect-10022020_4.jpg


The Rear Lights on Parking on
Mods, tweaks & upgrades for my Maruti Baleno Sigma-baleno-lighting-effect-10022020_5.jpg


-------------------


LED Footwell Lights on - night view
Mods, tweaks & upgrades for my Maruti Baleno Sigma-baleno-lighting-effect-10022020_6.jpg


Boot Light on (works with the door switch with dimming effect, same as the footwell lights) - night view
Mods, tweaks & upgrades for my Maruti Baleno Sigma-baleno-lighting-effect-10022020_7.jpg


Cheers...
dkaile is offline   (20) Thanks
Old 19th February 2020, 22:27   #6
Senior - BHPian
 
dkaile's Avatar
 
Join Date: May 2011
Location: Meerut, India
Posts: 3,397
Thanked: 7,899 Times
Re: Maruti Baleno : Official Review

Fitting Steering Wheel Controls in Baleno Sigma

Got aftermarket Steering Wheels Controls fitted in my Baleno Sigma today. Costed me 3500/- bucks including original MGP Clock Spring and installation.

Here's how it looks after fitting. Absolute OE fitting
Mods, tweaks & upgrades for my Maruti Baleno Sigma-baleno-steering-controls-19022020_1.jpg

A closer look at the buttons. All the buttons work perfectly except the Cruise Control ones, the module for which is missing in this variant.
Mods, tweaks & upgrades for my Maruti Baleno Sigma-baleno-steering-controls-19022020_2.jpg

They are backlit and the back light work perfectly with the headlight switch.
Mods, tweaks & upgrades for my Maruti Baleno Sigma-baleno-steering-controls-19022020_3.jpg

A closer look at the night view with back lighting
Mods, tweaks & upgrades for my Maruti Baleno Sigma-baleno-steering-controls-19022020_4.jpg

Mods, tweaks & upgrades for my Maruti Baleno Sigma-baleno-steering-controls-19022020_5.jpg

A view while the fitting was being done
Mods, tweaks & upgrades for my Maruti Baleno Sigma-baleno-steering-controls-19022020_6.jpg

The original clock spring also needs to be be replaced with a new MGP original one with 6 pins. The further Key1, Key 2 and Key Earth wiring already exists which gets connected to the steering wheel control cable available with the JVC stereo. The buttons are working perfectly after programming with the JVC stereo and work with all stereos with steering wheel control module.
Mods, tweaks & upgrades for my Maruti Baleno Sigma-baleno-steering-controls-19022020_7.jpg

Here's the part number of the original clock spring required to be changed. This part is common also with the new Swift, in case anyone is interested.
Mods, tweaks & upgrades for my Maruti Baleno Sigma-baleno-steering-controls-19022020_8.jpg

Cheers...

Last edited by dkaile : 19th February 2020 at 22:28.
dkaile is offline   (31) Thanks
Old 21st February 2020, 09:41   #7
Senior - BHPian
 
dkaile's Avatar
 
Join Date: May 2011
Location: Meerut, India
Posts: 3,397
Thanked: 7,899 Times
Re: Maruti Baleno : Official Review

Quote:
Thank you. Can you tell me more about how you routed wires from ice to steering column, what about airbag modules, etc. How complex is the process? I am worried about messing the existing setup by giving it to wrong hands
As per PM received by me from members, I thought it would be better to reply here for the benefit of the entire community rather than on PM.

Carrying on from my previous post, the wiring from the ICE to the steering column already exists in the Baleno. Here is the OE ICE socket of the Baleno in which I have identified the Key 1 - Green (Input 1), Key 2 - White (Input 2) and Key Ground - Pink (Steering Remote Ground) wires -
Mods, tweaks & upgrades for my Maruti Baleno Sigma-baleno-steering-controls-19022020_9.jpg

These attach to the Steering Remote wiring of your Stereo. Here is the one that I got with the JVC stereo for reference -
Mods, tweaks & upgrades for my Maruti Baleno Sigma-baleno-steering-controls-19022020_11.jpg

Here are the total 3 connectors that need to be connected -
Mods, tweaks & upgrades for my Maruti Baleno Sigma-baleno-steering-controls-19022020_10.jpg

The process is not for layman but is not overtly complex either. It would be better to get it done from a trained professional who has done it before as the clock spring needs to be placed after proper rotation count otherwise it could break the contact points inside the clock spring and your horn could stop working. Also the airbag module needs to be removed carefully but it is a simple process of unclipping the airbag module connector (yellow).

This video might clarify to a small extent what was done though the professional does not show all the steps involved. I am in no way promoting this particular professional, though I got my steering wheel control fitted from him, and it is for reference only. This video is of Brezza but the process is nearly similar and the steering audio controls are exactly the same. However he has skipped 2-3 crucial steps in the video about the changing of the clock spring etc. -


The process involves -

1. Removing the 2 screws at the back of the steering wheel and then unclipping the plastic module that will be replaced with the one with the steering control buttons
2. Unclipping the airbag/horn module. There are 3 clips, 2 on the sides and one at the bottom. After that it just pops out.
3. Removing the wiring of the airbag module (yellow connector) and the horn
4. Removing the steering after removing the single nut holding it in place, taking care to mark the center point with a marker pen.
5. Unclipping all plastic cladding behind the steering to reveal the wiring connector (Steering to ICE) and the clock spring which needs to changed as detailed in my previous post.
6. The wiring connector (6x2 pin one) from the new steering control module may not fit exactly in the clock spring, as it happened in my case as the connector was for Brezza. So all the wiring pins were removed carefully by a pin removal tool and fitted back in the original connector which came with car. The original connector originally had only 1 wire for the horn earth and was connected to the 2 pin clock spring connector which was replaced with the 6 pin clock spring, as already mentioned. This is the most crucial step for OE fitment as this involves all the wires for the backlighting with the headlight switch and the Key1/2/Ground wires and the battery positive and negatives to supply power to the keys. No wires were cut at all and the total job was connector to connector.

7. The clock spring has 2 parts. And the 2nd part was carefully removed from the OE part and replaced in the new clock spring. It's all held by plastic clip ons. The rotation of the clock spring carefully noted and reset to the original and the horn was then checked after final fitting that it functions properly even after rotating the steering from one extreme to the other.
8. All steering parts were refitted back in the same order.
9. The 3 wires in the OE ICE connector were wire tapped into the JVC steering wheel wiring as shown above and programming was done from the stereo settings which is detailed in the manual and is a simple procedure.
10. 9 Buttons function perfectly except the cruise control ones, the module for which is missing in this version - volume up, volume down, mute, mode, track up and track down, phone receive and phone disconnect and the bluetooth button. The track up and down buttons have DUAL functionality and a single tap skips the track and holding it down functions as fast forward/reverse. I have programmed the bluetooth button to Voice Command. You can also program it to function as the Play/Pause button, if required.

No original wiring was messed up as the installer was an expert and the airbag module functions perfectly as no air bag errors were received on the warning lights. Hope that clarifies. I would suggest people to get it professionally installed only from experienced installer in your area. I have also shared this information with a local installer in Meerut who has since started installing it locally here also as the parts are already available in Delhi market from China.

Cheers...

Last edited by dkaile : 21st February 2020 at 10:03.
dkaile is offline   (23) Thanks
Old 24th February 2020, 15:15   #8
Senior - BHPian
 
dkaile's Avatar
 
Join Date: May 2011
Location: Meerut, India
Posts: 3,397
Thanked: 7,899 Times
Re: Maruti Baleno : Official Review

How to boost Radio Signal reception in your Baleno with aftermarket Stereo
or How to wire up your antenna signal wires properly in any car.

So after installing the JVC Kenwood stereo in my Baleno Sigma, I was quite disappointed with the radio quality signal in my city Meerut vis-à-vis my Skoda Superb for example. It used to improve whenever I traveled to Delhi but outside the city or in my home town, it was pathetic. So after researching a bit I came to know that all VW group cars (or any good car for that matter) use a antenna signal booster which supplies 12V current to the antenna circuit and amplifies the signal.

So I opened up the stereo to discover whether the same existed in our Maruti and voila it does. Here is the view of the OE MGP antenna wiring socket which is connected to a adapter which connects to your stereo -
Mods, tweaks & upgrades for my Maruti Baleno Sigma-baleno-radio-antenna-boost_1.jpg

As you will see in this detailed shot, the adapter from the antenna socket has 2 wires coming out, one is BLACK with the antenna socket which gets connected to the antenna socket of your stereo and the second wire is the BLUE one which is supposed to supply 12V current to the antenna signal amplification circuit. Now this wire was WRONGLY connected to the Blue wire of the Suzuki Stereo Harness adapter which in fact is NOT further connected to any wire coming from the OE wiring harness. This Blue wire is actually supposed to be connected to the 12V supply Blue Wire named as Antenna Control in most aftermarket stereos, as has been now done -
Mods, tweaks & upgrades for my Maruti Baleno Sigma-baleno-radio-antenna-boost_2.jpg

And voila, all the stations which were not receiving signal outside the city, immediately start getting crystal clear reception -
Mods, tweaks & upgrades for my Maruti Baleno Sigma-baleno-radio-antenna-boost_3.jpg

I also thought of installing this Shark Fin antenna from ER which I got for 350 bucks. But it does not yield any improvement over the original signal and I also did not like the way it looks on the car. Maybe will think about it after getting it painted with OE color paint at a later date. Here is how it looks -
Mods, tweaks & upgrades for my Maruti Baleno Sigma-er-shark-fin-antenna_1.jpg

Mods, tweaks & upgrades for my Maruti Baleno Sigma-er-shark-fin-antenna_2.jpg

Cheers for now...
dkaile is offline   (20) Thanks
Old 25th February 2020, 00:46   #9
Newbie
 
Thunder70's Avatar
 
Join Date: Jan 2020
Location: TN/KL08
Posts: 22
Thanked: 24 Times
Re: Maruti Baleno : Official Review

Appreciate your hard work. Please post a picture after installing it on car.
Thunder70 is offline  
Old 28th February 2020, 10:33   #10
Senior - BHPian
 
dkaile's Avatar
 
Join Date: May 2011
Location: Meerut, India
Posts: 3,397
Thanked: 7,899 Times
Re: Maruti Baleno : Official Review

I am reading so many conflicting things about not upgrading to LED's etc., so I wanted to post my experience here. LED's are the future. My Ninja 1000 comes with full LED headlights from the factory and I absolutely love them. I was a bit apprehensive reading the experience of various forums to upgrading to LEDs from Halogens due to the beam pattern etc. But after doing do and having driven with them a few 100 kms, I would like to inform my compatriots that it really is a no brainer. The Philips LED bulbs that I have used is already posted in my previous posts.

Headlights OFF
Mods, tweaks & upgrades for my Maruti Baleno Sigma-baleno-headlights-led-27022019_1.jpg

LED Low Beam
Mods, tweaks & upgrades for my Maruti Baleno Sigma-baleno-headlights-led-27022019_2.jpg

LED High Beam
Mods, tweaks & upgrades for my Maruti Baleno Sigma-baleno-headlights-led-27022019_3.jpg

Notice the difference of the light pattern on the scooter ahead. So I suggest people to upgrade to LED's without apprehension just keeping in mind to go for good quality LED bulbs.

Cheers...
dkaile is offline   (15) Thanks
Old 28th February 2020, 10:52   #11
BHPian
 
Dieselritzer's Avatar
 
Join Date: Jul 2012
Location: Mumbai
Posts: 583
Thanked: 1,416 Times
Re: Maruti Baleno : Official Review

Hey can you share the process of doing it? Also, top end Baleno comes with factory fitted LED, is my understanding right?
Dieselritzer is offline  
Old 28th February 2020, 11:28   #12
Senior - BHPian
 
dkaile's Avatar
 
Join Date: May 2011
Location: Meerut, India
Posts: 3,397
Thanked: 7,899 Times

Quote:
Originally Posted by Dieselritzer View Post
Hey can you share the process of doing it? Also, top end Baleno comes with factory fitted LED, is my understanding right?
It's a simple plug and play method, photos of which I have detailed in my previous posts. You just plug out the old bulb and plug in the new taking care to spread the heat sinks attached to the LEDs. The ballast is zip tied to the wiring outside. All the variants of the Baleno except the base one, now come with LEDs.
dkaile is offline   (2) Thanks
Old 28th February 2020, 17:52   #13
GTO
Team-BHP Support
 
GTO's Avatar
 
Join Date: Feb 2004
Location: Bombay
Posts: 70,512
Thanked: 300,693 Times
Re: Mods, tweaks & upgrades for my Maruti Baleno Sigma

Super helpful, dkaile ! Thanks for sharing. Moving your posts to a new thread & will add to our homepage.
GTO is offline   (4) Thanks
Old 2nd March 2020, 10:17   #14
Distinguished - BHPian
 
Reinhard's Avatar
 
Join Date: Nov 2010
Location: Pune
Posts: 4,854
Thanked: 17,731 Times
Re: Mods, tweaks & upgrades for my Maruti Baleno Sigma

Excellent mods & DIYs dkaile! Nice results. I had seen these in your posts elsewhere on different threads.

Its good that you compiled these all into a single thread. A nice master-thread for all Baleno mods. Fantastic really. That's one well kitted Baleno indeed.
Reinhard is offline   (3) Thanks
Old 7th March 2020, 10:14   #15
BHPian
 
ashish2135's Avatar
 
Join Date: Sep 2014
Location: Jamshedpur
Posts: 132
Thanked: 514 Times
Re: Mods, tweaks & upgrades for my Maruti Baleno Sigma

Quote:
Originally Posted by dkaile View Post
It's a simple plug and play method, photos of which I have detailed in my previous posts. You just plug out the old bulb and plug in the new taking care to spread the heat sinks attached to the LEDs. The ballast is zip tied to the wiring outside. All the variants of the Baleno except the base one, now come with LEDs.
Thank you so much for sharing your experience and the reassurance of using LEDs. Just ordered the same set of Philips bulbs for my Baleno Zeta (pre-facelift).
Will install them soon.

ashish2135 is offline   (2) Thanks
Reply

Most Viewed


Copyright ©2000 - 2024, Team-BHP.com
Proudly powered by E2E Networks