| |||||||

| Search Forums |
| Advanced Search |
| Go to Page... |
 |
| Search this Thread |  66,439 views |
 2nd July 2019, 22:13
| #1 |
| BHPian Join Date: Mar 2019 Location: Pune, Bangalore
Posts: 109
Thanked: 642 Times
| When you can't afford that Tiger, you build one! My (Modified) Mahindra Mojo Hellooooo Team BHP!  It feels good to be here. A little bit about me before we get down to what the title promises. I am a Design Engineer by profession and a petrolhead by heart. I have been an automobile aficionado since as far as I can remember with my earliest memories running around the house with a plate in hand, making sounds of horns blaring and tyres screeching. I was born and brought up in the UAE. Grew up gawking and drooling at the insane automotive scene over there. Moved to Bangalore to pursue my B.E. Returning to India was a slap in the face. The roads, the cars, the dynamics! They were so different! I have lost all interest in cars since moving back to India. Luckily though, that affection has found its place in contraptions having two wheels lesser. The bikes I have owned till now - - 2011 Honda Unicorn Dazzler - 2016 TVS Apache RTR 200 The Dazzler was a stop gap measure to navigate the notorious ORR traffic in Bangalore. It was a no frills daily commuter which returned 55-60 kmpl on my daily office commute (~50km) . Suffice to say, it did it's job.  Smooth drivetrain, good looks, comfortable seats and great mileage! The perfect commuter! I covered roughly 6000km on it before I had to let it go once I got transferred to Pune. In Pune, with a daily commute of less than 5 km, there really was no need of a bike. But monsoons in Pune are addictive. The need wasn't there, but the 'want' definitely was. Fortunately, around the same time, there was an offer on OLX for a less than a year old RTR 200 going at around 60% of the OTR price. The owner was going on-site and wanted to sell it within a week. Checked out the bike in person. Loved it. Bought it.  Took to the curves like a ballerina takes to the stage. The RTR was a hoot to ride. A perfectly balanced chassis. Vibration free motor. And a bassy exhaust note. The only downsides were the stock MRF rubber and the lack of grunt at the low end. The latter in particular was very evident when going two up up the twisty ghats. I took it to most spots around Pune. There was also a trip to Mumbai and another one to Kashid. The bike never disappointed. It was with me for 5 months and 3500 km. Just when I thought this thing is a keeper, the Mojo came calling! Last edited by AlQuazi : 5th July 2019 at 20:11. |

|  (22)
Thanks (22)
Thanks
 |
| The following 22 BHPians Thank AlQuazi for this useful post: | amit_purohit20, aveoman19, bblost, CliffHanger, CrAzY dRiVeR, Cyborg, dailydriver, digitalnirvana, GTO, GutsyGibbon, LoneRidder, neil.jericho, Rehaan, Roy.S, Skyline_GT, Slick, theexperthand, The_Outsider!, timuseravan, Turbojc, vaish9925, wolg |
| |
|
3rd July 2019, 13:25
| #2 |
| BHPian Join Date: Mar 2019 Location: Pune, Bangalore
Posts: 109
Thanked: 642 Times
| Some teasers before we get into the main course!   A Mahindra you say? On two wheels?  When did this monstrosity happen? The backstory : The Mojo broke cover in 2015. It immediately polarized opinions with the way it looked. I for one, liked them. The owl eyes, the dual silencers, the ergonomics and the fact that it was being marketed as the go-anywhere vehicle had me hooked then and there. It had the big bike feel! It had character! (Take out the dB killers and the character just amplified multifold  ). ).However, there was no way I was going to plonk 2 Lakh+ on a bike. Not while still in college. So it remained a dream. The dismal sales meant spotting one was akin to spotting a UFO. This made the product all the more appealing. Fast forward to November 2017 - On a trip to Bangalore, a friend tells me his uncle wants to sell his Mojo in Bangalore. Its a 2016 model with 8k on the odo. The asking price was 1.35 Lakhs. But knowing my fascination for the bike, I could have it for much lesser. I quote my rate, he agrees, I take a long long test ride (read Nandi Hills) and just like that, I now own a Mojo!  Pretty sure I was more wide eyed than this when the deal went through  Hello Mojo! This was again an impulse buy. However, I still had the RTR 200 with me in Pune. As long as I had one bike, I wasn't allowed to bring another one in. For the next month or two, till I could find a buyer for the RTR, the Mojo remained parked at my brother's place in Bangalore with me in Pune. In the end, I sold the RTR back to the same guy I had bought it from.  The day the RTR was off my hands, I was back in Bangalore. This time with the intention of riding all the way to Pune. Up until now, the maximum distance I had covered in a day by bike had been some 350 odd kilometres. This was going to be more than double that! There was no option of splitting the trip over two days due to lack of leaves. The distance had to be covered in a day. So off we set. 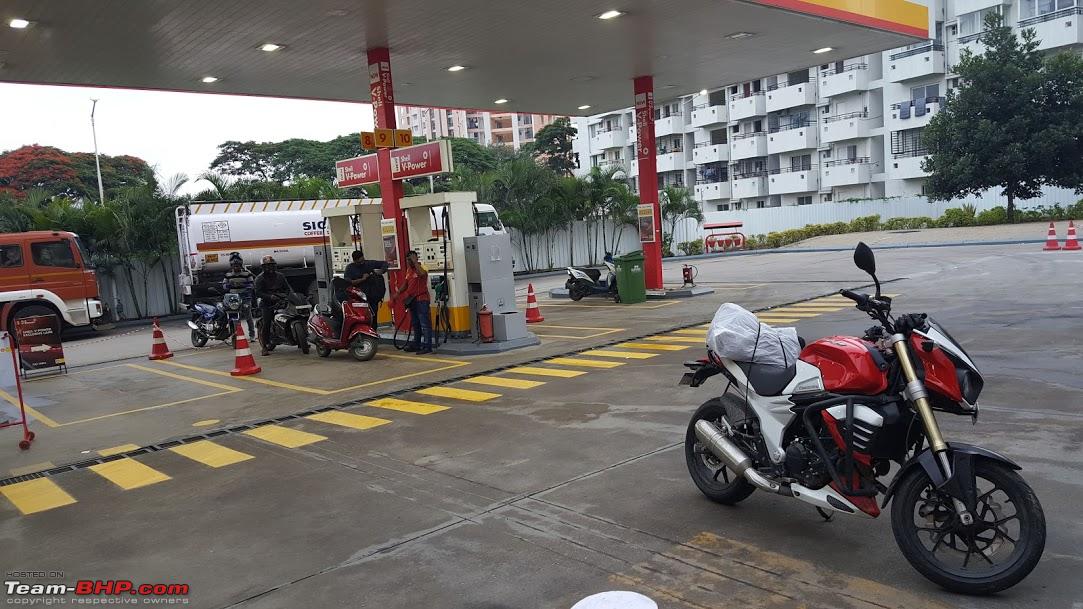 Started from Shell, Yeshwanthpur at 6:30 AM.  With clouds and wind mills for company  A scenic road.. 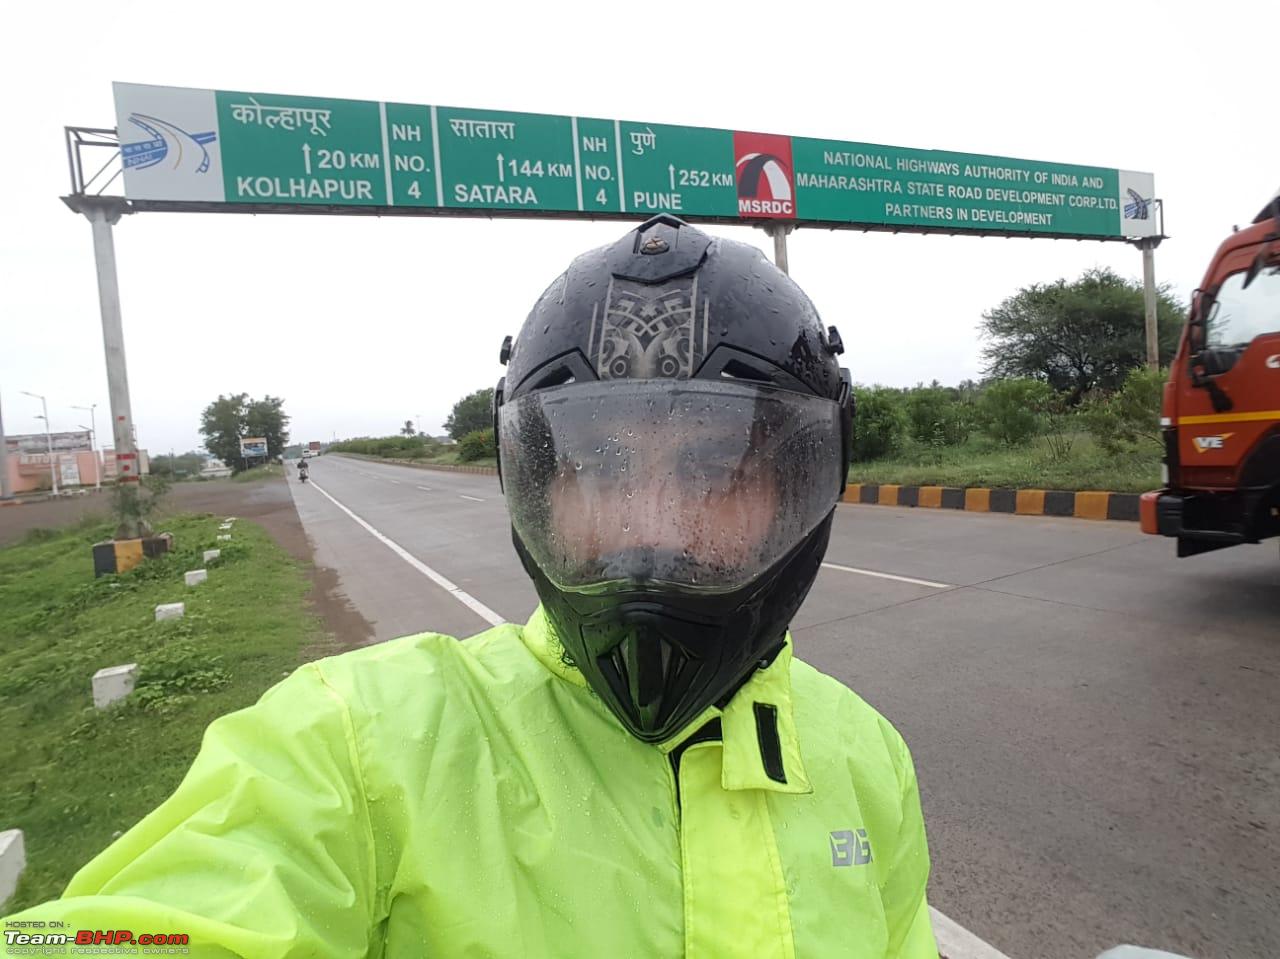 Intermittent rain.. 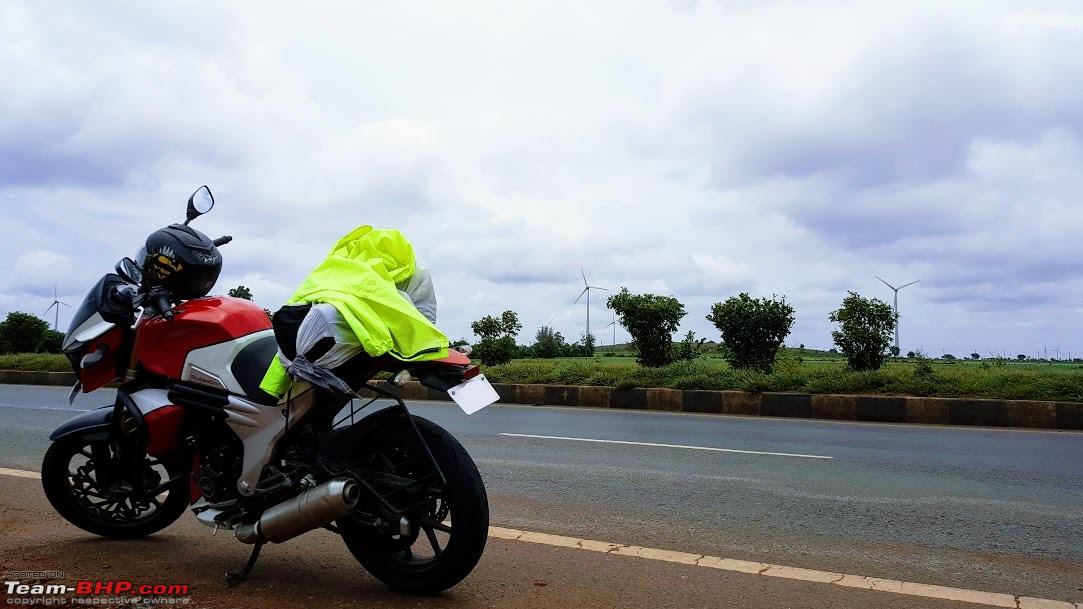 And #theUltimateTouringMachine  Ended at Wakad, Pune at 9 PM. 14 Hours. 850 km. Absolutely zero fatigue! I was pumped! When I first test rode the Mojo, I had doubts whether my obsession with it was misplaced. The bike was heavy. Its handling characteristics were borderline lethargic. Cornering clearance was a joke. It felt completely out of place in the twisties of Nandi Hills. Yes, the engine pulled like a locomotive. The drivetrain was extremely smooth with arguably among the best suspension on Indian roads. But one question kept nagging me. Would this really be as easy to live with as the Unicorn or RTR on a daily basis? All the questions and doubts were quashed at the end of this marathon run. This bike, was built for the highways. It would just go on and on and on. I did speeds of 110+ all day with occasional WOT bursts to go faster at times. The bike never complained. Stable as a rock even in bad crosswinds. The suspension was like riding a plush sofa on wheels. All this meant that I was completely fresh even after reaching my destination. The upright seating, the well damped suspension, the vibe free motor and the perfectly padded seat all came together to ensure a completely fatigue free experience. At the end of this ride, I realized two things - This bike is a keeper. It ain't going nowhere! And, It is going to take me places I have only ever dreamed of! Last edited by Rehaan : 11th July 2019 at 16:10. Reason: 2 Smilies per post / Updating post as per our rules. |
|
| (33)
Thanks
|
| The following 33 BHPians Thank AlQuazi for this useful post: | Akib Khan, aman9393, amit_purohit20, aveoman19, bblost, CliffHanger, condor, CrAzY dRiVeR, Cyborg, dailydriver, digitalnirvana, GTO, gunin, GutsyGibbon, Haroon, klgiridhar, neil.jericho, Night_Fury, PapaKiloSierra9, Rebelogue, Rehaan, Roy.S, Skyline_GT, smuniswami, swiftnfurious, tchsvy, theexperthand, TheHelix0202, The_Outsider!, timuseravan, TSIboy, Turbojc, vaish9925 |
|
3rd July 2019, 22:58
| #3 |
| BHPian Join Date: Mar 2019 Location: Pune, Bangalore
Posts: 109
Thanked: 642 Times
| With the back story out of the way, let's get into the finer details. What I liked about the Mojo - - The quirky looks. Twin pod headlamps with the eyebrow DRLs look unique. What I did not like about the Mojo - In stock form, the Mojo is a one trick pony. It eats up highways and does it exceptionally well. This bike is the answer to all your touring needs. Bad roads, no roads, highways, potholes. They are all dealt with without a sweat.- The handling. Did I mention how this thing is built like a tank? It also handles like one. As a daily ride in the urban jungle though, it is out of it's element. The heavy handle, long rake and big dimensions don't encourage you to zip through traffic. The fueling is not right at lower engine speeds while the gearing setup requires lots of shifting in bumper to bumper traffic. This vehicle was going to be my daily commuter as well as touring companion. While there was no doubt on it's highway capabilities, the fact remained that for 5 days of the week, it would have to deal with regular Hinjewadi traffic. In stock form, it just wouldn't cut it. So I began looking at all the possible mods that could be done to make this behemoth easier to live with on a daily basis. Over the next couple of months, I began making changes to customize the bike to my tastes. The primary focus was on improving the handling, the headlights and the pillion seat. I also decided on installing saddle stays and a top rack. These would definitely come in handy during the weekly grocery runs as well as the occasional tours. Last edited by AlQuazi : 9th July 2019 at 15:57. |
|
| (21)
Thanks
|
| The following 21 BHPians Thank AlQuazi for this useful post: | Akib Khan, aman9393, Balaji31582, CliffHanger, CrAzY dRiVeR, dailydriver, digitalnirvana, GTO, gunin, Ironhide, mh09ad5578, neil.jericho, Rebelogue, Rehaan, Roy.S, Slick, swiftnfurious, tchsvy, theexperthand, The_Outsider!, vaish9925 |
|
4th July 2019, 08:56
| #4 |
| BHPian Join Date: Mar 2019 Location: Pune, Bangalore
Posts: 109
Thanked: 642 Times
| THE BUILD My first priority was to make the handlebar lighter. I kid you not! That huge headlamp cluster weighs in at a whopping 5 kilos! That, coupled with the long-ish rake and the added weight of the USDs makes the steering extremely lethargic. There were a couple of ways one could make the steering feel less of a chore. The simplest was to use handlebar raisers. These would allow you increased leverage and in turn make U turns and impromptu pothole maneouvres easier. A colleague had installed handlebar raisers sourced from Lluvia.in on his Mojo and let me have a test ride. The difference was noticable. The handle was now more manageable. However, the headlamp's weight still remained. 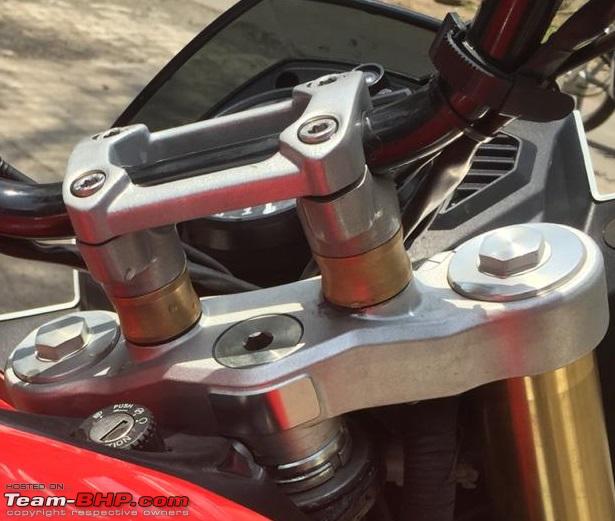 The gold finish made the risers look at home with the rest of the bike. The second option was to replace the headlamp cluster with a simpler rounded headlamp setup. In fact, this was a pretty popular mod within the Mojo Tribe (yes, we call ourselves that!). One of the dealers in Bangalore had fabricated a special bracket to hide the wiring and mount the round headlamp to it. This, coupled with the RE Himalayan visor completely changed the look as well as feel of the vehicle. Some fine examples of this mod, sourced from the respective owners - 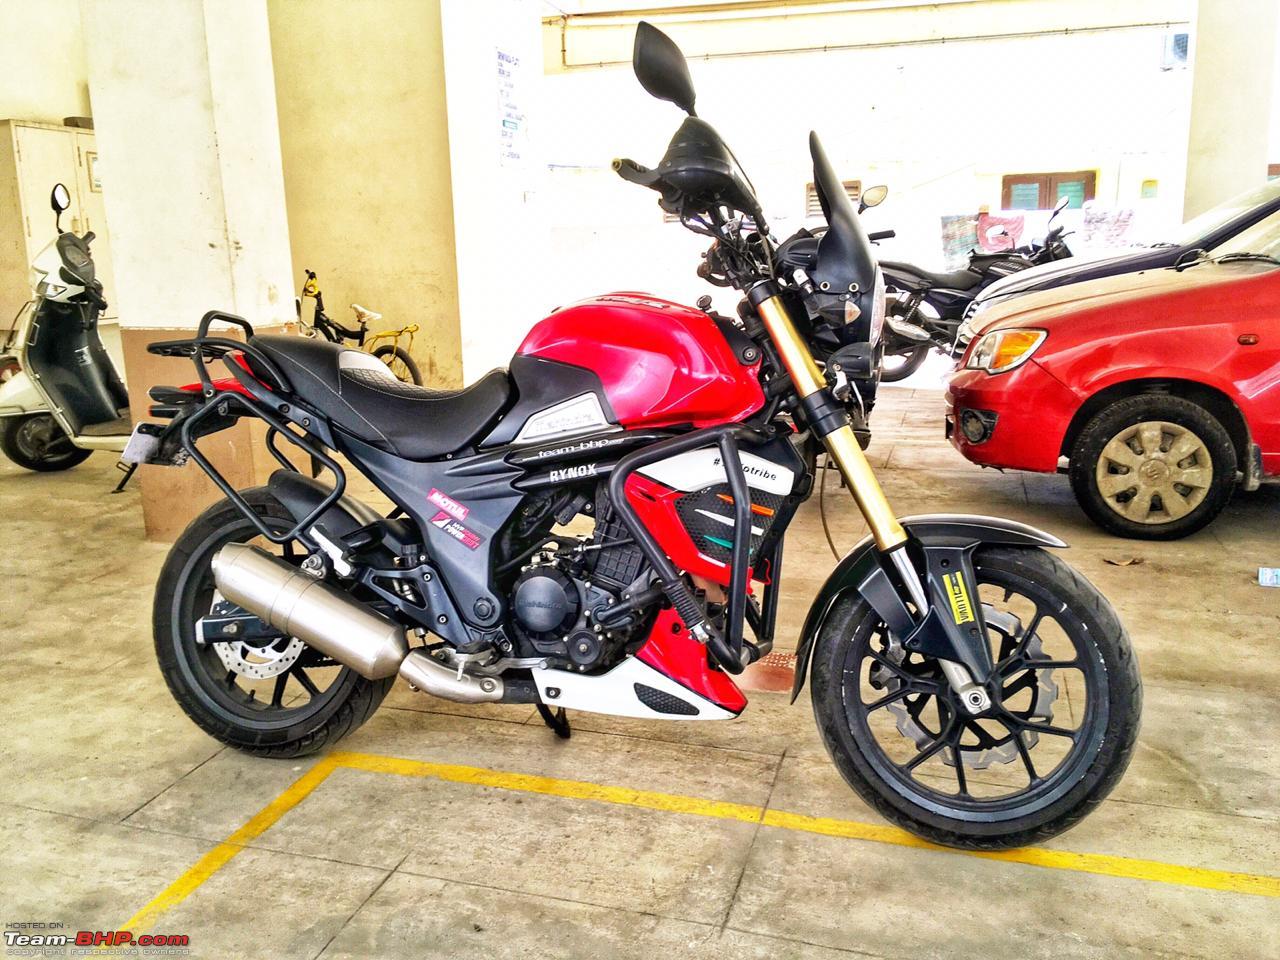 Round Headlamp, the REH Visor and so much more! 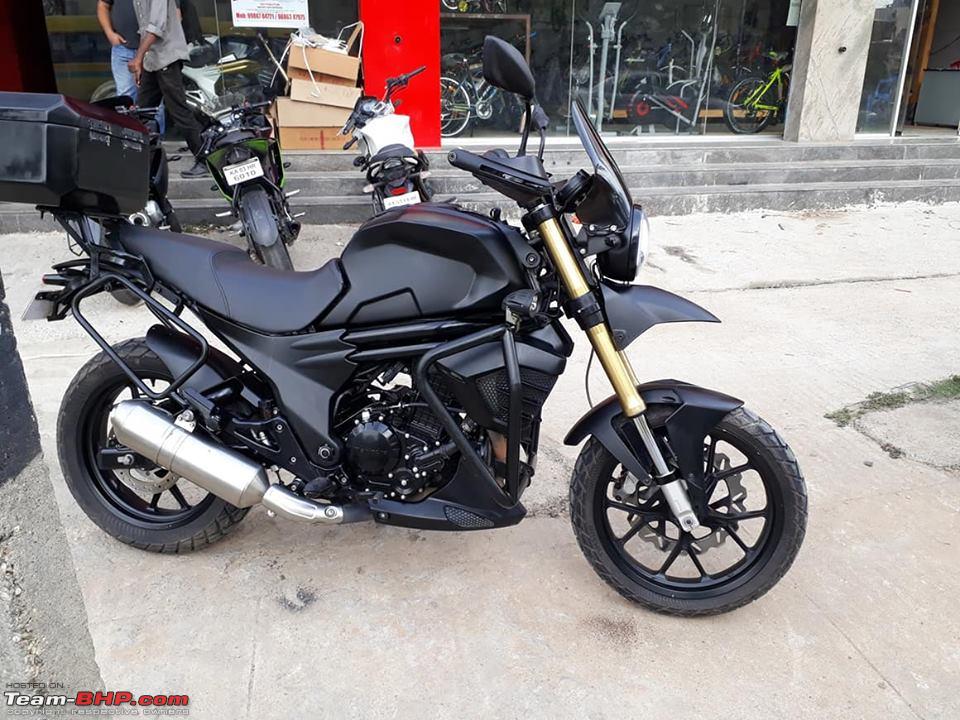 The same treatment, this time with a custom paintjob and a beak.  Spot the difference! I was skeptical about this mod. While this would certainly make the vehicle more agile, wouldn't the loss of weight inversely affect the straight line stability? One of the primary reasons for this stability was the weight concentration up front. With the headlamp removed, it would require comparatively more effort to maintain the straight line when doing triple digit speeds during crosswinds. Also, the stock headlamp assembly made the vehicle stick out from everything else on the road. With this mod, the bike would blend in which is definitely not what I wanted.  Was there a way to keep the stock assembly and yet make the steering independent of it's weight? A custom bracket maybe? To shift the headlamp forward and make it independent of the handlebar's rotation?  Something like this? So, one fine weekend, I opened up the headlight assembly in my apartment basement with the following objectives: - Experience firsthand the handling without the headlamp's weight.  Headless! Where's your Mojo now? I took a couple of rounds of the apartment parking with the 'head' detached. The difference was stark! The tank-like handling was gone. The bike was definitely more nimble. I also used the opportunity to determine the mounting points of the potential bracket. I could use the mounting points of the tank with the chassis to support the bracket on one end. This bracket would go between the fork tubes so as not to disturb their rotation. At the other end, the headlamp cluster would be mounted.  So I modelled the exisitng setup on CAD and designed a 3 piece bracket to go between the forks.  And got it fabricated The mounting then started. Required some cutting and fiddling around. But then it finally fit!  A weekend well spent! The result? The bike had transformed. It was more agile and nimble. I did not hesitate to zip through traffic anymore. My speeds over bad roads, corners, no roads all increased. Leaning into curves became easier making the ghats more fun! (The cornering clearance was still a joke though.) Suffice to say, there was no way I was going back to the stock setup now. I had tasted blood! Only one problem though. This setup took an already polarizing design and made it uglier! “ Looks like a vulture with that extended neck!” “More rooster than vulture I think.” "This has to be the ugliest bike I've ever seen." The negative comments withstanding, a lot of testing, multiple iterations and loads of terrible photos followed. 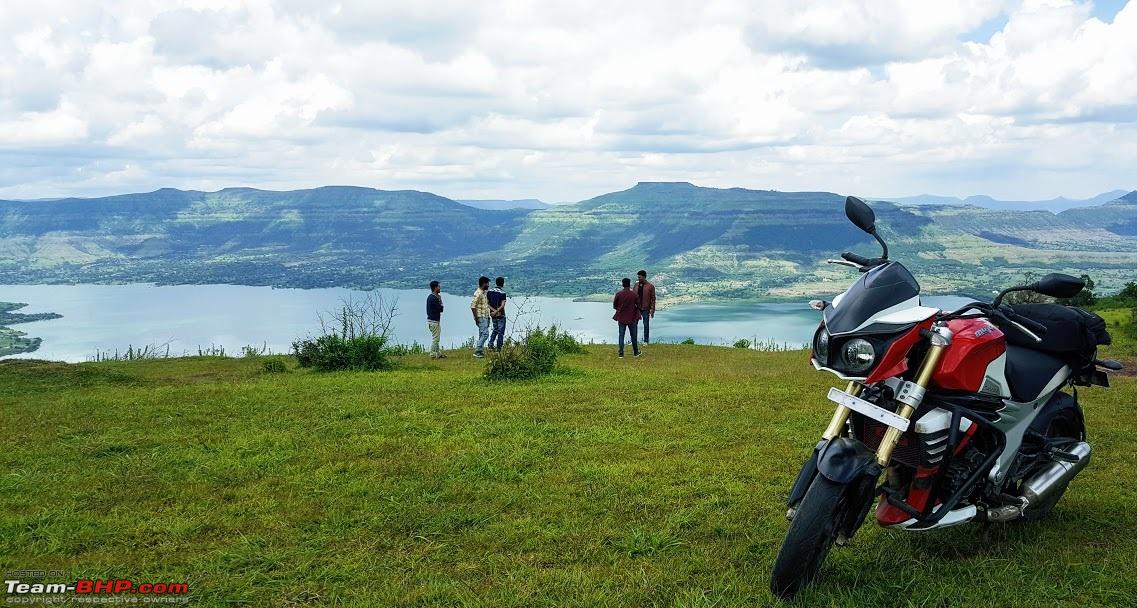 At Kaas Plateau..  Enroute Lavasa. Trying to find that least awkward angle.  A new number plate bracket to reduce some of the ugliness! More terrible photos followed.. 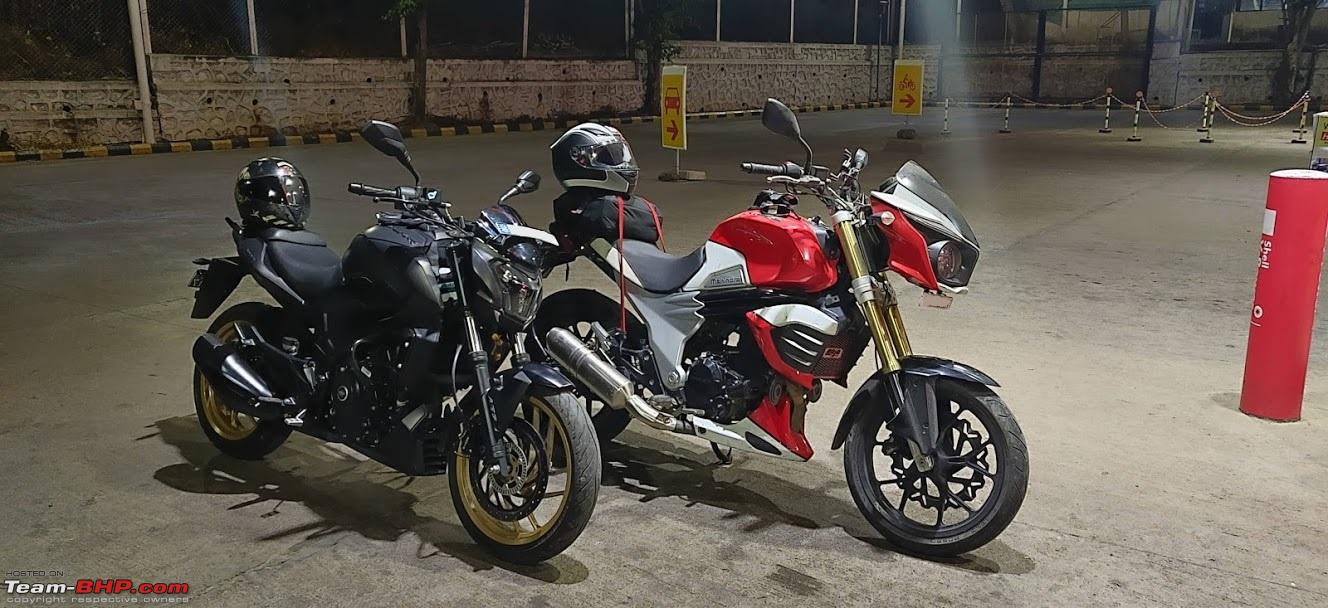 Sizing up the competition! I could eat you for breakfast bro! 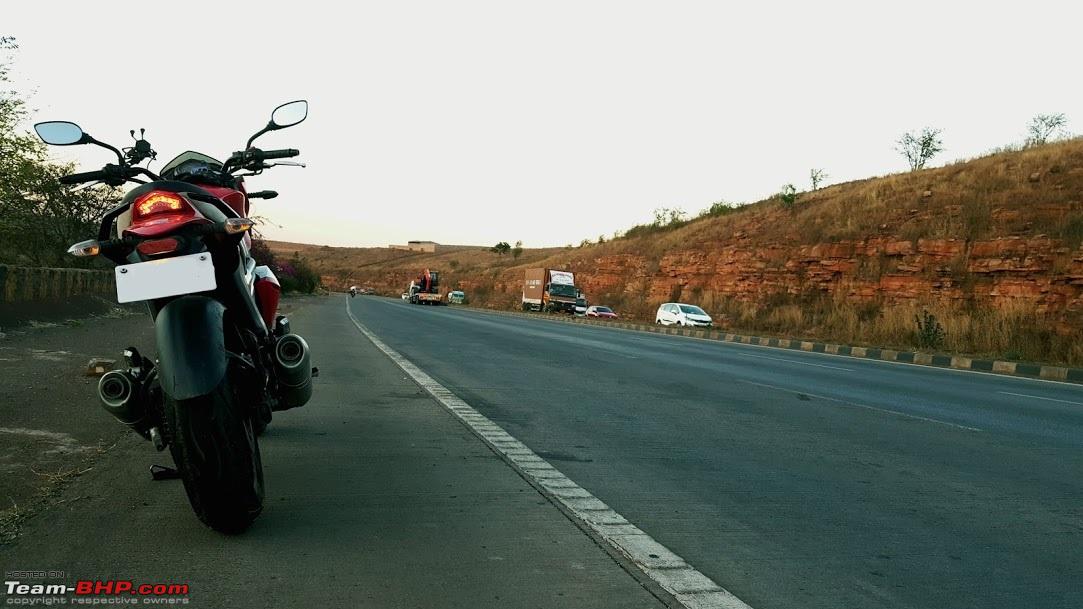 Nippani Ghat. This has to be the least awkward angle! The brackets had been tested for well over 2000 km over all sorts of roads. They did their job. However, there was no denying the fact that the bike looked ugly. No amount of clever photography was ever going to hide that gap around the handlebar. Something had to be done. A fairing had to built! Last edited by AlQuazi : 4th July 2019 at 17:07. |
|
| (37)
Thanks
|
| The following 37 BHPians Thank AlQuazi for this useful post: | aman9393, amit_purohit20, Balaji31582, Bee, CliffHanger, condor, CrAzY dRiVeR, Cyborg, Deepsp, Enobarbus, GTO, Ironhide, keroo1099, klgiridhar, K_Drive, mh09ad5578, narayan, neil.jericho, Night_Fury, PapaKiloSierra9, Rehaan, Roy.S, shyamg28, Skyline_GT, sukiwa, swiftnfurious, tchsvy, The Rationalist, theexperthand, TheHelix0202, The_Outsider!, timuseravan, Turbanator, Turbojc, vaasu, vaish9925, VijayAnand1 |
|
4th July 2019, 17:40
| #5 |
| BHPian Join Date: Mar 2019 Location: Pune, Bangalore
Posts: 109
Thanked: 642 Times
| THE FAIRING The plan to build the fairing was pretty straightforward.
Pretty simple, eh? Problem was, I had absolutely zero experience with any of this. But I was determined. I also had the Youtube university to back me up. Afterall, how hard could it really be? So I started with a bunch of amatuerish Sketchbook doodles. 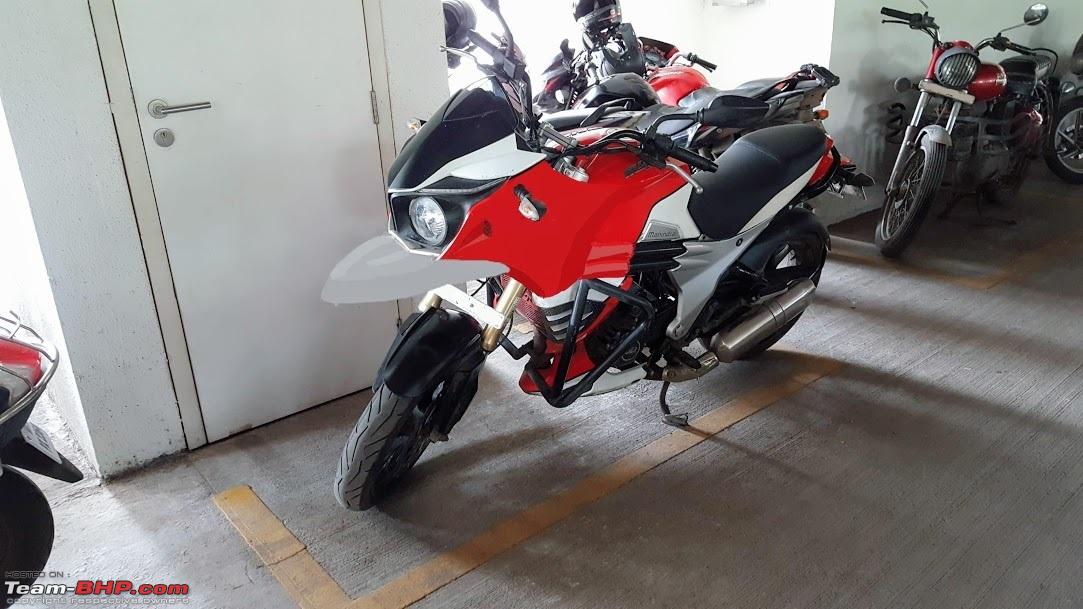 Beak? Or, 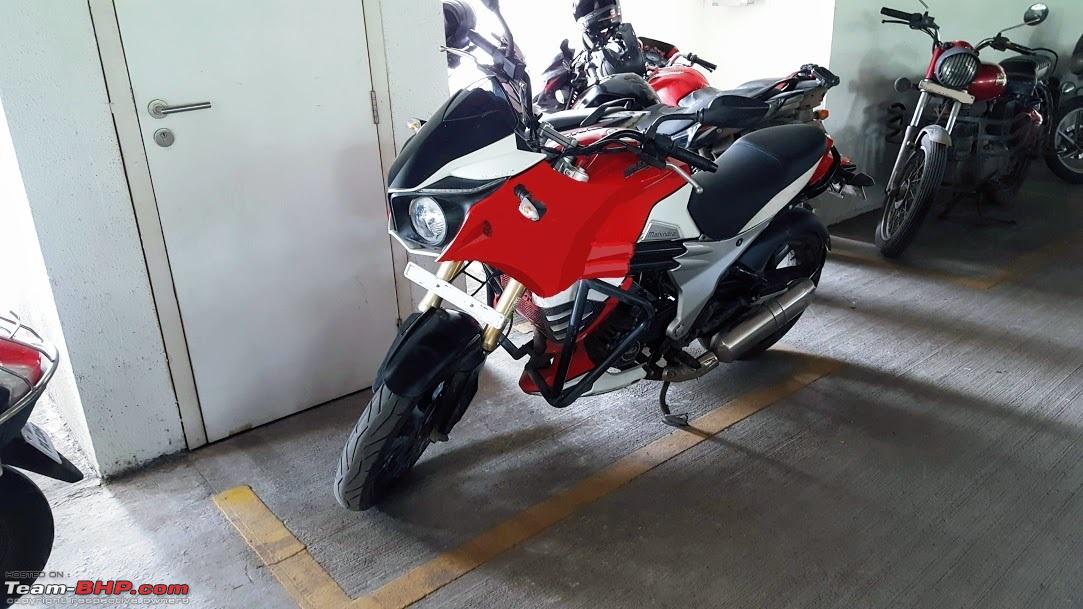 No Beak? Also made a less amateur version, once I got the hang of the app.  Oo La la! Now that a vague template was in mind, it was time to get the hands dirty. 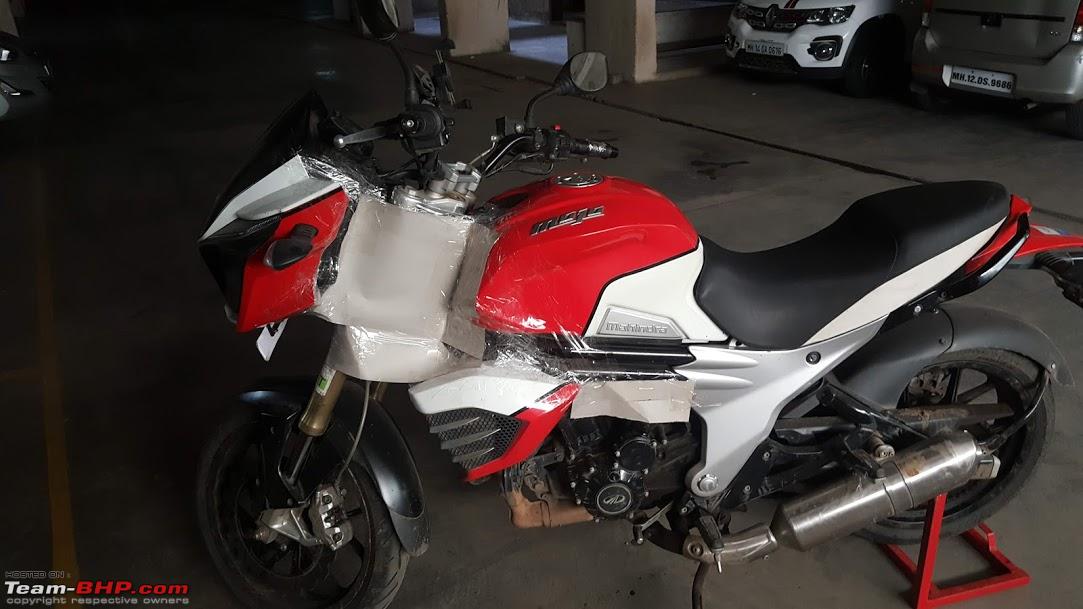 So I got him all taped up! 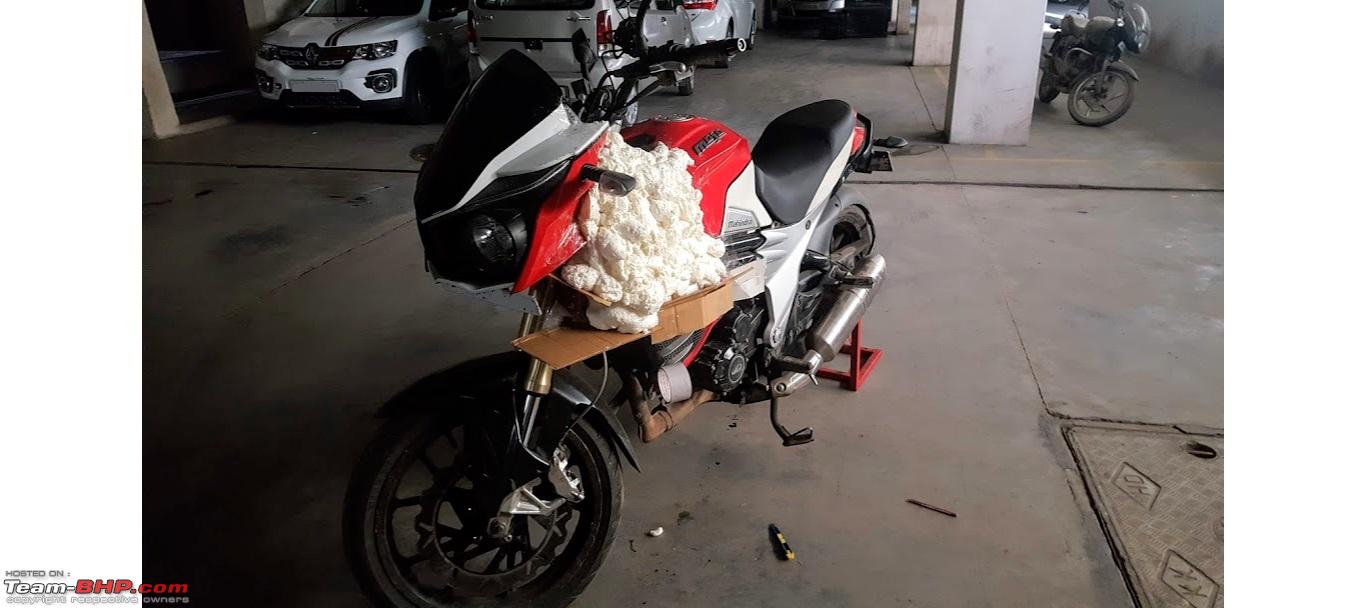 And went Bazooka with the styrofoam! 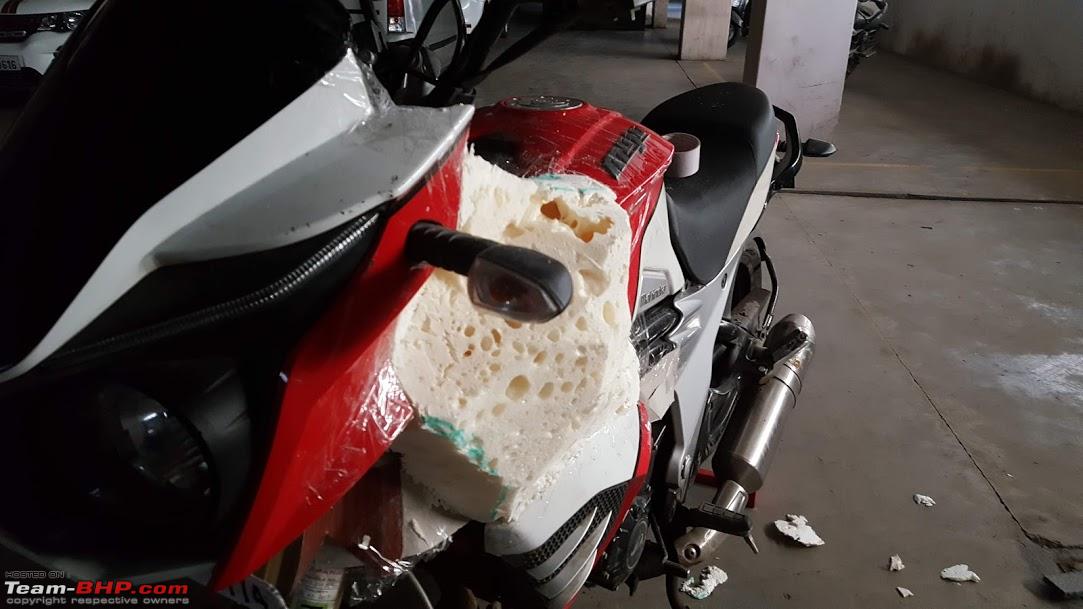 And got cutting and sanding! (Felt a lot like the shawarma guy doing this  ) ) More cutting and sanding followed!  And more, 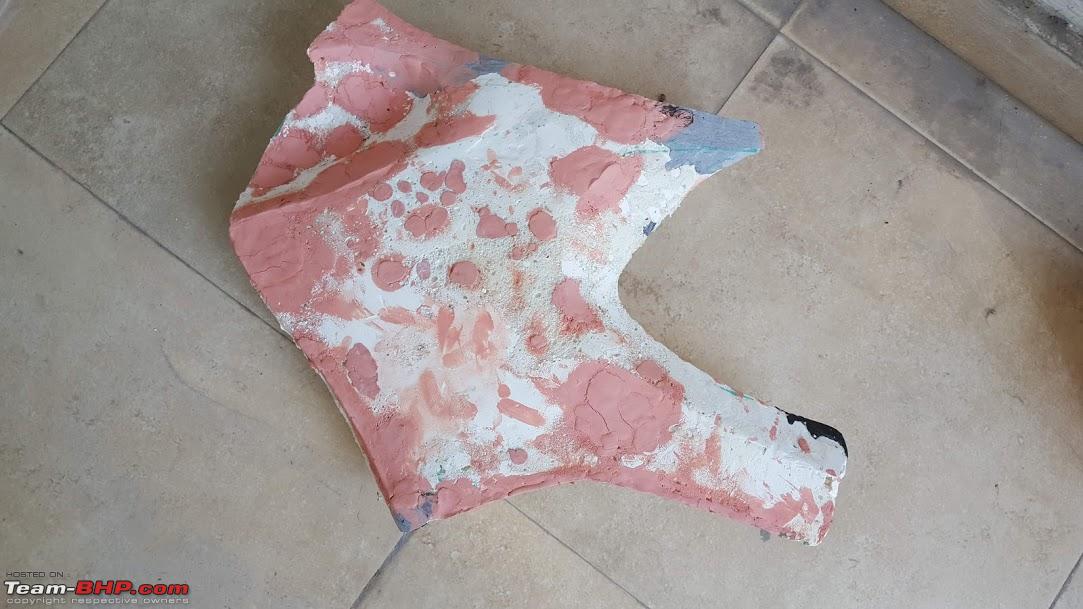 Clay, resin and putty, all were thrown in. After multiple iterations of sanding and finishing that lasted upto an entire month, I had had it! I realized I was completely clueless. I would never be able to achieve the required finish even if I kept going at it forever. Sigh! It was time to call the cavalry. I needed a professional who had worked with patterns and fiberglass molds. I began calling up vendors and custom shops around Pune. Surprise! Surprise! Nobody wants to touch the Mojo. Simply not worth the investment. Nobody buys this bike bro! Yeah well, their loss. The few actual guys who agreed, quoted insane prices. After an entire month of calling people up and getting rejected, I contacted 'Ground Designs' in Akurdi. They had done some classy mods on Thars and also a number of bike restorations. I spoke with the owner. Showed him the bike and my doodles. He agreed to take it up and the rate he quoted was fine with me. So I dropped the bike over. He took about a week to finalize the design and work on the pattern was started. We used MDF block around 12 mm thick which was then cut into shape and attached together using putty. Finishing was then done on the same to obtain a stepped look.  Its taking shape. Slowly, but surely! 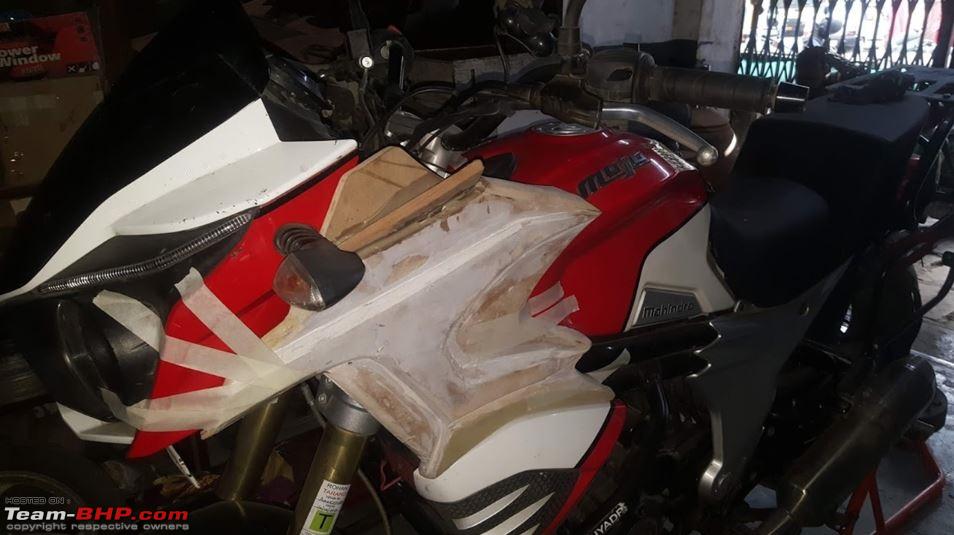 Still a long way to go though! 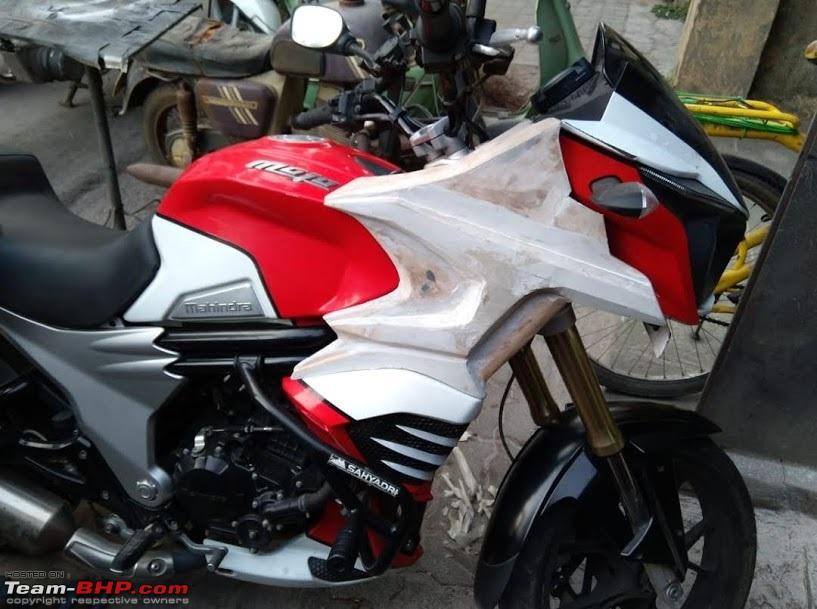 During one of the numerous attach and remove cycles to obtain that snug fit and finish. 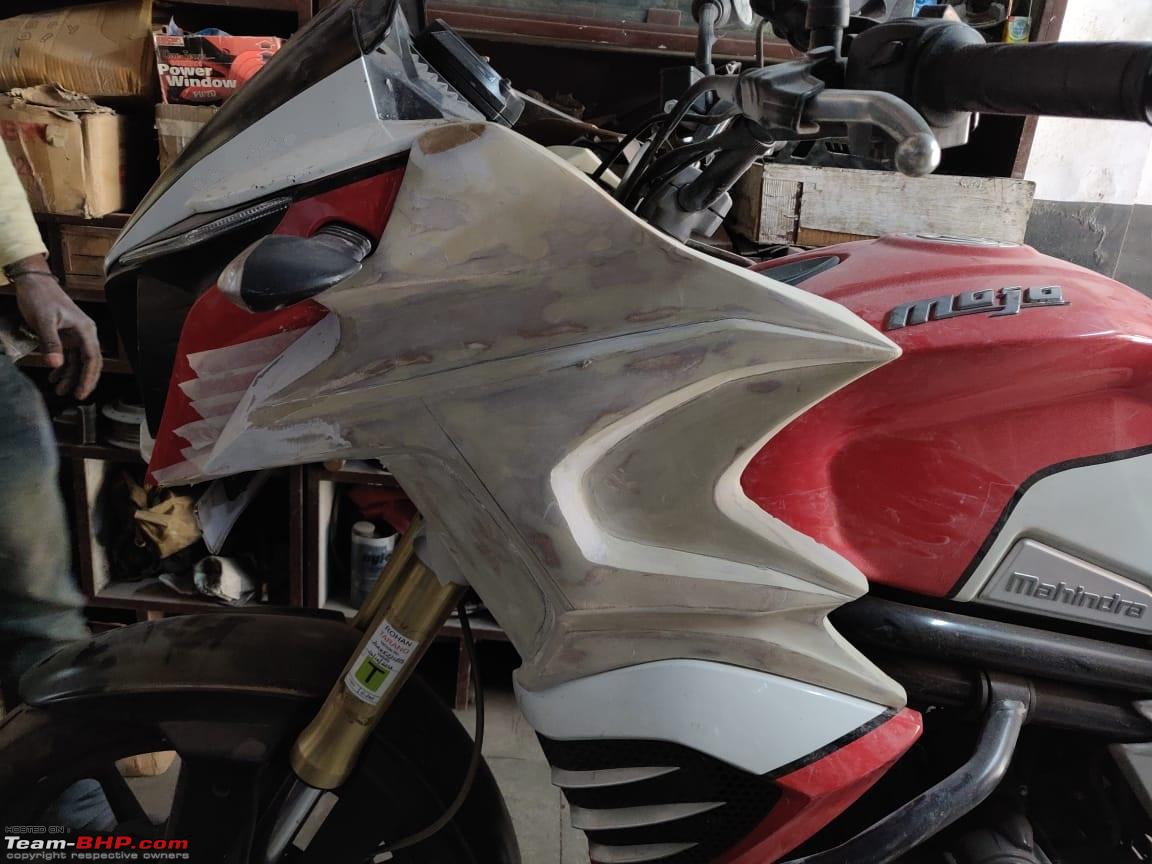 Almost there.. 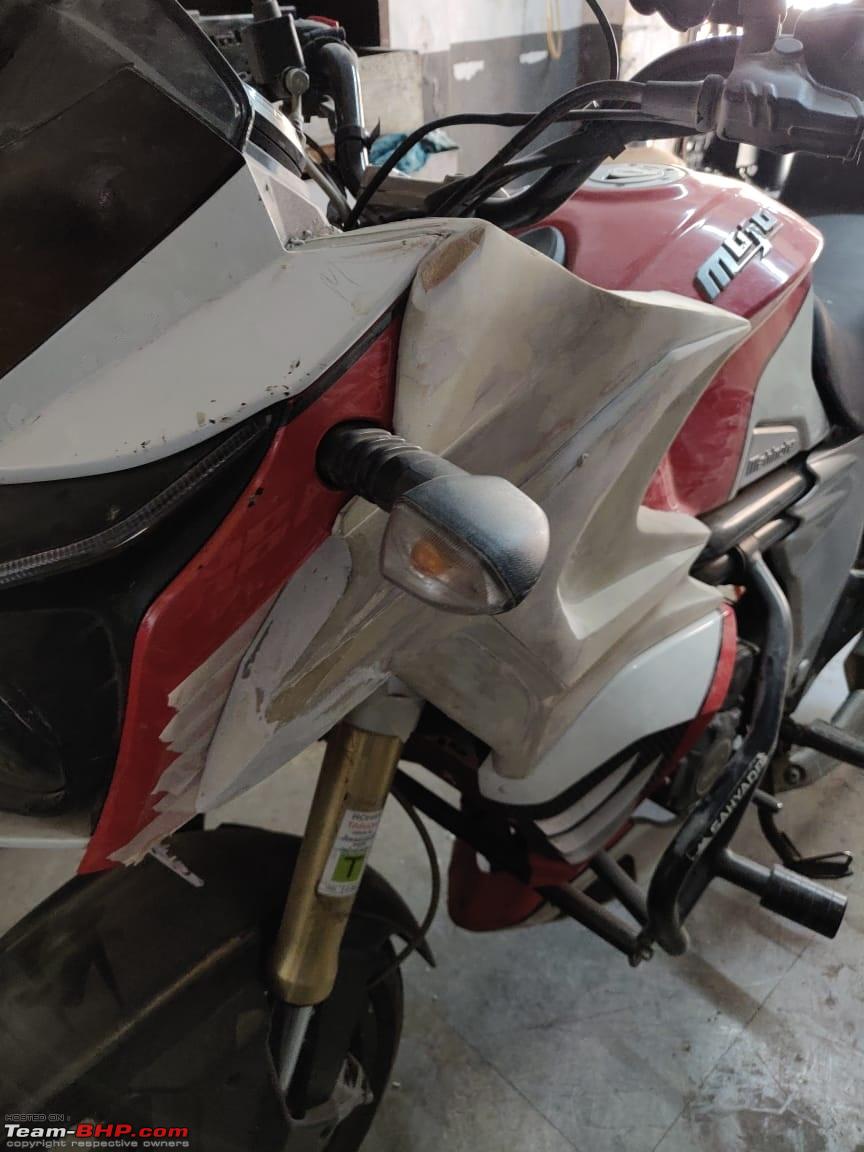 Just the finishing left now.. The pattern was then mirrored on the other side and a similar finishing process carried out. It is important to try getting as perfect a surface finish in the pattern as possible. This would reduce the amount of rework to be done once the finished part is extracted from the mold. 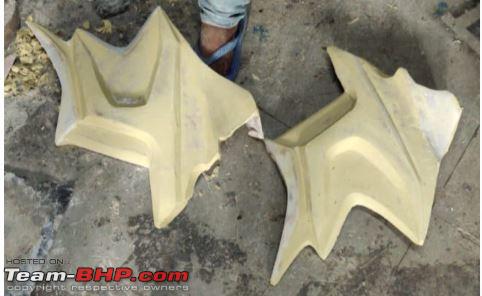 The left and the right, all finished! While we were at it, got started on a 'Tiger-esque' beak for the front too.  So far so good! Next in line was making the fiberglass mold from the wooden pattern. The pattern was first coated with a release spray. The fiberglass mats are then put on it and the epoxy resin applied using paint brush and rollers. Multiple layers were applied to ensure the mold was strong enough. Once the setup cured, the pattern is separated from the mold. 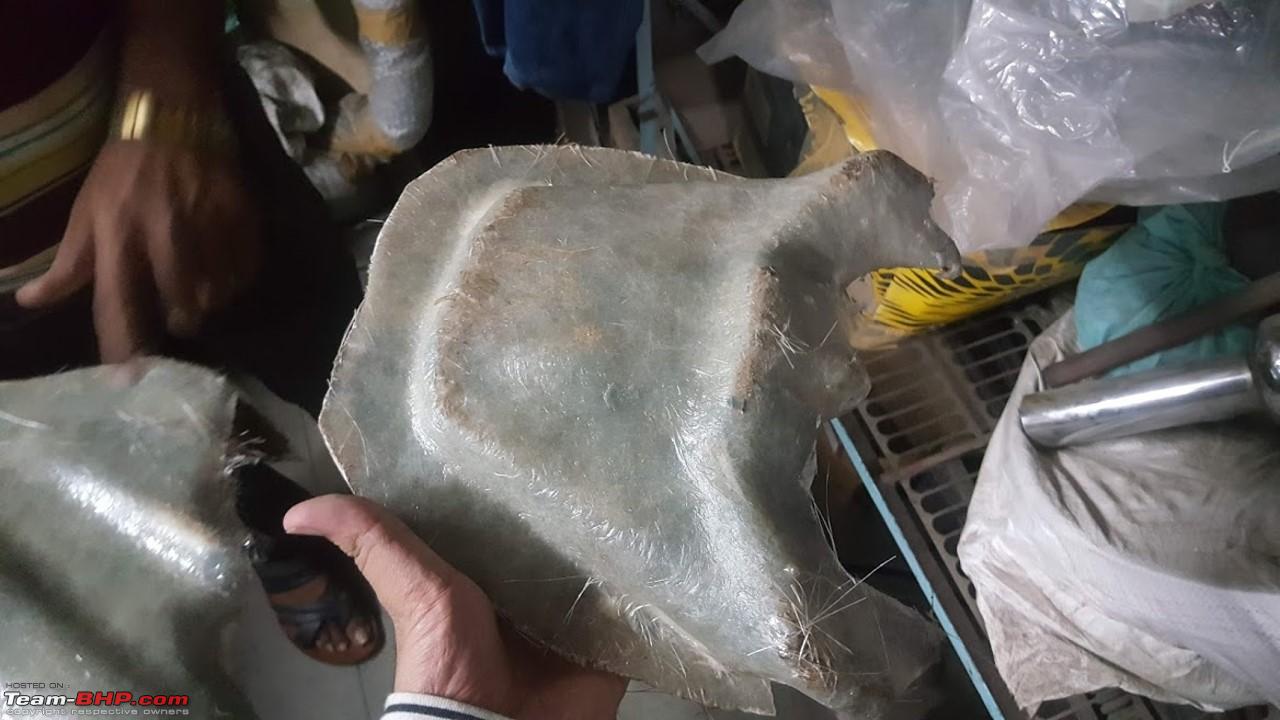 Beak - Outer surface of the mold.  Beak - Inner or A surface of mold  Fairing Mold- Outer Surface 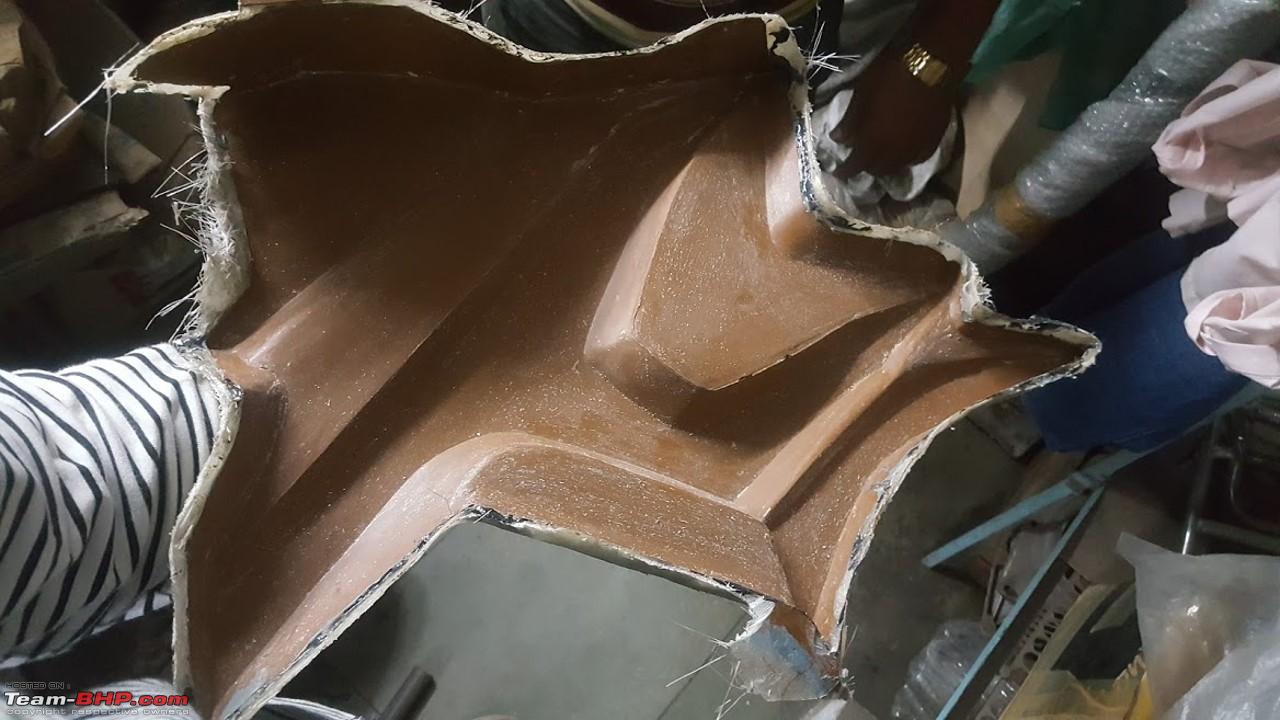 Fairing Mold - Inner or A Surface A similar procedure was repeated in order to extract the finished piece from the mold. A couple of coats of release spray were first applied to the mold. This would allow easy removal of the piece from the mold. A gel coat was then applied uniformly over the surface. The gel coat is usually the A surface (the surface you see and touch) of the finished piece. Once it cured, the fiberglass mat and resin are applied layer by layer. The fiberglass mat, resin and gel coat adhere together to form the piece to be extracted. On complete curing of the fiberglass, it can easily be pulled off from the mold.  The extracted beak. The dark surface coating is the gel coat. Once the final piece was taken from the mold, it could be finished for painting. The entire surface was first sanded with a coarse grit sandpaper till the gel coat appeared dull. This would be needed for the primer to adhere to the surface. Any dips in the coat were then filled with body filler and sanded down to get an even surface.  The yellowish layer is the body filler with the darker gel coat visible underneath. This process removes most 'spots' from the surface and makes it even. The primer was then applied following which another round of filler material and sanding was done, this time, with a finer grit paper.  Primer with a layer of Lambi getting ready to be sanded Wet sanding was then done using a fine grit paper to achieve the uber smooth surface finish.  Wet sanding for that smooth texture. The surface was now ready to be painted.  Some sketchbook inspiration to finalise the colors. 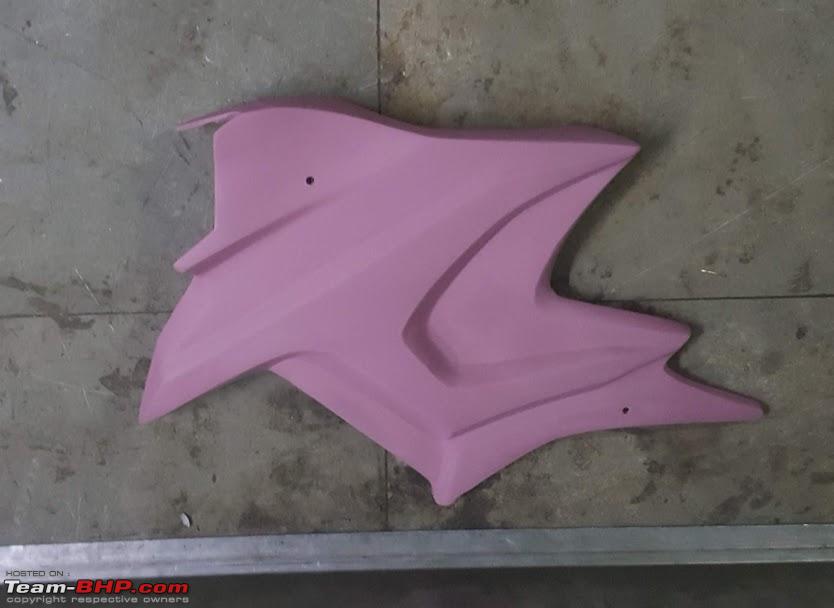 A layer of primer was first applied. 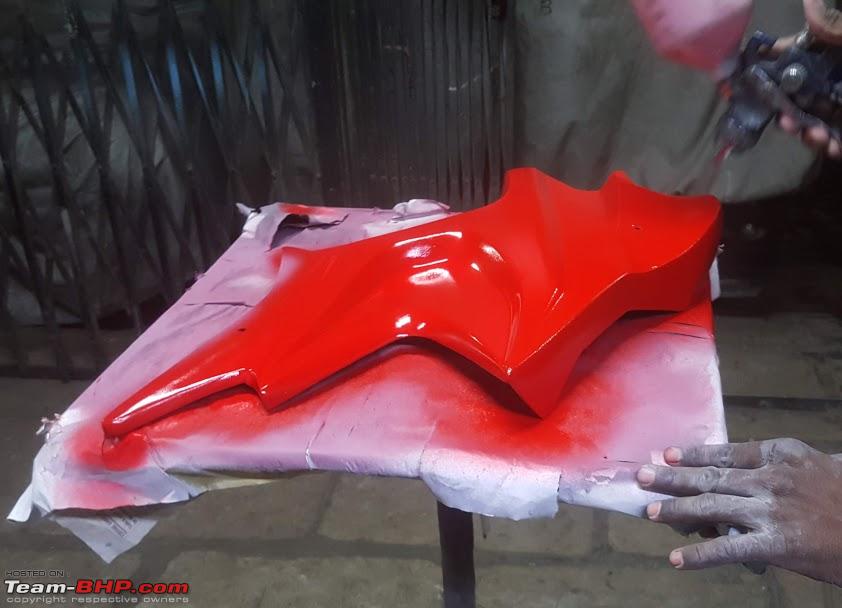 Followed by the base coat. 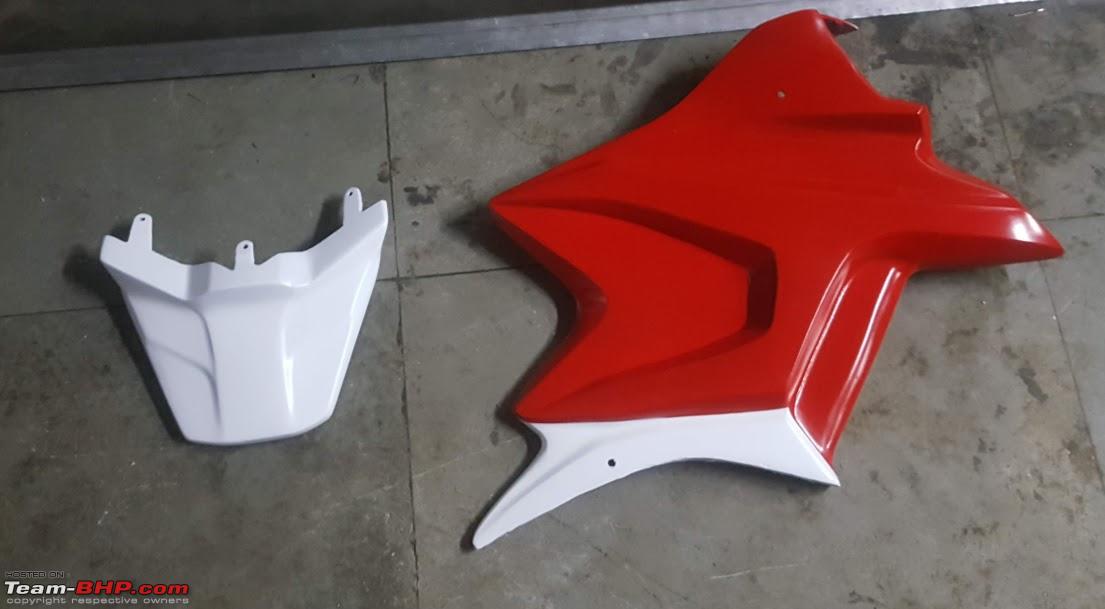 The dual tone fairing. 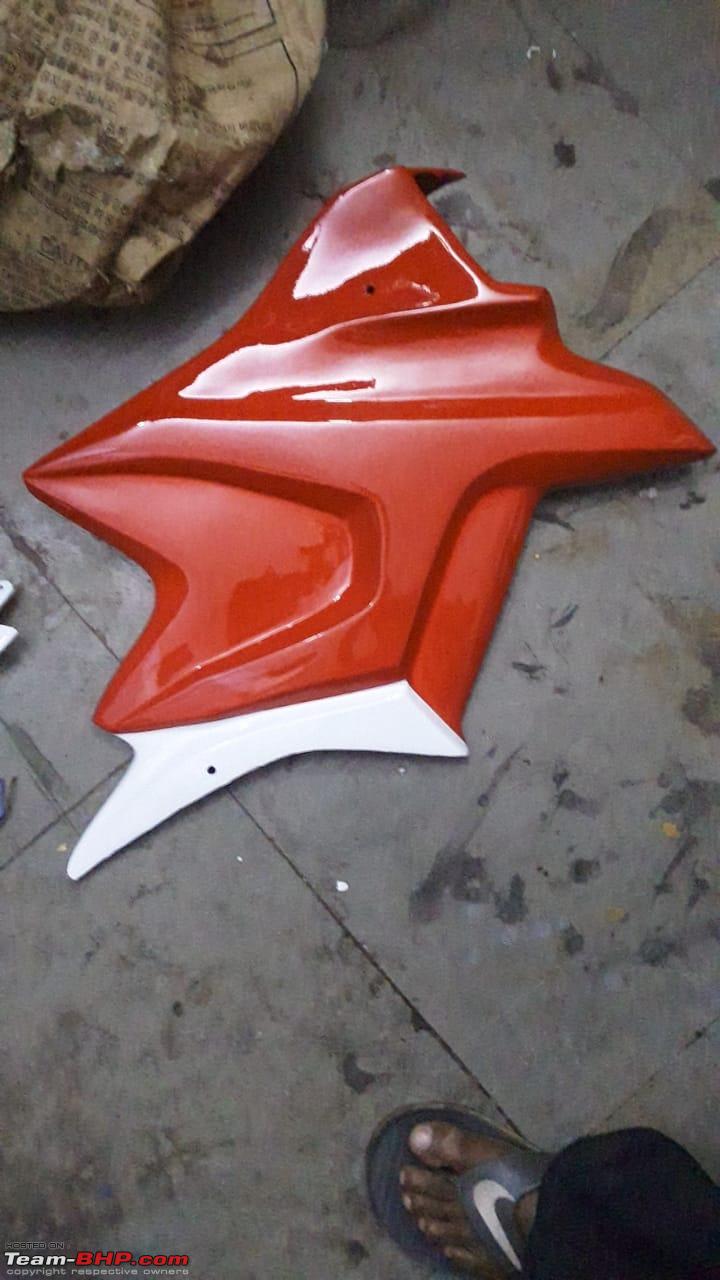 And finally the glossy clear coat. Last edited by AlQuazi : 10th July 2019 at 11:08. |
|
| (48)
Thanks
|
| The following 48 BHPians Thank AlQuazi for this useful post: | aman9393, audioholic, Balaji31582, Bee, CliffHanger, condor, CrAzY dRiVeR, Cyborg, digitalnirvana, dkaile, drrajasaravanan, govigov, GTO, gunin, Ironhide, JatinSharma, Karthik Chandra, keroo1099, klgiridhar, mh09ad5578, motorpsycho, narayan, neil.jericho, Night_Fury, Nilesh5417, PraNeel, Rehaan, Roy.S, shyamg28, Slick, SnS_12, somspaple, Sting, sukiwa, sunny29584, swiftnfurious, tchsvy, The Great, The Rationalist, theexperthand, TheHelix0202, The_Outsider!, timuseravan, Turbanator, Turbojc, vaish9925, VijayAnand1, wheelguy |
|
5th July 2019, 15:21
| #6 |
| BHPian Join Date: Mar 2019 Location: Pune, Bangalore
Posts: 109
Thanked: 642 Times
| OTHER MODS I rode the bike down from Bangalore in June 2018. Over the next month or two, the vehicle remained completely stock. I must have covered some 2000 km in the next two months exploring most regions around Pune. Over the course of these trips, some of the shortcomings of the bike were understood. Also, the need for certain additional accessories was felt. The major mod happening on the bike was the fairing whcih took the better part of a year to finish. This was because I wanted to do things myself rather than buy (overpriced) accessories off the shelf. However, over time I did realize that reinventing the wheel wasn't necessary every time. You would definitely save money in getting things done by yourself, but the time and effort it took was sometimes just not worth it. The following mods/accessories were added to the bike parallel to the faired conversion - - Radiator GuardRadiator Guard The radiator grill was the first thing that I got built for the bike. A number of online vendors offered these for the Mojo. But I found the prices too exorbitant for what was basically a laser cut pattern. So the side cowls were promptly opened up, mounting points identified and measurements taken, and a simple pattern with the Mojo logo at the center was then designed. The same was then laser cut, bent and powder coated through vendors nearby. The result- 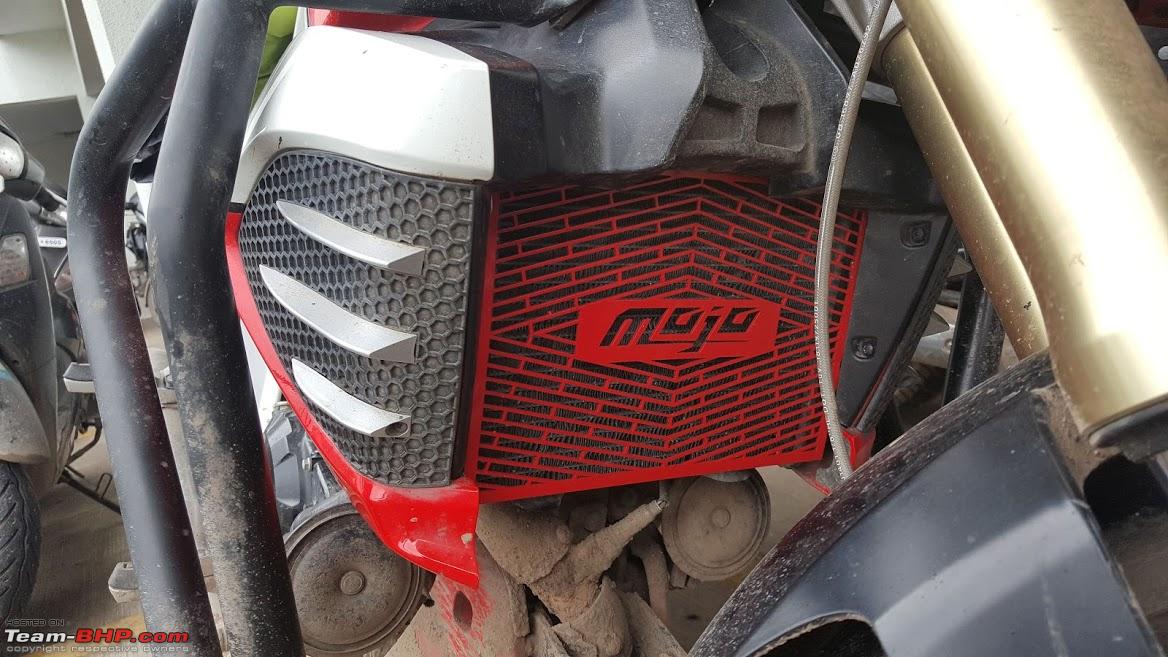 Headlight upgrade The stock halogens are pathetic to say the least. For the speeds which this bike is capable of, better lights were an absolute necessity. During night rides, the throw (or lack thereof) severely limited the speeds one could safely maintain. An upgrade was on the cards since day one. However, I was confused between upgrading the bulbs themselves, or adding auxillary lights. Mahindra did provide a pair of auxillary lamps at Rs. 4000. These came with their own wiring harness. Hence , no cutting or splicing would be required. 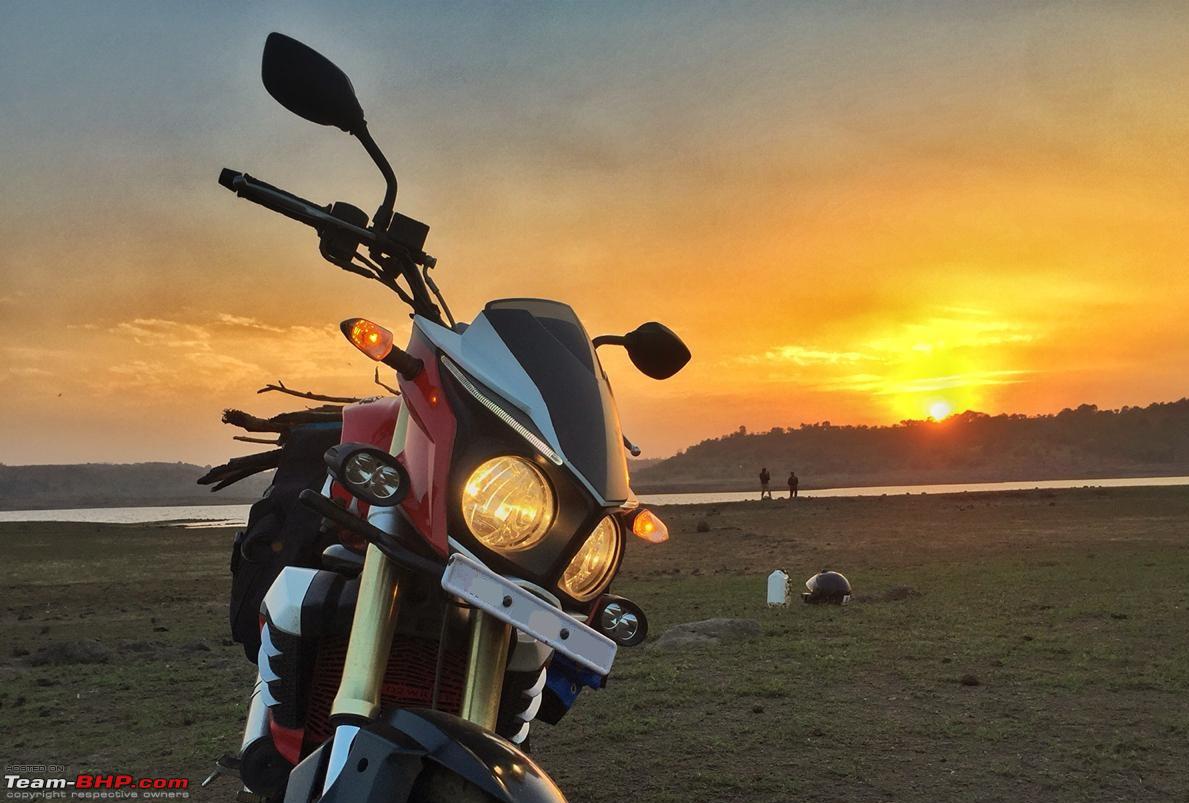 Mahindra's Aux lamps on a friend's bike  And their beam spread - PC Moto2Wrist from Youtube I found these to be a tad overpriced. Besides, I was leaning towards a headlight bulb upgrade because the final look would be much cleaner. In the end, I ended up shelling almost the same amount for LEDs from AliExpress. I ordered a set of 2 bulbs with 55W xhp50 chips with a color temperature of 4300k (yellowish white) and a light output of 12000 lumens. I am not a fan of white lights since they are useless in low visibility conditions. Hence I opted for warmer colors.  The stock halogens and their pathetic throw..  The LEDs..  And their spread. Enough to turn night into day! These lights were definitely an overkill for the Mojo. The low beams worked as desired. However, the high beams would light up the stratosphere . I tried adjusting the beam to it's lowest position to lower the high beam. But the beam would still not fall on the ground. In the end I adjusted it to the top most position in order to let the low beams fall farther away. The high beams are useless in this scenario. This setting works for now. However, the throw is not far enough to work well at higher speeds.Saddle Stays and Crash Guards - The previous owner had opted for the stock crash guard from Mahindra when buying the vehicle itself. The guard looked the part, with its thick tubing and wide coverage. However, it was attached to the chassis with a not so strong plate. This meant that even with the smallest of falls, it would bend and damage the radiator cowls.   The stock guard. Notice the plate with which it is attached to the chassis at the top. Once I began work on the fairing, I realized the crash guard would interfere with the body work. So I got it removed for the interim duration till I figured out a workaround. Around the same time, I came across a photo of the crash guards made by Sahyadri Moto, Thane. This guard attaches to the chassis via clamps at one end and the existing mounting holes at the other end. It not just looked the part, but was supposedly stronger too. However, the best part was that it went around the radiator cowl and not over it, allowing me free access to the (proposed) fairing.  The crashguard from Sahyadri Moto. PC - @mistygrey_ Instagram Mahindra also sold their own stock saddle stay + top rack combo as part of the touring kit. However, its loading capacity was limited due to the way it was designed. According to multiple owners, one of the welded brackets was quite thin for the weight it supported and could lead to weld failures under heavier loads. One more problem I foresaw, given how large the overhang was from the taillight, was that the brake lights could get obstructed if the top rack is loaded with bags.  The stock saddle stay on another Mojo. PC-Moto2Wrist Luckily though, Sahyadri Moto had their own saddle stay + top rack combo which was stronger than the stock setup. I found a number of Instagram photos of the same and liked what I saw. Unfortunately, they do not stock these but rather build them for order. So I called them up, scheduled a date to drop off the bike, and picked it back 10 days later with the new guard and stay in place.  With the guard and saddle stays in place. The crash guard and saddle stay give the vehicle the look of a complete tourer. I did have some complains with the setup though. The guards caused a lot of vibrations on the footpegs as well as handlebars. I initially assumed the issue to be bolts that weren't sufficiently torqued. However they were well torqued. I then added rubber padding between all points of contact. This did reduce the vibrations down to a bearable extent. However, the riding experience was not as smooth as was observed with the stock guard. On checking with the SVC, the mechanic immediately found the culprit - the rear monoshock was shot and leaking all over. The vibrations weren't so obvious without the guard, but got amplified with its addition. I am still to get the rear suspension replaced. The verdict on these vibrations will have to wait until that happens though. However, I did speak with a fellow owner who was running with the Sahyadri guard and saddle stays. He assured me that no additional vibrations were observed by him on adding these guards. One more issue I found was with the support rod connecting the two sides of the saddle stay. This rod goes around the tyre and under the number plate to attach to the stays' mounts at both ends. However, the clearance between the number plate and rod was not sufficient. As a result over any kind of surface undulations, the rod would strike the number plate and make noise. I am still to get this rectified. However, since there are no plans of using saddle bags any time in the near future, I have removed this rod as a temporary measure.  The clearance between this rod and number plate is quite less. Over bad roads, the plate vibrates causing a continuous pinging noise from the back of the bike. PC - @mistygrey_ Instagram Besides these minute niggles, I have no complaints from the setup. The crash guard is undoubtedly sturdier than the stock setup. The spools do stick out a bit making navigating traffic a little trickier. The saddle stays have been put to good use for all sorts of work as well as grocery duties.  A good top rack and bungees is all you need to make the Mojo as practical as an activa to ferry everyday stuff! Note: I am in no way associated with Sahyadri Moto nor am I promoting them. As a satisfied customer though, I do definitely endorse them for their commitment to quality in what was undoubtedly a rushed build. The Seat The pillion seat was one more grouse I had with the bike. It was just too small and narrow at the end for riding two up over any sort of distances. Your tailbone would inadvertently end up at the point with minimum padding. Anything more than half an hour at a stretch was a royal pain up the backside. I had held off modding the seat because I wanted the top rack in place first. When I gave the bike for the top rack build to Sahyadri Moto, I had told them to keep the level of the top rack an inch higher than the level of the pillion seat. The plan was to add an inch of foam to the pillion seat at a later point to bring it to in line with the top rack. This also improved the visibility of the tail lights even with luggage on. I got the seat cushioned at Nana Peth. I don't recollect the name of the shop though. The the seat was first stripped, foam was then added from the sides to make the base a lot larger. An inch of foam was then added at the top.  From this..  To this.. In the end, the foam ended up being higher than the level of the top rack. However, this wasn't a problem since I had plans to put a top plate on top of the rack. The Top Plate I had designed a top plate keeping in mind the dimensions of the top rack. The advantage such a plate would have is that it would be wider than the existing carrier and thus be capable of carrying bigger bags without sagging. However, too wide a plate and it would hit the pillion's legs when dismounting. A simple patterned plate with the Mojo logo was designed and cut in 4mm thick Aluminium. The plate was annodized with a dark grey finish and was installed with spacers underneath to bring it to the exact height as the seat.  Plate installed with spacers to bring it to the exact height as the (raised) pillion seat.  The top plate - 4mm thick Al annodized in a matte grey finish with the Mojo logo. Custom dB Killers The Mojo comes equipped with dB killers that mute the sound of the exhaust to quite an extent. Although the stock sound itself isn't too bad (thanks to the engine's sound), with the dB killers removed, it puts a lot of bikes to shame. However, the sound loudness is out of legal city limits (read cop magnet). Lluvia.in sells a pair of mild bass dB killers which mute the sound to a lower (and legal) limit. I had a couple of stainless steel rings lying around the office. Decided to experiment with them to see if I could come up with a sound that matches what Lluvia has achieved through their dB killers. 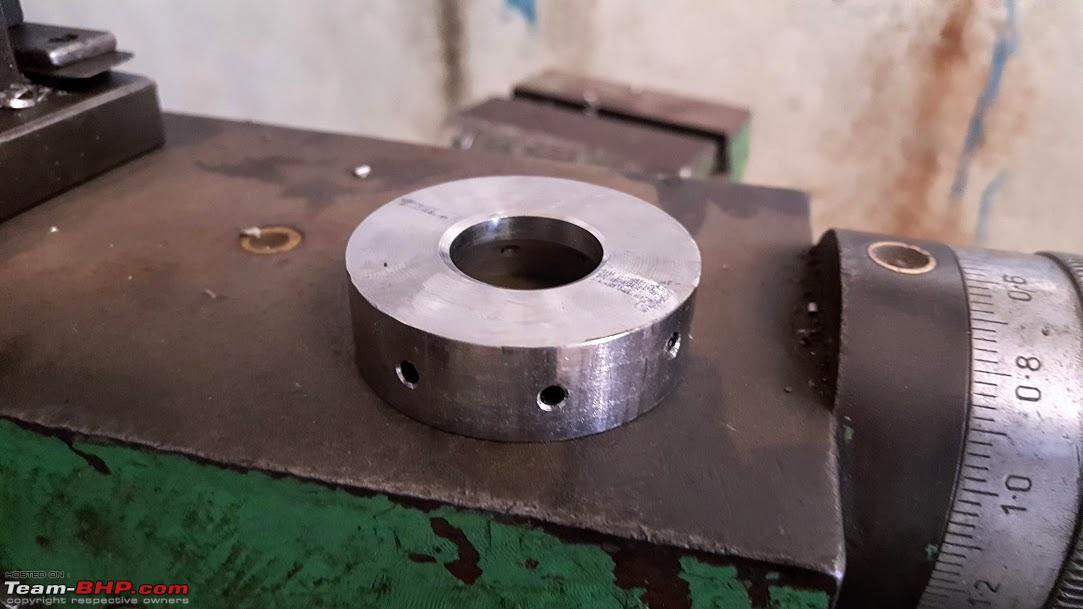 The SS rings going in for machining.  Post installation- The SS blends in with the end can's finish making the setup look quite natural. The sound is definitely muted and not as loud as the one produced without dB killers. However, I have realized that a loud exhaust is quite distracting in traffic, gets annoying very quickly and is a sure shot way of getting stopped by cops. The dB killers have their days numbered. I plan to go back to the stock setup soon. Last edited by AlQuazi : 10th July 2019 at 11:18. |
|
| (31)
Thanks
|
| The following 31 BHPians Thank AlQuazi for this useful post: | 2himanshu, aman9393, amit_purohit20, Balaji31582, CliffHanger, condor, CrAzY dRiVeR, Cyborg, digitalnirvana, drrajasaravanan, GTO, gunin, Ironhide, keroo1099, klgiridhar, mh09ad5578, motorpsycho, narayan, neil.jericho, Night_Fury, Rehaan, Roy.S, roy_libran, somspaple, sunny29584, swiftnfurious, The Rationalist, theexperthand, timuseravan, Turbanator, vaish9925 |
|
9th July 2019, 10:09
| #7 |
| BHPian Join Date: Mar 2019 Location: Pune, Bangalore
Posts: 109
Thanked: 642 Times
| UNVIELING THE (WANNABE) TIGER If you have stuck around for this long, kudos to you! After almost a year of after-office and weekend shenanigans, a lot of learning, new experiences of what to do and what not to do and lots and lots of 'testing', I present to you, the Mahindra Mojo ST 300 or as I like to call it, My Wannabe Tiger! IMO, this is what the Mojo should have been in the first place! Will let most of the pictures do the talking.. 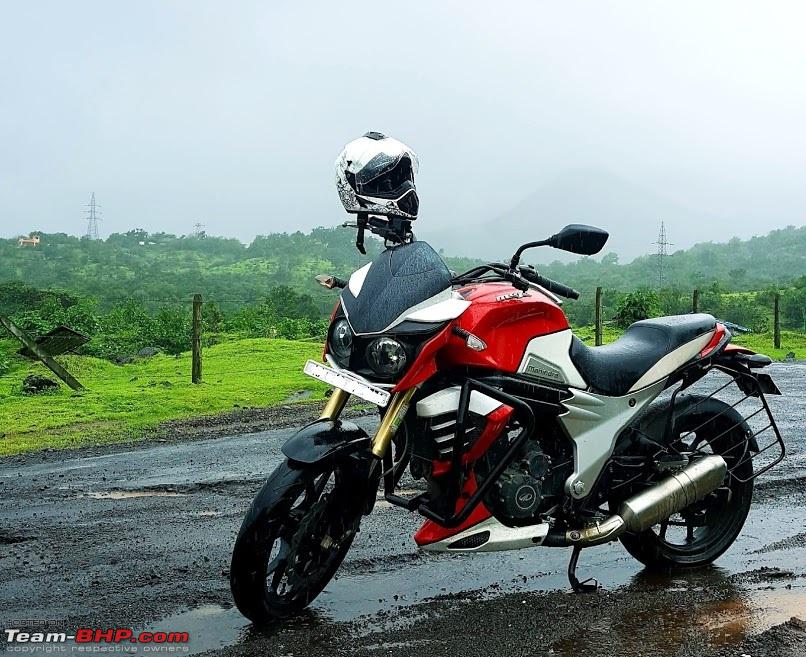 It was a good looking motorcycle,  Until this happened! Quite the ugly duckling, eh? Not anymore though. Gentlement (and ladies), feast your eyes on.. 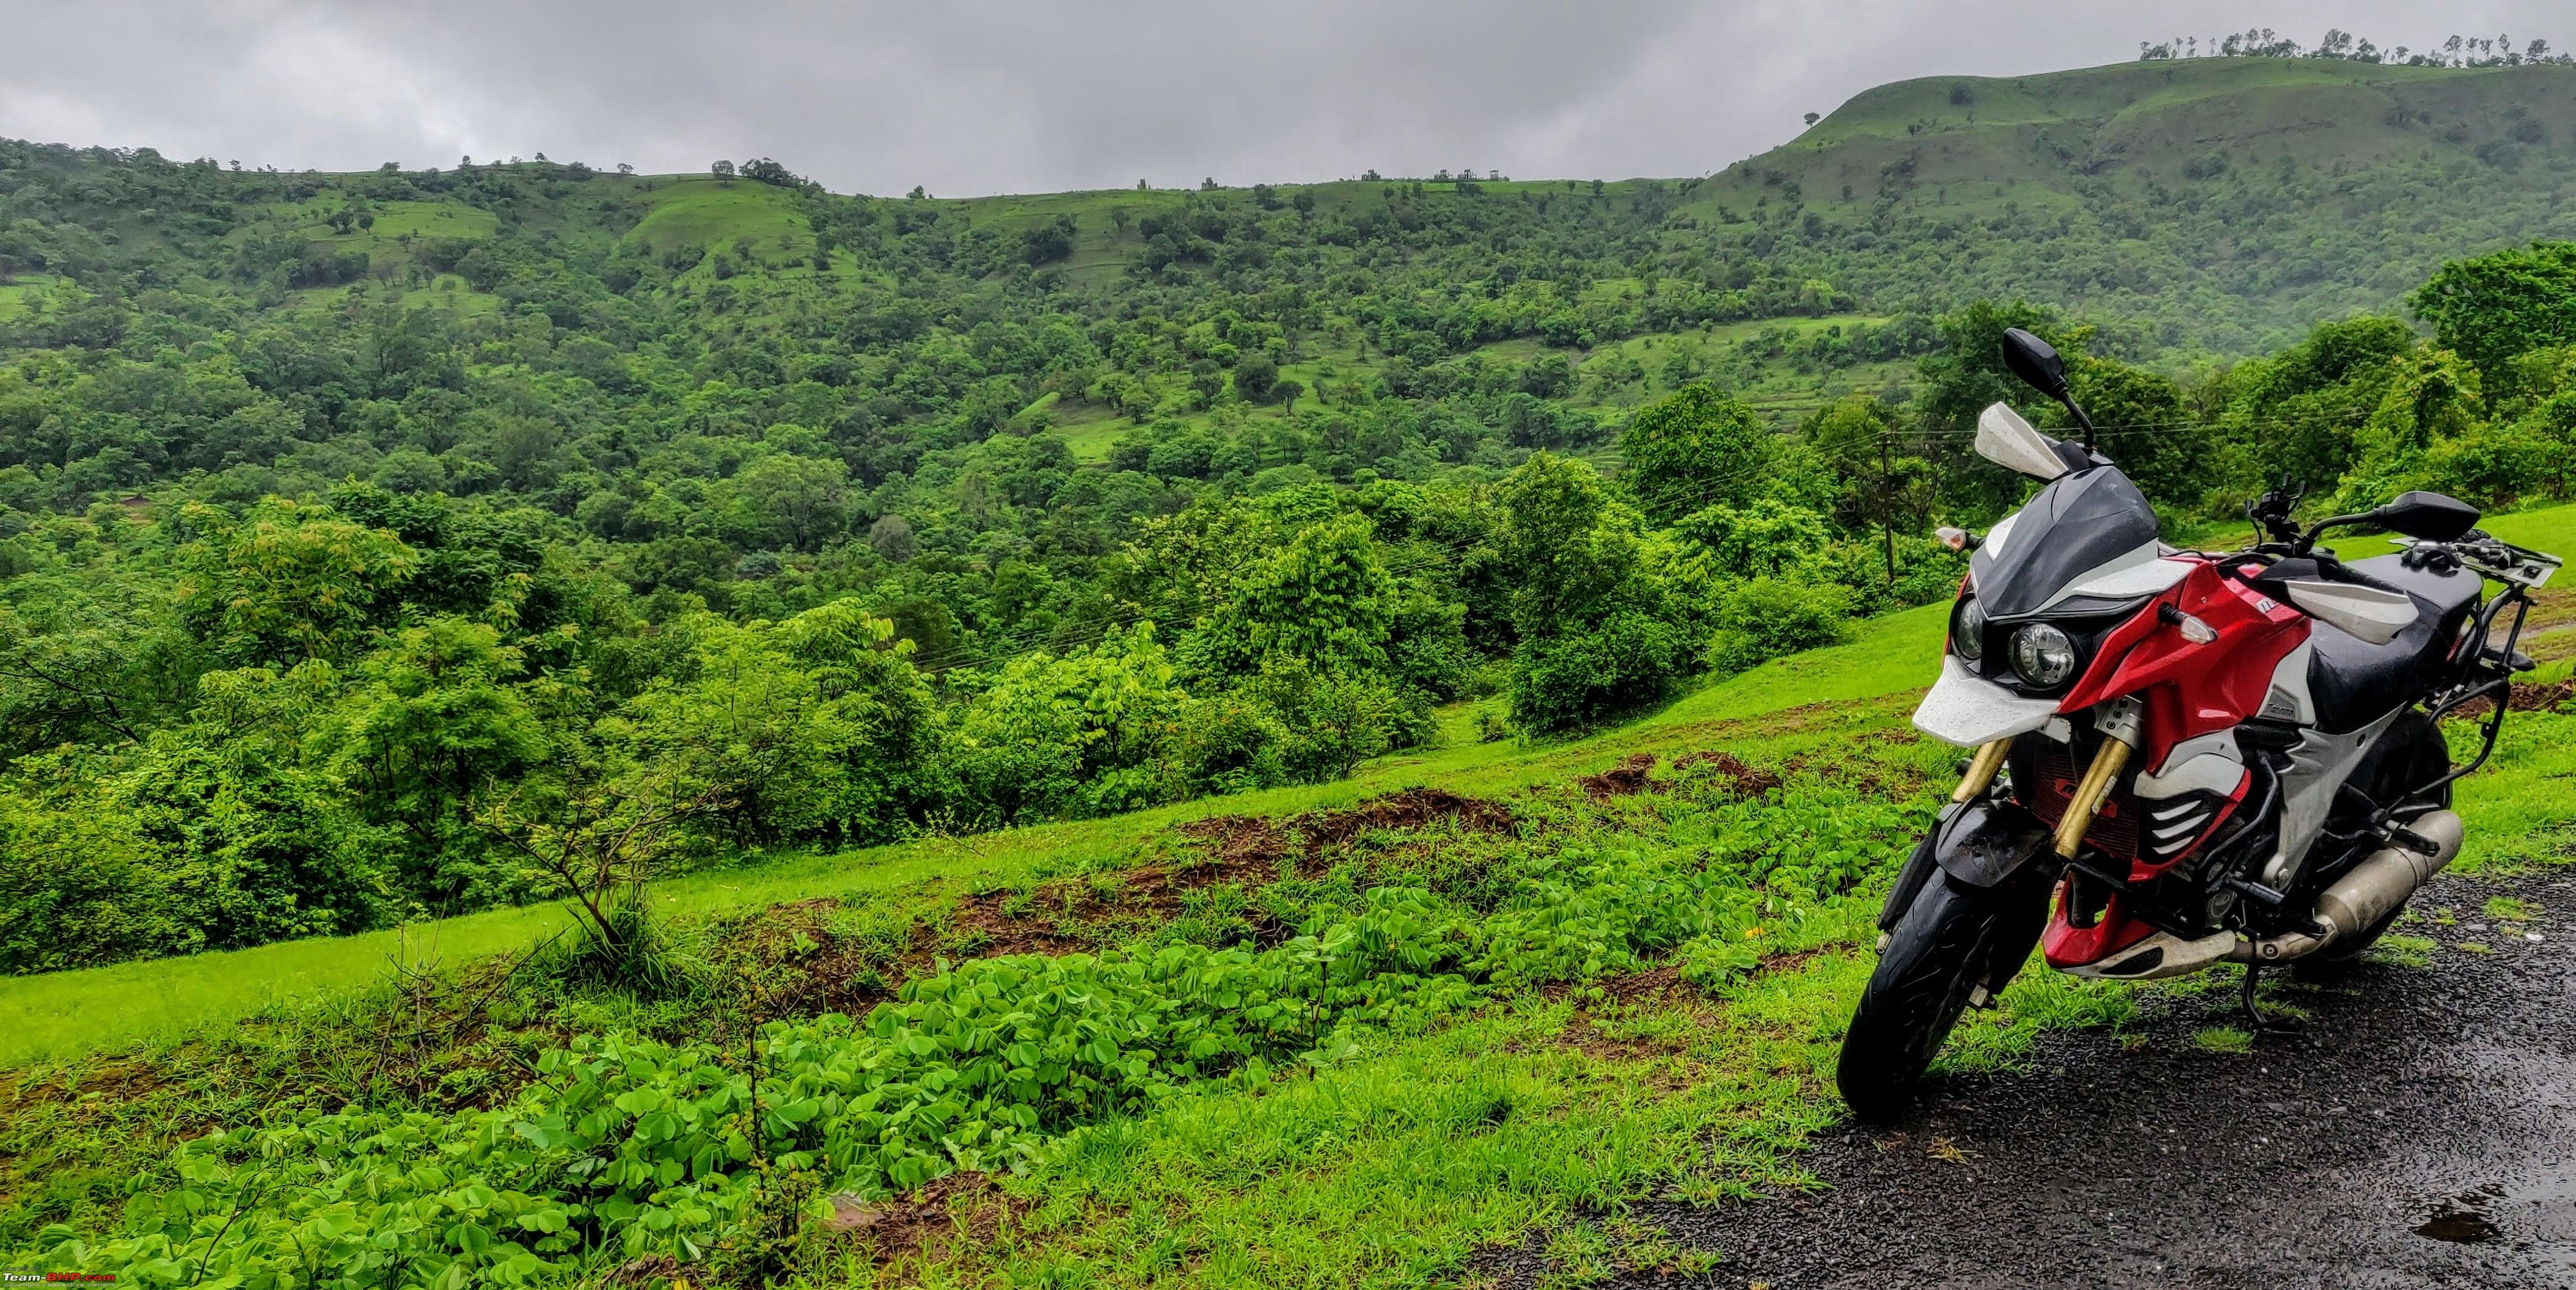 The Mahindra Mojo Sports Tourer 300 or ST 300 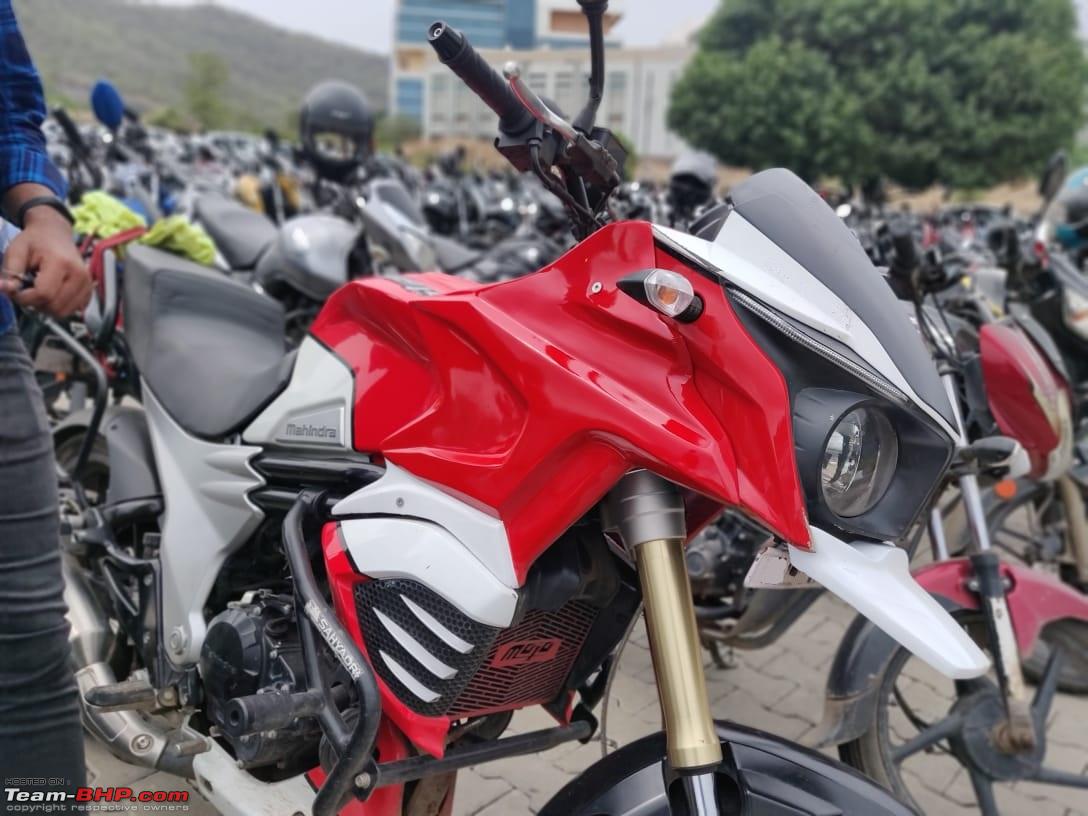 Hellooo Tiger!  Or Donald Duck.. Whatever you wanna call it! 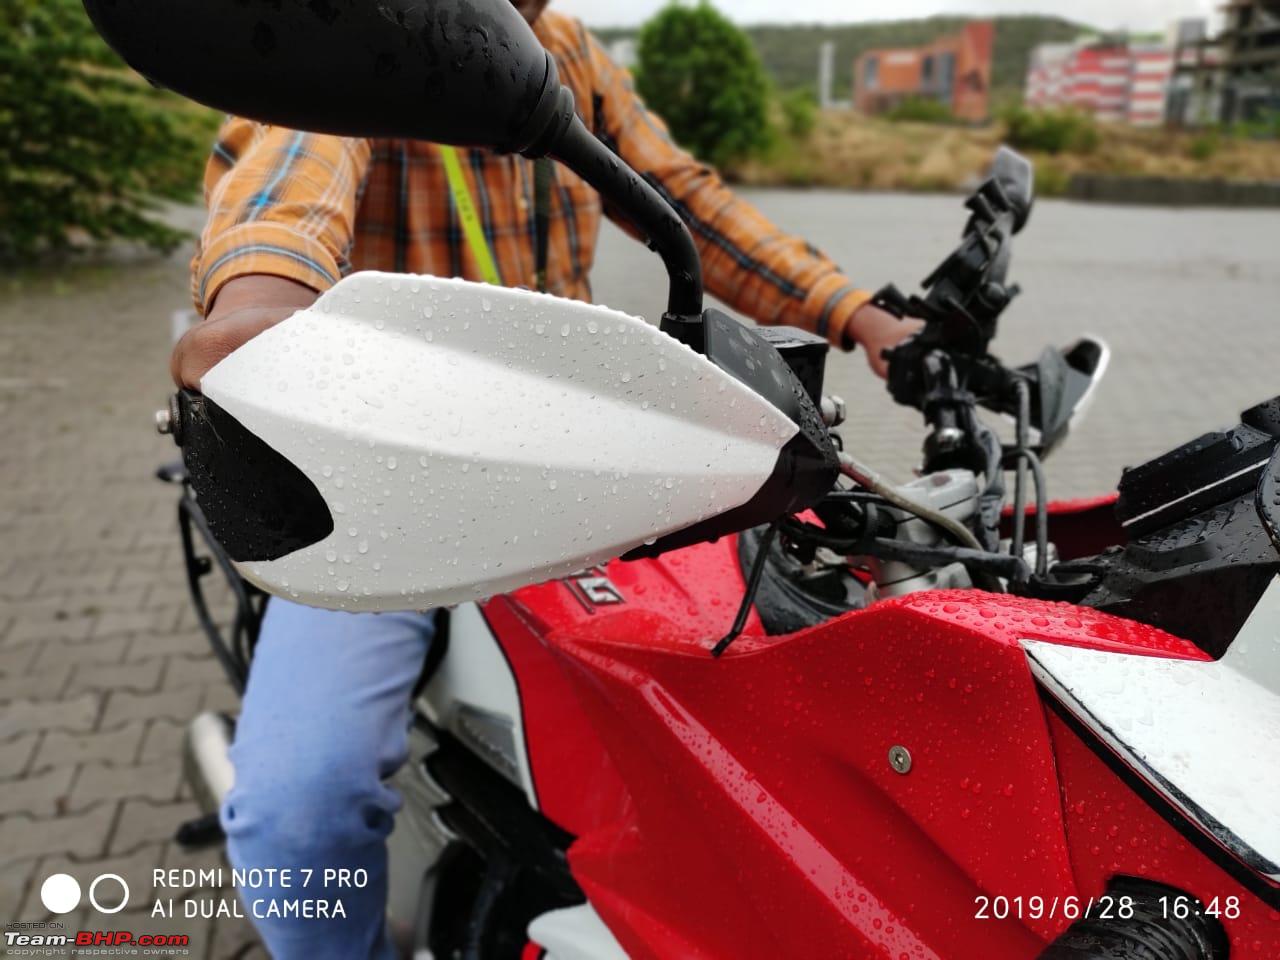 A last minute addition - the KTM knuckle guards. 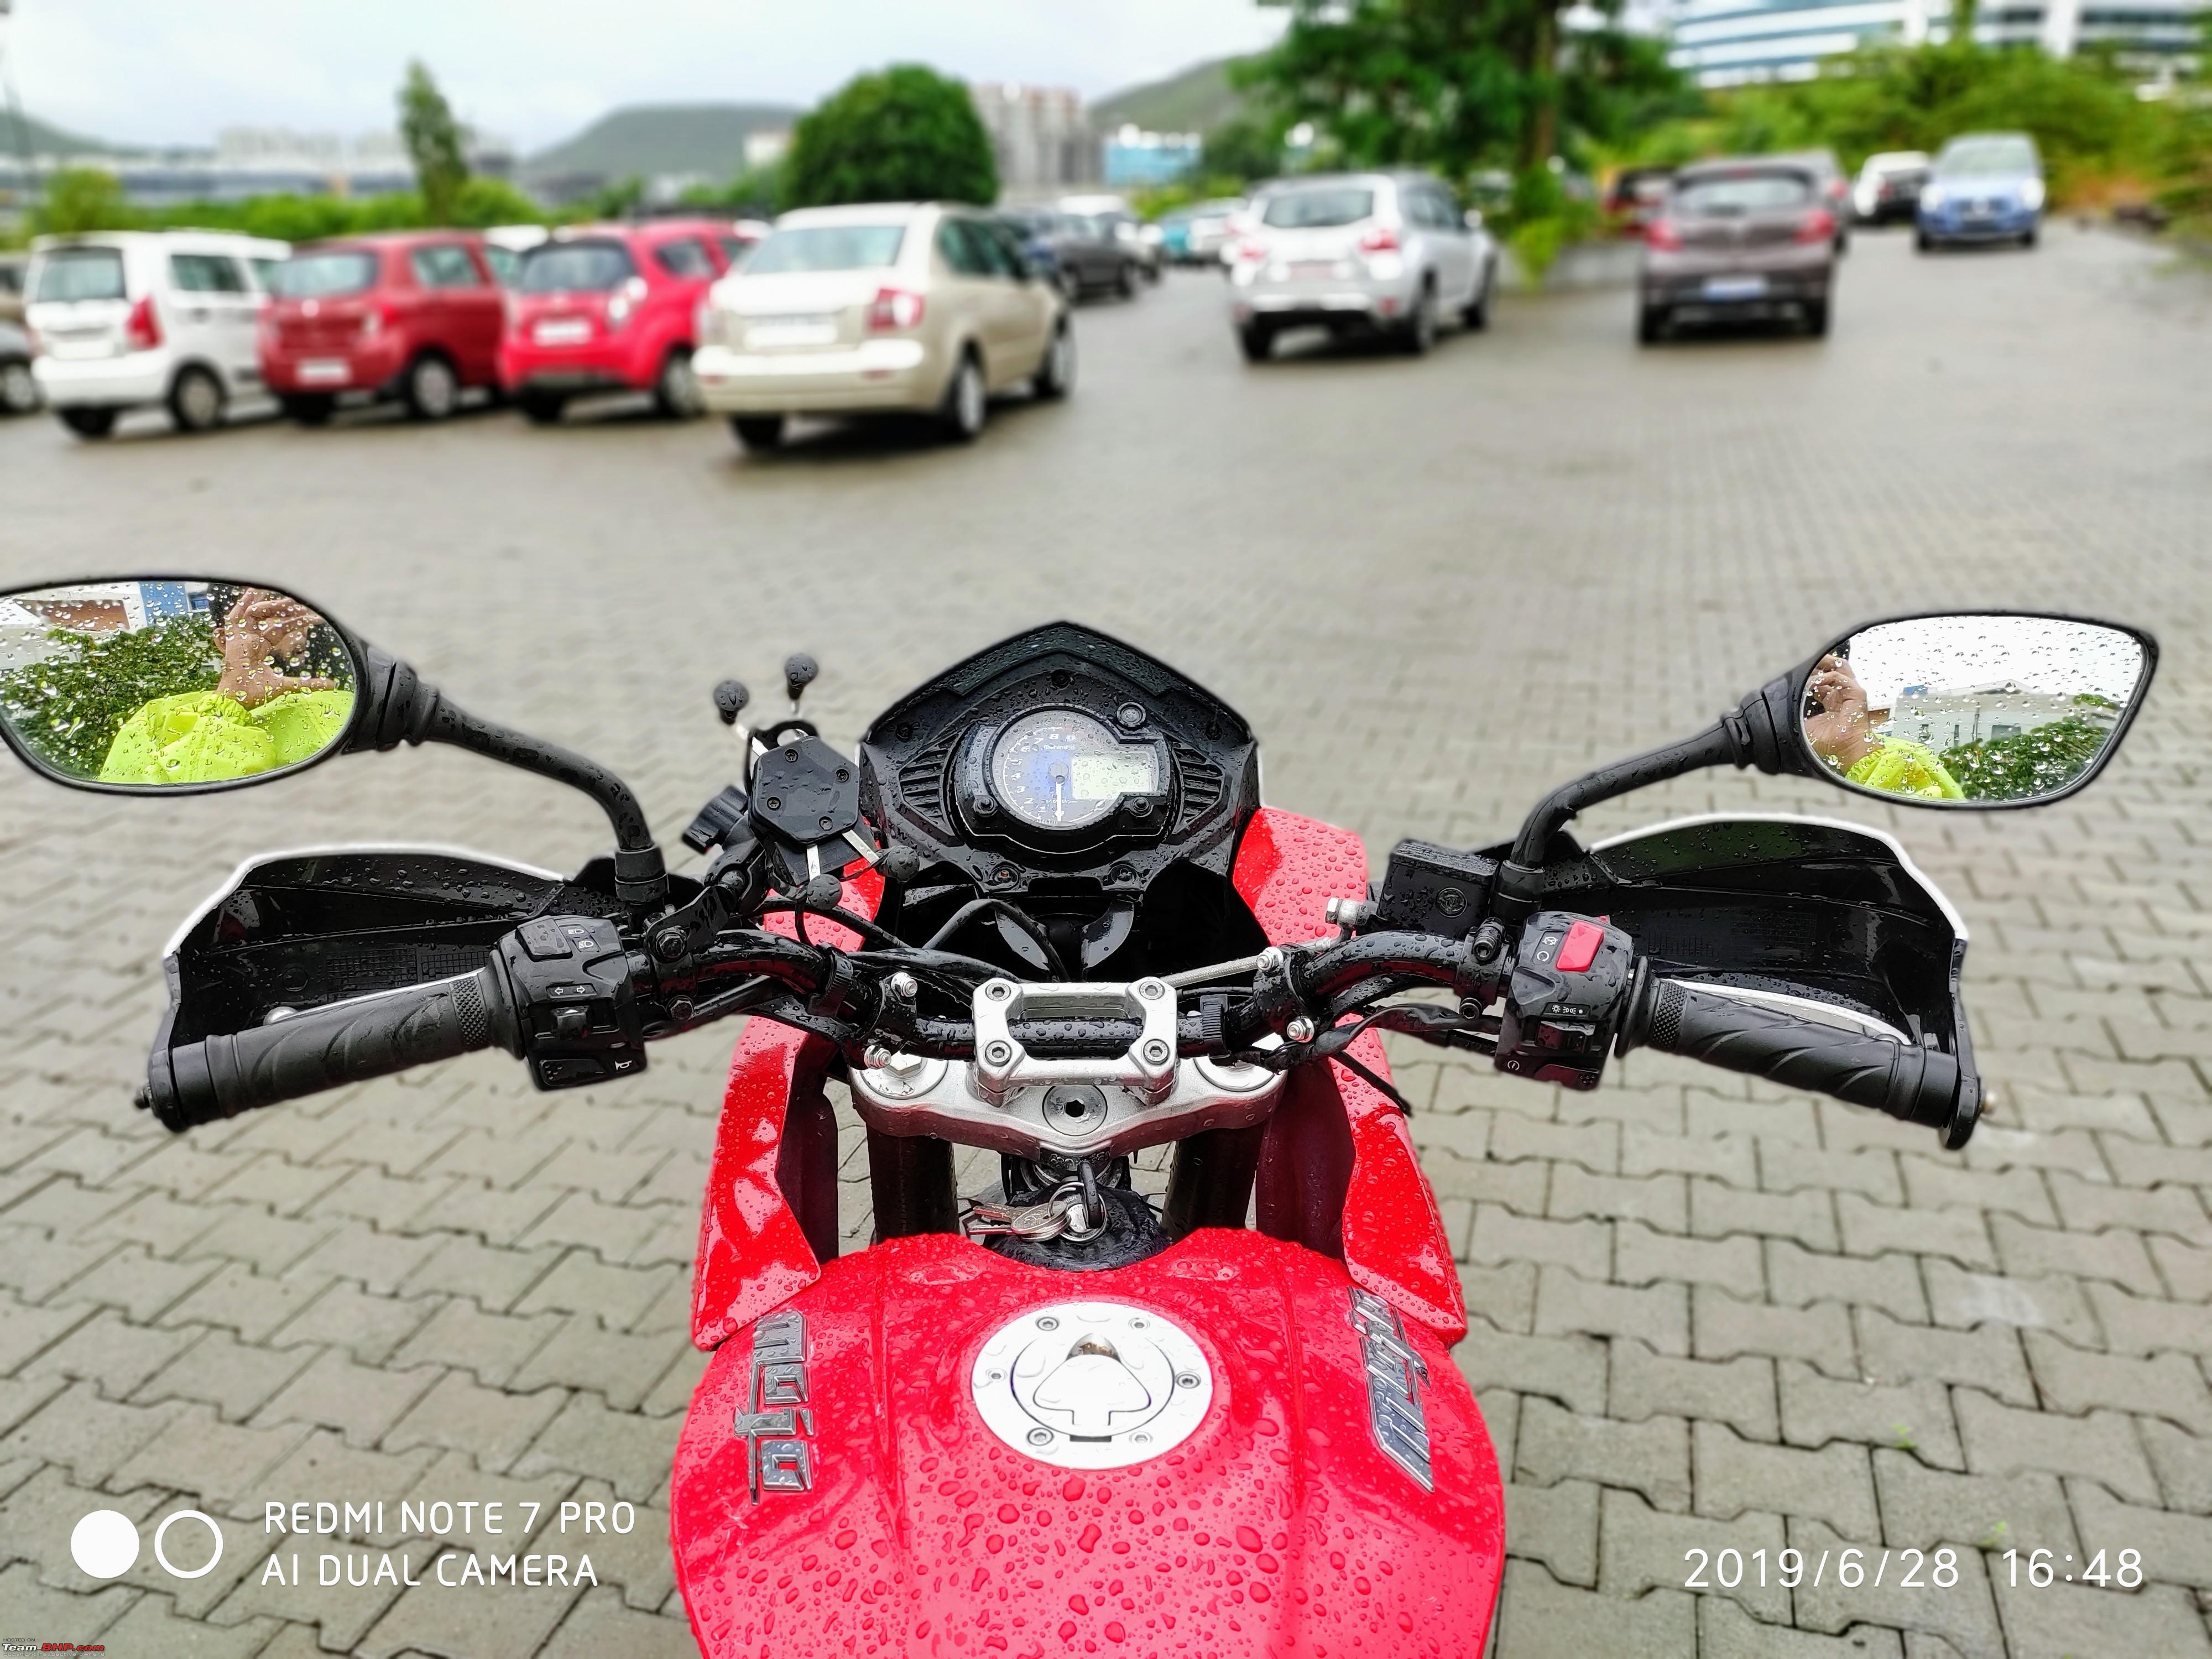 From the rider's perspective, 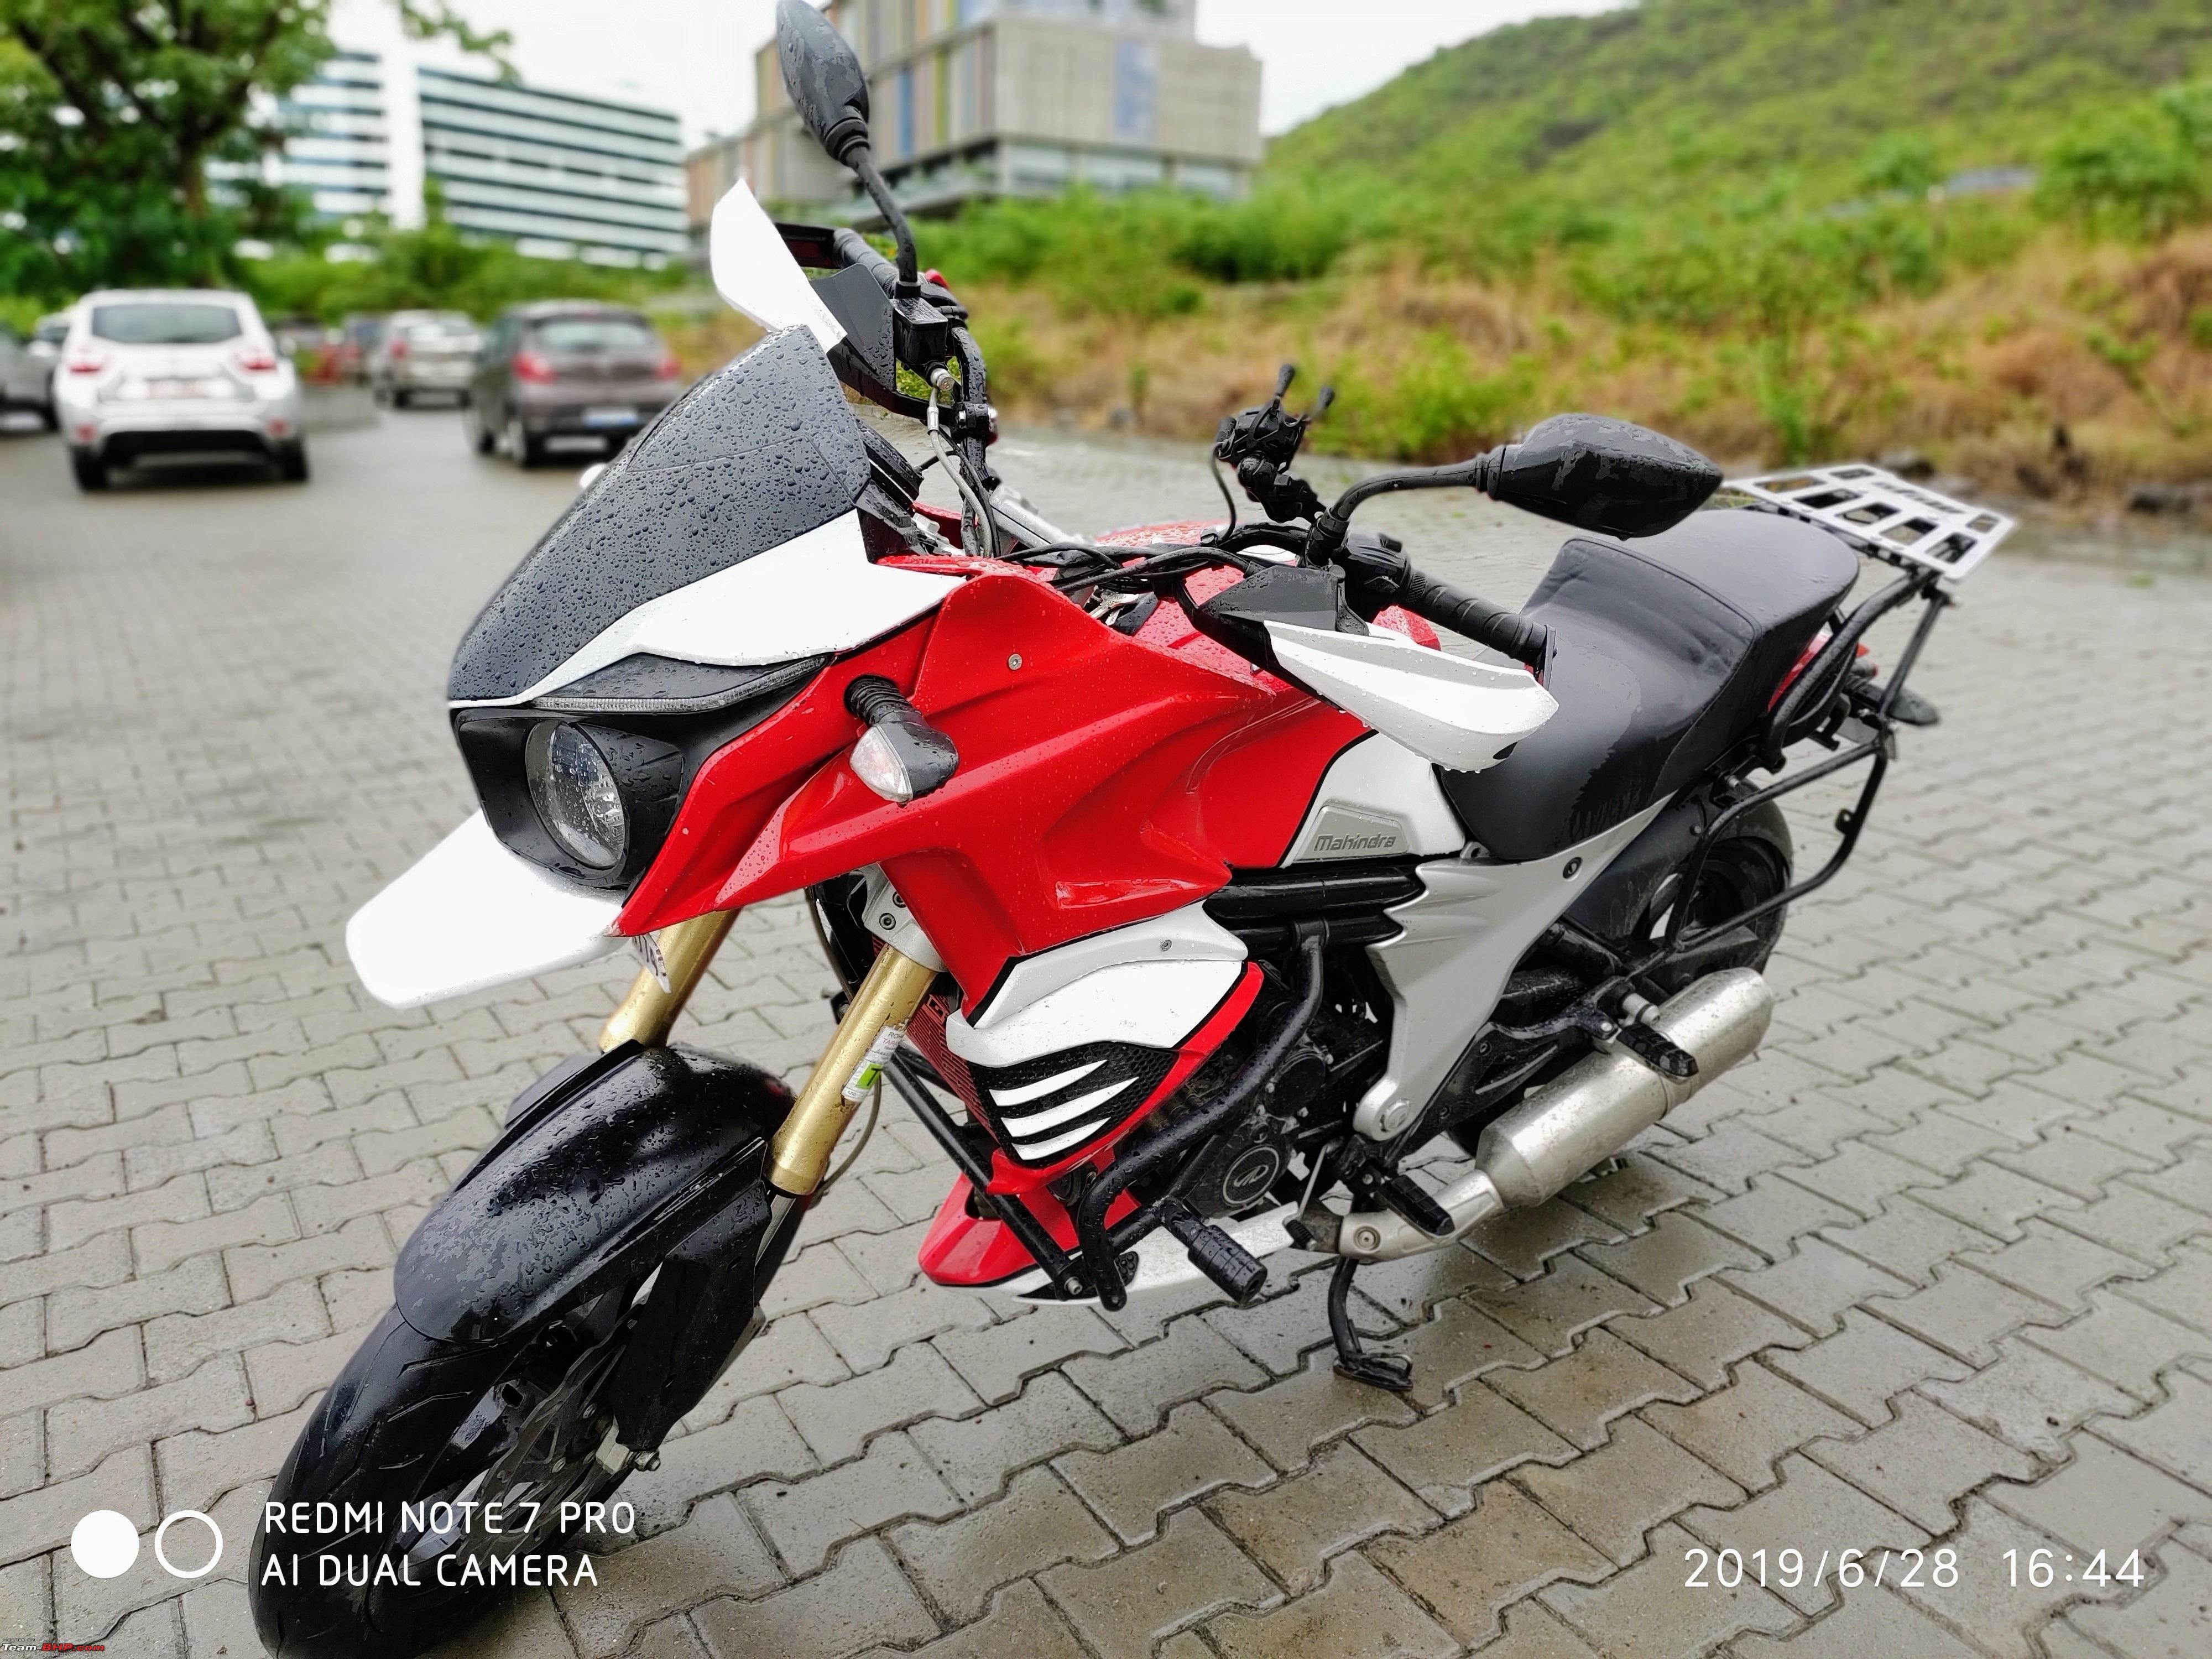 More perspectives.. 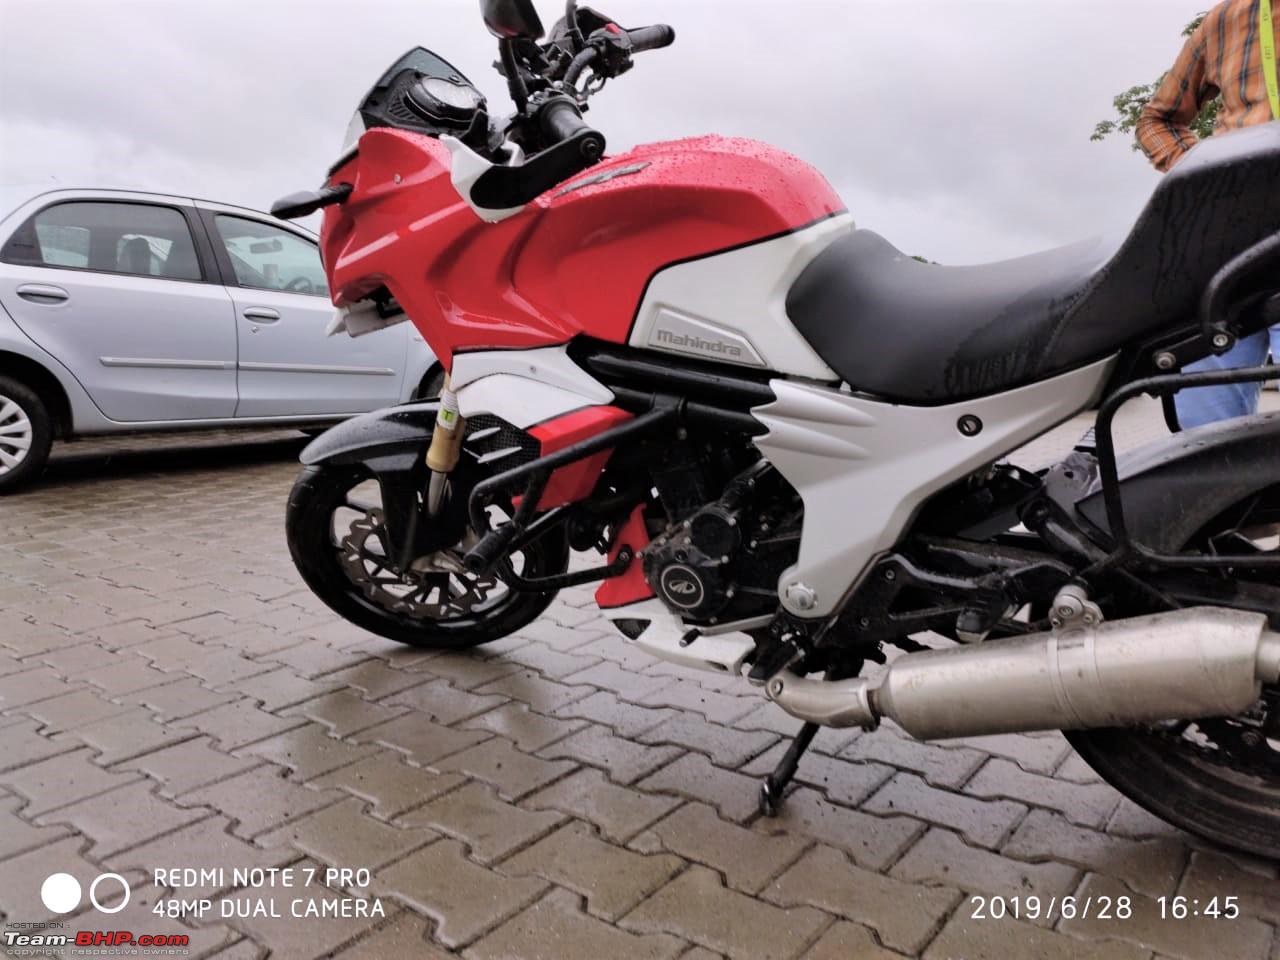 Better than stock? 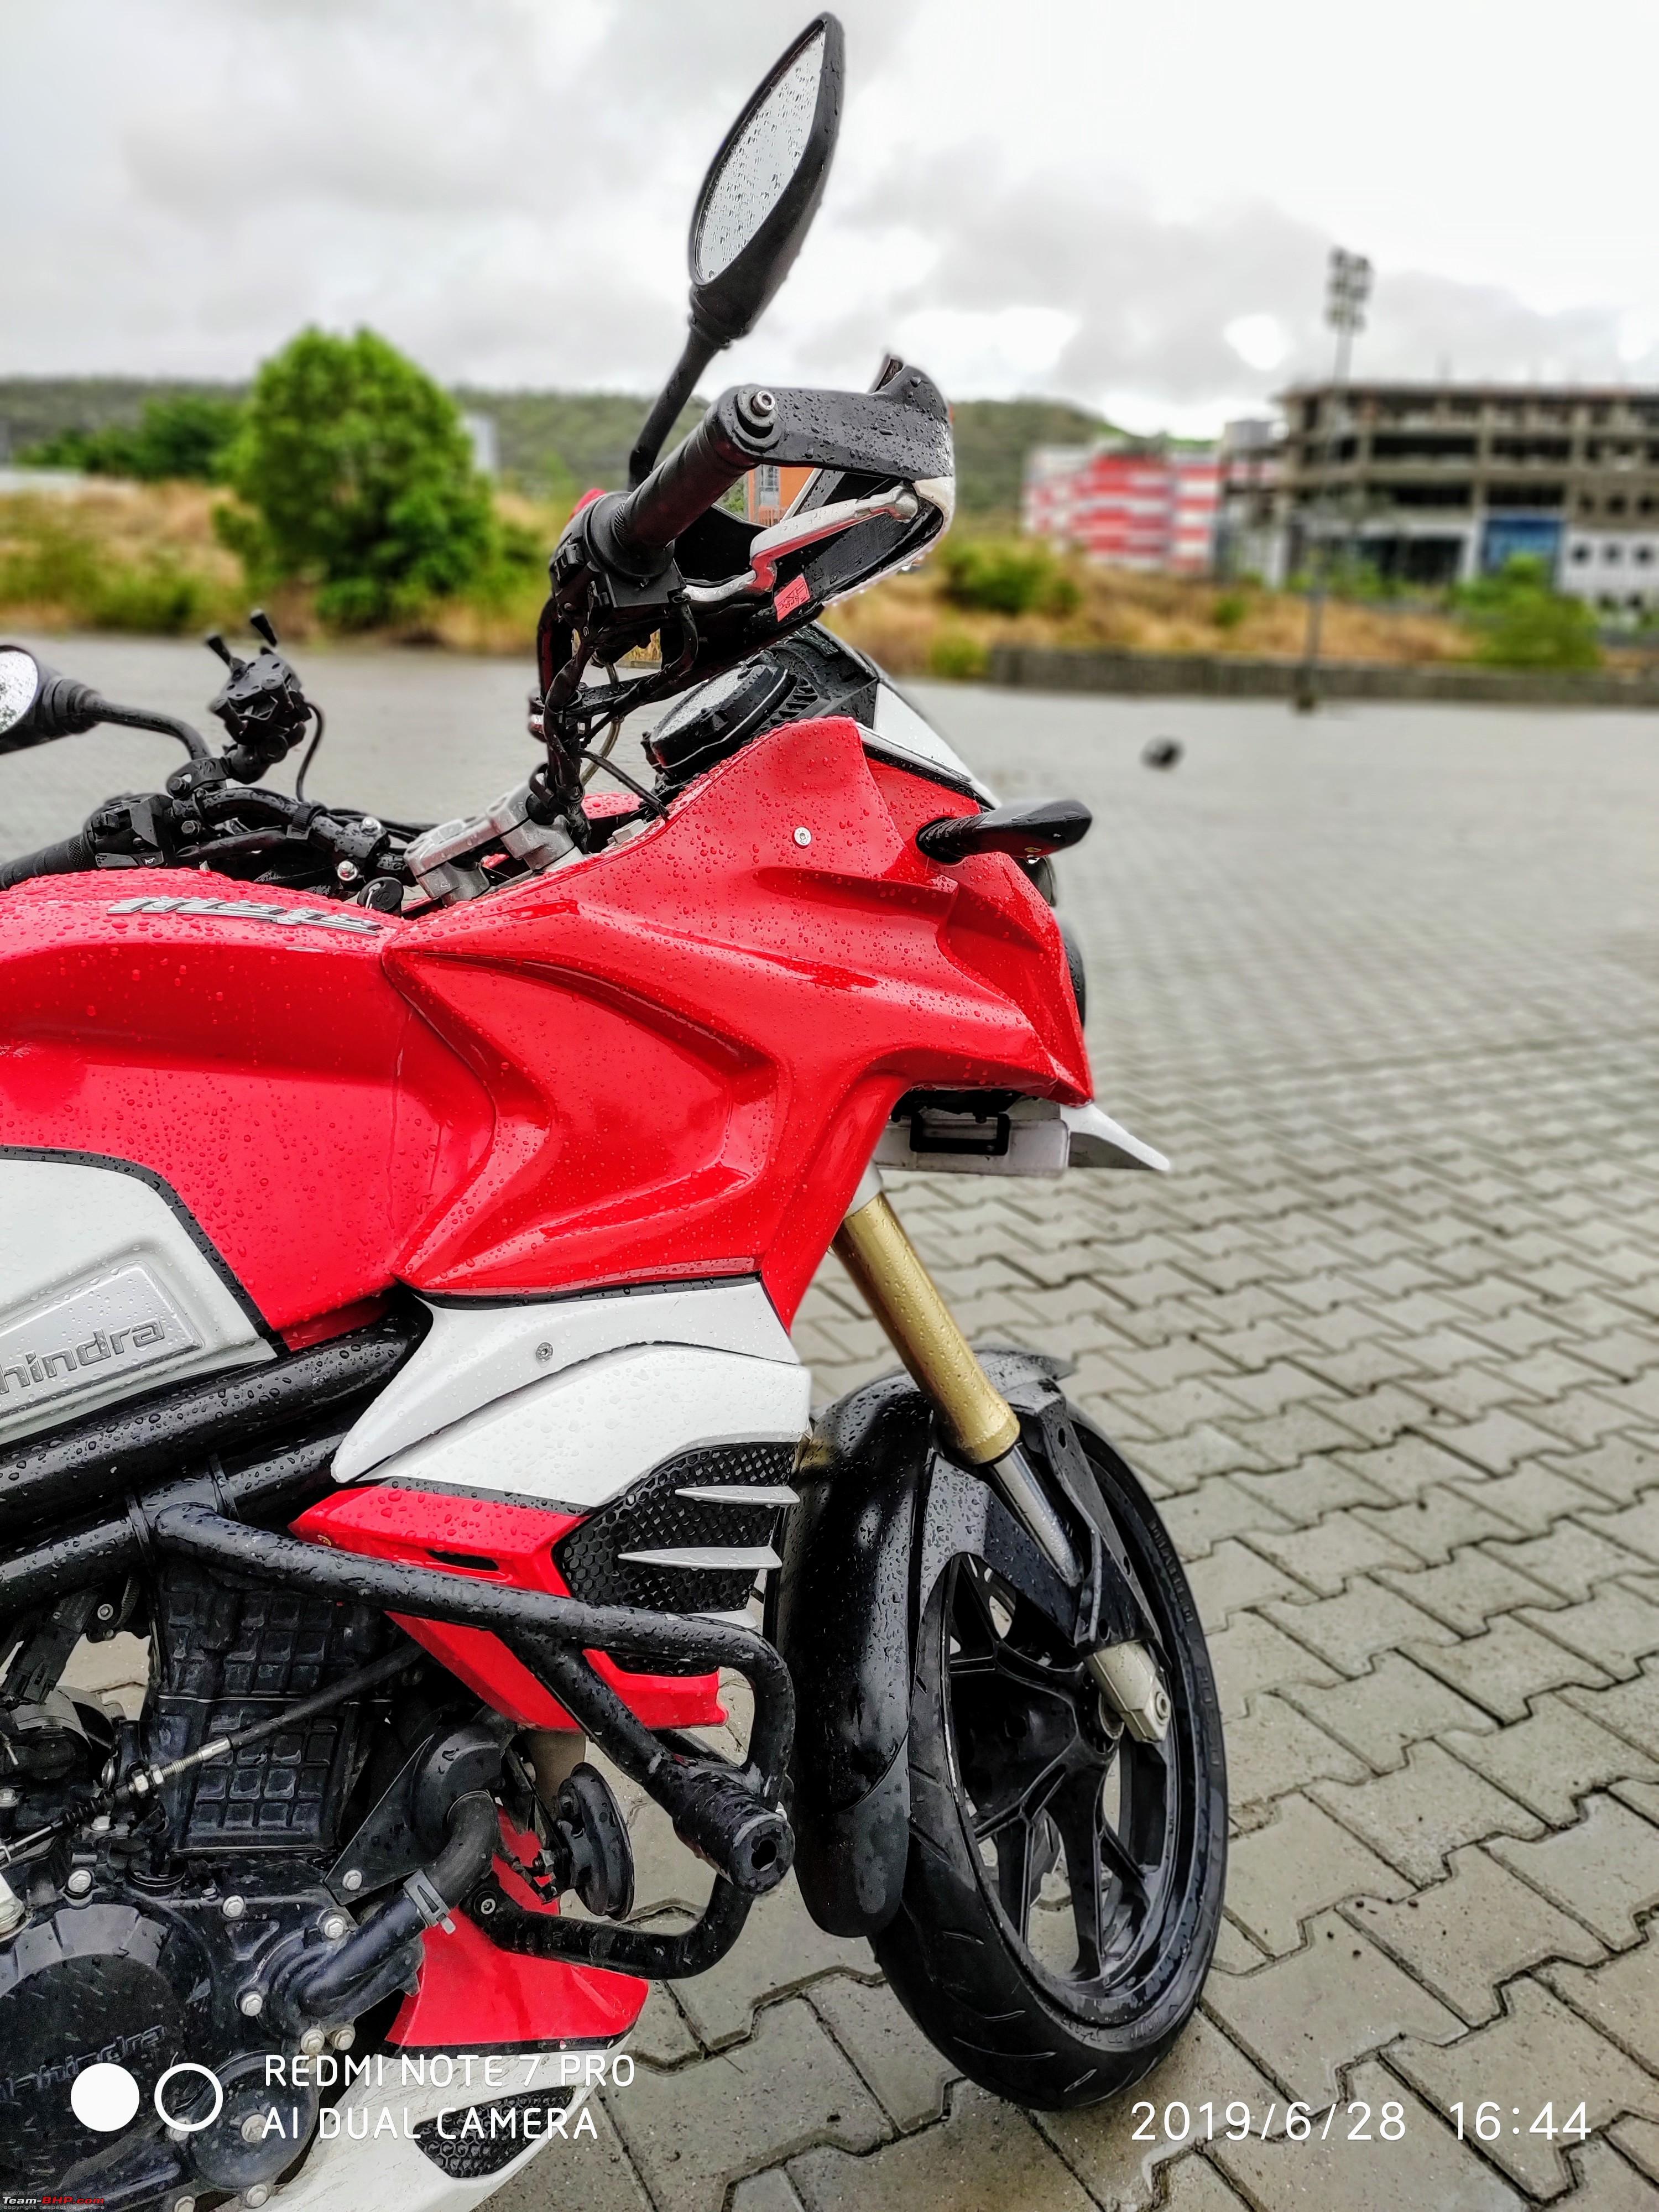 My favourite angle! The fairing and tank gel perfectly together.  The beak. Most of the above pics were taken in a parking lot. Since the monsoons are currently in full swing, I set off with some friends for a photo session and more, ahem, 'testing'. The scenic Sahyadri ranges..  More pictures of the beak. 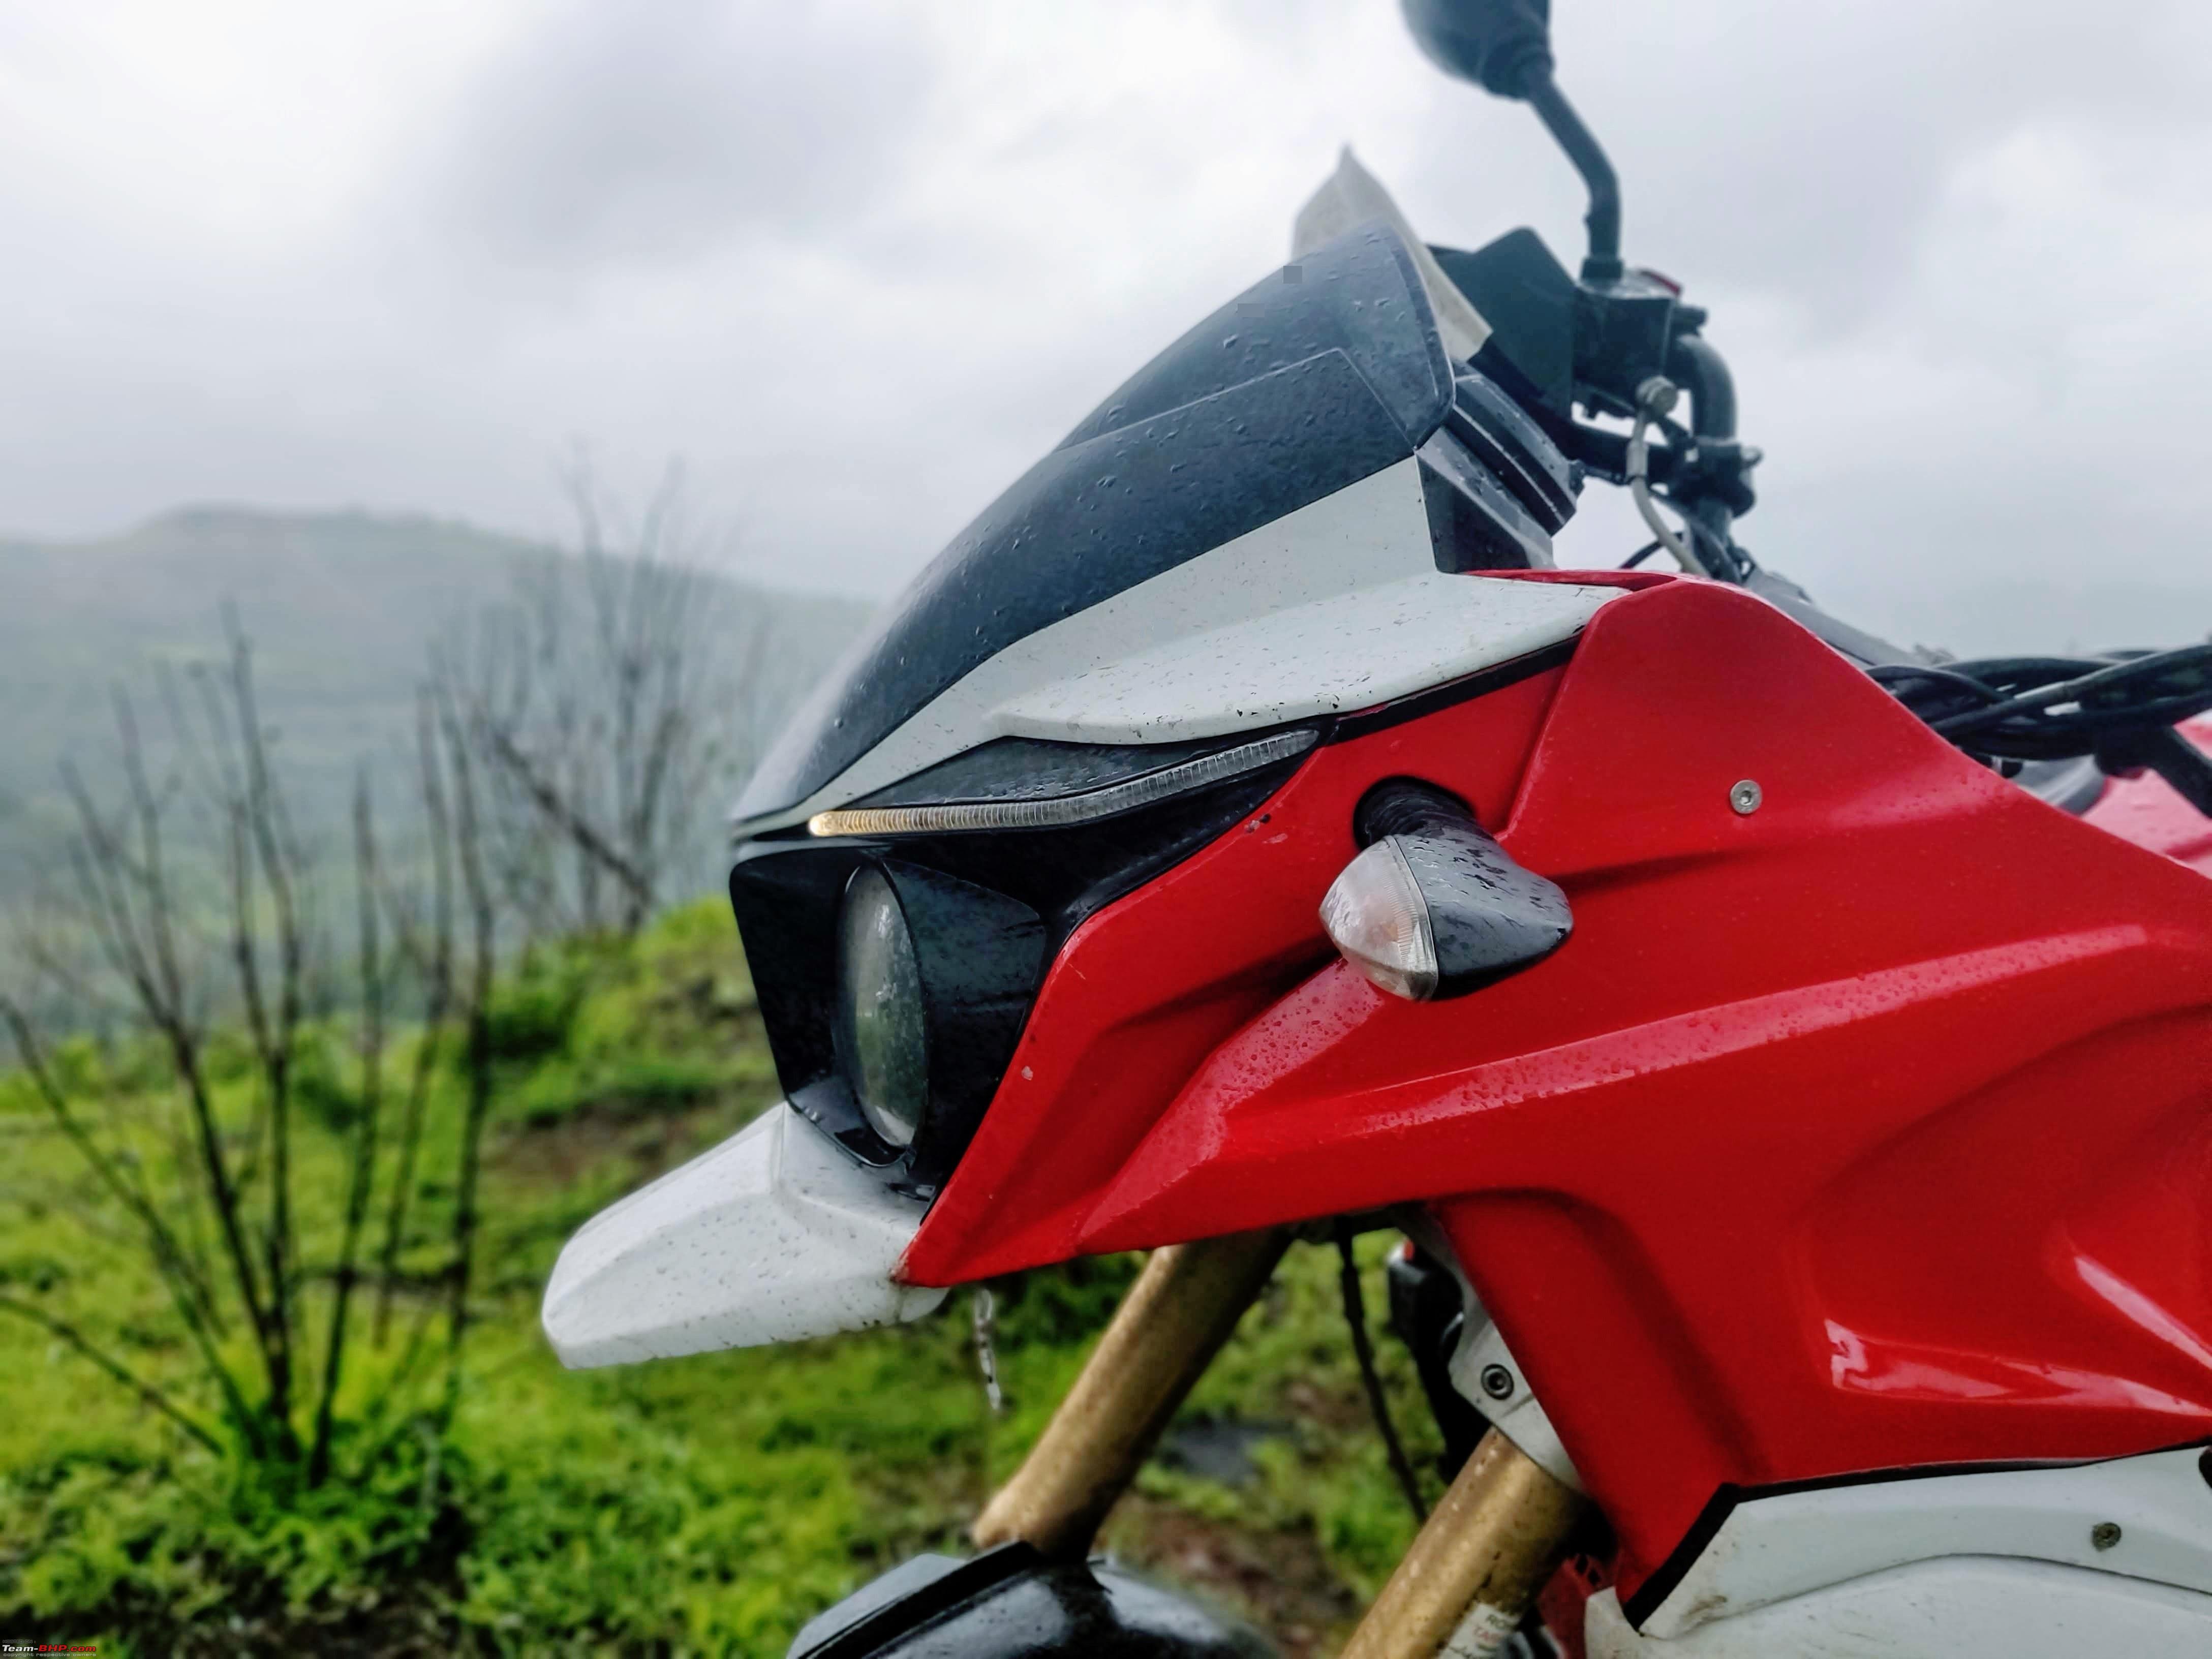 And the side. 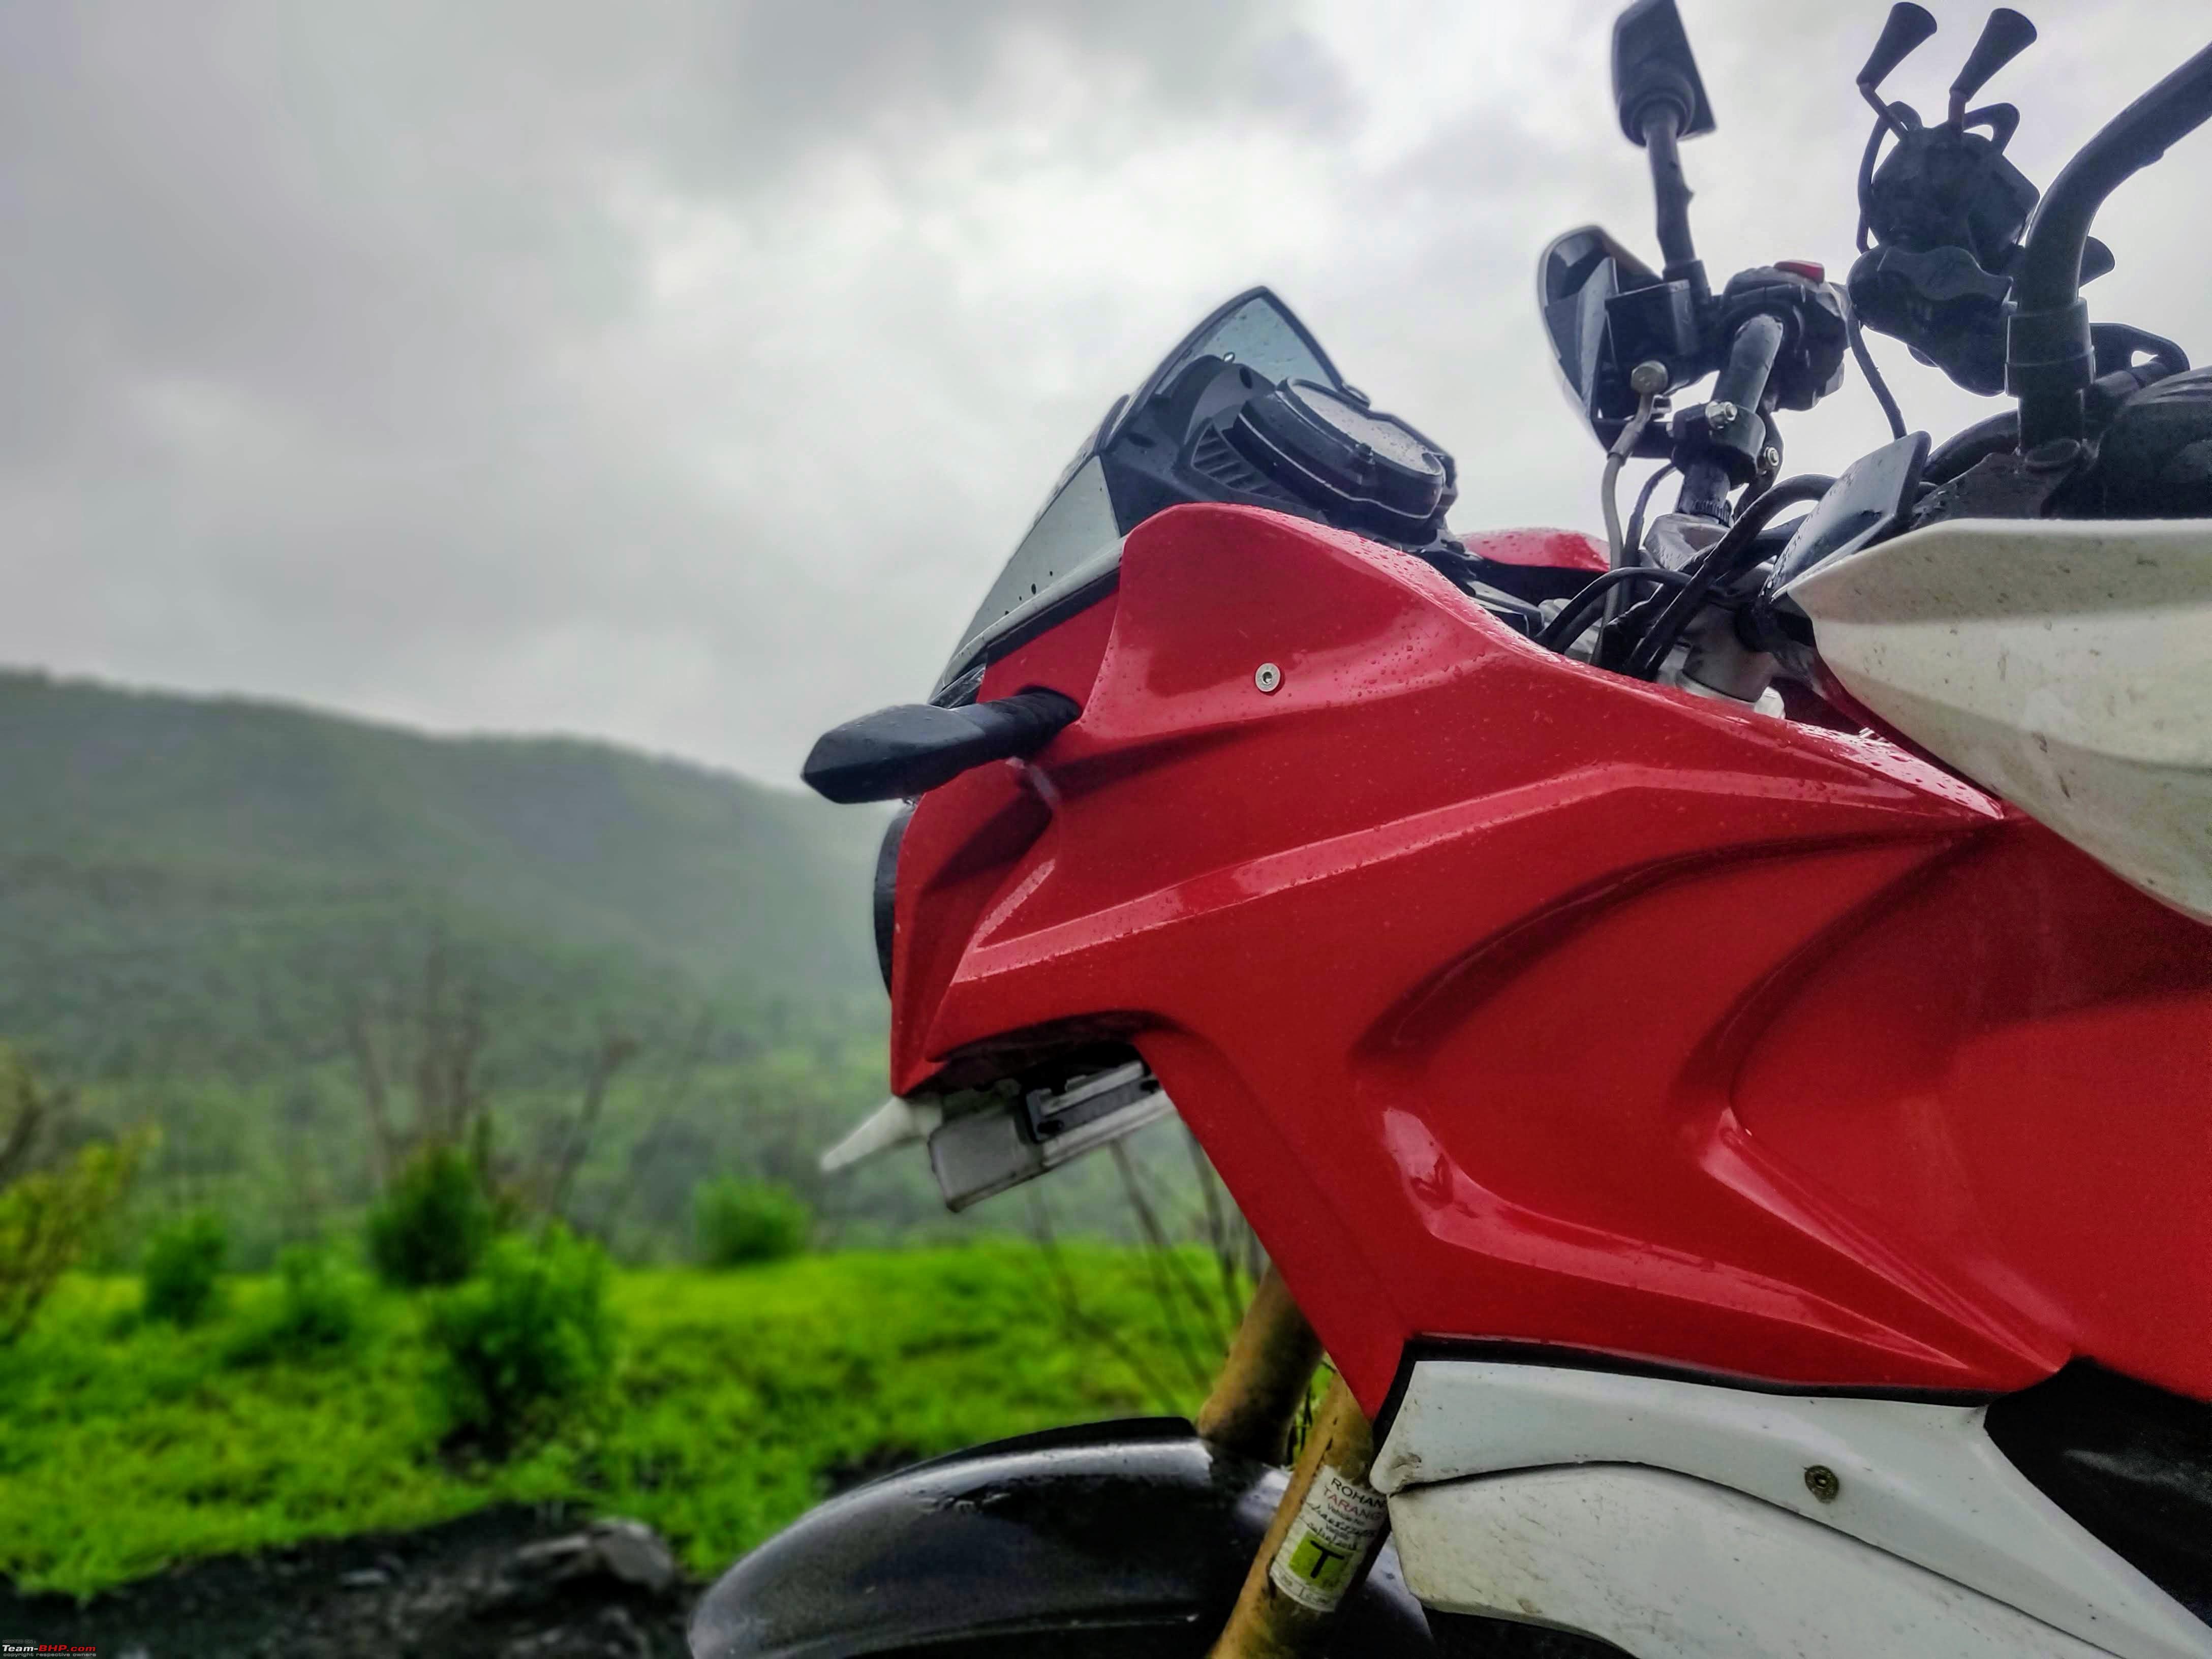 Them curves!  The crash and radiator guards.  Out hunting!  The pack, posing for photos..  Face-off..  And a riot of colors. When I set out to modify the Mojo, I never expected the outcome to be this satisfying. The build is almost complete with a windscreen and a new number plate bracket being the only additions left. A huge shout-out to the team at Ground Designs. The owner, Amit, has an eye for good design, something which is very evident in his other works which you can find on both Facebook as well as Instagram. He did take a lot of time with the bike though. A period of roughly two and a half months from the time I dropped the bike at the workshop for the first time to getting the panels installed on the vehicle. The results though, are out there for everyone to see. Some finishing touches are still to be made and some misalignment rectified. I am currently testing out the setup to check it's high speed stability and robustness over bad roads. The task at hand is to ensure no unwanted vibrations happen due to contact between the fairing and tank/headlight cluster. Last edited by AlQuazi : 10th July 2019 at 11:23. |
|
| (65)
Thanks
|
| The following 65 BHPians Thank AlQuazi for this useful post: | 2himanshu, ACMohan, alphadog, aman9393, amit_purohit20, aveoman19, Balaji31582, Bee, bigron, CliffHanger, comfortablynumb, condor, CrAzY dRiVeR, Cyborg, deepfreak15, Deepsp, digitalnirvana, dkaile, drrajasaravanan, ego4evr, Enobarbus, govigov, GTO, gunin, Ironhide, JatinSharma, keroo1099, KiloAlpha, klgiridhar, mh09ad5578, motorpsycho, narayan, neil.jericho, Night_Fury, Rebelogue, Rehaan, RoboCop13, Roy.S, roy_libran, sainyamk95, sammyboy, sandhyab, Shanksta, Shubhendra, shyamg28, SnS_12, sukiwa, svsantosh, swiftnfurious, tchsvy, The Great, The Rationalist, theexperthand, TheHelix0202, The_Outsider!, timuseravan, Torino, Turbanator, Turbojc, vaish9925, Venom_rider, VijayAnand1, wheelguy, wolg, zavegur |
|
9th July 2019, 20:57
| #8 |
| BHPian Join Date: Mar 2019 Location: Pune, Bangalore
Posts: 109
Thanked: 642 Times
| THE SERVICE EXPERIENCE, PARTS AND NIGGLES The vehicle has been serviced once at NAFS Motors, Bangalore and since then has been a regular at Solum Automobiles, Pune. The service experiences at both have been very satisfying. NAFS motors is an exclusive Mojo showroom who also do a lot of customization on the Mojo. At Solum Automobiles, the mechanic who works on the Mojo is fondly called the Mojo Doctor by the Pune Tribe. His mechanical competency with the bike is second to none and is often able to diagnose problems with a single ride of the vehicle(s). However, I do have a beef with the downtime even simple spares take to arrive. I had ordered a replacement master cylinder for the front brake under warranty. The part took a whopping 5 weeks to arrive at the SVC. The same story repeated when I had suffered a fall and the front mask needed replacement. The parts weren't in stock and took an entire month of continuous follow ups to arrive. Most wear and tear parts however, such as brake pads, chain sprockets etc. are readily available. My rear brake pads have been changed twice at around 8000km intervals while the front pads still have quite a bit of life left even at 21xxx kms. The chain sprocket is almost on it's way out and will need to be changed in another 2-4k kms. The stock Pirellis at the rear lasted me 16000 km by which time they had balded completely and would sway all over the place even with the slightest of brake inputs. I have since switched over to Ceat Zoom Rad X1. This tyre, while no match for the Pirellis in terms of grip, is a VFM option considering it only costs Rs. 4500. I am yet to change the front tyres from stock although these too have balded completely down the middle.   The stock Pirelli at 14000km & the Timsun 659 A which is the next replacement planned. IMO, considering the limited cornering clearance of the Mojo, radials don't make much sense. The best tyres for this bike would be a pair of Timsuns 659A for the kind of roads we experience. These are bias ply tyres for on and off road use which although heavier than the radials, also have a thicker sidewall thus providing a better ride quality. My rear monoshock sprung a leak when I couldn't spot a pretty nasty road undulation while doing triple digit speeds two up on the NH4. The pillion landed back down pretty hard bottoming out the shock. Since then, vibrations have crept in on the footpegs at the 70-80 kmph mark. This happened when the odo was at 18000 km. I am yet to get this sorted out despite the service center having the part in stock.  The leaking rear monoshock. Lesson learnt - The monoshock provides a magic carpet ride. But it needs its babying too to remain healthy. A recurring niggle most Mojo owners face is the fogging up of the speedometer console. With too much water ingress, the meter eventually fails completely. Mahindra has acknowledged this and replaces the meter under warranty. However, there is no way to program the odo to the older value and the new meter always starts from 0 km. Since my bike was anyway out of warranty, I did not want to risk the meter giving up on me. So opened it up and packed in a layer of silicone sealant where the two halves meet. The meter is yet to fog up since, but I am keeping my fingers crossed just in case. 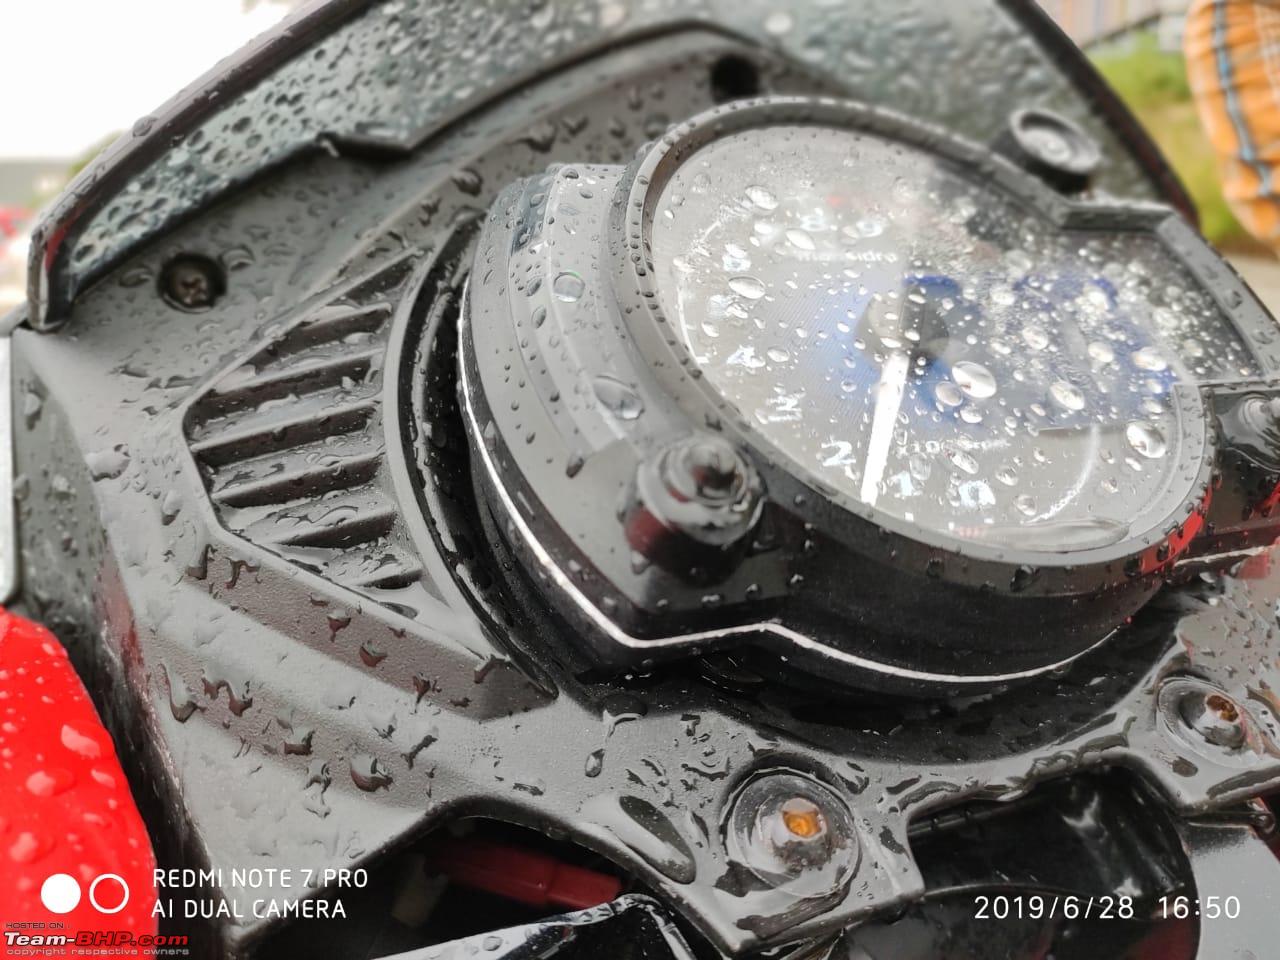 The white layer of silicone visible on the meter There have been isolated cases of ECU failures and failures of the Lambda sensor. While Mahindra proactively replaces these under warranty, it will be another hit to the pocket for me should any of these fail due to water ingress. The niggles aside, the Mojo is a fairly reliable machine. The engine is one of it's strongest points. We have a number of owners across the country having covered 1 Lakh plus km with just the regular services and wear and tear components being replaced. This bodes well for some of us who plan to keep the vehicle in for a long haul. The Mojo Tribe The Mojo Tribe is the name for the owner's groups. There exists an All India as well as the local chapters of the tribe. These tribes are pretty active in organizing the occasional rides as well as sorting out any niggles/complains etc. one might have with services and or spares. The Pune tribe, of which I am a part of, organizes a meet every couple of months besides the occasional breakfast rides. It is a good way to meet fellow tribesmen and petrolheads who are as passionate about the bike as you. You get to hear a lot of travel experiences, adventures, mods as well as the occasional SVC woes. 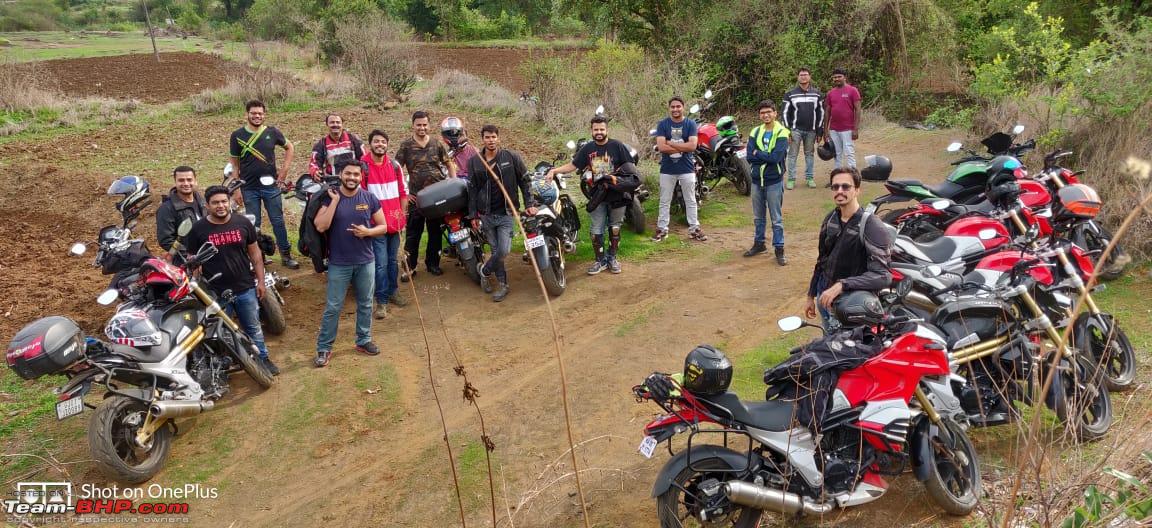 Breakfast ride to Mulshi..  The Mumbai and Pune tribes at Tapola, Mahabaleshwar Ending notes - The odo stood at some 10800 odd kms when I got the bike on my hands. I have only been able to add another 10000 km since, almost half of which must have come in the city. Going forward though, I hope to cover more distance touring rather than commuting (or disassembling it). This bike is a perfect travel companion to explore the country. It can cover some major distances without breaking a sweat! It is an effortless cruiser, with a befitting #UltimateTouringMachine tag attached to it. A trip down South is on the cards along with a GQ and a coastal run. The biggest hindrance would be convincing the folks at home. But fret not! The 'testing' guise that has worked till now, should hold up even in the future. This review has been in the making for a long time. However, I had decided to let the build finish before putting it up online. An adjustable windscreen is the next (and hopefully last) thing on the cards. Let's just hope I keep updating this thread regularly. The Mojo is a very well built albeit underrated machine. It needs its due on the most powerful Indian automotive platform on the internet. Thank you guys for reading!  Last edited by AlQuazi : 10th July 2019 at 16:54. |
|
| (77)
Thanks
|
| The following 77 BHPians Thank AlQuazi for this useful post: | abhijeet080808, amit_purohit20, arvindmanju, ashokrajagopal, AtheK, audioholic, aveoman19, Balaji31582, Bee, BLACNWYTE, BoneCollector, CarManMotorcycl, CliffHanger, comfortablynumb, condor, CrAzY dRiVeR, Cyborg, daretodream, deepfreak15, Deepsp, Desmosedici, digitalnirvana, dkaile, DriverWanderer, drrajasaravanan, ego4evr, Enobarbus, Funny, fusionbang, govigov, GTO, gunin, InControl, Ironhide, jkaushik, jusgetgoing, keroo1099, klgiridhar, lazy, mac187, mallumowgli, ManasN95, marcussantiago, maverickrider00, mh09ad5578, moralfibre, motorpsycho, narayan, neil.jericho, Night_Fury, Nitish.arnold, pavanmadhini, rajshenoy, rakesh_r, Rehaan, Roy.S, roy_libran, sammyboy, Shubhendra, shyamg28, smuniswami, somspaple, swiftnfurious, tchsvy, The Great, The Rationalist, theexperthand, The_Outsider!, Torino, Turbanator, Turbojc, vaish9925, Venom_rider, VijayAnand1, wheelguy, WhiteFang, zavegur |
|
11th July 2019, 08:34
| #9 |
| Team-BHP Support  | re: When you can't afford that Tiger, you build one! My (Modified) Mahindra Mojo Thread moved out from the Assembly Line. Thanks for sharing! |
|
| (4)
Thanks
|
| The following 4 BHPians Thank Aditya for this useful post: | AlQuazi, digitalnirvana, GTO, uday.ere |
|
11th July 2019, 09:44
| #10 |
| Senior - BHPian | re: When you can't afford that Tiger, you build one! My (Modified) Mahindra Mojo This is a 5* thread. After a long time I am seeing a build quite like this. Very importantly the motorcycle still looks very good. Would be even better once you have a windscreen. Kudos! |
|
| (6)
Thanks
|
| The following 6 BHPians Thank roy_libran for this useful post: | AlQuazi, audioholic, klgiridhar, Night_Fury, SnS_12, WhiteFang |
|
11th July 2019, 09:51
| #11 |
| BHPian Join Date: Jan 2009 Location: Bangalore
Posts: 98
Thanked: 330 Times
| Re: When you can't afford that Tiger, you build one! My (Modified) Mahindra Mojo Superb modification. Just how I had imagined Mojo facelift would look like (in case Mahindra is still interested ). Looks like spiritual successor to the Karizma to some extent. |

| (5)
Thanks
|
| The following 5 BHPians Thank abhijeet080808 for this useful post: | AlQuazi, audioholic, Night_Fury, tchsvy, WhiteFang |
| |
|
11th July 2019, 10:01
| #12 |
| BHPian Join Date: Feb 2010 Location: Blore
Posts: 268
Thanked: 665 Times
| Re: When you can't afford that Tiger, you build one! My (Modified) Mahindra Mojo Great Job there. Liked your patience and determination on this one. The bike looks lovely with the fairing and the beak Any plans to go for a single headlight and touring windshield? That would make a delight! Last edited by JayKis : 11th July 2019 at 10:03. |
|
| (1)
Thanks
|
| The following BHPian Thanks JayKis for this useful post: | AlQuazi |
|
11th July 2019, 10:32
| #13 |
| Distinguished - BHPian  Join Date: Oct 2018 Location: COK\BLR\MYS
Posts: 3,760
Thanked: 10,811 Times
| Re: When you can't afford that Tiger, you build one! My (Modified) Mahindra Mojo I have seen this bike in Bangalore or another one similarly done, I heard the sound first and thought it was a Mojo, but it looked purposeful with all the touring kit. Its a fine job you have done, I did not realize that it was a custom job. Mahindra should take some ideas from your build and re-launch Mojo as a true adventure touring bike, with all metal bits. |
|
| (8)
Thanks
|
| The following 8 BHPians Thank Kosfactor for this useful post: | AlQuazi, digitalnirvana, Night_Fury, sainyamk95, SnS_12, swiftnfurious, tchsvy, Turbanator |
|
11th July 2019, 11:16
| #14 |
| BHPian Join Date: Mar 2018 Location: Bengaluru
Posts: 188
Thanked: 618 Times
| Re: When you can't afford that Tiger, you build one! My (Modified) Mahindra Mojo If there ever was a Mojo that I'd really love to own, its this! Hats off to you. You have taken a bike that had a lot of rough edges and polished it to a beautiful shine making a gem out of it! Loved the way you identified all the pain points of the bike, assessed and analyzed, then executed the fix to perfection. All this without ever letting go of the main USP of the bike. This is one Mojo that definitely has its mojo going! Mahindra should learn a thing or two from you. Their product in stock form is 50% or thereabouts. You made it a 100%. You should post this thread to Anand Mahindra's Twitter handle. He is pretty active on Twitter. Would love to hear from him on this! |
|
| (3)
Thanks
|
| The following 3 BHPians Thank arijitkanrar for this useful post: | AlQuazi, digitalnirvana, mh09ad5578 |
|
11th July 2019, 11:35
| #15 |
| Newbie Join Date: Aug 2016 Location: Thodupuzha
Posts: 4
Thanked: 22 Times
| Re: When you can't afford that Tiger, you build one! My (Modified) Mahindra Mojo A fellow mojo owner here. What a right up bro. Thoroughly enjoyed it. I could relate to almost every experience you have had. Mojo to those who know it is something that has to be experienced to acknowledged. Cheers and wish you many more happy miles. |
|
| (3)
Thanks
|
| The following 3 BHPians Thank Downshift7 for this useful post: | AlQuazi, KA18, Swaroop Gowda |
|