News
Installing multiple DIY upgrades on my Volkswagen Polo TSI


A paddle shifter wheel is a great plus and a must have for all automatic cars, and its not just for the thrill, but it is also a really handy tool for driving down ghats, considering the stock brakes on the automatic car have a tendency to fade real quick, considering the torque converter is also lazy to shift down and shed speed.
BHpian fluidicjoy recently shared this with other enthusiasts.
Thought I'd post a quick series of updates from my Polo since there’s been too many of them and I don’t want to lose track, so its best I start with something. I plan to write a few more detailed posts in rapid succession.
Passat W8 Style Dome Light:
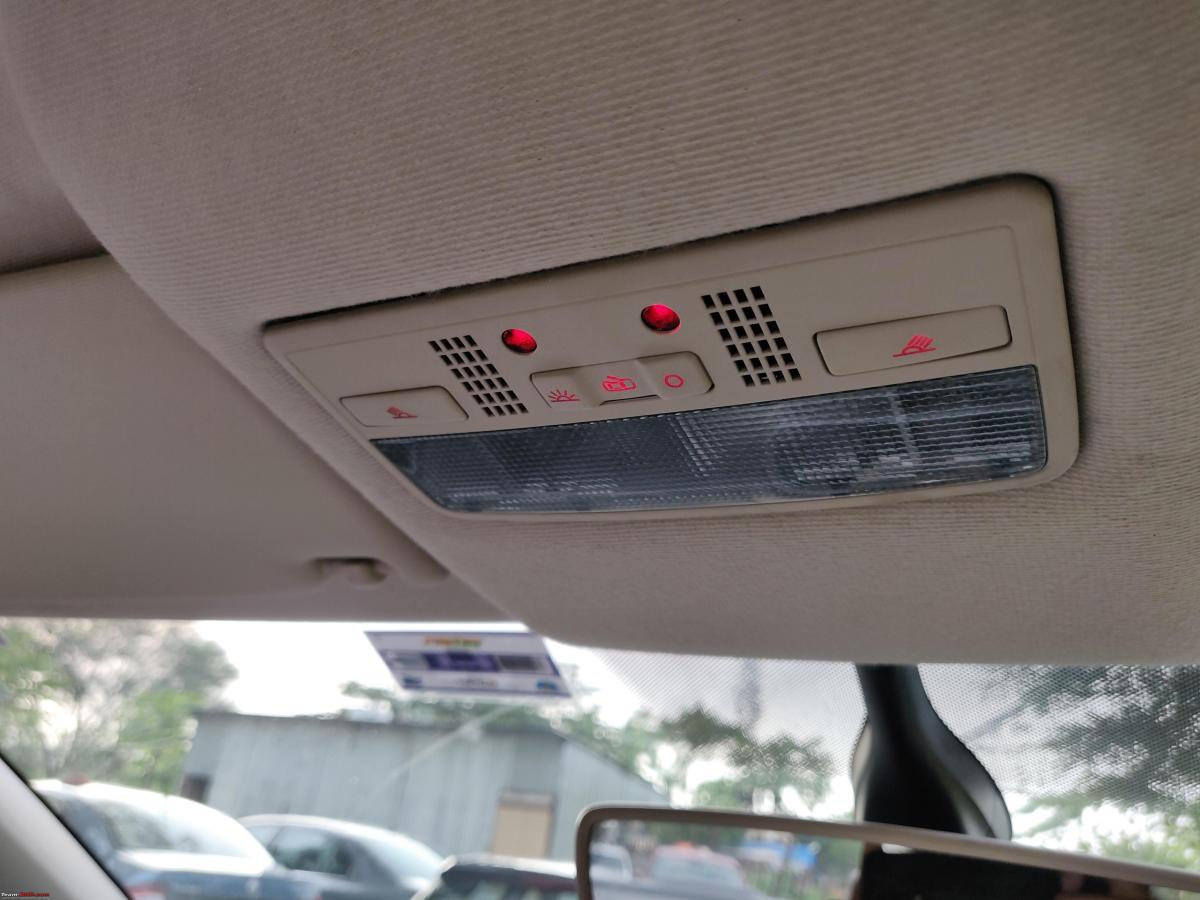
- I’d love to say there’s nothing special about the Passat W8 style light, but I would be lying, since there are so many folks who have this on their wish list. I was using a 3 Lamp Cabin light before, and it was serving a great purpose for the most part. However, I got the itch and procured this Passat Style cabin lamp, which has been installed by quite a few helpful BHPians like TheLizardKing, Agam Bhandari, Sarfraz Khan, Viraat and others. Now there’s only two things I'd like to repeat about this retrofit.
- It’s not as plug and play as the 3 Lamp Cabin Light which is a perfect plug and play fit, both physically and electronically.
You have to tap into a point for interior illumination, which enables the true killer feature on this lamp, the red glowing ambient light which shimmers down on the gear knob and instantly ups the premium feel in this cabin.
Few Takeaways:
- No afterglow trouble on the Philips T10 LEDs I purchased from Powerbulbs UK. The earlier assembly had a minor LED afterglow when the switch was on the Door Open position.
- Red ambient light really sets the mood right.
- Slot for placing microphone for installing of Composition Media and Discover Media external microphones in the roof, for superior call quality.
- Need to either flex the headliner, or cut the mounting clips to properly and snugly fit the lamp into the roof since it does not have any T20 bolts which the earlier lamps had. Not a deal breaker, but if you thought this was going to be a straight butter smooth swap, then you'd be in for a surprise. So for making a plug and play harness, I invested in a wire crimping tool from Stanley and also picked up a few solder less heat shrink crimps for making a plug and play harness for this retrofit.

For this particular harness, I used the heat shrinking solder crimp, but I’m glad I bought the crimping tool as I'm having a really good time crimping wires which I once would electrically tape after a Western Union splice. I find the crimping of automotive wires a much stronger alternative to insulation tapes. To combine the best of both words, it's probably a good idea to crimp and then insulate them with tape to keep moisture out of the crimp crevices.

When I was working at my internship firm, I had access to a few micro controller harnesses which was coincidentally a 0.25 and 0.5 gauge wire bundle. My manager was kind enough to let me take home a few of these harnesses and I used this spare harness for inserting in the headlight switch for enabling the illumination. So yes, as of now, I still haven't permanently altered any factory wiring harness and I'd love to keep it that way.
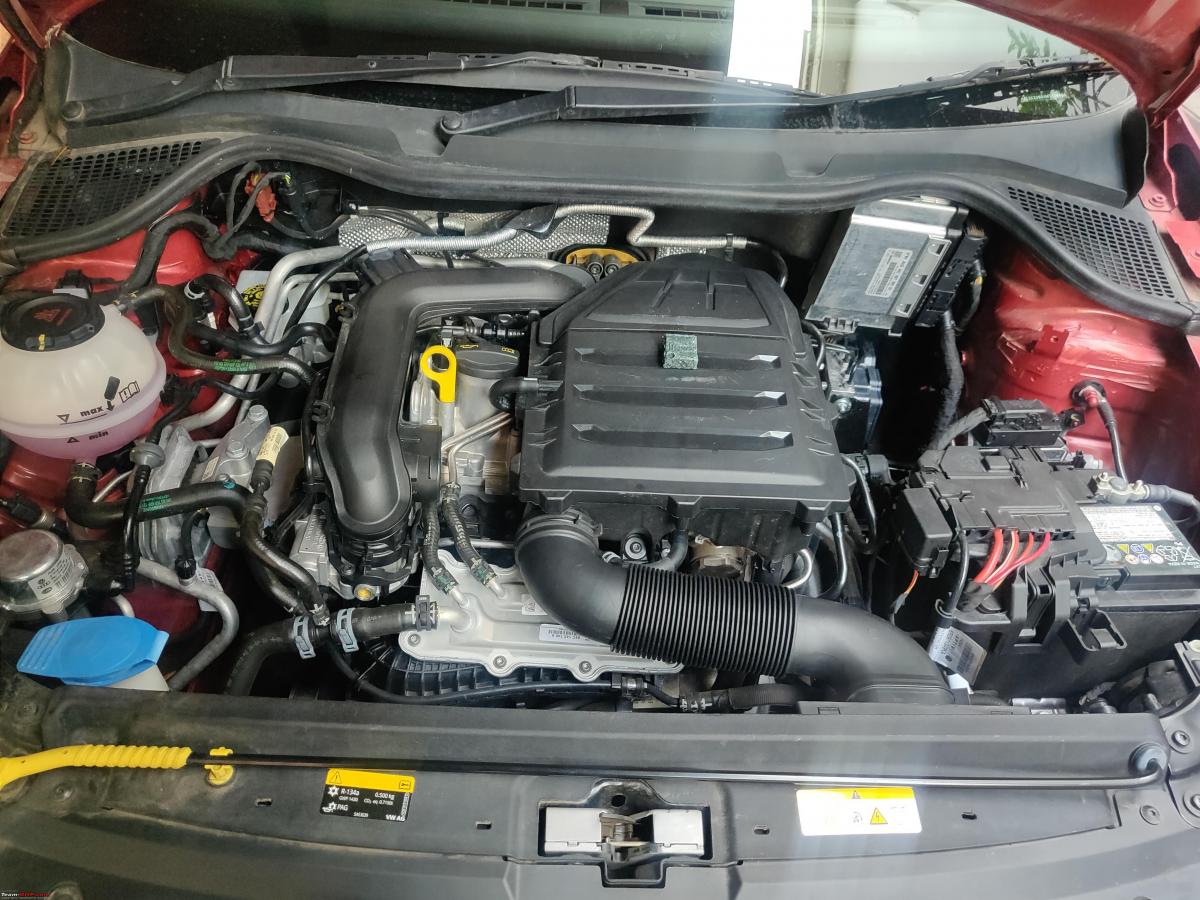
Bonnet Strut:
I’ve always wanted a hood strut and it’s been installed on numerous Polos and Vento on this forum. But most of the implementations I recall were using two struts to support the bonnet. I found references to a near OEM implementation, courtesy Ciclo and a few Europeans, and wanted to tread along that path. I ordered the supporting hardware from Ebay and was excited to try this out. Also, contrary to popular belief, quite a lot of vehicles do come with just one hydraulic, gas-oil hybrid strut to support the bonnet weight, and this just shows that a well designed strut can also do its job alone, and needn't always be in a pair, provided its the right spec. Our Tiguan and Jetta MK5 is a testament to this fact.
I ordered 1J0823359D and this strut was documented to have a near OE functionality. It has enough force to safely support the hood and the bonnet angle is now a tad more than the stock mechanical bonnet holder. And it is also magically just right for dropping the bonnet down from a small height (the right way to do it as per the Polo manual). The retrofit was not without its challenges since the Ebay bracket holes did not match the holes on the Polo bonnet hinge. So we had to drill it and file it. A friend of mine and I took turns to drill through the plate at The Mechanix Automotive.

I also thought it’d be a nice idea to coat the brackets and bolts to a near sunset red finish for consistency. I’m no expert with paints, but I found a fairly close spray paint shade on Amazon and tried it out, and the result turned out pretty good I think. I only wish I’d have suspended the work pieces from a small thread to prevent them from sticking to the cardboard I used to spray them on.
It was a joy to see everything work perfectly and this has been a boon when I need to work or check on things under the hood. The folks at the dealership were also amused to see this add-on and they made it a point to try it a few times each including a few side-way torsions on the bonnet to see if the strut would damage the alignment, but even they gave it the clean chit.
Some FAQs since I have already received a few skeptical queries:
- Will it bend the fender?
If you use a washer below the fender ball stud, then no, there shouldn't be a burden on the fender. - Will it disturb my bonnet alignment since other kits have used two?
No, the force is just adequate to properly support and also let the bonnet drop down on its own weight. The problem usually arises if the bonnet is freed from the hinges to begin with, and it also depends on the strut and associated forces being used. - Difference in Chinese and Two Strut Kits?
Chinese strut kits are priced nearly half of the OE strut kit. They have different brackets and accordingly different struts. Kits from China use an entirely different bracket which sits on both of the bonnet bolts and the force is such which might dictate the need for two struts. From what I’ve seen from my friends, such pair of struts do not give the convenience of a drop close. - How much have I tested this?
I have been using this from the last few months, and I open the bonnet at least 2-3 times a day, for a minimum of 4 days of the week for some work, or checking vitals since I’m paranoid about my work sometimes. So I can safely say the bonnet strut has felt perfect without disturbing anything on the car. - Can I use two such struts?
Probably not a good idea, since it was tested and determined to work best solo. Using two might not give the result of drop close and soft open, because of excess force. - Will it work on the Vento, Rapid, Ameo?
I have installed it on a Vento and an Ameo, but the same strut and mounting kit did not fit the Skoda Rapid since the fender is designed differently. We tried, and it wouldn't fit, and also ended up disturbing the bonnet alignment when we tried a few other mounting spots.
If you wish to assemble a similar kit, here are the links of products I used. I would have fabricated and arranged the first two objects locally, but Maharashtra was facing a strict lockdown with limited access to the industrial sector, and so I found it a good idea to import the parts instead.
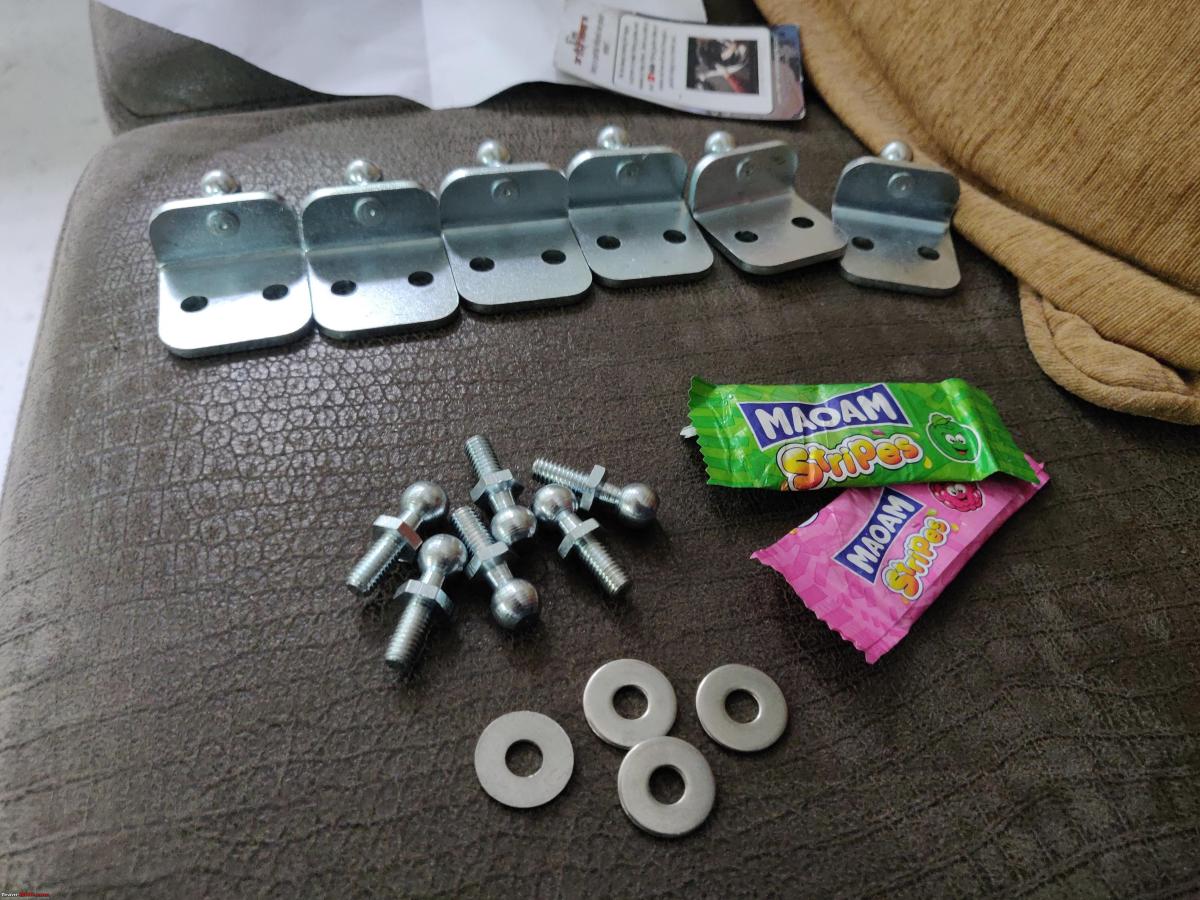
Ball Stud Bracket: https://www.ebay.co.uk/itm/111289292832
Ball Stud M6: https://www.ebay.co.uk/itm/111293093987
Gas Filled Strut: 1J0823359D, about 2500 at Volkswagen.
Net Cost: Rs. 3000 or so.
Fender torque spec: 6Nm
Boot Hinge: 20Nm
Here’s a quick video to see the strut in its glory and to also breeze past the installation journey:
Polo 6R OEM Gas Filled Hybrid Hood Strut Retrofit
Driver Side ORVM Upgrade:
On most European right hand drive cars, the driver mirror is aspherical to reduce driver side blindspots and this has been something I’ve seen on both the Jetta and the Tiguan, but the Polo sold in India came without this ingenious touch and to add insult to injury, the mirror size has also considerably reduced from the initial Polo which was sold in India. I personally have been able to drive around comfortably, after adjusting the ORVMs to its extremes, but there are quite a lot of drivers who wished the Polo’s ORVMs offered a better view.
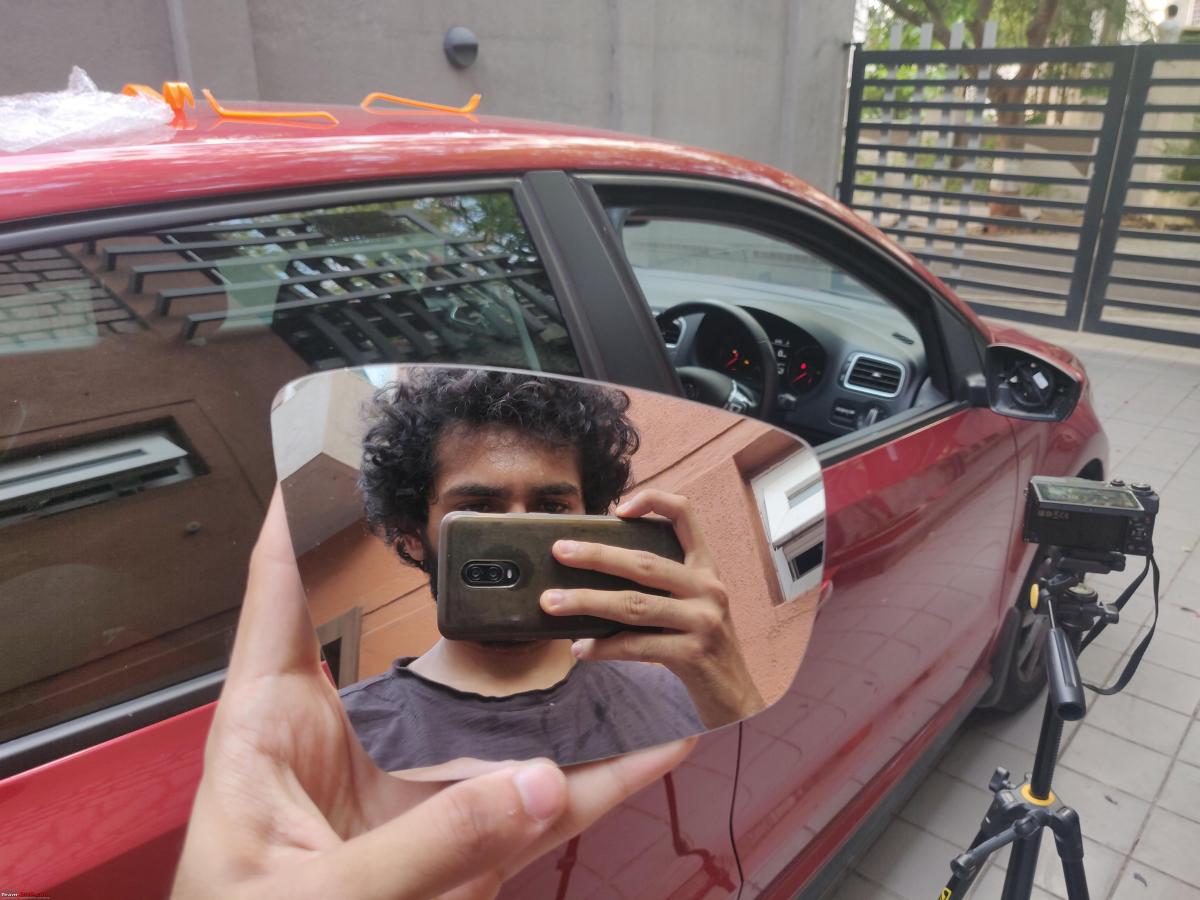
Well, the good news is, you can swap out the driver ORVM and replace it with an aspherical one. Replacing the mirror is fairly simple and all you need is a simple plastic pry or trim removal tool to release the stock mirror glass from the mirror adjustment motor.
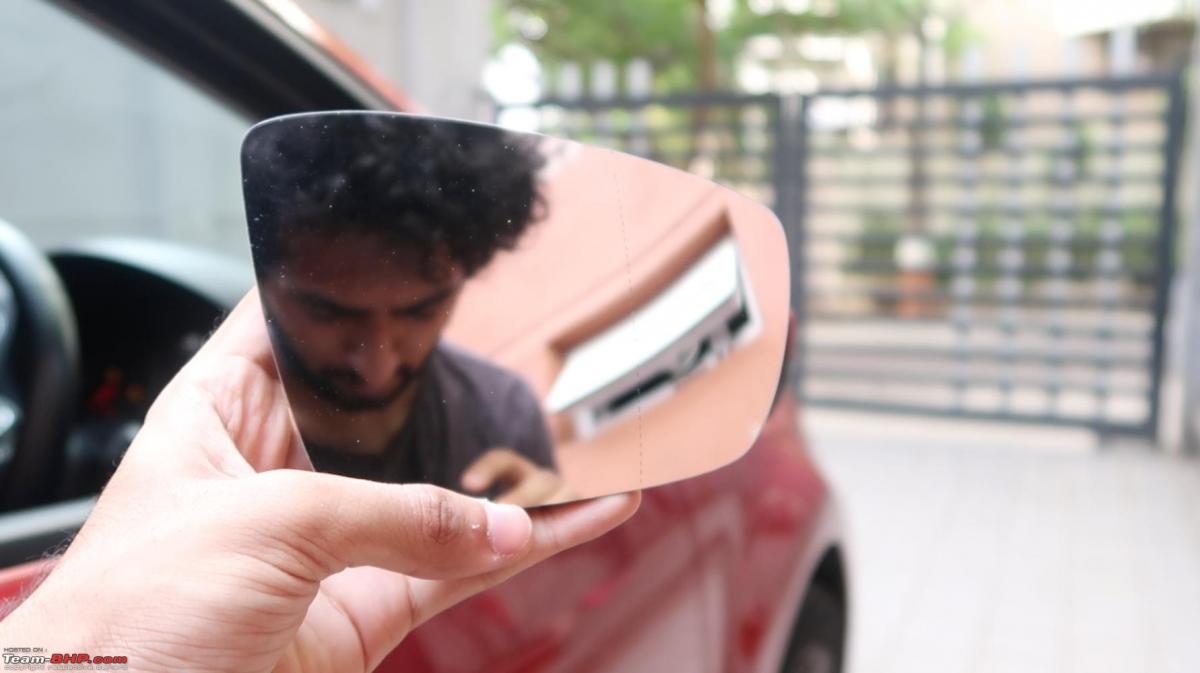
The aspherical mirror curves beyond the dotted lines, and offers a much better view of the side lane and this is especially usually to see objects in your blind spot. You can also find a passenger side aspherical mirror, but as per Euro spec, only the driver side mirror is aspherical from the factory.

I purchased this from Ebay and it landed at nearly 2000 rupees per side, courtesy shipping and duties. The mirror I have is now also a heated mirror, useful if I lived in a frosty area and was considering a heated mirror retrofit, but this is something I don't think I'll ever do. The mirrors I purchased are a good quality glass but I believe the factory aspherical mirror on European Polos could be a lot better but its priced 3x, and so I thought this one would suffice for now. What was an interesting revelation during this upgrade was that the stock mirror glass was made by TATA.
Automatic Headlight Switch Kit:
This is a very well documented modification on this forum, but I thought I'd summaries a few learnings. Firstly, higher variants of the Polo do come with a Rain and Light Sensor (RLS), but it is sad that the stock car electronics do not have the provision of using the light sensor functionality. The stock BCM part number on this Highline+ ends in 87S, while integration of the RLS for Automatic Headlights and Coming Home and Leaving Home lights needs a higher BCM and an automatic headlight switch. Actually, the Polo hatchback never came with automatic headlight provision from the factory. This was only a provision on the Polo sedan globally (which we know as the Vento).
Video:
Polo 6R - Automatic Headlights with Coming Home Leaving Home - CH/LH
So, most enthusiasts have been resorting to a Chinese autoswitch or external module with sensor which grants the Coming Home and Leaving Home Functionality, a very popular VAG Group feature, which I first experienced on our Jetta. Unlock the car in the dark, and the low beam lights up to guide the way. Push the light stalk and open the door, and the low beam lights up to find your way out. A very premium and a very welcome feature which would have been awesome to have on the Polo, right from the factory. But, the chinese auto headlight module is pretty solid at implementing these OE level features at a fraction of the effort, without a dent on the vehicle warranty. Now, there are quite a few variants of the Auto Switch. Some have an Inbuilt sensor, but if you have a design OCD, you'd hate how aftermarket it looks. The fonts are bad, the light bleeds out of a few switches as well. There are quite a few switches sold by retrofit guys which don’t even fit straight and this is because they're giving you the wrong switch under the pretext of being newer and genuine. An alternative to this problem, is using a genuine Auto Headlight Switch which has a 10 pin connector, and this can be connected to a Chinese auto headlight module, which has an external sensor which we route and tuck along the A-pillar. I haven't done my best at tucking this wire, but it can be done even more cleanly. After a point, you'll even forget the existence of this wire as you'll fall in love with the convenience this module brings in.

There is a certain satisfaction with having the genuine switch in your car. It also sports the brushed aluminium finish paint, which I had from the factory switch on my Highline+ vehicle, and sadly the GT Line only had to make do with a plastic headlight switch.

Again, there exist quite a few types of headlight switches. Many look similar, but not all of them are genuine. You can also find a newer type of switch if you want it. Our Tiguan has this kind of switch, but if you try and put the exact Tiguan switch in a Polo, it fits oblique and this is definitely not something that you wanted. So you have to find the right type of MK7 type genuine switch if that design is more your thing, as not all fit the same way on the PQ platform. Some sellers and retrofit guys might tell you that this is not possible, but my sincere request is to settle for nothing but the best and what's right for your car. There’s a small plus of going for the genuine switch, which is devoid of any modifications, and it is the future proofing of the switch with an automatic headlight upgrade in OE way, which I’m working on as we speak, and I’ll share more information about that in another post.
During the process, of studying these minute differences in switches, I discovered a way to enable Auto Headlights on a Vento Highline+ which which comes with the newer 6C Style LED Lights from the factory. This took nearly a day to perfect, and finally the Vento owner I did this for, was really happy with this newly added OE addition, all without a Chinese module. His 2017 Vento HL+ now has factory fit Coming Home, Leaving Home and Automatic Headlights, with a genuine Auto Headlight switch.
Steering and Paddling Around:
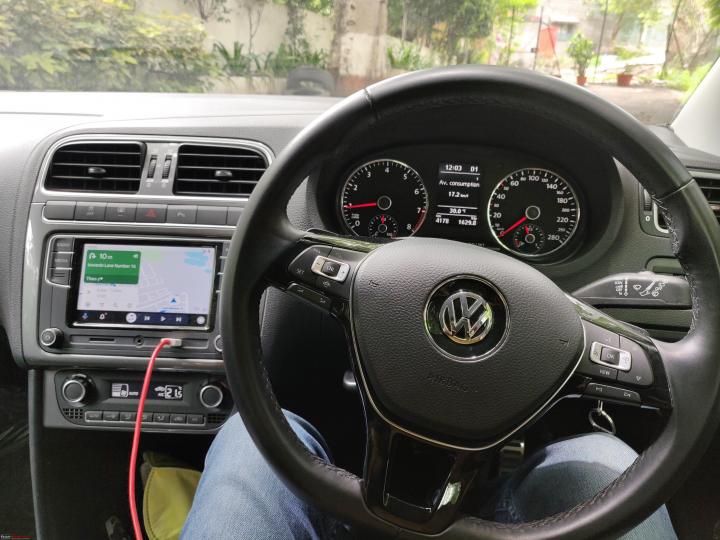
When we got home our car, I was barely impressed with the shift quality from this AISIN 09G 6 speed torque converter. I went on record and said that I wasn't interested in a paddle shifter steering, but a lot has changed on that front since February, as I've tried a plethora of paddle shifter wheels. Truth be told, other than the 3-2 and 2-3 jerk, I've accepted this gearbox now. Higher gears are remarkably smooth and downshifts from 6 to 5 to 4 to 3 are also fairly acceptable. However, it still isn't a DSG when it comes to shift speeds, but nevertheless, it is a very potent gearbox, with phenomenal in gear acceleration, and having a paddle shifter wheel truly lets you juice the nuts out of the top-end. In 2nd gear, the car just falls shy of 90km/h (need to re-validate this claim, by rechecking my GoPro data), and it still needs that extra second to upshift, with full throttle so beware of the redline. To stay at the redline, I’ve tried quite a few steering wheels on the Polo in the last few months, and that gave me my first insight into the insides of a paddle shifter. I hate to admit, but I accidentally yanked the wires out of my three pin paddle shifter connector and they were all identical. Same gauge, same black colour.

Replugging them back in resulted in a dead paddle and so I had to embark on a small detour which taught me quite a few things about how the Paddle Shifter electronics work. I had to take out the small cylindrical locking pin, and then ended up dissecting the paddle. I even got a chance to see the small elegant LED backlighting present on the paddle. What's interesting is that the paddle LED is not intrinsically Red or White. It's either Red or White, depending on how it's wired, and swapping two out of the three wires allows us this switch. It's an utter shame that the MK8 Steering wheels have no lighting on the paddles and this is slightly more disappointing on the non-touch steering wheels, which could definitely have had a Paddle Backlighting. But other than that disappointment, the MK8 R-Line steering is another level when it comes to sportiness. It's so good to hold despite seeming a little large considering the size of the Polo. To get it to work, you need to use a decoder box, post which it starts to properly communicate with the PQ25 car. Once everything is set, it really changes the look of the cabin and makes it a lot more upmarket and tech savvy than it already is. This is the MK8 Steering with a Golf GTI airbag. Such MK8 steerings are available in quite a few more trim options with a few different types of Airbags. I personally liked this Volkswagen logo and this airbag design appealed to me a lot more than a few other options. The wheel also blended in my Highline+ Polo's grey interiors just fine, but it also looks incredible on Piano Black GT TSI interiors.


However, the backlight colour temperature on this wheel is a lot stronger than the Maxidot lluster, and feels a little harsh on the eyes during night-time driving. On the MQB platform, the brightness of these can be controlled along with the Interior illumination from the head unit. I subsequently, moved back to a white backlight paddle shifter wheel, which is simple, yet elegant.

In the last few months, I’ve helped quite a few folks with a paddle shifter steering for their 1.0 TSI and all of them are loving the improved sportiness quotient on their cars, despite the initial disappointment for not having a quick DSG anymore. A paddle shifter wheel is a great plus and a must have for all automatic cars and its not just for the thrill, but it is also a really handy tool for driving down ghats, considering the stock brakes on the automatic car have a tendency to fade real quick, considering the torque converter is also lazy to shift down and shed speed. Occasionally, you may also choose to shift the car to cruise in D6 to extract that extra fuel efficiency considering the boom in petrol prices.

Ways To Use Paddle Shifts on a 1.0 TSI Torque Converter:
The paddle shifters can be used in 3 distinct modes. Clicking the paddle when in Drive (D), gives an immediate upshift or downshift and gives you control over the gearing via the paddles for a brief while until you shift or do nothing and if you do nothing, the car will shift back to automatically upshifting when it naturally would have. The second way is to slot the gearbox to tiptronic mode (pushing it besides D into the +- notch) and then choosing to shift using paddles. Unlike the first method, the car will not automatically upshift and take over while in tiptronic. And the third mode is via Sport mode which is similar to using it in mode one, but with a Sport mode activated on the drivetrain. The gearbox can also upshift to D2 from D1 with the paddles even from idle. This is how I usually test the paddles without driving around. That being said, paddles on a DSG are a whole different level of enjoyment.
Forced Mandatory 6 Month Service:
I ended up completing the 6 month checkup few days back at BU Bhandari Volkswagen. This has sadly become a warranty prerequisite at the dealership. I’ll try and share all that was inspected. In fact, I just walked in and found the service centre very relaxed due to the lockdown and asked if they could complete this checkup service. There were two particular concerns that I was having with the vehicle, prior to the vehicle going in. The handbrake warning and a consistent pulling issue. No points for guessing which one was fixed and which one still remains the same.
Handbrake Switch:
If you had read my previous post, you’d remember how I felt the handbrake switch was acting up and not disabling the handbrake ON warning from the cluster. For quite a long time, I couldn’t figure out how to solve the issue. Mechanically, the handbrake was doing just fine. The only fault was in the handbrake switch. Finally, I figured a way to use it without causing an alarm. The key was pushing the handbrake down slightly towards the left. And this helped me stay sane driving around town. However, my parents were not so happy with this issue, and naturally so.
Why should anyone have to spend valuable time thinking about the way a handbrake needs to be pushed down. So this issue was high on the priority list. The rear armrest and rear AC vents were removed and the entire centre armrest was taken out to relocate what was a dislodged handbrake switch sensor. The technician Aakash corrected the location and tested the switch about 30 times, and then tightened everything back gracefully.
The vehicle was inspected all-round and the technician started with all door locks and window motors and even the anti-pinch operation was tested. The wiper jets were tested and the spray pattern on the passenger side was recalibrate to direct itself on the windshield. All of the brake, fog and indicator lamps were tested and so were the headlights. They were impressed to see a very neatly implemented LED headlight bulb and were wondering where the shoddy wires were. I’ll get to this light bulb, the Philips Ultinon Pro 9000 in good detail soon. Here's a quick teaser, before and after, stock halogen vs Ultinon Pro 9000's cutoff on our parking wall.

Quite a lot of time was spent admiring the vehicle’s flip camera, OPS and Maxidot Cluster. No fuss was made despite the presence of these special entities.
Pulling Issue:
People often say numbers don’t lie, and I have to agree. I’ve driven quite a lot of 1.0 TSI Polos, both manual and automatic and me, and a few experts are convinced there’s a definite issue with the suspension on a few of these newer vehicles. There is something this vehicle which just makes it super road crown sensitive. I’ve had a left pulling from my first day of ownership, and there’s been considerable driver fatigue due to having to counter hold the wheel with my right hand. So during my last visit, the Volkswagen folks tried shifting the subframe to give the car more straight line stability. This reduced the pulling to quite some extent and now the car can track comfortably straight. However, this has made life horrible on banked rounds where the car just wants to drift off, and the issue is only worse with more passengers inside the car. At a point few months back, I had a daily interaction with at least 3-4 folks who were facing a similar pulling issue on their 1.0 TSI Polo. Some cars were pulling and veering right, even on roads inclined towards the left. This is something I still haven't gotten right, but I try to ignore it, but sometimes its just not possible to.
The subframe shift also caused a steering cross condition and a characteristic creaking noise when I sit inside the vehicle. I knew this beforehand, that the subframe bolts are one time use stretch bolts and recommended to be replaced each time the subframe is loosened, but the service guys were confident of using the same bolts and I trusted them. But, the creaking noise was very evident. So, during this service, I requested them to replace them, but they insisted they’ll tighten them again. If it creaks again, I will insist on a new set of 4 subframe main bolts and will have then torqued down to 70Nm + 90 Degree turn. Then, the car was being taken for alignment and the tyre pressure wasn’t measured, so we reversed the car out of the alignment lift and had all tyre pressures calibrated and then the alignment was performed. The technician acknowledged a slight cross and accordingly the toe was corrected and now the steering is straight and not crossed anymore. However, the car still has a massive crown drift and never have I ever experienced this amount of insane counter effort on any other vehicle. There are quite a lot of theories and remarks by reputed readers and writers that I’ve read on international forums and, but there is a strong lack of the means to solve this issue, and I think I’ll make a separate post on this, with few more facts when I try some more things and uncover few more unknowns.

In an attempt to fix the not so correct alignment and steering feel, I visited Poona Tyres, who have one of the best Hunter equipment and supposedly the most experienced tyre alignment technicians. The technician at Poona Tyres surprised me by starting off with the wrong Polo suspension spec. Then, I stepped in and opted for G33 : Rough Road Suspension for India, post which, the Toe was equalised on both sides. I have driven about 600 kilometres after this alignment, and the alignment seems to be done better than before, and the car is putting its power down better, but the steering still doesn't feel right. Even a gentle progressive braking manoeuvre (doesn’t help that I have a Big Brake Kit now) on the highway is turning the steering to one side, time and again, which makes me feel this is definitely an alignment thing. Sadly, we aren't in a setup where these minute issues are dealt with a very scientific approach to tackle the issue, and so for my own welfare, I refrain from bothering myself too much with this.
Some Related Random Life Updates:
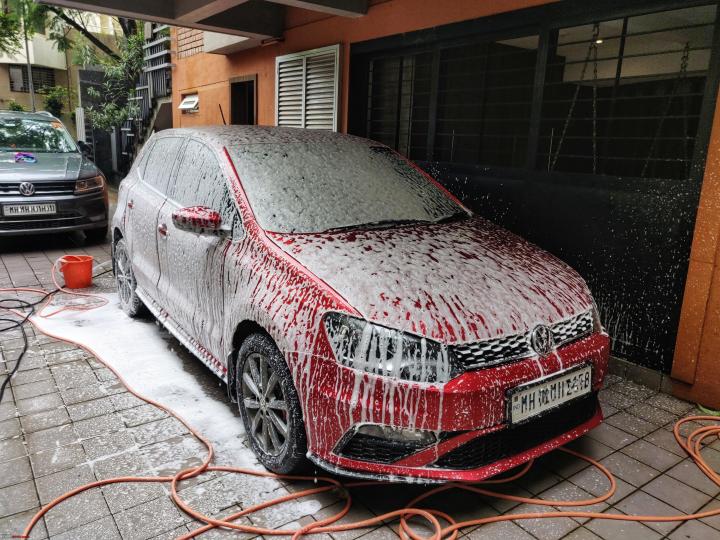
I recently graduated with a Bachelor of Technology, and since I have some free time now, I have been trying my hand at detailing of my vehicles and to begin with, I've invested in a budget pressure washer, which I'd love to write about after a short while of usage. I purchased it from Glosswerkz and it has been a genuine privilege interacting with the experts behind the firm. The Tiguan was the first vehicle I tried foaming, but I miserably messed the soapy concentration. I dare say, I got it right on the Polo.

I'm attaching a picture from my first ever attempt at trying to foam the Polo, and the foam turned out fine, but the 3M shampoo I used only did so much to shine my car. I tried Sonax Rinse and Shine, and the shine brought a wide smile on my face. My goal for the next few weeks is to learn to wash, foam and rinse each car, with as minimal water as possible, because every drop counts right? And no, it's not so simple to strike a balance between cleaning your car, and getting it right, and cleaning the premises at the same time. And from my very first attempt, I can’t help but say, detailing is hard, contrary to how effortless professionals make it seem.
The Rat Story:
So one fine morning while driving my father's car out, I noticed an airbag warning light on his instrument cluster. I did not want to scare him since he was heading out to work, and so I let him take the vehicle. I was paranoid about the fault, and so I drove to his workplace with a spare key, and requested him to drive home in our i10 instead. On reaching home, I connected ODIS, and found a Pedestrian Crash Sensor fault. I opened the bonnet and was disturbed to find a few rat droppings and lots of dust dirt and rat feet in the engine bay. Using my air-blower, I dusted the engine bay as best as I could, and using a hand spray, I cleaned and degreased the engine bay to wipe off all the dirt accumulated. It most likely seemed like a rat bite, and it was particularly disturbing since it was our first instance of a rat biting into our car.
I Instantly procured a set of glue mouse and rat pads and placed some cheese on it and kept them in the engine bay. Now I was really optimistic the rat would come and sit on it, but rats are a very intelligent species and this is no secret. The next morning, I opened the engine bay of our Tiguan, and noticed the pads had moved all over the place. One of them seemed to have fallen near the turbo and it was certain that a rat had come back to the engine bay. There was poop, and the most agonising part was that the rat had gnawed into the Thermal Insulating Engine Firewall, silver in colour. Long story short, the rat had escaped. RAT 1, Joy 0.
Just out of curiosity, I opened the Polo's hood and just when the hydraulic strut was softly opening, I stepped forward and I saw the rat in the Polo. It was fairly large, and I guess was about 6 inches or longer in length. I tried starting the engine hoping it'd leave, but couldn't really find it. That same day, I found a Rat Bite spray on Amazon, the only one which was delivering speedily and ordered it. I had it sprayed on the car's wires, and insulating shields, which had been bitten. The spray itself was too strong and despite wearing two N95s, I could feel the bitter after-smell in my throat, and if I think about it, I can still recollect it. It's that strong. A few hours later, I opened the hood again and noticed plastics on the battery cover being bitten off.

Only the hoses and wires I had sprayed with the Rat Spray were intact. So, I liberally sprayed the engine bay with the repellent spray again, and I have found this spray to prevent bites, but I feel the one I got isn't good enough to repel rodents out of the engine bay.
Few of my friends suggested going for a long highway run and said the rat might just leave the Polo since the TSI engines get really hot, and a quick highway spin might just be good enough for that. BHPian Asit Kulkarni suggested I pressure wash the engine bay, and shortly, I did that as well, but none of it worked, since there were rat marks the very next day as well. RAT 2, Joy 0. Since we have two pets at home, we've not been in favour of placing guillotines and rat poison around for obvious reasons. Further, I did not want the risk of having a dead rat in the engine bay, and so I was against the idea of poison. My father told me most rat poisons are designed to work in a way that the rat feels thirsty and leaves the premise in search of water, and so we thought we'd try this.
Liberal amounts of bait were placed in both the Tiguan and the Polo, since we were certain the rat was playing and jumping around the two German steeds. The next morning, the entire rat kill placed on the Polo's engine cover was snacked upon and finished by the rat, while the Tiguan's bait was just nibbled. Now, the wait was on, and sure enough, there was a dead rat outside our lane the same evening, and at first, we could only smell it, but later thanks to the crows, we could see it. RAT 2, Joy 1.
However, I was certain there would be one more rat, since they usually raid in pairs or groups and so we did not lose focus. Few more rat traps were placed near the premise and the next morning, a second rat was badly stuck on the Glue pad. RAT 2, Joy 2 and the game has been called off for now. I still need to repair the rat bite from the Tiguan, but thankfully, the Polo has been fine for now. Post this incident, I've taken some extra steps to keep the premises cleaner than it used to be. It was always clean, but a little leniency and too many cluttered objects is what led to the attraction of rats.
Golf MK8 Key:
Got to lay my hands on the gorgeous glass sandwich keyless MK8 Key meant for MQB cars. It’s gorgeous and is a huge step up in design language compared to its predecessor, and it stays true to the MK8 tradition of glossy digital panels. However, it’s still a very basic entity, compared to what the elder Germans offer on the BMWs. This isn’t a flip key, nor is it haptic as per MK8 standards. It’s just a more premium feeling offering.

Now’s a good time to reveal that this key also can be made to work with Polo, and here are some pictures of my new key with a backdrop of the Polo. Just kidding, this key isn’t for me. I’d have loved to code this to my car, but it doesn’t make sense to cripple myself since it is not a proper flip key, and I don’t plan on retrofitting a KESSY (Keyless Entry) setup anytime soon.
Fully Vaccinated with Covaxin:

Here’s me all masked up and awkwardly posing after I got my second and hopefully final shot of Covaxin. I got to drive to a civil Hospital on the outskirts of town for this dose, and it was a fantastic drive as always. I always look forward to long drives and being from a small populous suburb in Pune, the majestic flyovers in Pimpri Chinchwad don’t fail to impress me.
Trying To Organise:
I’ve accumulated a lot of small and big tools which are always all over the place, and since I’m no longer in college, I’ve run out of plausible excuses to not tidy my premises and affairs. So, I thought I’d start by ordering this humble rivet-free rack from Amazon to start stacking up my home garage tools. The rack itself was fun to assemble, but the tolerances are far from tight, making it a pseudo tool-less rack.

Each layer needed a few light hammer taps to lock into place. I got two of these, one which is 1.5 feet deep, which I find is more practical than the other 1 feet deep rack.
Hydraulic Jack Failure:
During my Jetta service few years back, I had purchased a Quick Lifting Gallop hydraulic jack, which was terrible right from the first day. It was conspicuous since it would lift fine, but would never gracefully and slowly lower itself when loaded. It would drop the weight down with a thud, and quite often, the car would rock on the jack stand. This was a potential issue, since jack stands can slip or rupture through vehicle floors. Initially I thought this was a characteristic of the jack, but nevertheless I instantly disliked it. Turns out, it was just a problem with the hydraulics.

Probably an instance of stuck gears or an improperly bled 3 ton hydraulic jack! So, I tried and finally managed to purge quite some air out and the jack was suddenly in a better place.
Polo and Pune Metro:
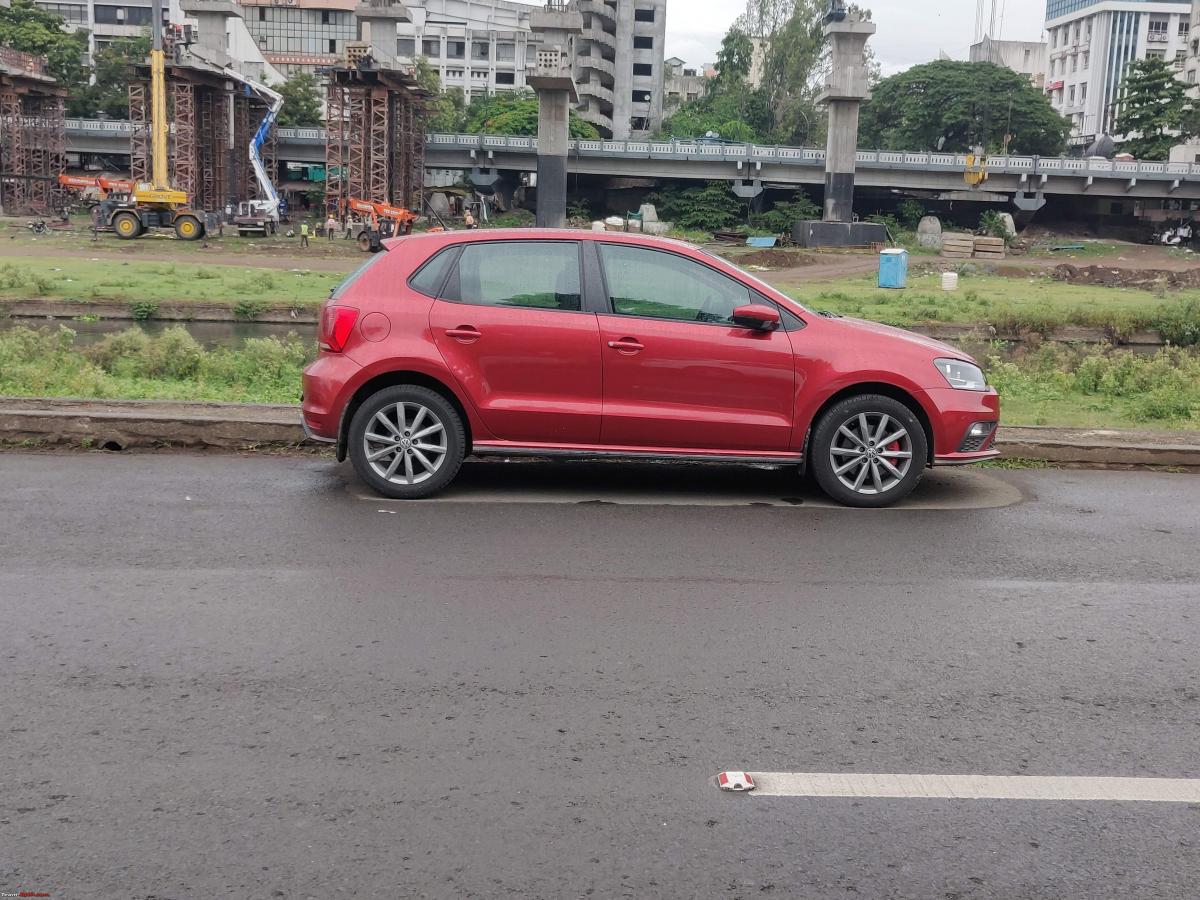
I’ve been sincerely waiting for the Pune Metro to start and 2 years back, I was hopeful I’d get to experience it before I graduate, but COVID had different plans for all of us. The metro project seems to be at it, despite numerous road blocks, and I took a moment to click the Polo in the backdrop of the river bank segment of the Pune Metro. There are quite a lot of vehicles parked here when the river bank hasn't swollen.
Repeated Strut Mount Creaking:
The strut top mounts I had replaced earlier under warranty seem to have gone bad in record time this time. I think I’ll spare myself the trouble and probably switch to a heavy duty top mount and thrust bearing this time. During my last visit to Volkswagen, the dealer technician said, even a pressure wash in the wheel arch can eliminate the creek, so I’d love to try this out and report if it really is worth it. If it is, I’m sure it’d save all of us quite some trouble. A further chat with him revealed India being a dusty country has these issues to which I hit back and said, “Sure. But why isn’t my 4 year 24000kms driven i10 a victim of these similar suspension issues?” There was no comeback, because let’s face it, some parts and cars are just hands-down better than other parts at being fuss-free.
Trying Better Brakes:
I’ve been unhappy with the brakes on my car right from the first day. Even after bedding in, I’ve found them quite a lot softer than I’d wish. This was not the case with a few other Polo TSIs I’ve driven so I associate this to be potentially due to some air in the brake line, something a pressure bleed or a good bleed should solve. However, it’s no secret that a good percentage of Automatic owners wish they had better brakes. I got in touch with a gentleman, who received my contact from the dealership and he really wanted some better braking, since he originally had FS3 calliper brakes on his original Polo back in the days. Sure enough, most folks who have driven a Polo Vento with FS3 calibers will appreciate how much better and stable the braking felt from high speeds compared to the Indian TVS Girling C54 calliper setup which frankly is just average.
I suggested him to upgrade to a Big Brake Kit, and had one ready in my circles for him to install. But he wanted to try better pads to begin with, and so I got him a pair of ATE Stock Replacement brake pads for our TVS Girling Calliper system. He also requested me to install the brake pads at his premises and brief him about the process. I packed my boot with all the tools I’d need:- a 12mm socket for the calliper slider pin bolts, a long screw driver, a brake piston compression tool, WURTH Brake Paste for backing plates, WURTH Silicone Grease, and also carried a pair of Gallop jack stands in the Polo boot and I was off to my work site.

Including coffee, and a very tutorial oriented brake pad replacement, the entire task was wrapped up under an hour, including two road tests. I found the ATE pads to be a lot better than stock, when it comes to the brake bite, and I say this after a mere 50kms of driving. I’m sure, once the pads are organically bedded in, they’d feel even better. The ATE pads are made in the Czech Republic and I’d highly recommend you to try them out if you want to try a road-friendly stock replacement pad. The ATE pads come with new calliper guide pin bolts and also come with new brake shims, something which I totally expected from ATE, considering the level they are at.

The owner of the Polo was also looking at options like an EBC Ultimax, EBC Yellow Stuff, Brembo but he was a big ATE fan, and did not want to use something that would eat into the rotors and so was advised against the Yellow Stuff by few of his friends.
I tried to work on his car just as I’d work on mine, and spent a considerable amount of time on degreasing contact points, brushing off contact rust and brake dust. Notice the silver shine on the passenger side caliper. All it needed was a little bit of love. I have asked him to drive about 300-400kms post which I will be tweaking the brake assist level on his car, to give him an even assuring braking on his car. For now, the brake pads have been really good and I was surprised as to how much difference the TVS and ATE pads could potentially make. I will cover my brake upgrade, headlight upgrade and a few more electronic updates in my next update. A parting shot to close this post!

Check out BHPian comments for more insights and information
Find Car News
Just News


_0.jpg)


About Us

Buy & Sell
USED CARS