News
My first-gen KTM 390 Duke: Throttle body cleaning & a few more DIYs


This was on top of the things to do when I bought the motorcycle, however, I was put off because of the sheer number of things that needed to come off just to take it out.
BHPian SunnyBoi recently shared this with other enthusiasts.
After the first outing, I realised there was too much play in the clutch lever and it was moving up and down too much. So I put in an M6 washer of the right thickness under the lever and that made it reasonably tight. If I tightened it all the way, the lever would start binding, I had to back off half a turn after getting it fully tight.

This meant I ended up adjusting the clutch cable slack too, having a 19mm spanner made moving the clutch arm so easy.

Replaced all the fake bolts on the fuel cap with real ones. Used M5x12 Allen bolts with regular M5 nuts underneath to hold the fake ones in place. The 3 Allen bolts that held the gas cap needed M5x40mm long bolts.

Fake bolts with nuts BARELY clear the underside. It's better to use thinner nuts if you get them.

The meter cover I received had a LOT of scratches on the transparent section. This was absolutely unacceptable to me.

Some time spent with my rotary and a 2-inch pad, and this was the end result. It isn't perfect but it will do just fine.

Looks good and all set!

The low beam on the bike stopped working again. SIGH. This time the low-high beam switch was faulty.
Since the headlight was removed for swapping the meter cover, I took off the left switch assy as well.
Disassembled the switch

Lo-Hi switch taken apart. There is a small spring not in the picture, between the triangular metal piece and the black plastic switch

I added a 3x1 o-ring to the base of the spring, so there is more tension and the triangular plate makes better contact. This worked! The switch is now slightly stiffer but it's worked and keeps working after about 50 cycles.

The pass switch was feeling very rough as if it was full of sand. Opened it to clean and it indeed was. I used up some Krytox 205 lube for the switch, it was leftover from another hobby of mine. Put back everything together and it feels much smoother.

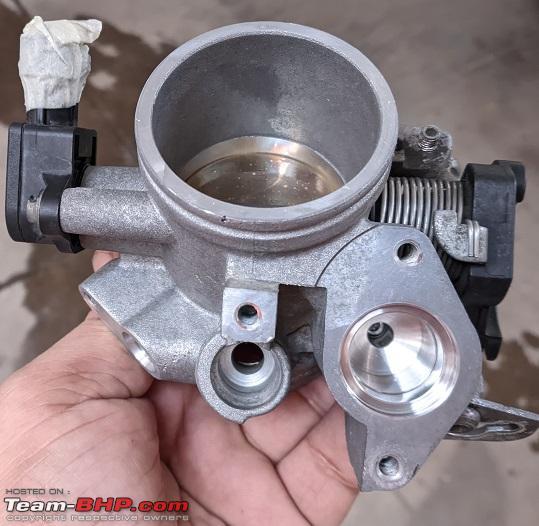
Next up, decided to tackle cleaning the throttle body. This was on top of the things to do when I first bought the bike, however, I was put off because of the sheer number of things that needed to come off the bike just to take it out.
I made up my mind and started early in the morning. Surprisingly it didn't take long to remove all the panels and then the airbox. I couldn't get the cable for the seat lock out despite removing the clip, so I kept the plastic piece on the chassis itself.

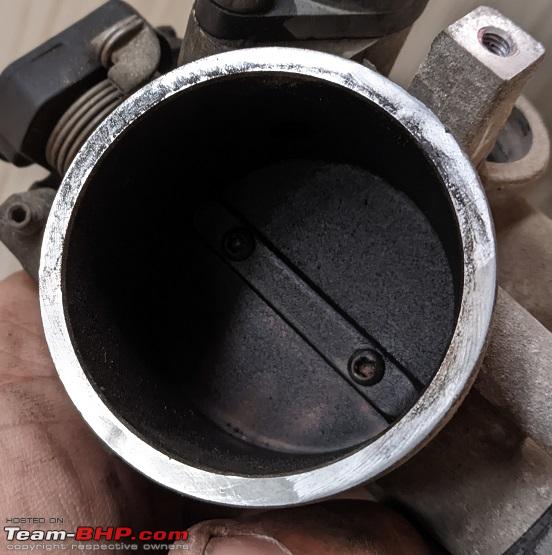
The throttle body, as expected, was caked up in carbon

Even the holes for the IVAC and injector were full of carbon

Port for the MAP sensor had a layer of varnish in it

Intake ports looked excellent. No caked on residue anywhere. The exhaust ports looked similar when I had taken out the exhaust so I'm very happy about the way the engine is right now.

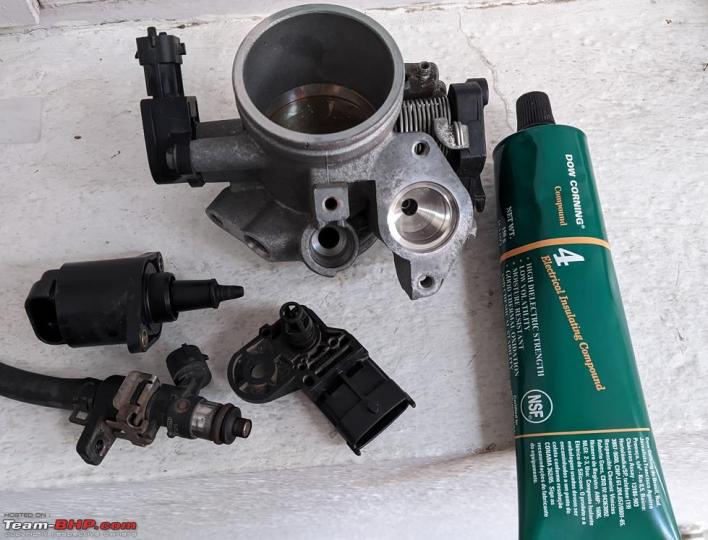
To begin with, cleaning the throttle body, I took out the MAP sensor, IVAC stepper motor and injector. I left the TPS on the throttle body - I took out the TPS from my car's TB a few years ago and it was a royal pain to put it back together.
Since any rubber/plastic parts around the throttle body were removed, I attacked the insides with Acetone. All the carbon on the venturi and throttle plate came off right away. I used some q tips to clean out the 2 passages that go into the stepper motor port, they came out very nice and shiny.
Next, I cleaned the outside with some all-purpose cleaner and water. Got the outside looking good, then I doused the insides with some 99% isopropyl alcohol - it has a propensity to absorb water so any water that went inside the TB passages when cleaning the exteriors will get absorbed by it.
The results were excellent. See it for yourself!


MAP sensor and stepper motor had a LOT of gunk on them

Cleaned them with IPA. I was careful not to touch the center portions of the MAP sensor, I just scrapped off all the carbon from the surrounding cage and then sprayed IPA on the sensor a few times

Used some Dow Corning grease to lubricate the o-rings on all the sensors and injector before putting them back into the throttle body. I left the injector alone this time.

With the throttle body done, my focus was back on the chassis. It had a lot of dust on it owing to the bike being 9 years old. So this time I gave the entire chassis a good clean, every nook and cranny of the orange frame was cleaned in detail

Lots of wiring harness tape had started to come off, the glue had gone bad.

Peeled off all the bad tape and I taped them back using Tesa 51036 Engine Loom tape.

Scuffed up the ECU ground lugs so they make better contact. Need to do this for all grounds.

My focus then turned towards the airbox. It was very common for airboxes to crack - thankfully mine was crack-free. There was some oil deposited below - another complaint. The seals below were all intact so I'm guessing the oil deposits were from the loose crankcase breather.
I was having a look at the breathers and the insides had a bit of "milkshake". I doused the inside with IPA and some of it came out. I also noticed that the breathers for both the crankcase and head were connected. I also saw the markings on it (B for the head vent and D for the crankcase vent) and was feeling suspicious if this was some kind of simple air-oil separator for vapours coming from the head with oil draining back via the crankcase breather. Oh well.

Soon I put back everything on the bike, primed the bike about 4 times and it immediately started up with no errors. The behaviour of the bike is pretty much unchanged from before, however, the bike seems to start a fraction quicker - requiring less cranking.
Check out BHPian comments for more insights and information.
Find Car News
Just News


About Us


Buy & Sell
USED CARS