Team-BHP > Technical Stuff > DIY - Do it yourself
Register New Topics New Posts Top Thanked Team-BHP FAQ


Reply
  Search this Thread
246,404 views
Old 4th January 2012, 20:20   #121
Senior - BHPian
 
ecenandu's Avatar
 
Join Date: Oct 2008
Location: Stockholm
Posts: 1,318
Thanked: 2,475 Times
Chevrolet Spark

My A/C blower was producing some funny noise when turned on. Sounded like some thing got stuck between the blade.

The blower is placed behind the glove box.

Remove the screws(6) indicated by arrows.

The last picture shows what I pulled out from the blower(tissue paper).After removing it, blower noise came back to normal.
Attached Thumbnails
A List of DIY's for your car: A Pictorial Guide-untitled-5.jpg  

A List of DIY's for your car: A Pictorial Guide-image1590.jpg  

A List of DIY's for your car: A Pictorial Guide-untitled-2.jpg  

A List of DIY's for your car: A Pictorial Guide-untitled-3.jpg  

A List of DIY's for your car: A Pictorial Guide-untitled-4.jpg  

A List of DIY's for your car: A Pictorial Guide-image0986.jpg  

A List of DIY's for your car: A Pictorial Guide-image1580.jpg  

A List of DIY's for your car: A Pictorial Guide-image1582.jpg  


Last edited by ecenandu : 4th January 2012 at 20:21.
ecenandu is offline   (3) Thanks
Old 4th October 2012, 22:16   #122
BHPian
 
sushil_n79's Avatar
 
Join Date: Feb 2008
Location: Bhopal (M.P),Hyderabad (A.P)
Posts: 346
Thanked: 239 Times
Re: A List of DIY's for your car: A Pictorial Guide

Dear All

Thanks for starting this thread. Can someone please tell me how to set the focus of the headlights for the Maruti Alto LXI. I tried looking for the adjustment screw could not find the same. request Pictorial guide please if possible
Thanks and Regards.
Sushil Narayanan
sushil_n79 is offline  
Old 12th October 2012, 22:12   #123
BHPian
 
di1in's Avatar
 
Join Date: Jan 2009
Location: Thrissur
Posts: 511
Thanked: 285 Times
Re: A List of DIY's for your car: A Pictorial Guide

Quote:
Originally Posted by sushil_n79 View Post
Dear All

Thanks for starting this thread. Can someone please tell me how to set the focus of the headlights for the Maruti Alto LXI. I tried looking for the adjustment screw could not find the same. request Pictorial guide please if possible
Thanks and Regards.
Sushil Narayanan
Perhaps you should try this question at this thread: http://www.team-bhp.com/forum/techni...t-beams-4.html
di1in is offline  
Old 8th November 2012, 21:44   #124
BHPian
 
Join Date: Jan 2011
Location: Bangalore
Posts: 324
Thanked: 1,437 Times
Re: A List of DIY's for your car: A Pictorial Guide

Can anyone tell me how to remove the old kenwood head unit of the ford ikon. I need to replace it with a sony HU. I need the wiring data too.
searchingheaven is offline  
Old 9th November 2012, 09:40   #125
BHPian
 
ilangop's Avatar
 
Join Date: Jul 2008
Location: Chennai
Posts: 992
Thanked: 903 Times
Removing the Kenwood unit in Ford Ikon

Quote:
Originally Posted by searchingheaven View Post
Can anyone tell me how to remove the old kenwood head unit of the ford ikon. I need to replace it with a sony HU. I need the wiring data too.
Hi,
You might need the tool provided for removing the unit. It is a pair of thin metal strip which you have to insert into the sides of the player (between the player and the outer housing). As you push the strips inside the player will side out a little. The rest you have to simply slide it out. To remove the outer cage you will have to undo the tabs that lock the cage with the centre console.
If you dont have those metal strips, you can get a pair for free from any car decors as not every customer would take them with him after the fitment of a player.
All the best.
ilangop is offline   (1) Thanks
Old 9th November 2012, 10:01   #126
BHPian
 
Join Date: Jan 2011
Location: Bangalore
Posts: 324
Thanked: 1,437 Times

Quote:
Originally Posted by ilangop View Post
Hi,
You might need the tool provided for removing the unit. It is a pair of thin metal strip which you have to insert.
thanks a lot. But isnt there anything which can be used instead of those? I dont have access to a car shop here for 3 days. I need to do it at my home.
searchingheaven is offline  
Old 9th November 2012, 10:32   #127
Distinguished - BHPian
 
mayankk's Avatar
 
Join Date: Apr 2010
Location: New Delhi
Posts: 5,148
Thanked: 8,168 Times
Re: A List of DIY's for your car: A Pictorial Guide

Quote:
Originally Posted by searchingheaven View Post
thanks a lot. But isnt there anything which can be used instead of those? I dont have access to a car shop here for 3 days. I need to do it at my home.
It is a very specfic set of tabs, which release the locks.
You WILL need them if you dont want to damage the tabs on the unit.
Look at Ebay if they can ship.
mayankk is offline   (1) Thanks
Old 9th November 2012, 17:07   #128
BHPian
 
harryms's Avatar
 
Join Date: Dec 2009
Location: Trivandrum
Posts: 131
Thanked: 25 Times
Re: A List of DIY's for your car: A Pictorial Guide

Quote:
Originally Posted by dhanushs View Post
Yes, the IKON's HL Focus can be adjusted up-down and left-right. There are two holes through which you can access the adjustment screws. As shown in the figure.

Attachment 599678

The Adjustment Screw. Use an appropriate tool.

Attachment 599679
can you please tell the functions of the two adjustment screw. which one is for horizontal and which one for vertical.

thanks
harryms is offline  
Old 12th December 2012, 00:32   #129
BHPian
 
Join Date: Aug 2007
Location: Bangalore
Posts: 210
Thanked: 26 Times

Quote:
Originally Posted by harryms

can you please tell the functions of the two adjustment screw. which one is for horizontal and which one for vertical.

thanks
Would like to know about this as well.
amitwiz1 is offline  
Old 12th December 2012, 10:02   #130
Distinguished - BHPian
 
dhanushs's Avatar
 
Join Date: Oct 2009
Location: Chennai
Posts: 4,286
Thanked: 10,185 Times
Re: A List of DIY's for your car: A Pictorial Guide

Quote:
Originally Posted by harryms View Post
can you please tell the functions of the two adjustment screw. which one is for horizontal and which one for vertical.
Quote:
Originally Posted by amitwiz1 View Post
Would like to know about this as well.
Hi,

I do not have the car with me at the moment. Will update when I get hold of it. However, recognizing, which screw for what isn't that difficult. Park your car facing a wall about ~20meters away. Just turn on your headlights and turn the screws. The beam will change direction. Its easier to track the low beam changing direction.

In case you don't want to mess up with the stock settings of the beam, just remember the number of turns you made. And, revert to original setting if not satisfactory.
dhanushs is offline  
Old 1st April 2013, 11:15   #131
BHPian
 
Join Date: Jan 2011
Location: Bangalore
Posts: 324
Thanked: 1,437 Times
Re: Ford IKON Flair - OBD Port, Fuel Cut off Switch and Fuse box Location

Quote:
Originally Posted by dhanushs View Post
OBD Port: Can be used along with an OBD Reader to access information about various sensors in the ECU and error codes. Know more HERE

Attachment 570933
Which bluetooth dongle are you using with the Ikon?
searchingheaven is offline  
Old 1st April 2013, 11:27   #132
Distinguished - BHPian
 
dhanushs's Avatar
 
Join Date: Oct 2009
Location: Chennai
Posts: 4,286
Thanked: 10,185 Times
Re: Ford IKON Flair - OBD Port, Fuel Cut off Switch and Fuse box Location

Quote:
Originally Posted by searchingheaven View Post
Which bluetooth dongle are you using with the Ikon?
searchingheaven, I'm using the Chinese ELM 327 Bluetooth dongle.
dhanushs is offline  
Old 2nd October 2013, 10:58   #133
BHPian
 
Join Date: Aug 2012
Location: Cochin
Posts: 57
Thanked: 36 Times
Re: A List of DIY's for your car: A Pictorial Guide

Quote:
Originally Posted by dhanushs View Post
...I have already sourced the motor for 250 Rs, have the wire for ~50 bucks. Now searching for an appropriate switch.....
Can you please provide some more details? Has this been installed? How has it held up? Is it a motor or a solenoid? I've searched online but am yet to get any positive result.
Ayson is offline  
Old 26th November 2013, 10:49   #134
Senior - BHPian
 
IronH4WK's Avatar
 
Join Date: Dec 2009
Location: Bangalore
Posts: 3,468
Thanked: 4,148 Times
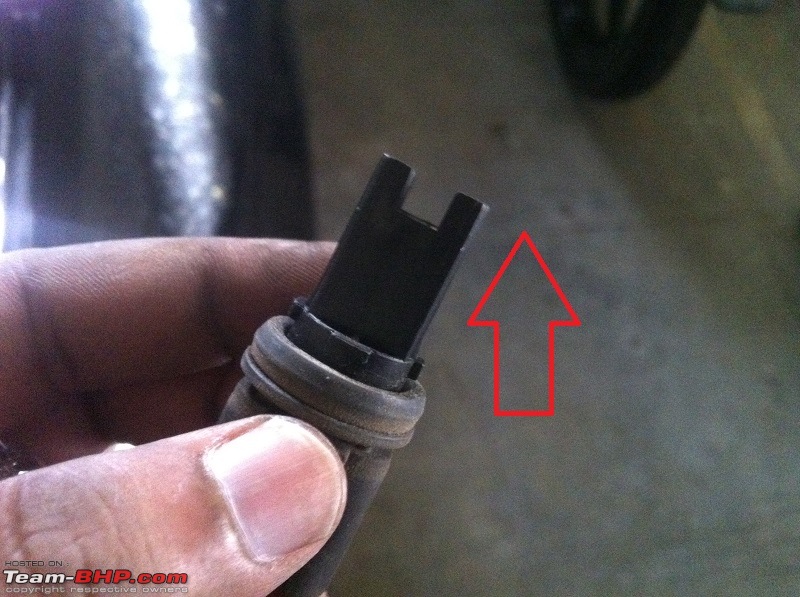
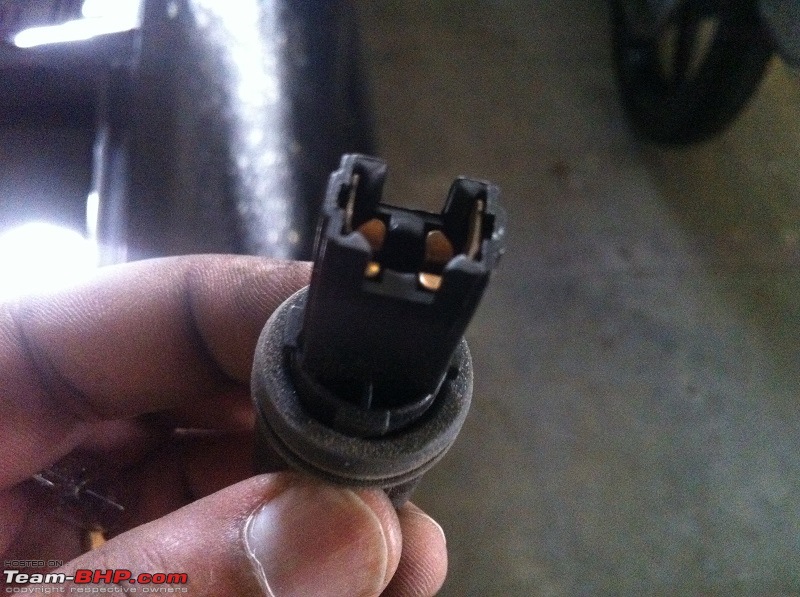
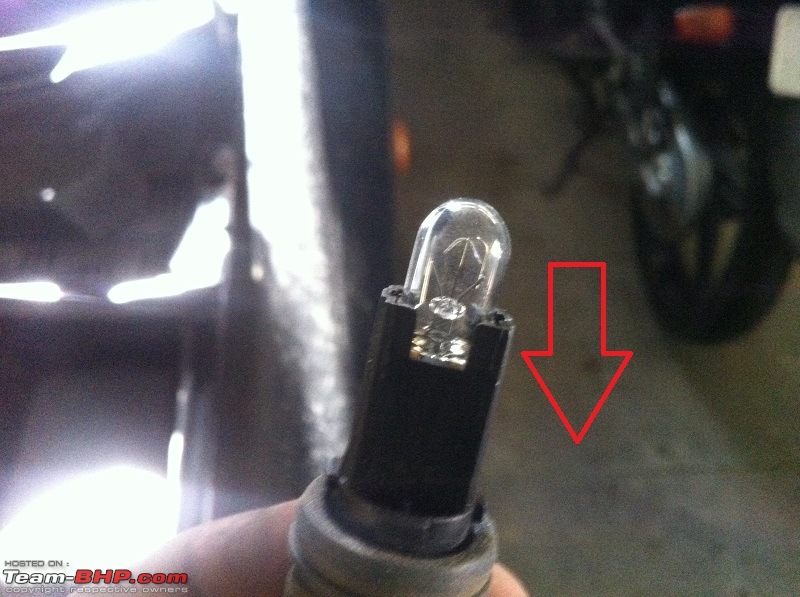
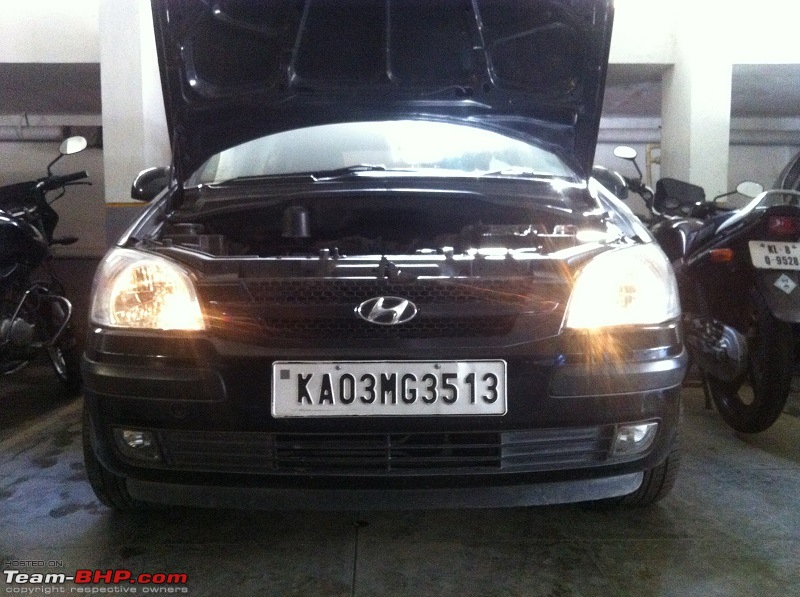
How to change front parking light of a 2006 Hyundai Getz

How to change front parking light of a 2006 Hyundai Getz

they say necessity is the mother of invention. well, i didn't invent anything (thank God for that), but had to find a way to fix the front parking light of my 2006 Getz myself (couldn't take it to the ASC). when i got down to the basement and opened the hood, it dawned on me that when i was searching the internet for steps to change the parking light, i didn't find a single piece of information/video which detailed how to change the bulb. hence this post.

prerequisites: this post assumes that you know:
- which bulb is not functioning
- how to open the hood
- how to find your way to the back of the headlamp unit

if you've gotten this far, read on!

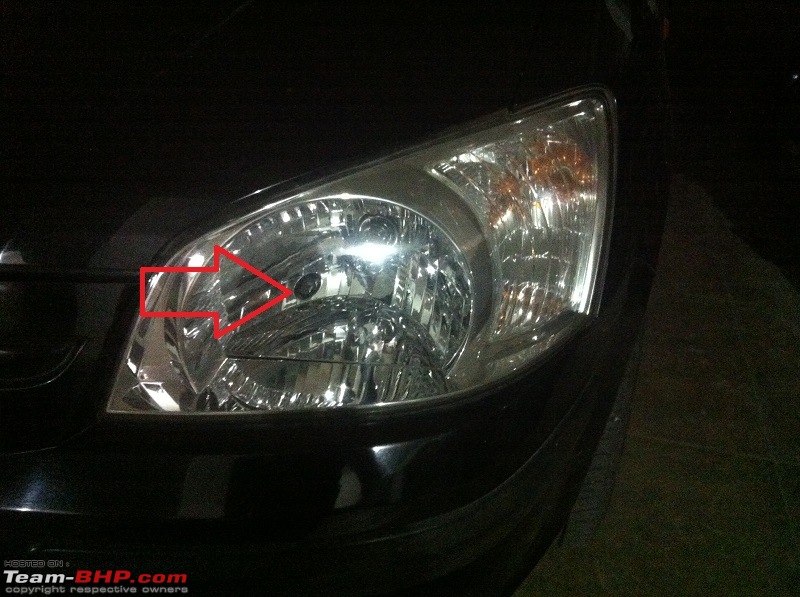
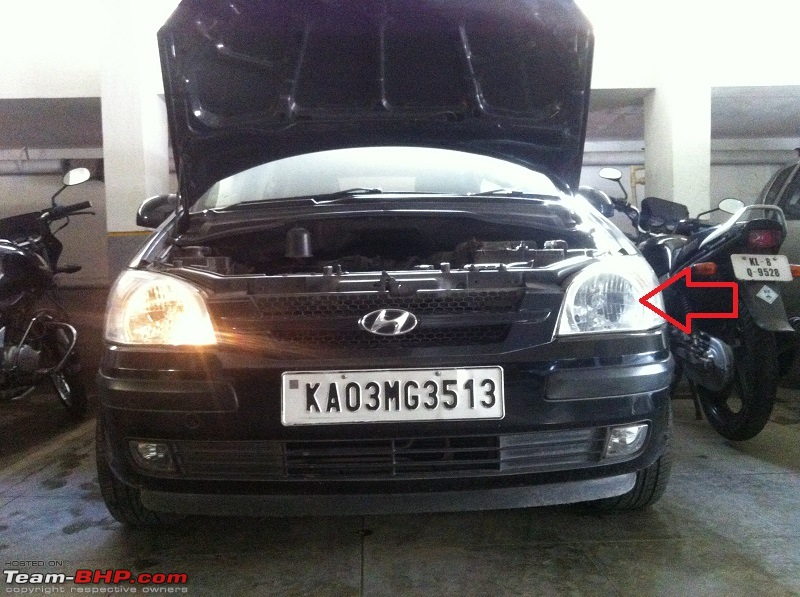
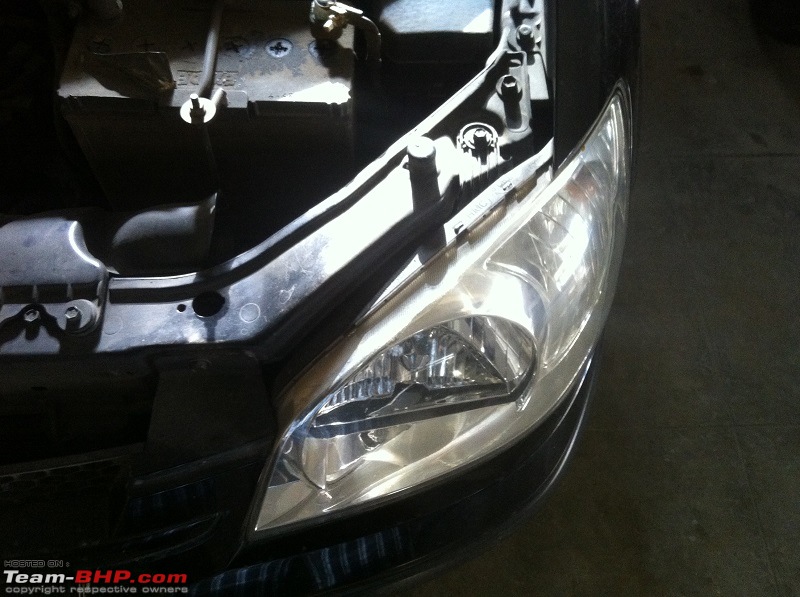
that is the bulb that's not working:
A List of DIY's for your car: A Pictorial Guide-step_0.jpg

see!
A List of DIY's for your car: A Pictorial Guide-step_1.jpg

approach the headlamp:
A List of DIY's for your car: A Pictorial Guide-step_2.jpg

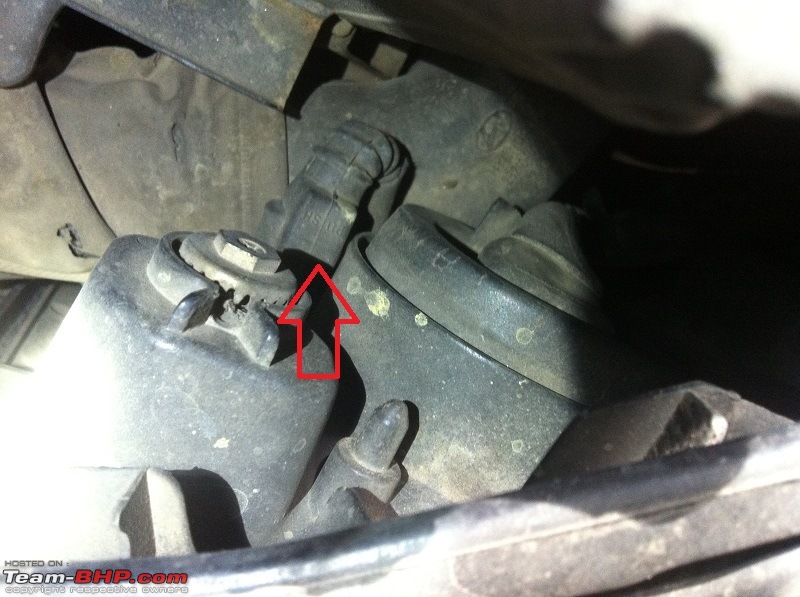
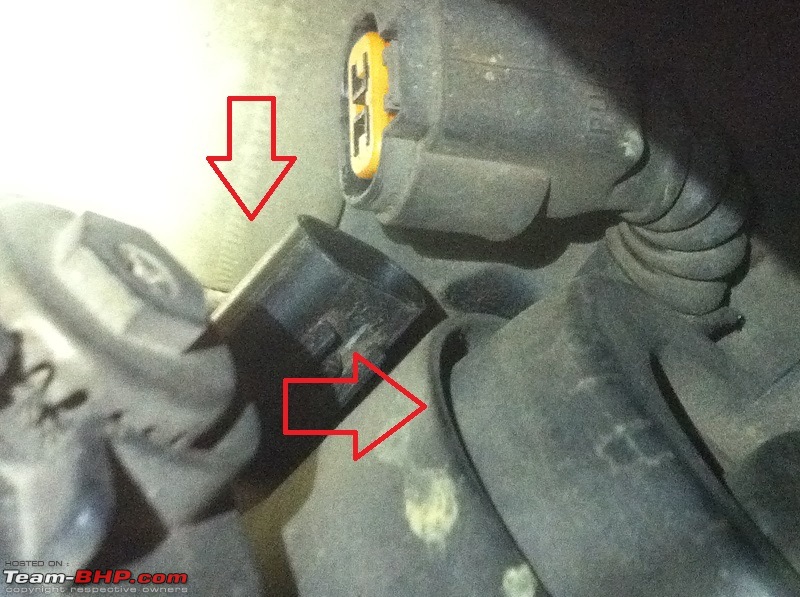
search for the connector at the back for the headlight; the park light is just below that:
A List of DIY's for your car: A Pictorial Guide-step_3.jpg

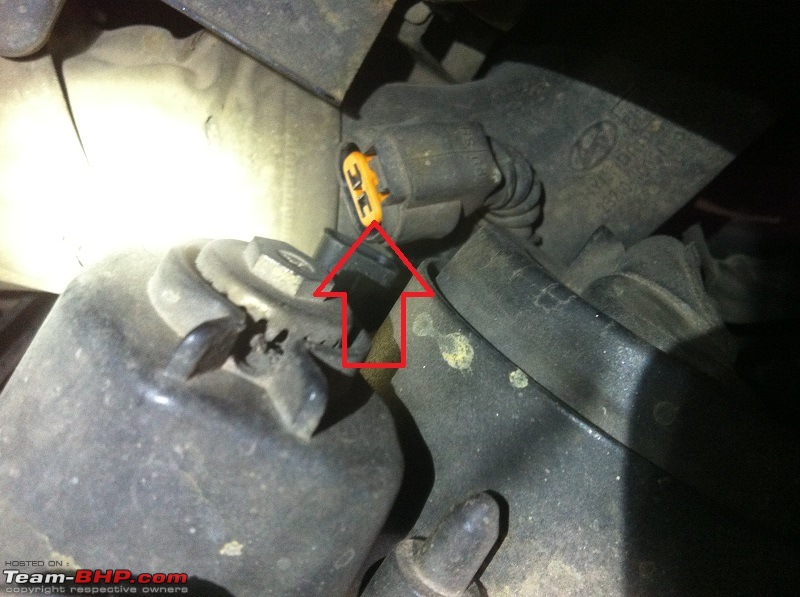
pull the thick cable out slowly; don't yank it:
A List of DIY's for your car: A Pictorial Guide-step_4.jpg

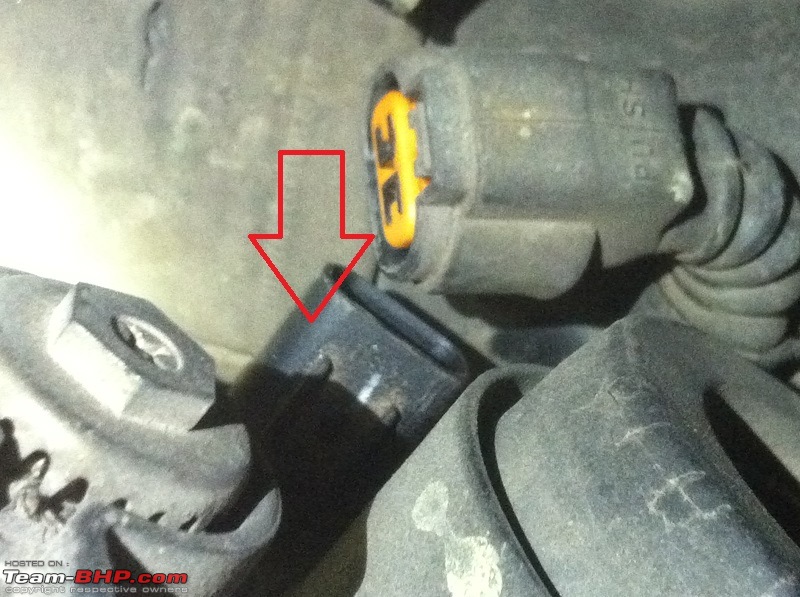
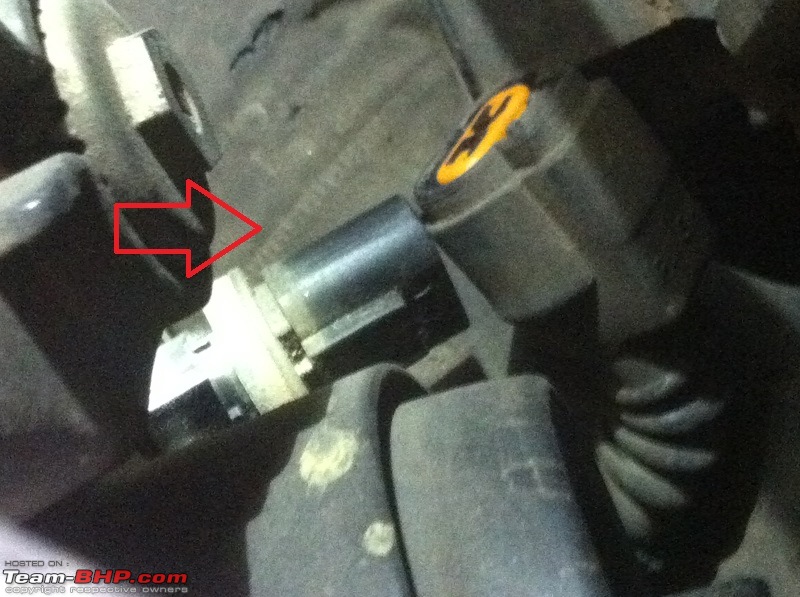
now you see the park light bulb holder:
A List of DIY's for your car: A Pictorial Guide-step_5.jpg

facing the headlamp unit, twist the park light bulb holder to the right:
A List of DIY's for your car: A Pictorial Guide-step_6.jpg

once you've twisted it, gentle pull it out; again, don't yank it:
A List of DIY's for your car: A Pictorial Guide-step_7.jpg

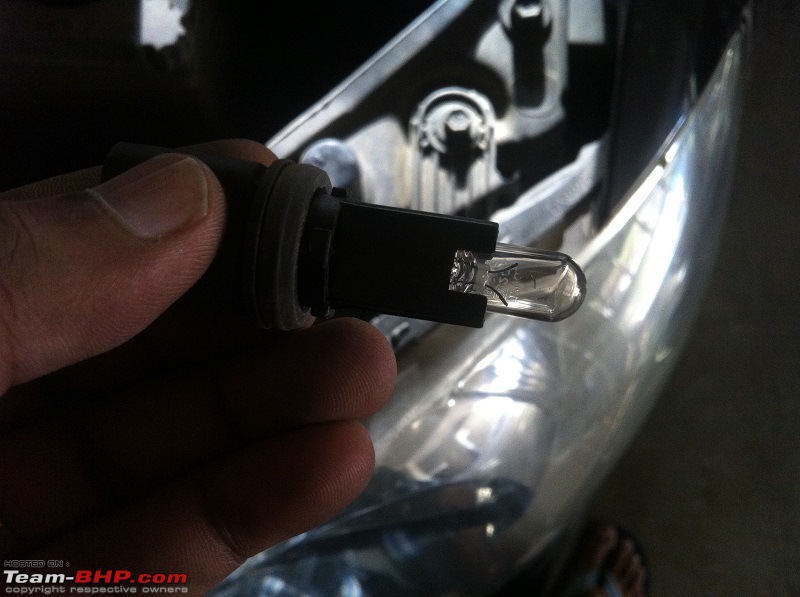
that's the fused bulb on its holder:
A List of DIY's for your car: A Pictorial Guide-step_8.jpg

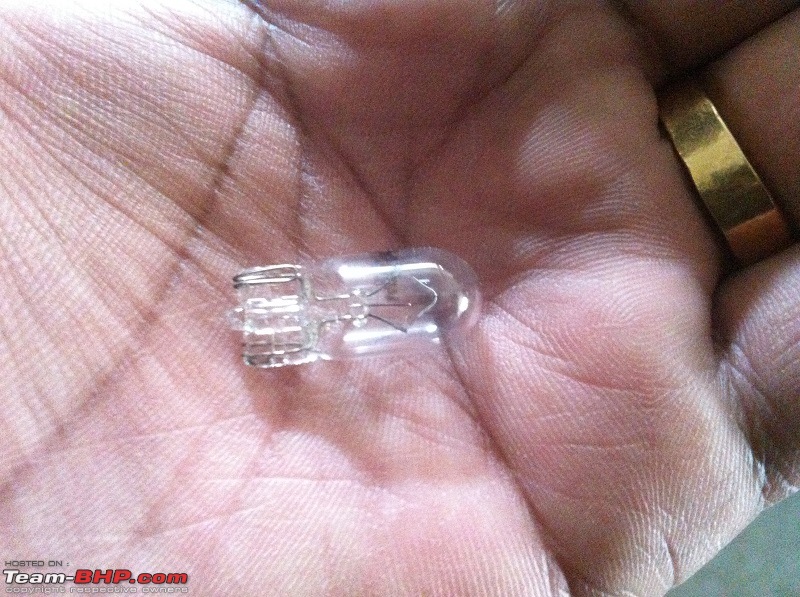
now here's the new bulb:
A List of DIY's for your car: A Pictorial Guide-step_9.jpg

to remove the fused bulb, gently pull it out:
A List of DIY's for your car: A Pictorial Guide-step_10.jpg

that's where the new bulb goes:
A List of DIY's for your car: A Pictorial Guide-step_11.jpg

push the new bulb on to the bulb holder gently until you can push (gently) no more:
A List of DIY's for your car: A Pictorial Guide-step_12.jpg

ta da!
A List of DIY's for your car: A Pictorial Guide-step_13.jpg

edit: forgot to mention - follow the steps in reverse to put everything back

Last edited by IronH4WK : 26th November 2013 at 11:13.
IronH4WK is offline   (6) Thanks
Old 3rd March 2014, 02:22   #135
BHPian
 
Join Date: Nov 2011
Location: Bangalore
Posts: 41
Thanked: 61 Times
Re: A List of DIY's for your car: A Pictorial Guide

Hello,

Sharing my experience on the replacement of the thermostat housing on a 2005 Ford Ikon 1.6 with 76000 km on the odo. Not exactly a DIY but a guide on what to expect if you are facing a coolant leak and find that the source is from somewhere around the thermostat housing.
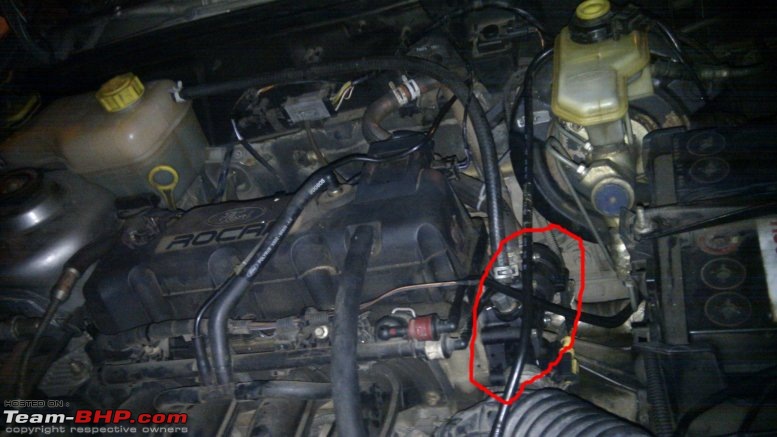
A List of DIY's for your car: A Pictorial Guide-fullengine.jpg


It started when I noticed coolant leak for a couple of days and wanted to take it to Metro Ford. I tried to search for the exact location one last time early morning and accidentally broke a tube on the thermostat housing leading to the diverter valve and emptied the entire coolant fluid leading to a fluorescent green floor! So there was no other option but to fix it myself, if not opting for getting the car towed! I pulled in my dad for assistance and set off to work.

Removal of the thermostat assembly:
A List of DIY's for your car: A Pictorial Guide-thermostatports.jpg
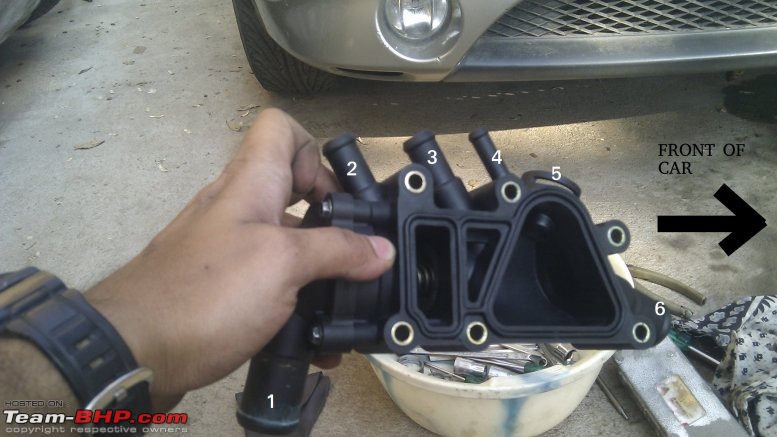
Before removal of thermostat assembly, start by draining the coolant. I did that by disconnecting hose 6 and let it drain to a tub under the car. Removing the battery and battery box might give you some room to move your hands about. Unfortunately I do not have pictures to show the disassembly of battery and battery-box, but I'd say it is pretty straight forward.

Disconnect hoses 2, 3, 4.
You may spill some coolant here and there when you remove these hoses, a bit of cotton waste will come in handy.
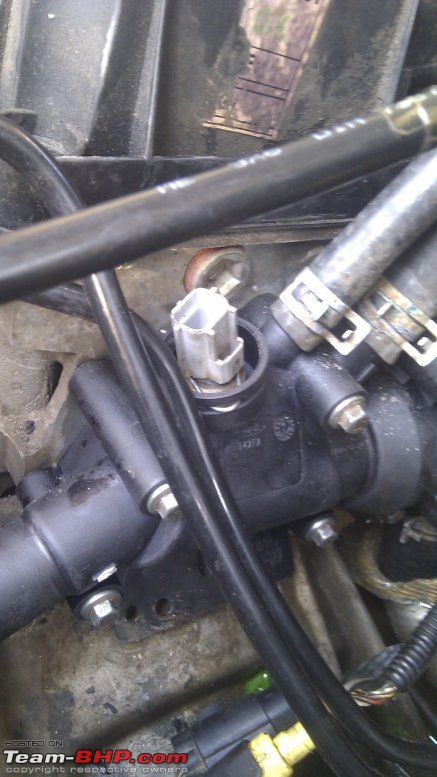
A List of DIY's for your car: A Pictorial Guide-sensor.jpg
Disconnect sensor clip very carefully with a pair of pliers and don't lost it. It's tendency to jump and my inability to catch it meant I had to make one from the spring of a laundry peg to seat the sensor in place, but may that not happen to you! (I sincerely hope it hasn't landed up in the fan shroud or somewhere!). The sensor comes out free once the clip is out of place.
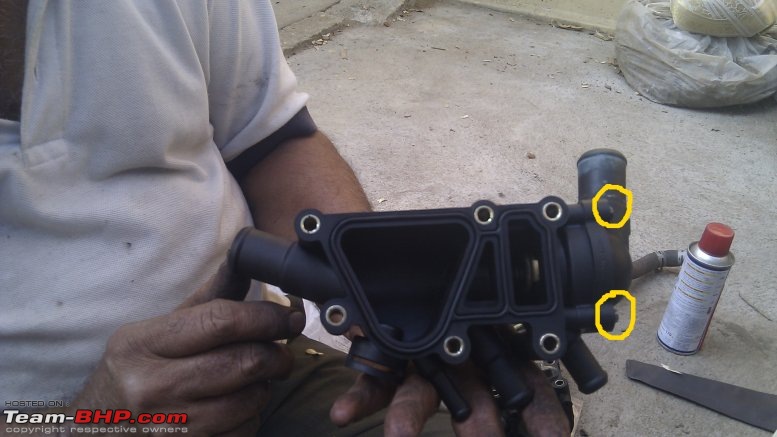
A List of DIY's for your car: A Pictorial Guide-selftappingscrews.jpg
Disassemble the 6 peripheral bolts. (I suggest use a 8mm socket to avoid chances of rounding off the bolt head. Some WD40 might be useful to release the jammed bolts from possible corrosion.)

Once all 6 bolts are out, gently lift the assembly upwards and disconnect hose 1. You will end up spilling more coolant with this hose as its level is much lower than hose 6. You can try and avoid it by resting its mouth at a higher point, something like this:
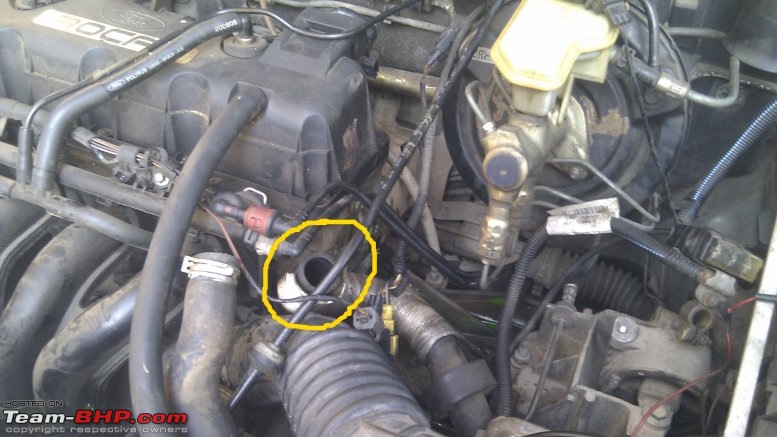
A List of DIY's for your car: A Pictorial Guide-hose1.jpg

A List of DIY's for your car: A Pictorial Guide-issues.jpg
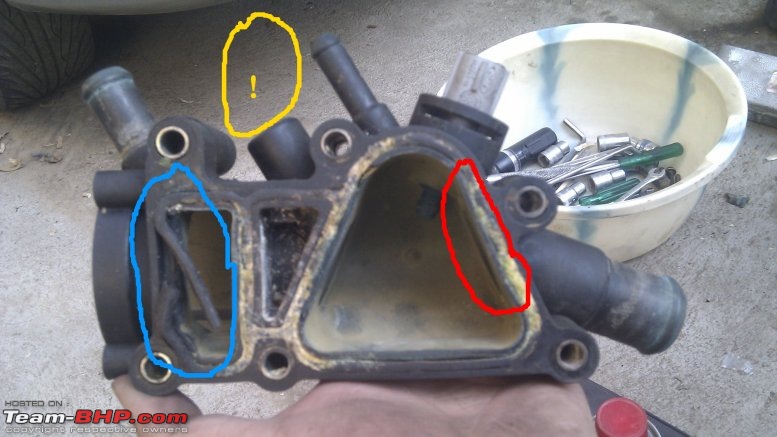
The issues in my case were the gasket was worn out and cut as shown in blue. I accidentally broke the pipe which was supposed to be in the yellow region. And a weird material warpage shown in red. The warped region broke immediately like a worn rag when I tried to press it back with my finger. I'm not really sure how glass-filled Nylon reacts to OEM coolant, but this is not how it is supposed to be!

Replacing the housing + gasket would solve my problem, at least by the look of it. (The initial leakage should've been from the broken gasket. I purchased a new housing + gasket from Metro Ford (Rs. 3200+720!). The valve assembly and temperature sensor were fine. (The whole assembly would set you back by 8.8K. That is what the service guys do irrespective of the problem)

The valve assembly cover can be removed by unscrewing 3 self-tapping screws: Click image for larger version

Name:	selfTappingScrews.jpg
Views:	3898
Size:	58.3 KB
ID:	1214323

Carefully remove the tapered rubber gasket (check for wear). The valve assembly with the plunger and spring comes out. (Sorry I do not have photographs of this part. I was concentrating too hard to click!)
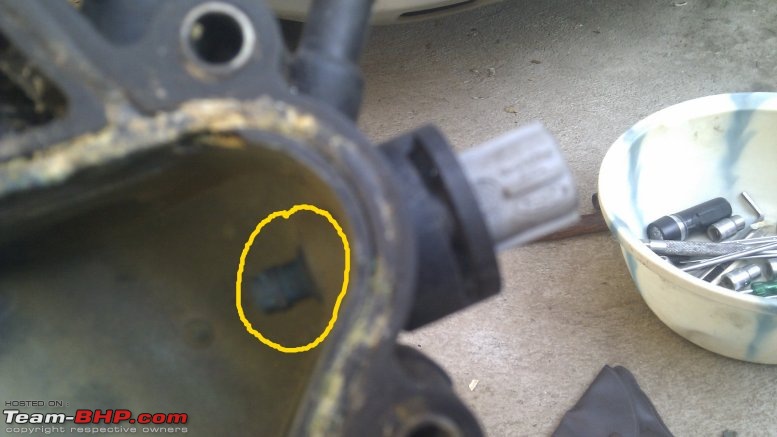
A List of DIY's for your car: A Pictorial Guide-sensoralone.jpg
The tip of the sensor will have oxide deposits and may look blue in colour. Gently scrub it with scotch-brite and some dilute soap water to remove the oxides and bring back the brass shine.
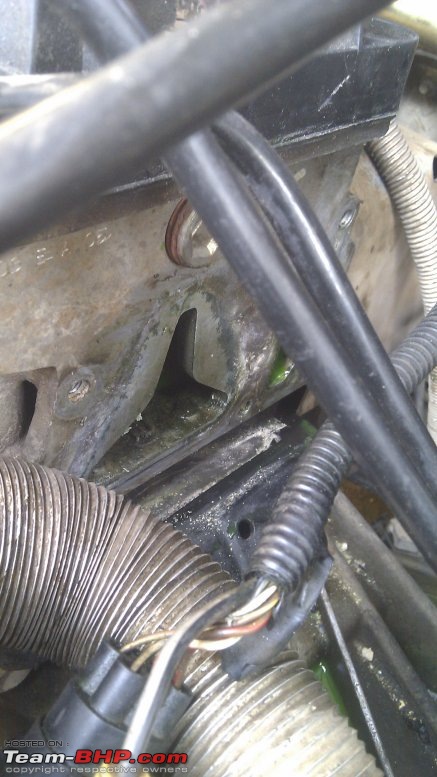
A List of DIY's for your car: A Pictorial Guide-enginehead.jpg
The area on the engine head, where the thermo-stat assembly mates will have oxide deposits. It would be a good idea to gently scrub off the oxides and other dirt with the tip of a broken hack-saw blade. (CAUTION: The engine head is Aluminium. Any strong movements can score the seating area and get us into worse trouble.)

The new housing with the valve-assembly, cover and gasket assembled. It would be good to not remove the valve cover from the thermostat housing once it is fastened with the self-tapping screws.
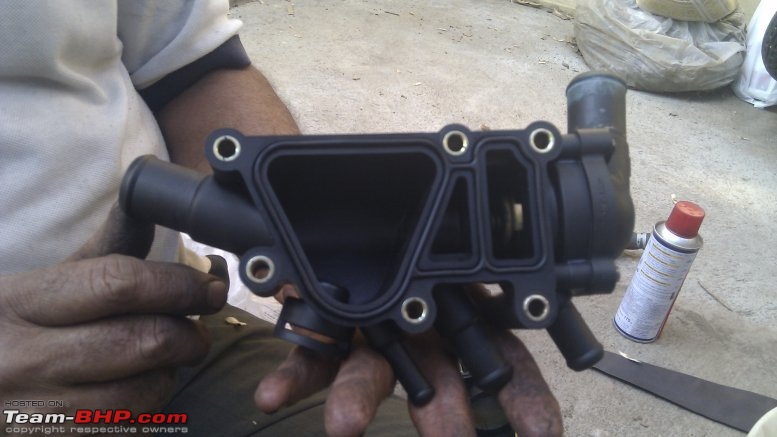
A List of DIY's for your car: A Pictorial Guide-assembled.jpg

Assemble hose 1 first onto the thermostat assembly. Fit the assembly on engine head with 6 screws and torque it sufficient enough to compress the new rubber gasket. Connect hoses 2, 3, 4, 6. Place the temperature sensor in slot 5 and fasten it with the clip. Fit the battery back and all electrical connectors if they were out.

It is a good practice to flush out the entire coolant system before filling in new coolant, if you choose to do it yourself. Else, top-up the coolant tank with water and drive straight to Ford service to get the coolant filled.

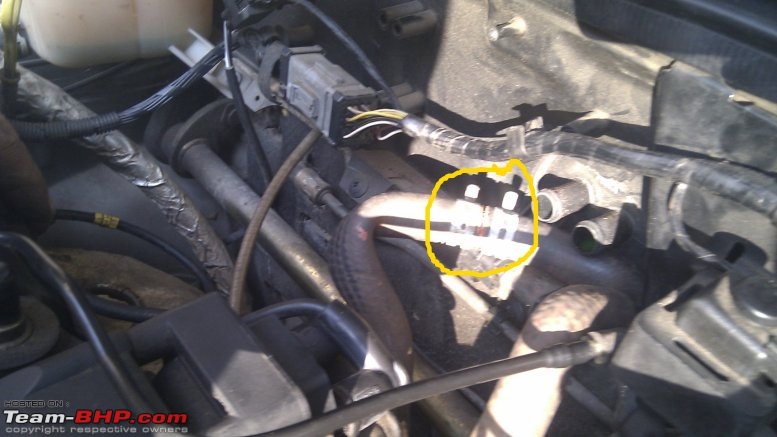
While I was at it, I also tried the mod done by dhanushs to fix the A/C diverter valve problem by using a 5/8th Copper pipe about 3 inches long and shorting the two ends after disconnecting from the diverter valve.
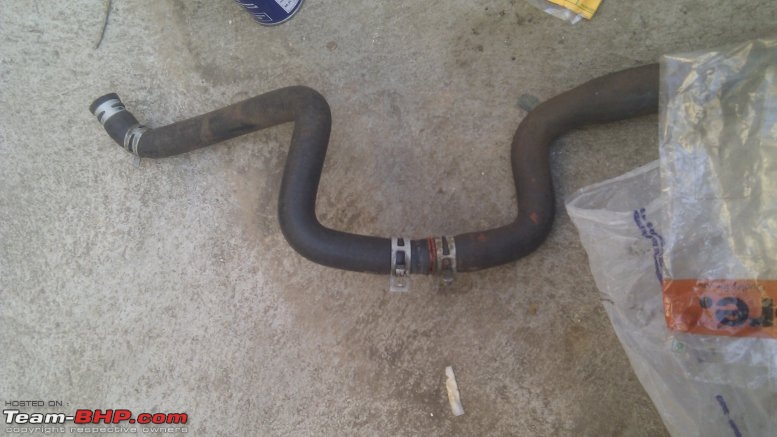
A List of DIY's for your car: A Pictorial Guide-joint.jpg
A List of DIY's for your car: A Pictorial Guide-joinedoncar.jpg

Currently I'm running on water + remaining coolant and went on a 20km drive just to check for leaks from the thermostat housing / Copper tube joint and plan to continue for another 20-30 kms. I have also purchased 2 litres of Glysantin G48 coolant from a Shell outlet (because Ford coolant was too expensive at double the price) and plan to fill it in a couple of days. (Please share your experience with this coolant if any of you have tried). The air-con rocks now too. Will post further update in two days time.

Hope this helps!

Regards,
Subramanyam
subramanyam84 is offline   (5) Thanks
Reply

Most Viewed


Copyright ©2000 - 2024, Team-BHP.com
Proudly powered by E2E Networks