Team-BHP > Technical Stuff > DIY - Do it yourself
Register New Topics New Posts Top Thanked Team-BHP FAQ


Reply
  Search this Thread
182,480 views
Old 15th January 2016, 11:53   #16
BHPian
 
Join Date: Nov 2015
Location: Kolkata
Posts: 80
Thanked: 40 Times
re: Installed! Bi-Xenon Projectors on my VW Polo GT TSi EDIT - Reliability Concerns Noted (Page#8)

Excellent post graaja!

It was very informative in nature and i for one, learnt quite a few things from it. Also, loved the smoked look... a right balance between performance and looks.
viv_cal is offline   (1) Thanks
Old 15th January 2016, 12:14   #17
BHPian
 
Join Date: Jul 2014
Location: Bangalore
Posts: 91
Thanked: 100 Times
re: Installed! Bi-Xenon Projectors on my VW Polo GT TSi EDIT - Reliability Concerns Noted (Page#8)

Wow, amazing diy post and a great look. Totally agree though that the stock headlamps suck hands down in high beam. I for one, feel no difference driving with them off at times on an illuminated road. Forgot to have the SA have a look at them during my recent 2nd service too. The warranty scare keeps me off any customization on the Polo, but glad and encouraging to see, its working so well for many tbhpians here.
AppyS is offline   (1) Thanks
Old 15th January 2016, 19:51   #18
Team-BHP Support
 
graaja's Avatar
 
Join Date: Nov 2013
Location: Coimbatore
Posts: 3,223
Thanked: 20,739 Times
re: Installed! Bi-Xenon Projectors on my VW Polo GT TSi EDIT - Reliability Concerns Noted (Page#8)

Quote:
Originally Posted by rapid_fire View Post
Thanks graaja for sharing. The output of hid light looks awesome! ! I really want to change my Skoda Rapid's halogen projectors to HID. What are the possible options for me? Please enlighten me.
Quote:
Originally Posted by swift_guy View Post
@rapid_fire : All you need is a kit of HID bulbs (projector specific) to go into your stock projectors. Many people have done this on their XUV500s'. You can choose a branded kit like Osram, P8 or Phillips, which would cost ~10k or a generic ebay.in kit for ~3k.
Apologies. I missed the fact that you already have projectors installed.

Does your Rapid come with projectors for low beam and reflectors for high beam? Assuming this is the case, you have a couple of options.

1. As swift_guy mentioned, upgrade the low beams with HID conversion kit (HID bulbs, ballast and wiring harness), and keep the halogen high beam with reflectors. This is the simplest of the options. This will improve the low beam performance, but not the high beams.
2. Replace the low beam projectors with BiXenon projectors which will give both low and high beams (like the one I went for). This will be the best in terms of performance, but involves various risks as I had faced for my installation. Also, with this option, you can also choose to keep the high beam halogens as well, which will give you double bright high beam - however, I do not know if this will create a high glare to the oncoming traffic, in which case, it is recommended to remove the high beam halogens.

Quote:
Originally Posted by viv_cal View Post
Excellent post graaja!

It was very informative in nature and i for one, learnt quite a few things from it. Also, loved the smoked look... a right balance between performance and looks.
Thank you for the kind words!

Quote:
Originally Posted by AppyS View Post
Forgot to have the SA have a look at them during my recent 2nd service too. The warranty scare keeps me off any customization on the Polo, but glad and encouraging to see, its working so well for many tbhpians here.
Yes. It is definitely worth having it looked by the SA. I felt that the high beams just added more brightness to low beams which meant they are angled too much downwards. If the angle can be corrected a little upward, the high beam will become much more usable.

Also, I too had warranty concerns before I started with the upgrades. But then,

Installed! Bi-Xenon Projectors on my VW Polo GT TSi. EDIT - Reliability concerns on page 8-life-too-short.jpg

Picture Credit: Car Throttle FB page

Jokes aside, I have taken care to keep all the upgrades plug and play, have retained all the OE components (HU, Headlights etc), and have avoided any cut or splice to wires on the OE harness. In case there is a need for a warranty claim, I can (at least that is the plan) connect the OE equipment back before taking it to the workshop.

Last edited by graaja : 15th January 2016 at 19:52.
graaja is offline   (3) Thanks
Old 15th January 2016, 21:11   #19
BHPian
 
swift_guy's Avatar
 
Join Date: Jan 2016
Location: NCR
Posts: 193
Thanked: 254 Times

Quote:
Originally Posted by AppyS View Post
The warranty scare keeps me off any customization on the Polo, but glad and encouraging to see, its working so well for many tbhpians here.
Don't worry much about warranties. graaja has summed it up very well. Avoid any wire cuts, i.e. do only totally reversible mods. If you have good relations with your dealer, you won't even need to put back stock equipment in a claim for different part (i.e. say HU in case of wiring). Dealers (higher ups) are actually a lot more practical than what the SAs show. So I think we can expect another Projector for Polo thread soon.
swift_guy is offline   (1) Thanks
Old 18th January 2016, 07:02   #20
Team-BHP Support
 
graaja's Avatar
 
Join Date: Nov 2013
Location: Coimbatore
Posts: 3,223
Thanked: 20,739 Times
re: Installed! Bi-Xenon Projectors on my VW Polo GT TSi EDIT - Reliability Concerns Noted (Page#8)

Performed alignment on the Polo GT TSi BiXenons. I used the procedure described in below page.

Aligning BiXenon Projectors

Here is a picture of the alignment procedure.
Installed! Bi-Xenon Projectors on my VW Polo GT TSi. EDIT - Reliability concerns on page 8-projector-alignment.jpg

Picture Credit: Owner of the picture in this link

Here is a high level description of the procedure.

1. Park the car as close as possible to the wall
2. Mark the position of the projectors using tape
3. Reverse the car 25 feet. The distance between the wall and the projectors should be 25 feet, not the front bumper or the front wheels
4. Adjust the projectors such that the slope of the cutoffs of each beam is aligned to the markers
5. After alignment, the right side beam should be at least 2.1" lower than the height of the right projector. If the projectors have the right cutoff, this will happen automatically

Here is the picture before alignment. Both the beams are pointing towards right side, the right side beam more out. Both the beams are lower by about 3".
Installed! Bi-Xenon Projectors on my VW Polo GT TSi. EDIT - Reliability concerns on page 8-before-alignment-1080p-text.jpg

Here is the picture after alignment.
Installed! Bi-Xenon Projectors on my VW Polo GT TSi. EDIT - Reliability concerns on page 8-after-alignment-1080p-text.jpg

Notes:
1. Click on the pictures and open in separate browser window to have a clear look of the markers.
2.The alignment is not 100% perfect - the markers should be exactly halfway of the slope in the cutoff. I think this is because of some error in placing the markers on the wall.
3. I do not know if this is the official and correct procedure to align the projectors. Came across this thread in Google Search and used it.

And here is a drive by video after alignment.


Before alignment, I had felt that low beams were too close and I had to use high beam often to be able to look farther while traveling at low speeds upto 50kph. After alignment, the low beam is adequate for speeds upto 50kph with good visibility. The low beam cut off is also below the eyeline of oncoming traffic. I saw only a couple of vehicles flashing, that was when the car was on a little upward slope thus lifting the cutoff. Also, as member "keeru" had observed, there was a small area of blind spot very close to the car. This fills up nicely when the fog lamps are turned on. The video is with fogs turned on. Also, from the drivers seat, only a small part of this spot is visible as the dashboard covers most of the blind spot. In my car, the seat height is set to maximum. If you drive with a lower seat height, this blind spot should be totally invisible.

High beams can be used outside city limits and for higher speeds. High beam gives excellent distance visibility and confidence to drive at higher speeds in the night. In the drive-by video, I used high beams just for demonstration. Low beams were quite adequate in this village road.

I am going to drive with this alignment for a few days and see how oncoming traffic reacts. If I see more vehicles flashing, I will then move the beams lower by an inch.

Quote:
Originally Posted by keeru View Post
1. There is a small blind-spot observed at the bottom left corner...
This time I paid special attention on the blind spot, and yes, there is a blind spot near the left side beam. Though this showed up in the earlier video, I had missed this as our natural line of vision while driving is a little farther. Also, from the driver's view, this blind spot is quite less compared to the video, as the dashboard covers up most of this blind spot. I turned on the fog lamps and the fog lamps fill in the blind spot nicely. Also, in my car, the seat height is set is set to maximum for my wife's driving position. If you drive at a lower seat height, the spot should be completely invisible.

Last edited by graaja : 18th January 2016 at 07:14.
graaja is offline   (2) Thanks
Old 18th January 2016, 10:03   #21
BHPian
 
antardaksh's Avatar
 
Join Date: Jan 2006
Location: delhi
Posts: 380
Thanked: 295 Times
Re: Installation Process

Quote:
Originally Posted by graaja View Post
This is a very crude and temporary arrangement and is not at all recommended. I have ordered the following connector set from AliExpress.
Polo Headlight connector
Hi,

Could you please post picture of rubber cap at the back of headlight. How has installer sealed the rubber cap to prevent moisture/water from entering headlight.

Do we get these caps as spare at VW workshop in case it gets damaged?

Regards.
antardaksh is offline  
Old 18th January 2016, 17:11   #22
BHPian
 
zee_bat's Avatar
 
Join Date: Jun 2014
Location: Delhi
Posts: 90
Thanked: 144 Times
re: Installed! Bi-Xenon Projectors on my VW Polo GT TSi EDIT - Reliability Concerns Noted (Page#8)

Very informative! I own a 2015 1.4 Octavia which doesn't give the projector/LED lamps as an option, they are available only in higher versions. Was planning to take the jump and get custom lights but just too worried about the warranties! will try to source used headlights now and do this!
zee_bat is offline   (1) Thanks
Old 20th January 2016, 10:24   #23
Team-BHP Support
 
graaja's Avatar
 
Join Date: Nov 2013
Location: Coimbatore
Posts: 3,223
Thanked: 20,739 Times
re: Installed! Bi-Xenon Projectors on my VW Polo GT TSi EDIT - Reliability Concerns Noted (Page#8)

Quote:
Originally Posted by antardaksh View Post
Could you please post picture of rubber cap at the back of headlight. How has installer sealed the rubber cap to prevent moisture/water from entering headlight.

Do we get these caps as spare at VW workshop in case it gets damaged?
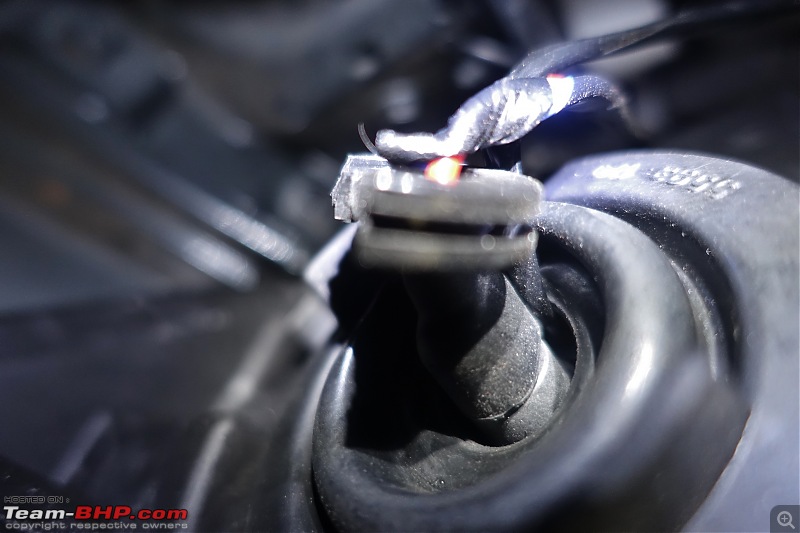
Hi Apologies for the delay. Below is a picture of the rubber cap. This is the best I could manage from the cramped engine bay.

Installed! Bi-Xenon Projectors on my VW Polo GT TSi. EDIT - Reliability concerns on page 8-dsc03477.jpg

Looks like the cap is not moisture proof anymore. I am planning to do the workaround done by Gannu (using a PVC pipe as extender) when I remove the lights for installing the wiring harness.

Regarding rubber caps, I am sure VW should have these as spares, have not checked though. I found a couple of links in AliExpress and eBay that sell these caps.

eBay link

AliExpress link

Quote:
Originally Posted by zee_bat View Post
Very informative! I own a 2015 1.4 Octavia which doesn't give the projector/LED lamps as an option, they are available only in higher versions. Was planning to take the jump and get custom lights but just too worried about the warranties! will try to source used headlights now and do this!
Yes. Getting a used headlight and retrofitting is a good option for warranty concerns.
graaja is offline   (1) Thanks
Old 21st January 2016, 14:06   #24
BHPian
 
Join Date: Sep 2015
Location: Bangalore
Posts: 87
Thanked: 37 Times
re: Installed! Bi-Xenon Projectors on my VW Polo GT TSi EDIT - Reliability Concerns Noted (Page#8)

Hi Graaja, I can see the indicator lamp reflectors are also painted hence, from the pictures can't make out any chrome on them. Will be there any side-effect while using the indicators as there wont be any reflection?
keeru is offline  
Old 21st January 2016, 15:32   #25
Newbie
 
Join Date: Jan 2016
Location: Bangalore
Posts: 7
Thanked: 2 Times
re: Installed! Bi-Xenon Projectors on my VW Polo GT TSi EDIT - Reliability Concerns Noted (Page#8)

Well written mod. I have been thinking of upgrading lighting on my Honda City for sometime now. A reference in Bangalore comes real handy.

I wanted to ask, the black shading on the reflectors, was it your choice or recommendation from Lumens?
sunilp.rao is offline  
Old 21st January 2016, 16:42   #26
Team-BHP Support
 
graaja's Avatar
 
Join Date: Nov 2013
Location: Coimbatore
Posts: 3,223
Thanked: 20,739 Times
re: Installed! Bi-Xenon Projectors on my VW Polo GT TSi EDIT - Reliability Concerns Noted (Page#8)

Quote:
Originally Posted by keeru View Post
Hi Graaja, I can see the indicator lamp reflectors are also painted hence, from the pictures can't make out any chrome on them. Will be there any side-effect while using the indicators as there wont be any reflection?
Yes. The reflectors for indicators are also black now. I realized about the reduced visibility of the indicators after it was made black. The indicator lamp themselves are bright and visibility is there. Still I am planning to replace the indicators with LED lamps (thanks to Gannu for the links) with lens. This should increase the visibility.

Link1
Link2

Quote:
Originally Posted by sunilp.rao View Post
Well written mod. I have been thinking of upgrading lighting on my Honda City for sometime now. A reference in Bangalore comes real handy.

I wanted to ask, the black shading on the reflectors, was it your choice or recommendation from Lumens?
I had seen the reflectors being made black for the smoked look in many internet pages. Gannu has done this in his lights as well here. So, I decided to have the black look on my headlights as well as it would go well with the grey body. Then I asked the installer and he said he will be able to do this.
graaja is offline   (1) Thanks
Old 7th February 2016, 22:09   #27
Team-BHP Support
 
graaja's Avatar
 
Join Date: Nov 2013
Location: Coimbatore
Posts: 3,223
Thanked: 20,739 Times
re: Installed! Bi-Xenon Projectors on my VW Polo GT TSi EDIT - Reliability Concerns Noted (Page#8)

"Operation Wiring Cleanup"

Finished the clean up of the wiring for the projectors.

I would like to thank Gannu for the ideas and guidance he provided me for this DIY. He gave me the idea of getting the headlight connector from AliExpress and also the ebay links to the heat shrink tubes.

As I had mentioned before, I was not happy with a few things during the projector install.

1. As we did not have the mating connector for the 10 pin headlight connector in the present generation GT TSi, and as I did not want any wire to be spliced in the original wiring, Vinod of Lumens systems did a make shift arrangement with some spade type terminals plugged into the original headlight connector. I wanted to replace this with a proper mating connector.
2. I was not happy with the wiring joints. For the joints, the wires were just twisted and insulated using regular insulation tape. Regular insulation tape is not very good for high temperature applications. At high temperatures, the adhesive becomes sticky and the tape starts to peel off. This is very dangerous inside the engine compartment and can lead to short circuit and fire hazard. I wanted to make proper joints by soldering the wires and use proper heat shrinking tubes for insulation.
3. The ballast, the halo driver etc were all left hanging inside the engine compartment. I wanted to properly fix them.

List of Materials:

First step was to get all the materials.

Got the 10 pin headlight connector from the below AliExpress link.

10 pin headlight connector

Got heat shrink tubes - 2mm, 3mm and 6mm from eBay.
2mm heat shrink tube
3mm heat shrink tube
6mm heat shrink tube

Got 1 sq.mm cables of various colors from local electronics market

Though I received all the materials 10 days back, got time only this week end to complete the job.

The Way Things Were:

The first task was to remove the headlights. Though I located the two torx screws to remove the headlights, the headlights wouldn't budge. Then watched the below YouTube video and knew that the headlights need a little force to dislodge from the locks.


Headlights successfully removed.
Installed! Bi-Xenon Projectors on my VW Polo GT TSi. EDIT - Reliability concerns on page 8-headlights-removed.jpg

Here are some pictures showing the way things were.

The wires on the passenger side headlight. Total mess!
Installed! Bi-Xenon Projectors on my VW Polo GT TSi. EDIT - Reliability concerns on page 8-before-passenger-side.jpg

The wires on the driver side headlight. Another mess!
Installed! Bi-Xenon Projectors on my VW Polo GT TSi. EDIT - Reliability concerns on page 8-before-driver-side.jpg

The insulation tape had become sticky, and had already started to peel off, just a month from installation. Cant imagine what would be the condition a year down the line!
Installed! Bi-Xenon Projectors on my VW Polo GT TSi. EDIT - Reliability concerns on page 8-tape-peeling-off.jpg

Driver side ballast tied to some wiring with a single tie. Passenger side ballast was hanging likewise. I was able to only fix the passenger side ballast using proper bolts. Had to leave the driver side ballast due to lack of space.
Installed! Bi-Xenon Projectors on my VW Polo GT TSi. EDIT - Reliability concerns on page 8-ballast-hanging.jpg

Last edited by graaja : 7th February 2016 at 22:25.
graaja is offline   (2) Thanks
Old 7th February 2016, 22:23   #28
Team-BHP Support
 
graaja's Avatar
 
Join Date: Nov 2013
Location: Coimbatore
Posts: 3,223
Thanked: 20,739 Times
re: Installed! Bi-Xenon Projectors on my VW Polo GT TSi EDIT - Reliability Concerns Noted (Page#8)

Operation Cleanup:

Below picture shows the connectors I received from AliExpress, one male and one female with the terminals. I received two such pairs. For this task, only the male part is required. The female part is already in the OE wiring harness. Also, there are 10 pins (male and female) per connector. I placed only 5 for the photo.
Installed! Bi-Xenon Projectors on my VW Polo GT TSi. EDIT - Reliability concerns on page 8-connectors.jpg

As I did not have a crimping tool, I soldered the wires to the lugs.
Installed! Bi-Xenon Projectors on my VW Polo GT TSi. EDIT - Reliability concerns on page 8-connectors-solder-wires.jpg

Inserted the blue rubber stopper.
Installed! Bi-Xenon Projectors on my VW Polo GT TSi. EDIT - Reliability concerns on page 8-connectors-insert-stopper.jpg

Inserted the wires to the connector. The passenger side connector has 4 wires (high beam, low beam, parking light and indicator), and the driver side connector requires only two wires (parking light and indicator)
Installed! Bi-Xenon Projectors on my VW Polo GT TSi. EDIT - Reliability concerns on page 8-connectors-insert-wires.jpg

This is how the connector looks on the front.
Installed! Bi-Xenon Projectors on my VW Polo GT TSi. EDIT - Reliability concerns on page 8-connectors-front-side.jpg

With the connectors ready, time to get back to the car. Below is my temporary workshop I used a soldering iron to solder the wires, and a SMD rework station to blow hot air on the heat shrink tubes.
Installed! Bi-Xenon Projectors on my VW Polo GT TSi. EDIT - Reliability concerns on page 8-work-area.jpg

Here is the close up of the jugaad job connecting the signals to the OE connector.
Installed! Bi-Xenon Projectors on my VW Polo GT TSi. EDIT - Reliability concerns on page 8-jugaad-before.jpg

With the jugaad replaced with the mating connector.
Installed! Bi-Xenon Projectors on my VW Polo GT TSi. EDIT - Reliability concerns on page 8-jugaad-after.jpg

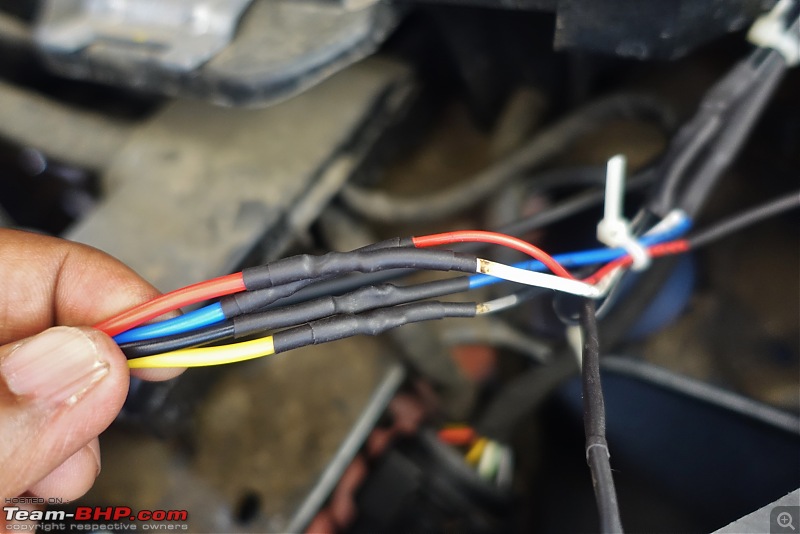
Then I removed all the wire joints, properly soldered and sealed using heat shrink tube.
Installed! Bi-Xenon Projectors on my VW Polo GT TSi. EDIT - Reliability concerns on page 8-joints-heat-shrink-tube.jpg

Here is a video that shows how to solder wires and use heat shrink tube. If you do not have a heat gun, you can also do this with a lighter. There is a related video that shows this.


Also properly bunched the wires and used lots of cable ties to keep the connections neat.

Found a M6 nut on the chassis to which I fixed the passenger side ballast using a bolt. The driver side ballast had to be left tied to a cable harness.
Installed! Bi-Xenon Projectors on my VW Polo GT TSi. EDIT - Reliability concerns on page 8-ballast-fixed.jpg

Here is a picture of the passenger side wiring now.
Installed! Bi-Xenon Projectors on my VW Polo GT TSi. EDIT - Reliability concerns on page 8-after-passenger-side.jpg

Here is a picture of the driver side wiring.
Installed! Bi-Xenon Projectors on my VW Polo GT TSi. EDIT - Reliability concerns on page 8-after-driver-side.jpg

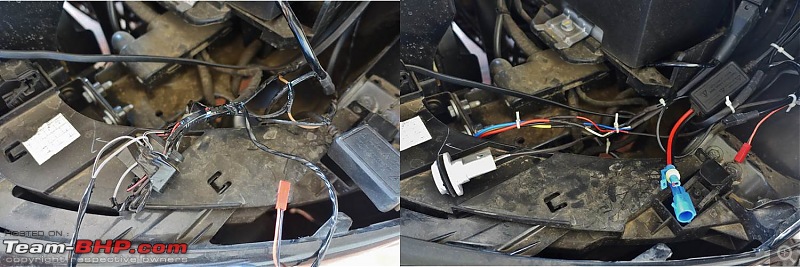
A couple of before/after pictures.

Passenger side.
Installed! Bi-Xenon Projectors on my VW Polo GT TSi. EDIT - Reliability concerns on page 8-before-after-passenger.jpg

Driver side.
Installed! Bi-Xenon Projectors on my VW Polo GT TSi. EDIT - Reliability concerns on page 8-before-after-driver.jpg

Once the wiring was complete, connected the head lights to the wiring harness and fixed the headlights back.

Found another problem during this DIY. On the passenger side headlight, noticed that the sealing was not proper. This is the light we had to open up to remove a small stain late in the night. Maybe the technician was too fatigued that he did not seal the lights properly (he had also not fixed the reflector properly which I have explained earlier in the thread).

Installed! Bi-Xenon Projectors on my VW Polo GT TSi. EDIT - Reliability concerns on page 8-bad-seal-2.jpg

Installed! Bi-Xenon Projectors on my VW Polo GT TSi. EDIT - Reliability concerns on page 8-bad-seal-1.jpg

Called Vinod and he said his technician will be visiting Coimbatore for some retrofits, and he will solve this issue during this visit. Fingers crossed!
graaja is offline   (8) Thanks
Old 24th February 2016, 21:31   #29
BHPian
 
vinj14's Avatar
 
Join Date: Jun 2011
Location: Chennai
Posts: 322
Thanked: 305 Times
re: Installed! Bi-Xenon Projectors on my VW Polo GT TSi EDIT - Reliability Concerns Noted (Page#8)

Hey,
Thanks for the info on headlight adjustments. I installed HIDS on my laura and alignment feels off. Im going to follow your method to get them aligned. Just a quick Q. When you start the alignment the headlight rotatory switch should be be at '0' right?

Last edited by vinj14 : 24th February 2016 at 21:34.
vinj14 is offline  
Old 24th February 2016, 21:47   #30
Team-BHP Support
 
graaja's Avatar
 
Join Date: Nov 2013
Location: Coimbatore
Posts: 3,223
Thanked: 20,739 Times
re: Installed! Bi-Xenon Projectors on my VW Polo GT TSi EDIT - Reliability Concerns Noted (Page#8)

Quote:
Originally Posted by vinj14 View Post
Hey,
Thanks for the info on headlight adjustments. I installed HIDS on my laura and alignment feels off. Im going to follow your method to get them aligned. Just a quick Q. When you start the alignment the headlight rotatory switch should be be at '0' right?
Hi, As my Polo GT TSi had the headlight leveling motors inside the headlight assembly, when I changed to older generation headlight assembly, I lost the motorized level control function. So, I am not sure about this. I think it would be better to do the alignment with the headlight leveling switch in the middle position.
graaja is offline   (1) Thanks
Reply

Most Viewed


Copyright ©2000 - 2024, Team-BHP.com
Proudly powered by E2E Networks