| |||||||

| Search Forums |
| Advanced Search |
| Go to Page... |
 |
| Search this Thread |  70,094 views |
 30th September 2019, 09:39
| #1 |
| Distinguished - BHPian  | Tata Nexon DIY: HID Bi-Xenon projector foglamps installation 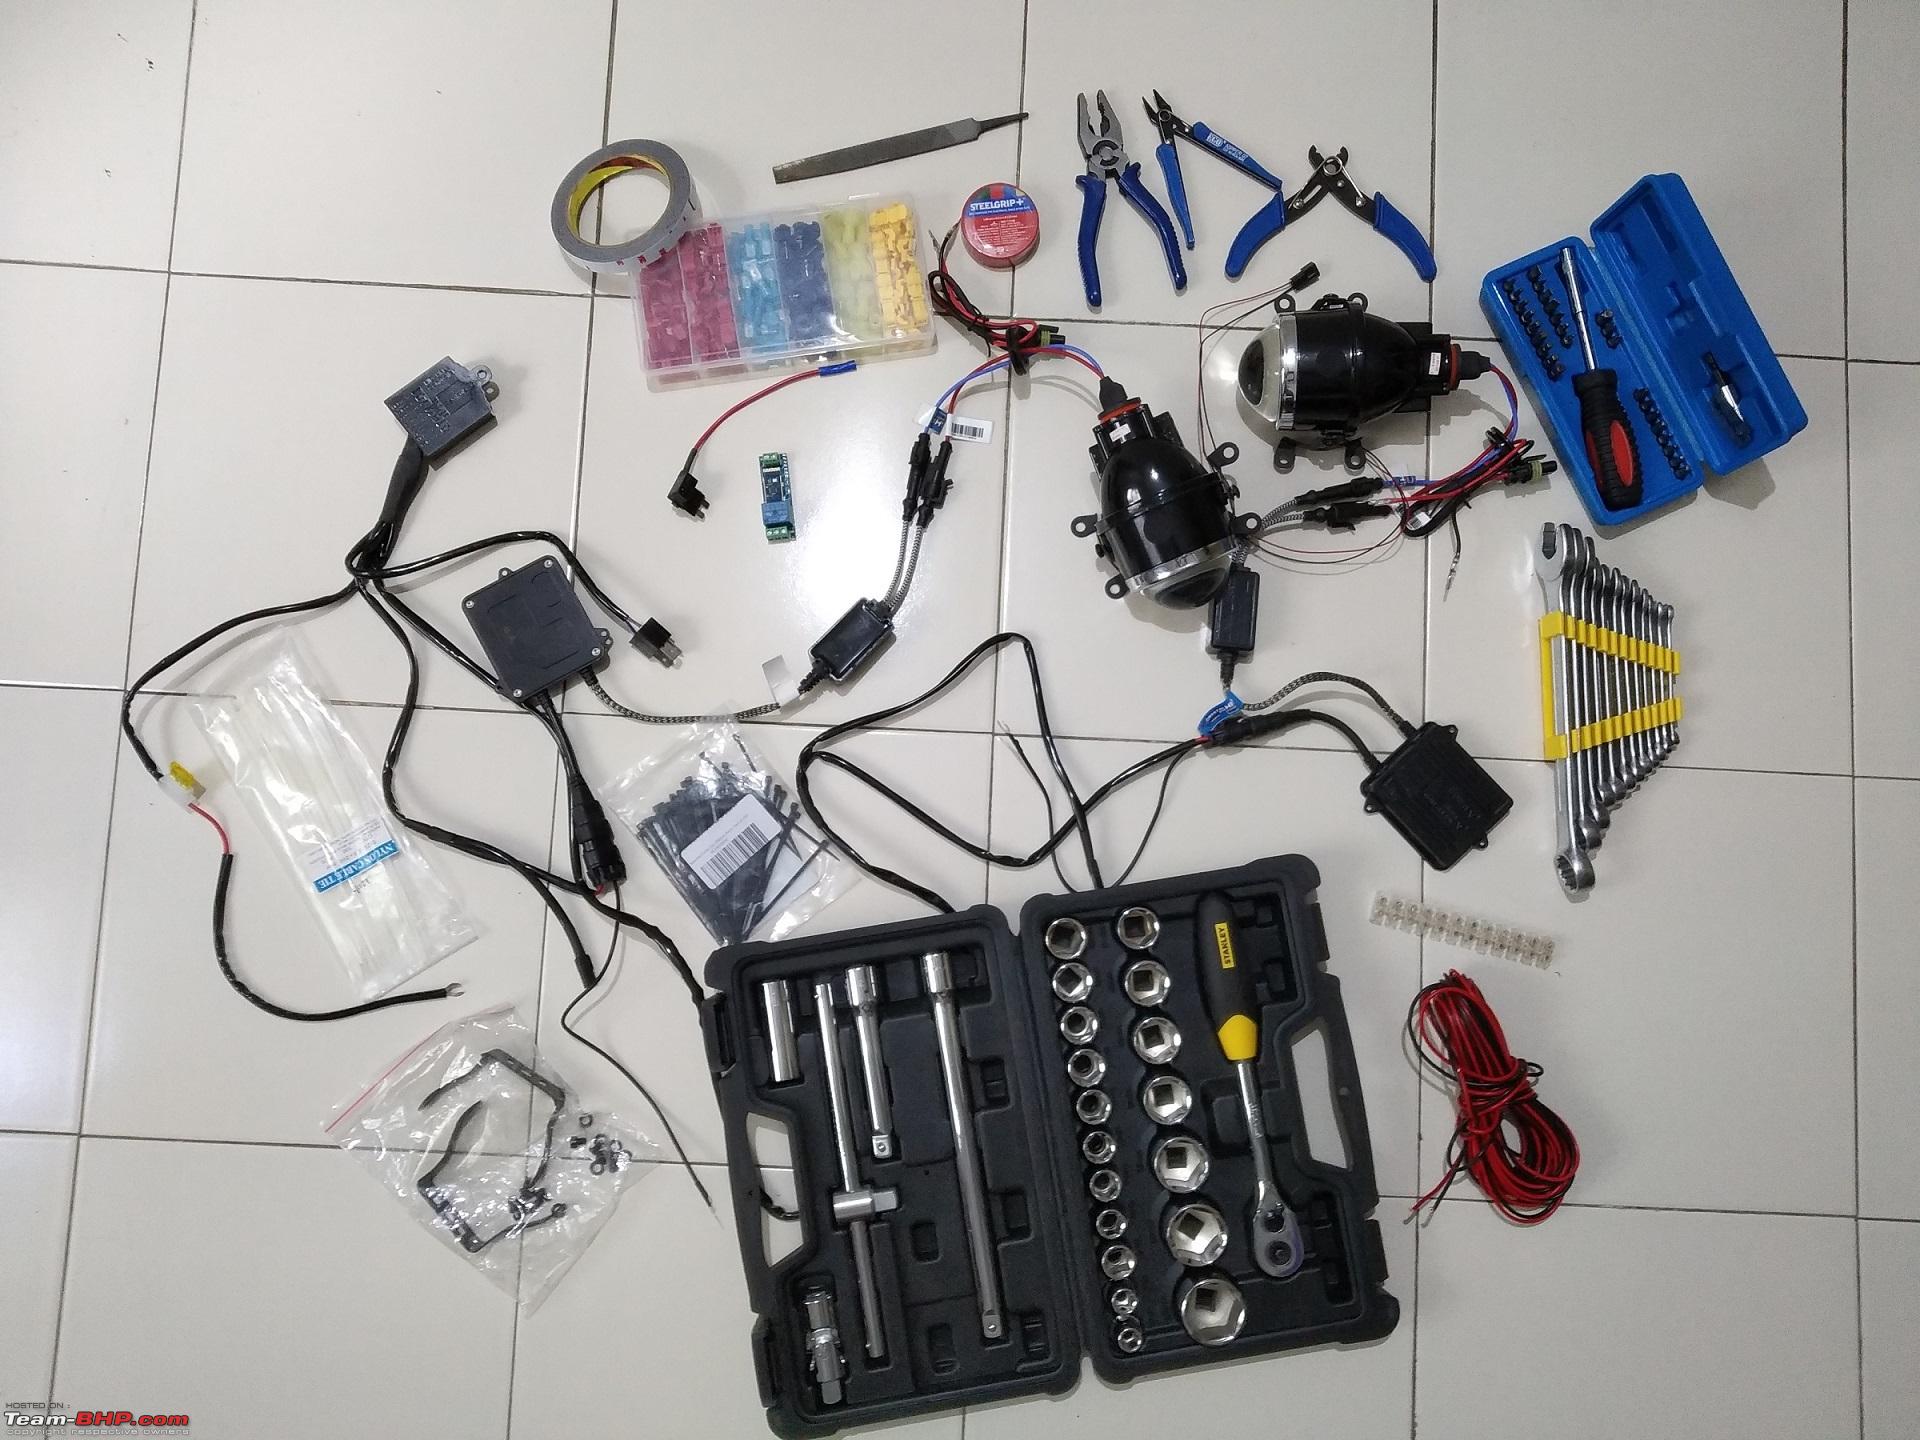 A big shout-out to My Dad, who as always is the hands-on electronic, mechanical guru & takes a lot of interest in technology of multiple types. Always present to help & guide when I roll eyes towards the skies. He also spent hours in the parking with me giving tips for cleaner finishes, better connections & providing the vital helping hand when I needed one in precarious positions! Introduction My car (and the guinea pig of the project) - Tata Nexon XZ+ Diesel. Just a few weeks back, I completed a DIY headlamp upgrade by installing Osram 35W 4200K HIDs in the stock low beam projectors in my Nexon. The improvement is remarkable & will fit the upgrade requirement of most owners for regular use. For me, it was always planned to be a 2 step upgrade. Osram HID was just the Stage I, for urban usage. You can find the detailed DIY installation guide for the Osram HID installation on TBHP here - Link - TBHP DIY thread - Osram HID upgrade on Nexon (DIY - Tata Nexon XZ+ - Osram 35W HID conversion kit) For the Konkan & Goa drives I go/hope for, a Stage II was always planned. This thread is of the Stage II. In this DIY we'll look at removing the stock fog lamps that come with Nexon XZ+ & installing projectors with HID bulbs. While a Nexon is the test-bed here, the project can be used as a reference for ANY CAR with circular fog lamp housings that can accept a 2.5 or 3 inch HID projector unit. Stock Setup
Target Setup
The projectors, HID bulbs, ballast harness & relay harness are all sourced from MotorBasket, Delhi. The discussions happened with Mr. Rishi from MotorBasket over just phone & Whatsapp & deal was completed with online UPI payment. A very kind gentleman who responds literally 24x7 & is well informed about the product. Very patient in communication & also has technical team available for query resolution. (Thankfully I didn't need their help & it went smooth.) Together with another couple of fellow Nexon owners (And friends!) we agreed on a bulk order and got the kits for about INR 7000 each. Individual prices of course will vary & you'll have to discuss with the seller. PM me in case anyone needs contact details for MotorBasket. They are easily found on Instagram & Facebook I believe. (I can't share links because I'm not a user of any social networking sites unfortunately.) These are all also available on AliExpress at similar / lower prices. However the 1 year warranty trumps pricing difference big time. Blaze India & XPMicro sell similar product kit too but at much higher prices. Why Relay Harness The simplest installation would be to go with an H11 connector kit with Canbus adapter ballast. (Trivia - H11 & H16 pins are same, only bulb wattage is different). If you opt for this setup, here are the only steps to do -
Its absolutely fine to use this for anyone who always has fog lamps ON. The stock wires are SAME as the ones for headlamp & will easily handle 55W HIDs without any need of separate relay. I know folks who have done this already & are using it since months without any issues. The Cons of this setup -
And so - I have decided to give up on the stock wiring, forget that there is a fog light button on the dash board & run separate wiring via a dedicated relay harness to control these HID fog lights. The Switch for the Relay Harness When you have a relay harness - you need to have a switch to trigger it. The default way is to simply install a small switch/push button somewhere on the dashboard. This is also very easy to use while driving as you can easily turn the lights ON and OFF while driving. Here are some tips for this approach - Using Hardware Switch
Bluetooth Switch! Instead of the above, I decided to do something wicked & try out a Bluetooth relay module that can be controlled using a simple programmable Bluetooth app on mobile. This module is also available for just INR 210 on AliExpress. There are plenty freeware Bluetooth controller apps on the PlayStore. We can write our own as well. Simple to use Android APIs for BT control. The module is very small (you'll find pictures below). I decided to secure it within the main fuse box. So - my fog lights are controlled by mobile phone instead of a hardware switch. A Pseudo Connected Car!! So - as mentioned above - there are 2 ways to install the fog lights & 3 ways to switch them ON/OFF. This thread is about my specific approach. For your own projects - you can ignore some bits & use some of them anyway for reference depending on which steps apply for your approach. I'm trying to keep it as generic & detailed as possible. Last edited by Reinhard : 30th October 2019 at 15:21. |

|  (20)
Thanks (20)
Thanks
|

| The following 20 BHPians Thank Reinhard for this useful post: | ampere, chiranjitp, digitalnirvana, dpat17, Enobarbus, gauravanekar, GTO, HappyWheels, InControl, keroo1099, manjunag, Myth_sx, neil.jericho, Sebring, siddarthab, theexperthand, The_Outsider!, VinodDevil81, vsrivatsa, wheelguy |
| |
|
30th October 2019, 11:03
| #2 |
| Distinguished - BHPian | re: Tata Nexon DIY: HID Bi-Xenon projector foglamps installation The HID Kit As mentioned above - sourced the HID kit from MotorBasket. Here is what I ordered in the package - (You can talk to the vendor & get the right setup combination shipped depending on your car & installation preference.)  Contents -
Everything with 1 year replacement warranty by MotorBasket. Ideally - you get 3M double sided tapes for mounting the ballasts as well. Sadly - they missed those in the package sent to me & I had to order it separately for about 400 INR from Amazon as a set of 5. Little nuance so I let it go.  The bulbs are really good for 4200K and indeed give "normal" yellow temperature and not white light. They are from a typical kit & so come with a grommet & wire connectors to hook up power from stock harness into the ballasts. Those 2 extra wires are redundant in my case as my ballasts will be powered from the separate relay harness. As such - at the end of my installation, I cut the grommet & removed those extra wires & connectors to reduce hanging weight behind the projectors and on the wiring. Last edited by Reinhard : 30th October 2019 at 15:22. |
|
| (16)
Thanks
|
| The following 16 BHPians Thank Reinhard for this useful post: | ampere, digitalnirvana, DrANTO, Enobarbus, gauravanekar, GTO, HappyWheels, InControl, Jeroen, neil.jericho, paragsachania, siddarthab, The_Outsider!, VinodDevil81, vsrivatsa, wheelguy |
|
30th October 2019, 11:13
| #3 |
| Distinguished - BHPian | re: Tata Nexon DIY: HID Bi-Xenon projector foglamps installation Things you'll need Now we prepare for the installation. Here's a quick list of items that you should have ready. Spend some time in collecting all these beforehand. Its better to spend time patiently to get everything first. Otherwise a missing item stalls us midway in the installation & its quite frustrating!!
Optional but recommended items
Last edited by Reinhard : 30th October 2019 at 15:00. |
|
| (16)
Thanks
|
| The following 16 BHPians Thank Reinhard for this useful post: | ampere, chiranjitp, digitalnirvana, Enobarbus, GTO, HappyWheels, ilangop, InControl, Jeroen, manjunag, neil.jericho, paragsachania, theexperthand, VinodDevil81, vsrivatsa, wheelguy |
|
30th October 2019, 11:32
| #4 |
| Distinguished - BHPian | re: Tata Nexon DIY: HID Bi-Xenon projector foglamps installation Preparing the Projectors & Bulbs Interestingly, the bulb and projectors don't really get along well out of the box. If you insert the bulb in the projector - it won't turn clockwise to lock into its secured position. That's because the thickness of the projector's body is more than the gap between the bulb's base latches!  (Note that this is something dependent on individual batches & sometimes the bulb may just well fit well out of the box! Best to test first before doing what I'm going to tell below.) This is where you'll have to use the flat iron file.
 ^^Note - this picture is for representation only. Took it after I had already completed the filing. Hence the bulb's protective foam tube is missing. When you do this - keep the white foam tube around the bulb to keep it safe. Now mount the projectors onto the "side mount" clamps in the provided kit. This is how the clamp should be oriented. The picture isn't final fixture. The edge of the clamp with the screw holes should be flush with the ring of the projector (towards the edge near the bulb holder). This picture is from when it was yet to be tightened & I was trying out how its fitting in the bumper.  Use this screw from the package with a provided washer to mount the clamps. Make sure you have the matching screw driver bit in your set.  Tip - In any DIY project, its always advisable to keep screws lose until the very final step. This way, undoing anything for making changes / correcting mistakes doesn't cause damage to material. Just ensure you tighten everything at the end & don't leave any internal screws loose! Last edited by Reinhard : 30th October 2019 at 14:56. |
|
| (12)
Thanks
|
| The following 12 BHPians Thank Reinhard for this useful post: | ampere, digitalnirvana, DrANTO, Enobarbus, GTO, HappyWheels, Jeroen, Leoshashi, neil.jericho, paragsachania, VinodDevil81, wheelguy |
|
30th October 2019, 11:54
| #5 |
| Distinguished - BHPian | re: Tata Nexon DIY: HID Bi-Xenon projector foglamps installation Prepare the wires & replace H4 connector As mentioned earlier, the kit comes with an H4 triggered relay harness. More often than not, the pin-out for an H4 male connector when looking towards the pins is like this (apologies for poor artwork) -  Its this way in the relay harness I received too. If you aren't sure, you can run quick tests by connecting the wires to car's battery & ground and check which wire does what.  Here - White is low beam, Blue is high beam & brown is ground wire.
I cut the provided H4 connector as I don't have an existing socket to plug it into. This can be used directly when retrofitting into a car that has an H4 headlamp setup. In my case - much easier to solder to our own wires & run them around. In the picture above, you can see I have already soldered the ground wire & my green wire has a shrink tube around it. After soldering is complete, move it onto the solder area & shrink them with a heat gun. Here is how it would look afterwards -  If you don't want to use shrink tubes - you can use wire connectors OR cover the solder joints with steelgrip tapes. Connectors are better as steelgrip tape will lose adhesive over time with temperature in engine bay. Last edited by Reinhard : 30th October 2019 at 14:44. |
|
| (9)
Thanks
|
| The following 9 BHPians Thank Reinhard for this useful post: | ampere, digitalnirvana, Enobarbus, GTO, HappyWheels, neil.jericho, paragsachania, VinodDevil81, wheelguy |
|
30th October 2019, 12:35
| #6 |
| Distinguished - BHPian | re: Tata Nexon DIY: HID Bi-Xenon projector foglamps installation Install Projector Now its time to remove the existing fog lamps & install the projectors. In case your car / trim doesn't have existing fog lamps in place, you'll have to by-pass some of the removal steps & simply remove the filler cap from the housing. Nexon has a clipped-on eyebrow that covers the 3 screws holding fog-lamp shroud in place. Quite a neat design for utility as well as aesthetics I must say. Great for a DIY person for sure. Its held in place by 6 clips. Use a long flat head screwdriver wrapped in a cotton rag (yes this is where you use the rag!) to insert in the gaps & push the clips.  (In the picture I don't have the rag, this is for representation only. But don't miss it - the screw-driver when used directly will damage bumper/shroud/paint.) Unhook the clips gently. Don't use too much force or the plastic will get damaged. Pull the eyebrow outwards. A removed eyebrow -  This is what the fog-lamp housing will look like now -  You'll see 3 horizontally placed screws on the top edge of the shroud. Remove them, pull out the shroud & the fog lamp's 4 screws will be exposed. Undo those 4 as well & pull out the fog lamp gently. Keep these 3+4 screws secured, the same ones will go back in their places with projectors also.  Now simply undo the H16 socket connector from the stock harness & remove the fog lamp. Push the connector back into the bumper hole. It will stay idle & safe inside. Now place the ballast & relay somewhere secured in the engine bay & run the coupling wires out from the fog-lamp housing by hand / fishing lines. This is an absolute MUST on the car LHS. On LHS - its impossible to reach the fog lamp from inside due to ECU, battery, coolant tank, headlamp all blocking access. On RHS - the fog lamp can be reached from engine bay also and wire coupling can be done afterwards. Still - better to do it outside before installing projector. (Wire picture is from RHS.)  Now connect the wires - you can't get them wrong thanks to good standardization of connectors with reversed plug orientation on each line. Also visible is the high-beam connector coming from the relay harness (just peeping out from the bumper's hole). Mate this one with the solenoid wires coming from the projector assembly's body. After all coupling is done, put the projector inside the bumper housing, align the 4 holes & fix back with the 4 screws originally removed. If required - bend the 4 points of the mild steel mounting clamps of the projector slightly to align well with the bumper's screw holes. IMPORTANT - The projector should be oriented such a way that the solenoid wires are on the underside. If you install the projector with solenoid wires coming out the top - you install it upside down & high beam will only illuminate more under the bumper and you'll always throw a glare at oncoming traffic  . If your projectors come with orientation identification stickers - nothing like it. . If your projectors come with orientation identification stickers - nothing like it. Complete these steps above on both LHS and RHS in identical manner. One side at a time to ensure no mistakes. At this stage - it would be best to connect the wires temporarily & do a functional test to ensure all is working as expected. No need to secure wires, connect switches etc. Just connect them to battery & ground terminals with correct polarities and test the bulbs, projectors & solenoid (high beam) functions. If everything is working fine - we can tighten all the screws, replace the shrouds & clip back the eyebrow. Before installing the eyebrow back, just flex the clips outwards gently (don't bend them). This way they'll fit back with a reassuring snap. Hot wire test in progress with Dad's help!  Last edited by Reinhard : 30th October 2019 at 15:00. |
|
| (11)
Thanks
|
| The following 11 BHPians Thank Reinhard for this useful post: | chiranjitp, digitalnirvana, Enobarbus, GTO, HappyWheels, manjunag, neil.jericho, paragsachania, somspaple, VinodDevil81, wheelguy |
|
30th October 2019, 13:34
| #7 |
| Distinguished - BHPian | re: Tata Nexon DIY: HID Bi-Xenon projector foglamps installation The Wiring High beam hick-up! As I mentioned earlier, there is a bit of a downer in how the high beam is driven by the relay harness.
So for now - I have just left that wire unused & secured it safely away under a thick insulation tape. We'll connect the solenoid wires separately at a later stage directly with a tap into the fuse. This means we'll not use the high beam wire in the relay harness. Powering the Bluetooth Module As mentioned earlier, I'll be using a 12V Bluetooth module as a relay to power the main relay harness.  The photo was taken when I was testing my setup to ensure it matches with my theory for functionality. Thus - you can see the crude way in which I have tapped the wire directly into the fuse without an actual fuse tap. To power this module - we need to find a suitable fuse tap to ensure it works only when the car is in ignition mode. Since the "ACC" fuse in Nexon is in the cabin fuse box, the old-faithful way is a dead end. Had to find a similar fuse & it is the fuse #38 / EMS ECU fuse. Tap into that one with a MICRO size fuse tap. The tap will go into the +ve input of the BT relay module. -ve terminal of the BT module to be hooked up to battery -ve OR body ground bolt nearby.  Once this is done - the BT module will function and appear as a device when you search from phone! Now also connect the 12V supply to the "COM" pin on the output side so that the HID relay harness will be supplied 12V when the BT relay trips to "ON". (After everything is done and working, wrap the module into a thin light weight bubble wrap/small plastic box & securely place it within the fuse box.)  Powering the Relay Harness Trigger
The relay will now have switching action based on BT module's input.  Powering the bulbs 
Last edited by Reinhard : 30th October 2019 at 15:04. |
|
| (12)
Thanks
|

| The following 12 BHPians Thank Reinhard for this useful post: | Ananthponraj, chiranjitp, digitalnirvana, Enobarbus, gauravanekar, GTO, HappyWheels, neil.jericho, paragsachania, somspaple, VinodDevil81, wheelguy |
|
30th October 2019, 14:08
| #8 |
| Distinguished - BHPian | re: Tata Nexon DIY: HID Bi-Xenon projector foglamps installation Final Mounting & Tidy Up The wiring is now complete & we have to secure all things safely & cleanly in their permanent places. Pull out those zip tags & 3M tapes & put them to use generously. Goal is to leave the engine bay visually clean & safe. All wiring must be tightly secured at multiple places to ensure that it doesn't hang around or get in contact with any hot or moving items in the engine bay.
|
|
| (11)
Thanks
|


| The following 11 BHPians Thank Reinhard for this useful post: | chiranjitp, digitalnirvana, Enobarbus, GTO, HappyWheels, manjunag, paragsachania, somspaple, Taha Mir, VinodDevil81, wheelguy |
|
30th October 2019, 14:21
| #9 |
| Distinguished - BHPian | re: Tata Nexon DIY: HID Bi-Xenon projector foglamps installation Configuring the BT Switch with Mobile app
Most importantly - (at least my) phone connects to this device as well as the Harman system simultaneously without any issue. So I can just open the app & toggle the fog lamps when needed without having to hassle about connection / pairing etc. I use fog lamps only as fog lamps. I mentioned that before I think!  So I can always pull over and turn on the fog lamps safely. Will never be touching the phone while driving. I never do. So I can always pull over and turn on the fog lamps safely. Will never be touching the phone while driving. I never do. |
|
| (11)
Thanks
|

| The following 11 BHPians Thank Reinhard for this useful post: | BoneCollector, chiranjitp, digitalnirvana, Enobarbus, GTO, InControl, paragsachania, somspaple, TheCatalyst, VinodDevil81, wheelguy |
|
30th October 2019, 14:28
| #10 |
| Distinguished - BHPian | re: Tata Nexon DIY: HID Bi-Xenon projector foglamps installation Test & Results  Yes, I'm absolutely happy. About 7.5k INR & about 10 hours (including shopping for supplies!) spent well. Yes, I'm absolutely happy. About 7.5k INR & about 10 hours (including shopping for supplies!) spent well.Did a quick test at a pitch dark spot & the results are excellent. You'll mostly remember I also have 35W OSRAM Xenarc ECO HID in the headlamp low beams. They work well in tandem with the new fog lights & the colour temperatures of both sets are matching very well! I'm especially glad about this.
Last edited by Reinhard : 30th October 2019 at 14:39. |
|
| (24)
Thanks
|


| The following 24 BHPians Thank Reinhard for this useful post: | amrutmhatre90, arungeorge, arvindmanju, BoneCollector, chiranjitp, digitalnirvana, dksv, DrANTO, Enobarbus, Ertigiat, GTO, InterceptorGuy, keroo1099, paragsachania, procrj, Rshreyansh, SaiSW, siddarthab, SS-Traveller, Taha Mir, Tgo, TheCatalyst, VinodDevil81, wheelguy |
|
30th October 2019, 14:38
| #11 |
| Distinguished - BHPian | re: Tata Nexon DIY: HID Bi-Xenon projector foglamps installation Next Steps - High beam solenoid activation So now the primary functional requirement is implemented. What remains is wiring up the high-beam solenoid controller wires separately as a fuse tap into the high-beam fuse in box. Should not take more than an hour or so if all goes according to my theoretical understanding of how it should work. But then there can always be surprises. Fingers crossed. Rear fog light Another big grime that I have had is the latest generation Nexon losing it's valuable rear fog lamp. A must have in my opinion. I have already sourced the OEM spare part courtesy of Boodmo for 430 INR.  I have already installed it on the rear bumper (Man is that easy! Its a press fit unit and fits in 2 seconds!). But wiring is pending. I'm thinking on 2 options for powering it -
Would like thoughts of fellow BHPians on which of these two I should do. That would be the next DIY thread once complete! |
|
| (25)
Thanks
|
| The following 25 BHPians Thank Reinhard for this useful post: | ampere, badboyscad, BoneCollector, car-dent, chiranjitp, DevilzzzzOwn, digitalnirvana, DrANTO, Enobarbus, Ertigiat, gauravanekar, GrammarNazi, GTO, keroo1099, Leoshashi, PapaKiloSierra9, paragsachania, Prakritij, Sam.k, siddarthab, somspaple, SS-Traveller, Torq, VinodDevil81, wheelguy |
| |
|
31st October 2019, 13:32
| #12 |
| Team-BHP Support  | re: Tata Nexon DIY: HID Bi-Xenon projector foglamps installation Thread moved out from the Assembly Line. Thanks for sharing! |
|
| (3)
Thanks
|
| The following 3 BHPians Thank ampere for this useful post: | digitalnirvana, GTO, Reinhard |
|
31st October 2019, 14:24
| #13 |
| Distinguished - BHPian | re: Tata Nexon DIY: HID Bi-Xenon projector foglamps installation A very detailed and nice DIY. The elaborate steps will help me in fixing the fogs in another Nexon. That work is pending due to multiple commitments on either side. Just one thing, I know the camera has more exposure compared to a human eye but the low beam appears to be pointing too down on right side and the fogs are brightening the area near to the car a lot. The low beam can be easily adjusted using the alignment knobs. |
|
| (1)
Thanks
|
| The following BHPian Thanks BoneCollector for this useful post: | Reinhard |
|
31st October 2019, 14:45
| #14 |
| BHPian Join Date: Aug 2008 Location: bangalore
Posts: 613
Thanked: 1,808 Times
| re: Tata Nexon DIY: HID Bi-Xenon projector foglamps installation Excellent DIY project, and superbly detailed. The kit you got looks identical to the Sinolyn projectors I got off aliexpress for my T-Jet, but I ended up using Osram 35W HIDs and balasts instead Sinolyn. Congrats on a job well done. |

| (1)
Thanks
|
| The following BHPian Thanks keroo1099 for this useful post: | Reinhard |
|
31st October 2019, 15:10
| #15 | ||
| Distinguished - BHPian | re: Tata Nexon DIY: HID Bi-Xenon projector foglamps installation Quote:
Quote:
| ||
|
| ()
Thanks
|

|