Team-BHP > Vintage Cars & Classics in India > Post-War
Register New Topics New Posts Top Thanked Team-BHP FAQ


Reply
  Search this Thread
42,214 views
Old 3rd July 2008, 15:52   #61
Senior - BHPian
 
V-16's Avatar
 
Join Date: May 2005
Location: mumbai
Posts: 4,594
Thanked: 950 Times

Attaching a few pics for your reference.

Name:  190.gif
Views: 1352
Size:  9.4 KB
The placement of the blinker lights on the front wings. Cars before 1963 had their rear view mirrors placed on these blinkers.
Post 1963, these moved near the front window.


Name:  190 int.gif
Views: 1575
Size:  48.4 KB
My 1963 MB 190C 'Heckflosse'-190-seat-adj.jpg

1). Back seats for the 190 and 190D were not adjustable unless ordered that way. One could only move the seats forward and backward
2). There was no door pockets in the 190
3). Normal layout of the 1963 190 back panel
4). There was no rear armrest unless specially ordered.

In 1963 things were changed. All heckflosse models recieved a minor change or a face lift around
the range.

Name:  190 interior.gif
Views: 1411
Size:  24.5 KB
My 1963 MB 190C 'Heckflosse'-190-rear.jpg


Name:  rear lights.gif
Views: 1341
Size:  8.1 KB
The tail lights were also changed from 1963 onwards as shown above


Your colour which you say is a DB350 was available only after 1965. The
colour to match that which was available from the factory would be a Dark Blur MBtex code L1 or a medium blue leather code 206.

Code 206 as given below
My 1963 MB 190C 'Heckflosse'-code-206354.jpg

Name:  W110 seats.gif
Views: 1630
Size:  45.5 KB

My 1963 MB 190C 'Heckflosse'-110-interior.jpg

Another post 1963 interior pic. See the different door panel style. Maybe this was incorporated in 1963 itself, which would mean certain cars got this type of door panels and certain cars made prior to that, were made as per the previous pic's specifications and fluted design.
This car is a 200 but the styling was the same

The top/roof liner would be a white cloth with perforations in it. Some people do put rexine on the roof but thats wrong. My car also has a rexine roof liner but i have sourced the original material awaiting fitment.

Hope this is of some help to you.

Last edited by V-16 : 3rd July 2008 at 15:54. Reason: add
V-16 is offline   (1) Thanks
Old 3rd July 2008, 16:01   #62
BHPian
 
Join Date: Mar 2008
Location: N Delhi/Pune/Kolkata/Schwarzenfeld
Posts: 886
Thanked: 293 Times

[quote=Prabal;889596]Fantastic colour vcash, an absolute favourite of mine. IMO, the paint job looks very good (I can see "check putty" at few places, so it'll get a coat more atleast, I suppose?). People tend to do the 'glossy' bit in restoration, I feel, so this is cool. In fact, really period.


Mods: Request edit, as I've overshot the time-limit.

Could it be made overdo please and merged? My apologies for the bother.
Prabal is offline  
Old 15th July 2008, 22:54   #63
BHPian
 
vcash's Avatar
 
Join Date: Dec 2006
Location: Los Angeles
Posts: 453
Thanked: 22 Times

I was talking to my painter about the Clear Coat or 'Lacquer' as he calls it and he tells me that since this a standard paint i.e non metallic, clear coat is not applied - He was mentioining something about hardner being applied during the primer stage so this is not needed.

He says that clear coat is only needed for metallic shades and thats what gives it a glossy look?

Is there any truth in what he is saying about not applying clear coat on my car or is this pretty much bull and something has been botched up?

The car has 3 coats of paint now and he claims that all he has to do is apply "Robin (Rubbing) Polish".

Also - a side request - do any 110 /111 owners have a picture of their original keys / key rings? I want to see if I can get original keys stamped in Delhi and maybe pick up a key ring.

Thanks,
vcash
vcash is offline  
Old 17th July 2008, 11:50   #64
BHPian
 
vcash's Avatar
 
Join Date: Dec 2006
Location: Los Angeles
Posts: 453
Thanked: 22 Times

Hey Everyone,
An update on the paint - it seems that my mechanic was right in stating that there would be no clear coat applied. The process of paint protection is taken care during the hardner phase.

I also got my car's datacard from the Mercedes Classic Center out in CA. I encourage all vinatge and classic merc owners to get this for their car as it contains valuable information regarding trim / production date etc. The phone numbers are 001-866-622-5277 and 001-949-598-4850.

Anyway, here is my car's data card. As you can see it was produced in 1963 and the exterior is Medium Blue as confirmed earlier. Interior is black MB-Tex but I am going to forgo this originality to get a dark tan instead since the contrast would look nicer in my opinion. Other than that, I am not sure what some of the other items on the Data Card tell me - Can someone help decipher?

Engine: xxxxxx-xx-xxxxxx
Transmission: 172537
350- Paintwork, Medium Blue
101- Interior Trim, Black MB Tex
402- Seat Bench
475- Low-compression engine and oil bath cleaner on export vehicles
481- Undershields
329- Mode of packing
Front left axle- 174762
Front right axle- 174746
Rear axle- 163796
Steering box- 173736
Wheel- 5Kx13
Tire- 7.00x13
Production: November 8, 1963
Attached Thumbnails
My 1963 MB 190C 'Heckflosse'-datacard.gif  


Last edited by vcash : 17th July 2008 at 12:00.
vcash is offline  
Old 17th July 2008, 12:17   #65
DKG
Senior - BHPian
 
DKG's Avatar
 
Join Date: Feb 2008
Location: Hyderabad
Posts: 3,711
Thanked: 1,389 Times

Quote:
Originally Posted by vcash View Post
He says that clear coat is only needed for metallic shades and thats what gives it a glossy look?

Is there any truth in what he is saying about not applying clear coat on my car or is this pretty much bull and something has been botched up?
Some solid colours don't require the clear coat. Why don't you just call up the paint company's local rep and he'll clarify
DKG is offline  
Old 17th July 2008, 18:48   #66
BHPian
 
vcash's Avatar
 
Join Date: Dec 2006
Location: Los Angeles
Posts: 453
Thanked: 22 Times

Here is the email I got from Du-pont. Decisions, decisions? I think that I might not apply the clear coart after all since I do not want that glossy finish. Thoughts?


Quote:
Dear Mr XXXXXXX,

In case on non-metallic paint, clearcoat is optional.

We will get all appearance / resistance properties, even without clearcoat (just a single stage 2K system).
By applying clearcoat over it, gloss and appearance is enhanced.

Please call me , if further clarification is required.

regards,
xxxxx xxxxxx
Manager-Technical
XXXXXXXXXXX
vcash is offline  
Old 18th July 2008, 09:49   #67
DKG
Senior - BHPian
 
DKG's Avatar
 
Join Date: Feb 2008
Location: Hyderabad
Posts: 3,711
Thanked: 1,389 Times

Quote:
Originally Posted by vcash View Post
Here is the email I got from Du-pont. Decisions, decisions? I think that I might not apply the clear coart after all since I do not want that glossy finish. Thoughts?
Don't underestimate the gloss of a single stage system. It will be quite glossy too.
DKG is offline  
Old 22nd August 2008, 15:43   #68
BHPian
 
vcash's Avatar
 
Join Date: Dec 2006
Location: Los Angeles
Posts: 453
Thanked: 22 Times
Bubble Trouble!

Update! Update! Update!

Okay - Have hit a bit of road block. Everytime, the car is ready for delivery and the final inspection on bodywork is taking place, I start to see small deformities and bubbles in the paint. The garage makes the painter repaint the defective panel and the bubbles show up again! The delivery has been delayed a good one month because of this problem. Now, he is asking for one more month to complete the paint job. We are not sure why the bubbles keep coming up considering that all the rusted panels were removed and we used high quality original standox putty (lambi) / hardner / paint during the restoration process.

My mechanic is now saying that he is going to shave down the bubble infected area to the sheet metal (You can see that this has been already started), apply some special '3M Coating' and then apply the putty and then paint the panels.

1) Is this procedure correct? How do we go about erradicating this bubble menace.

2) Also, I have taken some addtional pictures in the morning sun (Which has come out after many weeks!), so any comments and observation on the paint job will be much appreciated. Please let me know if you spot any deformities such as waves, shut lines, panel gaps, door alignment etc. so I can point this out to the painter.

3) Finally, the paint on the steel hubcaps keep flaking no matter what we do - How do I keep this on?

Many Thanks,
vcash

And now, here are the pictures:
Attached Thumbnails
My 1963 MB 190C 'Heckflosse'-img_0782.jpg  

My 1963 MB 190C 'Heckflosse'-img_0783.jpg  

My 1963 MB 190C 'Heckflosse'-img_0760.jpg  

My 1963 MB 190C 'Heckflosse'-img_0766.jpg  

My 1963 MB 190C 'Heckflosse'-img_0771.jpg  

My 1963 MB 190C 'Heckflosse'-img_0774.jpg  

My 1963 MB 190C 'Heckflosse'-img_0775.jpg  

My 1963 MB 190C 'Heckflosse'-img_0777.jpg  

My 1963 MB 190C 'Heckflosse'-img_0780.jpg  

My 1963 MB 190C 'Heckflosse'-img_0793.jpg  

My 1963 MB 190C 'Heckflosse'-img_0797.jpg  

My 1963 MB 190C 'Heckflosse'-img_0784.jpg  

My 1963 MB 190C 'Heckflosse'-img_0785.jpg  


Last edited by vcash : 22nd August 2008 at 15:48.
vcash is offline  
Old 10th September 2008, 10:49   #69
BHPian
 
vcash's Avatar
 
Join Date: Dec 2006
Location: Los Angeles
Posts: 453
Thanked: 22 Times

Okay guys - we are back to step I. Essentially the bubble areas are being scraped off and we are going to repaint that panel. You can see that the putty has been applied and the painting will begin tomorrow.

My only concern is that he is saying that he will not scrape of the areas not giving trouble and will paint over it. Will this be okay or will the paint come out uneven. I would have liked a complete putty and paint job but he is saying that the paint will come out just fine?

Your thoughts?
Attached Thumbnails
My 1963 MB 190C 'Heckflosse'-img_0831.jpg  

My 1963 MB 190C 'Heckflosse'-img_0832.jpg  

My 1963 MB 190C 'Heckflosse'-img_0834.jpg  


Last edited by vcash : 10th September 2008 at 10:56.
vcash is offline  
Old 10th September 2008, 11:10   #70
DKG
Senior - BHPian
 
DKG's Avatar
 
Join Date: Feb 2008
Location: Hyderabad
Posts: 3,711
Thanked: 1,389 Times

vcash bubbles are usually pointers to poor surface preparation, inaccurate mixing of filler and hardner, premature sanding before the filler dries up, and rust on metal.

You may require the preparation to be redone. Otherwise you will risk the problems to resurface. In painting 90 % of the hardwork is in preparation. If that is compromised even the best of paints give a horrid finish.

If the incidence of bubbles is high I would suggest going back to bare metal, use wash primers, then quality fillers, putty and finally paint.

I don't know what the guy is charging you for the paintjob, but a car of that size when done correctly with say 3M materials and 2K paints would be close to a lac for a show finish, glass like.

If he is charging you less then obviously he has to compromise on materials and you will have to strike a balance in what is acceptable to you.

Materials are very very expensive. We recently finished a 52 Chevy and almost 50k alone went into the materials. The labour portion is huge as its a very labour intensive process. Needless to say the end result is stunning.
DKG is offline  
Old 10th September 2008, 11:42   #71
BHPian
 
vcash's Avatar
 
Join Date: Dec 2006
Location: Los Angeles
Posts: 453
Thanked: 22 Times

Quote:
Originally Posted by DKG View Post
vcash bubbles are usually pointers to poor surface preparation, inaccurate mixing of filler and hardner, premature sanding before the filler dries up, and rust on metal.

You may require the preparation to be redone. Otherwise you will risk the problems to resurface. In painting 90 % of the hardwork is in preparation. If that is compromised even the best of paints give a horrid finish.

If the incidence of bubbles is high I would suggest going back to bare metal, use wash primers, then quality fillers, putty and finally paint.

I don't know what the guy is charging you for the paintjob, but a car of that size when done correctly with say 3M materials and 2K paints would be close to a lac for a show finish, glass like.

If he is charging you less then obviously he has to compromise on materials and you will have to strike a balance in what is acceptable to you.

Materials are very very expensive. We recently finished a 52 Chevy and almost 50k alone went into the materials. The labour portion is huge as its a very labour intensive process. Needless to say the end result is stunning.
Thank You DKG for this information. The garage has used authentic Standox Putty and Paint. The painter says that some portions that did not need bodywork were not shaved down to the bare metal and that is why the bubbles resurfaced. The areas you see with the putty have now been shaved down to the bare metal and the process has started again.

What do you feel about him now just going a couple of coats and blending in the putty and non-putty regions?
vcash is offline  
Old 10th September 2008, 11:57   #72
DKG
Senior - BHPian
 
DKG's Avatar
 
Join Date: Feb 2008
Location: Hyderabad
Posts: 3,711
Thanked: 1,389 Times

Quote:
Originally Posted by vcash View Post
What do you feel about him now just going a couple of coats and blending in the putty and non-putty regions?
That is not a problem as long as he resands the paintwork and paints the panels. This kind of repainting can cause shade problems if the paint used is not from the original batch he mixed. If he is having a fresh lot mixed ask him to ensure there is no tint variation.

My only fear in this is once you take delivery and the bubbles appear later he may not wish to redo at his expense. If as he is doing this round of retouches you notice fresh bubbles elsewhere its best you redo the entire car as its a botched paintjob. I know this is a huge disappointment but its better you sort this out once and for all
DKG is offline  
Old 10th September 2008, 13:01   #73
BHPian
 
vcash's Avatar
 
Join Date: Dec 2006
Location: Los Angeles
Posts: 453
Thanked: 22 Times

Quote:
Originally Posted by DKG View Post
That is not a problem as long as he resands the paintwork and paints the panels. This kind of repainting can cause shade problems if the paint used is not from the original batch he mixed. If he is having a fresh lot mixed ask him to ensure there is no tint variation.

My only fear in this is once you take delivery and the bubbles appear later he may not wish to redo at his expense. If as he is doing this round of retouches you notice fresh bubbles elsewhere its best you redo the entire car as its a botched paintjob. I know this is a huge disappointment but its better you sort this out once and for all
Thanks. My understanding with him is that incase of any deformities in the paint job post delivery, he will rectify them on his own cost. But I will give him your suggestions as well.
vcash is offline  
Old 10th September 2008, 13:11   #74
Senior - BHPian
 
V-16's Avatar
 
Join Date: May 2005
Location: mumbai
Posts: 4,594
Thanked: 950 Times

Vikash, the good news is that your paint is non metallic which can if need be touched up. So one can do proper sanding and get the desired effect but you have to be sure that there is no moisture either in the putty or when the painting is in process otherwise the bubbles will reappear. Also if the painting is done in the open and not in a booth, such thinks happen.
Otherwise the car is looking good.
V-16 is offline  
Old 16th February 2009, 11:43   #75
BHPian
 
vcash's Avatar
 
Join Date: Dec 2006
Location: Los Angeles
Posts: 453
Thanked: 22 Times

Hello Everyone!
I have some good news. My 1 year restoration project is nearing fruitation. Exterior and Mechanical Work is complete save for some small detailing stuff this week and the upholstery and interior work will be done in the next 3 days. Needless to say I am quite excited!

I had a favor to ask of all of you out there in different cities. My mechanic has gone and misplaced / broken 4 parts that I require. Can you please check to see if you can locate these parts from donor W110 cars or maybe a parts kabadiwala? I would of course bear all expenses including cost of part and courier charges to Jamshedpur. Once again, I would really appreciate any help on this.

Here is what I need:
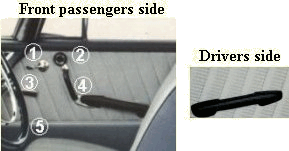
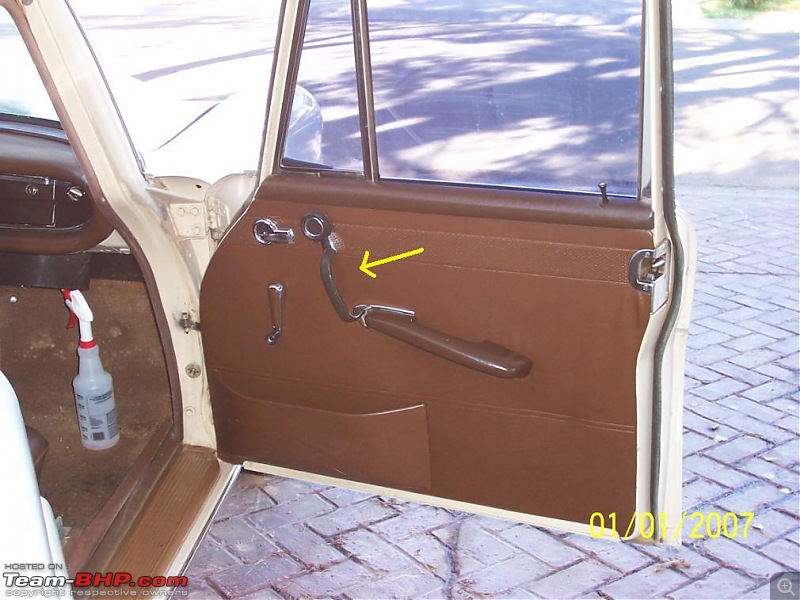
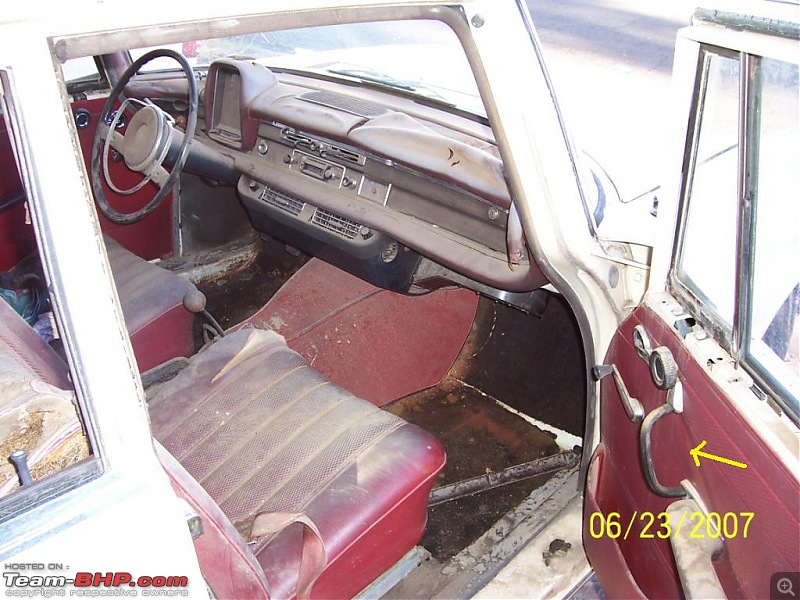
1) One Extended Door Handle - Right Hand Side (Passenger Side in LHD cars). I have marked this with an arrow.

My 1963 MB 190C 'Heckflosse'-053.jpg

My 1963 MB 190C 'Heckflosse'-100_2146.jpg

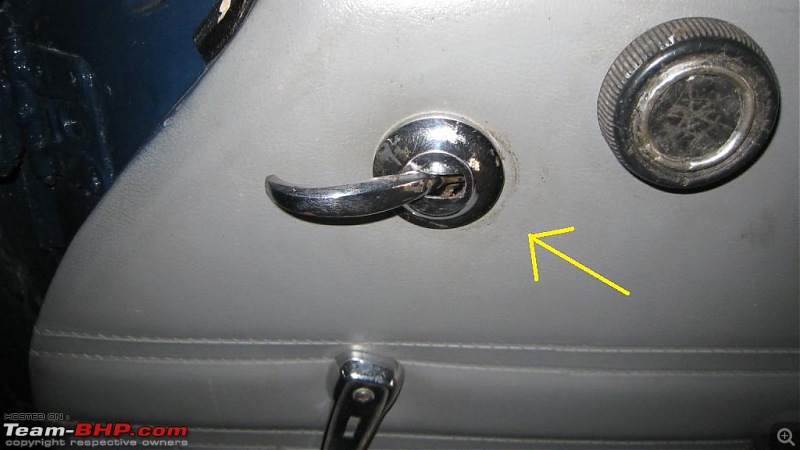
2) One Chrome Door Handle Cover - I only need one as I have 3. This can come of any door as it is an universal fit.

My 1963 MB 190C 'Heckflosse'-img_0856.jpg

My 1963 MB 190C 'Heckflosse'-img_0858.jpg

My 1963 MB 190C 'Heckflosse'-img_0860.jpg

My 1963 MB 190C 'Heckflosse'-img_0847.jpg

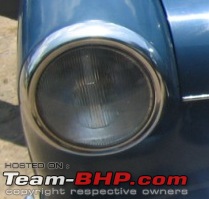
3) One Right Hand Side Bosch Headlight - The Headlight has two concentric circles and vertical slats. It is made by Bosch and says Germany in cursive script.

My 1963 MB 190C 'Heckflosse'-img_0783.jpg

4) Wiper Blade Chrome Holder - I already have the Chrome linkage that leads to the Wiper Arms but the Chrome Holders that hold the rubber wipe blades have to be sourced. I would require a pair of these.

My 1963 MB 190C 'Heckflosse'-hotbenz1.jpg

My 1963 MB 190C 'Heckflosse'-img_4736.jpg

My 1963 MB 190C 'Heckflosse'-100_2143.jpg

Thanks!
vcash
vcash is offline  
Reply

Most Viewed


Copyright ©2000 - 2024, Team-BHP.com
Proudly powered by E2E Networks