News
2012 Maruti Ertiga: How I installed a rear wiper & washer myself

The total cost of the project came to around Rs. 7,000.
BHPian paragsachania recently shared this with other enthusiasts.
Another practical feature added - Rear wiper and washer
10 years on and adding rear wiper and washer will help me stop doing this each time I'm headed for a drive during the monsoons:

For ease of understanding, I will break this project into two distinct phases: Assessment & Implementation (with the latter having few more distinct phases within)
Assessment:
To be able to successfully execute this DIY there were critical elements that had to be assessed as below for feasibility check and the ease of installation:
- Hole in the boot door - Drilling a hole onto the boot area and the possibility of it
- Location of the nozzle for the washer spray
- Wiper control stalk - Compatibility of the combination stalk with rear wiper function
- Mounting Points - Provision of mounting points for wiper motor in the boot door area
- Source to tap power for washer and wiper- Exactly as per ZDi variant’s wiring
Routing of hose from boot door area
1. Hole in the boot door - Drilling a hole onto the boot area and the possibility of it:
The biggest apprehension when installing a rear wiper always begins with a question on where to drill a hole; whether that is on the car’s body or the boot door glass depending on the car you have. In case of 1st generation Ertiga, the wiper pivot for the ZDi variant was part of the boot door and that meant the hole had to be drilled on the boot door. When trying to understand the construct and components of the boot door from Boodmo, I realised that the part where the wiper pivot comes out from the boot door is actually a garnish made of plastic and available as a separate part. This certainly made me assume that I will not have to drill any hole into the boot’s door as the garnish already has it.

2. Location of the nozzle for the washer spray:
Apart from this, the next thing to ascertain was the placement of the washer nozzle for the rear wiper. In case of Ertiga, this was fairly easy since the nozzle was integrated with the high mount stop lamp (HMSL) and all I had to do was to order this part and fix it my car’s boot door.
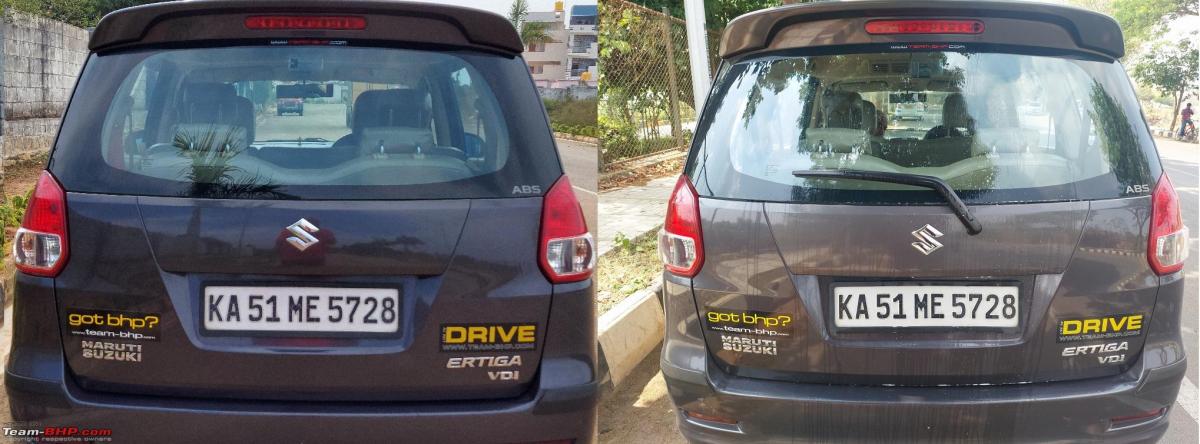
The below image compares the boot door area of the 1st Gen VDi and ZDi variants, the location of the garnish and the wiper pivot as well as the nozzle for rear washer which is part of the HMSL.

3. Wiper control stalk - Compatibility of the combination stalk with rear wiper function:
Although there was no assessment required for this, I still went ahead and checked the 10 pin coupler on the existing combination switch/wiper control stalk and noticed empty pins on the socket meant for controlling the rear wiper function in the ZDi variants. The wiper control stalk completes the circuit by connecting the ground terminals for the washer and wiper. The 12v power for both of them (washer and wiper) is drawn from the junction box. Hence, if I were to control the rear wiper and washer function from the combination stalk, I had to leverage the blank pins by inserting 2 pins for the wiper and washer ground on the 10 pin socket here.

4. Mounting Points - Provision of mounting points for wiper motor in the boot door area:
This was the next assessment that had to be done to ensure that fitting the wiper motor on the boot door was a straightforward task. I looked around the internet, especially YouTube to find any videos that will show me how the rear wiper motor was mounted in the higher variants and I could find one (screengrab from the video below).

The construct of the door panel for my VDi variant was similar and I could locate the 3 holes for mounting the rear wiper motor on the boot door.

5. Source to tap power - Exactly as per ZDi variant’s wiring:
This was perhaps the most difficult assessment and the main reason was the location of the junction box and the ease of access to this in the driver side footwell area. There are 2 connectors that would come into play here.
Power for wiper motor will be tapped from the fuse side of the junction box from one of the connectors
Power for washer pump will be tapped from the relay side of the junction box from another connector
The first half of the success came when I could insert the test probe for positive terminal of the multi-meter in the corresponding empty pin the socket and could confirm the availability of 12v on this pin. With this assessment, at least I became sure that power can be drawn from the respective socket. At this stage, I didn’t attempt to open the junction box to check for the availability of 12v power from another socket located at the back of this box and was somehow confident that power from the rear socket also will not be an issue.


6. Routing of hose from boot door area:
In the VDI variant a grommet on the left hand side top of the boot door allows wires for the high mount stop lamp, boot door actuator & licence plate lamps pass through from the car’s body into the boot door. I had used the same grommet to route the cable for the rear dashcam as well. I then checked one of the images from the official review to confirm the presence of one more grommet but on the right hand side top of the door in the ZDi variant.
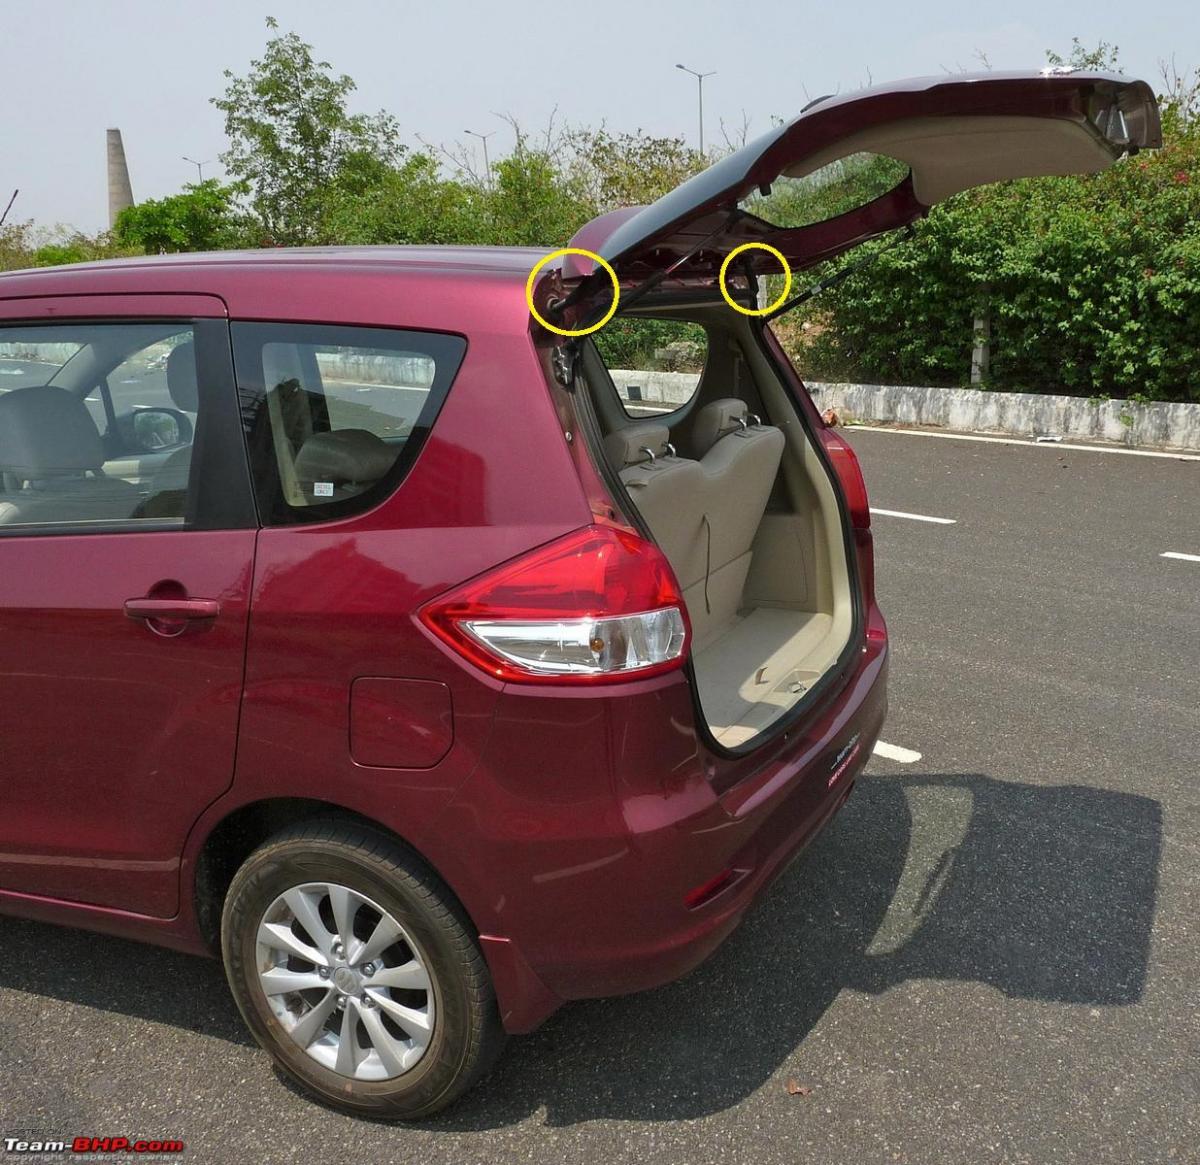
After this, I checked my car and found the presence of dummy plastic caps both on the car’s body and the boot door on the right hand side top, thus confirming the possibility to install one more grommet to route the washer hose.


With all these assessments, I was good to go with the installation, details of which is in subsequent posts.
Continue reading BHPian Paragsachania's posts on his rear wiper install for more insights and information.
Find Car News
Just News


About Us