News
DIY: Changing brake pads on my Volkswagen Polo GT TDI

Plans of getting the remaining part for the big-brake kit for the front wheels have been put on the back burner at the moment.
BHPian Gannu_1 recently shared this with other enthusiasts.
Since I have been doing WFH over the last week, I thought of dropping an update in the thread.
Plans of getting the remaining part for the big-brake kit for the front wheels have been put on the back burner at the moment owing to:
- The current covid scene and soaring fuel prices which has reduced the long-distance drives considerably.
- My friend who's in Germany, who was to travel to India during this summer carrying the remaining parts with him, has postponed the travel plans due to the lockdowns.
- Financial constraints! The caliper and the brackets would set me back by close to 25-30k INR.
- No urgency for this upgrade at the moment with just the home - workplace - home 12 km daily drives. My role at work has also changed a bit due to a new order that has come so less of shipyard commutes too.
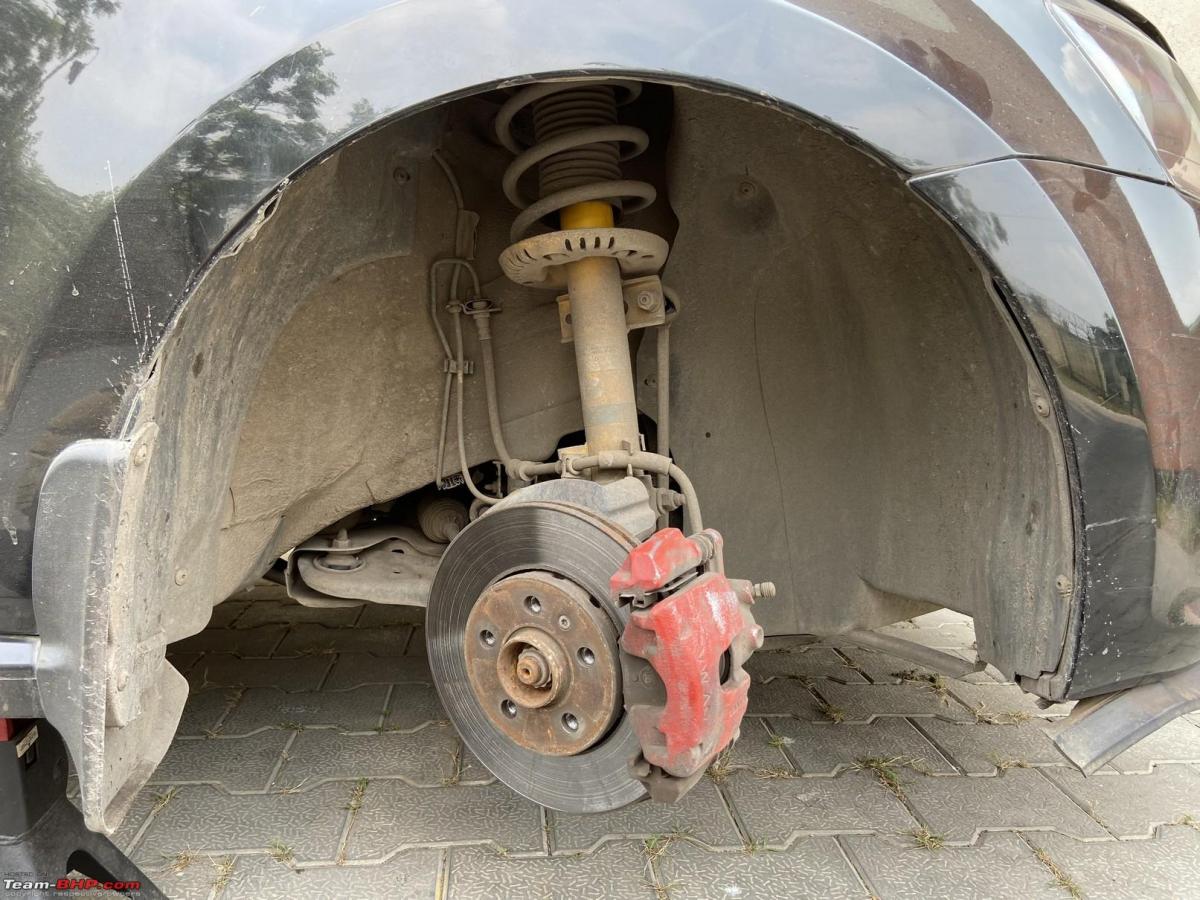
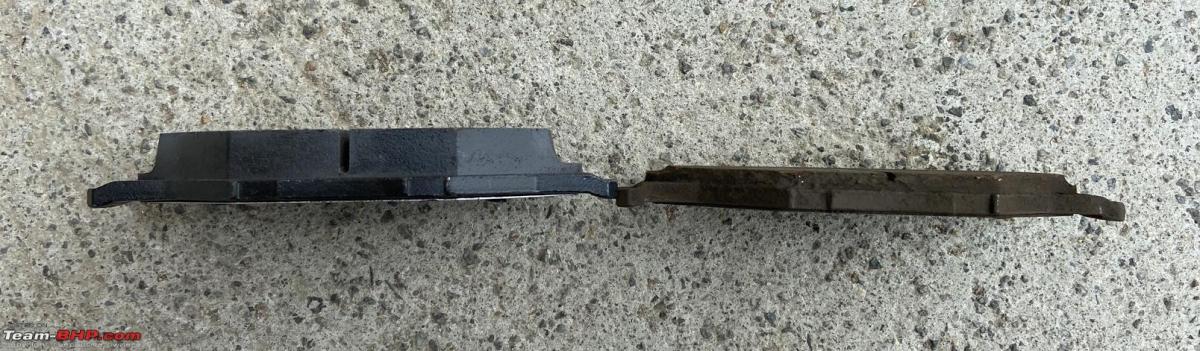
A couple of weeks back, during a casual inspection of the existing front brake pads, I found them worn out by a sizeable margin. Just a few mm of the frictional material was left on the outside.

I was pretty sure these are not going to last until the new callipers and calliper brackets of the big-brake kit arrives so I decided to swap the existing pads with a new set. I am not much of an enthusiastic driver and my brakes are very sensibly used, so an OEM replacement set would do just fine. To keep that in perspective, the current set has last me over 93,000 km. They were replaced during the scheduled fifth/75,000 km service and the car is now at 167,700 km.
I’ve had a good experience with Boodmo thus far so decided to source the pads through them. A set of TVS-Girling pads was priced at a shade less than Rs. 1500 in Boodmo (part number - 29932547, link). The same set with the additional sliding clips and bolts which makes up the OEM brake pad replacement kit retails for Rs 1800 (part number - 6RU698151A, link). I decided to opt for the TVS-Girling set while retaining the sliding clips and bolts. Plus, I wanted to change the pads myself having seen a few DIY videos and links on changing brake pads on the forum. But I did not realise what I would be getting into and some lessons will be learnt that day!
The pads were shipped through Delhivery and they arrived as scheduled. From order placement to delivery it took about a week.

I decided to change the pads on a weekend and assembled all the tools required for the job. I also wanted a pair of helping hands for the job so I roped in my good friend and colleague - Gagan. He isn’t new to this thread though. He was the friend who lugged the Bilstein kit from Germany during his Euro trip and we had been to Yercaud for a leisure trip back in 2016. He's very fond of cars, have been an active member and judge of the Formula Student competition held in India and abroad and currently owns a 2016 Jazz.
The apartment complex where I stay doesn’t have many open parking spots with a shade so we had to pick an open space and do the job. Times I wish I had a closed garage with a nice epoxy flooring, a hydraulic lift to raise the car, an air compressor, tool cupboards and such like BHPian Jeroen’s garage. One day perhaps!
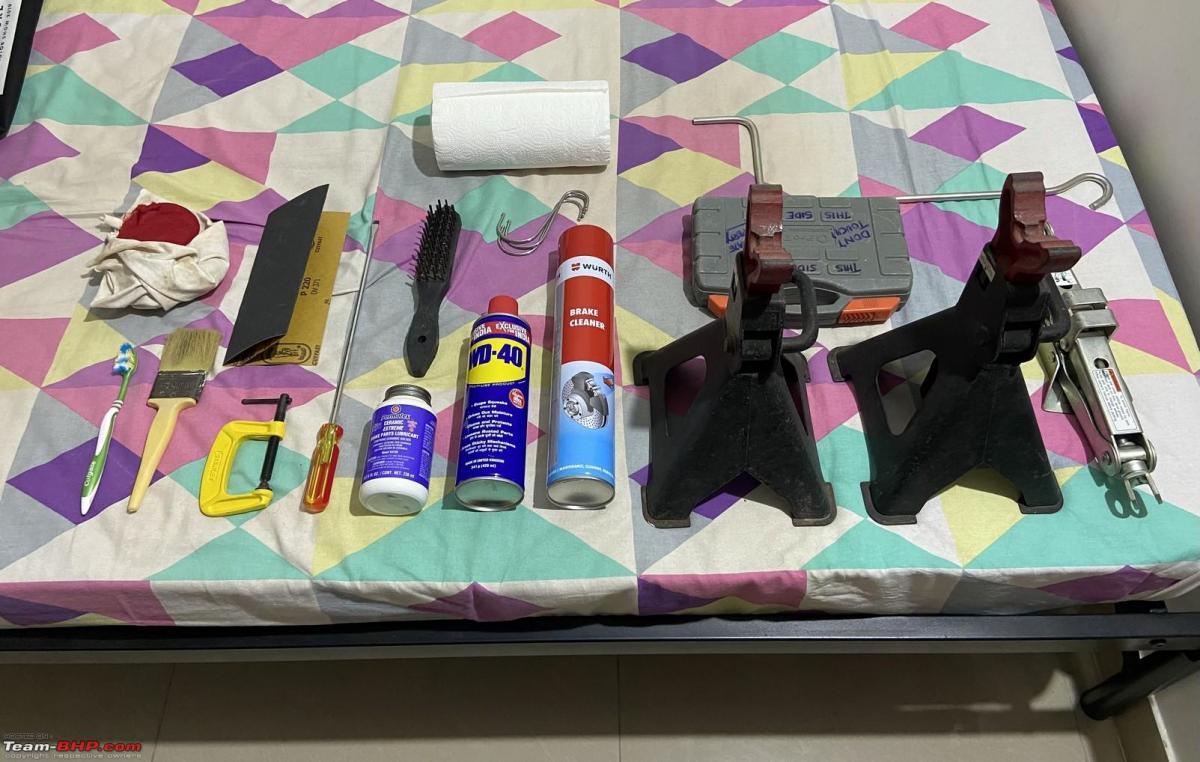
List of tools/consumables
1. Jack (I used a Maruti’s screw jack as it was easier and much safer to operate this rather than the VW supplied jack).
2. A pair of jack stands
3. ¼” ratchet set or a 12-13 ring spanner (to undo the calliper bolts from the guide pins)
4. Wire brush (to clean the callipers from the brake dust and rust)
5. C-clamp 120 mm or 6 inch OR a flat-head screwdriver (to compress the calliper piston back)
6. S-type hooks (to hang the calliper from the spring after it is removed from the assembly)
7. Sand papers 220 grit (wasn’t used as the wire brush helped remove all the brake dust and rust)
8. Brake grease (to be applied in the sliding clips, guide pins and the rear side of the pads)
9. Brake cleaner spray (alcohol-based spray to clean the assembly from the brake dust and rust)
10. WD40 (for general cleaning and stripping the older grease)
11. Paint brush, discarded toothbrush (for hard to reach areas)
Took all the tools to the car parked in the basement and drove her out to an empty spot.
Steps
1. Slacken the lugs of the front wheels.
2. Jack up the front wheels and place the jack stands at the strong points.
3. Remove one of the front wheels - we started with the driver-side wheel first.
Place the wheel removed behind the jack stand for added security.
4. Rotate the steering wheel towards the extreme right to permit access to the calliper bolts from the wheel hub.
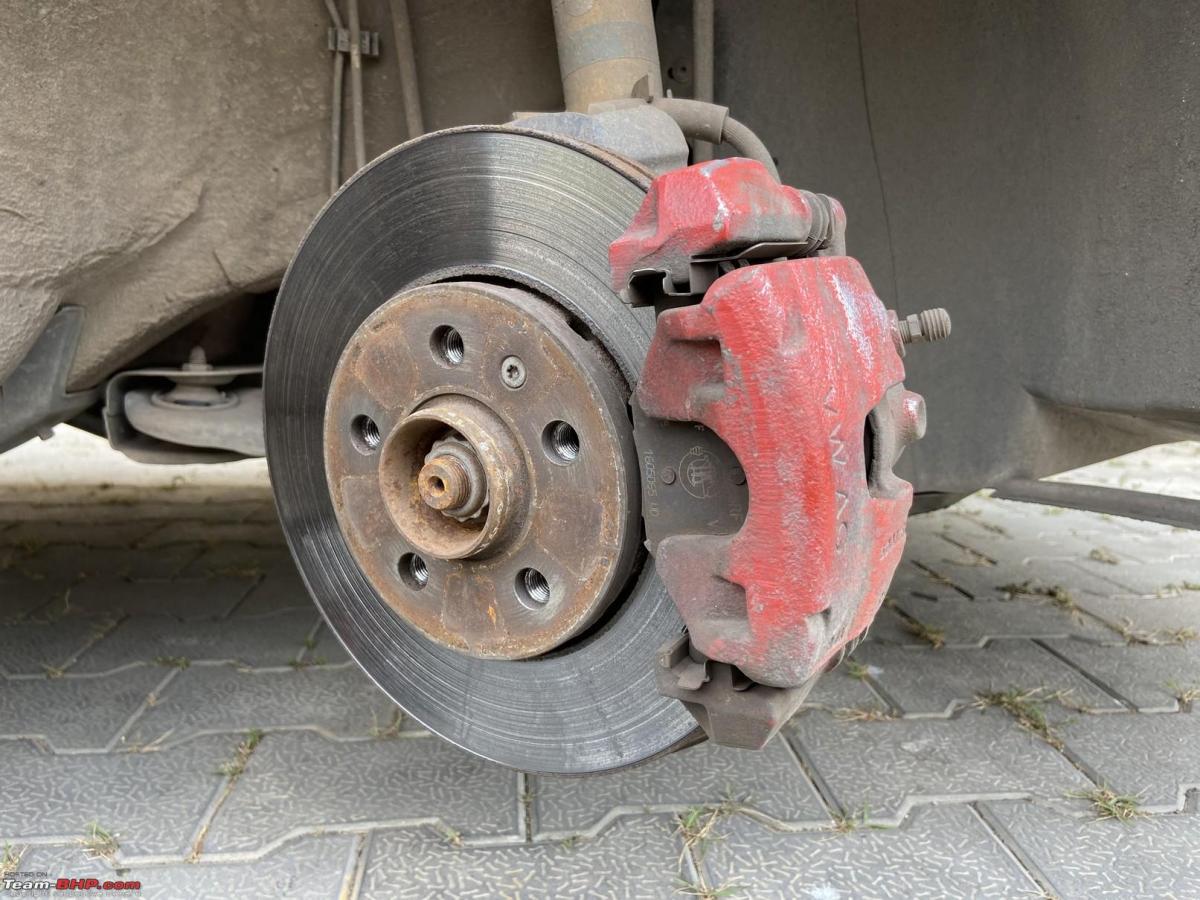
5. Clean the calliper assembly with the wire brush and the brake cleaner spray thoroughly. There’s bound to be plenty of brake dust and perhaps a bit of rust too.

6. Unscrew the cap of the brake fluid reservoir and keep the cap atop the outlet.

This is to permit the brake fluid to rise when the pistons from the callipers are pushed. Don’t keep the outlet for a longer time as brake fluid is hygroscopic and absorbs moisture from the air.
7. Use the flat-head screwdriver on the inside brake pad to push the piston back to the outermost position. Insert the screw driver here and push the piston back:

Or you can use the 6”/120 mm C-clamp and the old brake pad to compress the piston. /Lesson learnt #1.
When the piston is compressed, the brake fluid in the reservoir rises. When you do it for the other wheel too, it may spill out a bit so keep some rag clothes around the reservoir cap as brake fluid is highly corrosive.
Here’s how it is done with the C-clamp and the old brake pad:
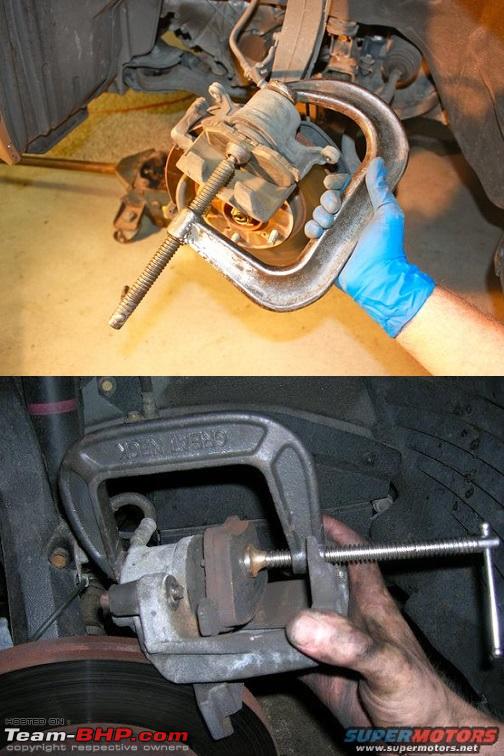
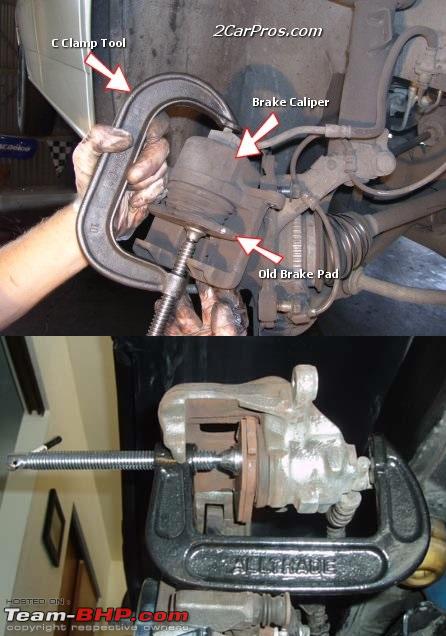
(Images from Google Images; copyright respective owners)
8. Undo the 2 hex. head bolts on the top and bottom of the caliper assembly:

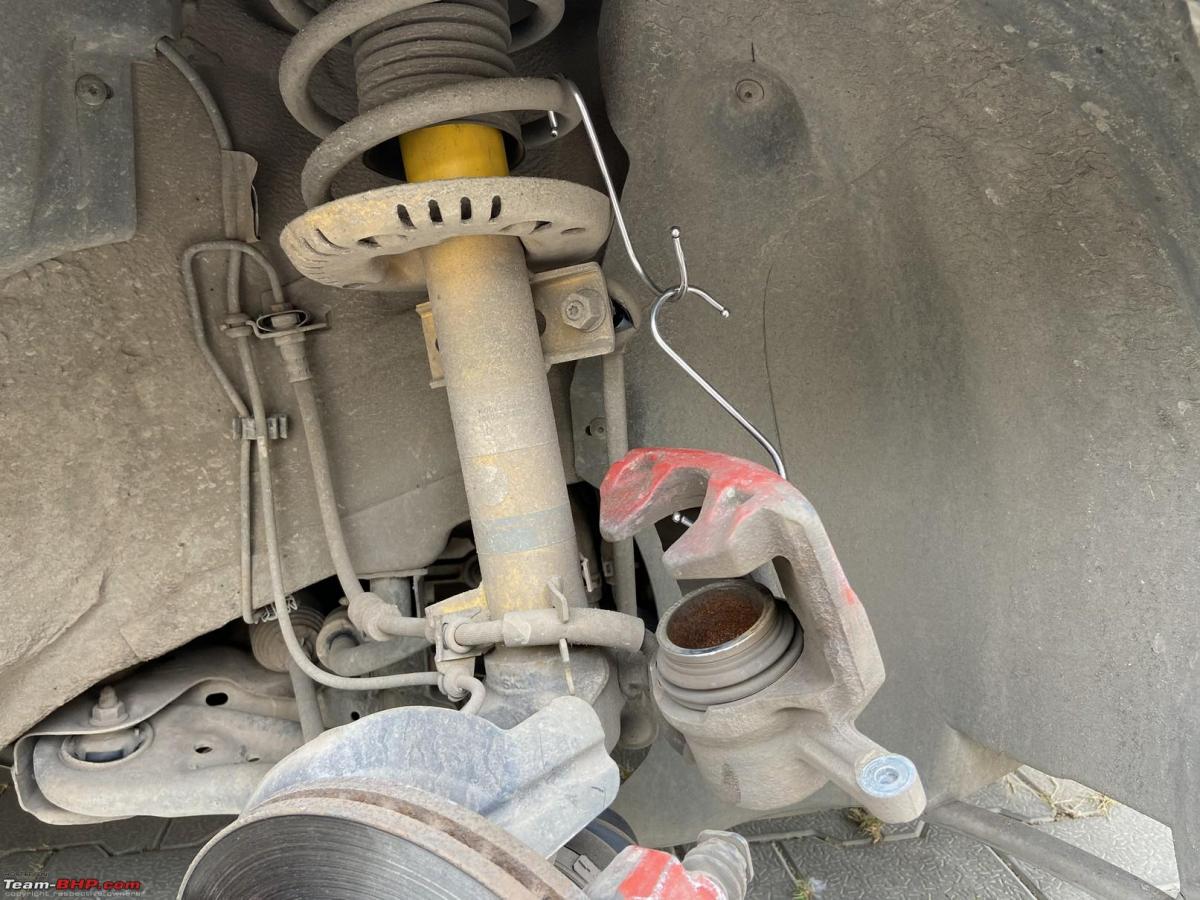
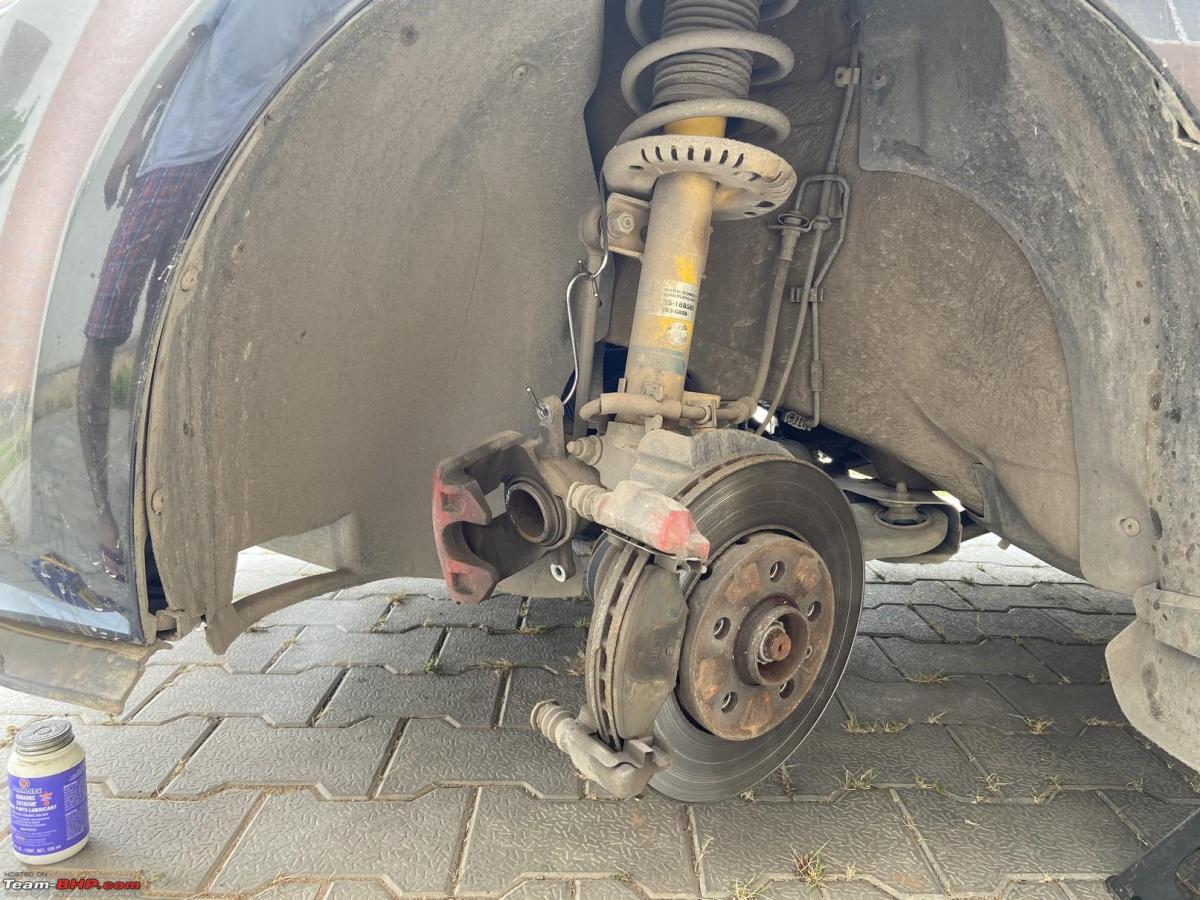
9. Remove the caliper and hang it to the spring using the S-hooks:
10. Slide the old brake pads out of the clips. They’ll slide out without any effort.
Check out the difference between the old and the new pads:
11. Clean the sliding clips using wire brush and the brake cleaner spray. Remove the bushes and the guide pins from the caliper bracket and clean them thoroughly.


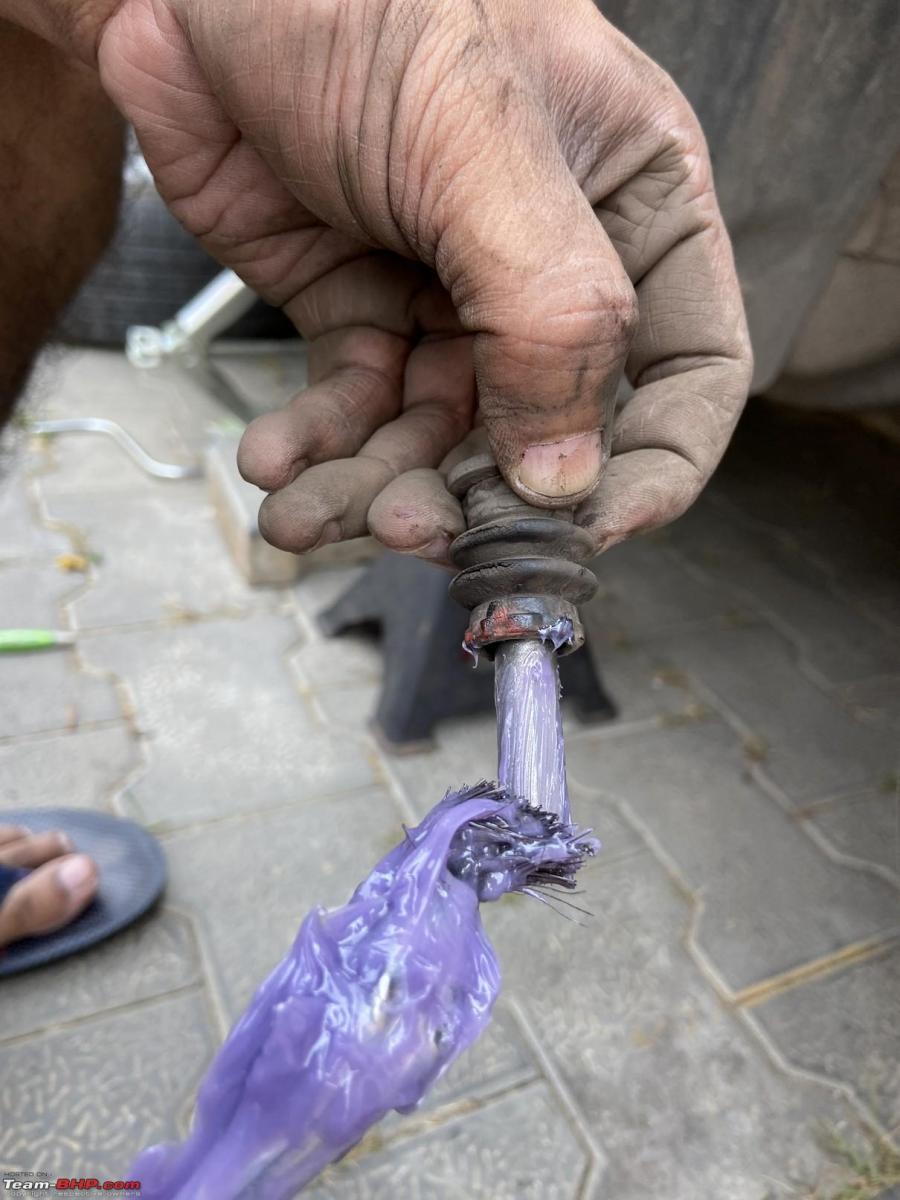
One of the sliding pins had some pitting in them and was stuck inside the calliper bracket for a good time! We had to use some force to get it off. Look at the condition of the pin:

Can clearly see the pitting.
12. Apply the brake grease in the slide paths of the clips and the guide pins. If the rubber bushes of the guide pins are worn off or torn, you’ll have to replace them to prevent dust ingress on the pin. Bushes are dirt cheap. Inspect and replace as necessary. Replace the guide pins and the bushes into the bracket.
Be careful while applying the brake grease on the parts - the frictional surface and the discs should not have a speck of this grease! The mating surfaces have to be absolutely clear from the grease. Use the tissue paper and the brake cleaner to wipe off any grease on the surface of the rotors.
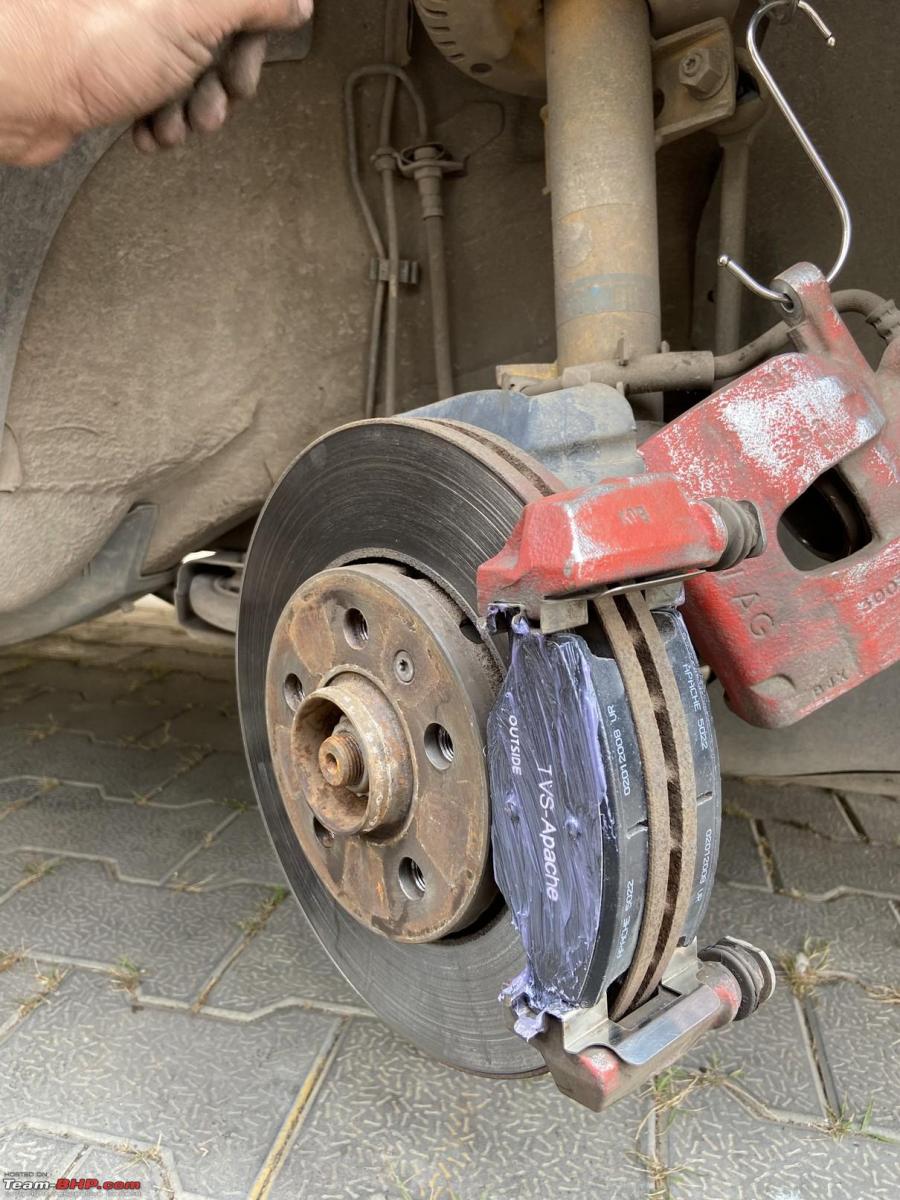
13. Insert the brake pads into the sliding clips on both sides of the disc. IMPORTANT - While inserting the brake pads, observe the INSIDE and OUTSIDE markings on the pads! Some set of brake pads have rivets on the inside while some have it on the outer ends. Where the rivets are located close to each other, these are the pads meant for the outside and where the rivets are located far away, these are the pads meant for the inside i.e. the piston side. The piston head has to mate flush with the metal surface of the pads. Lesson learnt #2.
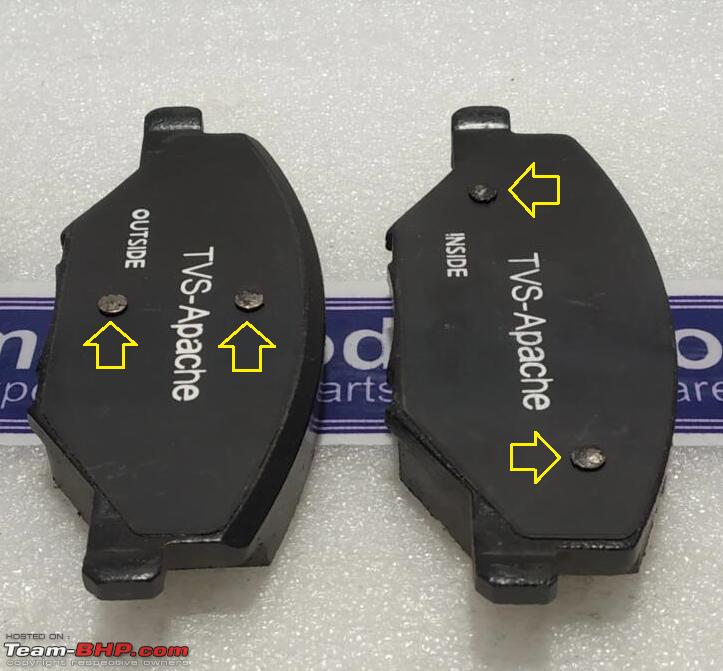
(Image courtesy - Boodmo)
Whereas some pads have no such distinction and they can be interchanged. Take a look at this set from Motherson:

(Image courtesy - Boodmo)
You can see that the rivets are located at the extreme ends and does not come in way of the piston head.
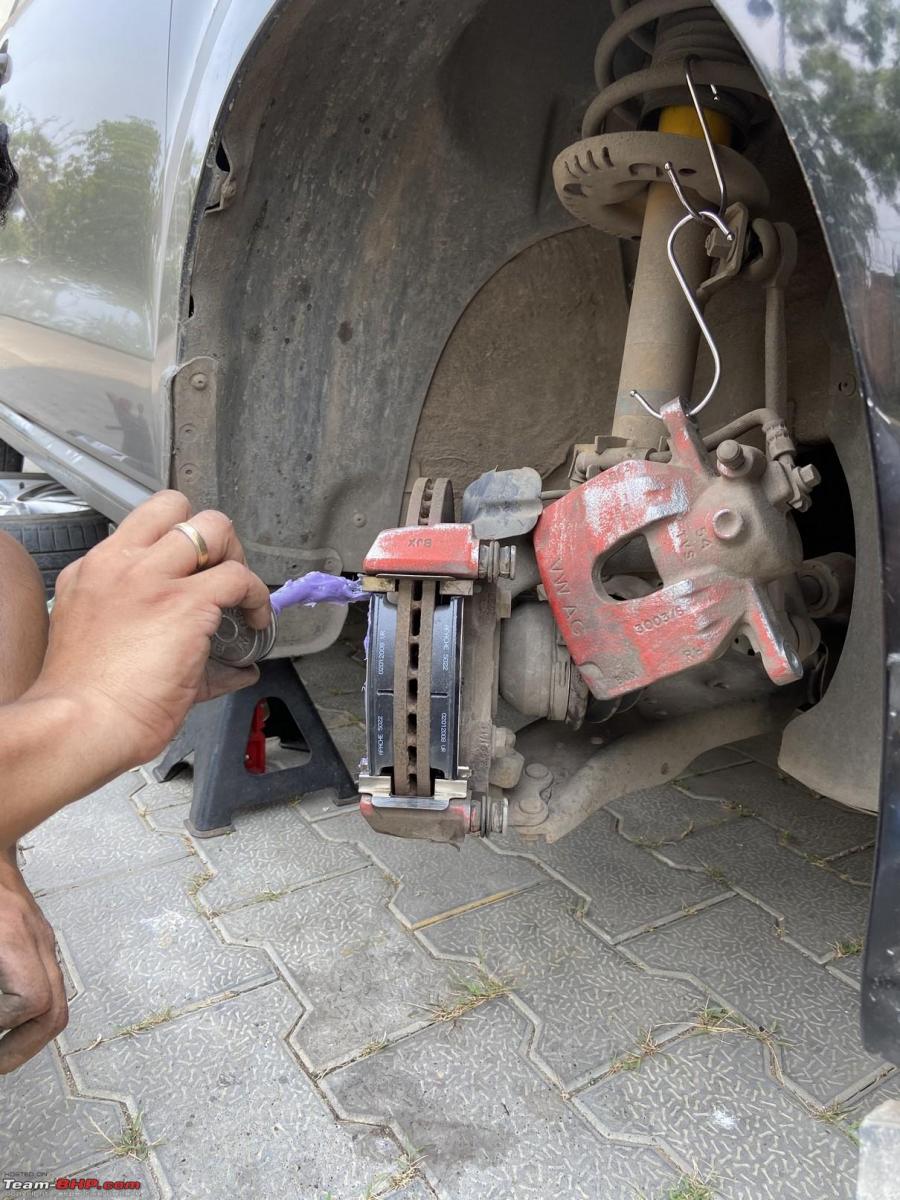
14. After the pads are inserted, apply some brake grease on the metal plate of the pads. Too much of grease is bad and too little would be insufficient. Just a small layer is sufficient.
15. Replace the caliper back in place and secure the calliper to the bracket using the bolts. Tighten the bolts. I simply hand tightened it using the 1/4” ratchet. If you have a torque wrench, tighten the bolts to 35 Nm.
16. Rotate the steering wheel back to the centre so the wheel hub is centred and replace the wheel.

17. Redo the above steps for the other wheel.
18. Replace the brake fluid reservoir cap and close it firmly. If some fluid was spilled outside (likely when the piston on the second wheel is compressed), check the fluid level in the reservoir and top up if required. The level should not go below the minimum mark. Clean the surrounding areas of the reservoir.
19. Lower the car after removing the jack stands.
20. Before driving off, start the car and press the brake pedal to reduce the pedal play and let the respective pistons push the pads firmly towards the rotors. Do a short test drive to confirm the braking action multiple times.
Lessons Learnt
As I mentioned before, we ended up doing some mistakes during this DIY being the first time we were attempting this. Its all about the experience and we always learn something every time.
#1. Use a 6”/120 mm C-clamp or a larger size for compressing the calliper piston back. We messed up here because my puny 50 mm C-clamp was not sufficient for the job as the clearance was less. So, we had to resort to the flat-head screwdriver method. Needless to say, I ordered two additional C-clamps to my kit. Will come in handy next time.
#2. Pay attention to the INSIDE/OUTSIDE markings on the pads when you replace it on the calliper. We ended up installing the two OUTSIDE brake pads on the driver-side wheel and the two INSIDE brake pads on the co-driver side wheel! Just as we were about to wind up and replace the co-driver side wheel back into the hub, I saw the INSIDE marking on the brake pad!


Sigh! We had to trace back a few steps and redo it correctly.
#3. Carry some bottles of drinking water to keep yourself hydrated when you’re on the job. We didn’t and dearly paid the price for it! I am glad and very thankful to my partner Gagan who went to the nearby supermarket to fetch some cold drinks. The shade went away after some time and it was sunny where we were working. We were so damn exhausted at the end of it!
#4. Use a pair of latex gloves while doing this job. Our hands were really dirty at the end of the job and required extensive cleaning especially the nooks and crannies of the finger nails. A face mask will prevent brake dust/rust while cleaning with the wire brush from entering into the respiratory system.
I cleaned the discarded pads and painted it with two coats of spray paint. Using them as paper weights at work:

That’s all for now. The car’s odo stands at 167,800 km. I am figuring out some high beam issue on my headlamps as we speak. Shall post about that separately. Take care and stay safe!
Check out BHPian comments for more insights and information.
Find Car News
Just News


About Us