News
DIY: Installing Apple CarPlay & Android Auto in my Audi A4

The unit and the installation process is the same for both the A3 and A4 models.
BHPian prateekchanana recently shared this with other enthusiasts.
Finally, after looking at dinu2506's thread of adding CarPlay to his Audi A4 B8, I gave up on the temptation of adding it to my car as well. I have been doing a lot of research since I got the car and I finally decided to go the DIY route and give it a shot myself first and if I fail will try finding a third-party installer.
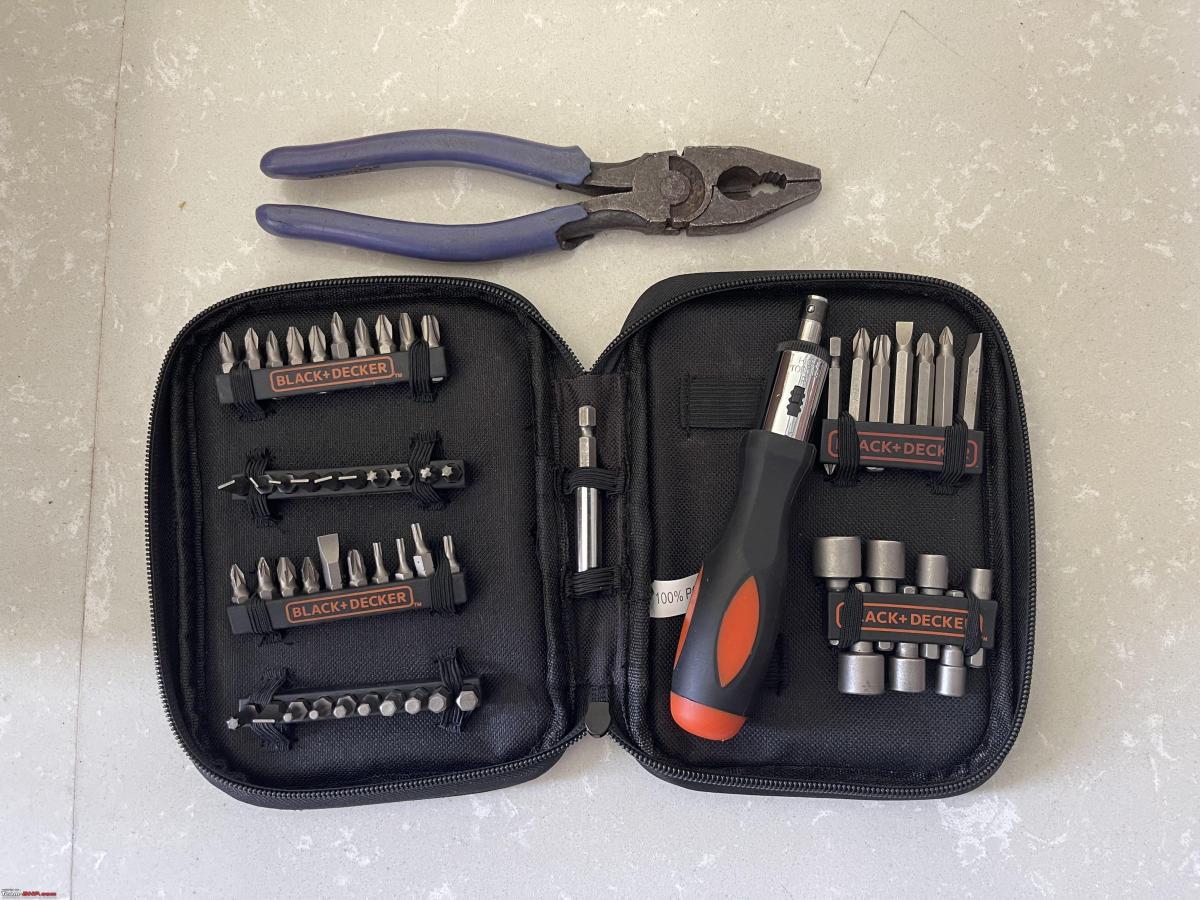
I began with the following tools:
- A screwdriver to remove the 8mm screws and plier (attached pic)
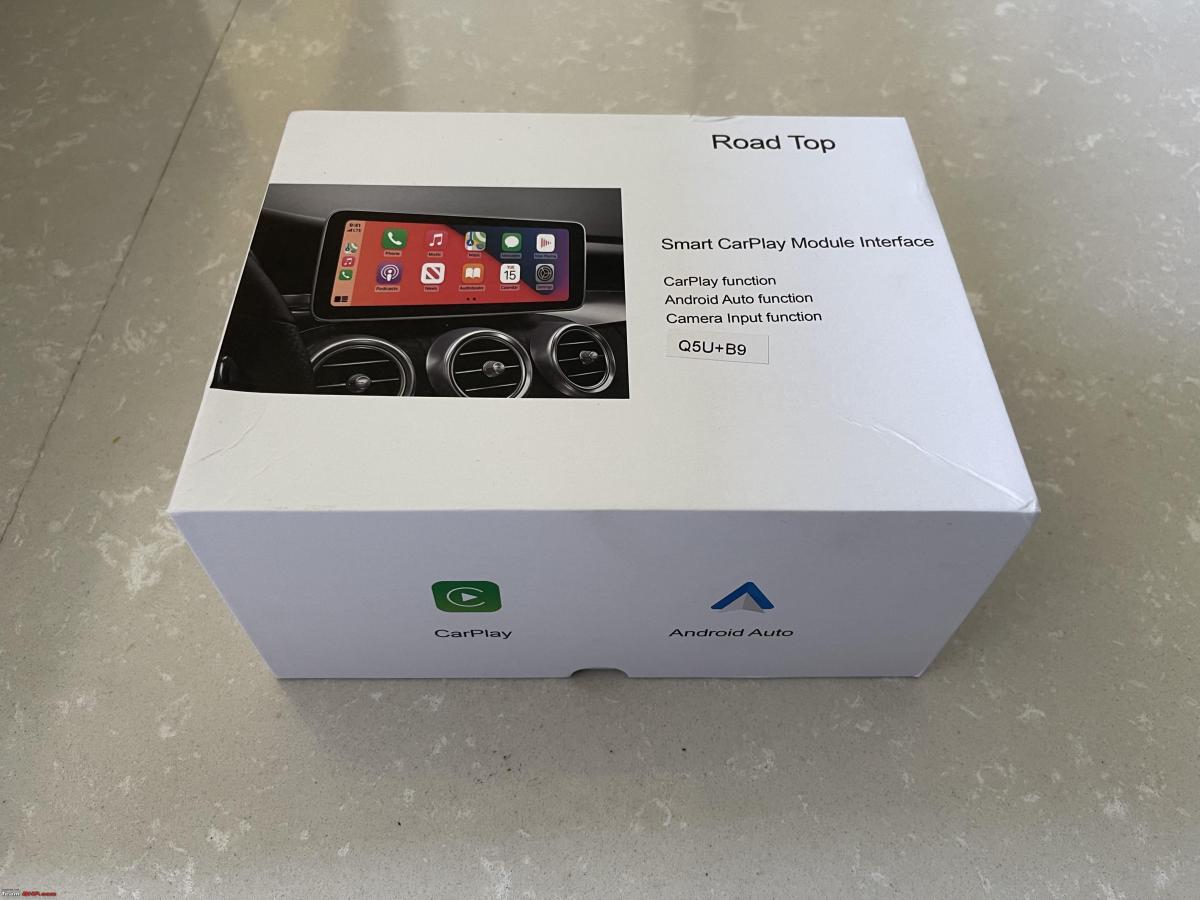
- Car play Box (ordered from Road Top)
As I mentioned I was looking for this upgrade almost since the time I bought my car, and with every new car getting this as standard, this made me miss it more and more. Before this, I have attached a magnetic mobile holder to the windscreen and use it for navigation. Even though this works fine, having the maps displayed on the car screen makes it so much more cleaner. Not having CarPlay is the single most feature I have missed most on my car since day 1.
I researched this since the days of good old Aliexpress and there were many sellers selling these boxes for all cars from BMW, Audi, Lexus to Toyota and more. Upon researching more came across a brand called Joyeauto which is famous for this. There are many brands /websites internationally which sell these boxes with their own interfaces and boot logo like RSNAV, Carsgadget and even Evoretrofits in India which a fellow BHPian used. If they had their outlet in Delhi I would probably have gone to them as well for the ease of doing things.
Doing all the research I came across a brand called Road top which was available on amazon.com, Aliexpress and had even their own website. Their box did the same thing and was much cheaper as well compared to other brands. Saw their reviews on Amazon and finally ordered directly through them. They gave the option of shipping via DHL or India post. The day I placed the order they asked me to share all the car model details and images of the centre MMI screen, along with the dashboard buttons layout and software information. Shared the same and they shipped the box 2 days later. I chose DHL and the box reached India and was delivered to me in 4 days flat from the date of shipping. DHL guys were very proactive and they collected all custom documents even before the box got shipped for quick clearance. They shared the link of the amount of customs duty to be paid as well online. The box got delivered the same day to me when I paid the customs duty.
The box was delivered on Thursday and my weekly off was Monday so I waited for the same to start installing it. Meantime I reviewed all the documents that came with it and for some reason, they sent the guide for installing it in A3 B9.

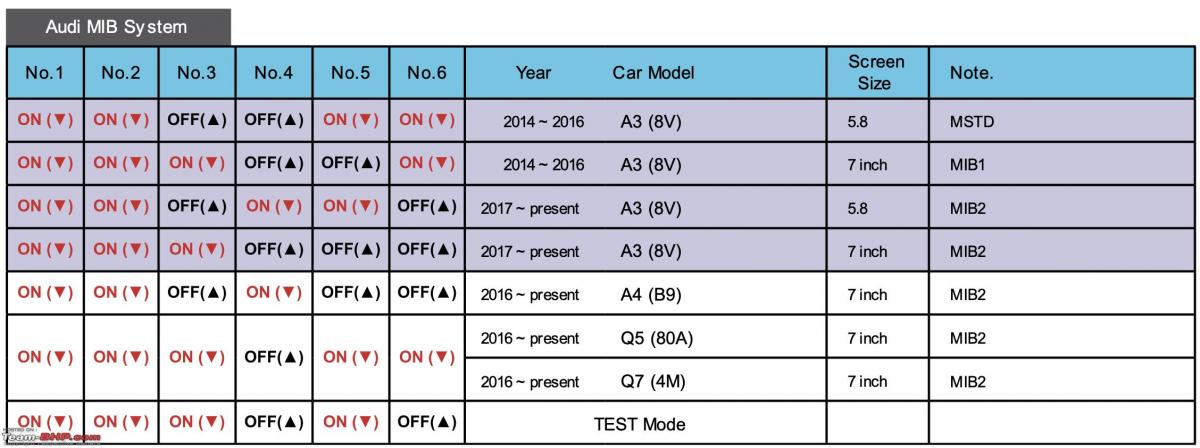
Upon contacting them over email, and even a WhatsApp number they provide told me that the installation process is the same for A3 & A4. I had seen many videos of the installation of this box but could only find one specific to A4 B9. I also learned that each box comes with some toggle switches which needs to be turned on or off according to the specific model and features of the car. As per them, I had to use the same configuration as A3 and turn on only the first three toggles as seen in the pic below.
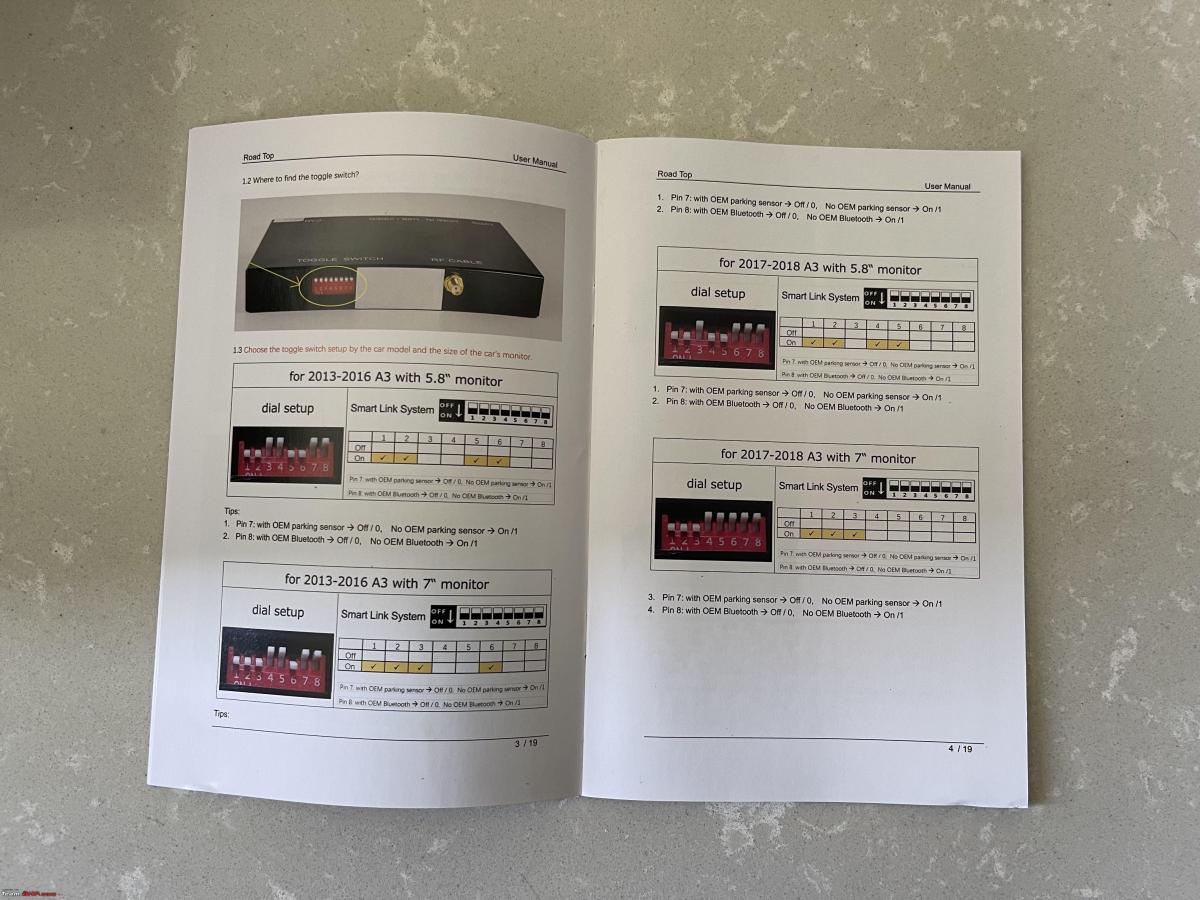
I found another installation link from the RSNAV website in form of a PDF file which gave very detailed installation instructions as well as specific toggles to be turned on and off for each of the Audi models. Attached screenshot for the same below
(Source: RSNAV.com)
As seen from the above picture for installing in A3, the first three toggle switches need to be on, the same which were mentioned in the booklet I received, but for A4, the third switch needs to be off and the 4th needs to be on. RSNAV has very good reviews and a very active user forum so I followed this pattern of the toggle switches in my box as well.
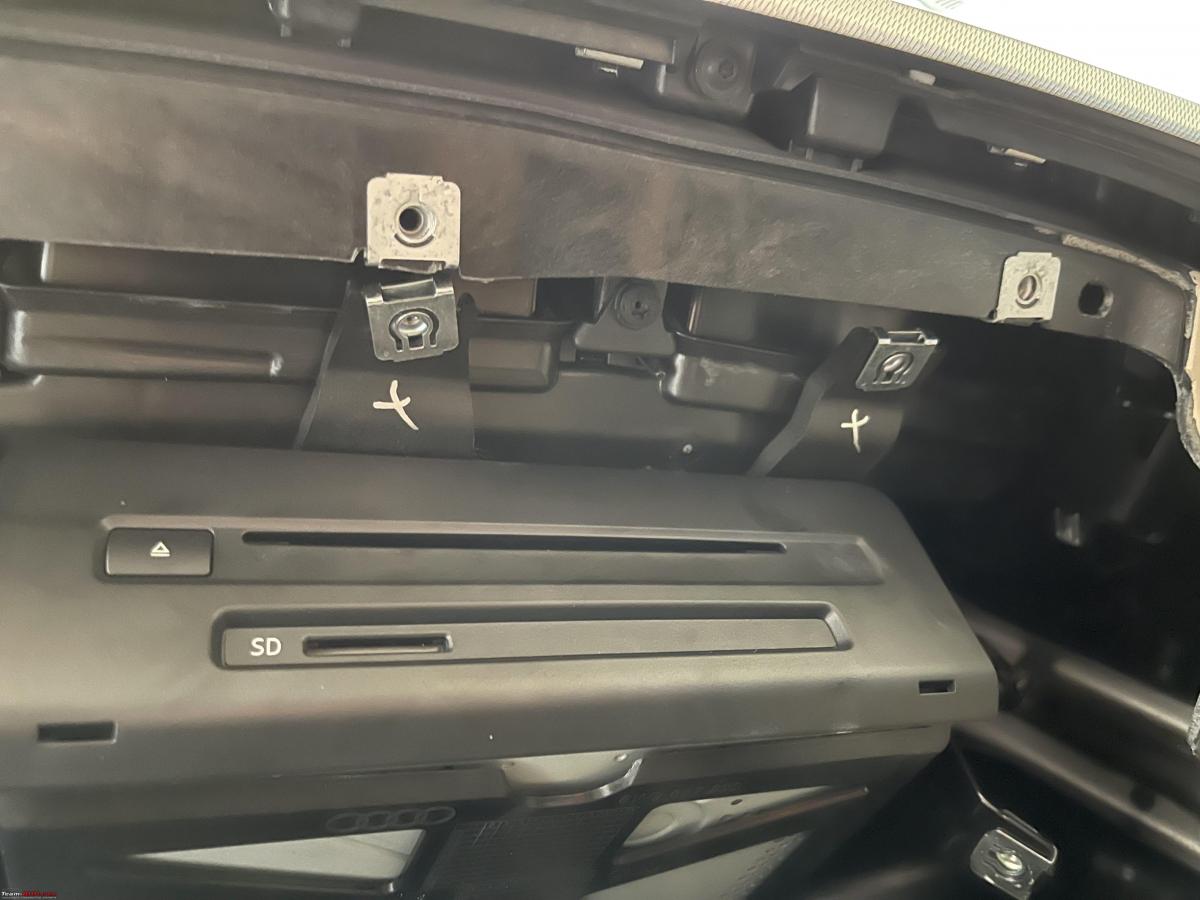
All the views I had seen stated that the glovebox is held by 4 screws and I thought that should be easy to remove and a 10-minute job. But boy I was wrong. A couple of videos I saw of A3, additionally also required removal of side panel near the glovebox with a pry tool and removing an extra screw there, so I was ready to remove that also. I started by removing the two screws outside the glovebox in the footrest area first. They came off easily and were easy to remove with a screwdriver.
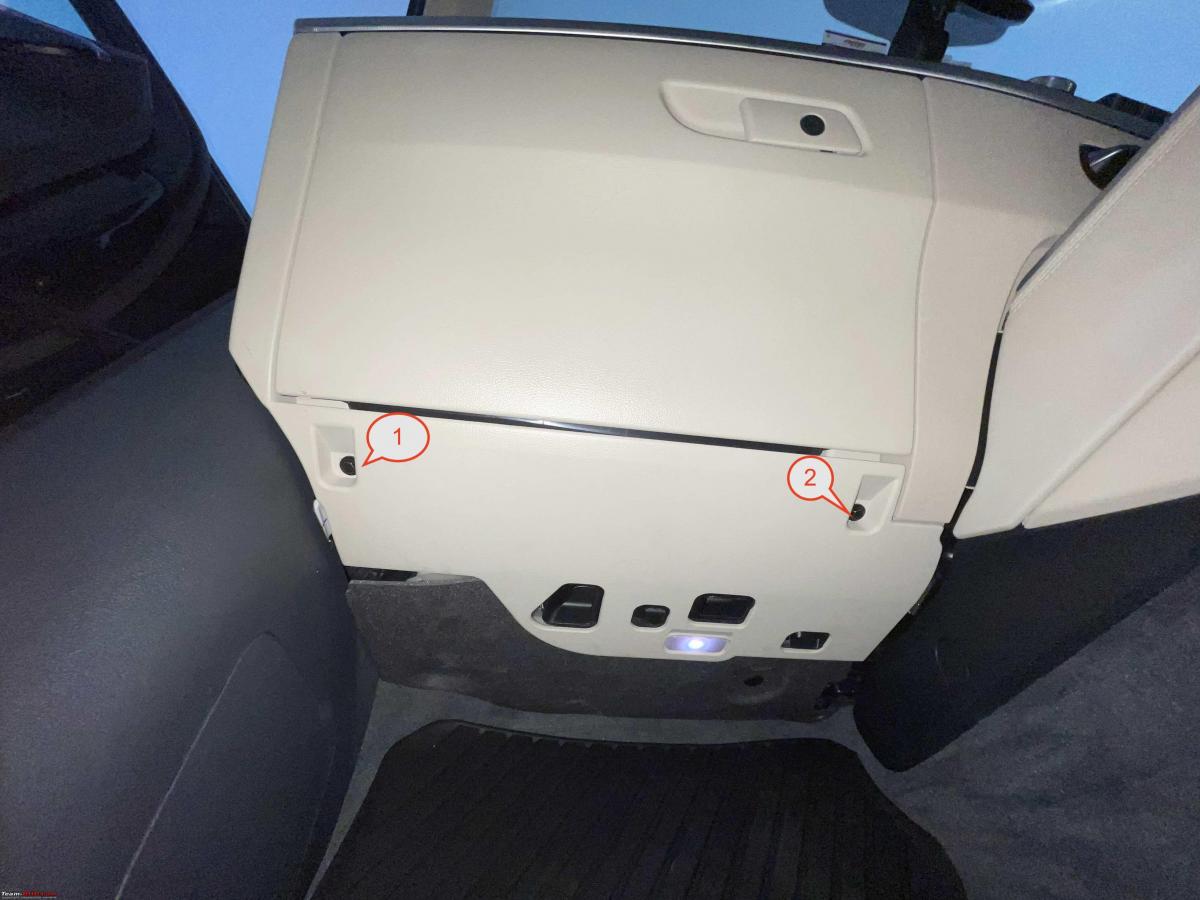
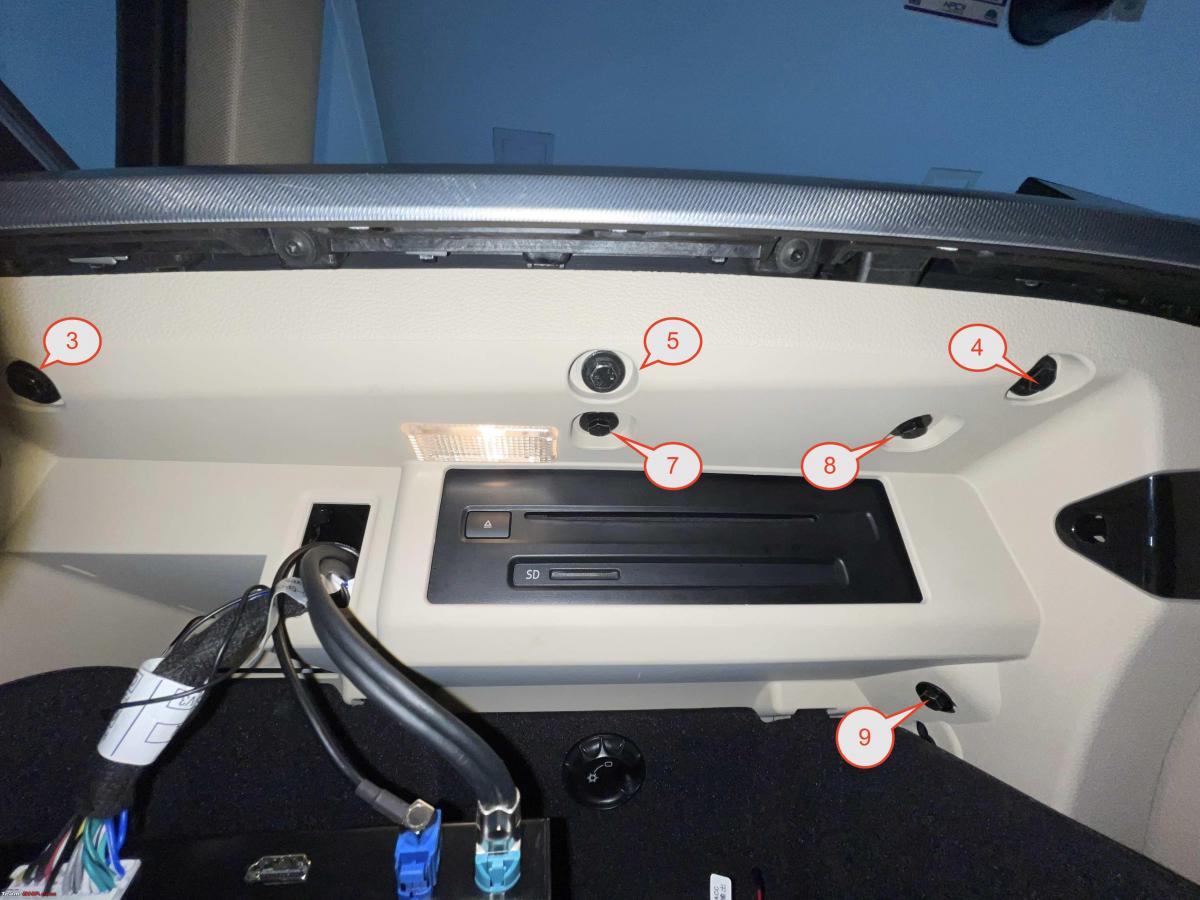
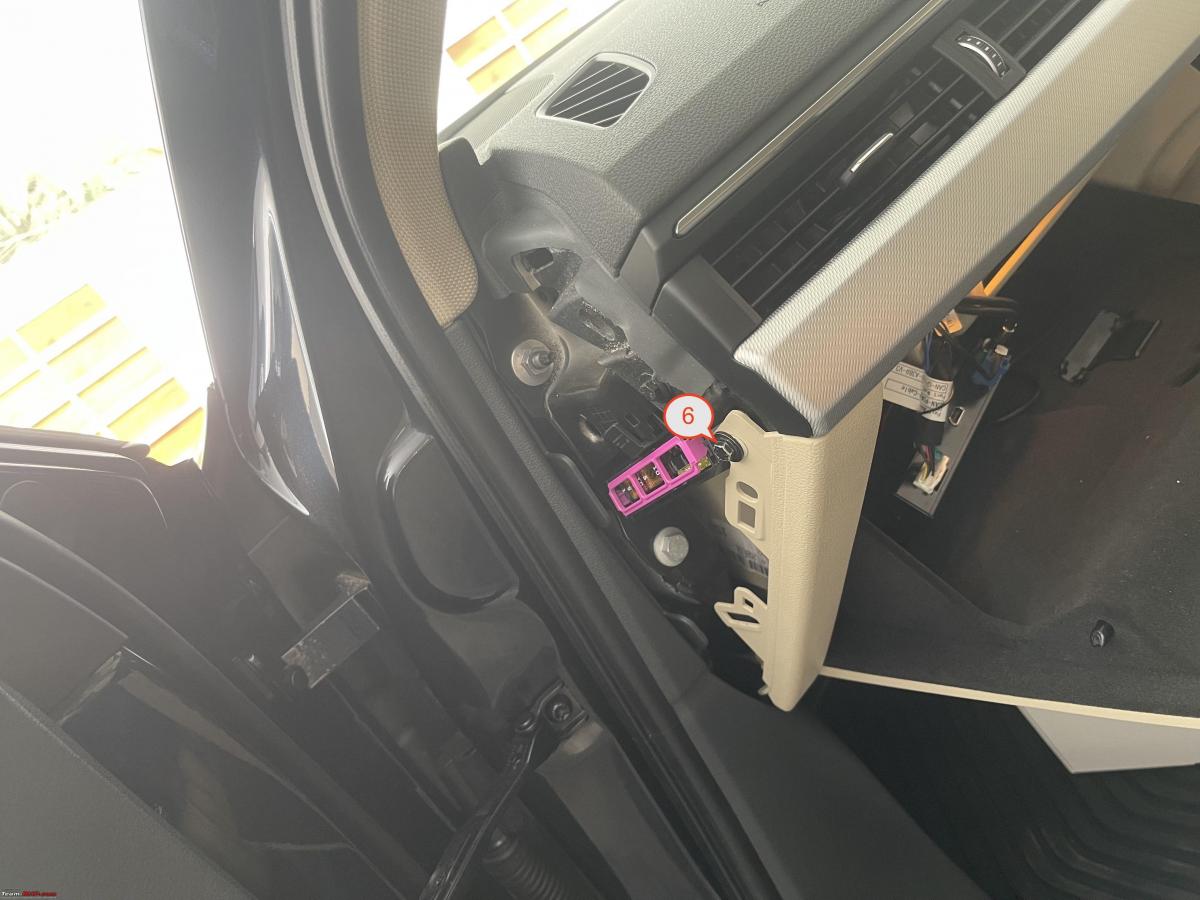
Then I removed screw numbers 3 & 4 inside the dashboard. Saw screw number 5 there and removed it too and the dashboard was still stuck. Removed the side panel and found screw number 6 and thought it's done but no. I started seeing around and found 2 more screws (7 & 8) inside the glove box just in front of the head unit and removed those two as well. Now the left side of the glovebox came out but it was still stuck on the right side. To my surprise if found the 9th screw which was the most difficult to remove as there was no space to use the screwdriver here. Below is the pic highlighting all of them. Had to manually turn the screw with the little screw holder placed on the screw and rotating it with plass. (That's where the plass was used).
It took me a good 45-60 mins to remove all of them. Finally, the glovebox came out and it had 2 cables inside, plugged for light and cooling which I did not remove and left the glove box in the foot area on top of a box making sure that the cables are not getting strained even a little bit.
Now the next step was to remove the MIB head unit, which is held by two screws according to the videos I had seen. Even though I could locate and remove these screws in 5 minutes, for some reason the head unit refused to come out.

These screws are located pointing upward and were quite easy to remove once located. I tried locating more of them and took some pictures to find them it was not easy to look inside there. The frond-end had 2 crosses with white ink and what looks like two broken screws.
Finally, the head unit came off and it was held by a couple of clips and it took some effort and force to remove it. I was afraid of applying too much pressure as I did not want to break anything so took it out very slowly. I also kept looking around for more screws as I was afraid I might find more of them in the Indian spec car just like the glovebox. Thankfully there were only two of them and the head unit came out.
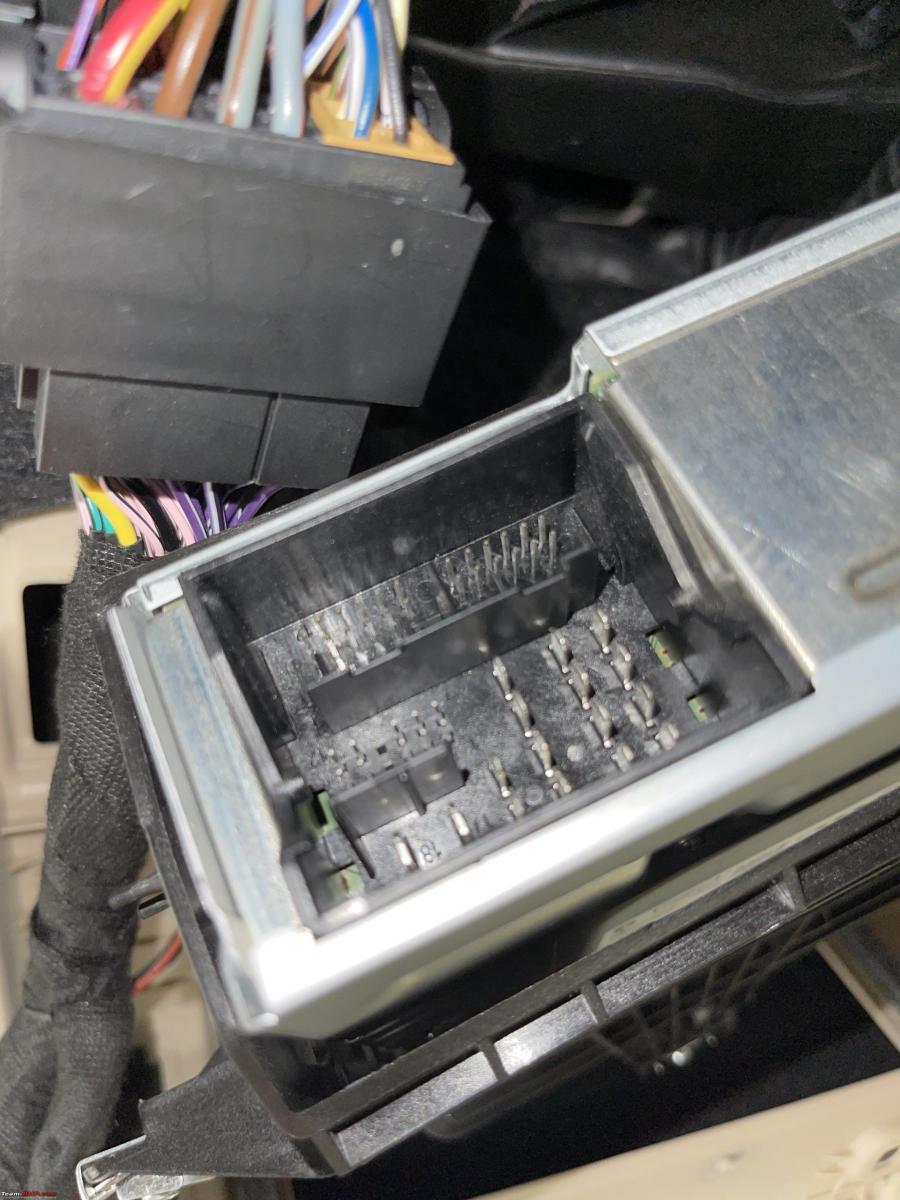
After this, I noticed the wires behind it are too short to move it much further. The videos I had seen had much longer wired and they could easily place the unit in their laps. The 48pin harness is held down by a clip and I had seen the same being removed many times in the video and I could take that out. Below is the image I took before removing any cable from the head unit just in case I need to put everything back the same as the original.

The videos mentioned three similar-looking cables behind the MIB head unit, one of which is LVDS (mostly grey) and needed to be removed and connected to the car play box. My head unit only had the 48 pin harness, one pink cable and one white cable. There was a vacant yellow slot where no cable was plugged in. Upon seeing this I was a little worried that maybe the car will not support it as only one pink cable was there and one empty slot. I went ahead with the only cable that was there and assuming it was LVDS.
I was able to easily remove and attach the original 48 pin car harness in the provided cable but was not able to put the new harness connector behind the MIB unit even after multiple tries. As it contains multiple pins, I decided to remove both the LVDS and white cable and took the head unit out. This is how it looks.
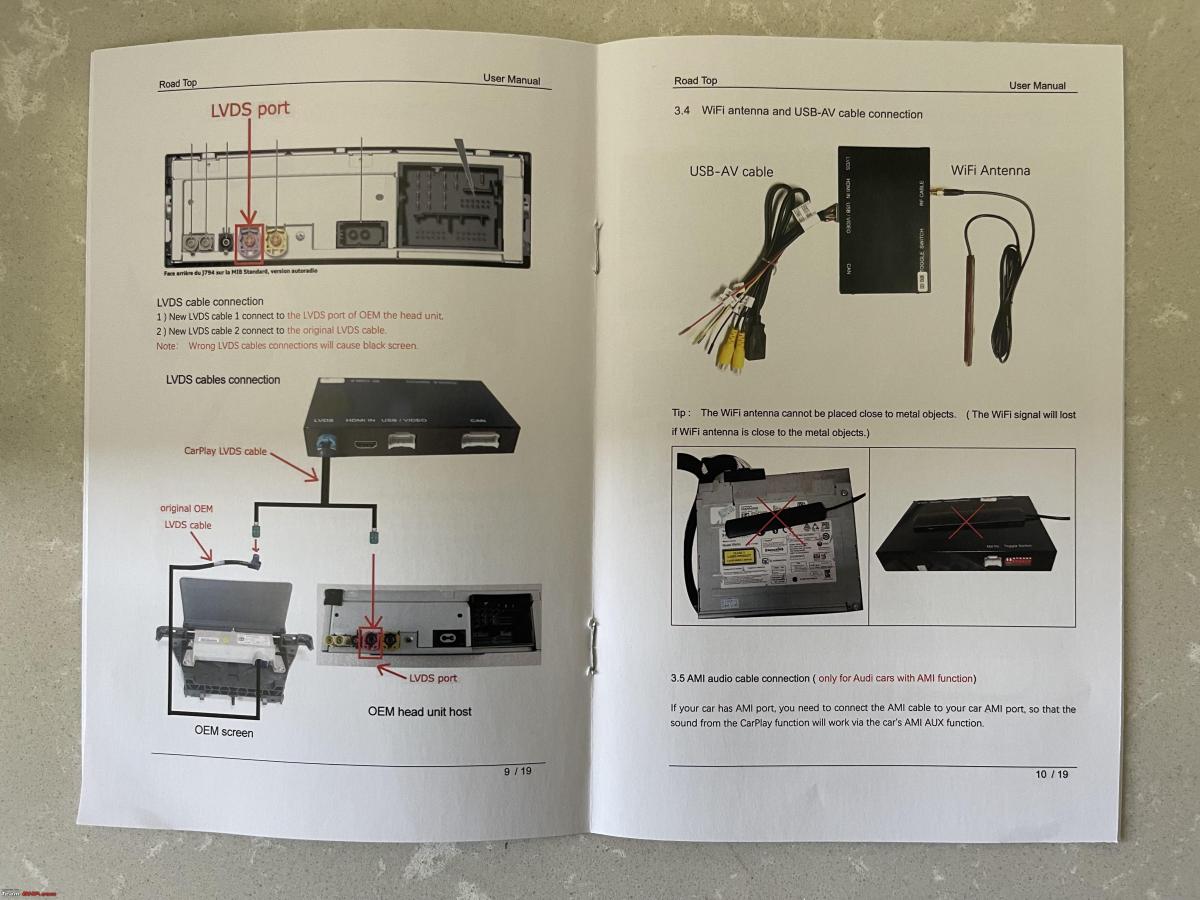
It was much easier to put the new cable in the head unit now and post that I connected the LVDS cable as well. One end of cable went inside the MIB unit, one end inside the cars original connection and the third end in the car play box. The same connection pattern was followed for the 48 pin harness as well. Below is an image from the user guide I received of how it looks.
After all this, I connected the following cables in the car play box:
- Third end of the cable coming from 48 pin harness
- This end of LVDS cable
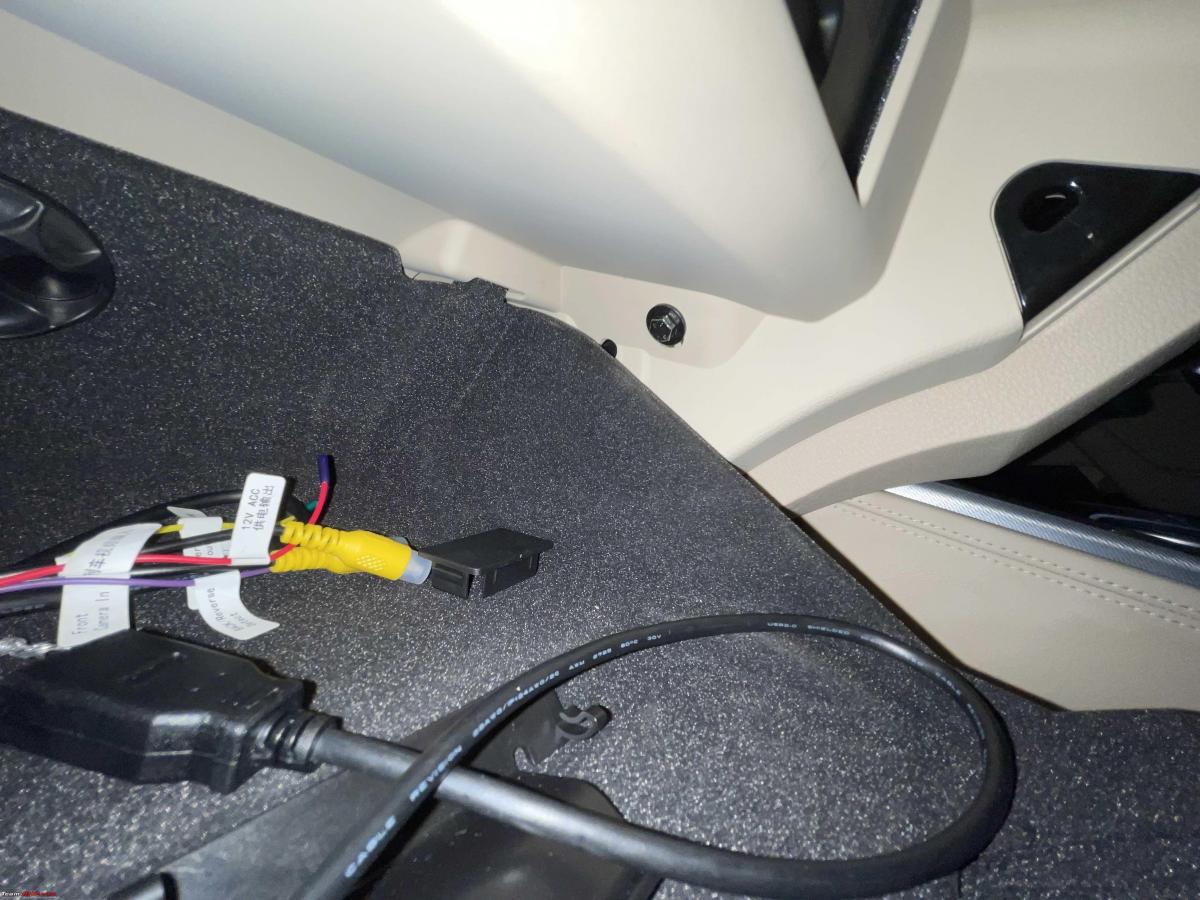
- Wifi cable with an antenna that can be stuck on or left inside the dash. (should be kept away from metal for best signal strength)
- USB connection cable.
Finally turned on the car to test the system and it worked in one go. The efforts had finally paid off and I couldn't have been happier. For audio to work, I need to select AUX in media. All of the systems have this requirement. For older cars, they even ship a cable for AMI to aux for the system to make audio work. The cable came with my box too but is useless for me.
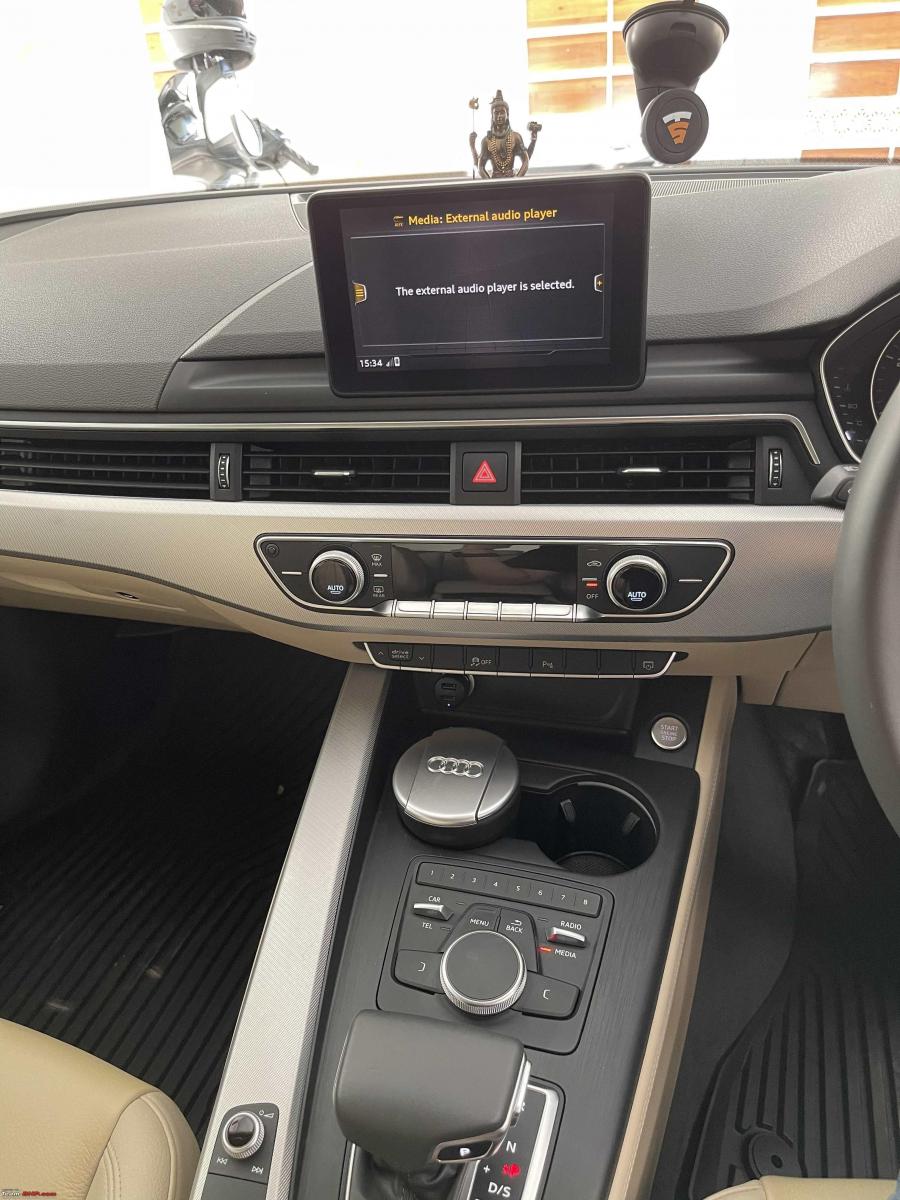
After this, I have to long-press the media button for 3 seconds to turn the system on and it asked me to choose from CarPlay / Android Auto/ YouTube/ camera and a couple of other things. As soon a I chose CarPlay, the CarPlay screen came up and it automatically asked me to enable CarPlay over WIFI. I enabled the same and removed the cable and the car play was still working. Tried playing music, give a Siri command and both worked like a charm. (Have to keep aux selected as the source for this system to work.)
Since the beginning of my hunt for this CarPlay retrofit solution, I did not like the idea of a cable running through the A-pillar to behind the rearview mirror for the mic to work as it was done in dinu2506's car. Even though he suggested it's barely noticeable I was not comfortable with this and I found out that the newer car play boxes use the cars original Bluetooth mic and don't need any additional mics to be placed. This was a huge relief for me.
I noticed the Wifi antenna was not plugged properly but the wireless CarPlay was still working. (probably because the box was still out in the open). Plugged it back again and placed it behind the AC controls.
Now that everything was working, all connections were done now came the last step was to place the box behind the MIB unit. it took me half an hour and I tried all possible places I could but it simply refused to go in properly at any open space. A couple of places where it went partially in did not allow the glovebox to be aligned properly. After giving up on this I decided to let the box stay inside the glovebox and route all the cable from a dummy plastic which was easy to remove. The cable looks like below in the glovebox. Have removed the visible it's below and on the left side of the original MMI unit which is visible at the time of taking the below picture.
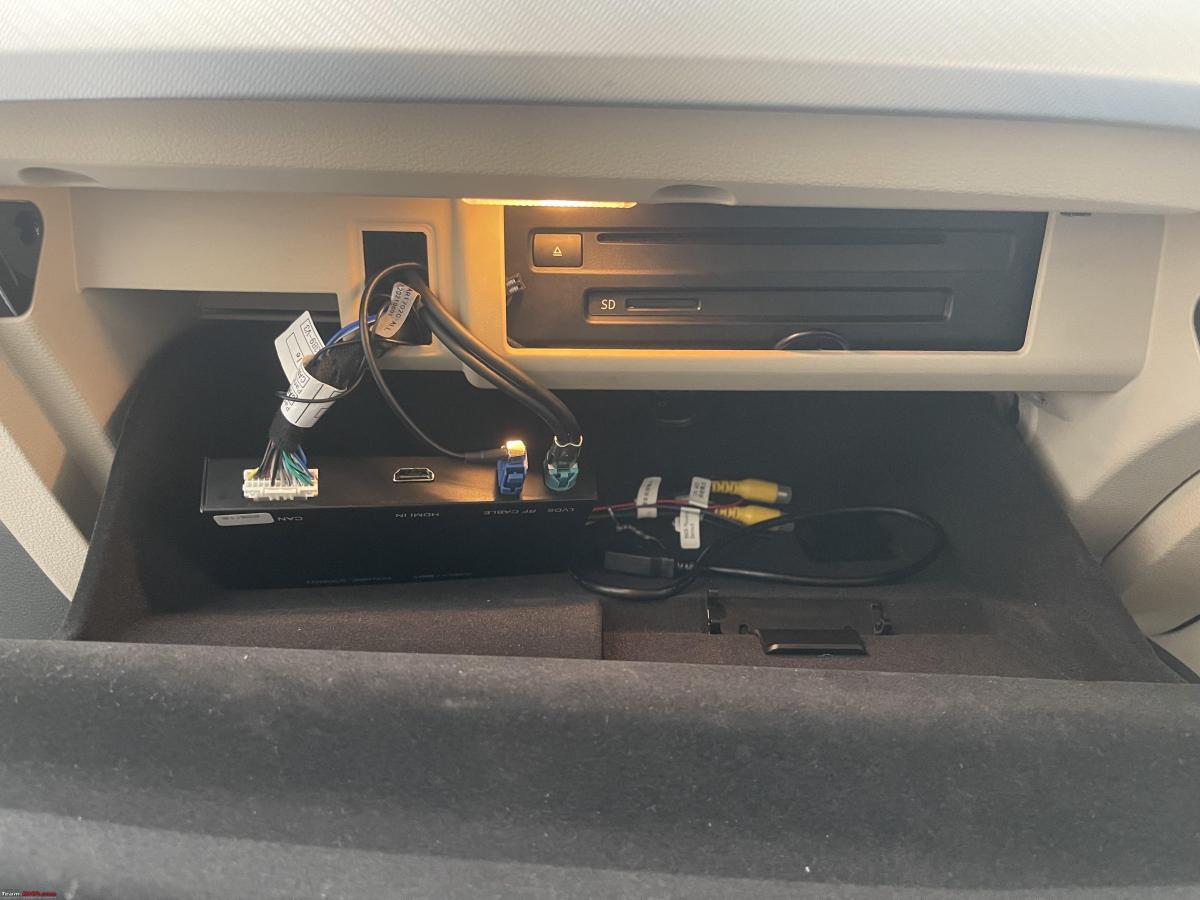
This is the only gripe I have left now with installing the box myself that I could not place behind the glovebox. I didn't try to apply too much pressure/force as I was afraid of breaking anything inside. Also in the short time, I used the CarPlay function the unit got a little hot, so did not want to keep it too close to any other part behind the glovebox where it can not pass heat properly. The good part of it being inside the glovebox is I can turn the a/c on and it can remain cool while working.
Finally tested everything once again before putting the glovebox back and it was working perfectly fine. Took 15 mins to put all the screws back, thanks to screw number 9, which took the max time. Attached is another picture of it below.
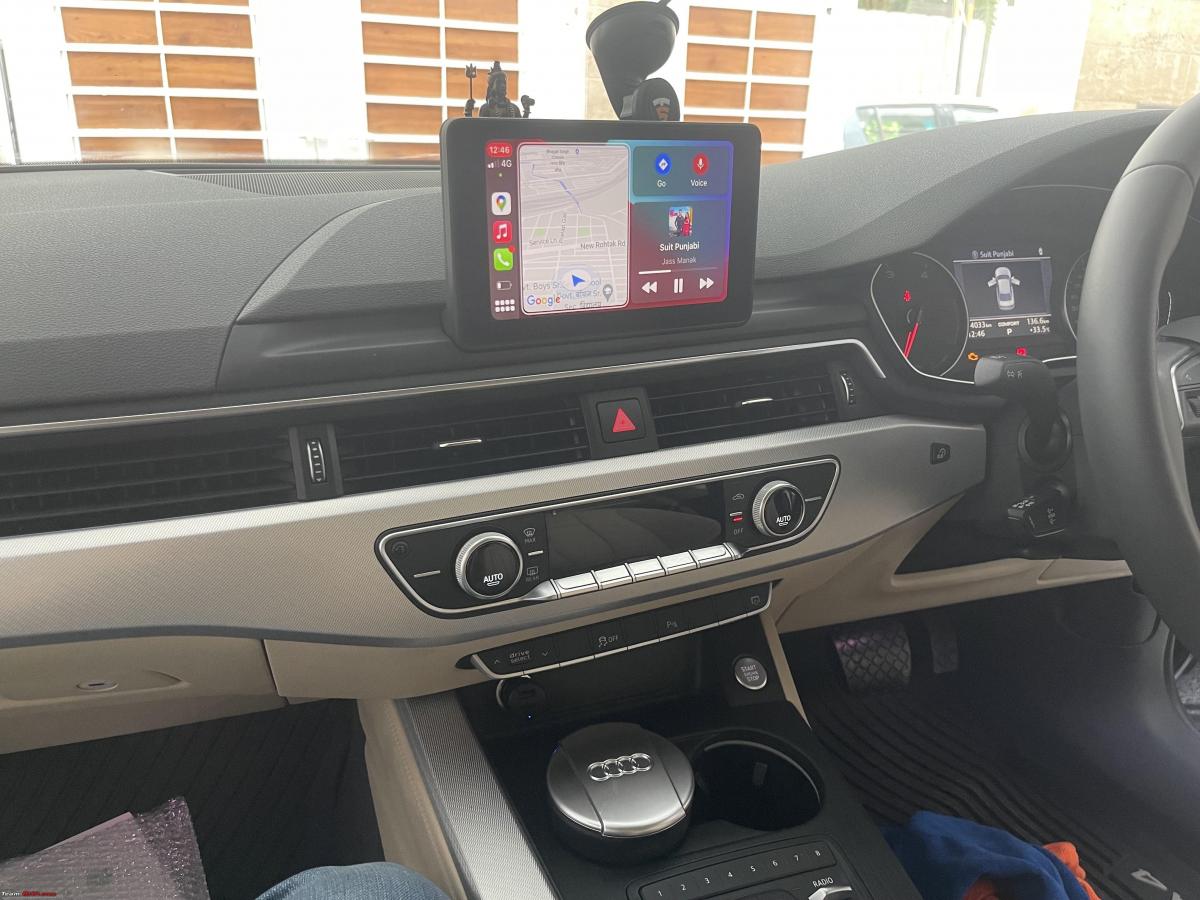
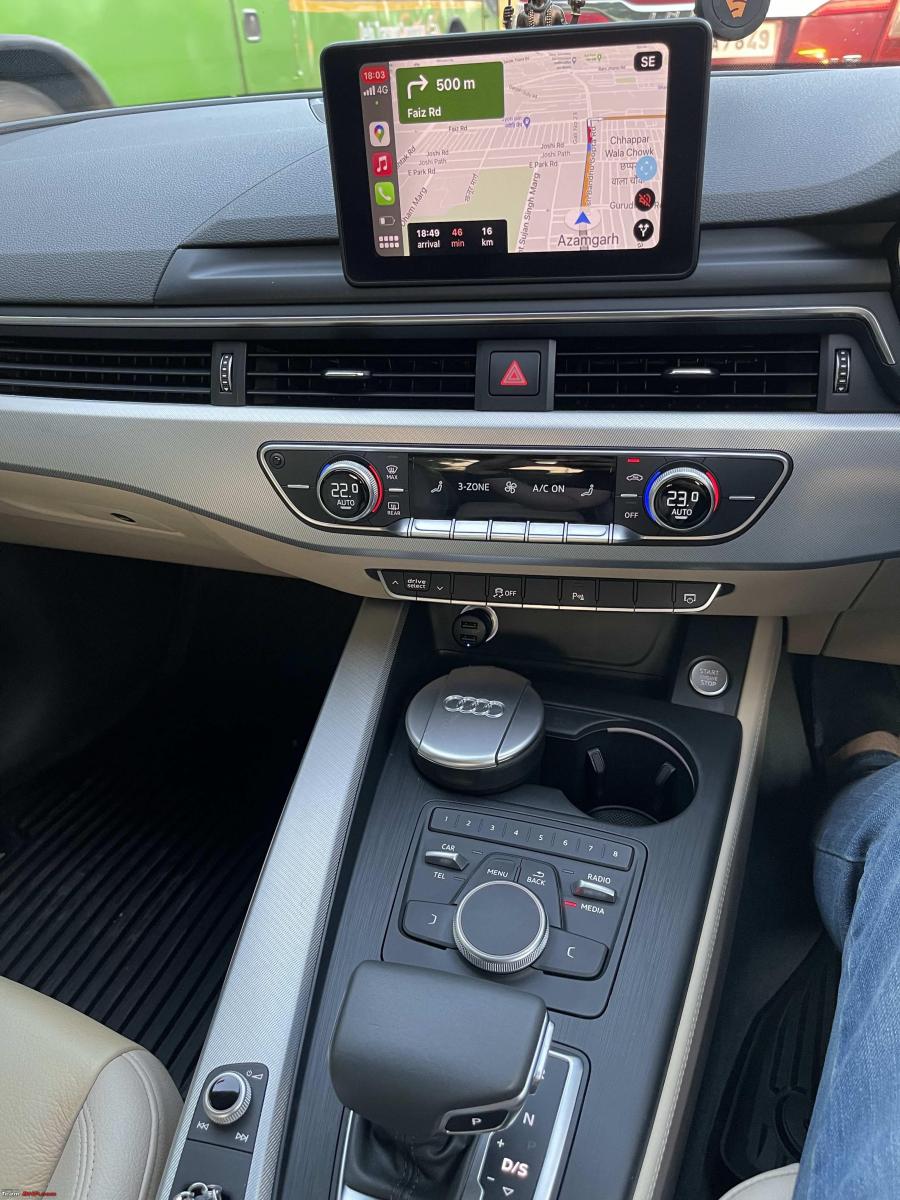
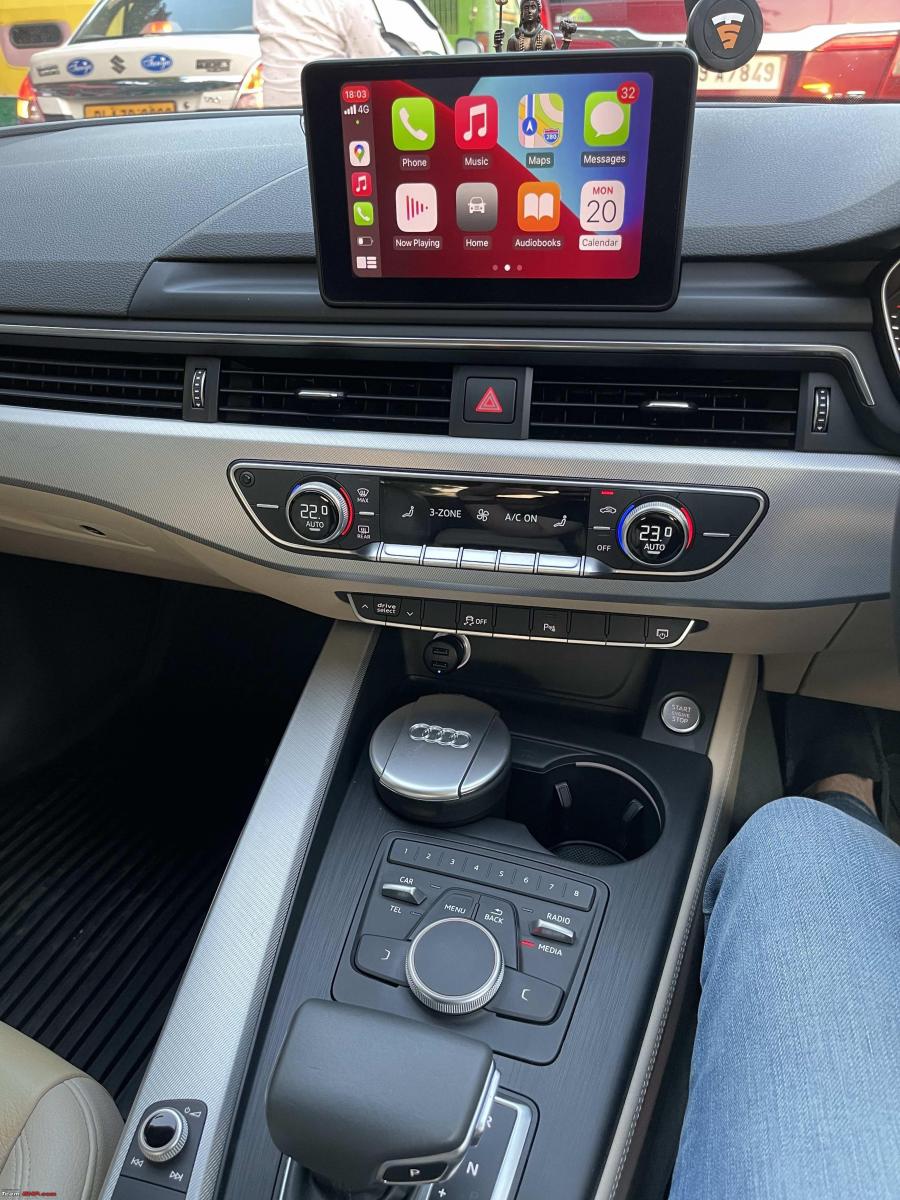
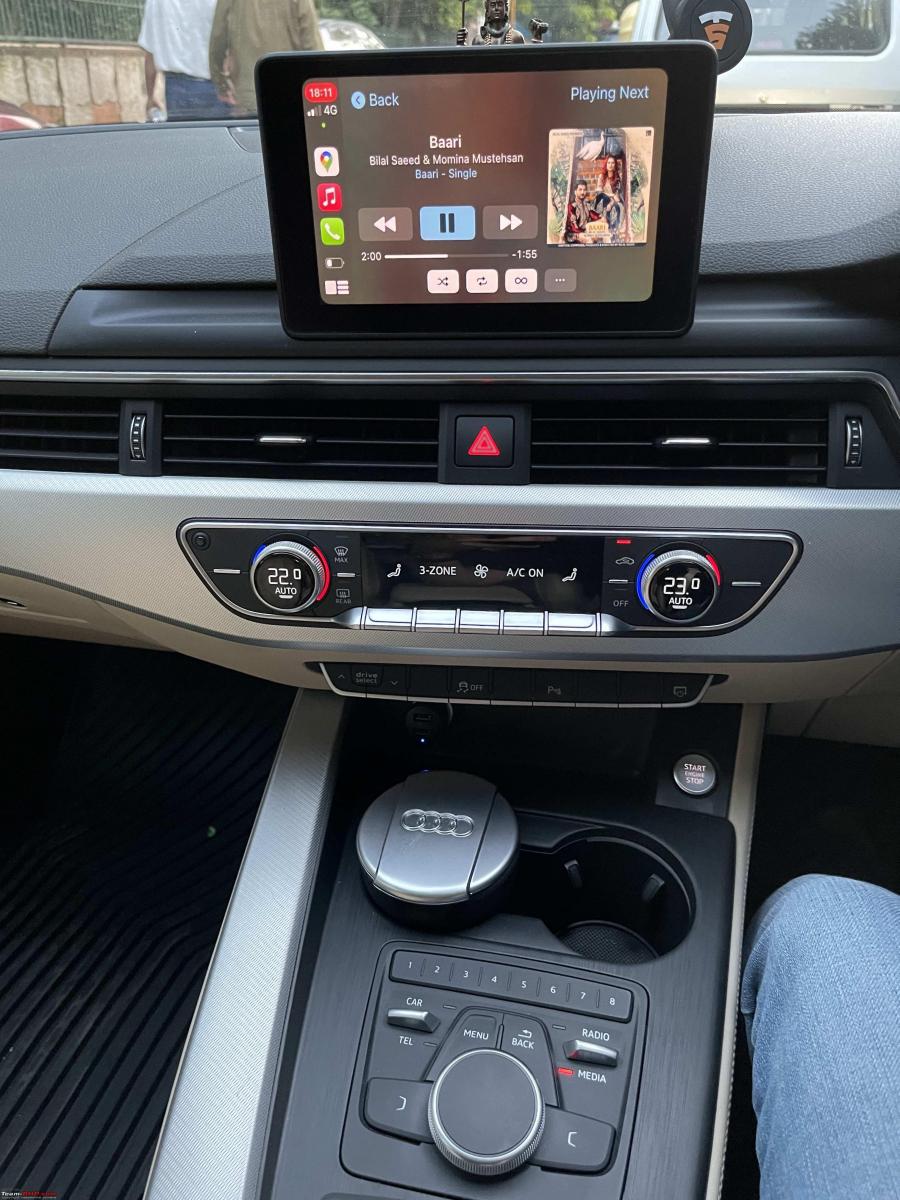
Once again tried all the functions including Maps/ Siri / Phone call / Music and everything is working like a charm. Can't wait to take the car now for a long drive and use the car screen for navigation and music instead of the phone. Cost a fraction of what I would have had to pay to any third party including evoretrofits for installation. But then the ease of getting this done by professionals without having to worry about connections also is a part of that cost. Attaching a couple of pictures of the device in action of the short trip I took to test all the functions.
The box works very seamlessly for example when I switch to reverse, the camera comes up and switches off back to CarPlay as soon as I switch to D. Also the phone connects automatically every time I turn on the car without having to switch to AUX or holding the media button to use CarPlay. It is stored in memory and works automatically after about 5 seconds or so. As it works wirelessly the phone can stay in the pocket or inside the handrest with plugged into USB for charging.
Check out BHPian comments for more insights and information.
Find Car News
Just News
 (1).jpg)


_0_0.jpeg)

About Us


Buy & Sell
USED CARS