News
Installing an under-seat subwoofer on my Tata Nexon


I've always had a subwoofer in my car. Had it in the Tata Vista, Maruti Alto K10, Ignis and even the VW Polo. Now, it is time to get one in the Nexon.
BHPian Reinhard recently shared this with other enthusiasts.
DIY - Installing an Under-Seat SubWoofer in Tata Nexon XZ+

Background
I've always had a subwoofer in my car. Had it in the Vista since 2011. The same one was moved to the AltoK10 when I let the Vista go (the detailed project is documented here). Have recently let the Alto K10 go, replaced by an Ignis (more on that some other time). The JBL Amplifier & large subwoofer - are now in the Polo GT TSI, coupled to an Android head unit. Maybe a thread for that project some other time.
The Ignis Zeta (2019) I acquired, came with an Android head unit installed by the 1st owner. Back then, Zeta didn't get the SmartPlay. Which is good, as I like these Androids as well - most importantly because they also have amplifier pre-outs! But I wanted the boot of the Ignis to be usable as the in-laws also will be using the car once in a while to travel to native place, with luggage. And thus - took a chance of trying out an active under-seat subwoofer in the Ignis. The result - was way better than what I was expecting.
And so - I got the one final push I needed. So far I had restrained myself for good 3 years - to save the boot of the Nexon. Did all possible projects on this car (all documented in DIY subforum) but didn't install a subwoofer so far. Not anymore. The under-seat install in Ignis was a good POC. The little unit is very good & hence - here is finally the project in the Nexon, to get those missing bass filled well into the cabin.
To be honest, there is no count to how many threads and posts we have of excellent DIY implementations of adding subwoofers / multi-channel amplifiers and high end audio setups in cars. But then I realized there seem to be none or not many of them, for one of the highest selling hatchbacks of the country, the Tata Nexon. So, thought of making one as I work on the project.
The project should be a useful reference for Nexon (and other Tata cars) XM onwards, which get stock ICE (Harman) units. In case your car has an Android - most of the things are easier since you have pre-outs in place. In this thread - we'll once again do an install with 0 wire cuts. Not even a single splice or T-tap in fact! The key point to cover here will be sourcing the audio signal & amplifier signal from the existing harness of the Harman ICE silver box in a way as clean as possible. So let's dive in!

Let's break down the thread into sections
Product Overview
We'll have a look at the general list of products used for this project & specifically look at some details of the 2 key products to be installed. Have provided links for some of the key items.
Products & Tools
- Under-seat subwoofer - I used Zoook MonsterX1 8" Zoook Monster X1 active subwoofer
- Audio High-Low signal converter with RCA out - Audio High-Low converter with RCA Out
- High-quality copper wiring
I used:
- Polycab fire proof 2.5sq mm copper for power from battery to amplifier
- Polycab fireproof 1sq mm copper for ground, amplifier power signal from HU
- In-Line fuse - I bought it for INR 50 from a spares store, but for reference - Inline Fuse
- 15 or 20 Amp blade fuse (if not included in the fuse holder).
- 8 to 10 ft shielded stereo RCA cable - Stereo RCA cable
- Large and small zip ties in plenty of numbers to keep things organized and safe
- Trim remover tools (it's good to have).
- Standard spanner set.
- Standard screwdriver set - with Philips and flat heads.
- Silicone or similar sealant in a very small quantity.
- Conduits/Wire looms for keeping wires safe - 1/2 Inch dia wire loom
- Lug connectors for battery terminal & grounding.
- Wire nipper, stripper.
- Crimping tool (it's good to have).
- A good portable LED light source. It's very handy when working under a dashboard or car seat. Very dark places these!
- 3x household match-sticks. Yes.
Now - there are readily available "subwoofer wiring kits" with accessory stores / Amazon etc, that include a visibly thick power wire, RCA cables and an inline fuse. But then - somehow I don't trust these Chinese wiring kits over guaranteed good quality copper cores and fire-proof shields of our good trustworthy Polycab. Personal choice, the thick outer shields of those kits have good reason too - so you may want to use those kits ready-made, rather than fiddling around like me.
Coup de grace
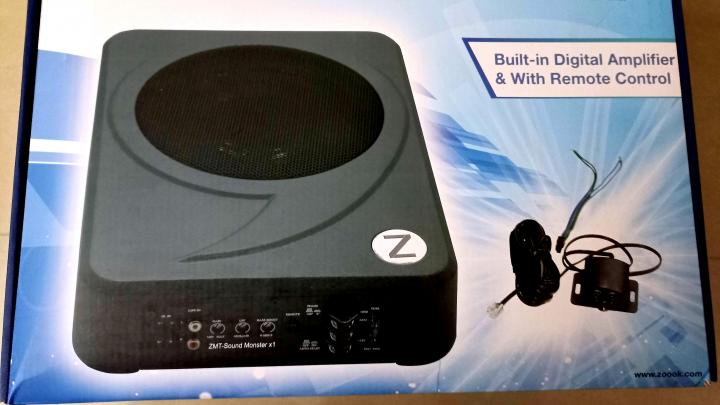
Zoook MotoX1 8" powered subwoofer
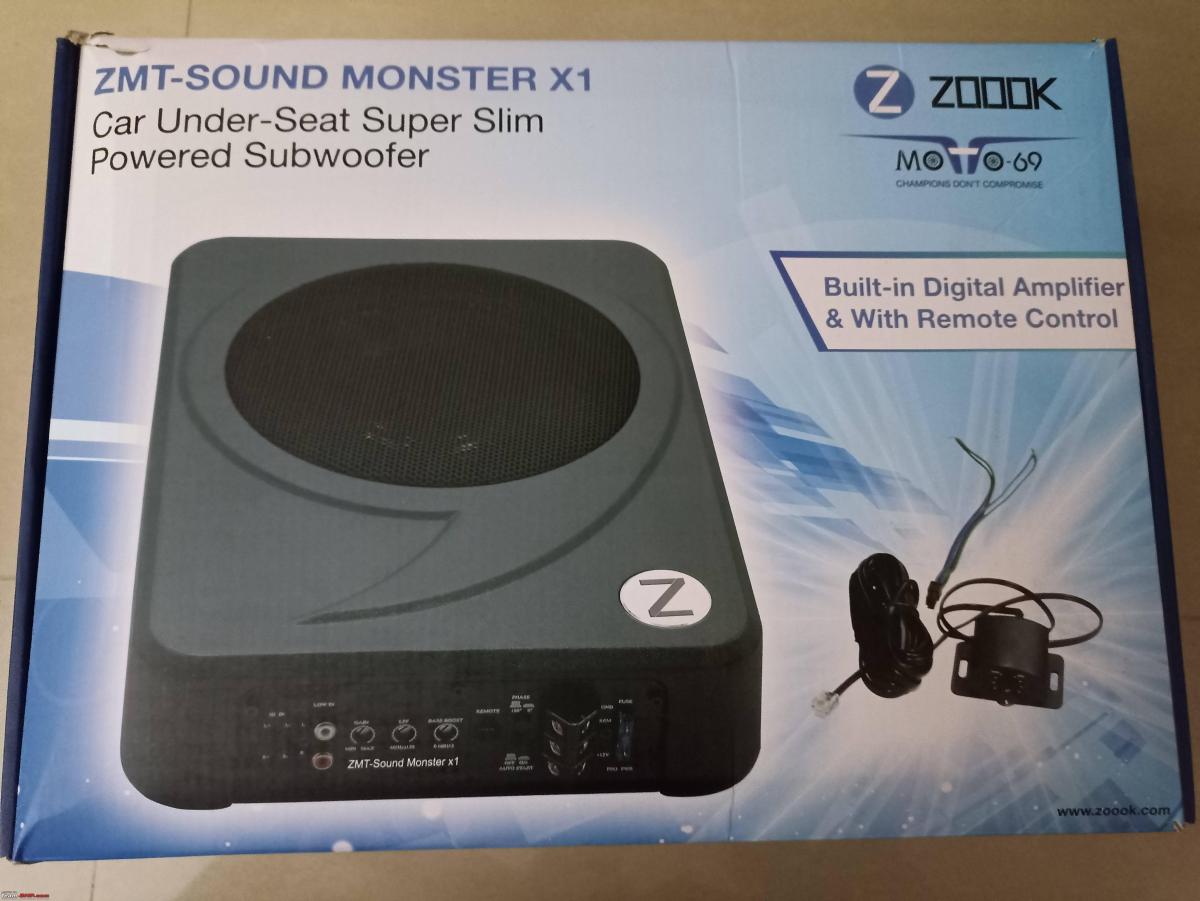
- One of the cheaper available options out there on Amazon.in, that doesn't have a really off-putting Chinese name.
- The company apparently is French. Doesn't matter, I'm assuming it to be Chinese through and through.
- It's surprisingly heavy for its size and appearance.
- Fully aluminium body. So in case you turn it on, bass is up and you have kept it tilted or on improper support - it makes funny metallic resonating sounds sometimes.
- Safety grill over the speaker is metallic and will do well in keeping the thing safe from the feet of the rear passenger.
- It has 3 electrical connectors with screws for - +12V, GND & remote power up signal.
- Usual stereo RCA input is what we'll use. It also has another kind of stereo input connector. I have not used it. The connector pigtail for this input is also included in the package by the way.
- There is a pretty ubiquitous type remote bass controller rotary knob included. The provided wire for it is very long, and you can place the knob literally anywhere in the car as per your convenience. It's a PnP jack-socket connection. No tools required.
- It has a 180-degree shift button as well, to adjust the output based on where you place the woofer.
- Costed me around 9K INR from Amazon.in.
Generic signal high-low - RCA converter

- Picked it up from a myriad of similar / identical options available on Amazon.in. All pretty much from our unfriendly neighbour.
- Has dual channel gain-controller screws as well. I see very little use of them to be honest. Have kept the gain to "full" simply for symmetry and to avoid any mismatching inputs to the amplifier.
- Kit includes a pigtail, that has open ended wires to be used for LEFT+, LEFT-, RIGHT+, RIGHT-, +12V input (to power the device itself), GND, 12V REMOTE signal (to amplifier, to power it up).
- And of course - it has a stereo RCA female output pair, into which we'll connect our RCA cable, towards the amplifier.
- I thought of using this one, to avoid having to open up one end of stereo RCA wires, and splicing them into the head unit wiring. That gets really messy. This box makes it cleaner if nothing else and brings in a bit of modularity should you need to change the stereo wires for some reason afterwards. I'm getting lazy!
- Refer to the above image in a later wiring step - to know which wire goes where in the Harman HU's connectors.
Opening The Car Up
In this section, we'll look at the steps to safely remove body panels, glove-box etc, to reach the heart of the Harman ICE unit. The so-called "Silver Box". (The name is so lame!)
Start working on the Nexon's interiors and the first thing you notice is how far ahead TaMo has come, in general design & putting things together. It's a pleasant surprise to see how intricately things are designed. The presence of high-quality insulation, damping materials in most places, very strong and long-lasting clips, perfectly interlocking parts. First thought I had was - "These guys have pulled apart a VW Polo, and studied how VW has done things. Then copied!". Not bad! Having worked in similar areas of my Polo just a couple of months ago - it was glaringly visible & similarities were quite in-my-face.
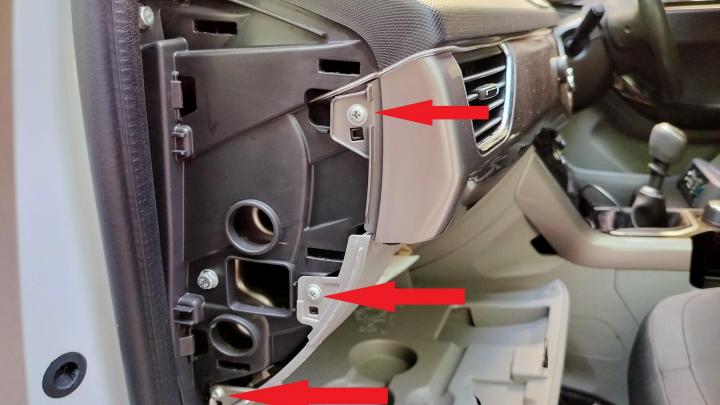
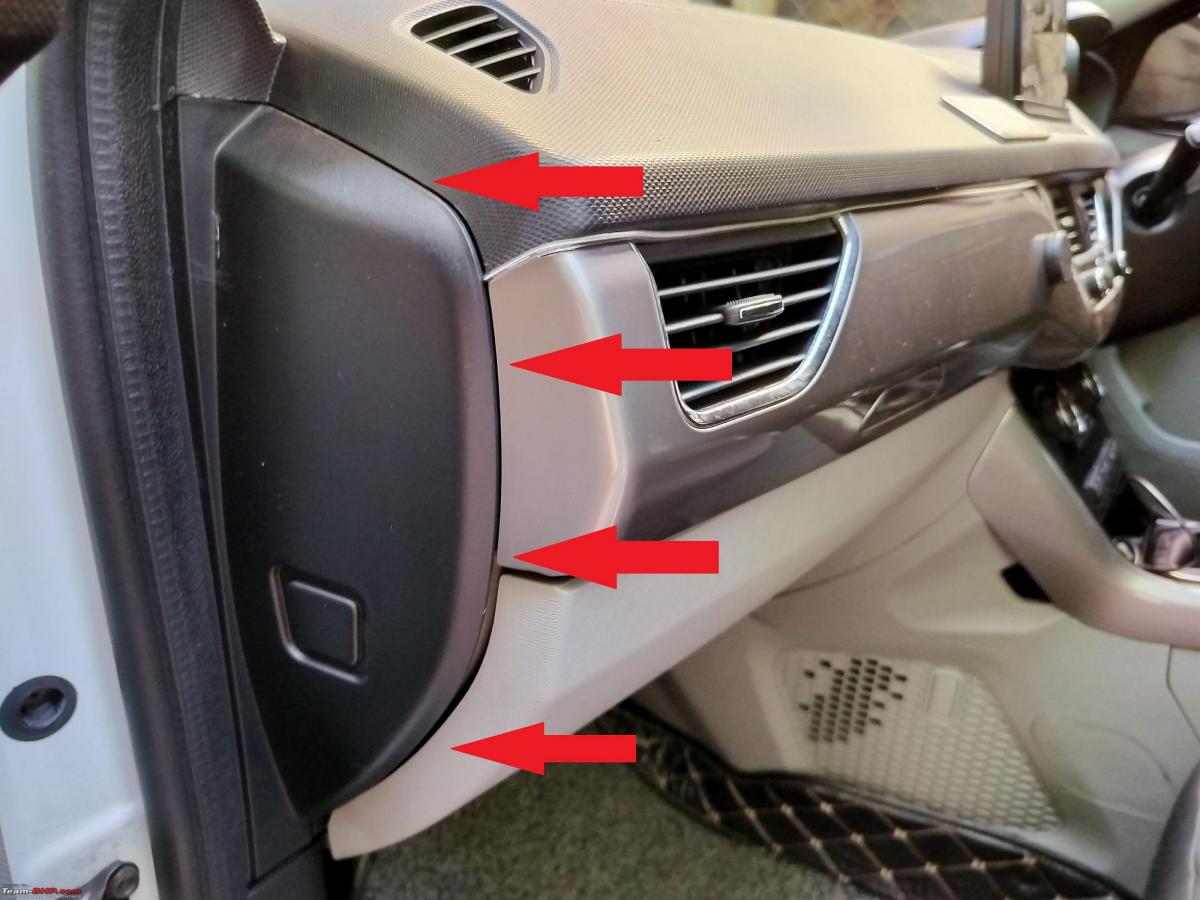
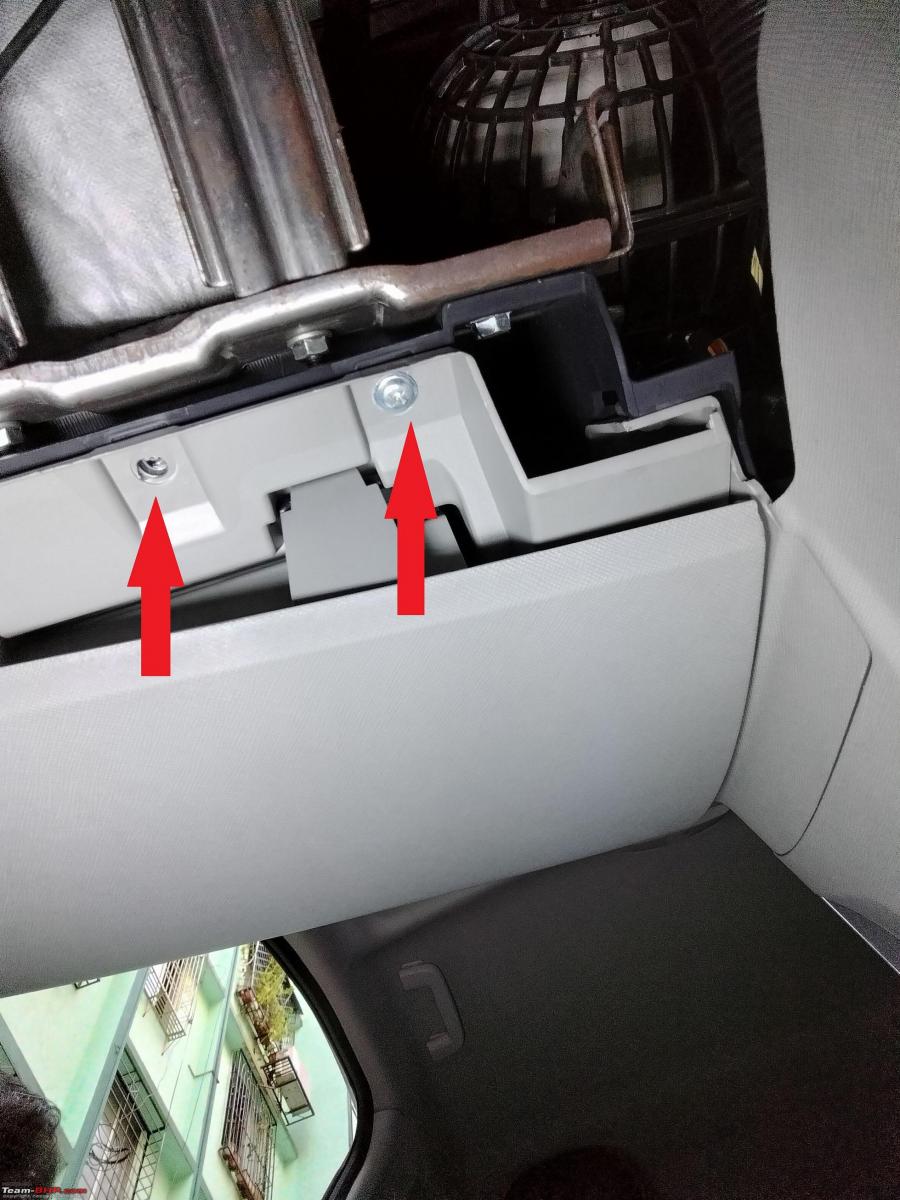
So, first thing to do, is to remove the side corner panel of the dashboard, that is generally hidden behind the closed door panel. Pry open gently from the areas marked with arrows in the image below.
This will expose these 3 screws (marked by arrows). Undo them. Note that the SAME screw spec is used in absolutely all the screws that we'll be working on. So - just keeping count is enough. No need to note which one goes where. Phew !.

Then we have to take the silver dash garnish out completely, pull slightly outward from the side edge to release the small latches there. Then, using a standard trim removal tool (or a flat screwdriver covered with something soft - take out the panel slowly outwards from door side, towards the steering wheel. It will come out eventually, exposing the screws that hold the glove box in place, and also the start-stop button wiring.

Safely unlatch the connector for the start-stop button, and keep the garnish panel safely aside. It will be needed once more during the project for testing & then directly at the end when you complete everything.

Note that the glove-box door release latch - is inside this silver panel. So once you remove it - the glove-box lid, will stay open. I used a zip tie to keep it back in closed position afterwards.
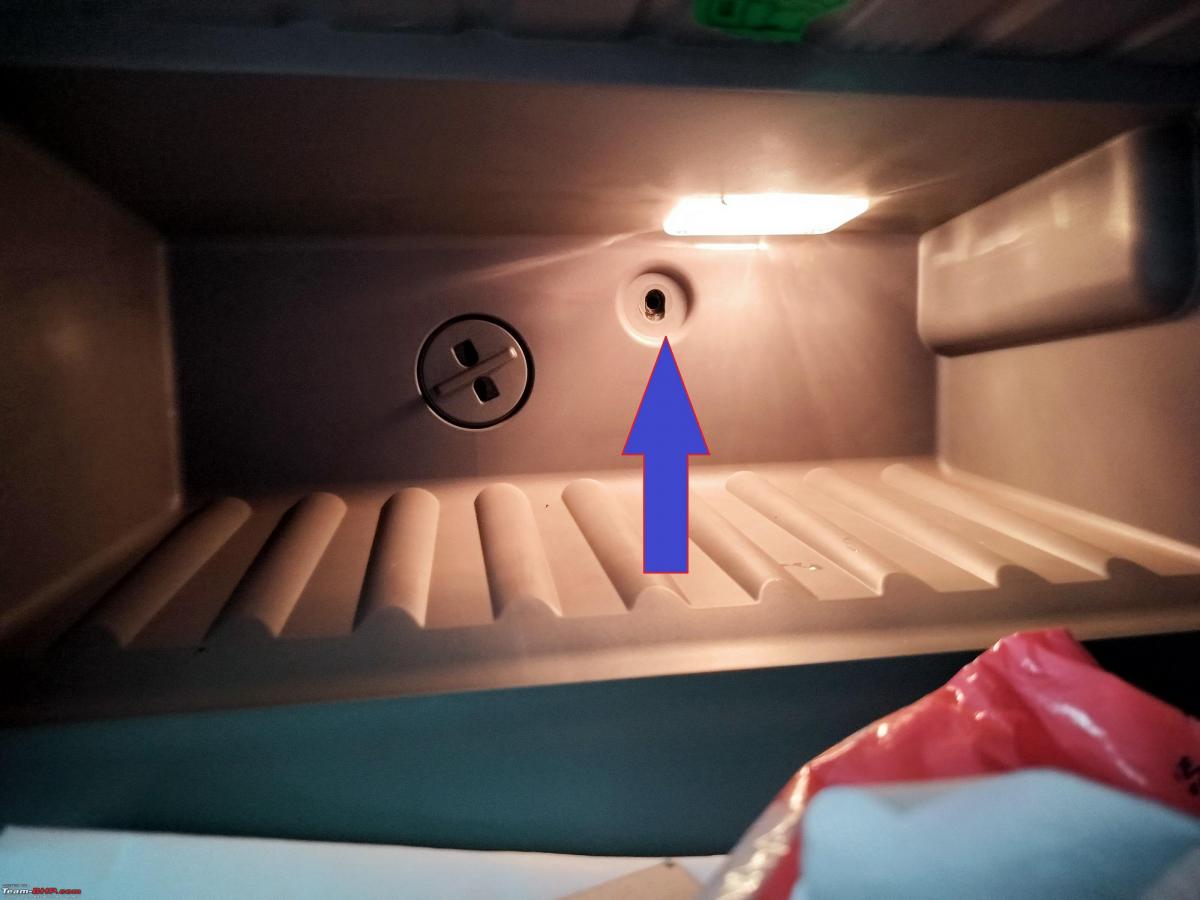
Inside the open glove box, you'll see a single bolt in the back wall. Use a small spanner to take it out. Its tricky since the room available to turn the spanner is quite less.
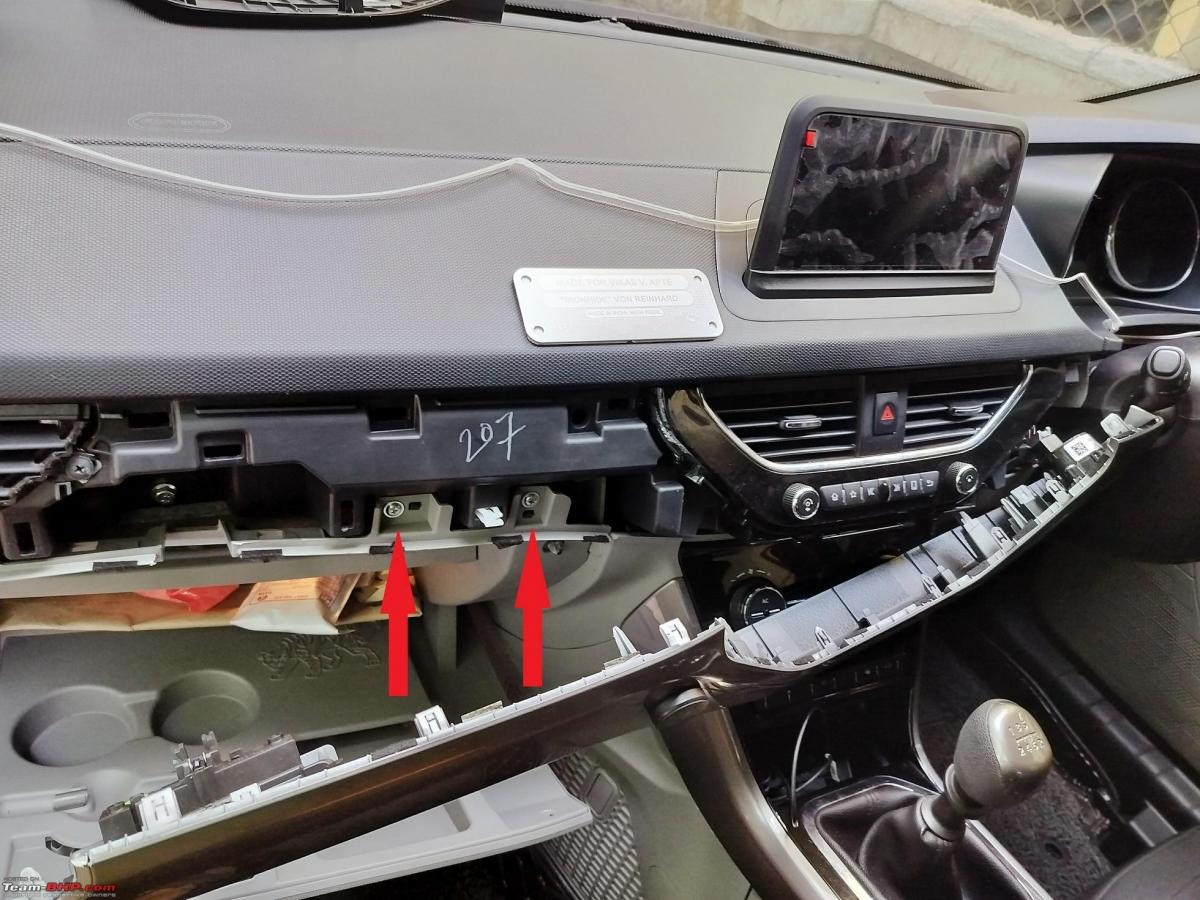
Now - you have to find 4 screws under the glove-box by peeking, touching - whatever works for you! I have tried to post pictures of them here. They are at the lower-most edge of the box basically. You can easily find them by simply running your hand from edge to edge under the glove-box. Getting the screwdriver to fit into them at the right angle, is the only tough bit till you get a hang of it. I have done this twice now - Polo & Nexon have it identical!

Unscrew the 4 screws you'll see holding the glovebox on the top edge (behind the silver panel we just removed.)
Now your glove-box is free. Slowly pull it forward. If yours is XZ+ - you'll have to disconnect the AC cooling duct at the rear, the 2 pin connectors on car door side edge, for the glove-box door switch (this triggers the box light) And the connector for the T10 bulb that illuminates the glovebox (this connector is on top of the glovebox, near the deeper edge.


Once all these connections are safely removed - keep the glove box safely aside. This is how the final situation will be.


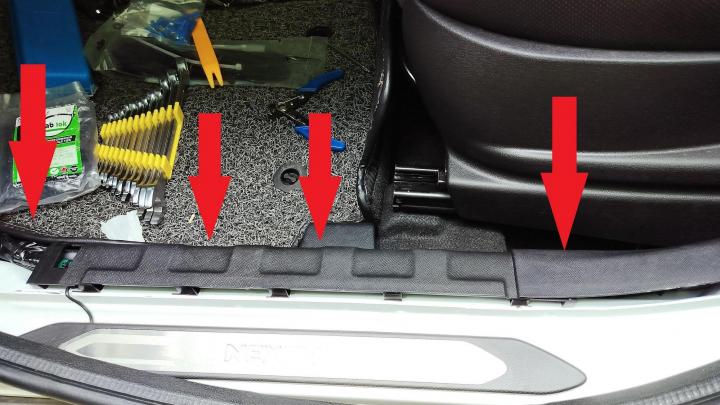
Remove the LHS corner & floor side trim (black) to eventually route wiring under the passenger seat. I've installed the subwoofer under the passenger seat since it is generally vacant. If your co-driver doesn't like the beats directly under - you may want to install this under the driver's seat.

And this is it. The silver-box, from which we want to take out the wiring. Also marked by 4 red arrows - are the points below which are 4 screws of the glove-box, that you have to work on, without much visual input in an earlier step.
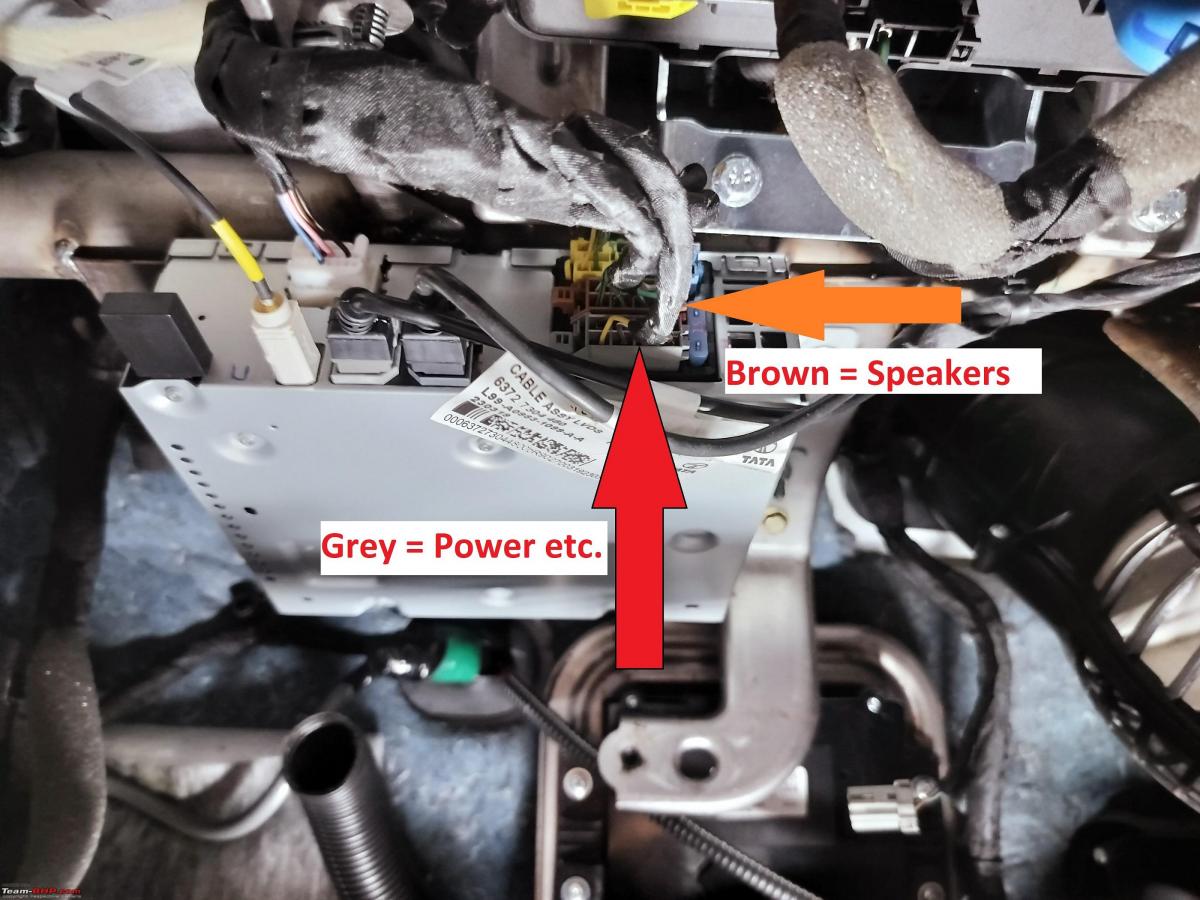
Now - you'll see the now pretty globally standard connector harness sticking into the silver-box. The Blue-Yellow-Green one, is usually for steering-mounted controls inputs etc. The Brown one - is for speaker wiring & the Grey one is for power, and other car signals. Take out the grey & brown ones using the latches on the left side. These are the 2 that we will be working on.
And that's it - we are done pulling things apart. Over to connections now.
Continue reading Reinhard's DIY experience for BHPian comments, insights and more information.
- Tags:
- Indian
- Member Content
- Nexon
- Tata Nexon
- DIY
Find Car News
Just News


About Us


Buy & Sell
USED CARS