News
Maruti Ciaz auto-dimming IRVM upgrade for just Rs 838

The mounting button is kind of the same across Japanese cars and it wouldn’t be an issue to swap a Maruti part with a Honda part.
BHPian lemedico recently shared this with other enthusiasts.
Inspired by multiple DIYers on this forum, I too managed to upgrade to an auto-dimming IRVM on my wife’s Ciaz Delta 2021.
The back story goes, we’ve never had base models of any car in the house, until this one was accidentally bought by my car noob fiancé (now wife). The chip shortage plus the generally slow market-led towards multiple failed attempts to find an Alpha variant of the Ciaz.
The accidental bit is defined by the fact the variant nomenclature by Nexa is descriptive only when talking about the ALPHA, which makes sense as that word automatically broadcasts the superior product. The ones below in descending order are then Zeta, Delta, and Sigma. These make no sense unless you know Greek.
The dealership in Ludhiana had a Delta ready and she just picked it up thinking it is one below the Alpha and would have all important if not flamboyant features. Alas, it isn’t and lacks a lot of necessary must-haves. The auto-dimming rearview mirror to be one extremely important function in all of the household’s opinion.
I began to search around for the mirror upgrade threads on Team-bhp. I came across great threads by Leoshashi and chiranjitp.
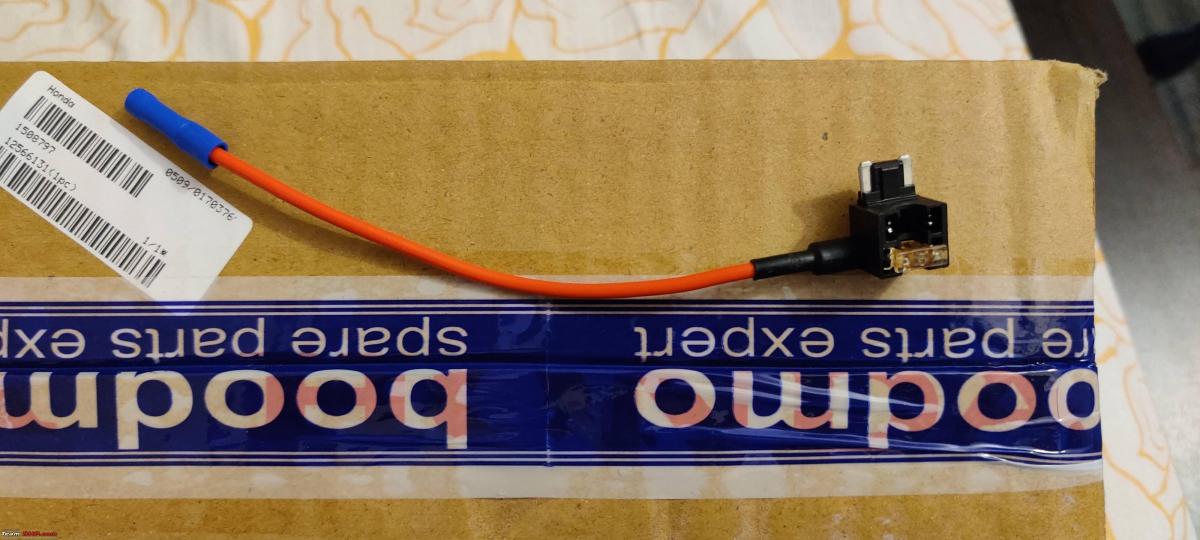
Chiranjitp’s thread was an eye-opener with his discovery of a Rs. 422 part on Boodmo.com for a Honda City ZX 4th generation. It fitted perfectly in his decade-old Swift. No kidding, it is actually that price!!
As described on the thread by Chiranjitp, the Honda mirror has a 5-wire connector, but the ones of interest are the red-live and black-ground. I had them both extended 1.5 meters and then the heat shrunk.
The black wire was crimped to a brass wire terminal, which would later find a place on a dashboard bolt to provide the ground connection.
I had to find a fuse tap for the live wire connection and was helped by a fellow BHPian JithinR to get it from this website.
The Ciaz uses a low-profile mini fuse design. A set of two was available for Rs. 199+ shipping = Rs. 258. Delivery was quick, and the two bots were perfect and robust. They came with 5-ampere fuses pre-installed.
The red wire was crimped onto the existing crimp on the fuse tap (after routing the wire to the fuse box). Now I was ready with the whole shebang. For those who aren’t physics buffs, and need to understand how exactly to determine which fuse/blank terminal to tap into, or which direction to put the fuse tap, please watch this stellar video.
Enter, big problem. I couldn’t knock out the factory fitted IRVM. I was too tight and brute strength was predictive of a cracked windshield. I went to Maruti and had a workman knock it off without telling him why I want it off. He obliged.
The mounting button is kind of the same across Japanese cars and it wouldn’t be an issue to swap a Maruti part with a Honda part.
Once ready with this as well, on a lazy evening away from patients and the hospital, I began installing the mirror.
Step 1: remove the right had A-pillar. No need for pry tools or any tools like a screwdriver. It comes off easily with just your fingers.
Step 2: mount the new mirror onto the button and tighten the Torx bolt. This one has a bolt, the original mirror doesn’t and stays snug on the button with the help of a metal clip.
Step 3: route the two wires along the edge of the headliner, towards the right A-pillar and then along the wire loom on the A-pillar. Tie it up at a few points to keep it there. You may or may not choose to use a wire cover on the part in between the mirror and the headliner. I chose not to as it isn’t a visual blob; it sits there discreetly against the black paint. The small, useless plastic cover itself costs half as much as the mirror at 200 rupees!
Step 4: The black wire terminal is screwed onto the dashboard holding bolt which was surprisingly loose when I fiddled with it!
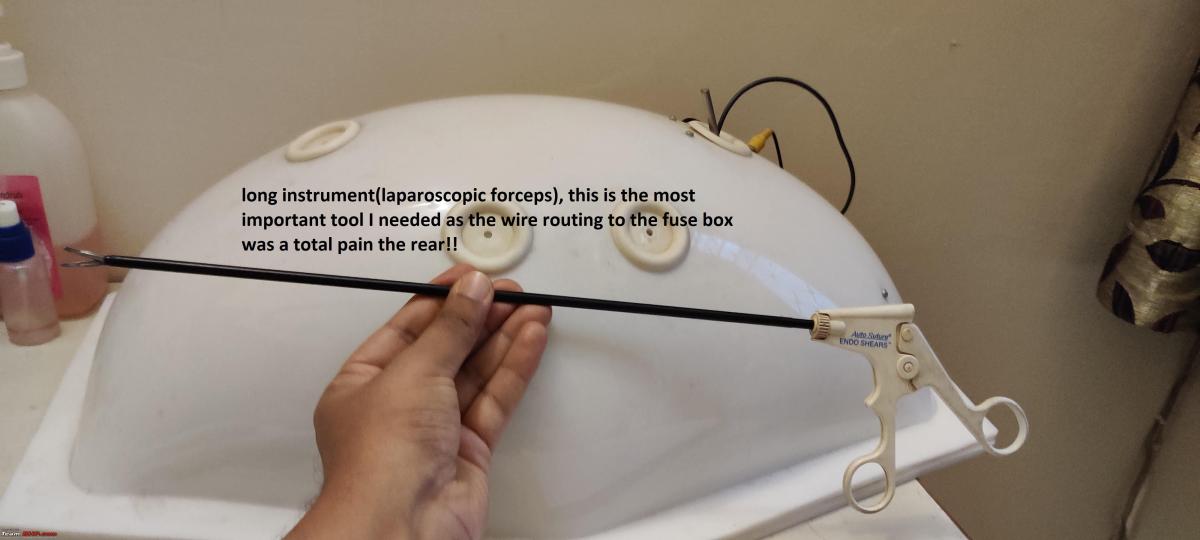
Step 5: Route the red wire into the gap in between the dash and the quarter glass. It is important to remember NOT to crimp the fuse tap BEFORE you get the wire to the fuse box. It won’t go as it’s a tight gap. And once the wire gets there, it's dangling way too high to be able to grab by hand. I had to use a laparoscopic instrument from my operating room to get it down. Tough task as you have to twist and turn your body in the driver footwell to be able to see up there and work on the fuse box.
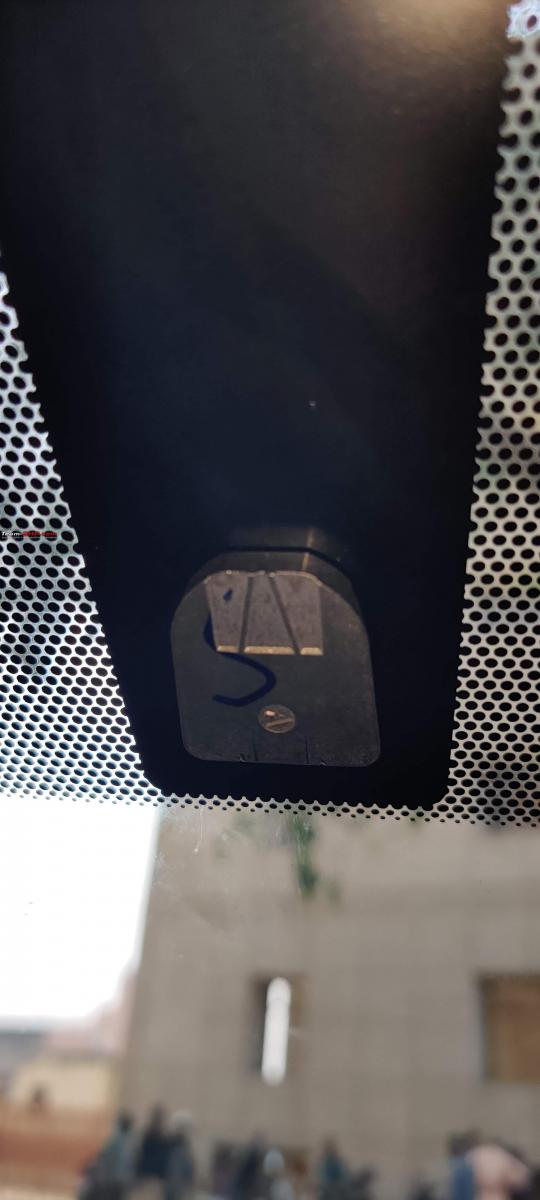
Step 6: crimp the fuse tap onto the red wire and hook it up to the pre-determined blank fuse socket. A socket that has power only after ignition start and is preferably a blank slot. Lucky me, the Ciaz has just the one encircled in the photo. Note that the box cover won’t fit after the tap is fitted. It’s a chunky bit. A cover isn’t needed anyway.
Step 7: put back the A-pillar trim by hand.
Step 8: fire up the ignition and test the function with a torchlight. Worked immediately for me.
Step 9: clean up, wash up and go for a drive.
I’d like to mention this particular mirror is frameless but has a 5-6 mm border which doesn’t darken. This is enough to make you squint when high beam lights shine onto your IRVM. I was immediately disappointed at that, but you could negate its effect by adjusting the mirror a bit diagonally downwards to your line of sight. It works well then.
The total cost was:
- Mirror + shipping= Rs. 529
- Wire lengths and soldering = Rs. 150
- Fuse tap = Rs. 159
Total Rs. 838
This is the first time a Honda part is seen selling for thousands less than a Maruti part. If I remember correctly, the upgrade kit from Maruti is at least Rs. 10,000 on Boodmo. I recommend all of you to do this simply DIY as long as the part is available for peanuts on the website. It isn’t a difficult job and would improve your night driving experience a lot.


Check out BHPian comments for more insights and information.
- Tags:
- Indian
- Maruti Suzuki
- Member Content
- Ciaz
- DIY
Find Car News
Just News


About Us