Team-BHP > Technical Stuff > DIY - Do it yourself
Register New Topics New Posts Top Thanked Team-BHP FAQ


Reply
  Search this Thread
127,863 views
Old 17th January 2016, 11:47   #1
Distinguished - BHPian
 
audioholic's Avatar
 
Join Date: Jun 2012
Location: BengaLuru
Posts: 5,658
Thanked: 19,403 Times
DIY: Fixing a scraped / scratched bumper

Disclaimer: This is not a product commercial for any brand. Sadly, there is no DIY alternative apart from Com-Paint and hence I had to use this product only.

Disclaimer 2: I am not responsible if you end up ruining your paintwork and hence I advise caution and care before you do this. Once its done, you will enjoy the results though.

Disclaimer 3: This was intended purely to satisify my enthusiasm and hence, I do not want to compare the results with what is achieved through a professional setup.

If you are done with this, then lets get going. Before this,:

An Introduction:

My neighbours always look at me like as if I am some mechanic of sorts. Mainly because they will find me meddling with car and bike every weekend and it could be something as small as cleaning the car, or sometimes give me a surprised look when they find that the car is missing a tyre or sometimes a bumper 
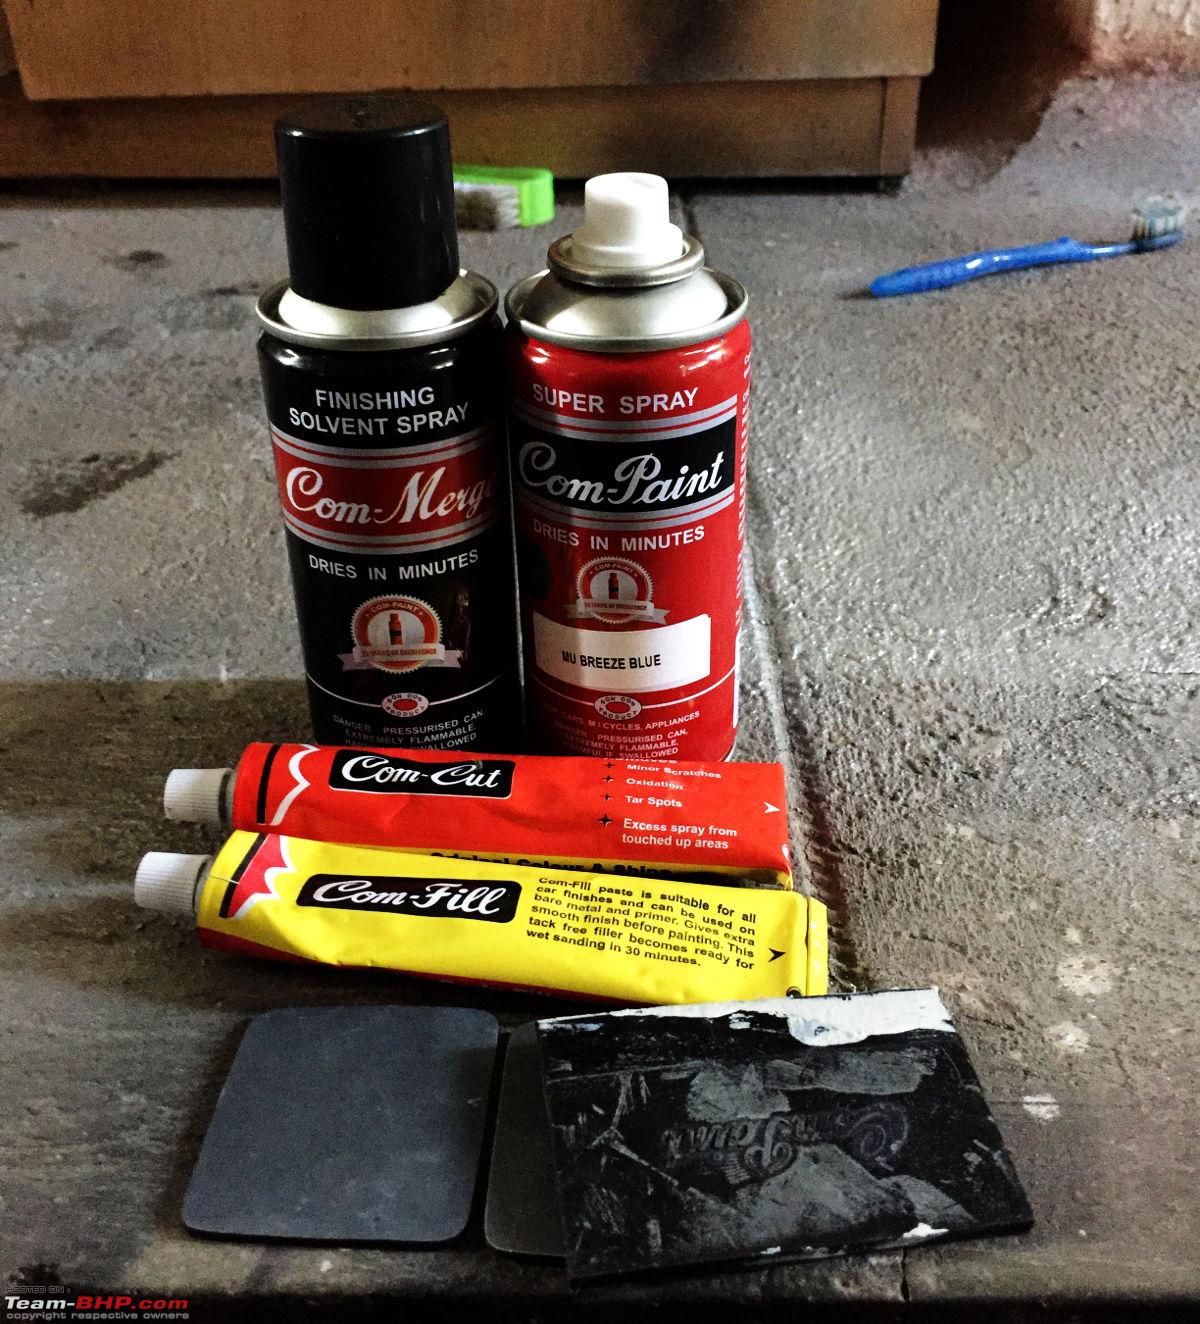
To add to their thoughts, I have a range of tools in a cupboard in the basement which just reassures their thoughts.

As luck had it for me, I started working in the automotive sector writing code for safety systems. This just made people go bonkers.

Story of my life:
DIY: Fixing a scraped / scratched bumper-story-my-life.jpg

Now coming to the actual matter, my WagonR had taken quite a few scrapes in the bumpers thanks to the bikers of bangalore who think that they can suddenly become slim and squeeze through any gap thats available.

DIY: Fixing a scraped / scratched bumper-bikers.jpg

It has become a regular affair for a part of the population to do this whenever there is a traffic jam. Hence, my car was subject to this kind of an abuse sometime back. Nowadays, I make sure that the gap left is not enough for these pricks to squeeze through. Cant help it. The resultant damage was this:

DIY: Fixing a scraped / scratched bumper-1.jpg


DIY: Fixing a scraped / scratched bumper-2.jpg

DIY: Fixing a scraped / scratched bumper-3.jpg

DIY: Fixing a scraped / scratched bumper-4.jpg

Apart from the bumper, my car is almost scratch free and this was like a sore eye. I enquired with MASS and the standard answer was to repaint the whole bumper. Even though I told them that I wouldnt complain if there was a slight mismatch they did not budge. Though it isnt that expensive to get it painted, these things are a regular affair and such scratches will keep occurring as long as traffic manners wont improve. At the same time, I had heard of Com-Paint kits and they were relative inexpensive, or rather I must say costed peanuts. However, I was worried seeing a few reviews of how badly mismatched the colour was.

For my SX4, I could do small touch ups using Bosny Silver can which had a 90% colour match with the paint of the car and I was happy with it. For the WagonR, since breeze blue was not a standard colour, I couldnt get hold of anything else.

In addition to this, CP was earlier offering only a paint and a solvent and sand paper. But now, I saw that they had added a body filler and applicator too, which meant I could fill up the scrapes instead of just repainting it. Just painting a scrape will keep the mark as it is and will not remove it. Hence, I ordered a Com-Paint value kit from Amazon, which was actually a bad idea. Why shouldnt I have ordered online:
  • They took a long time to ship the product
  • There was no price advantage compared to buying from a local distributor
  • I paid extra for crappy shipping instead of which I could have just gone to a shop and picked it up
  • I had to repeatedly send mails to ensure that they did not mess up with the colour.
However, when the product arrived, it was packed in an average fashion(not the way Amazon fulfilled orders are packed) but thankfully, it was the right colour and there was nothing missing. I had also ordered a body filler extra tube(for again a very less price) and that was there too.
These are what came in the package:

DIY: Fixing a scraped / scratched bumper-5.jpg

Tested the colour for matching and at least on paper it was not bad.

DIY: Fixing a scraped / scratched bumper-6.jpg

Once that was done, I was ready to go. Since it was for the bumper, I did not worry about the colour match because its not actually prominently visible compared to the bonnet, doors etc. I would never try this on those panels.

NOTE: All images are sourced from commons and copyrights belong to respective owners.

Last edited by audioholic : 17th January 2016 at 13:39.
audioholic is offline   (54) Thanks
Old 17th January 2016, 12:22   #2
Distinguished - BHPian
 
audioholic's Avatar
 
Join Date: Jun 2012
Location: BengaLuru
Posts: 5,658
Thanked: 19,403 Times
re: DIY: Fixing a scraped / scratched bumper

The process:

1. Surface preparation:

I removed the fog lamp bezel and cleaned the area thoroughly with soap water, fresh water and later followed by an IPA wipe down. The bumper area is the one that is given least attention while cleaning especially by my watchman who cleans the car and this results in a lot of dirt here. This also causes the overall paint shade to become yellowish which might create some difference in how the paint looks.

DIY: Fixing a scraped / scratched bumper-7.jpg

DIY: Fixing a scraped / scratched bumper-8.jpg

2. Filling up the scratch:

Since they provide an applicator and a filler that is premixed compared to what we get outside, its quite easy to apply the filler. Just take the required quantity of filler and drag it across the scratch with the applicator. The filler will accumulate where it is supposed to and a little all over the place. A repeat application will be good in case there are some spots left out. Even if there is a little excess, it can always be sanded down to give a flat finish.

One issue with this filler is it dries very fast. Hence, in less than two three minutes, the filler left on the applicator will be hard. Hence, this process should be done swiftly as possible. I left the filler for ten minutes and immediately wet sanded the area. After wet sanding was done, I left the filler dry for a few hours. It looked like this:

DIY: Fixing a scraped / scratched bumper-9.jpg

DIY: Fixing a scraped / scratched bumper-10.jpg

First wetsanded with 400 grit paper, and later 1000 grit. One mistake that I learnt a lesson from was we should always sand in the direction perpendicular to the scratch. I did it the other way and this did not give me a perfect surface. Will have to redo certain areas.

3. Painting:

If you arent used to spray painting, then buy a can of a cheap spray paint and practice painting a waste object. Only then attempt with stuff like the car.

Important thing while spray painting is to not attempt cover the whole spot in one go. It took almost five to six coats for me to get full coverage. Spray in minute quantities and through a sweeping area. Never target a single point and keep the can stationary since it will easily lead to excess paint and dripping.

Self Improvisation: I realised that the can of Com-Merge that they provide was not meant to be used with the spray since it was creating more harm than good. Hence, I did not use it and used only the paint CM is more suitable to rip off the paint in case something goes wrong.

Here is how it looked after the first spray:

DIY: Fixing a scraped / scratched bumper-11.jpg

DIY: Fixing a scraped / scratched bumper-11a.jpg

You can see that the paint is sprayed very lightly, and the white filler is still visible. That is what I mean when I say not to spray it thick. A gap of around five minutes is good for the previuous coat to stick to the surface and partially dry, so that it wont combine with the next coat and drip down. After spraying around three times, this was the result:

DIY: Fixing a scraped / scratched bumper-12.jpg

You can see the result of the mistake I did while I was sanding down the filler. It is still showing up the scratches. Hence, I will do a rework once this paint totally cures to get rid of the mark.

The below image shows how the paint has matched -


DIY: Fixing a scraped / scratched bumper-13.jpg

I would be giving 9/10 for it given that I have a very high expectation whenever any body work happens. For the common eye, or when looking from a distance, it would be 9.5/10. My dad couldnt make out a difference. Moreover, as I said before, the bumper shade would have changed due to not having detailed it so one round of compounding and polishing should make things almost flawless.


Things yet to be done are:

1. Paint the rest of the bumper
2. Once paint cures, solve the issue next to the fog lamp bezel,
3. Detail the bumper.
4. Replace the fog lamp bezel

Overall, I am happy with the product and for the price they are offering, it is very VFM. I am not sure how much more the paint will last but I am looking forward to buying another can of paint if its available separately. I will also use it to paint the mudflaps.


Last edited by audioholic : 17th January 2016 at 17:36.
audioholic is offline   (68) Thanks
Old 17th January 2016, 17:41   #3
Distinguished - BHPian
 
audioholic's Avatar
 
Join Date: Jun 2012
Location: BengaLuru
Posts: 5,658
Thanked: 19,403 Times
re: DIY: Fixing a scraped / scratched bumper

Round 2:

Coming to the other half of the bumper:

Filler applied:
DIY: Fixing a scraped / scratched bumper-14.jpg

Wetsanded down:
DIY: Fixing a scraped / scratched bumper-15.jpg

DIY: Fixing a scraped / scratched bumper-16.jpg

After the initial coat:
DIY: Fixing a scraped / scratched bumper-18.jpg


Final result
DIY: Fixing a scraped / scratched bumper-19.jpg

Costed Rs. 720 for the whole kit and a few of my own stuff like a sandpaper and I think there is at least 1/4th paint left in the can if not close to 1/2. However there is a lot of body filler left and I havent touched the cutting compound either. I will use my regular 3M compound to finish the surface since I am not sure how aggressive or how good the Com-Cut is so I dont want to ruin this work in any way.
audioholic is offline   (107) Thanks
Old 18th January 2016, 09:58   #4
GTO
Team-BHP Support
 
GTO's Avatar
 
Join Date: Feb 2004
Location: Bombay
Posts: 70,512
Thanked: 300,691 Times
Re: DIY: Fixing a scraped / scratched bumper

Thread moved from the Assembly Line to the DIY Section. Thanks for sharing!
GTO is offline  
Old 18th January 2016, 10:12   #5
Distinguished - BHPian
 
mayankk's Avatar
 
Join Date: Apr 2010
Location: New Delhi
Posts: 5,148
Thanked: 8,168 Times
Re: DIY: Fixing a scraped / scratched bumper

Thanks for this! Its exactly what I needed for my tucson's cladding and bumper. The whole thing would cost at least 5k. I just didnt know that com paint has now started off offering filler as well. Definitely worth a shot.
mayankk is offline   (1) Thanks
Old 18th January 2016, 10:58   #6
BANNED
 
Join Date: Aug 2008
Location: Delhi
Posts: 154
Thanked: 113 Times
Re: DIY: Fixing a scraped / scratched bumper

Quote:
Originally Posted by audioholic View Post
One mistake that I learnt a lesson from was we should always sand in the direction perpendicular to the scratch.
Thanks for this advice.

I had used com-paint last year on my white car, on the bumpers. The kit was without "filler" then. Very easy to apply. I had used com-cut, then polished and waxed the area too, later on.

But after an year or so, the painted areas have became yellowish. I don't know if this is due to lack of clear coat on those areas. So this time I'll buy their clear lacquer too and give it a shot.

I don't care much about slight colour mismatch, but the denter/painters insist on painting the whole panel, and the endless arguments made me resort to DIY.
sinhead is offline   (1) Thanks
Old 18th January 2016, 10:59   #7
Distinguished - BHPian
 
nkrishnap's Avatar
 
Join Date: May 2006
Location: Bangalore
Posts: 3,983
Thanked: 7,407 Times
Re: DIY: Fixing a scraped / scratched bumper

The problem I have observed with Com Paint is, it sort of discolors over a period of time. Though this works for the small fixes at places which is not easily visible to the eye.
nkrishnap is offline   (5) Thanks
Old 18th January 2016, 11:22   #8
BHPian
 
amit_purohit20's Avatar
 
Join Date: May 2006
Location: mumbai
Posts: 676
Thanked: 902 Times
Re: DIY: Fixing a scraped / scratched bumper

Quote:
Originally Posted by sinhead View Post
Thanks for this advice.

I don't care much about slight colour mismatch, but the denter/painters insist on painting the whole panel, and the endless arguments made me resort to DIY.
The painters actually never paint the whole bumper at all! Its just to fool us and extract money. They just rub the localized spot, apply putty and filler and then spray over the local spot.

Yes they do have techniques to make sure the new paint and the old paint match together by rubbing the new paint a bit.

Unless and until the matching is not going to work out properly they do paint the local spot only.
amit_purohit20 is offline   (4) Thanks
Old 18th January 2016, 11:30   #9
Senior - BHPian
 
Join Date: Dec 2007
Location: Bangalore
Posts: 4,106
Thanked: 537 Times
Re: DIY: Fixing a scraped / scratched bumper

Great thread.

Still remember the first time I used ComPaint on the Safari's bumper and made a mess!

The final outcome is good. Looks like time to get a can and try out again.
HappyWheels is offline   (1) Thanks
Old 18th January 2016, 14:12   #10
BHPian
 
xs2mayank's Avatar
 
Join Date: Dec 2015
Location: KA 09 / TX (US)
Posts: 45
Thanked: 27 Times
Re: DIY: Fixing a scraped / scratched bumper

Very nice DIY.

The final result almost matches the baseline colour and scratches/dents will be hardly visible from a distance.

Certainly very useful in Indian conditions where scratches/dents are something we car lovers have to live with. Such kind of DIY really helps in getting rid of these eye sores without costing a bomb to your pocket or running to garages for getting them fixed.
xs2mayank is offline   (1) Thanks
Old 18th January 2016, 14:14   #11
BHPian
 
motor_breathing's Avatar
 
Join Date: Jun 2008
Location: Bangalore
Posts: 267
Thanked: 213 Times
Re: DIY: Fixing a scraped / scratched bumper

Quote:
Originally Posted by nkrishnap View Post
The problem I have observed with Com Paint is, it sort of discolors over a period of time. Though this works for the small fixes at places which is not easily visible to the eye.
I had this problem with withe color. Few months after using the com paint, the touched up areas looks yellow and ugly. Didn't face much of an issue with metallic black.
motor_breathing is offline   (1) Thanks
Old 18th January 2016, 14:57   #12
BHPian
 
Join Date: Sep 2014
Location: Trivandrum
Posts: 410
Thanked: 1,910 Times
Re: DIY: Fixing a scraped / scratched bumper

Quote:
Originally Posted by motor_breathing View Post
I had this problem with withe color. Few months after using the com paint, the touched up areas looks yellow and ugly. Didn't face much of an issue with metallic black.
Yes what you said is true. I had tried on the bumper of my Swift (couple of years back) which is of Pearl Artic White in colour. So abandoned its use. It looks ugly as the colour turns yellowish. Lucky that I'd used to touch up a small area of the right side of the back bumper (to remove the scratch created by a "GOOD" biker while waiting at a signal).
kozhissery is online now   (1) Thanks
Old 18th January 2016, 15:08   #13
Senior - BHPian
 
greenhorn's Avatar
 
Join Date: Apr 2007
Location: KL-01
Posts: 7,745
Thanked: 4,397 Times
Re: DIY: Fixing a scraped / scratched bumper

I would suggest that you buy some clear coat spray paint as well - the painted portion has a matte finish compared to the rest
http://www.team-bhp.com/forum/modifi...t-tubes-9.html
spray clear coat over the painted surface, and then polish it with rubbing compound - this is a theory, as I don't have much time to spend on my car
greenhorn is offline   (2) Thanks
Old 18th January 2016, 15:18   #14
Distinguished - BHPian
 
audioholic's Avatar
 
Join Date: Jun 2012
Location: BengaLuru
Posts: 5,658
Thanked: 19,403 Times
Re: DIY: Fixing a scraped / scratched bumper

Quote:
Originally Posted by greenhorn View Post
I would suggest that you buy some clear coat spray paint as well - the painted portion has a matte finish compared to the rest
http://www.team-bhp.com/forum/modifi...t-tubes-9.html
spray clear coat over the painted surface, and then polish it with rubbing compound - this is a theory, as I don't have much time to spend on my car
I do have stock of Bosny clear coat with me. However, the bumper does not have a clear coat and there is only paint. Yes the bumper overall has a matte finish which will have to be entirely sprayed if I want a uniform finish.

Yellowing I think is an issue with lighter shades like white because I see that many cars have this effect. Not sure if the bumper will remain scratch free for another year for me to check the effect.
audioholic is offline   (1) Thanks
Old 18th January 2016, 16:39   #15
BHPian
 
rakesht_ripps's Avatar
 
Join Date: Feb 2011
Location: Hyderabad
Posts: 40
Thanked: 77 Times
Re: DIY: Fixing a scraped / scratched bumper

Great Job done 
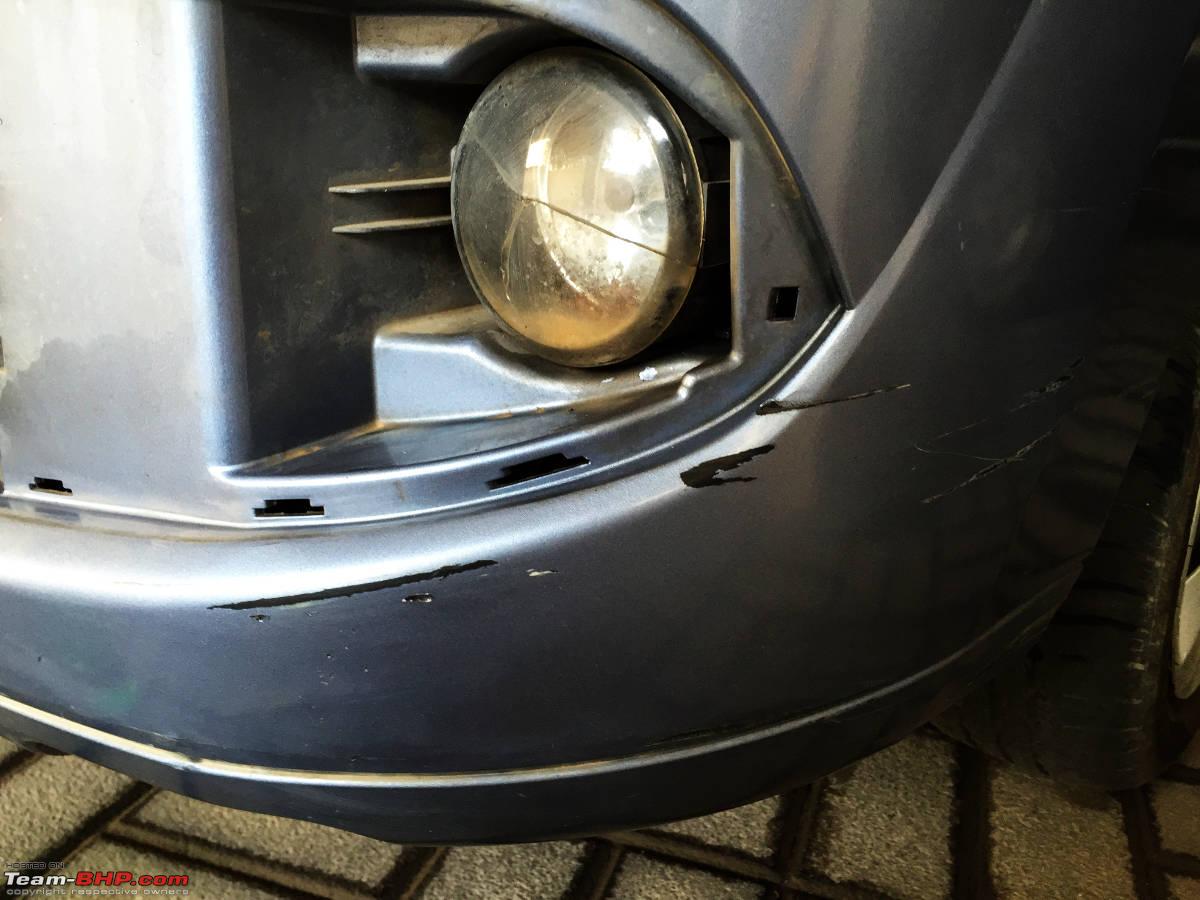
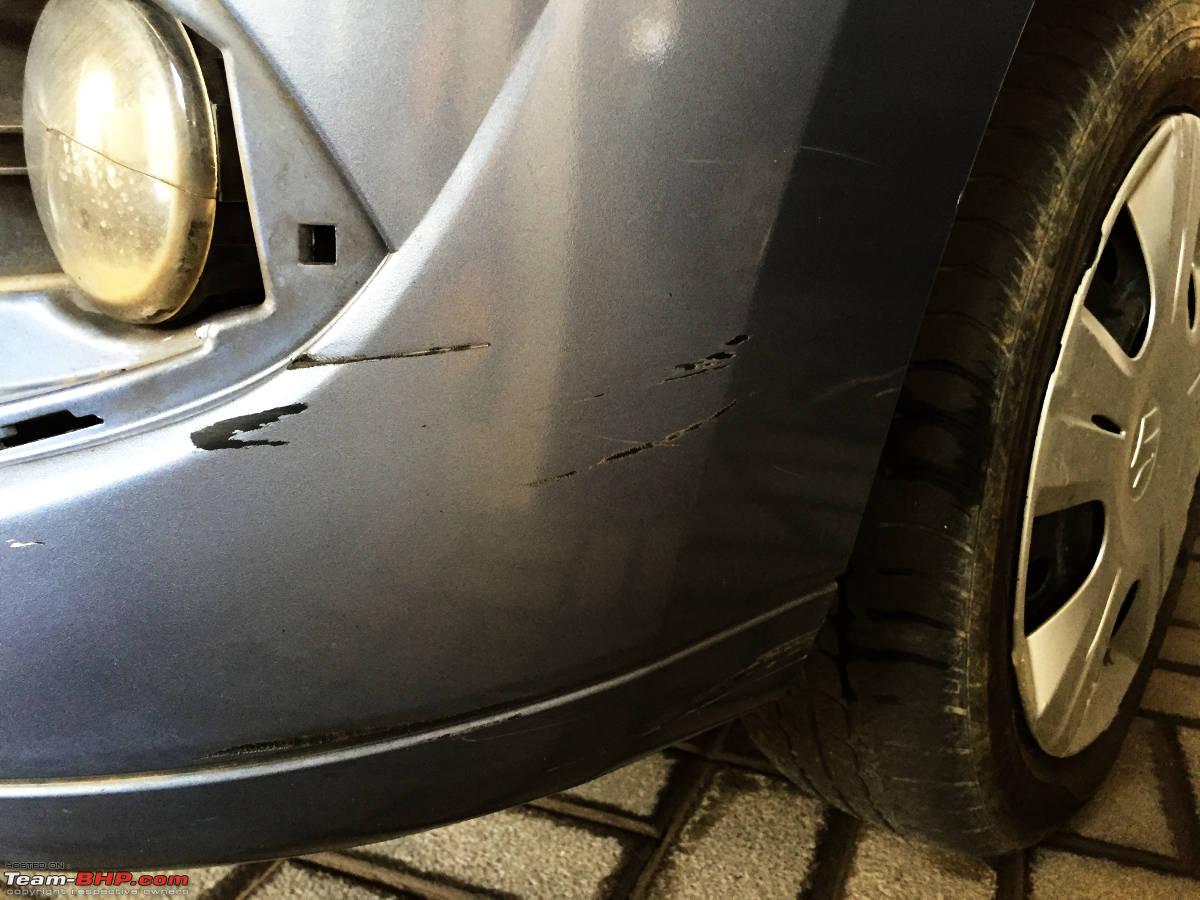
I have similar scratch marks on my black I20. Please let me know the site on which you placed order for com paint. Thanks in advance
rakesht_ripps is offline   (1) Thanks
Reply

Most Viewed


Copyright ©2000 - 2024, Team-BHP.com
Proudly powered by E2E Networks