| |||||||

| Search Forums |
| Advanced Search |
| Go to Page... |
 |
| Search this Thread |  95,779 views |
 11th April 2016, 21:39
| #1 | |
| BANNED Join Date: Oct 2011 Location: Hyderabad
Posts: 12,346
Thanked: 21,451 Times
| DIY Install & Review - The Mini 0806 Dash Camera After a lot of deliberation on whether to get a dashcam or not as the route I take is less populated but has a share of heavy vehicular traffic and idiotic taxi drivers. So I felt it is better to get one and I have has a few close calls already, I decided to invest in a decent Dashcam. Moreover I did think about the future where I will be doing road trips so a dashcam is a must so why not invest now and get familiar with its functioning so that I don't need to fumble around then. My requirements were:
Started off with a low budget, I began my search and narrowed on MINI 0801 but was discouraged due to heating issues. So the next one that was good enough after comparing specs was MINI 0805. But after a bit more research and a suggestion from fellow BHPian in the DVR thread made me think again: BHPian FarPatel's Suggestion Quote:
Here is the tabular comparison of the MINI Series: 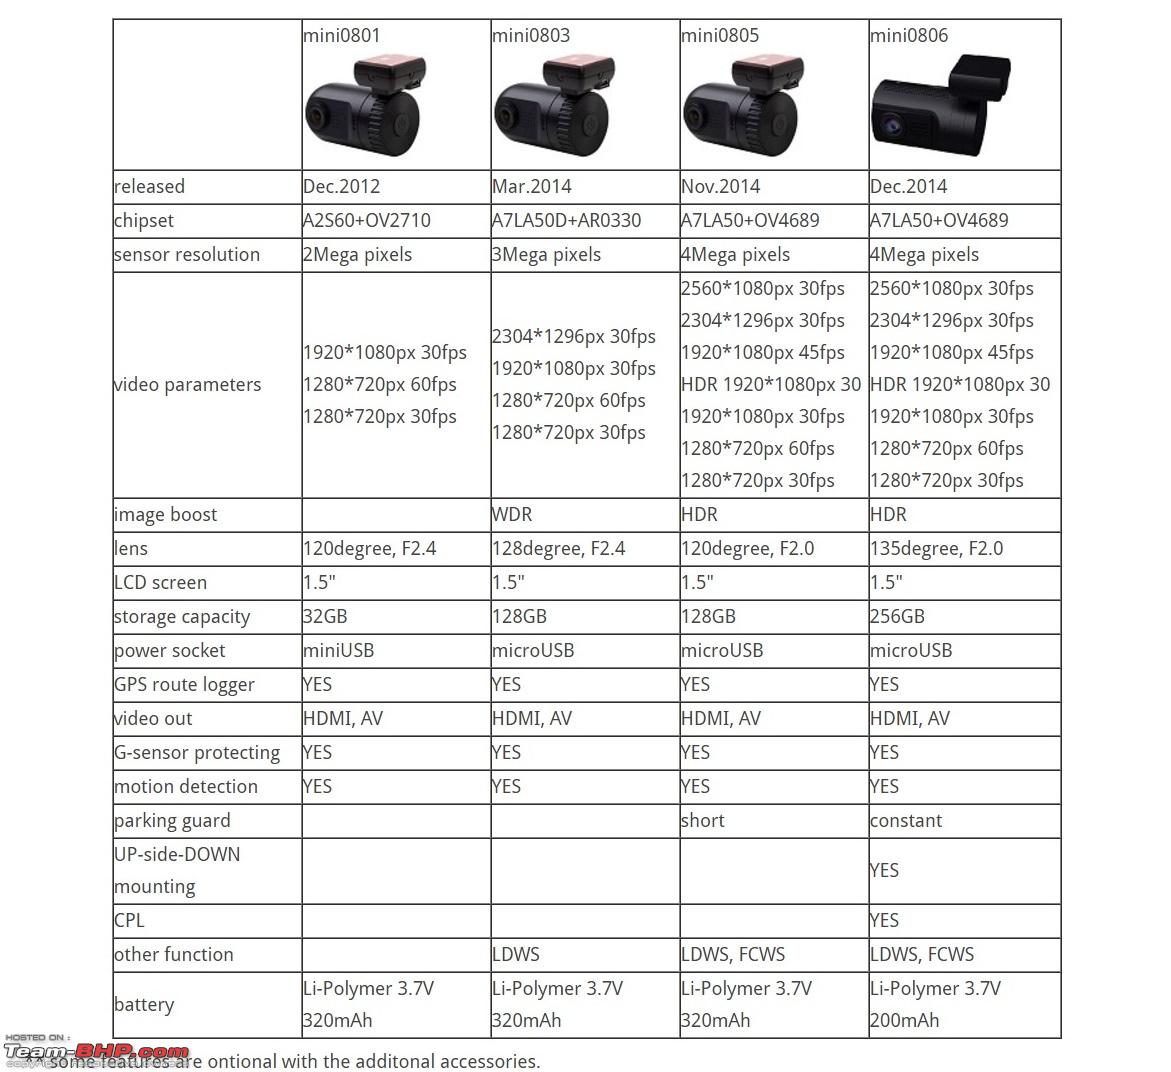 Cost comparison (These are approximate prices of the cam taken from AliExpress with GPS logger): MINI 0801 - ₹2210 MINI 0803 - ₹4600 MINI 0805 - ₹4800 MINI 0806 - ₹7200 Though steep but I found it good enough when comparing to all the ones I searched. Most of my requirements were fulfilled by the MINI 0806 so I went ahead and purchased it. Since this is a long time investment and may work reliably, the cost would even out over time. Specifications of the MINI 0806 in isolation 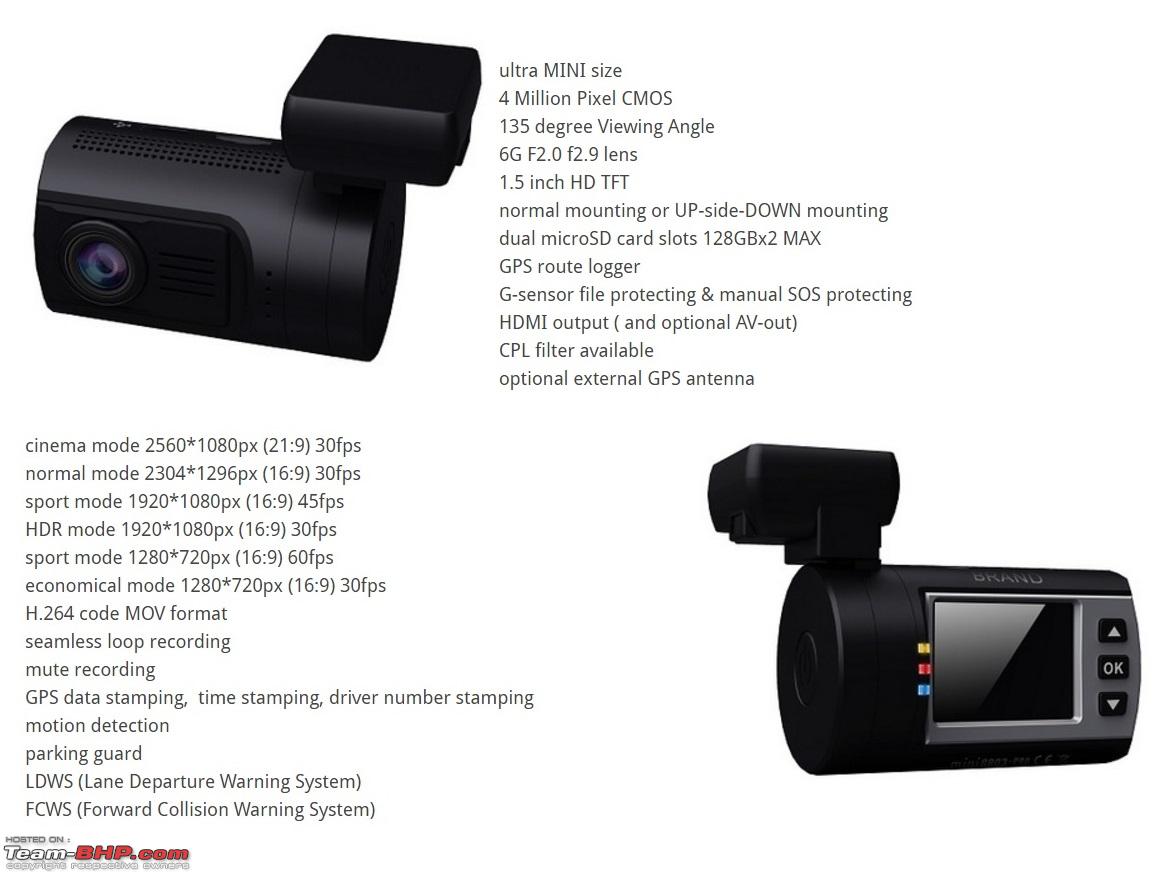 What is what on the cam - Buttons, lights etc - Identification 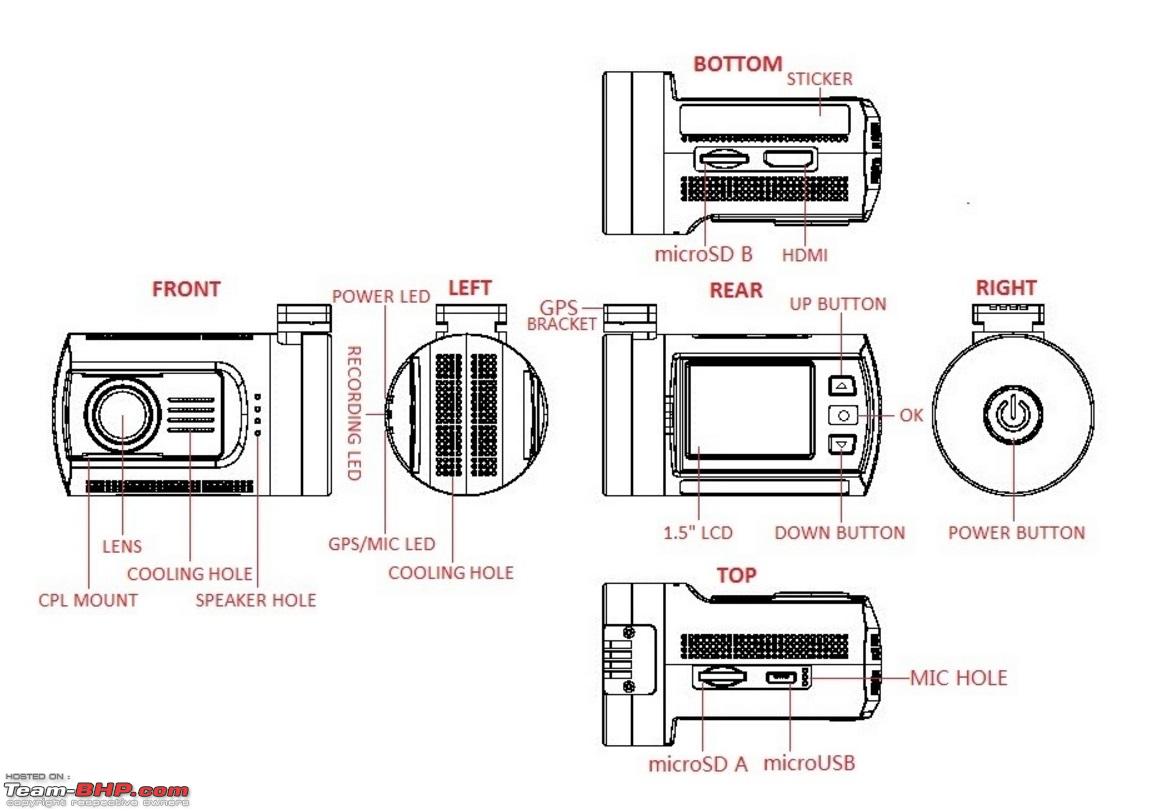 Total Costs: Dashcam: $98 - ₹ 6986 Memory Card: (Samsung 64GB Class 10) - ₹1054 Hard wiring Kit: $3.24 - ₹ 216 After 41 days from shipping from GearBest, I received the order in good condition and without any customs duty to be paid. Opened the package and checked for contents and condition. Found all to be OK.  I will focus on Installation and a Mini Review of the Dashcam in the following posts: 1) Installation 2) A Small Review 3) Items required for installation 4) Links to videos recorded and uploaded 5) Files viewing and File size reduction Softwares Last edited by a4anurag : 15th April 2016 at 00:45. | |

|  (38)
Thanks (38)
Thanks
|
| The following 38 BHPians Thank a4anurag for this useful post: | abirnale, aditya79india, aeroamit, ajaypjayaraj, ashpalio, baby_antu, captain.torque, car_da_mum, D C, dockap, dpkbehera, ecosport rules, F150, frankmehta, graaja, GTO, HappyWheels, harsh79, Jselvan_BluOval, karansm4u, Leoshashi, mpksuhas, novicefreak, parsh, Payaniga, RavenAvi, Rehaan, saargoga, shipnil, shreyak_ss, suhaas307, suresheadala, swiftnfurious, Tamarind, theexperthand, Varun_HexaGuy, VijayAnand1, Zinda |
| |
|
12th April 2016, 22:56
| #2 |
| BANNED Join Date: Oct 2011 Location: Hyderabad
Posts: 12,346
Thanked: 21,451 Times
| re: DIY Install & Review - The Mini 0806 Dash Camera 1) INSTALLATION of the Dashcam There are two ways one can go about installing the dashcam in ones car: Choice A: Using the 12V car charger provided connected to the 12V socket Choice B: Hardwiring the Dashcam __________________________________________________ _________ In Choice A - It is pretty straightforward and easy to complete the installation as there nothing much to do. i) Decide the position of the Dashcam and Stick the mount; ii) Route the wiring from the dashcam mount towards the 12V socket and NOT vice-versa* iii) Connect the charger into the socket and you are done. TomTom charger that I use currently  Car charger provided in the package (Note the USB port)  I could have used this method as the car charger that I use is a TomTom one that has 2 USB ports and one 12V socket to compensate. The car charger that is provided in the package would fit into that socket in the TomTom one and even then I will have 3 USB ports to use. Since I am the solo user of the car, 2 ports are left idle anyway so there would be no load on the 12V socket. I didn't choose this method because I wanted a cleaner install and not to clutter the central console with wires routing over/under them. Also I may forget to plug the charger in or someone may pull it off to use to charge their mobiles. Keeping the issues in mind, I went with the Choice B. __________________________________________________ _______ Hardwiring the dashcam makes it safer and reliable in terms of performance and battery life. There would be no issues of draining/recharging as the power would be supplied 24x7 when the engine is running to record the videos. Also I would be carrying over this dashcam to my next car so the easy to unplug and carry it would be better and also warranty-proof (For next car) if going the hardwiring way. Steps to Hardwiring the Dashcam: -- I am putting down the points in a brief manner so that it is easy to understand and follow:
NOTE: * If the wiring is routed from the fuse box towards the dashcam on top, the extra wiring would be a mess and also be difficult to hide it into the headliner trim above so it is best going from top to bottom i.e. From dashcam to fuse box so all extra wiring is secured and hidden neatly underneath the dashboard. **Deciding on position of DASHCAM MOUNT -- When one is in confusion and not able to decide on getting the right position for the mount, please do NOT use the sticker pads provided in the package as they would render useless if once stuck to the windshield. To remove that sticker pad a thin knife would be required. So to try out different positions before finalising it is better to use Cellophane tape which can be stuck to the mount and windshield temporarily. This is a better method and easier on mount too. Record couple of videos and keep checking it during playback. After deciding, using a marker make small markings and then use the sticker pads provided to mount the dashcam. Preparing the Hardwiring Kit: The kit has two ends: 1) A Micro USB port that connects to the dashcam 2) A Red+black wire to be connected to the power source and earth Clear labelling on kit which is power source and which is Earth, Neat!  Earth connection crimped  Power connection crimped  Wiring connected and heat shrink'ed to the hardwiring kit 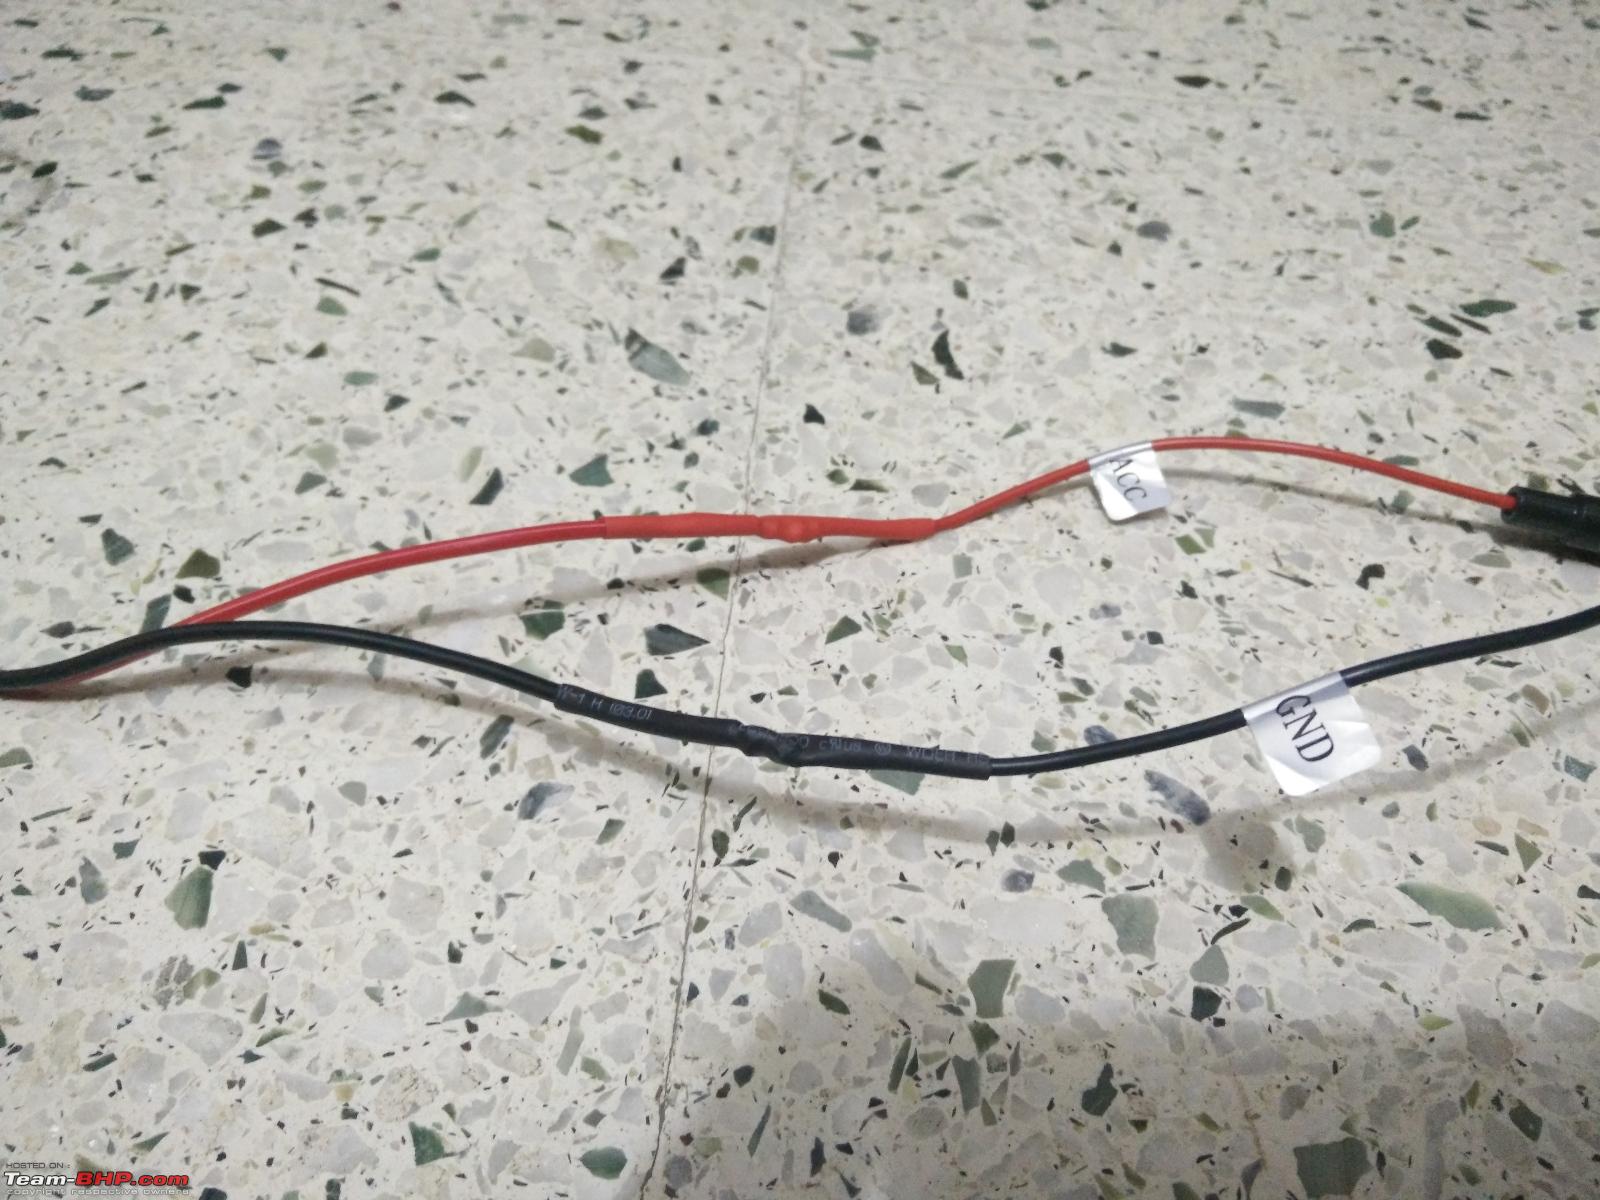 Hardwiring Kit - Labelled what is what! 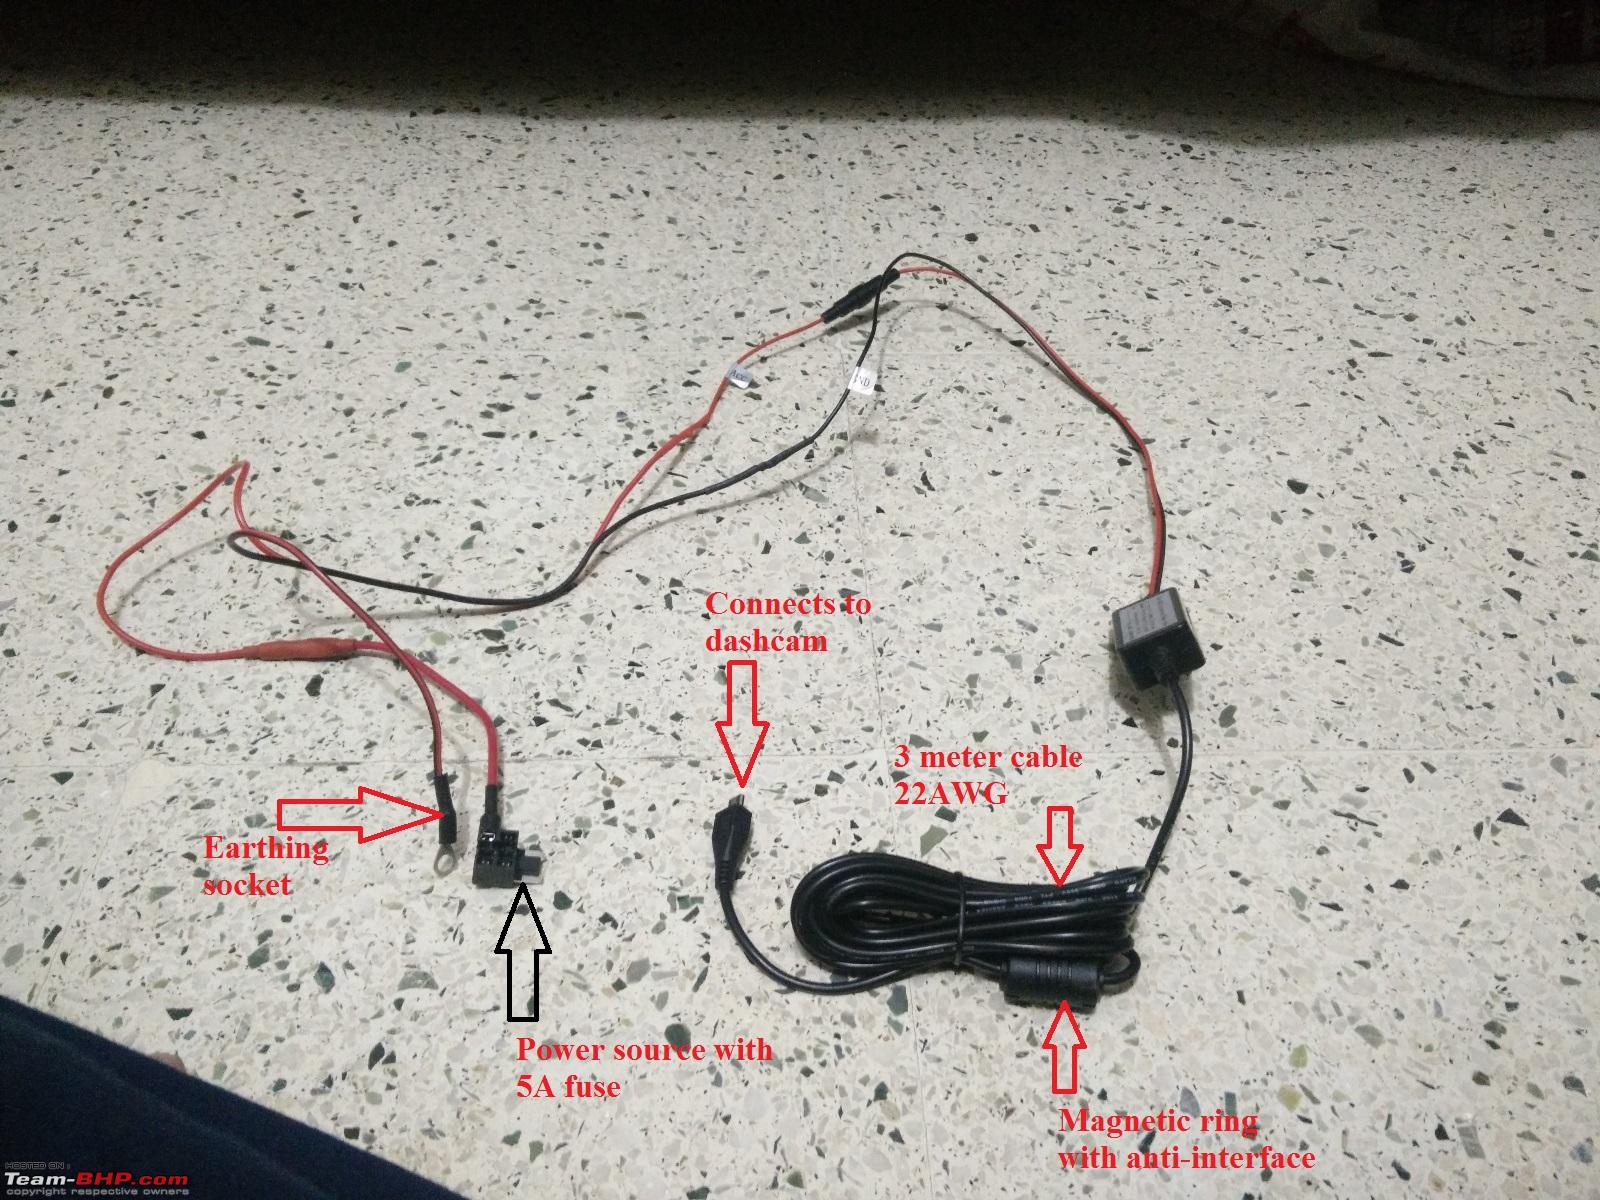 To put it in simple terms, first using a wire stripper, strip some insulation off to get a larger and cleaner source of wiring to be connected. I have used a small extra wire (Thicker) to connect the hardwiring kit and fuse tap cable. For the Power Connection: Strip some insulation off the red wire and fix it tightly into the butt connector of the fuse tap cable. After getting a tight fit inside the connector, using a crimping tool, crimp the butt of the fuse tap cable to secure the connection we'd just made. Slide in a piece of heat shrinking tube prior to crimping. Using a hot air blower, shrink the tubing over the connection to be safe and clean. For the Earth connection: Strip some insulation off the black wire and fix it tightly into the ring terminal that I using from the set of terminals that I have. This ring terminal will then be plugged into the car metal body point to act as Earth in the whole connection. Since I have already hard-wired my Auto-dimming IRVM previously, I will be using the same earthing point in this install too. Enough of theory, lets get the installation pictures talk the rest story: A-Pillar trim removal - remove the beading and pull out the trim using the panel removing tools  Fuse to be tapped from the fuse box:  Checked and confirmed on the fuse using the 12V fuse tester pen  Way to route the hardwiring line - Through the dashboard  Wiring kept ready to be routed through A-pillar  Routed through A-Pillar and secured using wire holder clips  A close-up of the wire holder clips  5A fuse in the fuse tap cable (Fuse rating on the converter box is 1.5A so went double of that rating hence using a 5A one)  Fuse tap cable connected in the chosen fuse (Note the first fuse tap present that is for the Auto-dimming IRVM)  Earth connected to the same point that I used for the Auto-dimming IRVM  Mount fixed on the windshield after a lot of trial 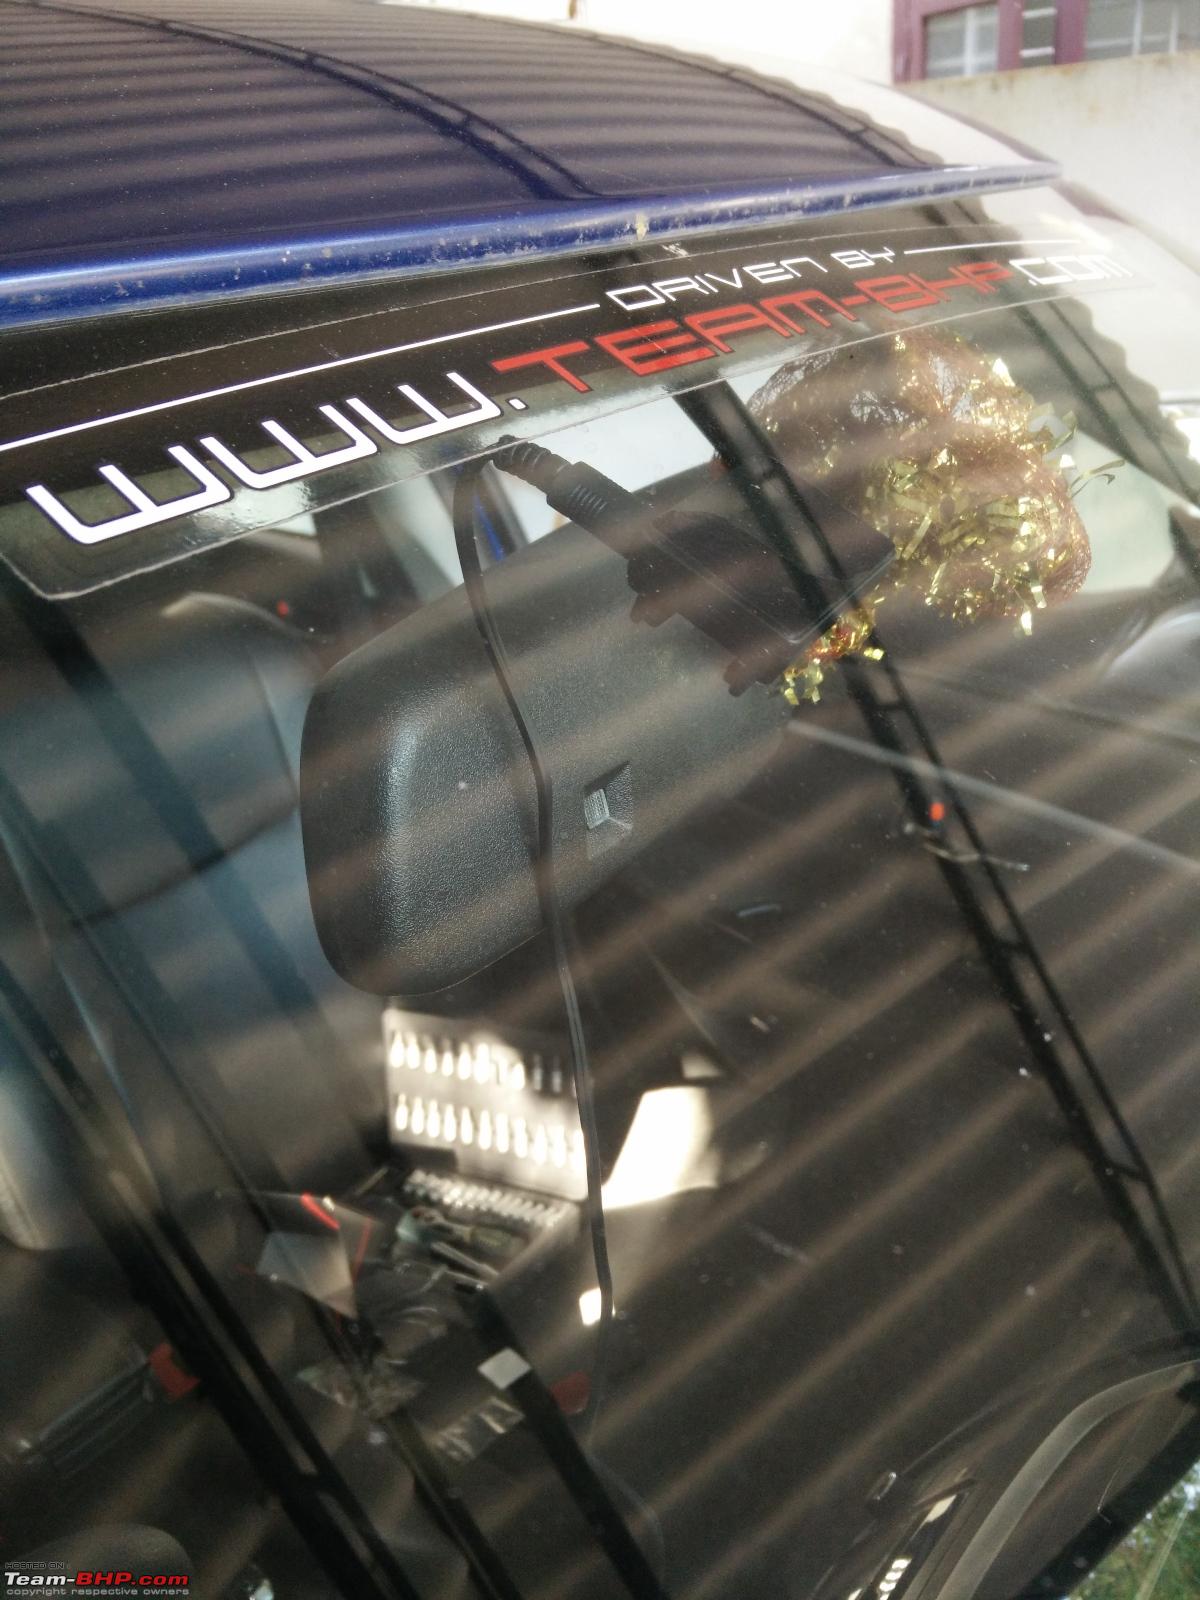 [b]Test shot after hardwiring[ - All Good!!/B] 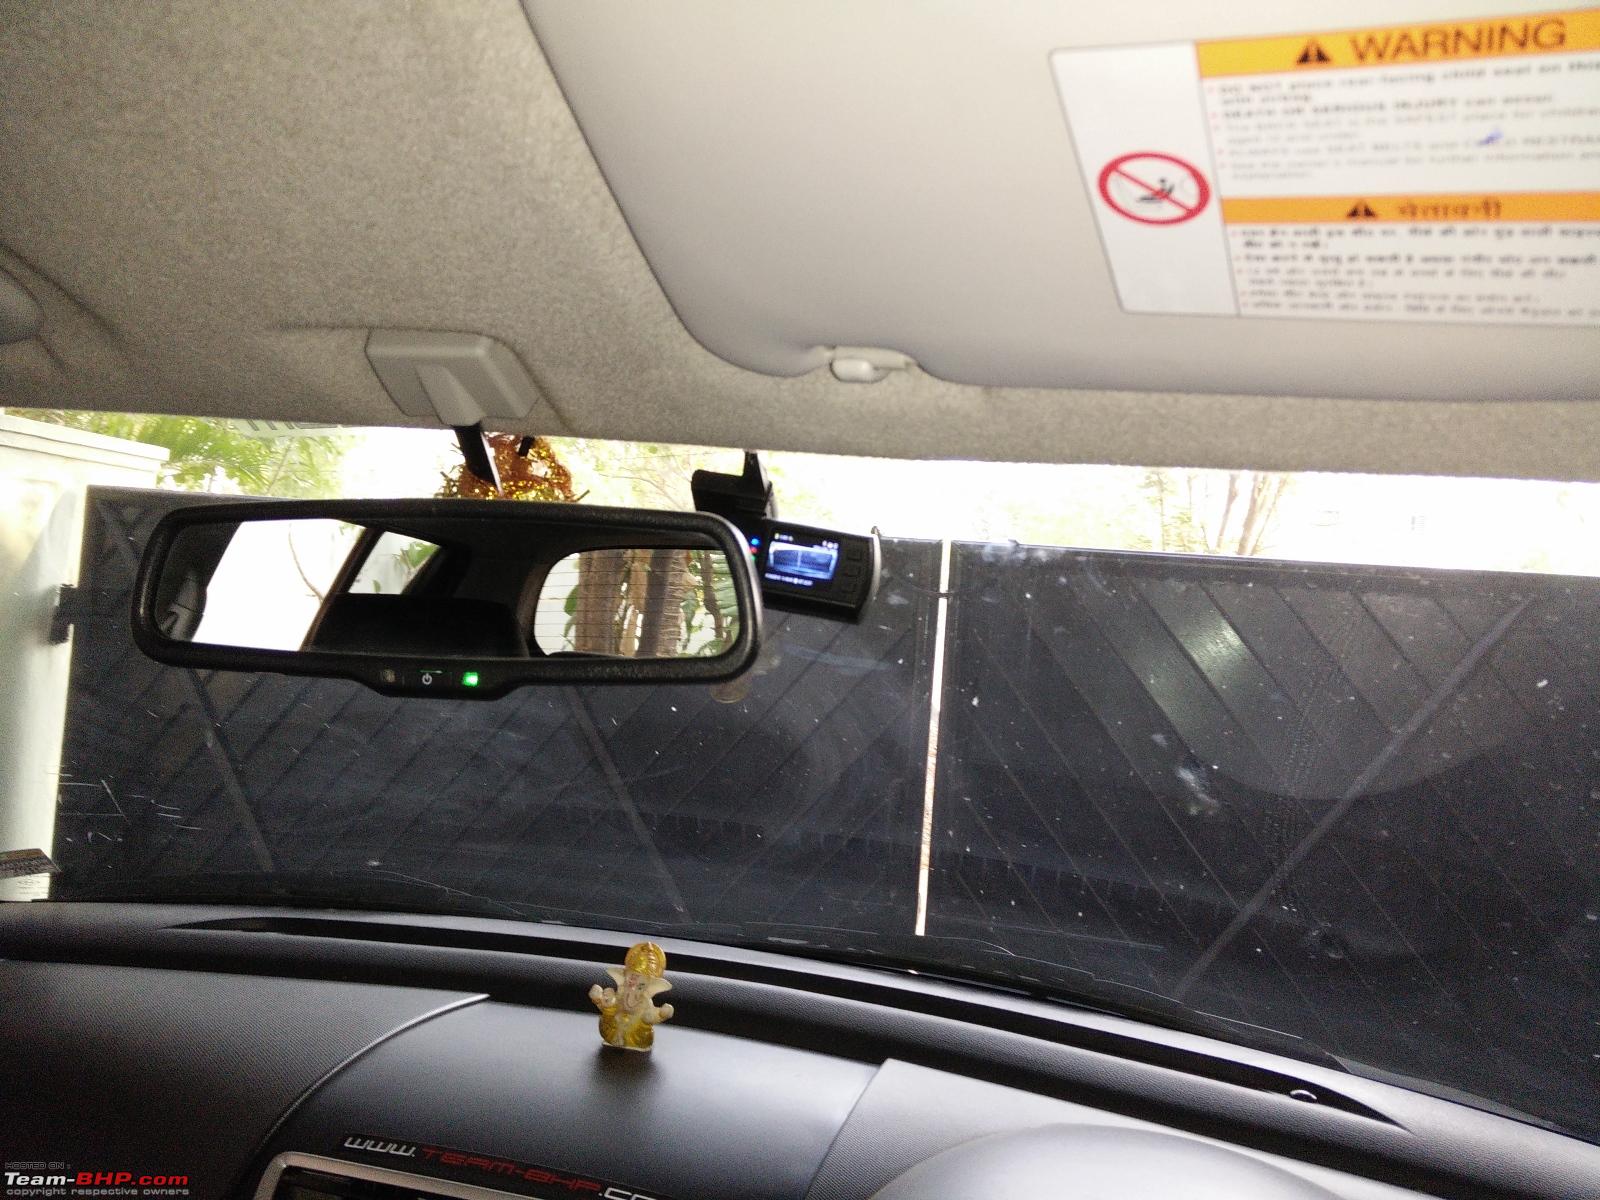 Driver's View 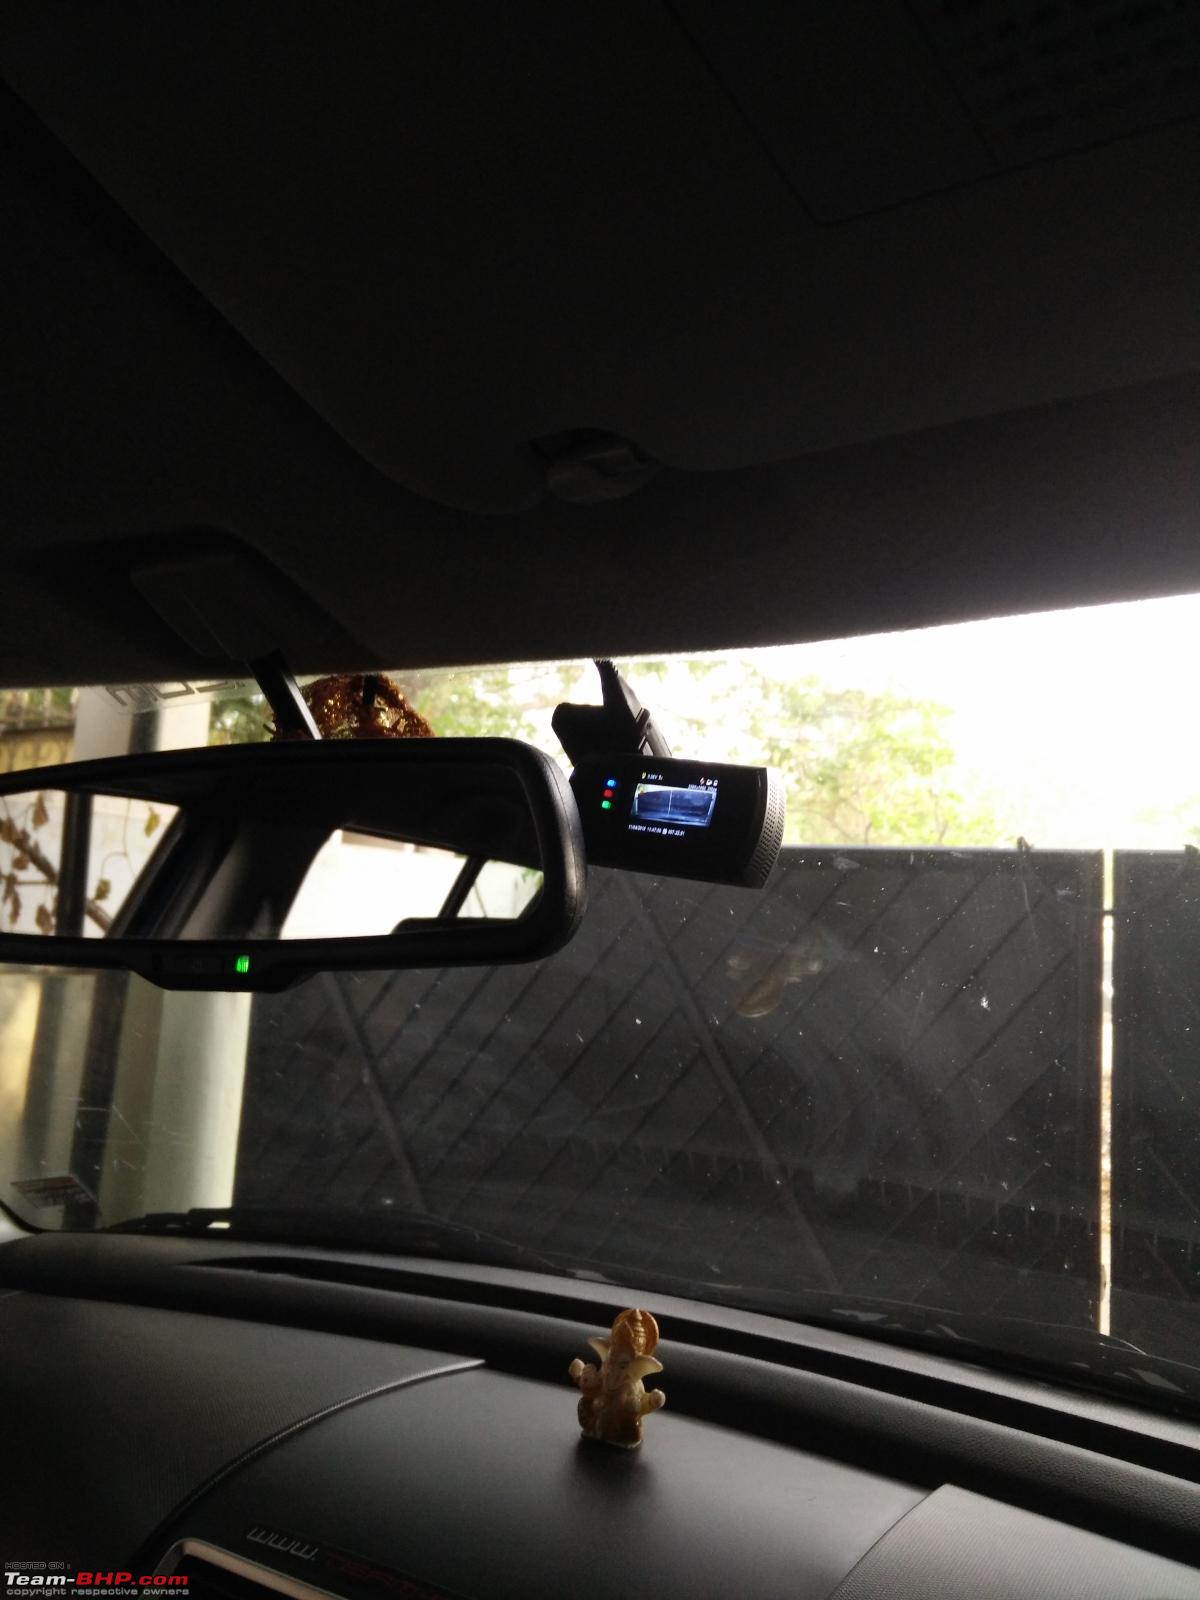 View from outside  Closeup shot of the dashcam from outside  Last edited by a4anurag : 15th April 2016 at 00:20. |
|
| (31)
Thanks
|
| The following 31 BHPians Thank a4anurag for this useful post: | aeroamit, ajaypjayaraj, ashpalio, baby_antu, captain.torque, car_da_mum, daretodream, dockap, DrANTO, drivebyfire, Ertigiat, graaja, GTO, Herbie98, Jselvan_BluOval, karansm4u, kashyapz8055, Lalvaz, Leoshashi, mrbaddy, parsh, petrolhead_neel, RavenAvi, Rehaan, shipnil, Shivanshu, swiftnfurious, tharian, theexperthand, Varun_HexaGuy, whitewing |
|
13th April 2016, 00:07
| #3 |
| BANNED Join Date: Oct 2011 Location: Hyderabad
Posts: 12,346
Thanked: 21,451 Times
| re: DIY Install & Review - The Mini 0806 Dash Camera Before going to the review of the Dashcam, Here are the items required to complete the Installation. Dashcam to be installed  Hardwiring Kit  Fuse tap cable and a Set of fuses (Different Rating)  Crimping Tool  Heat Shrink tubes  12V Fuse tester pen  Hair Dryer  Car panel/trim removal set 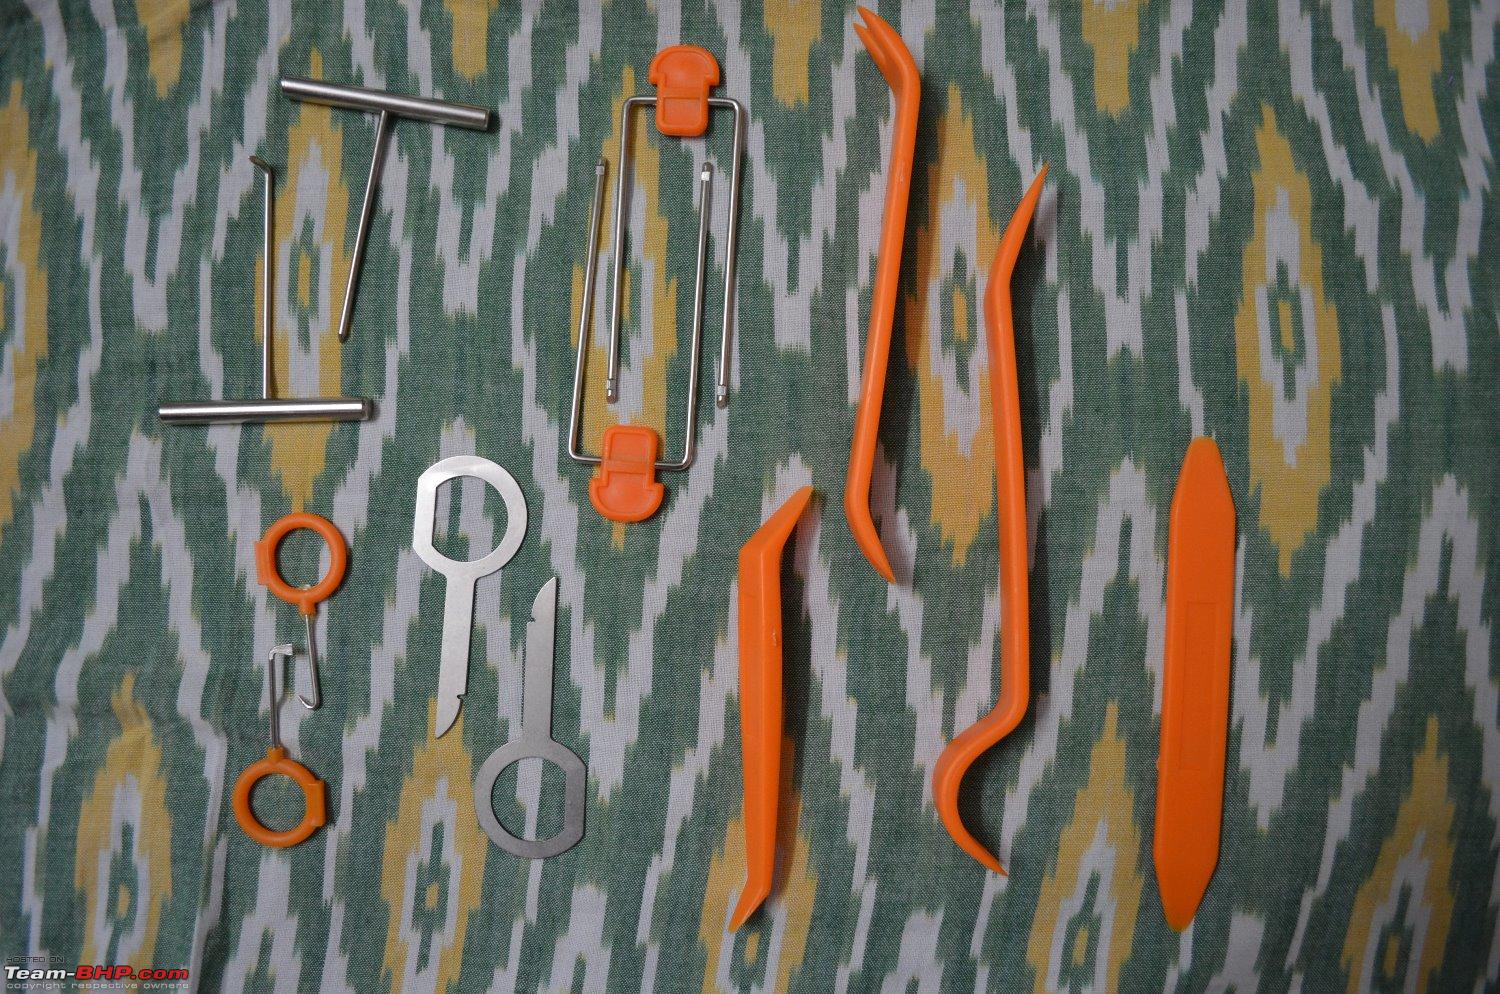 Zip ties  Extra piece of wiring I used a bridge between fuse tap cable, earth and the hardwiring kit  __________________________________________________ _____________ A size comparison of the cam v/s my car's Antenna   When I was preparing the install and carrying out the works, I let the battery of the cam charge using the 12V car charger provided  Contents of the Package  Firmware upgraded today evening - Old v/s New  CPL Filter mounted and set at the required position for best results  Last edited by a4anurag : 14th April 2016 at 21:57. |
|
| (31)
Thanks
|
| The following 31 BHPians Thank a4anurag for this useful post: | aeroamit, ashpalio, baby_antu, captain.torque, car_da_mum, dailydriver, daretodream, dockap, DrANTO, ecosport rules, graaja, GTO, HappyWheels, harsh79, karansm4u, Leoshashi, mrbaddy, naddy, parsh, RAC, RavenAvi, Rehaan, shreyak_ss, suhaas307, suresheadala, swiftnfurious, Tamarind, theexperthand, Varun_HexaGuy, VijayAnand1, Zinda |
|
14th April 2016, 23:10
| #4 |
| BANNED Join Date: Oct 2011 Location: Hyderabad
Posts: 12,346
Thanked: 21,451 Times
| re: DIY Install & Review - The Mini 0806 Dash Camera 2) Dashcam Review - MINI 0806 With the installation done and also details furbished on how to get the install done (be it hardwiring or using the 12V socket), it is not time I put down a small review of the MINI 0806 and couple of videos taken over 3 days of the drive. PS: This is the first time I am writing a review on a dashcam so please bear with me. What I like:
What I don't like:
Looks & Size
Mounting Options
Video Recording & Practicality This is the following list of resolutions that I can choose to record:
I'll be adding some sample video links that I have uploaded on my YouTube channel in the following post. Last edited by a4anurag : 15th April 2016 at 00:21. |
|
| (24)
Thanks
|

| The following 24 BHPians Thank a4anurag for this useful post: | ajaypjayaraj, ashpalio, baby_antu, captain.torque, car_da_mum, dailydriver, DrANTO, ecosport rules, espraveen, graaja, GTO, HappyWheels, harsh79, karansm4u, kashyapz8055, Leoshashi, parsh, RavenAvi, Rehaan, suhaas307, swiftnfurious, Tamarind, theexperthand, Varun_HexaGuy |
|
14th April 2016, 23:32
| #5 |
| BANNED Join Date: Oct 2011 Location: Hyderabad
Posts: 12,346
Thanked: 21,451 Times
| MINI 0806 dashcam videos I have put the links here based on the time at which these videos were shot. Day Time Videos: Videos shot at Dawn Night Time Videos: Miscellaneous Videos: This may be silly for it be put as a video but I liked the way the cam responded to the sweep. Overall the wiper arm movements are smooth. Issues Faced Till Now: Any idea guys, why this has happened though I noticed it only once till now but was puzzled a bit. NOTE: Pleas use HD option in Quality section when viewing videos on YouTube to get the real clarity out. Thanks. Last edited by a4anurag : 15th April 2016 at 06:07. |
|
| (22)
Thanks
|
| The following 22 BHPians Thank a4anurag for this useful post: | aeroamit, ajaypjayaraj, ashpalio, baby_antu, car_da_mum, drivebyfire, ecosport rules, espraveen, graaja, GTO, HappyWheels, karansm4u, Lalvaz, Leoshashi, parsh, RavenAvi, Rehaan, sumitsinha0280, theexperthand, Varun_HexaGuy, vnidta, V_Gupta |
|
15th April 2016, 00:10
| #6 |
| BANNED Join Date: Oct 2011 Location: Hyderabad
Posts: 12,346
Thanked: 21,451 Times
| We have now completed the installation and also done the recording with a small review of the Dashcam. Now lets come to the part of viewing this on the system at a later stage. 1) Video playback Software: I use the software named 'Dashcam Viewer' which gives out data of GPS, speed, maps and video itself in 4 different windows. Since this is a paid software ($15), I am using VLC player currently. What the Dashcam viewer offers me (Taken from Dashcam viewer website):
Link to website: Dashcam Viewer Dashcam Viewer Dashboard 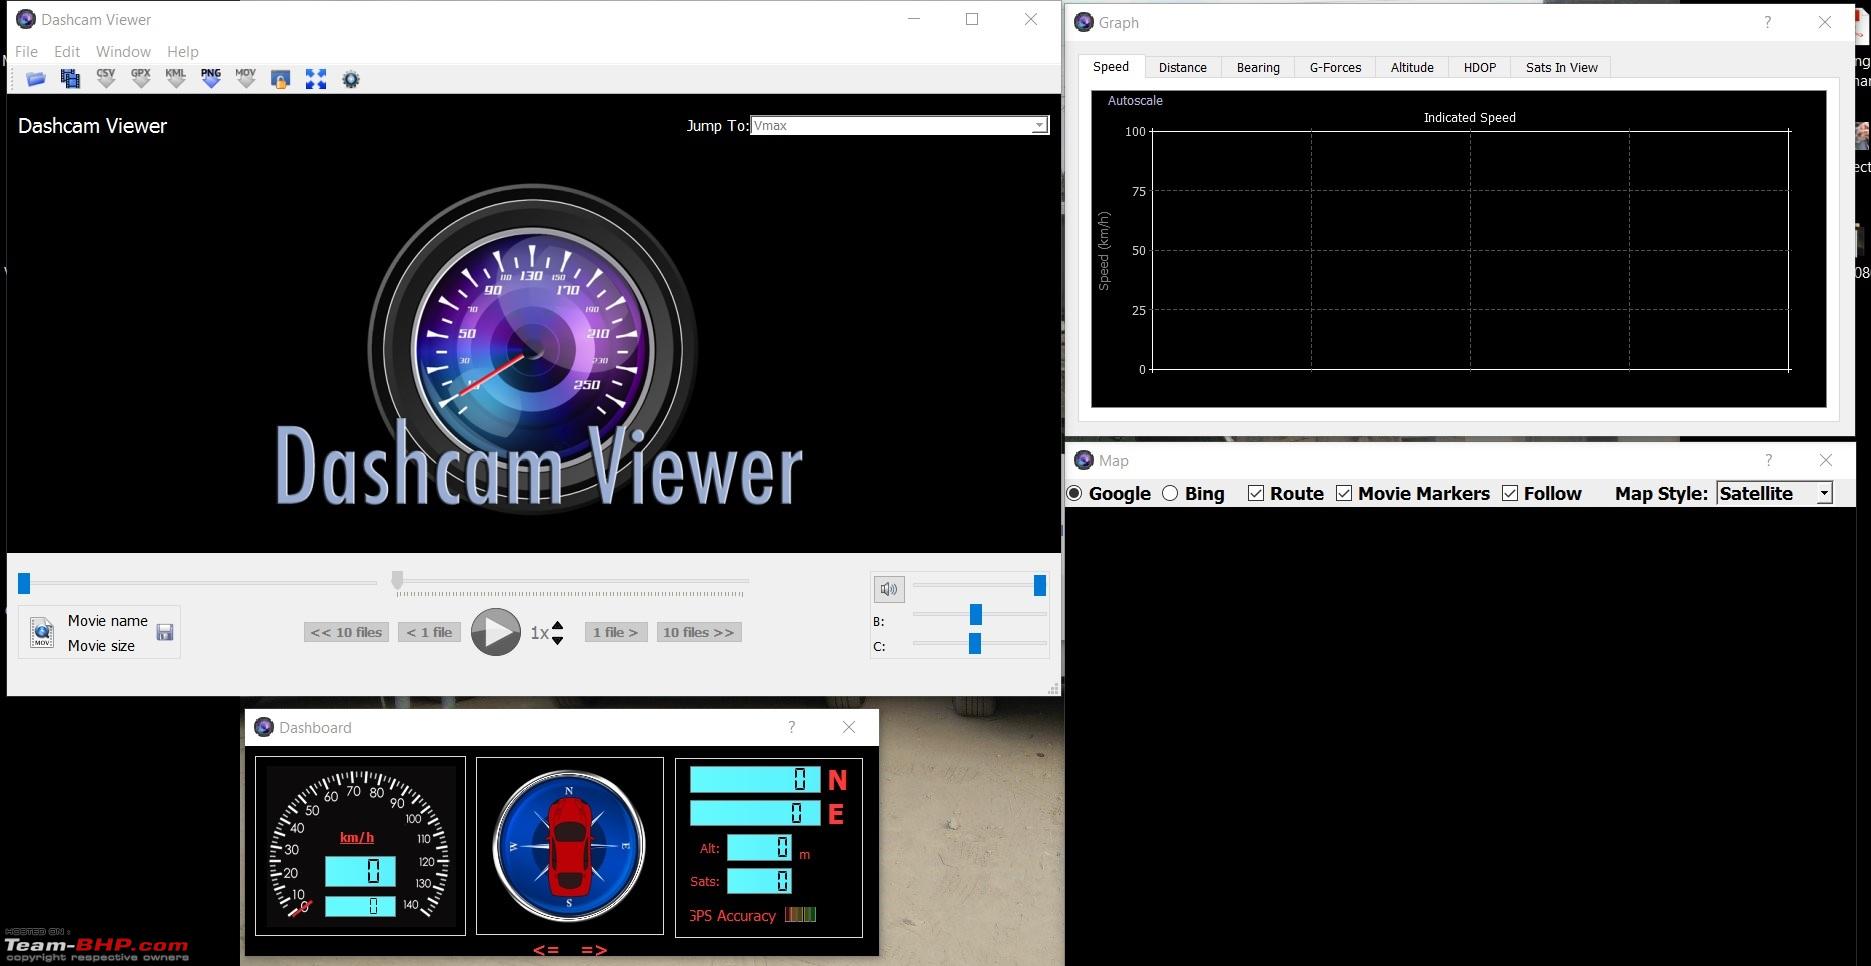 Sample 1 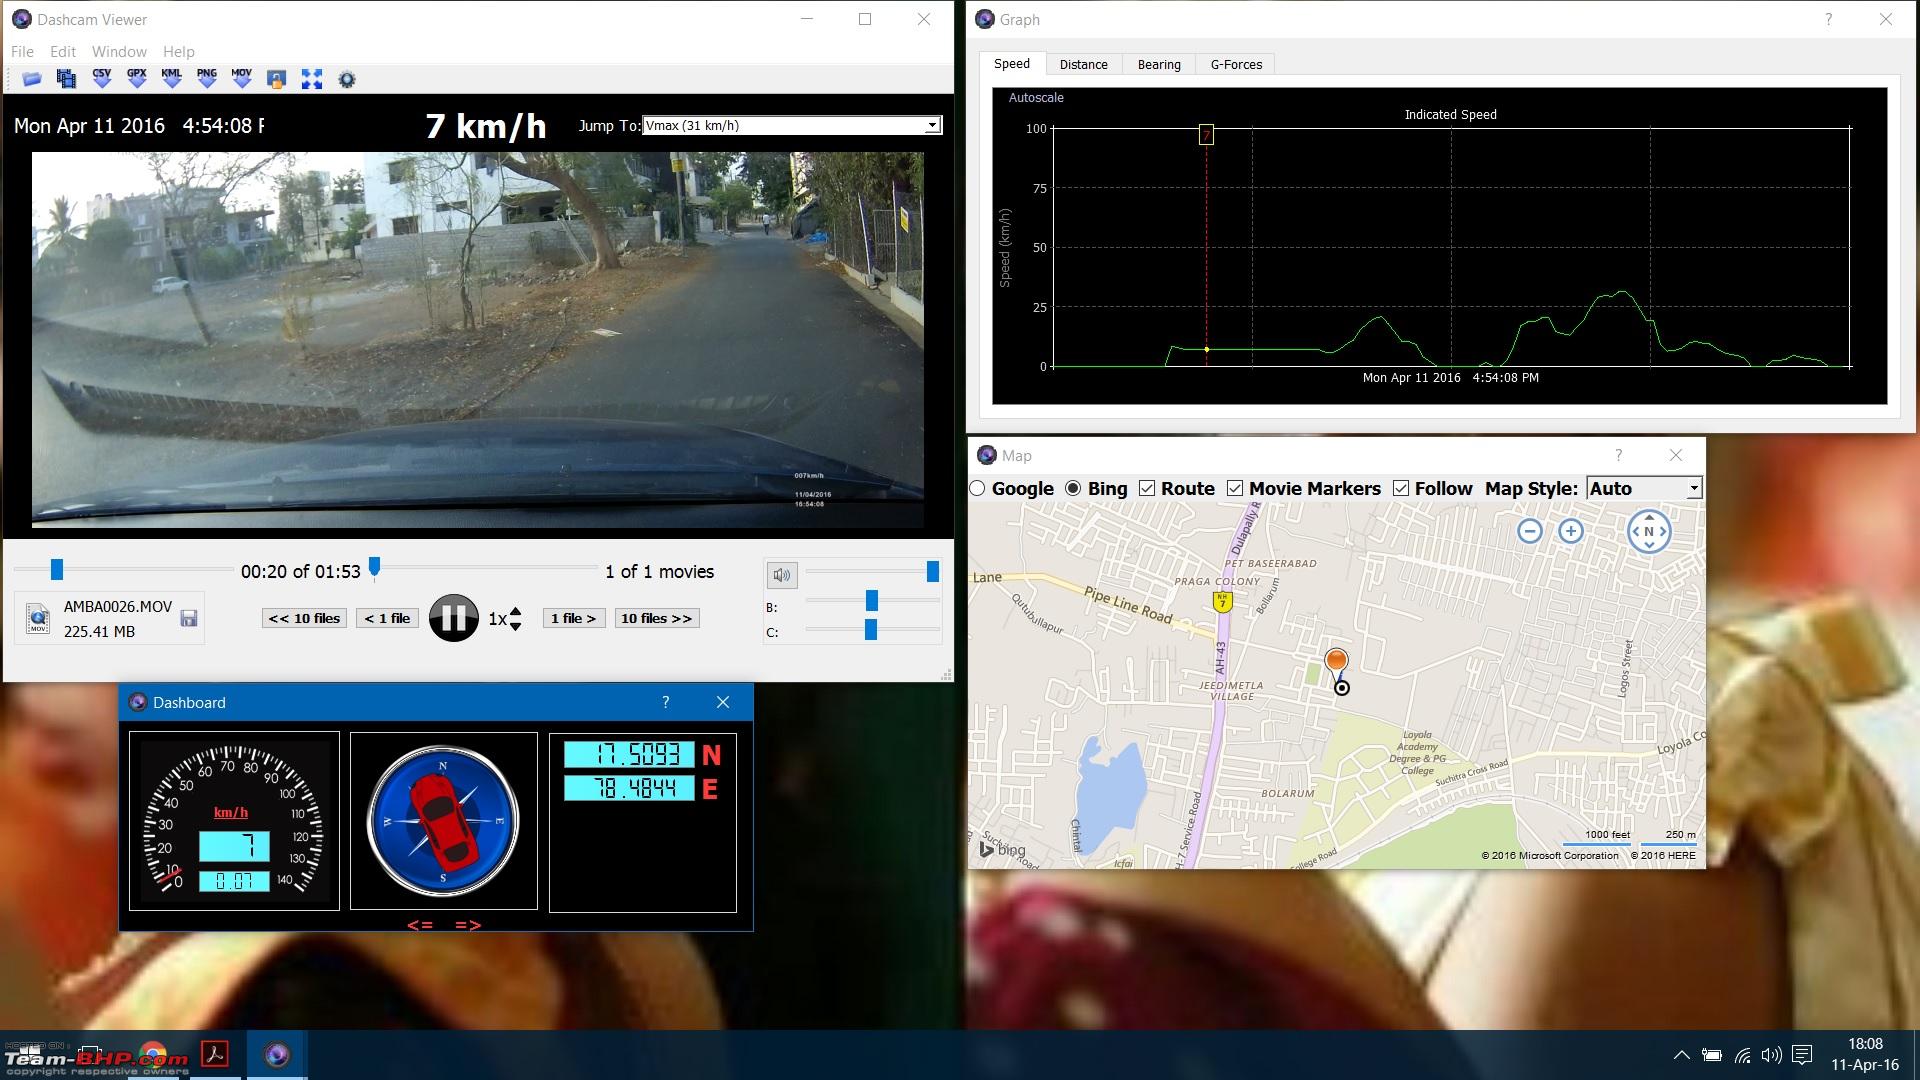 Sample 2  Sample 3  2) File Size Reduction Software With file sizes ranging from 200MB to 500MB, uploading videos on YouTube becomes a pain so a file size reducer software is a MUST. Moreover the slow internet speed at home doesn't help matters either so I chose this after reading reviews online. Handbrake is the name of the software which I am using to reduce file sizes drastically without affecting video quality to a large extent. Link to website: Handbrake Software Handbrake Dashboard  Process to reduce size:  Next step  Before vs After - File Size reduction process  __________________________________________________ ____________ Here are a few image screenshots from the videos describing the read-ability of number plates. Afternoon time 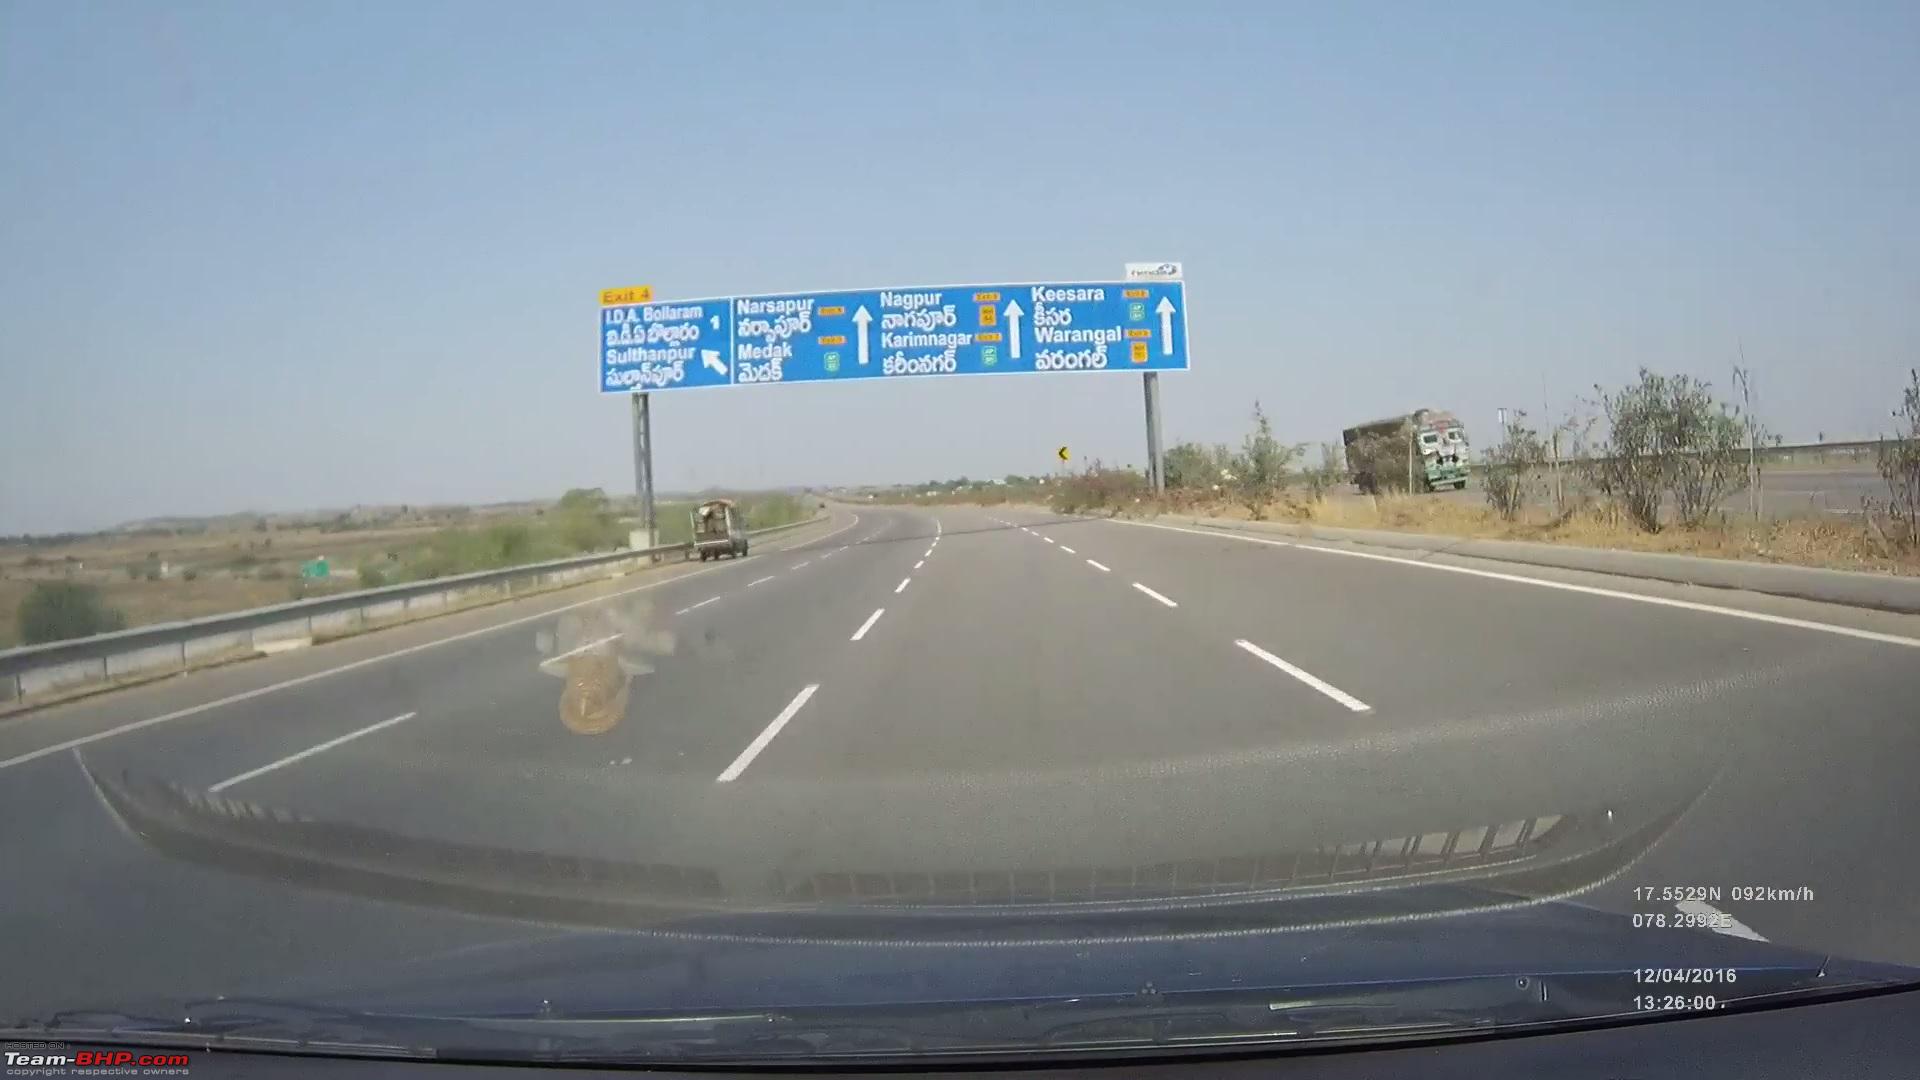 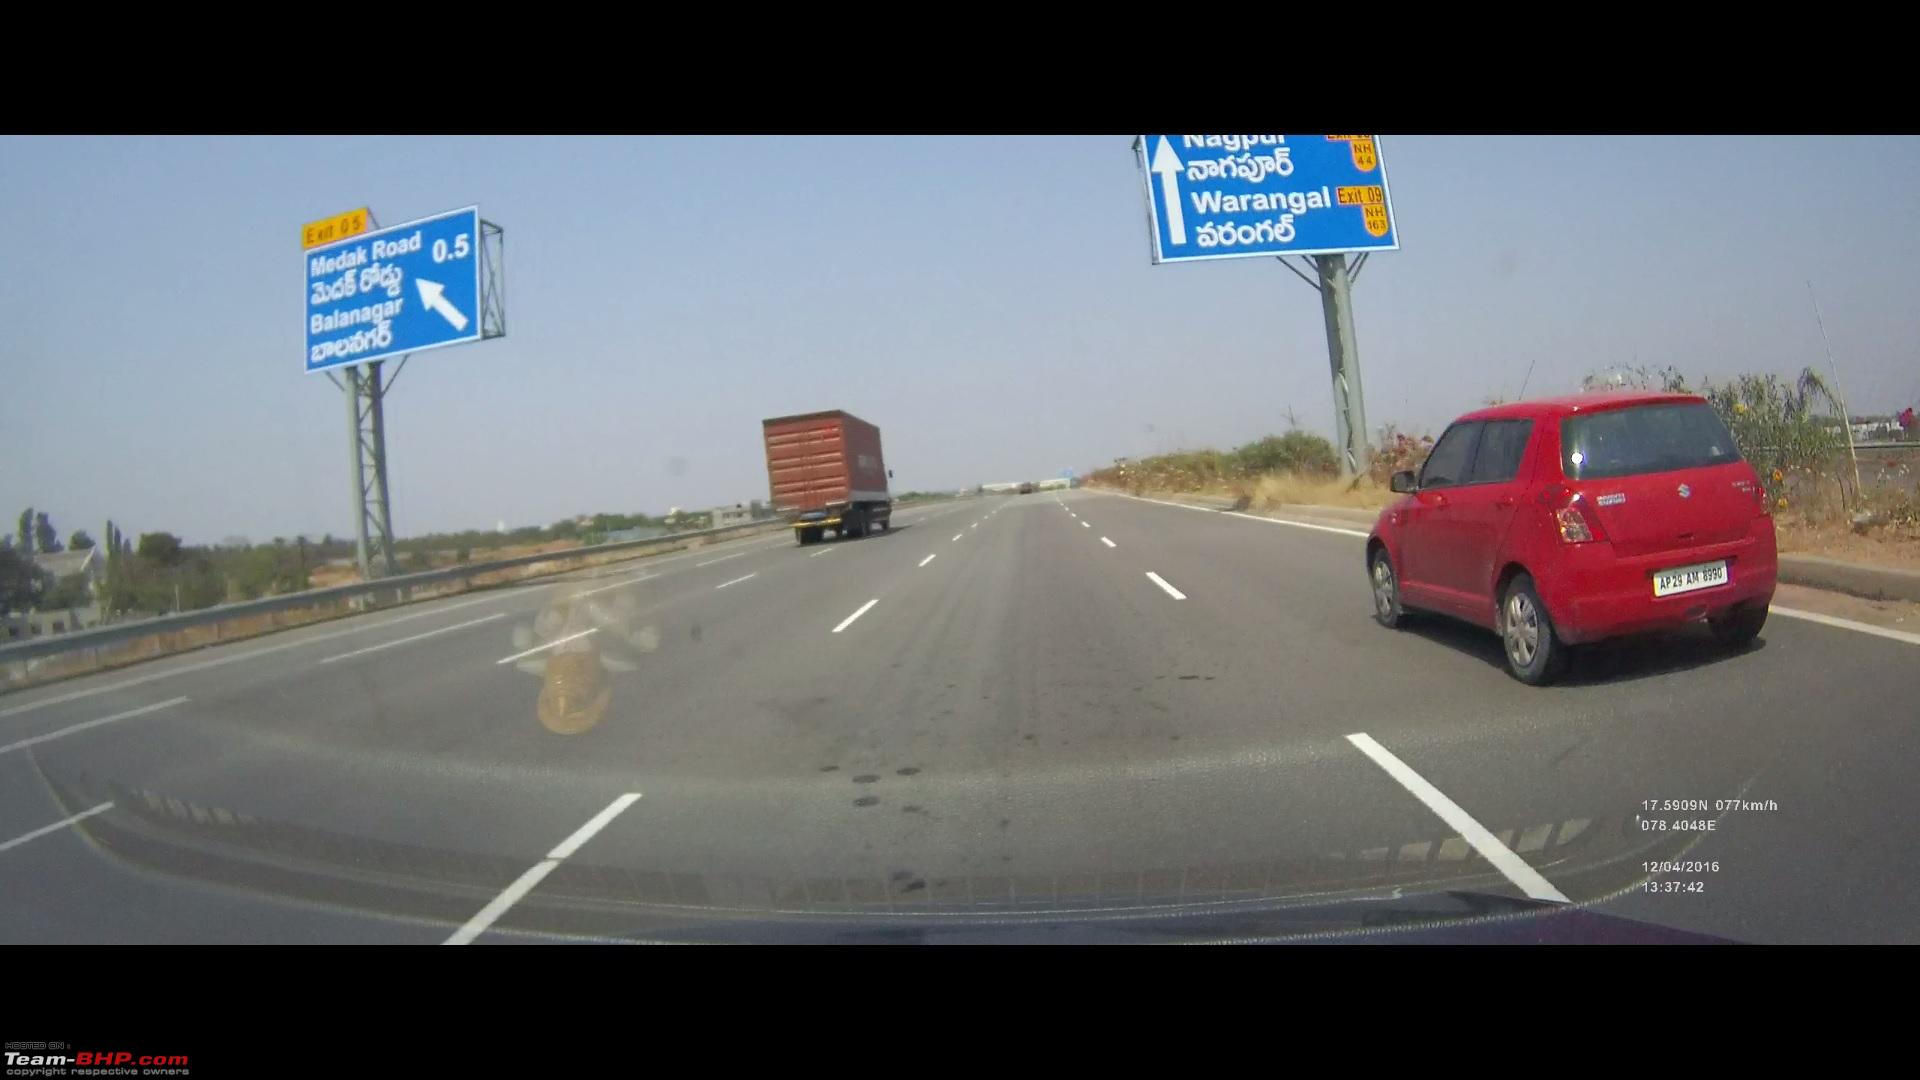 Night Time  As a feature it is good to have - CPL Filter. Here is a image that shows the functionality Without CPL Filter - Glare from dashboard  With CPL Filter - Slight reduction in glare 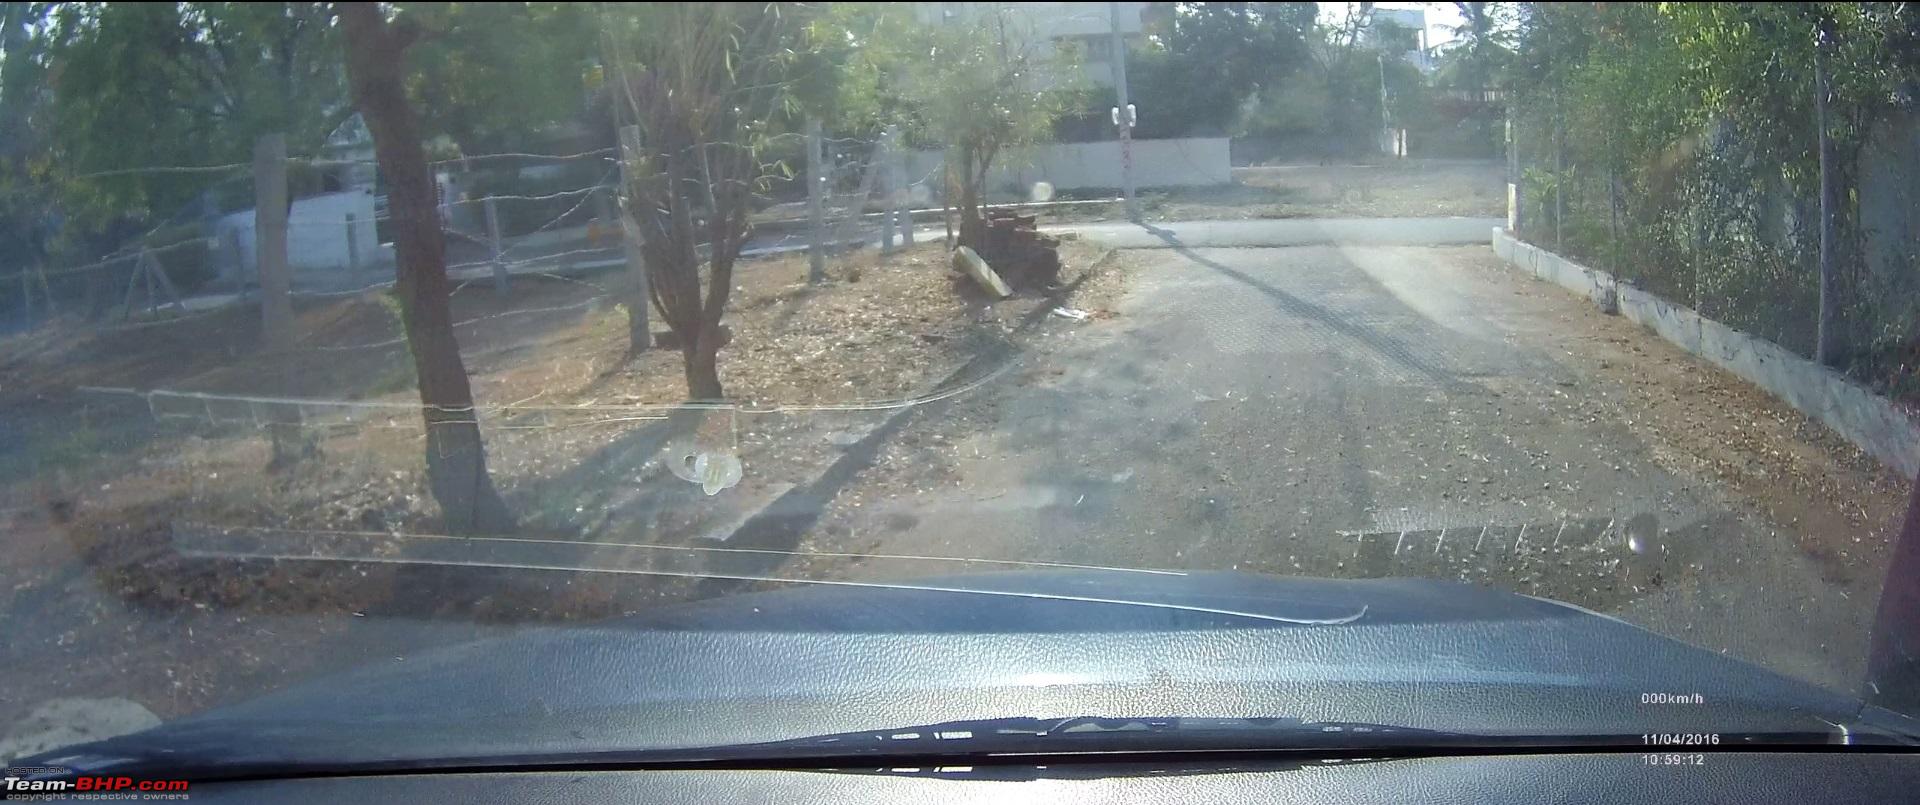 That's it from me for now. Will update the thread regularly with long term review of the dashcam which shall help others in purchase. Overall I am happy with the decision to buy this dashcam even though it was a long stretch of budget. Love to watch me drive and also one thing that I am benefiting by the dashcam more than anything else is the small mistakes that I do daily during the drive which I didn't realise all this while is getting rectified and I am making it sure that they aren't repeated. Thanks for reading guys. Do pour in your comments and feedback on the review. Would also appreciate points if I have done any mistake in the review and points to improve for the next time. Last but not the least, thanks to websites like: Dashcam talk, Black box my car, Dashboard camera reviews, Best dashboard cameras for putting their reviews and comparison which made me decide on what must be bought. Last edited by a4anurag : 15th April 2016 at 01:24. |
|
| (59)
Thanks
|
| The following 59 BHPians Thank a4anurag for this useful post: | Aakarsh, aeroamit, ajaypjayaraj, ashpalio, baby_antu, bhaskaracs, car_da_mum, chetans, comfortablynumb, concorde24, dailydriver, Digital Vampire, dr. sen, DrANTO, drivebyfire, driverace, ecosport rules, el lobo 6061, espraveen, GetLife, GKMahajan, graaja, Grr7, GTO, HappyWheels, harsh79, iron, jaskaranjaiya, karansm4u, kashyapz8055, Lalvaz, Leoshashi, maheshramaling, MidnightBlack, mrbaddy, mvadg, Nagesh Bhatt, navsjab, parsh, petrolhead_neel, Praneeth, Rajeevraj, RavenAvi, Rehaan, RocketRaccoon, samaspire, searchingheaven, shreyak_ss, sidzz, spiritofmars, sridhar-v, suhaas307, sumitsinha0280, swiftnfurious, Thad E Ginathom, theexperthand, Varun_HexaGuy, vikred, vnidta |
|
15th April 2016, 07:14
| #7 |
| Team-BHP Support  | re: DIY Install & Review - The Mini 0806 Dash Camera Thread moved from the Assembly Line to the DIY Section. Thanks for sharing! |
|
| (1)
Thanks
|
| The following BHPian Thanks Aditya for this useful post: | a4anurag |
|
15th April 2016, 08:21
| #8 |
| Distinguished - BHPian  | re: DIY Install & Review - The Mini 0806 Dash Camera That's a brilliant DIY report you have penned in. Rating it a well deserved 5*!!! I am impressed by the specs of this 0806 variant, and will be closely observing your long term experience with it. If it turns out to be decently reliable, I'll order two of them-one for each car. Driving today without a dashcam is like heading into a warzone unarmed!!  Thanks again for the detailed installation procedure, as it will help a lot of DIY newbies like me Regards, Shashi |
|
| (6)
Thanks
|
| The following 6 BHPians Thank Leoshashi for this useful post: | a4anurag, baby_antu, Jselvan_BluOval, karuvally, MAKMADDY17, sumitsinha0280 |
|
15th April 2016, 13:22
| #10 | |
| BANNED Join Date: Oct 2011 Location: Hyderabad
Posts: 12,346
Thanked: 21,451 Times
| Quote:
| |
|
| (1)
Thanks
|

| The following BHPian Thanks a4anurag for this useful post: | Leoshashi |
|
15th April 2016, 13:29
| #11 |
| Senior - BHPian Join Date: Jun 2013 Location: Hyderabad
Posts: 1,176
Thanked: 2,063 Times
| re: DIY Install & Review - The Mini 0806 Dash Camera WOW! That was the most detailed dashcam review ever. Awesome detailing  How long does it take for the built in GPS to catch signal? |
|
| (1)
Thanks
|
| The following BHPian Thanks ecosport rules for this useful post: | a4anurag |
| |
|
15th April 2016, 13:37
| #12 | |
| BANNED Join Date: Oct 2011 Location: Hyderabad
Posts: 12,346
Thanked: 21,451 Times
| Quote:
What I do now is, come out of my house and then switch on the dashcam. It catches GPS signal within 15 seconds. | |
|
| (1)
Thanks
|
| The following BHPian Thanks a4anurag for this useful post: | Leoshashi |
|
15th April 2016, 14:27
| #13 | |
| Senior - BHPian Join Date: Apr 2005 Location: bangalore
Posts: 1,044
Thanked: 599 Times
| re: DIY Install & Review - The Mini 0806 Dash Camera Quote:
| |
|
| (1)
Thanks
|
| The following BHPian Thanks rkg for this useful post: | mrbaddy |
|
15th April 2016, 19:23
| #14 | |
| BANNED Join Date: Oct 2011 Location: Hyderabad
Posts: 12,346
Thanked: 21,451 Times
| re: DIY Install & Review - The Mini 0806 Dash Camera Quote:
I did try the Registrator Viewer and it is good. 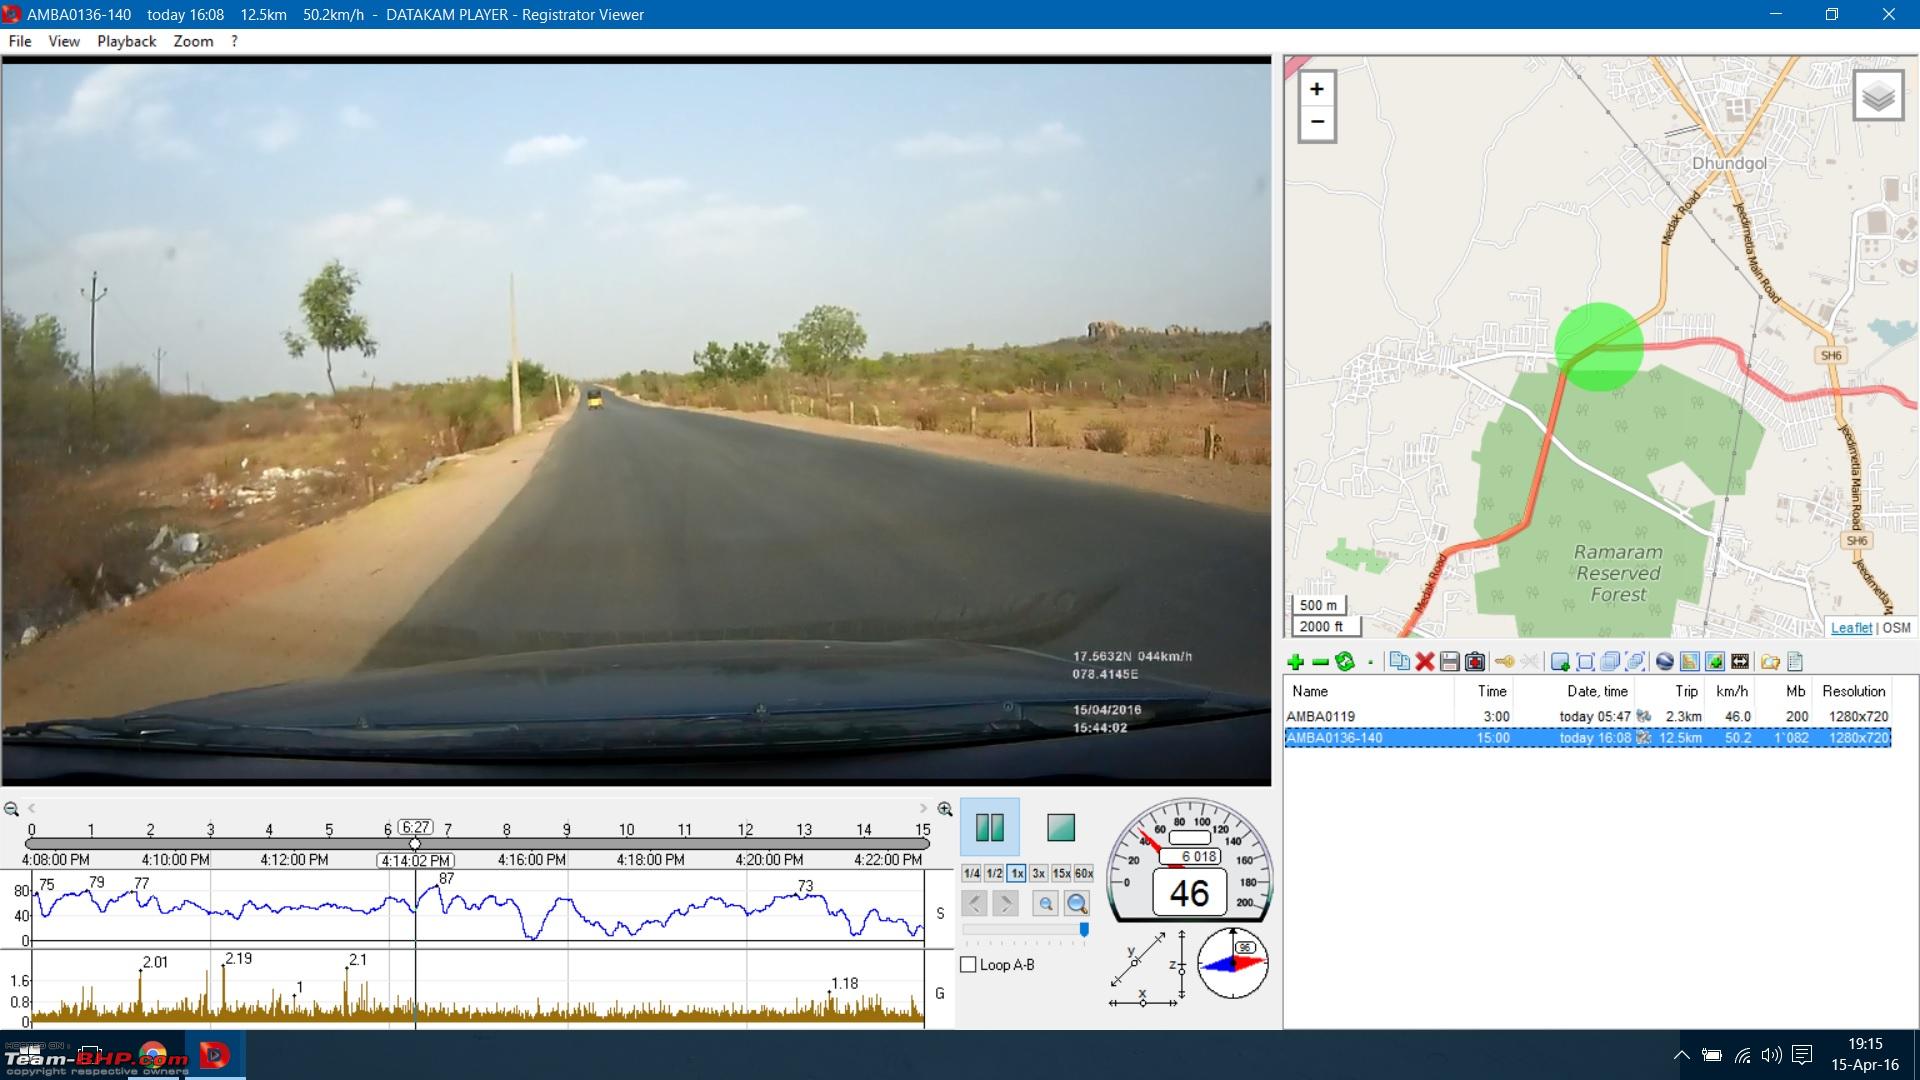 Thanks buddy. | |
|
| (2)
Thanks
|
| The following 2 BHPians Thank a4anurag for this useful post: | Leoshashi, Zinda |
|
16th April 2016, 11:30
| #15 |
| Senior - BHPian Join Date: Apr 2005 Location: bangalore
Posts: 1,044
Thanked: 599 Times
| re: DIY Install & Review - The Mini 0806 Dash Camera Its Ok. The beauty of this SW is it automatically adds up all continuous files in to one single file and plays it. If you have 3 minutes clips each for 2 hours, it makes it a single file of 2 hours and plays it. I have read in some forum ( may be dash cam talk) that the author has died in a road accident. He is from soviet block |
|
| ()
Thanks
|
|