News
1st-gen Hyundai Creta: Rear drum to disc brake conversion

At the end of the 10 kms TD, I was happy thanks to the good braking and couldn't replicate the hard pedal issue or the spongy pedal-feel in the Seltos.
BHPian a4anurag recently shared this with other enthusiasts.
2017 Hyundai Creta (1st Gen): Rear Drum to Disc Conversion
The Hyundai Creta (1st generation) was notorious for braking related issues along with a few other niggles that Hyundai India never addressed in public even after complaints that fell on deaf ears. Issues concerning braking I feel were:
- An over-sensitive ABS set-up
- The hard pedal condition during emergency braking,
- The spongy pedal feel (initial pedal travel)
These are some issues that I have observed in these 1,00,000+ kms and also other Creta owner's on FB groups too have complained about but no solution from the manufacturer's side even after 6 years of the launch of the 1st generation Creta (from 2015). Since Hyundai India was doing nothing about it, I decided to look for a solution where I can find peace with these brakes.
By the end of 2019, Kia had launched the Seltos in India. My eyes were lit when I saw that the car sported discs on all 4 wheels. During the 2nd week of January 2020, I got a chance to TD the Seltos diesel for 10 kms. My motto for the TD was only to check how the braking feel is and what feedback I got from the car's braking system in different situations on the road (be it the city or highway like speeds). Since the Seltos had its underpinnings similar to the 1st generation Creta, I was worried if the braking issues would repeat here also or if Kia had learnt from Hyundai’s mistake and rectified it before launching the Seltos in India. At the end of the 10 kms TD, I was happy thanks to the good braking and couldn't replicate the hard pedal issue or the spongy pedal-feel in the Seltos. I sincerely appreciate Kia for giving discs all-round in the Seltos since the launch from mid-variants and not like Hyundai where they skipped it completely even during the facelift in 2018.
In November 2020, I had got to TD the 2nd generation Creta with all 4 discs: Here's what I commented in one thread of similar discussion.
After driving almost 87,700 kms with disc + drum combination in the Creta, recently got a chance to drive the 2020 Creta Diesel SX(O) equipped with discs all around.
The difference that I could notice was day and night. I was in love with how the car responded to brake pedal inputs and also tried emergency braking a couple of times from 60 kmph, 80 kmph and 100 kmph. The 2020 Creta just stopped with the least drama!
I wish Hyundai had given discs all around from Day 1 of Hyundai Creta in India.
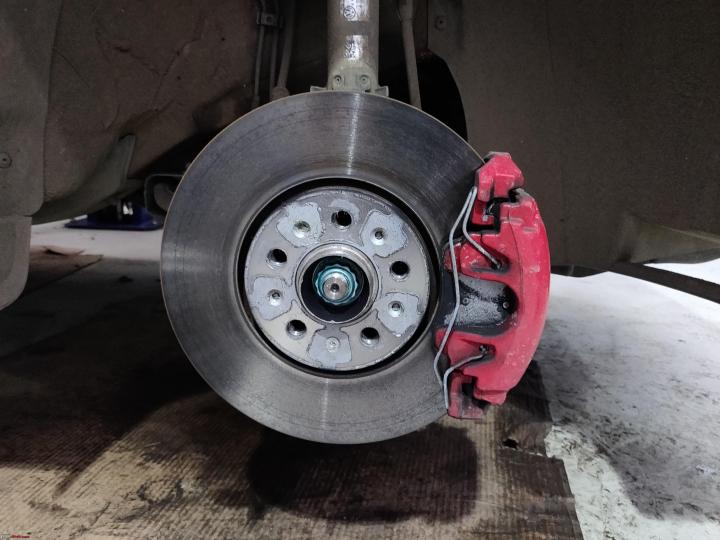
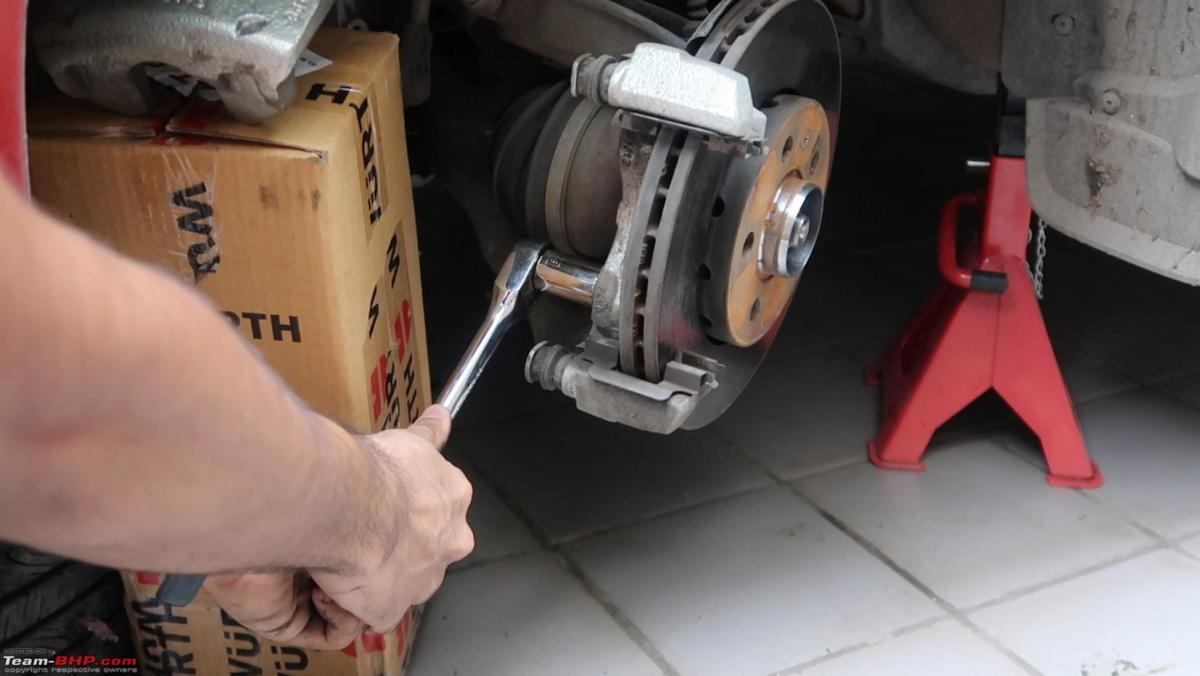
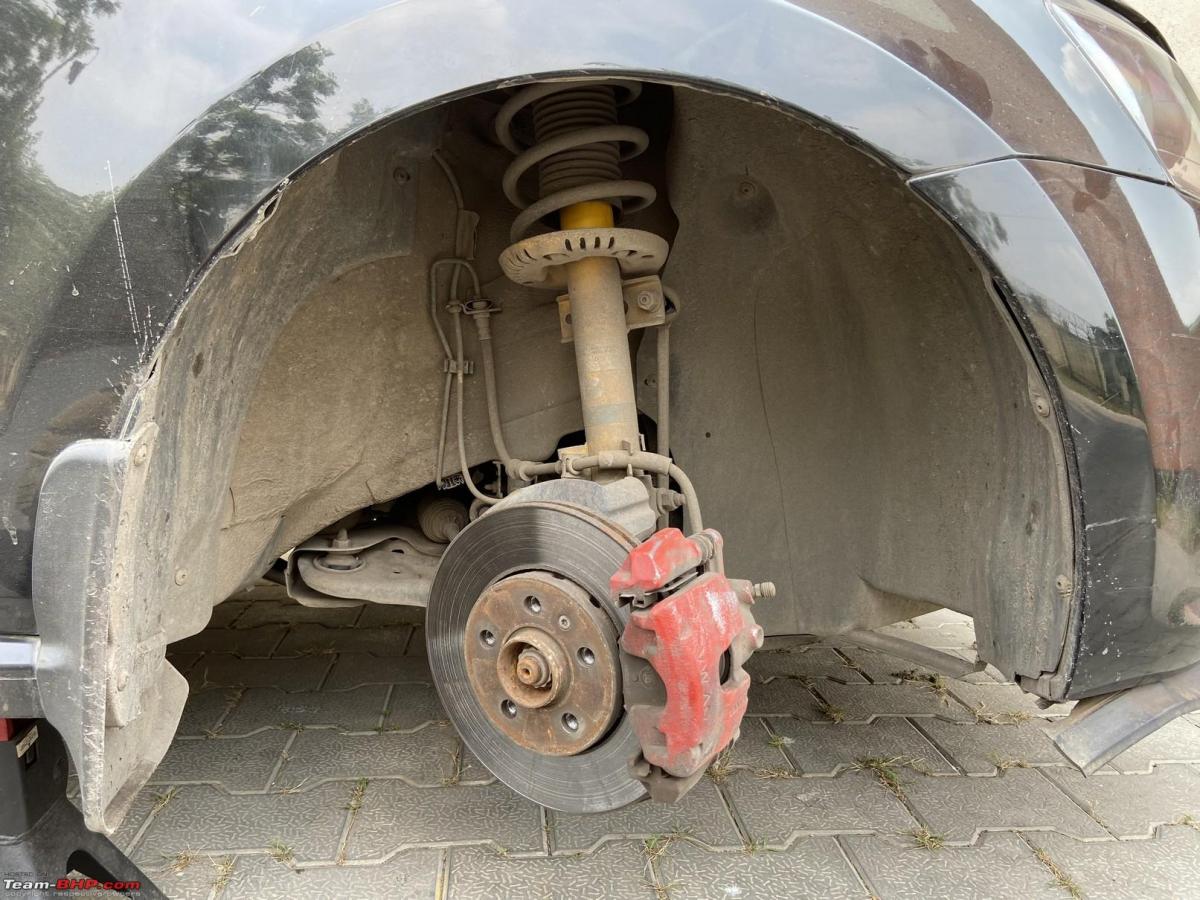
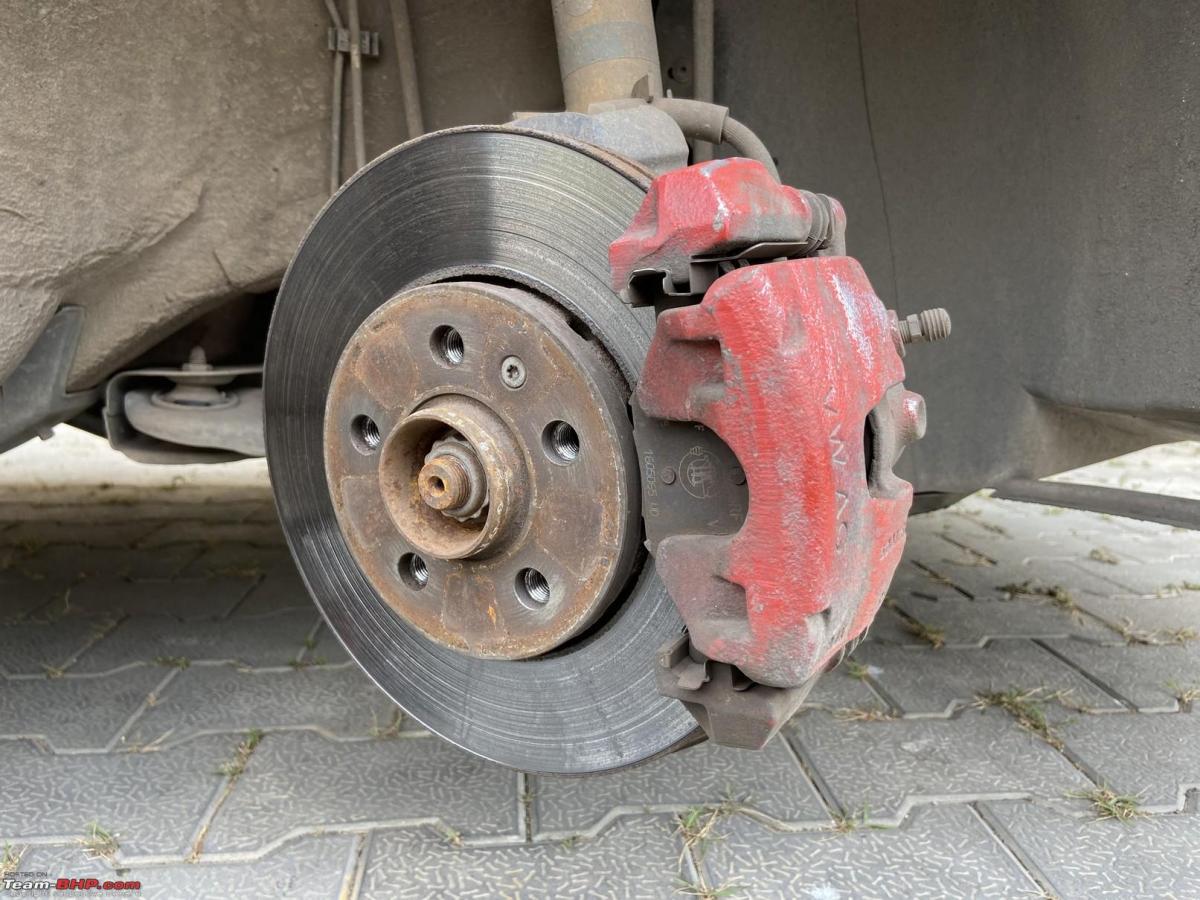
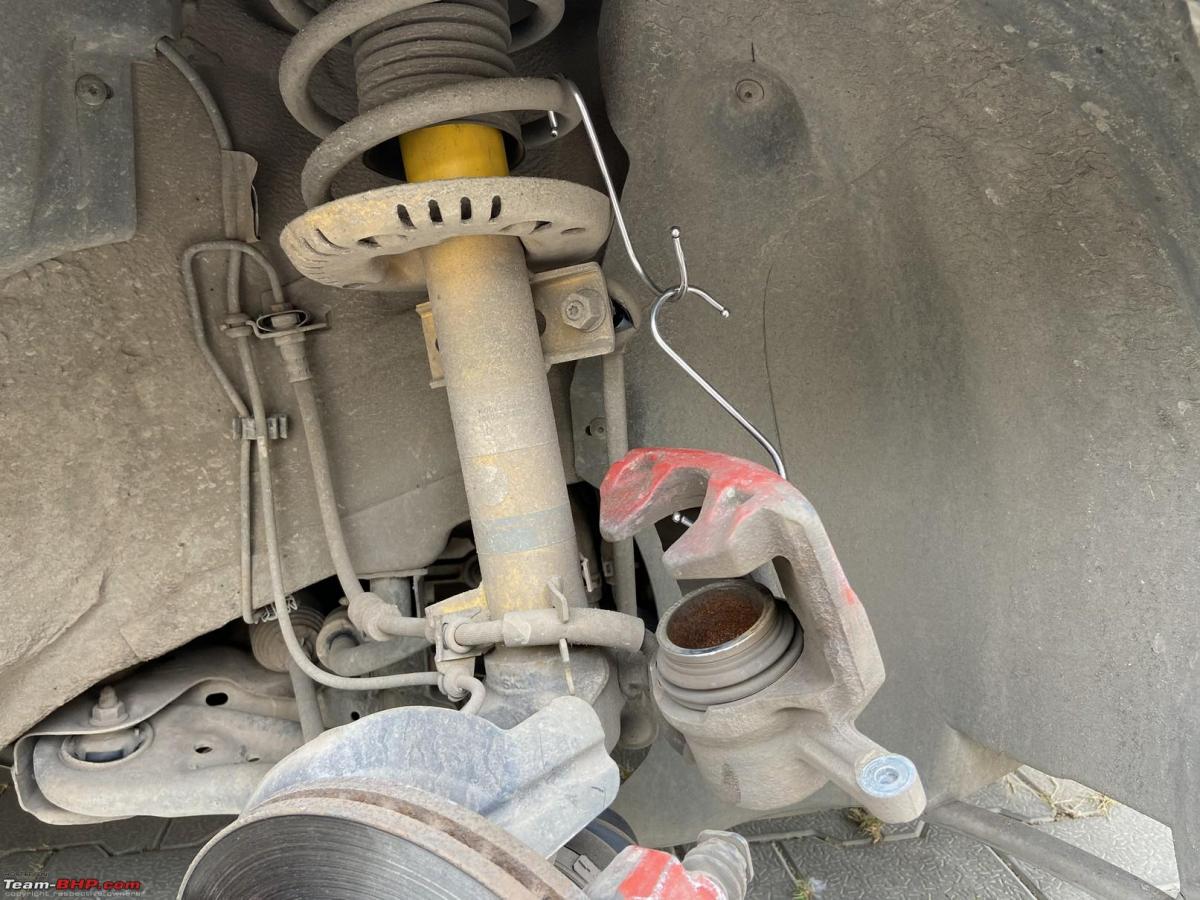
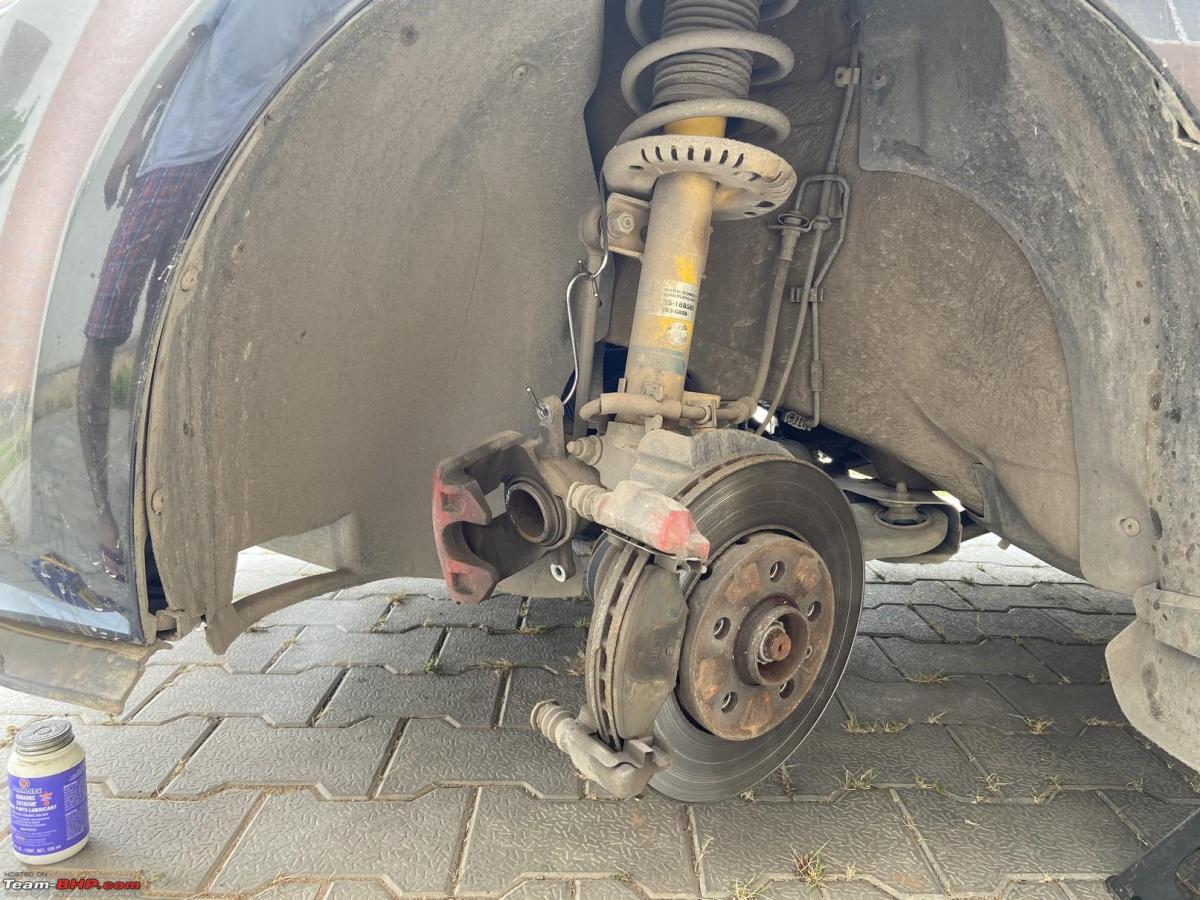
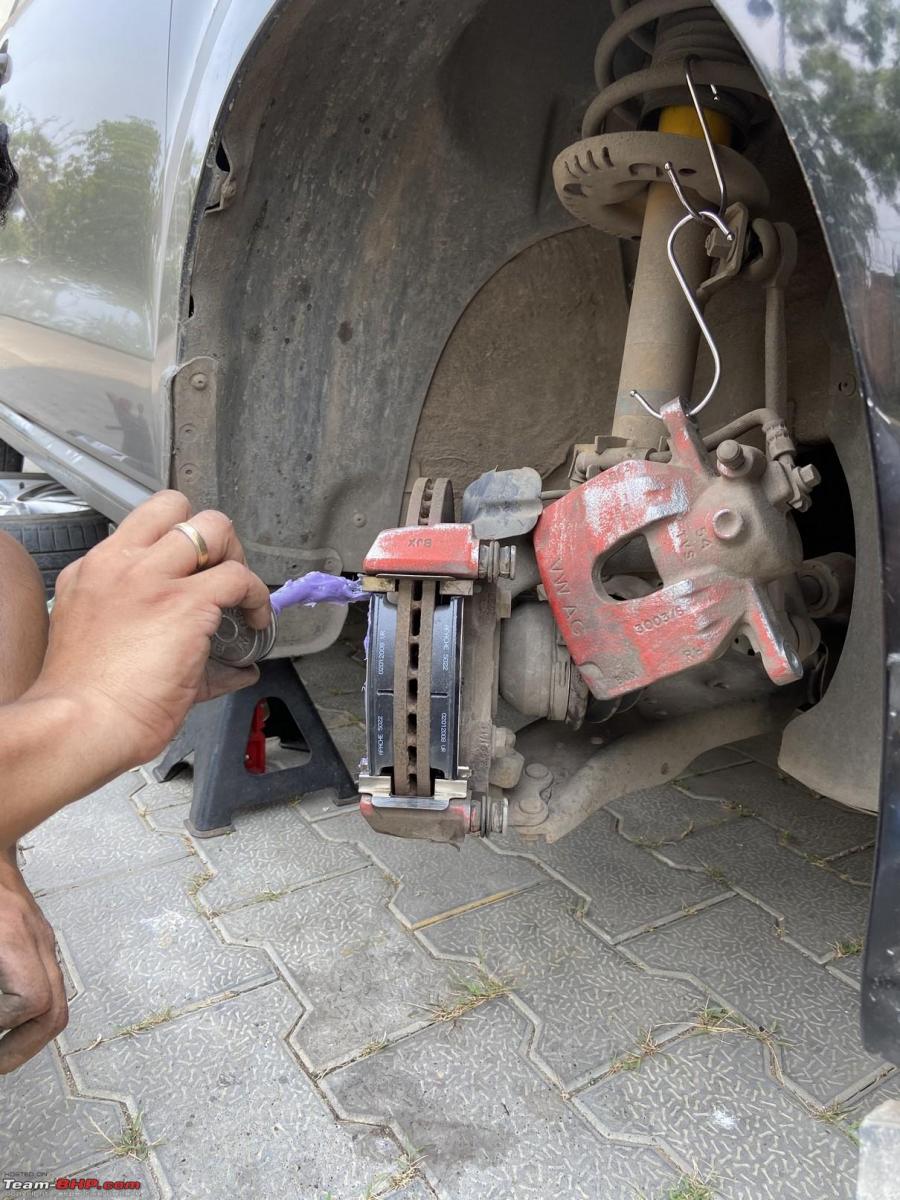
One day when both of us (BHPian interc00led and me) had visited our FNG for some work on our cars, we see a Seltos that had come in for denting and painting job. Luckily, that car was with the disc brake at the rear. Immediately we took some pictures to assess what we would need to make the conversion successful.
Seltos - Caliper close-up view:

Disc setup - LH side:

Disc setup - RH side:

To a layman, they looked identical and when we were closing looking at the setup, it felt pretty identical, even the torsion beam and mounting points which made us happy since the job of swapping would not be difficult and the conversion process should go on smoothly.
Items Required for this MOD (adding in no particular order)
- 1/4" Socket set
- 1/2" Socket set
- Torque Wrench
- DOT 4 brake fluid - 1L (minimum)
- Microfibre towel
- Wheel blocks
- Jack stand
- Spanner set
- Flathead screwdriver
- Star Screwdriver
- Sandpaper - For cleaning the rotor and pads
- 100% IPA (Iso Propyl Alcohol) for cleaning
- Screw gauge
- Punch set
- Vernier callipers
- Service manual (for the tightening torque values)
- Cutting pliers
- Trim panel removal tools
Disclaimer & Warning
I and/or Team-BHP are NOT responsible if there is any loss of life or damage to personal or private property if someone tries to replicate this Modification on their respective cars. A lot of thought process and trial has gone in and after weighing in all factors, I have done it. Please do it at your sole discretion.
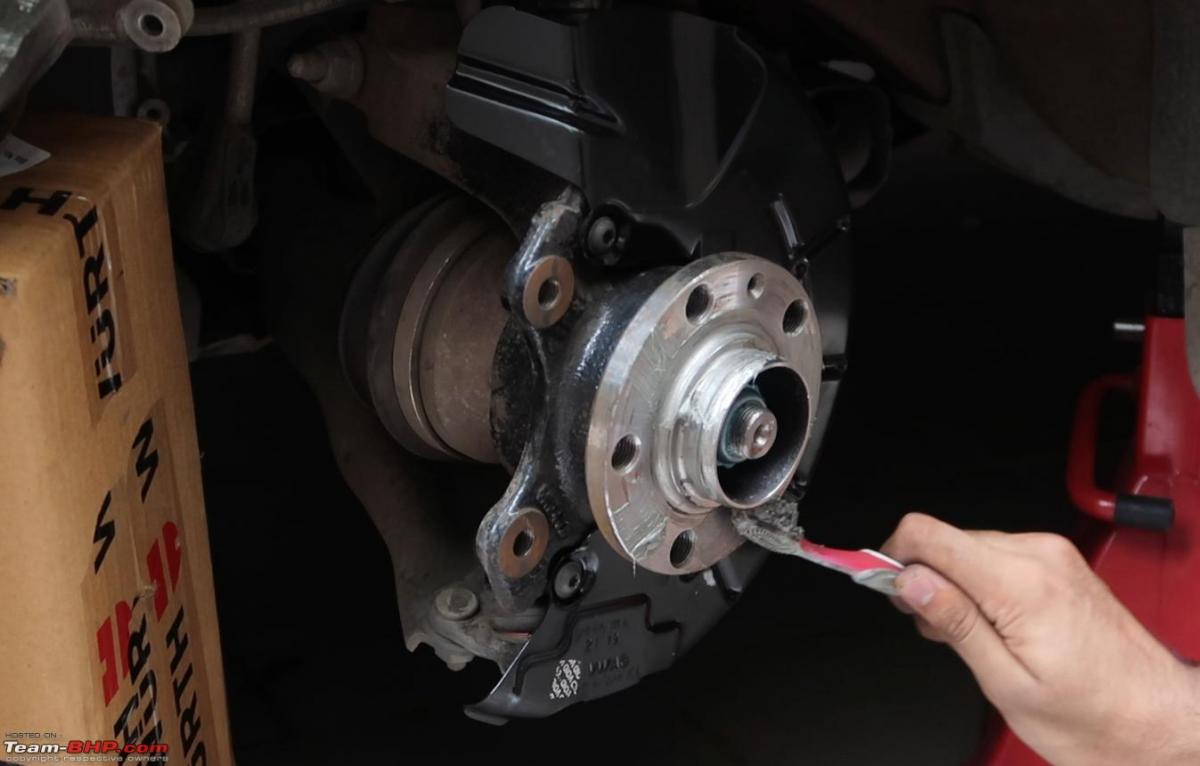
Rear Disc Setup: Parts list of what we picked up
The list below is the individual items that we procured from the scrapyard:
- Rotors x 2
- Brake caliper LH
- Brake caliper RH
- Caliper mounting bracket LH
- Caliper mounting bracket RH
- Rear Pads set x 1 (i.e. 4 pads)
- Parking brake cable LH
- Parking brake cable RH
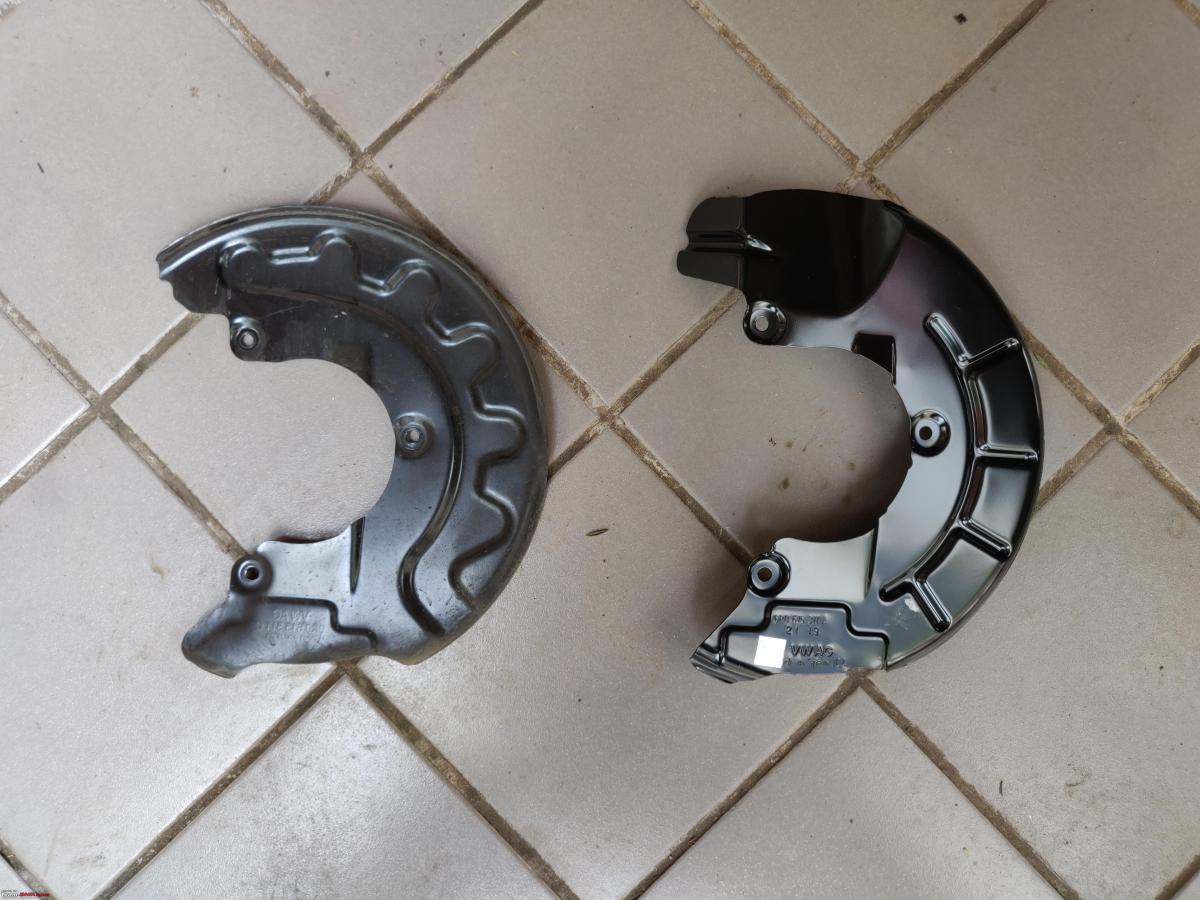
- Dust shield LH
- Dust shield RH
- Pad Return spring x 4
- ABS Sensor wiring
- Caliper mounting bolts x 4
- Torsion beam bolts x 8
Details of the Braking Setup used (OEM)
- Type: Solid Disc
- Disc OD: 262mm
- Disc Thickness: 10mm
- Cylinder Type: Single Piston
- Brake Pad Thickness: 10mm
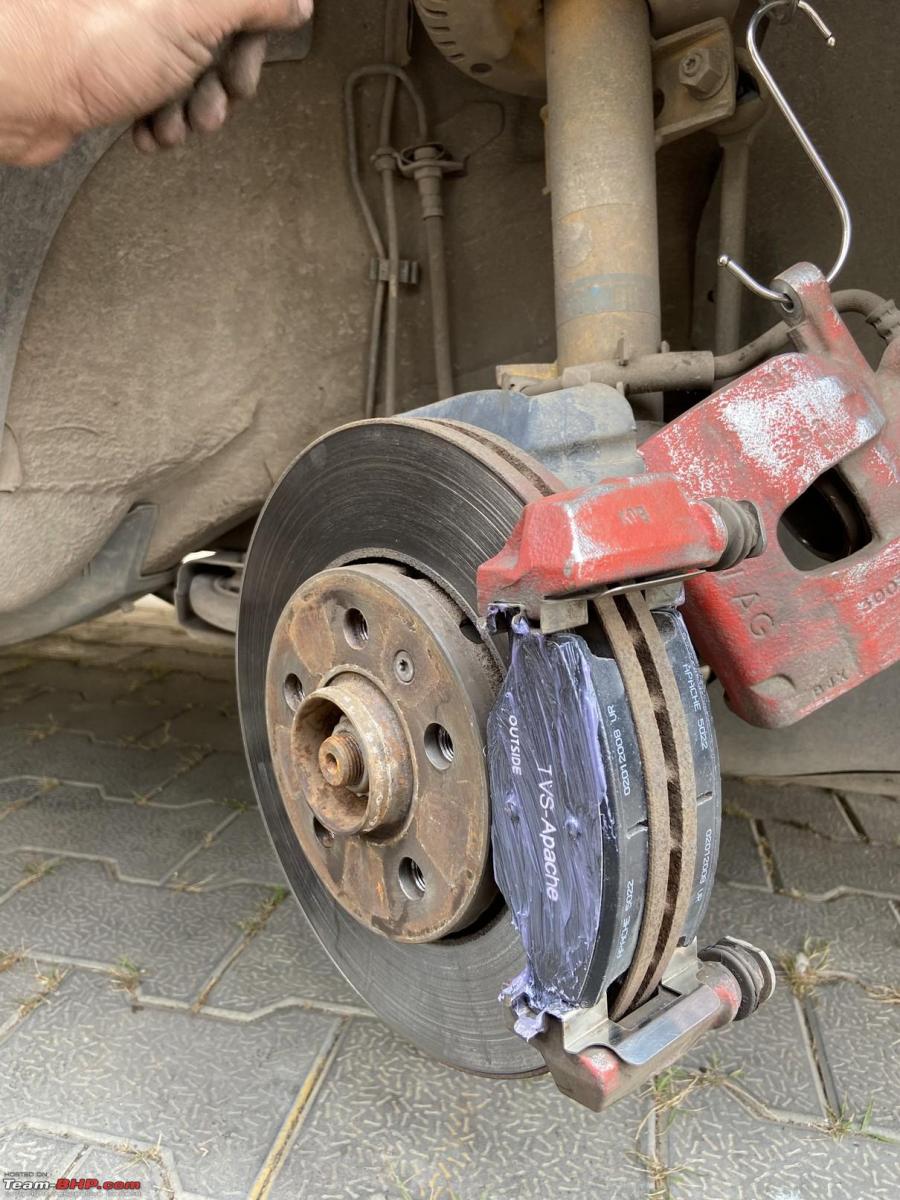
Disc Set - LH & RH Side

ABS Sensor wiring

Mando Caliper Set with brake fluid pipe

Caliper Set

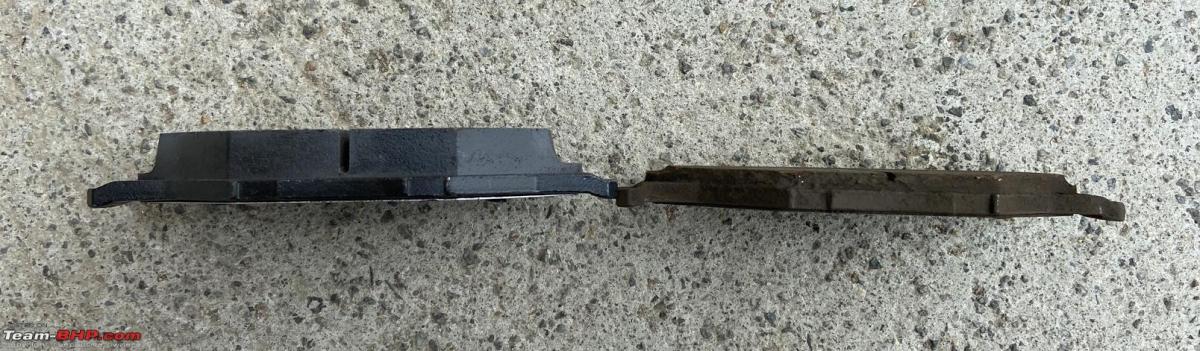
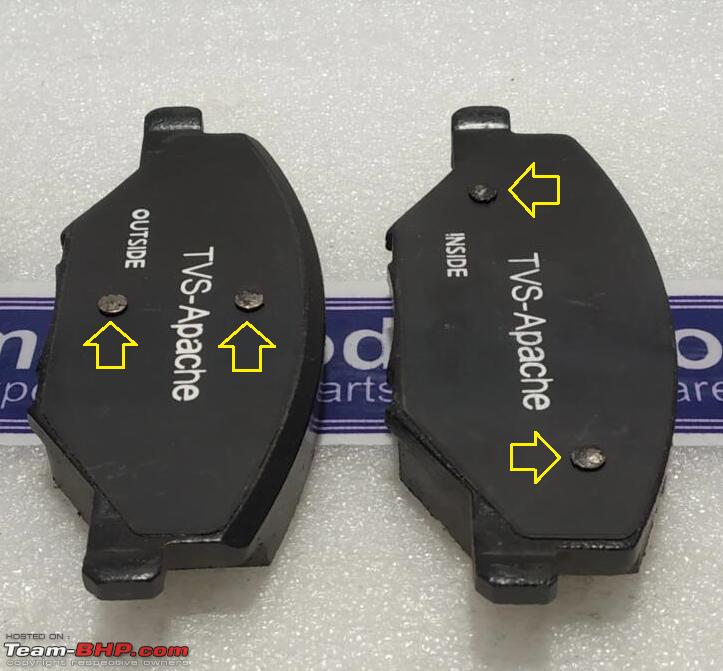
Brake Pad Set (Fresh and hardly used). Was cleaned before put to use.

The Rotor (262mm solid disc)

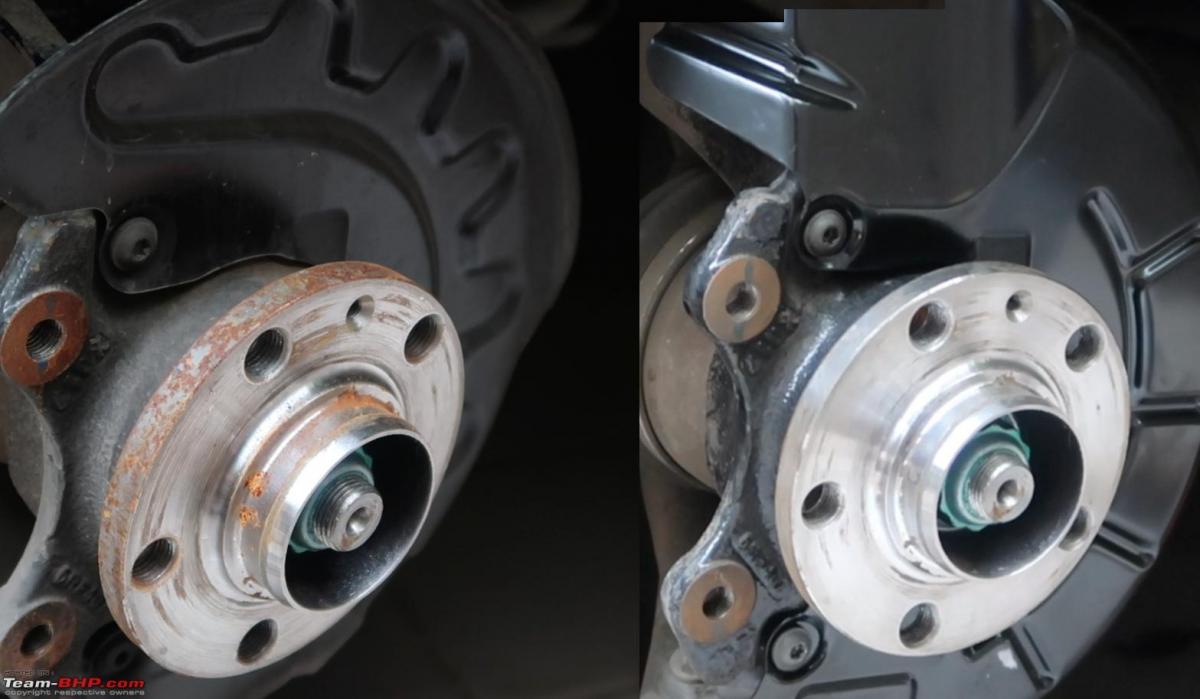
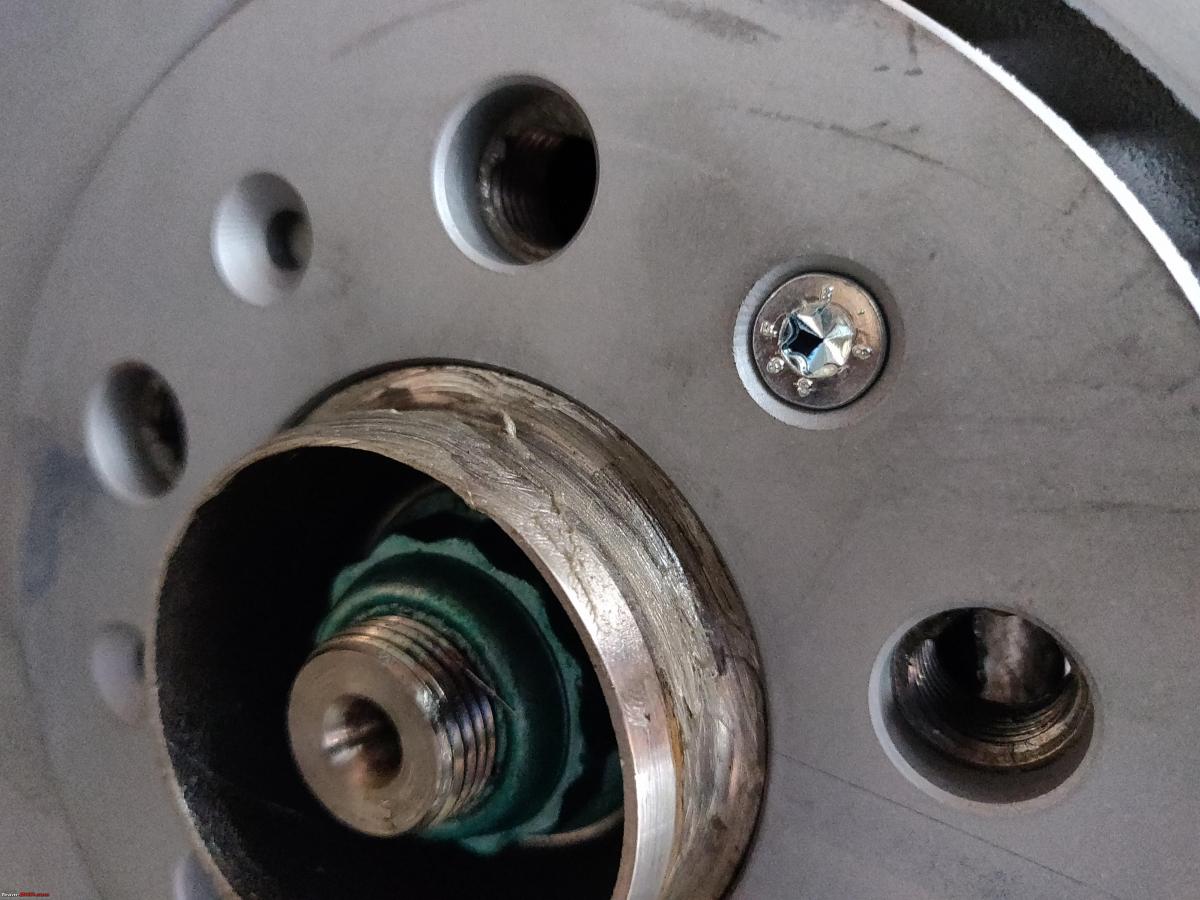
The Hub (Not compatible with the Creta's torsion beam)

The Dust Shield and Caliper mounting bracket

Caliper mounting bracket separated

AFAIK and as per Hyundai parts search, if all of the above would have been bought from the ASC against any compatible VIN, I would surely be spending somewhere near ₹75,000+. Since the hubs from the set we picked up were not compatible, we returned them to the scrapyard dealer and have asked him to procure two rear hubs of the Creta model I drive that would be exchanged once he procures them.
Continue reading a4anurag's experience for more insights, information and BHPian comments.
- Tags:
- Indian
- DIY
- brakes
- Disc Brake
- Creta
News
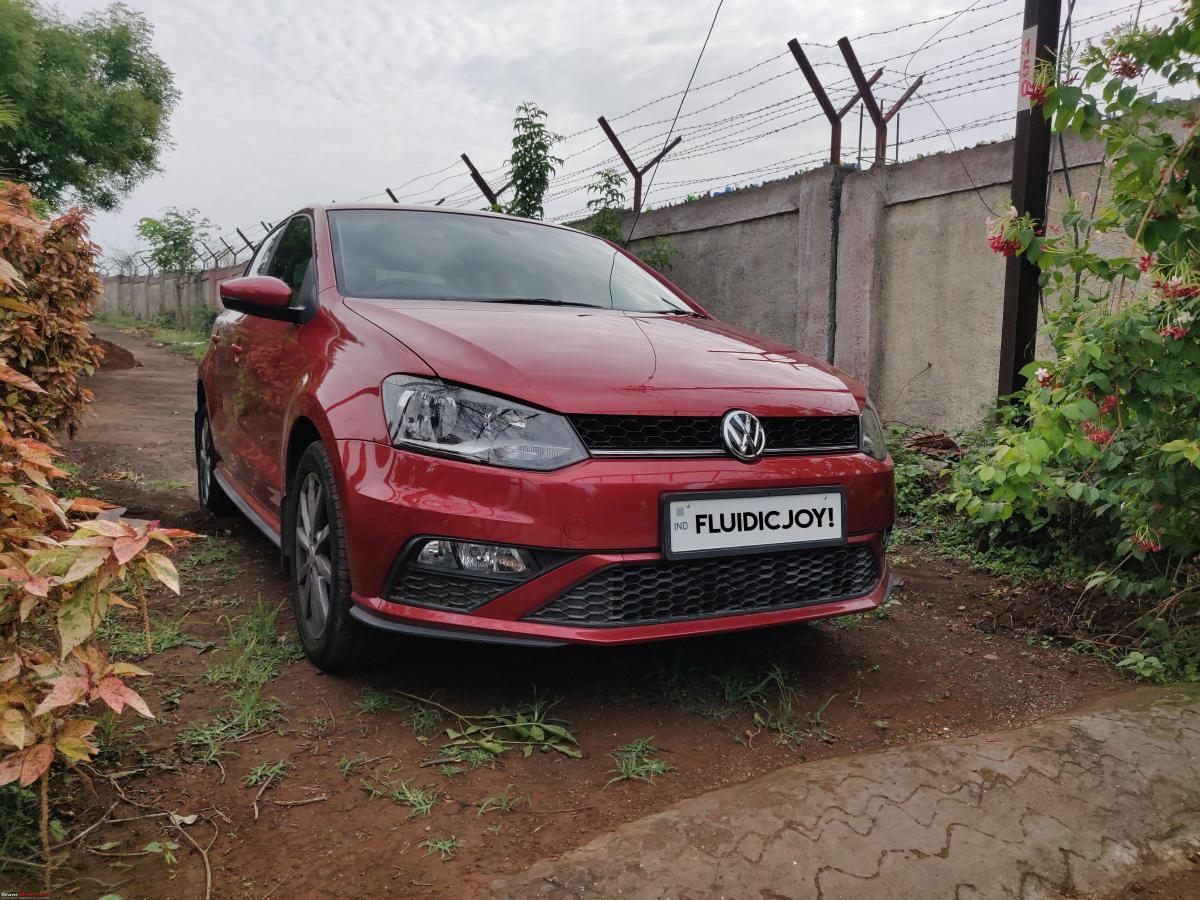
Installing an OEM 288mm Big Brake Kit in my Volkswagen Polo
Leaving the air in the system aside, I wasn’t too happy with the stock brakes on my Polo and this is something more common for folks with the Automatic gearbox
BHPian fluidicjoy recently shared this with other enthusiasts.
Opening Thoughts
So whenever you get a new car, the brake system is usually not at its best when its brand new. The discs and pads need a while to bed in and gel into each other for a reliable braking performance. The pedal is also not at its best during this initial warmup period. However, on my car, I found the brake pedal to be quite spongy and soft even after crossing the 1500 km mark. This could have well been due to improper brake bleeding from the factory, something which should not have happened but seemed to be the case. This sentiment only accentuated when I drove a few other Polo TSIs and found the pedal a lot firmer and consistent. In fact, even the dealership folks were asking me if I found the brakes spongy. Truth is, they were working fine, but the pedal had a fair amount of softness, but it wasn’t sinking to the floor and there was no immediate reason to worry, so I thought I’d give it a while before considering a brake bleeding job on my car.
Leaving the air in the system aside, I wasn’t too happy with the stock brakes on my Polo and this is something more common for folks with the Automatic gearbox. This is because of how eager the 1.0 TSI + Torque Converter drivetrain is in general. It’s no secret that braking and reduction in engine speed has a lot to do with how the gearing downshifts and this 09G gearbox just keeps delivering power. It likes to rev hard in general, and even while coasting there’s not a lot of engine braking to help in reducing speed. Moreover, I’ve found the stock brakes to exhibit plenty of brake fade after a spirited driving session during the day. So for all of these reasons, I was looking at better brakes for this car.
Making a Choice
Here are a few options and combinations I had seen friends and fellow BHPians resort to in the past:
- Better Brake Pads - I would have had to consider performance brake pads like EBC Yellow Stuff or opt for higher quality stock replacement pads like EBC Ultimax, Brembo, ATE Brake Pads (Made in Czech), but I felt the gains would not be organic with this approach.
- Upgrading Discs - Using drilled, slotted rotors from Brembo etc.
- Aftermarket Performance Callipers with Dual Pistons etc.
- Full OEM Big Brake Kit
It is no secret that the TVS Girling Brake system is fairly commuter at best. The stock brake system by TVS Girling is referred to internally as the C54 caliper system, and although it is quite conventional, it isn’t as well engineered as high-end brake systems made by ATE brakes, which is one of the most reputed brake OEMs in the world. It has innate problems which only multiply in our driving conditions. Further, Volkswagen doesn’t grease the slider pin until it’s time for a carrier replacement, which is accompanied with a fresh satchel of silicone grease. To be honest, the Indian brake system can fare a lot better with some love and care, and regular greasing and cleaning of hardware like Caliper Slider pins, Brake shims etc. The Indian OE TVS Girling pads have lasted some drivers and inspirational BHPians like Gannu quite a lot, but they don’t offer users a supreme performance and reliability for most other dusty, Indian driving conditions. There are quite a lot of hardware related brake complaints, which simply cannot be improved by upgrading to better pads or discs. Moreover, quite a few performance pads have a reputation for eating into rotors (which users might argue as fairly cheap by Volkswagen standards). A quick side view shot I clicked against a nicely vandalised wall near a neighbouring badminton court. Notice the silver shine of the stock braking system.

I wanted a cohesive solution and opted to go for an OEM Big Brake Kit. This brake kit uses a common VW Group calliper made by ATE braking (1K0 615 123 and 1K0 615 124) and uses dry slider pins. This same calliper is found on the Jetta, Laura and few other cars from the VAG stable. The part number suffix at the end determines the paint code. If you look at the two calliper assemblies side by side, you’ll instantly notice how much more sophisticated this newer brake calliper is. The piston and seals too are quite a few notches above in quality compared to the TVS Girling Brake system. The insides of the TVS Girling Brake calliper piston in my 4k KM driven car were fairly rusted already.

The same piston in the ATE brake system seems to be properly coated with a textured material, which should be fairly resilient to rusting.
I found a set which had calipers and carriers that I needed and ordered it along with my friend Sarfraz. The kit I received had quite a lot of paint damage in transit, but the reason I got put-off was because I was sent an incorrect caliper. So the carriers on this brake system are same for both the sides, which is the case in many calliper carrier brake systems, but the left and right callipers are not alike. They are directional for a purpose. If you do end up installing them on the wrong side, expect a huge braking issue concerning the pedal feel due to air in the system. So long story short, the bleeder screw on the calliper should be pointed upwards. That is the correct orientation for installing this brake system. If you accidentally install a wrong calliper on the right side, then you’ll never be able to reliably purge all of the air out of the brake lines during bleeding. Many folks internationally have made similar mistakes on their brake systems and have changed entire brake systems to fix their pedal softness, ineffective braking problems and the fault was finally diagnosed to be a calliper with an incorrect fitment.
So after this instance, I began parts hunting to assemble the right 288mm Big Brake kit. The Brake Kit I have is essentially a Red Caliper Carrier which pairs to a larger disc. You can opt for either a 288mm or a 310mm Disc which featured on the GTI, but both have their share of pros and cons with respect to this PQ25 6R platform. To begin with, it should be noted that a Big Brake Kit adds mass at the front end since each brake disc, calliper and carrier are heavier than the stock brake component. The 310mm disc is also heavier than the 288mm counterpart. For cars with ESP, the coding also takes into account the brake sizes on the front and rear axle, and we’ll speak about it in a bit. If you buy a full kit all together, it turns out to be much cheaper, since you don't have to bother buying bits and bobs, but here is a list of all parts needed if you’re handpicking everything.
Parts
OE Numbers of Parts
- Brake Discs :- 6R0 615 301 A/D - 288x25, 5/100 - Zinc Coated
- Brake Pads :- 5K0 698 151 A
- Brake Calipers :- 1K0 615 123 and 1K0 615 124 (Made by ATE)
- Polo Vento Brake Calliper Carrier for 288mm :- 6R0 615 125
- Brake Calliper Slider Pins :- 251 615 219
- Brake Calliper Retainer Spring : 1K0 615 269
- Guide Sleeve Kit :- 8V0 698 647
- Self-Locking Calliper Carrier Bolts :- N 90708504
Other Optional/Miscellaneous Parts
- Dust Shields :- 6R0 615 311 A/D, 6R0 615312 A/D
- Caliper Piston Repair Kit :- 1K0 698 471 B
- Brake Dust Shield Bolts :- WHT005227
- Brake Bleeder Dust Cap :- 211611483
- Rotor Retaining Screw :- N 10648301
Some more scoop about parts
I purchased 288mm Zinc Coated brake discs by ATE, but frankly the OE Zinc coated Discs are a really good choice too. 6R0 615 301A is fairly well-priced and can be found under 6k a pair while the newer revised part 6R0 615 301D is about 9400 rupees a pair, since it is a newer offering and a supersession from 301A, but both are made in Germany. The ATE Discs I purchased come with two Rotor Retaining Torx bits, which have a really premium shiny finish to them. Brake Pads for the MK6 Jetta are a straight fit for this calliper carrier but they come with a Brake Wear Sensor which the Polo presently is not equipped with, but obviously something premium which is in the works soon. I don’t think I classify as a heavy braking guy, but I wanted to try ATE Ceramic Pads which ATE recommends to be used with its stock replacement rotors. This is what the box of the ATE Ceramic pads looks like and my dogs wanted to pose in the background.

The most attractive USP of going with ATE Ceramic Pads is lesser brake dust and I must say, it’s real. I only hope these pads last as long as the usual ATE pads last on this calliper system, since these don’t come cheap, especially if you import them from abroad.
Installation Stories
So I was initially going to install this brake kit at The Mechanix Automotive where I would be working on the car raised on a lift. I thought I’d also have the expertise and experience of Sushant from the Mechanix Automotive and this seemed like a sorted plan. A family friend of mine working at the VW dealership was very keen that I install the brake kit under their supervision at the dealership and so I had quite a few options to choose from. I was really keen on doing this installation myself, but the only weak link according to me was the brake bleeding. I could do this on my own at the Mechanix or at home, but I only had two jack stands and so it would have been really inconvenient to bleed all four wheels at home. So, I packed all of the parts in the boot and was off to the Mechanix Automotive, but midway, I realised I had forgotten Brake Pads and Dust Shields at home. So I took a U-turn and took this as a sign that I was meant to complete this installation at home. BHPian Sarfraz was chiefly instrumental in inspiring me to do this at home, and thanks to his motivation I managed to complete this task, and it turned out great.
Tools Used
- 11mm Wrench for Brake Bleeder, Brake Line,
- 12mm Wrench for Older Brake Calliper Slider Pins.
- 18mm Wrench for Calliper Carrier Bolts
- T30 Torx Bit for Brake Shield, Brake Rotor Retaining Screw
- T45 Torx Bit for Brake Calliper Slider pin - An Alley key might also be usable, but I've found that the OEM slider pin likes the T45.
- Stanley 1/2 Inch Drive Tool Kit
- Stanley 1/4 Inch Drive Tool Kit
- Pair of Jack Stands
- Wire Brushes for brushing off rusty surfaces
Chemicals Used
- PetrelPlus Anti-Seize for Bearing
- WURTH High Temperature Brake Paste
- WURTH Silicone Grease for priming new slider pins
- Brake Cleaning Sprays
Getting Started
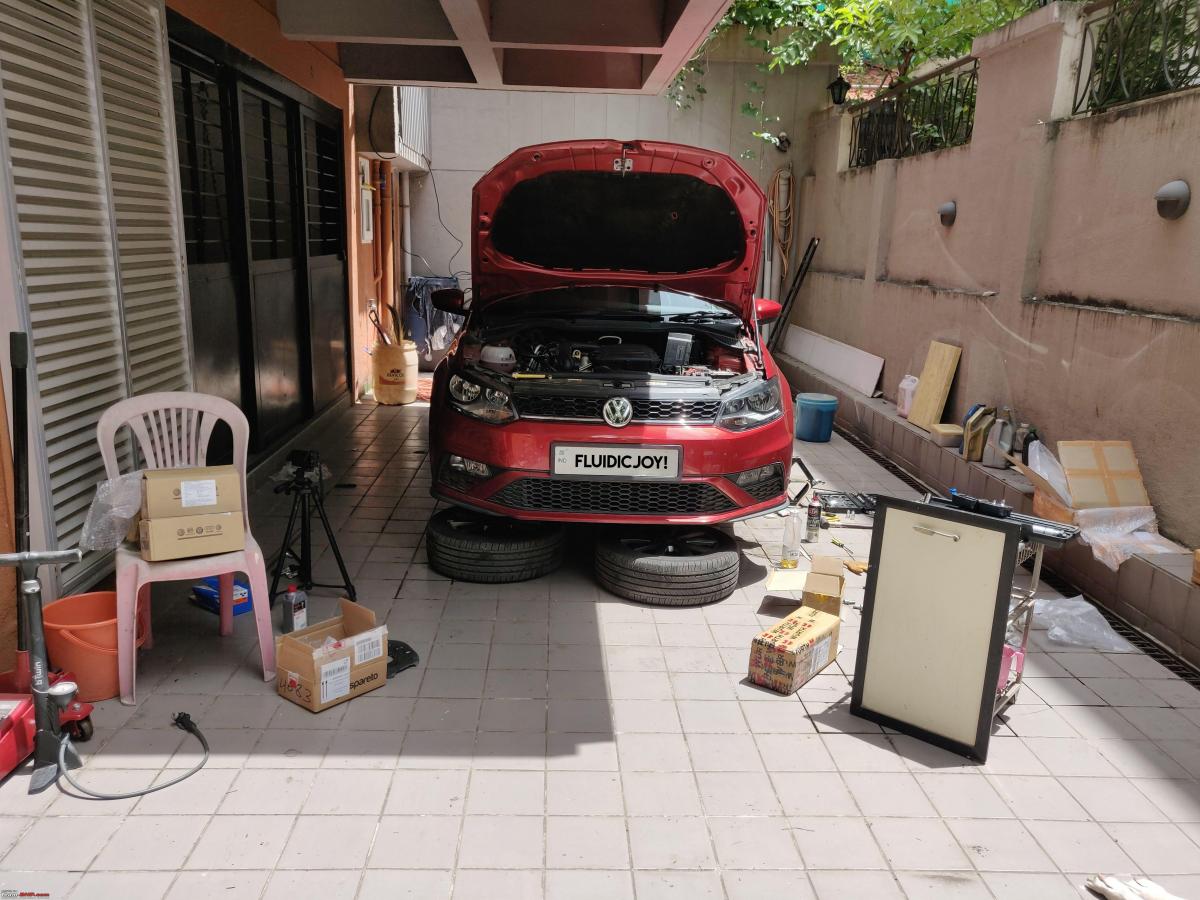
So I began by freeing the wheel bolts using the included tool and then securely placed the vehicle on a pair of jack stands. My hydraulic jack was out of order and so I had to raise the car using the included screw wheel jack. Surprisingly, this was an effortless affair and I'm glad the Widow Maker is being eliminated for good.

Another huge advantage of raising and supporting both front wheels at the same time is the ability to turns the steering wheel and subsequently the rotor to allow maximum leverage for taking out the critical calliper carriers bolts. In this picture, I have turned the steering to the left to easily access the passenger side caliper.

So this is the stock brake system and notice the accumulated surface rust on the rotor. A big reason for the presence of this rust here is the non-application of anti-seize. I have seen quite a few high-end VWs like the Passat and Tiguan, Skoda Superb, Audis to have a generous coat of anti-seize from the factory itself, and true to that, those rotors do not have surface rust at these points. Volkswagen seems to have skimped on this part since the Polo is an entry level offering. Nevertheless, this is only a very minor thing, and here's a before and after only a minute of light brushing with a metal wire brush.

Next, using a 12mm wrench or a socket, we undo the two calliper slider pin bolts after which, we can wiggle the stock calliper out. If the calliper isn't free, then use a screw driver for slightly compressing the piston inwards to easily free-up the calliper. Here's a quick at the stock pads which have a clear INSIDE and OUTSIDE marking. Two holes on the pad backing plate are also a distinguishing factor for INSIDE and OUTSIDE pads.

Once the caliper is free, hang it from a bungee cord but since I don't have one, I'll use a tall box to place the caliper on it. The whole idea is to prevent hanging the caliper and avoid straining the rubber brake hose.
My strategy for this installation was to touch the brake line at the very end to try and lose as less brake fluid as possible to avoid running the master cylinder bone dry. So with this idea in mind, I proceeded to install everything else without still undoing the stock brake line from the stock caliper. With the old pads taken out of the way, it's now time to take out the stock caliper carrier which is held by two 18mm self locking bolts. I was expecting these to be really tight and since I don't have immense muscle power, I was mentally ready I'd need to use a long pipe slipped on a 1/2 inch extension. However, with the 1/2 inch Stanley Ratchet, I could free these bolts fairly easily. The factory torque spec for these bolts is 124 Nm.
Once the carrier is out of the way, we can now proceed to remove the stock 256mm brake disc rotor which is held by a T30 Rotor retaining screw. Using a wheel lug nut is a good tactic to prevent the rotor from falling on your foot or arms. A lug nut is also helpful in the event the brake rotor is tightly rusted onto the hub. We can whack it with a rubber mallet or spray penetrating fluid till it is free and thanks to the safety of the lug nut, the rotor won't fall off.

After the stock rotor is out of the way, we see the wheel hub, which is again rusted due to our natural elements. Using a combination of WD-40 and brake cleaners followed by some light to moderate brushing, we can successfully brush off this surface rust to reveal a nice and shiny wheel hub.
The 288mm and 310mm brake disc slightly interferes with the new brake dust shields 6R0 615 311 C, which is designed for the 256mm brake disc. So you can either slightly bend the dust shield or replace it to 6R0 615 311 A and 6R0 615 312 A which was initially sold on earlier Polos and Ventos. I believe replacing it to an appropriate sized dust shield is the way to go, since the objective of dust shields is to prevent stray dirt from contaminating the braking surfaces. 6R0 615 311/312 D would have been perfect, but these were never sold or natively available in India and would have been an unnecessary expensive, so the shield 311/312 A works just fine. This brake shield is made in Spain. Here's a side by side view of both the shields but this picture is not a perfect representation of the geometric differences between the two.
The dust shield is held on by three T30 screws, two of which are unobstructed while one is slightly recessed behind the wheel hub.

Taking the dust shield off gave me a chance to have a look at the notorious ABS Sensor which has troubled a lot of Polo Vento owners in India.

Here's the new dust shield along with the freshly polished wheel hub, waiting to receive the 288mm brake disc.

Next, I applied a thin coat of Anti-Seize to the wheel hub to reduce the rate of surface rust formation.
Now we're in a position to install the new brake rotor which should be lightly degreased before installation. This is more true in the case of non-zinc coated discs which have an oily protective film to keep them corrosion free in packaging. Zinc coated discs are usually advertised are ready for fitment. However, sometimes manufacturers apply stickers or some packing guides between rotors and they end up sticking or leaving light traces on the braking or non-braking surfaces. Notice the light blue tinge on the rotor face which mounts the alloy wheel. It is a remnant of the blue brake guide which came with the ATE Rotors. Using some more brake cleaner and wiping it off with a light rag or cloth would eliminate it.

Here's a closeup of the ATE Zinc coated ventilated brake disc. Notice the insides of the disc.

Ideally, this good zinc coat should prevent the rotor but accumulating rust in these crevices but after a rainy month with these discs, I've already found quite some surface rust in these fins, which isn't something I was expecting. The disc is held in place with the T30 rotor retaining screw and ATE supplies new brake rotor screws along with new rotors. There is no absolute need to replace this screw unless you ended up stripping it during its removal. The torque spec for the T30 rotor retaining screw is 4.5 Nm. Notice the light coat of anti-seize we applying during cleaning and greasing of the hub.
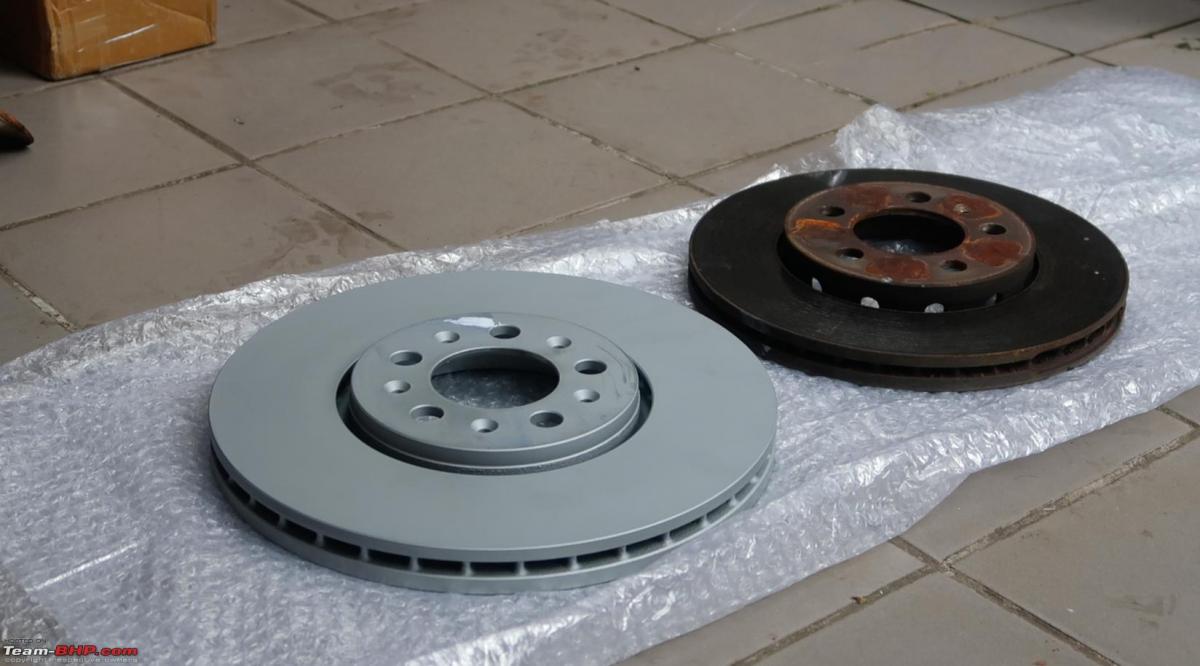
Before we proceed any further, let's have a quick visual comparison between the old and the new rotor.
Now that our shiny new rotor is in place, we can reinstall the caliper carrier. I hand threaded the new self-locking calliper carrier bolts to prevent any cross-threading.

The caliper carrier bolts are recommended to be replaced when the carrier is removed.

I have seen quite a lot of garages reuse these bolts, but I also happen to have heard a few horror stories which stem from reusing of these calliper carrier bolts and so I decided to replace them during this installation. These are to be torqued down to 124 Nm.

Continue reading fluidicjoy's experience for more insights, information and BHPian comments.
- Tags:
- Indian
- DIY
- Polo
- Volkswagen
- brakes
News
Best ways to properly clean a car's brakes
While I use a brake cleaner to get rid of the brake dust and oxidation, it is hard to reach 70% of the brake and 100% of the brake pad area.
BHPian Stribog recently shared this with other enthusiasts.
Brakes are a dust magnet, rust magnet and in general, are also hard to clean.
While I use a brake cleaner to get rid of the brake dust and oxidation, it is hard to reach 70% of the brake and 100% of the brake pad area.
What is a good way to clean / detail these areas? Or is removing the wheels and then cleaning them the only possible option?
Here's what BHPian Indian2003 had to say on the matter:
You dont need to unless you have some high end car like the Lamborghini or some supercar with big wheels that you need to show off.
If you have to clean the brakes, just use some compressed air but this is a waste of time. Just make sure you use the brakes to keep the rotor surface free of rust. While washing the car, you can use water if you want.
Here's what BHPian Dr.AD had to say on the matter:
I have never specially cleaned the brakes. Just drive the car and the rust will go away. The brakes get cleaned by high-pressure water whenever I do a complete water wash for the car at a detailing place (usually once a month). Other than that, I never had to clean the brakes and did not face any issues in any of my cars so far.
I never thought that except for supercars or really high end cars where one can show-off the wheels and brakes, we need to specifically clean the brakes.
Maybe it is just me and I am not finicky about cleaning every small part of the car. But especially in Indian driving conditions, it is futile to try to keep every part clean. Just drive the car and it will be fine.
Here's what BHPian SS-Traveller had to say on the matter:
I haven't done anything of the sort in 40+ years of fiddling about with a variety of cars, and never felt the need to. Brakes are generally immune to rust, dust & oxidation.
OTOH, the brakes need a bit of routine maintenance very occasionally, and that may include the need to clean off the dust. The most important components needing attention are the caliper pins. If they aren't cleaned and greased occasionally, this happens.
I have my brakes attended to once in 20,000-25,000 km, usually along with a visual check for pad thickness - my cars do not have pad wear sensors.
Here's what BHPian R2D2 had to say on the matter:
Don't be too finicky about those brake assemblies. They get dirty and very quickly during the rains.
Yeah there are some exotic cars which have calipers which are factory painted or coated in a colour but those vehicles are in a different league and not used for commutes. Unless you have one of these don't bother.
More importantly, do not apply detailing chemicals or wax on the rotors, calipers brake pads & hoses. You can wash of the muck with a water hose or wipe them clean with a wet rag.
Here's what GTO had to say on the matter:
Never cleaned the brakes of any of my cars as there is no need to. But more than the brakes, its important to properly clean the alloy wheels of brake dust. You'll see lots of it after high speed drives & your car wash pappu will never bother doing the rims properly.
As Indian2003 & Dr.AD said, drive to clear up the layer of rust.
Check out BHPian comments for more insights and information.
- Tags:
- Indian
- brakes
- Disc Brake
News
DIY: Changing brake pads on my Volkswagen Polo GT TDI

Plans of getting the remaining part for the big-brake kit for the front wheels have been put on the back burner at the moment.
BHPian Gannu_1 recently shared this with other enthusiasts.
Since I have been doing WFH over the last week, I thought of dropping an update in the thread.
Plans of getting the remaining part for the big-brake kit for the front wheels have been put on the back burner at the moment owing to:
- The current covid scene and soaring fuel prices which has reduced the long-distance drives considerably.
- My friend who's in Germany, who was to travel to India during this summer carrying the remaining parts with him, has postponed the travel plans due to the lockdowns.
- Financial constraints! The caliper and the brackets would set me back by close to 25-30k INR.
- No urgency for this upgrade at the moment with just the home - workplace - home 12 km daily drives. My role at work has also changed a bit due to a new order that has come so less of shipyard commutes too.
A couple of weeks back, during a casual inspection of the existing front brake pads, I found them worn out by a sizeable margin. Just a few mm of the frictional material was left on the outside.

I was pretty sure these are not going to last until the new callipers and calliper brackets of the big-brake kit arrives so I decided to swap the existing pads with a new set. I am not much of an enthusiastic driver and my brakes are very sensibly used, so an OEM replacement set would do just fine. To keep that in perspective, the current set has last me over 93,000 km. They were replaced during the scheduled fifth/75,000 km service and the car is now at 167,700 km.
I’ve had a good experience with Boodmo thus far so decided to source the pads through them. A set of TVS-Girling pads was priced at a shade less than Rs. 1500 in Boodmo (part number - 29932547, link). The same set with the additional sliding clips and bolts which makes up the OEM brake pad replacement kit retails for Rs 1800 (part number - 6RU698151A, link). I decided to opt for the TVS-Girling set while retaining the sliding clips and bolts. Plus, I wanted to change the pads myself having seen a few DIY videos and links on changing brake pads on the forum. But I did not realise what I would be getting into and some lessons will be learnt that day!
The pads were shipped through Delhivery and they arrived as scheduled. From order placement to delivery it took about a week.

I decided to change the pads on a weekend and assembled all the tools required for the job. I also wanted a pair of helping hands for the job so I roped in my good friend and colleague - Gagan. He isn’t new to this thread though. He was the friend who lugged the Bilstein kit from Germany during his Euro trip and we had been to Yercaud for a leisure trip back in 2016. He's very fond of cars, have been an active member and judge of the Formula Student competition held in India and abroad and currently owns a 2016 Jazz.
The apartment complex where I stay doesn’t have many open parking spots with a shade so we had to pick an open space and do the job. Times I wish I had a closed garage with a nice epoxy flooring, a hydraulic lift to raise the car, an air compressor, tool cupboards and such like BHPian Jeroen’s garage. One day perhaps!
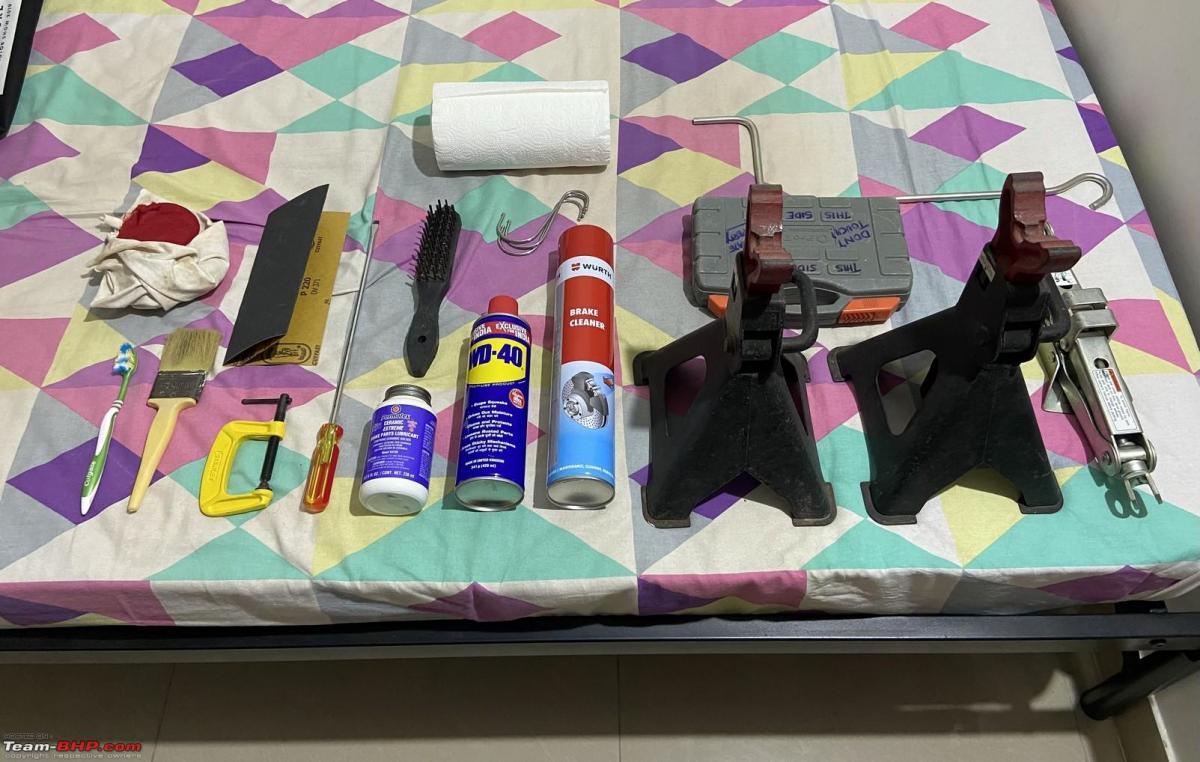
List of tools/consumables
1. Jack (I used a Maruti’s screw jack as it was easier and much safer to operate this rather than the VW supplied jack).
2. A pair of jack stands
3. ¼” ratchet set or a 12-13 ring spanner (to undo the calliper bolts from the guide pins)
4. Wire brush (to clean the callipers from the brake dust and rust)
5. C-clamp 120 mm or 6 inch OR a flat-head screwdriver (to compress the calliper piston back)
6. S-type hooks (to hang the calliper from the spring after it is removed from the assembly)
7. Sand papers 220 grit (wasn’t used as the wire brush helped remove all the brake dust and rust)
8. Brake grease (to be applied in the sliding clips, guide pins and the rear side of the pads)
9. Brake cleaner spray (alcohol-based spray to clean the assembly from the brake dust and rust)
10. WD40 (for general cleaning and stripping the older grease)
11. Paint brush, discarded toothbrush (for hard to reach areas)
Took all the tools to the car parked in the basement and drove her out to an empty spot.
Steps
1. Slacken the lugs of the front wheels.
2. Jack up the front wheels and place the jack stands at the strong points.
3. Remove one of the front wheels - we started with the driver-side wheel first.
Place the wheel removed behind the jack stand for added security.
4. Rotate the steering wheel towards the extreme right to permit access to the calliper bolts from the wheel hub.
5. Clean the calliper assembly with the wire brush and the brake cleaner spray thoroughly. There’s bound to be plenty of brake dust and perhaps a bit of rust too.

6. Unscrew the cap of the brake fluid reservoir and keep the cap atop the outlet.

This is to permit the brake fluid to rise when the pistons from the callipers are pushed. Don’t keep the outlet for a longer time as brake fluid is hygroscopic and absorbs moisture from the air.
7. Use the flat-head screwdriver on the inside brake pad to push the piston back to the outermost position. Insert the screw driver here and push the piston back:

Or you can use the 6”/120 mm C-clamp and the old brake pad to compress the piston. /Lesson learnt #1.
When the piston is compressed, the brake fluid in the reservoir rises. When you do it for the other wheel too, it may spill out a bit so keep some rag clothes around the reservoir cap as brake fluid is highly corrosive.
Here’s how it is done with the C-clamp and the old brake pad:
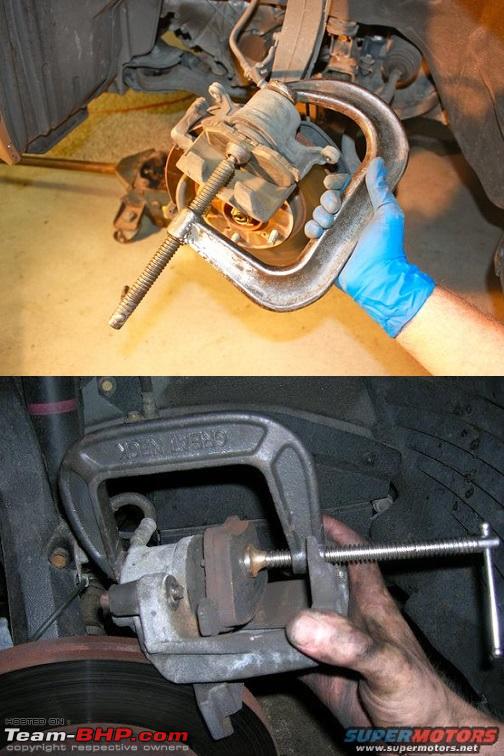
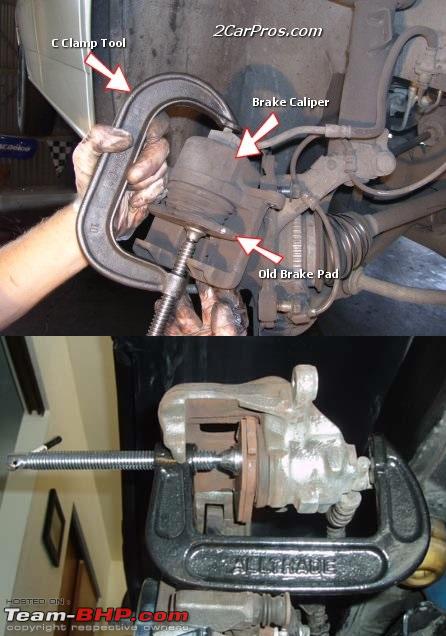
(Images from Google Images; copyright respective owners)
8. Undo the 2 hex. head bolts on the top and bottom of the caliper assembly:

9. Remove the caliper and hang it to the spring using the S-hooks:
10. Slide the old brake pads out of the clips. They’ll slide out without any effort.
Check out the difference between the old and the new pads:
11. Clean the sliding clips using wire brush and the brake cleaner spray. Remove the bushes and the guide pins from the caliper bracket and clean them thoroughly.


One of the sliding pins had some pitting in them and was stuck inside the calliper bracket for a good time! We had to use some force to get it off. Look at the condition of the pin:

Can clearly see the pitting.
12. Apply the brake grease in the slide paths of the clips and the guide pins. If the rubber bushes of the guide pins are worn off or torn, you’ll have to replace them to prevent dust ingress on the pin. Bushes are dirt cheap. Inspect and replace as necessary. Replace the guide pins and the bushes into the bracket.
Be careful while applying the brake grease on the parts - the frictional surface and the discs should not have a speck of this grease! The mating surfaces have to be absolutely clear from the grease. Use the tissue paper and the brake cleaner to wipe off any grease on the surface of the rotors.
13. Insert the brake pads into the sliding clips on both sides of the disc. IMPORTANT - While inserting the brake pads, observe the INSIDE and OUTSIDE markings on the pads! Some set of brake pads have rivets on the inside while some have it on the outer ends. Where the rivets are located close to each other, these are the pads meant for the outside and where the rivets are located far away, these are the pads meant for the inside i.e. the piston side. The piston head has to mate flush with the metal surface of the pads. Lesson learnt #2.
(Image courtesy - Boodmo)
Whereas some pads have no such distinction and they can be interchanged. Take a look at this set from Motherson:

(Image courtesy - Boodmo)
You can see that the rivets are located at the extreme ends and does not come in way of the piston head.
14. After the pads are inserted, apply some brake grease on the metal plate of the pads. Too much of grease is bad and too little would be insufficient. Just a small layer is sufficient.
15. Replace the caliper back in place and secure the calliper to the bracket using the bolts. Tighten the bolts. I simply hand tightened it using the 1/4” ratchet. If you have a torque wrench, tighten the bolts to 35 Nm.
16. Rotate the steering wheel back to the centre so the wheel hub is centred and replace the wheel.

17. Redo the above steps for the other wheel.
18. Replace the brake fluid reservoir cap and close it firmly. If some fluid was spilled outside (likely when the piston on the second wheel is compressed), check the fluid level in the reservoir and top up if required. The level should not go below the minimum mark. Clean the surrounding areas of the reservoir.
19. Lower the car after removing the jack stands.
20. Before driving off, start the car and press the brake pedal to reduce the pedal play and let the respective pistons push the pads firmly towards the rotors. Do a short test drive to confirm the braking action multiple times.
Lessons Learnt
As I mentioned before, we ended up doing some mistakes during this DIY being the first time we were attempting this. Its all about the experience and we always learn something every time.
#1. Use a 6”/120 mm C-clamp or a larger size for compressing the calliper piston back. We messed up here because my puny 50 mm C-clamp was not sufficient for the job as the clearance was less. So, we had to resort to the flat-head screwdriver method. Needless to say, I ordered two additional C-clamps to my kit. Will come in handy next time.
#2. Pay attention to the INSIDE/OUTSIDE markings on the pads when you replace it on the calliper. We ended up installing the two OUTSIDE brake pads on the driver-side wheel and the two INSIDE brake pads on the co-driver side wheel! Just as we were about to wind up and replace the co-driver side wheel back into the hub, I saw the INSIDE marking on the brake pad!


Sigh! We had to trace back a few steps and redo it correctly.
#3. Carry some bottles of drinking water to keep yourself hydrated when you’re on the job. We didn’t and dearly paid the price for it! I am glad and very thankful to my partner Gagan who went to the nearby supermarket to fetch some cold drinks. The shade went away after some time and it was sunny where we were working. We were so damn exhausted at the end of it!
#4. Use a pair of latex gloves while doing this job. Our hands were really dirty at the end of the job and required extensive cleaning especially the nooks and crannies of the finger nails. A face mask will prevent brake dust/rust while cleaning with the wire brush from entering into the respiratory system.
I cleaned the discarded pads and painted it with two coats of spray paint. Using them as paper weights at work:

That’s all for now. The car’s odo stands at 167,800 km. I am figuring out some high beam issue on my headlamps as we speak. Shall post about that separately. Take care and stay safe!
Check out BHPian comments for more insights and information.
- Tags:
- Indian
- DIY
- brakes
- Polo GT TDI
- Polo
News
New Brembo brake caliper concept features customisable LEDs
.png)
.png)
.png)
.png)
Brembo has unveiled their 'New G Sessanta' brake caliper concept featuring customisable LEDs, as part of the company's 60th anniversary.
Brembo has unveiled a new brake caliper concept for motorbikes called the 'New G Sessanta'. The concept comes as part of the brand's 60th anniversary celebrations.
The new concept from Brembo features LED lights integrated on the body of the brake caliper. Brembo states that the LED lights on the brake caliper, can be used for multiple applications. This could range from enhancing the aesthetics of the bike to functioning as a direct visual communication to the user. The LEDs can also be used as a 'courtesy light', allowing users to locate the bike at night or in a dark environment.
The LEDs on the brake caliper concept are customisable. Users can control the colour and brightness of the LEDs through a smartphone app; setting it to their tastes and preferences.
Being a part of the brand's 60th-anniversary celebrations, the concept has been inspired by Brembo's first-ever brake caliper from 1972 and the name of its designer. The company states that the G Sessanta concept also previews the brand's vision for its brake calipers in the future.
News
Brake failure issues in Hyundai Creta

Thanks to BHPians naveen.raju, RavenAvi, navy68 and Paul63 for sharing their experiences regarding the failure of the Hyundai Creta's brakes.
In November 2019, the traction control and ABS warning lights lit up for 30 seconds in BHPian naveen.raju's Creta. The owner's manual of the car states that while normal braking function will still be operational in such as case, it is better to take the car to a workshop.
A week later, on the way to the workshop, the car witnessed brake failure at very low speeds. The car was unable to stop and hit a Maruti A-Star ahead of it. The brake pedal was as hard as a rock and there was a loud grinding noise. The failure was attributed to two faulty ABS sensors, which were replaced. Even in the event of a failure of the ABS system, the conventional braking system should still work and bring the car to a standstill.
BHPian RavenAvi notes that the initial lot of Creta owners has been aware of this issue from as early as 2016-2017. BHPian navy68 has reported a similar incident of brake failure happening in his car in December 2018, while Paul63 has reported a brake failure in his Creta inside his apartment parking in the same month. The case was escalated to Hyundai management, which did extensive test drives, installed testing equipment, but couldn't reproduce the same.
RavenAvi also reveals that the same problem is being discussed in a closed group on Facebook. Group member Jismon Joy's Creta had the same problem, which resulted in his car crashing into the one ahead of it on February 15, 2020. The company has replaced both the hubs of the rear wheels free of cost. Jimson's car was out of warranty.
Pages
About Us