Team-BHP > Technical Stuff > DIY - Do it yourself
Register New Topics New Posts Top Thanked Team-BHP FAQ


Reply
  Search this Thread
228,537 views
Old 31st August 2015, 17:03   #31
Senior - BHPian
 
IndigoXLGrandDi's Avatar
 
Join Date: Aug 2009
Location: Solapur (MH-13)
Posts: 1,784
Thanked: 567 Times
Re: DIY: Hardwiring your Dashcam

I bought a Blaupunkt 2.0 Dash Cam from Snapdeal.

Now we have two vehicles- Xylo E8 (ABS) and Elite i20 Asta CRDi.

I don't want to go the Hardwiring Way as I will be the only one using the Dash cam in both vehicles (only in one vehicle at a time of course depending which I use). Is there any alternative way to hide the Power Cable from hanging below the IVRM?

Also should I remove the Transparent plastic stuck on Lens ahead? Does it disturb the picture quality if not removed?
IndigoXLGrandDi is offline  
Old 31st August 2015, 20:29   #32
BANNED
 
Join Date: Oct 2011
Location: Hyderabad
Posts: 12,350
Thanked: 21,411 Times
Re: DIY: Hardwiring your Dashcam

Brilliant thread Arun. Thank you for the write-up.

I am going this route for some electrical additions in my Swift in the near future so for a foolproof and safe wiring along with a neater look, I'll be going thread's way!

Thanks once again. Have the thread 3 times already.
a4anurag is offline   (1) Thanks
Old 31st August 2015, 20:43   #33
BHPian
 
vinitbhavi's Avatar
 
Join Date: Aug 2015
Location: Mumbai MH 02
Posts: 423
Thanked: 1,151 Times

As of today the prices on flipkart are the lowest for the blaupunkt dvr at 3700 followed by Amazon and snapdeal.
vinitbhavi is offline  
Old 1st September 2015, 22:28   #34
BHPian
 
Join Date: Aug 2010
Location: Delhi
Posts: 164
Thanked: 243 Times
Re: DIY: Hardwiring your Dashcam

Quote:
Originally Posted by GrammarNazi View Post
You can also use Meerkat or Periscope on your phone to live stream the video.

IIRC Those apps have an option to save the stream video too.

All this while you can focus just on driving.

If still hesitant, an App called DailyRoads can record the drive video in the background.

Rgds & Drive safe!
Thanks for your response.

I'm looking for something like this
http://www.lyfelens.com/

This requires a public ip address on a mobile 4G/3G modem with port forwarding - both not allowed by any mobile operator.

Best Regards.
DwarkaDelhiWala is offline  
Old 15th September 2015, 09:19   #35
BHPian
 
Join Date: Apr 2006
Location: NOIDA
Posts: 70
Thanked: 29 Times
Re: DIY: Hardwiring your Dashcam

Well I got the delivery of my dashcam about a week ago but due to busy schedule I installed it only today.

I have managed to get all the tools mentioned in first post for hard-wiring easily via a freight forwarding company.

Now the problem is I cannot figure out how to reach the fuse box on the passenger side of EcoSport. To be honest in all my previous rides fuse box was easily accessible.
I am unsure basically how to remove the glove box. I fear breaking some joints if applied force.

May be I can get the hardwiring done from a professional. However, for my own knowledge I should know how to reach fuses in case of an emergency!

Wondering if there is a video made by anyone on how to disassemble and reach the fuse box?
cowboy45 is offline  
Old 15th September 2015, 11:08   #36
Distinguished - BHPian
 
arunphilip's Avatar
 
Join Date: May 2007
Location: Bangalore
Posts: 1,989
Thanked: 6,170 Times
Re: DIY: Hardwiring your Dashcam

Quote:
Originally Posted by cowboy45 View Post
Now the problem is I cannot figure out how to reach the fuse box on the passenger side of EcoSport. To be honest in all my previous rides fuse box was easily accessible.
The EcoSport is the first car I've seen that requires disassembly just to reach the fuse box, and is quite a nuisance!

Basically, you need to do this:
1. The part of the glove box that you usually open and store things in, can be removed by squeezing in the rubber/plastic stops at the top left and top right of the moveable glove box. This will allow you to fully flip the glove box downwards. Then at the hinges, you'll notice 2 plastic cylinders. Force them out (towards the right) using the orange plastic pry tools.
2. The glove box shelf, and area surrounding the glove box is the glove box assembly. This is secured by 4 screws that point upwards. There are two screws just above where you place your feet, and two screws at the top.
3. Once you remove these 4 screws, use the orange pry tools to exert gentle pressure on this assembly to pop the clips out and remove it.

Check this post for a few more pictures specific to the EcoSport.
Quote:
Originally Posted by arunphilip View Post
I've hard-wired a dashcam to my EcoSport (see thread). While doing that, I took a few photos of the area behind the dashboard on the passenger side, that might be of interest to owners.
If you're not comfortable doing this, I'd recommend you go to Ford and ask them to do it for you. Since its the fuse box, they'll be familiar in accessing it.
arunphilip is online now   (1) Thanks
Old 16th September 2015, 11:47   #37
BHPian
 
Join Date: Apr 2006
Location: NOIDA
Posts: 70
Thanked: 29 Times
Re: DIY: Hardwiring your Dashcam

Quote:
Originally Posted by arunphilip View Post
The EcoSport is the first car I've seen that requires disassembly just to reach the fuse box, and is quite a nuisance!

Basically, you need to do this:
1. The part of the glove box that you usually open and store things in, can be removed by squeezing in the rubber/plastic stops at the top left and top right of the moveable glove box. This will allow you to fully flip the glove box downwards. Then at the hinges, you'll notice 2 plastic cylinders. Force them out (towards the right) using the orange plastic pry tools.
2. The glove box shelf, and area surrounding the glove box is the glove box assembly. This is secured by 4 screws that point upwards. There are two screws just above where you place your feet, and two screws at the top.
3. Once you remove these 4 screws, use the orange pry tools to exert gentle pressure on this assembly to pop the clips out and remove it.

Check this post for a few more pictures specific to the EcoSport.


If you're not comfortable doing this, I'd recommend you go to Ford and ask them to do it for you. Since its the fuse box, they'll be familiar in accessing it.
Thanks. Finally I did succeed reaching the Fuse box. Had to struggle finding flower pointed screw driver.

For some odd reason Garmin GPS and Novatek dashcam both wont turn-up when connected to power wire coming from fuse but the wiring was proper and I could light up a test bulb. On several checks found that both devices would turn on only when plugged in using the 12v cig socket adapters that they came with.

I decided to get a 12v socket splitter and connected it to the ignition powered fuse and then both devices plugged into spiltter. Then placed the splitter safely behind the glovebox and secured it to make sure its fixed.

Now no wire clutters.
cowboy45 is offline   (1) Thanks
Old 16th September 2015, 13:47   #38
BHPian
 
Join Date: Apr 2006
Location: NOIDA
Posts: 70
Thanked: 29 Times
Re: DIY: Hardwiring your Dashcam

I have a question - now that both my navigator and dashcam are hardwired. If I turn off the devices using the power button on them (just when I dont need them or remove for updates and data etc), will that help to save battery or circuit will continue to draw same power?
cowboy45 is offline  
Old 16th September 2015, 14:44   #39
Distinguished - BHPian
 
arunphilip's Avatar
 
Join Date: May 2007
Location: Bangalore
Posts: 1,989
Thanked: 6,170 Times
Re: DIY: Hardwiring your Dashcam

Quote:
Originally Posted by cowboy45 View Post
I have a question - now that both my navigator and dashcam are hardwired. If I turn off the devices using the power button on them (just when I dont need them or remove for updates and data etc), will that help to save battery or circuit will continue to draw same power?
Typically, these devices come with 'soft' buttons that switch on/off power via the circuit board. Even when off, there'll be a tiny amount of power loss, although that's of the order of a few milliamps. However, that's the theory. In reality, that's not worth worrying about, since it will take an extremely long time to make an impact on a car battery.

Devices that come with physical buttons will mechanically break the circuit resulting in zero power draw.

Likewise, if you unplug those devices to perform updates, then the circuit is again broken, resulting in zero power draw.

Having said that, you've mentioned in your previous post that you've wired this to a fuse that is powered by the ignition. So, the only time this will be powered on is if the ignition is switched on (either in ACC mode, or with the engine running).
arunphilip is online now   (1) Thanks
Old 27th October 2015, 22:04   #40
Distinguished - BHPian
 
audioholic's Avatar
 
Join Date: Jun 2012
Location: BengaLuru
Posts: 5,659
Thanked: 19,406 Times
Re: DIY: Hardwiring your Dashcam

I just finished hardwiring my dashcam which I had ordered from Aliexpress a month back. The camera had good reviews and I got it pretty quick without hassles.

Since I was alone during the install, there are no WIP pics. However, just to give a brief idea about the setup, here are some highlights:
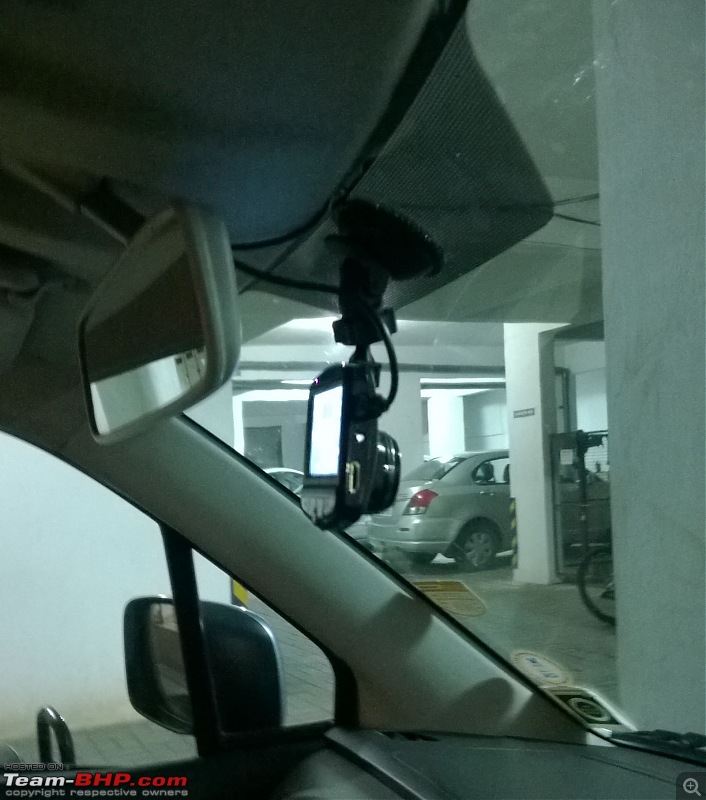
  • Mounting the dash cam was through the suction mount provided. I wanted the camera to be as high as possible in order to prevent any obstruction to my view of the road, hence I planned to mount it on the top edge of the windshield. But due to the anti glare print on the glass, the suction mount wouldnt hold. Hence, I stuck a piece of transparent film in this region(as you can see in the picture) which will enable the mount to grip well compared to on the glass.
DIY: Hardwiring your Dashcam-7.jpg

DIY: Hardwiring your Dashcam-6.jpg
  • Routing the wire was pretty easy. First had to remove the door beading a little close to the A pillar and remove the trim. Dropped down a piece of wire from the bottom of the windshield and it came down to the footwell. Tied the pin to this wire and pulled it up to access it out of the dashboard and into the A-Pillar. Took the wire along the A-Pillar and above the roof lining and exited it near the IRVM. Looped the cable to the IRVM and secured it with cable tie to prevent accidental pulling or mount failure. Secured the cable to the A-Pillar using Cable tie and put back the trim and beading.
DIY: Hardwiring your Dashcam-3.jpg


DIY: Hardwiring your Dashcam-2.jpg


DIY: Hardwiring your Dashcam-4.jpg

DIY: Hardwiring your Dashcam-5.jpg
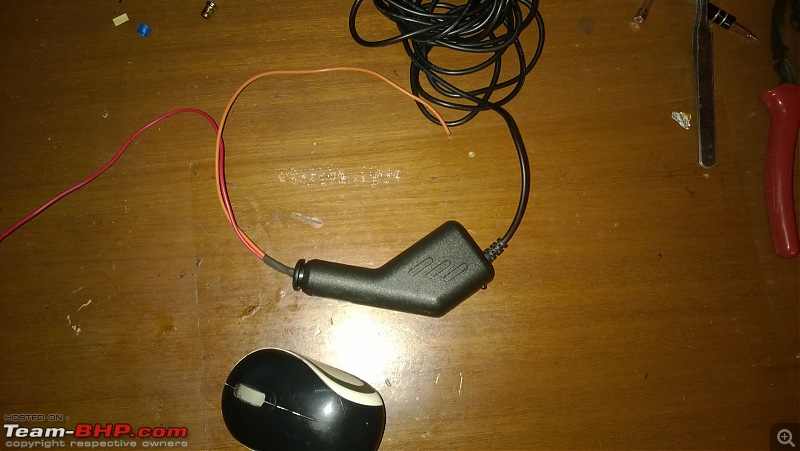
  • Modified the Power supply provided with the camera in order to hardwire. The power supply was originally meant for the 12V socket but yours truly did an implant surgery on the adapter
DIY: Hardwiring your Dashcam-8.jpg

Whoever came up with the idea of mounting the BCM inside the footwell at the bottom of the A-Pillar, they deserve to be thrashed.
  • So, my plan was to take power directly from the ignition signal. As soon as ignition is switched on, the camera should be powered. Hence I planned to take power from the BCM fusebox. But I did not want to cut any wires NOR Splice it using the snap connectors. Hence I was looking for a fuse tap. Many thanks to Parag(Paragsachania) for lending me a spare fuse tap in time so that I didnt have to wait for it to come from abroad. We had a nice meet and discussed a lot of car stuff(as usual *green grinning fella*) and I rode away with the fuse tap.
  • I had soldered the fuse tap and a ground cable to the provided power supply. Surprisingly found only the ACC fuse to be dead when the car was off. All other sockets had power in them including the spare and Airbag blank socket though it is supposed to be powered off when car is not started. Hence I had to put the fuse tap in the ACC socket and provided a 7.5A fuse to the dashcam(which I am going to replace with 5A soon).
  • The ground cable was connected to the brake pedal bracket which had bare metal. Need to clean up this connection with a neat lug nut sine I have just taped the wire and twisted it currently. Since its the ground wire, not an issue.
  • Had to do the most difficult Yogasanas to access the BCM fusebox and though plugging in was simple and easy, securing the wires was very cumbersome and though I am thin, it was really difficult to go there and access the area. I placed the adapter to the left of the BCM and used a cable tie to secure it as well as the wiring.
NOTE: When working in the footwell with wires, ensure that the wires are tightly secured else it will meddle with your legs when you are driving and may get entangled. Any wiring in the footwell area must be properly secured


DIY: Hardwiring your Dashcam-1.jpg
audioholic is offline   (7) Thanks
Old 27th October 2015, 22:29   #41
Distinguished - BHPian
 
arunphilip's Avatar
 
Join Date: May 2007
Location: Bangalore
Posts: 1,989
Thanked: 6,170 Times
Re: DIY: Hardwiring your Dashcam

Quote:
Originally Posted by audioholic View Post
I just finished hardwiring my dashcam
Nice work, thanks for sharing your experiences here. Which car is this? I see a Maruti sticker on the windshield - is it an S-Cross or Ciaz?

Quote:
Originally Posted by audioholic View Post
Looped the cable to the IRVM and secured it with cable tie to prevent accidental pulling or mount failure.
Good idea to loop the cable around the IRVM. May I also suggest putting a cable/zip tie to tightly secure the cable to the suction mount? Right now, if the suction fails, your smart idea of looping the cable around the IRVM will help prevent the camera from falling. However, the weight of the camera+mount will come entirely onto the mini-USB socket - it might hold, it might unplug itself, or worse still, it might damage the socket. By tying the mount to the cable, the weight of the camera+mount will be transferred to the cable sheath, which is quite strong.

Quote:
Originally Posted by audioholic View Post
The ground cable was connected to the brake pedal bracket which had bare metal.
Just FYI, there's usually a grounding bolt near the fusebox. No need to change what's working fine, however.
arunphilip is online now  
Old 28th October 2015, 00:04   #42
BANNED
 
Join Date: Oct 2011
Location: Hyderabad
Posts: 12,350
Thanked: 21,411 Times

Quote:
Originally Posted by arunphilip View Post
Which car is this? I see a Maruti sticker on the windshield - is it an S-Cross or Ciaz?
That looks to be a WagonR. The A-Pillars suggest.
a4anurag is offline   (1) Thanks
Old 28th October 2015, 09:36   #43
Distinguished - BHPian
 
audioholic's Avatar
 
Join Date: Jun 2012
Location: BengaLuru
Posts: 5,659
Thanked: 19,406 Times
Re: DIY: Hardwiring your Dashcam

Quote:
Originally Posted by arunphilip View Post
Good idea to loop the cable around the IRVM. May I also suggest putting a cable/zip tie to tightly secure the cable to the suction mount? Right now, if the suction fails, your smart idea of looping the cable around the IRVM will help prevent the camera from falling. However, the weight of the camera+mount will come entirely onto the mini-USB socket - it might hold, it might unplug itself, or worse still, it might damage the socket. By tying the mount to the cable, the weight of the camera+mount will be transferred to the cable sheath, which is quite strong.
Tying the cable to suction mount will make it difficult to remove the mount in case required and will need the tie to be cut. Hence, I havent done that. However, I am thinking of a cleaner solution to both minimise wire length that is exposed and also ensure a fall safe setup. The socket wont be damaged or unplugged since the mount and camera is very light and this wouldnt create a jerk strong enough to cause any damage. This is more of a concern with the Micro B plug than the Mini-B plug that is given here. Mini-B is much stronger and resistant to damage due to pulling and bending.
audioholic is offline   (1) Thanks
Old 28th October 2015, 11:53   #44
Distinguished - BHPian
 
arunphilip's Avatar
 
Join Date: May 2007
Location: Bangalore
Posts: 1,989
Thanked: 6,170 Times
Re: DIY: Hardwiring your Dashcam

Quote:
Originally Posted by audioholic View Post
Tying the cable to suction mount will make it difficult to remove the mount in case required and will need the tie to be cut. Hence, I havent done that. However, I am thinking of a cleaner solution to both minimise wire length that is exposed and also ensure a fall safe setup. The socket wont be damaged or unplugged since the mount and camera is very light and this wouldnt create a jerk strong enough to cause any damage. This is more of a concern with the Micro B plug than the Mini-B plug that is given here. Mini-B is much stronger and resistant to damage due to pulling and bending.
You make a fair point, particularly with the weight of the camera and the socket strength .

On the topic of zip ties, you can get a removable zip tie (like this one). It has a little tab that you can release with your thumb to loosen/open it up. I like this particular one, because the tie is also quite wide, so the likelihood of it cutting wires when tightened/stressed are much lower.
arunphilip is online now  
Old 21st November 2015, 21:26   #45
BHPian
 
Join Date: Apr 2013
Location: Bangalore
Posts: 181
Thanked: 234 Times

Here comes my jugaad Rs. 60 hardwiring setup on my Ford fiesta 2014.

Fuse tap + Low voltage tester.

To check which fuse works only on ignition on I used the same fuse with a mobile charger connected to it.

Left side top most fuse in fiesta is unused and powers on only when the engine is running. For ground, there is a nice little bolt on the right side of the fuse box.
Attached Thumbnails
DIY: Hardwiring your Dashcam-1448120866091.jpg  

DIY: Hardwiring your Dashcam-1448120907797.jpg  

DIY: Hardwiring your Dashcam-1448121292144.jpg  

linuxmanju is offline   (4) Thanks
Reply

Most Viewed


Copyright ©2000 - 2024, Team-BHP.com
Proudly powered by E2E Networks