| |||||||

| Search Forums |
| Advanced Search |
| Go to Page... |
 |
| Search this Thread |  251,125 views |
 19th August 2015, 16:25
| #1 |
| Distinguished - BHPian  | DIY: Hardwiring your Dashcam Time taken: 30-60 minutes DIY experience level: Beginner Introduction and Benefits of Hard-Wiring Dashcams are gaining popularity in India, particularly among Team BHP members, as can be seen by the interest in the dashcam thread (link). This thread covers how to hard-wire your dashcam to your car's fuse box. I've used this approach to hard-wire dashcams to both my Ford EcoSport (Garmin Dash Cam 20) and my Hyundai Getz (Transcend DrivePro 100).Challenges of using a 12V socket
Benefits of Hardwiring
Alternatives to Hard-Wiring
With that introduction out of the way, let's get on with the details. This DIY guide is split into two parts:
High-Level Schematic Here's a high-level view of how the hard-wiring process will work, with a description of each item. The key elements are:
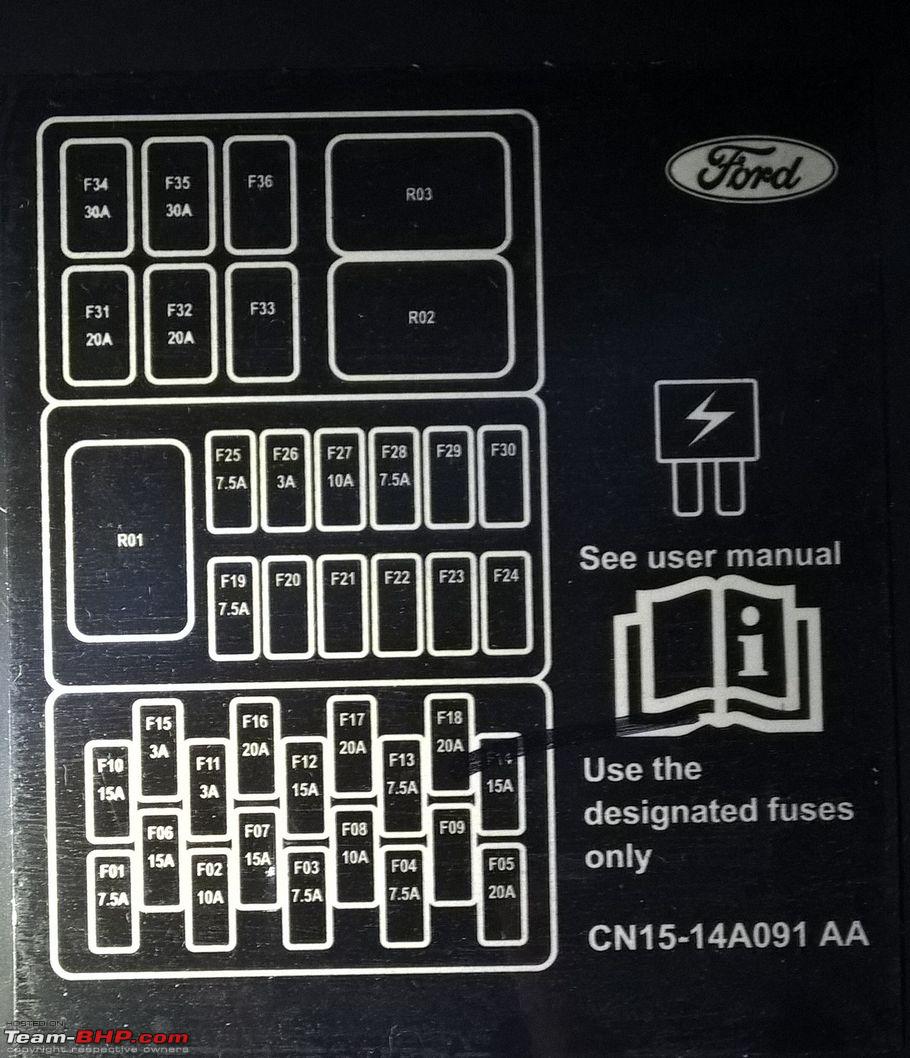
1: The Fuse Box
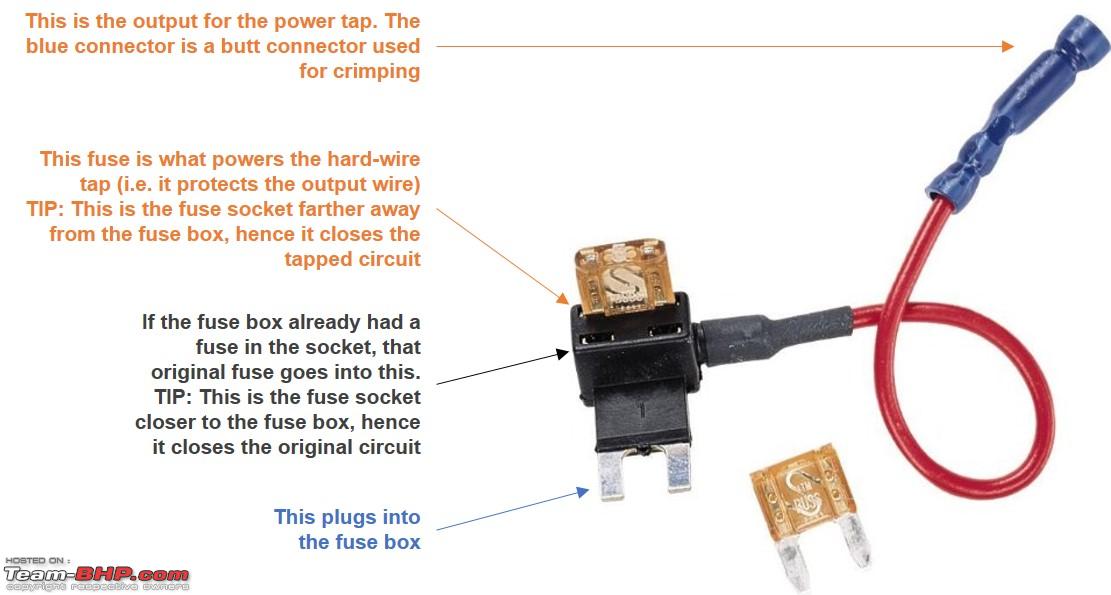
2: The Fuse Tap A fuse tap works by plugging into the fuse box, closing off the original circuit using the original fuse, and also providing a fused current tap for an extra circuit. The below diagram will give you a better indication of how this works:
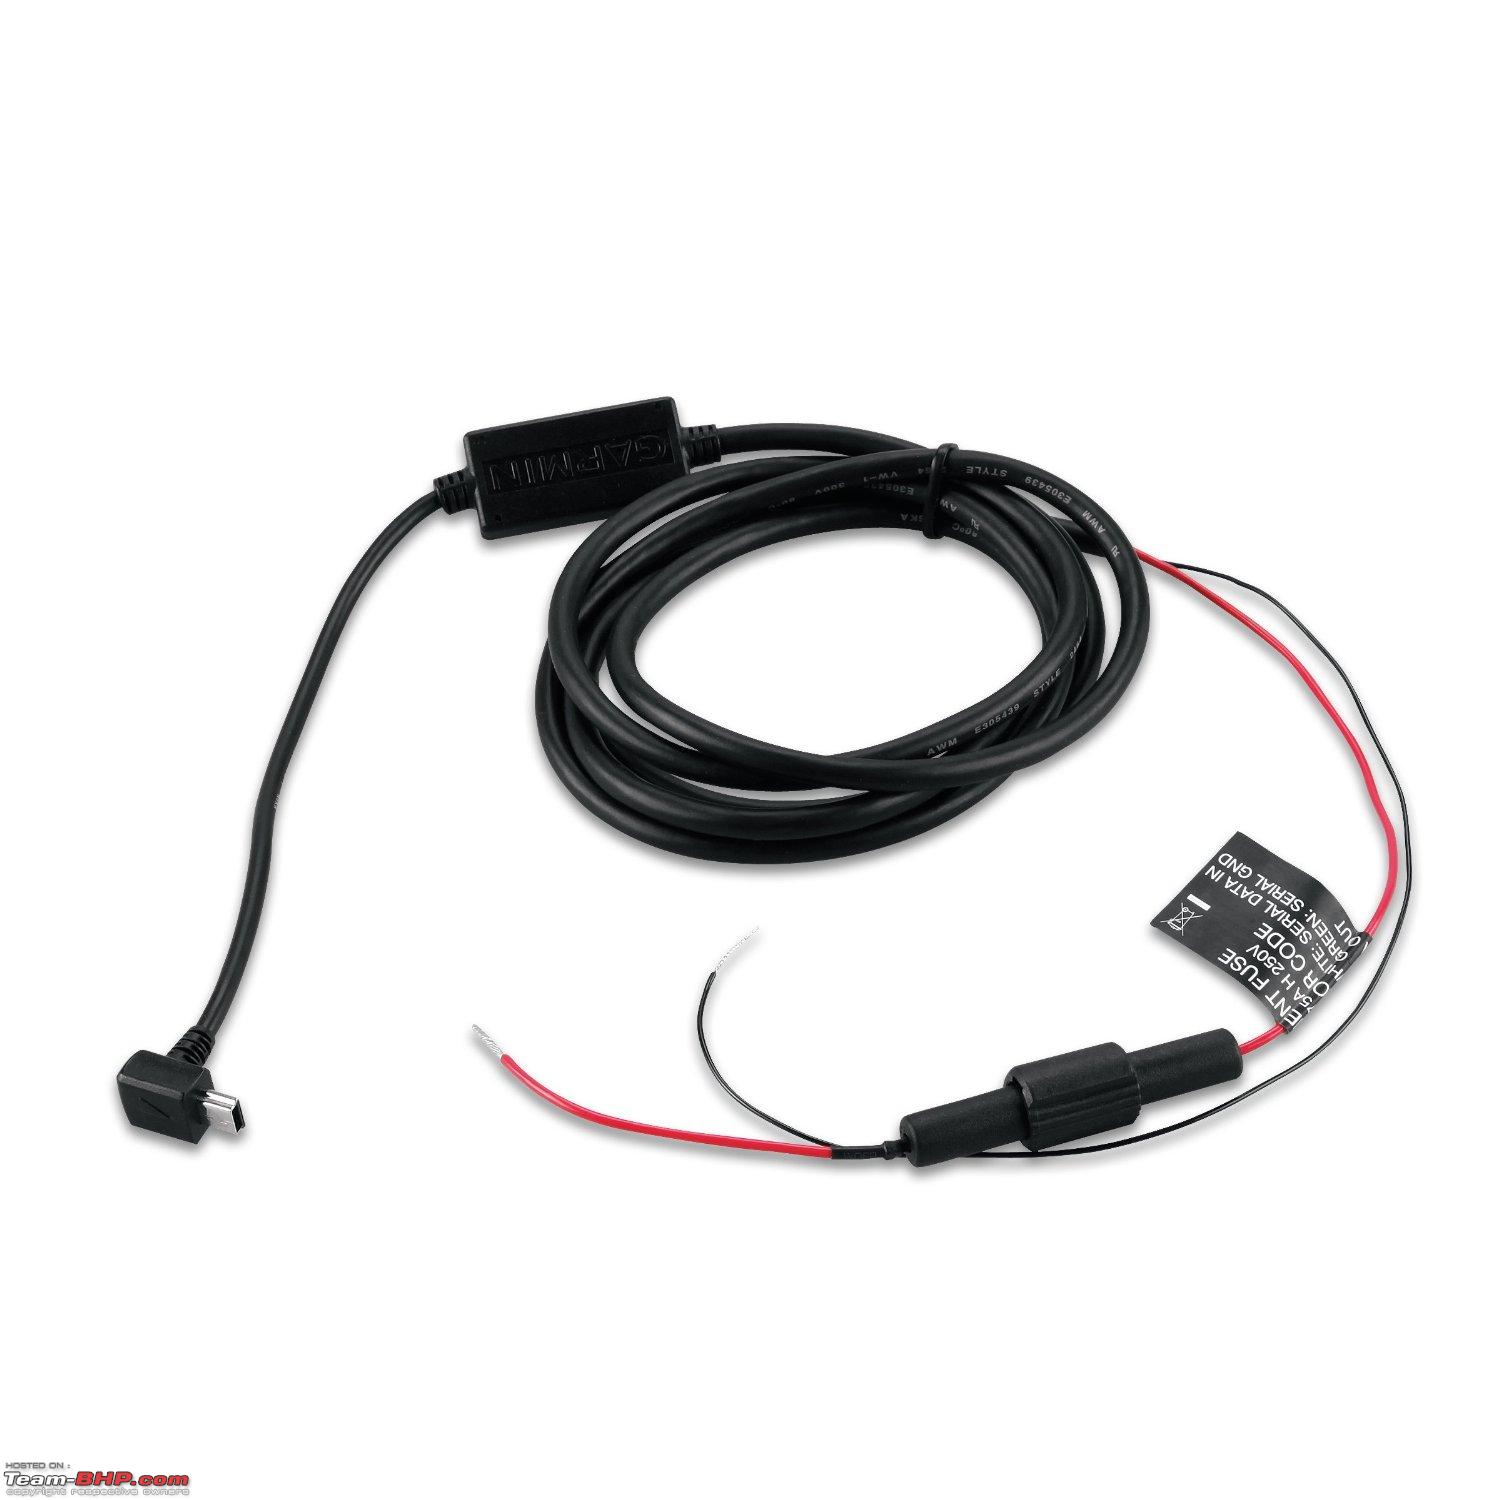
3. Hard-Wire Kit The hard-wire kit converts the 12V of the car's electrical system into the 5V required for USB. It has bare wires at one end, and a mini-USB jack at the other. Between these two, there'll be a DC-DC converter, and usually an inline fuse also.
4. The Dash Cam This is your dash cam of choice! For reference, I use a Garmin Dash Cam 20 and a Transcend DrivePro 100. Last edited by arunphilip : 20th August 2015 at 12:27. |

|  (52)
Thanks (52)
Thanks
|
| The following 52 BHPians Thank arunphilip for this useful post: | .anshuman, aeroamit, akhil_rpmlover, anra, batterylow, bblost, benbsb29, Bimmerhead557, BLACKBLADE, deetjohn, dpkbehera, ecosport rules, frankmehta, gpa, GTO, HappyWheels, harsh79, Highh5, IndigoXLGrandDi, jaskaranjaiya, joednazareth, JoseVijay, libranof1987, maheshramaling, mvadg, Myth_sx, outofthebox, paragsachania, parsh, R2D2, raghu13uk, Rajeevraj, Rehaan, S2!!!, samabhi, scwagh, sdp1975, shifu, shipnil, ssambyal1980, sudeepg, sumeethaldankar, Surprise, swiftnfurious, Tanmay K, Technocrat, tharian, The Great, theexperthand, TheTeacher, Varun_HexaGuy, Wanderers |
| |
|
19th August 2015, 18:06
| #2 |
| Distinguished - BHPian | Procedure for Hard-Wiring Procedure for Hard-Wiring Now that we've got all that background information out of the way, let's move on to the actual work.
1. Access the Fuse Box Your owner's manual will detail how you access the fuse box in the passenger compartment. If in doubt, you can ask around at your A.S.S. or an FNG. If you need to perform some disassembly, then make sure that you keep track of each screw, nut/bolt, connector. You don't want to put everything back together only to wonder why you're left with a stray screw! 2. Identify an Appropriate Fuse
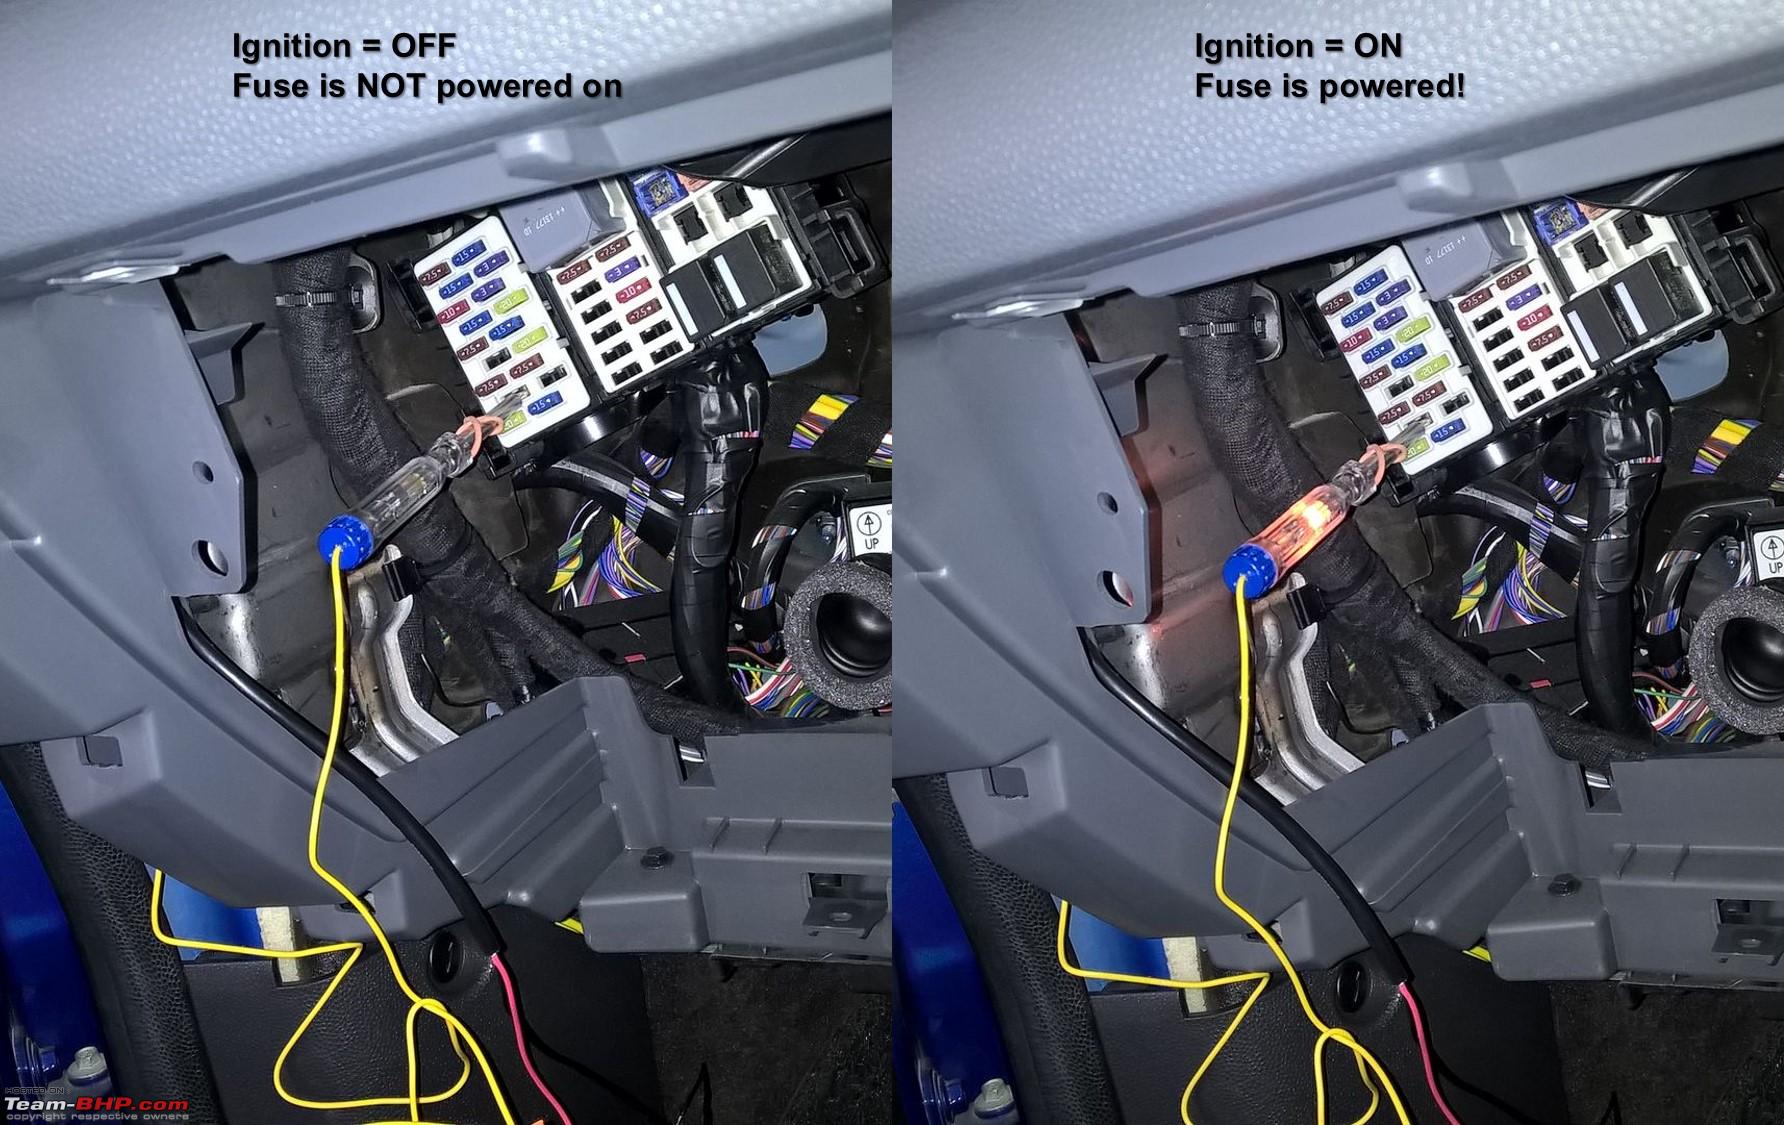
3. Test the Fuse Socket For this step, you'll need an automotive tester. I used this Draper Low-Voltage Tester.
4. Measure the Wiring Length
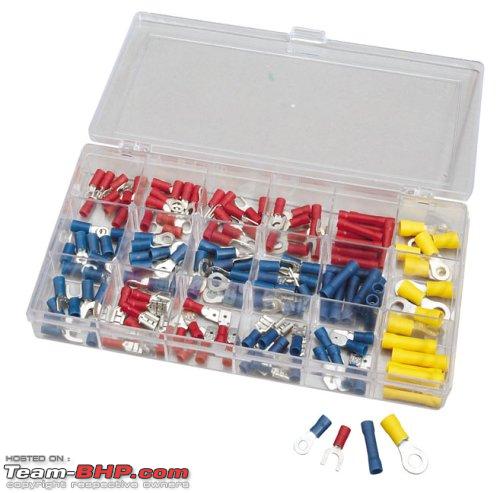
5. Prepare the Wiring Aside: This is an area where I learnt a lot from online resources, since I had initially thought of our Indian jugaad approach of twisting wires and using insulation tape!
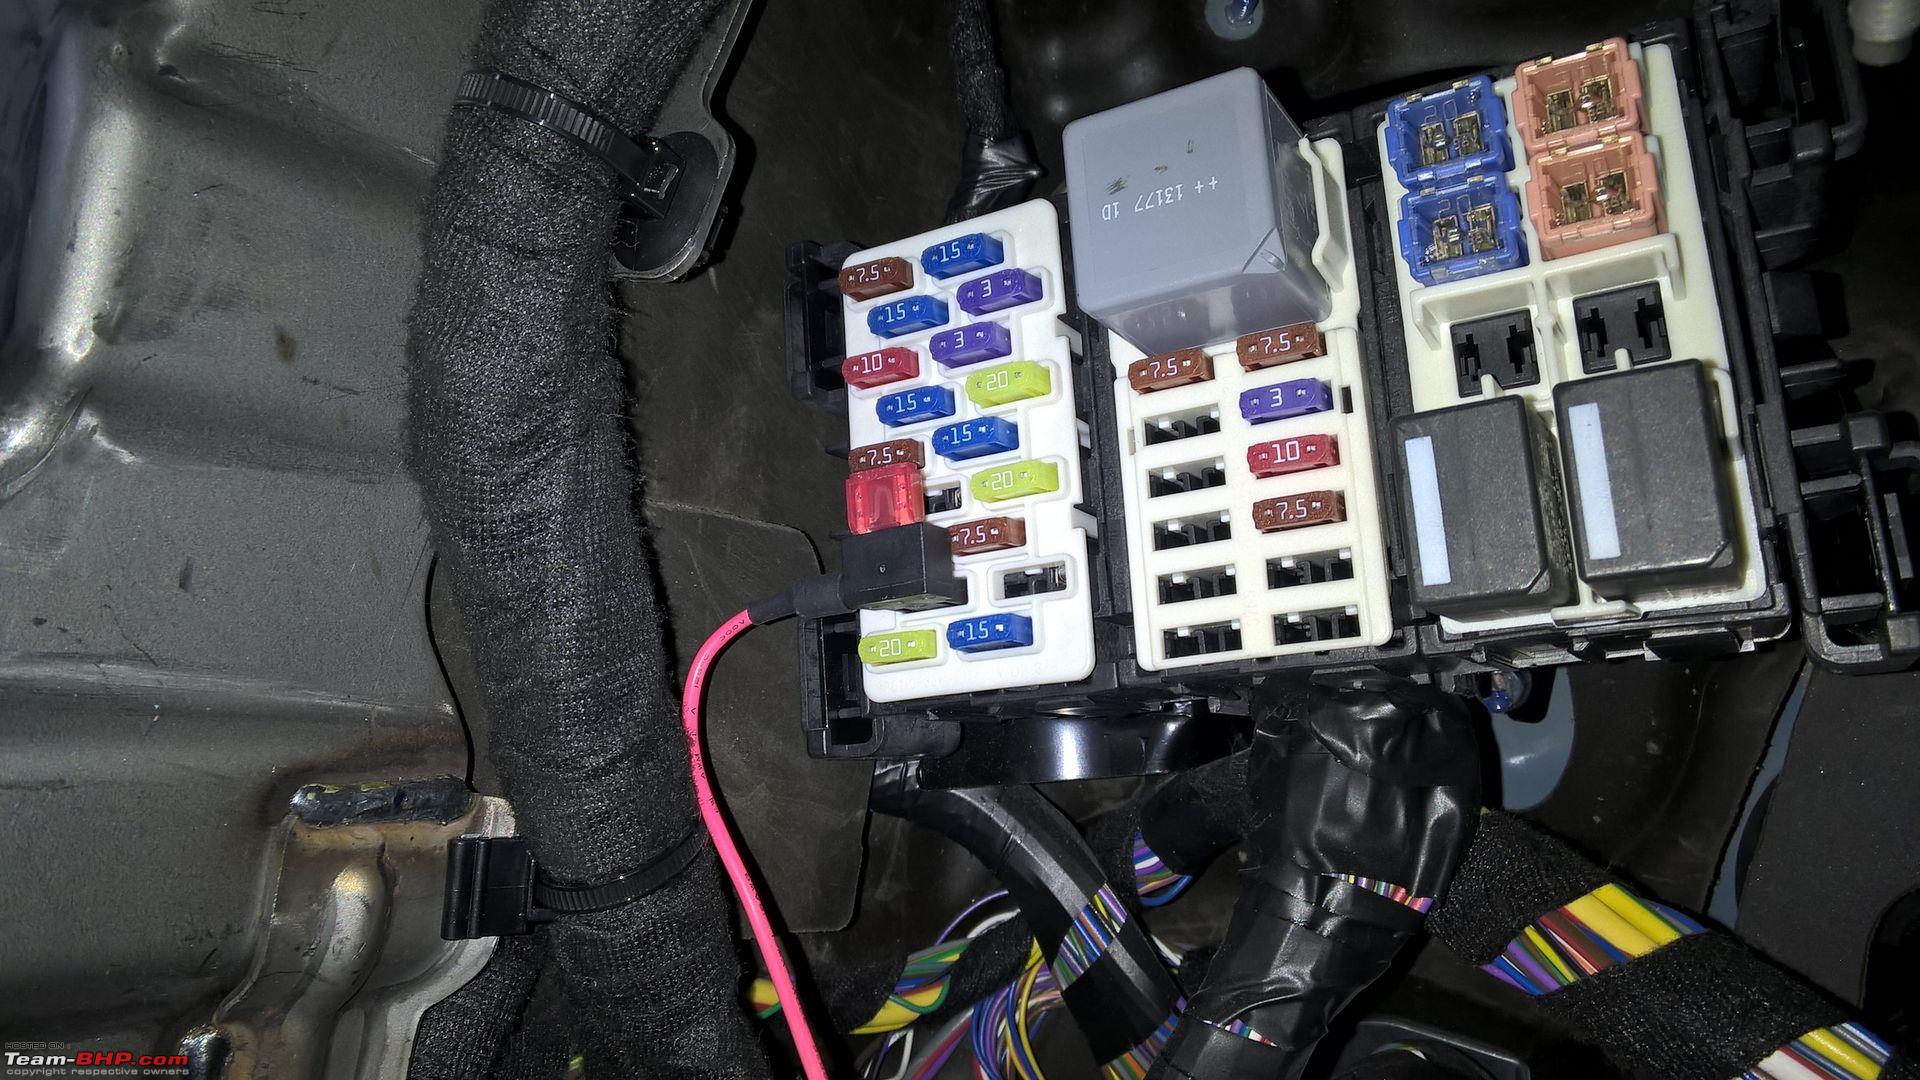
6. Fit the Hard-Wire Kit
7. Test the Hard-Wire Kit
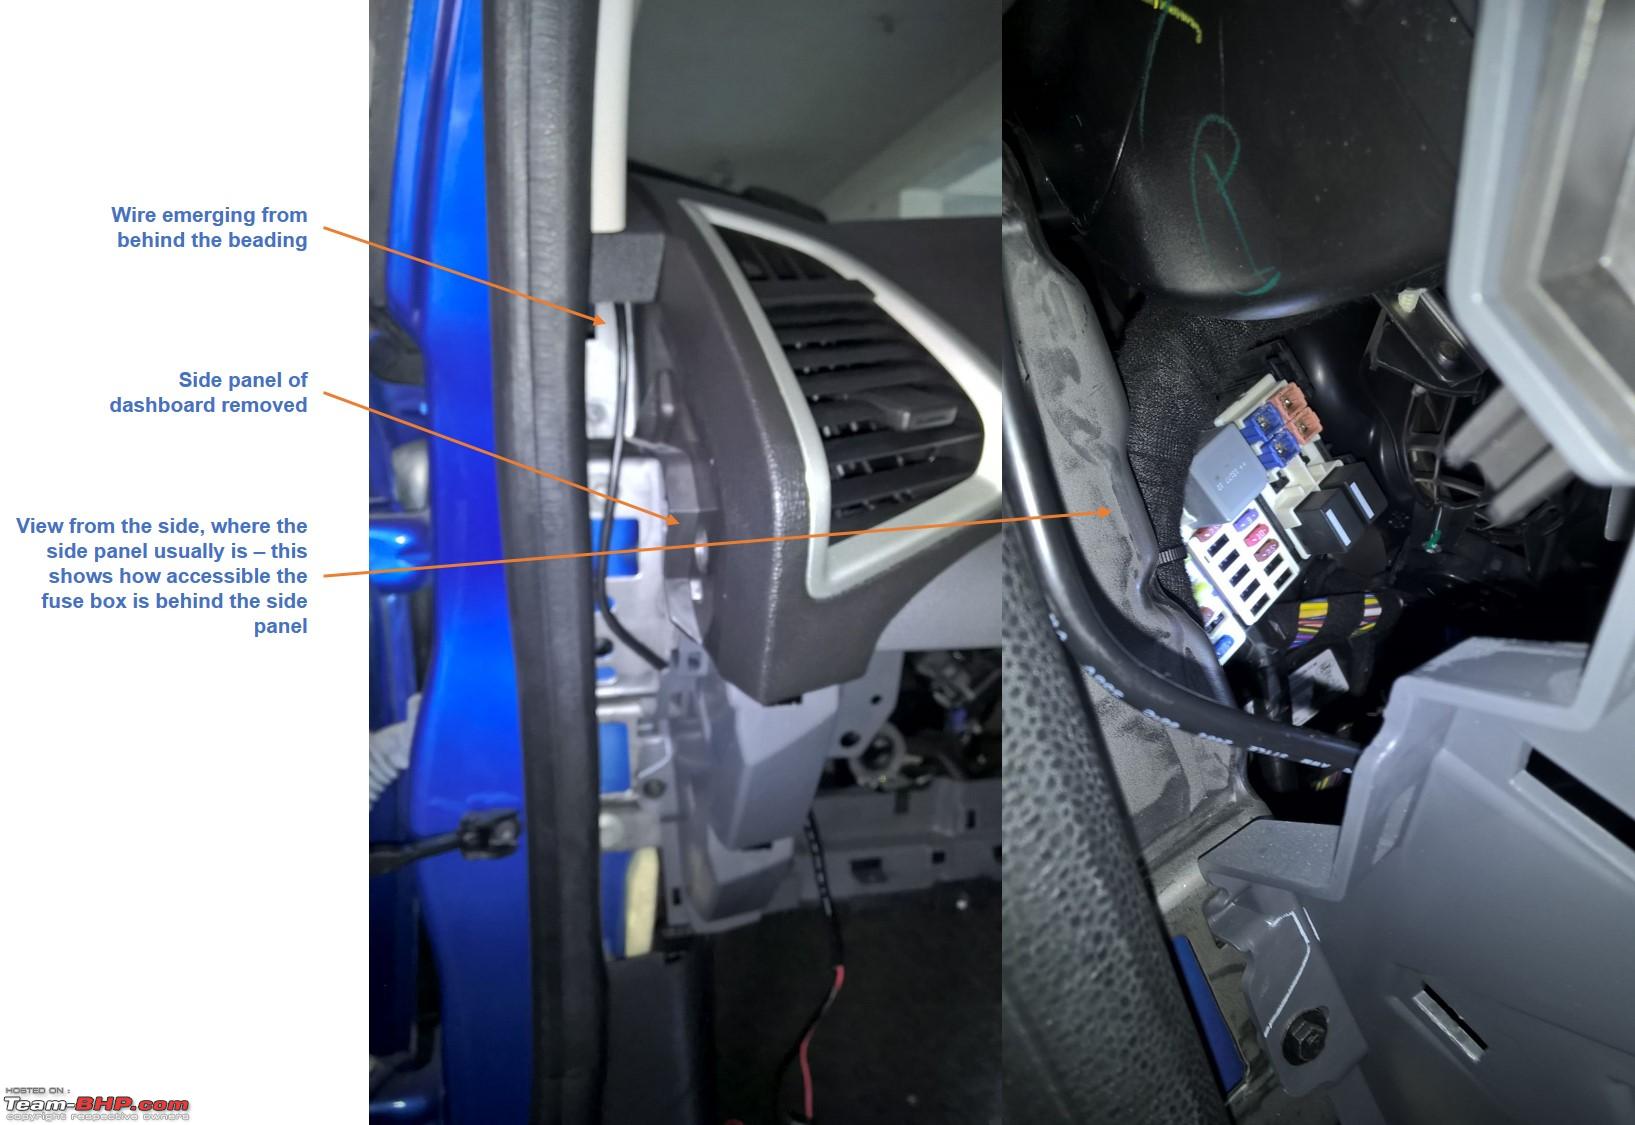
8. Route the Cabling
9. Final Test Before you proceed with any other activities, redo the tests you performed earlier, just to ensure that things still work fine.10. Close and Clean-Up
Last edited by arunphilip : 20th August 2015 at 12:38. |
|
| (116)
Thanks
|


| The following 116 BHPians Thank arunphilip for this useful post: | aah78, aeroamit, akshay, amitwiz1, anachronix, ani_meher, aqualeo2040, arjithin, ashpalio, batish, BB311, bblost, benbsb29, bharatbs, Bimmerhead557, BLACKBLADE, braindead, brownkaiser, carrazy, cdmanju, chakri400, cowboy45, d3mon, daretodream, deetjohn, dhanushs, dpat17, dpkbehera, Dr.AD, Drbhavesh, drmohitg, Dry Ice, ecosport rules, fiat_tarun, fiesta, frankmehta, Geo_Ipe, govigov, Grand Drive, grandkruizer, GTO, HappyWheels, harsh79, hemanth.anand, IcarusMan, InControl, IndigoXLGrandDi, jaskaranjaiya, JithinR, joednazareth, JoseVijay, kat, Leoshashi, Lij, Magnaspectre, maheshramaling, malgudi, manas_270, McLaren Rulez, mi2n, moralfibre, mpksuhas, mrbaddy, MSAneesh, mvadg, Myth_sx, NewUser123, nikhiljaipurkar, PapaKiloSierra9, paragsachania, parsh, pc73, R2D2, racer_m, raghu13uk, ragh_bhushan, rakesh_r, Ramon, razor4077, Rehaan, Roy.S, roy_libran, S2!!!, SaiSW, samaspire, sdp1975, Shakensoul, shipnil, Shubbi, snaseer, sourabhzen, speed kills, srikanthmadhava, SS4, SuhairZain, swiftnfurious, Taha Mir, TaurusAl, Technocrat, TejashM, Thad E Ginathom, tharian, The Great, theexperthand, Torq, unk9ja, vaasu, Varun_HexaGuy, Vid6639, VijayAnand1, Viju, Vtach, VW2010, Wanderers, yajaman99, ysjoy |
|
20th August 2015, 14:26
| #3 |
| Team-BHP Support  | Re: DIY: Hardwiring your Dashcam Thread moved from the Assembly Line to the Modifications Section. Thanks for sharing! |
|
| (2)
Thanks
|
| The following 2 BHPians Thank GTO for this useful post: | arunphilip, samaspire |
|
20th August 2015, 14:56
| #4 |
| Distinguished - BHPian Join Date: Nov 2007 Location: Belur/Bangalore
Posts: 7,147
Thanked: 27,207 Times
| Re: DIY: Hardwiring your Dashcam That's a clean DIY Arun  . .We have done exactly same in funkykar's Linea before we headed for our Ladakh Drive last year. The need of the hour then was an independent power source for the Dashcam while the 12V socket at the front was used for Navigation device and another DIY 12V socket sitting at the back was used for Mobile/Tab charging. For the Ertiga too I thought of hardwiring but then I got a neat location to add another 12V socket that almost looked OE where I have plugged the Dashcam's charger almost permanently while I use the other 2 sockets for charging multiple devices on the go. Thanks for sharing this, will certainly help a lot of folks who want a non-messy, clean and independent route to power up the Dashcam and not worry about it subsequently to turn it on/off. |
|
| (5)
Thanks
|
| The following 5 BHPians Thank paragsachania for this useful post: | arunphilip, gpa, GTO, joednazareth, JoseVijay |
|
20th August 2015, 16:54
| #5 |
| BHPian Join Date: Jul 2009 Location: Bangalore/Vizag/Damanjodi
Posts: 68
Thanked: 5 Times
| Re: DIY: Hardwiring your Dashcam What coincidence, I was fiddling with my car the other day just to do the same. But considering my limited knowledge I found it best to leave the work to a professional least my car goes up in flames. But after reading this I think I am ready to give it another shot! Thank You Arun! |
|
| (3)
Thanks
|
| The following 3 BHPians Thank zazer for this useful post: | arunphilip, joednazareth, snaseer |
|
20th August 2015, 17:07
| #6 | ||
| Distinguished - BHPian | Re: DIY: Hardwiring your Dashcam Quote:
 . Re-read this part and take confidence from it: . Re-read this part and take confidence from it: Quote:
There is an advantage, and a risk, to performing this (or any other) DIY:
| ||
|
| (3)
Thanks
|


| The following 3 BHPians Thank arunphilip for this useful post: | GTO, joednazareth, Varun_HexaGuy |
|
20th August 2015, 17:07
| #7 |
| BHPian Join Date: Apr 2006 Location: NOIDA
Posts: 77
Thanked: 35 Times
| Re: DIY: Hardwiring your Dashcam Thanks. I have ecoSport and have recently ordered a dashcam on sale from Aliexpress. Will try this one as 12V socket is already in use by Garmin Navigation system. |
|
| (1)
Thanks
|
| The following BHPian Thanks cowboy45 for this useful post: | arunphilip |
|
20th August 2015, 20:17
| #8 |
| BHPian Join Date: May 2014 Location: TN38/KL11/KL58
Posts: 659
Thanked: 990 Times
| Re: DIY: Hardwiring your Dashcam Great Work! I just bought this a few days earlier and was wondering how to power it without utilizing the only cigarette lighter socket available. http://www.snapdeal.com/product/blau...g/656059560877 Last edited by batterylow : 20th August 2015 at 20:18. Reason: Additional data |
|
| (3)
Thanks
|
| The following 3 BHPians Thank batterylow for this useful post: | arunphilip, joednazareth, TejashM |
|
20th August 2015, 20:40
| #9 |
| BHPian Join Date: Aug 2015 Location: New Delhi
Posts: 132
Thanked: 233 Times
| Re: DIY: Hardwiring your Dashcam This is one really useful DIY, and not that tough to perform! Thanks for detailing each step. However, I wanted to ask that did you order each item from the international websites or are they (good quality stuff) available in India? |
|
| (1)
Thanks
|
| The following BHPian Thanks parth.jain for this useful post: | arunphilip |
|
20th August 2015, 22:50
| #10 | |
| Distinguished - BHPian | Re: DIY: Hardwiring your Dashcam Quote:
While I did try to find these items in Indian sites first, I faced a few challenges:
| |
|
| (2)
Thanks
|
| The following 2 BHPians Thank arunphilip for this useful post: | joednazareth, parth.jain |
|
21st August 2015, 10:18
| #11 |
| Senior - BHPian | Re: DIY: Hardwiring your Dashcam This is a good solution to power multiple devices. However for people who don't want to fiddle with the electronics one can get a power bank. I was able to power and record from my Transcend camera by connecting it to a usb power bank which i purchased from Amazon. This is however impractical as one has to remember to charge the power bank overnight and remember to carry it daily in the car but for long distance journey with a overnight stay is still a decent option. |
|
| (2)
Thanks
|
| The following 2 BHPians Thank sumeethaldankar for this useful post: | arunphilip, joednazareth |
| |
|
21st August 2015, 10:42
| #12 | |
| Distinguished - BHPian Join Date: Nov 2007 Location: Belur/Bangalore
Posts: 7,147
Thanked: 27,207 Times
| Re: DIY: Hardwiring your Dashcam Quote:
And remember - The Fuse Tap cable always have 2 Fuses. One that takes care of the load and the other to take care of the internal (car's) circuit. Fuse Tap method is perhaps the cleanest & Safest of options to source 12V power and its 100% reversible that leaves zero signs if you revert back. Last edited by paragsachania : 21st August 2015 at 11:02. | |
|
| (5)
Thanks
|
| The following 5 BHPians Thank paragsachania for this useful post: | arunphilip, joednazareth, roy_libran, sumeethaldankar, The Great |
|
21st August 2015, 11:54
| #13 | |
| BHPian | Re: DIY: Hardwiring your Dashcam Quote:
Excellent !! To the point write-up, detailed pics, attention to detail and above all its inspirational, and if not this there are a lot of bits on our car that we can do it on our own. Hats off !! A quick question here, I know you are a pro in this but, did you see any difficulty in fixing the dashboard area back. I assume you did the whole thing on your own. I am also curious to know, whether there are any new rattling noises of uneven fitting post your work. | |
|
| (1)
Thanks
|
| The following BHPian Thanks peterjim13 for this useful post: | arunphilip |
|
21st August 2015, 11:56
| #14 |
| Distinguished - BHPian Join Date: Sep 2008 Location: --
Posts: 3,617
Thanked: 7,691 Times
| Re: DIY: Hardwiring your Dashcam Excellent post Arun! Immensely useful. I can identify with each of the cons you have put up under "Challenges of using a 12V socket". After living for close to 2 year with a 12v extender arrangement, I absolutely abhor all the wiring going around, and desperately want to reduce the clutter. Are these fuse taps/heat shrink tubing etc, available locally? Or one needs to order from AE? |
|
| (1)
Thanks
|
| The following BHPian Thanks Dry Ice for this useful post: | arunphilip |
|
21st August 2015, 13:44
| #15 | ||||
| Distinguished - BHPian | Re: DIY: Hardwiring your Dashcam Quote:
I'd probably just qualify that while you are working with the car electricals, you're not tampering with the OEM electricals in any way (unlike say, a poor ICE installation which results in cutting/splicing of wires). So that should reassure you. Quote:
Quote:
 ! So firstly, yes, I did all the work myself, unaided. The dashboard and side panel are well equipped with clips that come off and latch back on cleanly, so it was easy, and no damage was caused. I've not faced any rattles, so that too seems to be fine (phew!). Again, the clips ensure that alignment is perfect - once it snaps back in place, its like a factory fit, there's no dependence on the DIYer to carefully align panels. Its like Lego! ! So firstly, yes, I did all the work myself, unaided. The dashboard and side panel are well equipped with clips that come off and latch back on cleanly, so it was easy, and no damage was caused. I've not faced any rattles, so that too seems to be fine (phew!). Again, the clips ensure that alignment is perfect - once it snaps back in place, its like a factory fit, there's no dependence on the DIYer to carefully align panels. Its like Lego! Quote:
| ||||
|
| (4)
Thanks
|
| The following 4 BHPians Thank arunphilip for this useful post: | joednazareth, paragsachania, peterjim13, sumeethaldankar |
|