Team-BHP > Technical Stuff > DIY - Do it yourself
Register New Topics New Posts Top Thanked Team-BHP FAQ


Reply
  Search this Thread
229,133 views
Old 10th January 2017, 16:42   #106
Distinguished - BHPian
 
arunphilip's Avatar
 
Join Date: May 2007
Location: Bangalore
Posts: 1,989
Thanked: 6,171 Times
Re: DIY: Hardwiring your Dashcam

Quote:
Originally Posted by samaspire View Post
Can't I use a multi-meter instead of this tester?
Yep, absolutely. Set it to DC Voltage mode, and look for a 12V (or -12V if your test leads are reversed, it doesn't matter).

And kudos to you for owning and using a multi-meter
arunphilip is offline   (2) Thanks
Old 10th January 2017, 16:42   #107
Distinguished - BHPian
 
Mr.Boss's Avatar
 
Join Date: Mar 2011
Location: GPS signal lost
Posts: 2,811
Thanked: 7,464 Times
Re: DIY: Hardwiring your Dashcam

Quote:
Originally Posted by samaspire View Post
Can't I use a multi-meter instead of this tester?
Obviously you can use it.
Intention of using fuse tester is to find the Input & Output sides, with a multi-meter the same can be tested.
Mr.Boss is offline   (2) Thanks
Old 10th January 2017, 17:14   #108
Senior - BHPian
 
samaspire's Avatar
 
Join Date: Sep 2015
Location: Manipal / Udupi
Posts: 1,630
Thanked: 4,860 Times
Re: DIY: Hardwiring your Dashcam

Quote:
Originally Posted by arunphilip View Post
Yep, absolutely. Set it to DC Voltage mode, and look for a 12V (or -12V if your test leads are reversed, it doesn't matter).

And kudos to you for owning and using a multi-meter
Sorry, I don't own one yet - just thought, why take half measures. I've been itching to do learn proper electrical wiring. A multi-meter (maybe a soldering kit as well) would be useful for all that.

newbie Sam
samaspire is offline   (1) Thanks
Old 10th January 2017, 17:47   #109
Distinguished - BHPian
 
arunphilip's Avatar
 
Join Date: May 2007
Location: Bangalore
Posts: 1,989
Thanked: 6,171 Times
Re: DIY: Hardwiring your Dashcam

Quote:
Originally Posted by samaspire View Post
Sorry, I don't own one yet - just thought, why take half measures. I've been itching to do learn proper electrical wiring. A multi-meter (maybe a soldering kit as well) would be useful for all that.
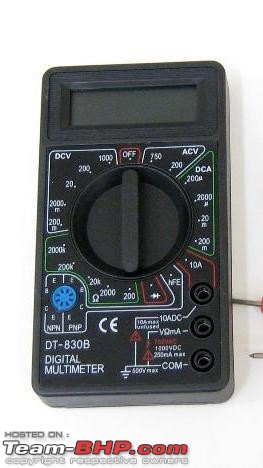
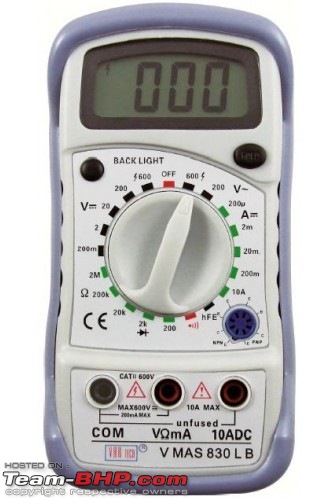
OK, in that case, let me give you a few tips on selecting multimeters. There's a common type of multimeter that has "830" in its name, and is very cheap. It will look like either one of the following:
DIY: Hardwiring your Dashcam-830-multimeter-style-1.jpg DIY: Hardwiring your Dashcam-830-multimeter-style-2.jpg

The colour of the moulding might change, but essentially, the shape and layout is often like the one shown above. All of these multimeters are based on a chipset called the 830, hence the name.

The 830 chipset is itself a fine chip (the only drawback being its absence of auto-ranging), however, the problem with these multimeters is that they are mass produced in China for a low price (you can get them for 100 - 500 rupees in India), so the quality of connectors, protection circuitry, CAT ratings, test leads, etc. is often lacking.

Now, for low voltage applications such as battery-powered electronics and cars (if you stay away from the spark plugs), the risk of harming yourself with this cheap stuff is low, but there is still the risk of damaging the equipment you're looking at (e.g. a poorly built multimeter can cause a short).

However, buying a multimeter is a bit of a disease - once you get it, you'll feel like sticking it into every electrical and electronic appliance. And once you consider doing a continuity test of a wire at home, you need to be confident that the multimeter won't kill or harm you.

Therefore, since you're not interested in half-measures, do yourself a favour and consider a good brand of multimeter. Internationally, there are various renowned brands easily available, but in India I've found that Fluke is one manufacturer who makes their multimeters (and other measuring devices) easily available online.

I've no affiliation with Fluke, but just recommend them based on reputation, and having used them for a few years. I've just noticed that Amazon India also carries Extech multimeters which is also a well regarded brand, and the Extech EX330 is one that has received a lot of acclaim. This multimeter also comes with a K-type thermocouple which allows you to measure temperatures (such a the temperature at the AC vent).

Fluke have a range of multimeters of which the Fluke 101 is the cheapest, at Rs. 2000. The only drawback of this is that you cannot measure currents (only voltage), and if you want something that can measure current, then consider either the Fluke 106 or Fluke 107. These are their entry-level multimeters. They have a further range of multimeters that are focused on electrical use, electronic use and automotive use, but those are more targeted at professionals than hobbyists.

Last edited by arunphilip : 10th January 2017 at 18:04.
arunphilip is offline   (3) Thanks
Old 11th January 2017, 15:23   #110
Senior - BHPian
 
dass's Avatar
 
Join Date: May 2008
Location: Bangalore
Posts: 1,291
Thanked: 737 Times
Re: DIY: Hardwiring your Dashcam

I don't have the courage to attempt the hardwiring the dash cam that I recently received. I tried to procure some parts and finally when I tried to check for the location of the fuse and the angle at which it is located in the Dzire, will need a lot of stretch from my bad back to do it. Hence I have decided to get it done from someone who knows how to do it and wont take much time.

Can anyone suggest a good accessories guy, in the marathalli area who can do this installation properly?
dass is offline  
Old 12th January 2017, 10:29   #111
Distinguished - BHPian
 
arunphilip's Avatar
 
Join Date: May 2007
Location: Bangalore
Posts: 1,989
Thanked: 6,171 Times
Re: DIY: Hardwiring your Dashcam

Quote:
Originally Posted by dass View Post
Can anyone suggest a good accessories guy, in the marathalli area who can do this installation properly?
Any reputed ICE installer should have no problem in installing this, as hardwiring a dashcam is quicker & easier than an ICE installation. If you know someone, that's good, else check the Bangalore TBHP directory for a nearby and recommended ICE installer.

It would be good if you know the procedure for the installation (and I presume you already have the fuse tap and hardwiring kit), so you can supervise the chap doing the installation and ensure he doesn't take any shortcuts. Since yours is a Dzire, the best reference for you will be a4anurag's dashcam thread where he's installed a dashcam in his Swift.

I trust this helps you.
arunphilip is offline   (1) Thanks
Old 29th January 2017, 17:26   #112
Senior - BHPian
 
samaspire's Avatar
 
Join Date: Sep 2015
Location: Manipal / Udupi
Posts: 1,630
Thanked: 4,860 Times
Re: DIY: Hardwiring your Dashcam

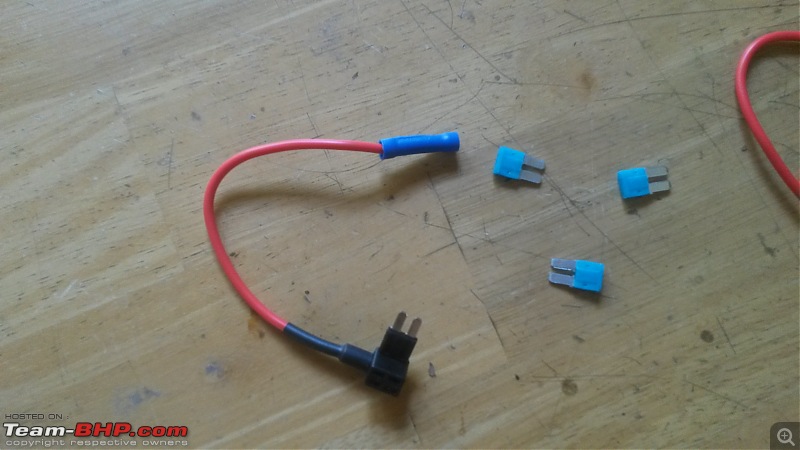
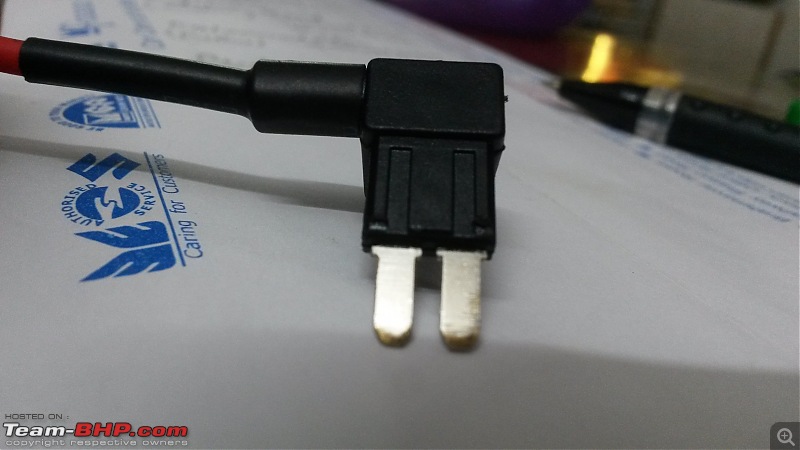
I have finally got most of the needed parts but have run into an unexpected roadblock. The fuse tap does not go into the fuse box - the grooves don't match. The Ford fuse has a small step at the top while the fuse tap is rectangular. Only solution that I can see is to melt the casing with heat, but is it advisable?

Another issue is that I'm not able to find fuses - even the service centre doesn't have it! The ones that came with the taps are all 15A and of poor quality - aluminium.

Last edited by Samurai : 18th February 2017 at 09:15. Reason: typo
samaspire is offline   (1) Thanks
Old 29th January 2017, 20:37   #113
Distinguished - BHPian
 
audioholic's Avatar
 
Join Date: Jun 2012
Location: BengaLuru
Posts: 5,663
Thanked: 19,443 Times
Re: DIY: Hardwiring your Dashcam

Quote:
Originally Posted by samaspire View Post
I have finally most of the needed parts but have run into an unexpected roadblock. The fuse tap does not go into the fuse box - the grooves don't match. The Ford fuse has a small step at the top while the fuse tap is rectangular. Only solution that I can see is to melt the casing with heat, but is it advisable?

Another issue is that I'm not able to find fuses - even the service centre doesn't have it! The ones that came with the taps are all 15A and of poor quality - aluminium.
Dont do any modifications to the car. Do post pictures of your ford's fuse and the fuse tap. If the fuse tap does not go into the slot, maybe you can get the legs of the fuse tap ground to match the legs of the Ford fuse.
audioholic is offline   (3) Thanks
Old 29th January 2017, 21:13   #114
Distinguished - BHPian
 
arunphilip's Avatar
 
Join Date: May 2007
Location: Bangalore
Posts: 1,989
Thanked: 6,171 Times
Re: DIY: Hardwiring your Dashcam

Quote:
Originally Posted by samaspire View Post
I have finally most of the needed parts but have run into an unexpected roadblock. The fuse tap does not go into the fuse box - the grooves don't match. The Ford fuse has a small step at the top while the fuse tap is rectangular. Only solution that I can see is to melt the casing with heat, but is it advisable?
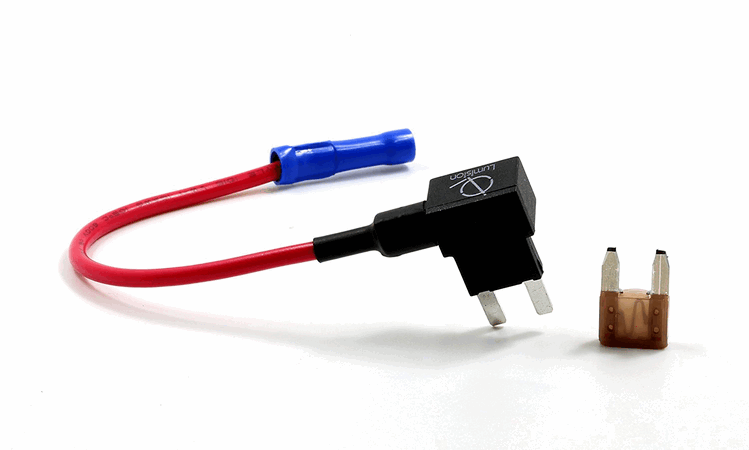
Is the problem with the prongs/legs of the fuse tap being squared off, while the prongs/legs of the fuse itself are tapered? i.e. like the following image?
Name:  71hfhntfnuL._SL1500_.gif
Views: 2175
Size:  36.8 KB
Fuse tap with squared-off legs, fuse with tapering legs

If so, then yes, I agree with audioholic's recommendation - its probably easy to just grind the legs of the fuse tap (using a dremel or similar tool) to achieve a similar taper.

However, I'm not sure if this is the problem you're facing, or its something to do with the plastic coating of the fuse tap/fuse, since you're referring to melting the case.

Last edited by arunphilip : 29th January 2017 at 21:17.
arunphilip is offline   (3) Thanks
Old 29th January 2017, 23:48   #115
Senior - BHPian
 
samaspire's Avatar
 
Join Date: Sep 2015
Location: Manipal / Udupi
Posts: 1,630
Thanked: 4,860 Times
Re: DIY: Hardwiring your Dashcam

Quote:
Originally Posted by audioholic View Post
If the fuse tap does not go into the slot, maybe you can get the legs of the fuse tap ground to match the legs of the Ford fuse.
Quote:
Originally Posted by arunphilip View Post
Is the problem with the prongs/legs of the fuse tap being squared off.

...something to do with the plastic coating of the fuse tap/fuse, since you're referring to melting the case.
I had initially thought that the problem is with the plastic coating of the fuse tap and I was considering melting that; not the car's fuse holder .


But after reading your responses, I checked by inserting the fuse that came with the tap - it does not go in either. The problem is as you both have stated - the prongs need to be tapered off.

Would a hand file work?

DIY: Hardwiring your Dashcam-20170129_231853.jpg

DIY: Hardwiring your Dashcam-20170127_151532.jpg
samaspire is offline   (1) Thanks
Old 30th January 2017, 00:10   #116
Distinguished - BHPian
 
arunphilip's Avatar
 
Join Date: May 2007
Location: Bangalore
Posts: 1,989
Thanked: 6,171 Times
Re: DIY: Hardwiring your Dashcam

Quote:
Originally Posted by samaspire View Post
Would a hand file work?
Yep, a hand-held file would also suffice, provided it is compact enough (yet abrasive enough) to do the job.

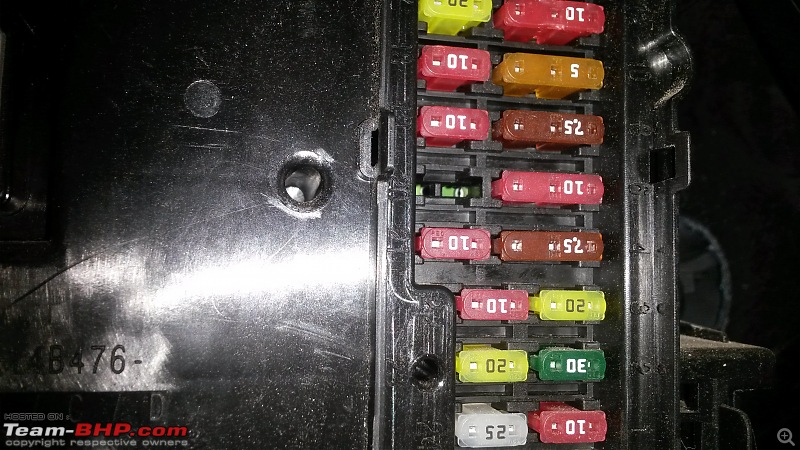
Compared to the earlier picture of an Aspire fuse (the red fuse from the previous page) it appears that the legs of your fuse tap have to be ground down particularly on the outside, since the outer edges of the Aspire fuse appear to be more bevelled than the inner edges.

Coming to the fuse to be used with the fuse tap - can you not use one of the spare fuses that will be present in the first aid kit? That will usually contain spare bulbs and a few fuses.

The legs of the blue fuses in the above picture (which I presume came with the fuse tap) look far thicker than the legs of the red fuse, so I can see why they don't fit in the fuse box (do they fit in the fuse tap, though?)
arunphilip is offline   (1) Thanks
Old 30th January 2017, 07:28   #117
Senior - BHPian
 
samaspire's Avatar
 
Join Date: Sep 2015
Location: Manipal / Udupi
Posts: 1,630
Thanked: 4,860 Times
Re: DIY: Hardwiring your Dashcam

Quote:
Originally Posted by arunphilip View Post
Can you not use one of the spare fuses that will be present in the first aid kit? That will usually contain spare bulbs and a few fuses.

(which I presume came with the fuse tap)

(do they fit in the fuse tap, though?)
I did not get any spare fuses or bulbs in the kit, but I've asked Ford to arrange for them now.

Yes

Yes, but tight.
samaspire is offline   (1) Thanks
Old 12th February 2017, 22:15   #118
Senior - BHPian
 
samaspire's Avatar
 
Join Date: Sep 2015
Location: Manipal / Udupi
Posts: 1,630
Thanked: 4,860 Times
Re: DIY: Hardwiring your Dashcam

Quote:
Originally Posted by audioholic View Post
If the fuse tap does not go into the slot, maybe you can get the legs of the fuse tap ground to match the legs of the Ford fuse.
Quote:
Originally Posted by arunphilip View Post
... it appears that the legs of your fuse tap have to be ground down particularly on the outside
done. Dashcam fusetapped.

Both of u were right - the legs had to be tapered. I hunted for suitable files and finally found one small enough that is used by goldsmiths. But filing it was too much effort, so I gave it to a goldsmith and got 3 pairs of fuses and taps filed for 100 bucks.

That was not the end of the story. The fuse tap still would not fit in the fuse box.

DIY: Hardwiring your Dashcam-20170212_204041.jpg
The filed legs

The grooves in the casing were obstructing entry as I had initially thought. I melted them with a hot knife and removed the grooves. And it worked.

The Aspire has a few unused fuses but all were supplying power even without the key in the ignition. Finally I connected the Dashcam to the audio unit which is perfect because it has the ideal switch off scenario.
samaspire is offline   (2) Thanks
Old 4th May 2017, 15:02   #119
BHPian
 
CrazyToDrive's Avatar
 
Join Date: Nov 2016
Location: Pune / Mumbai
Posts: 92
Thanked: 306 Times
Re: DIY: Hardwiring your Dashcam

Quote:
Originally Posted by samaspire View Post
done. Dashcam fusetapped.

The Aspire has a few unused fuses but all were supplying power even without the key in the ignition. Finally I connected the Dashcam to the audio unit which is perfect because it has the ideal switch off scenario.
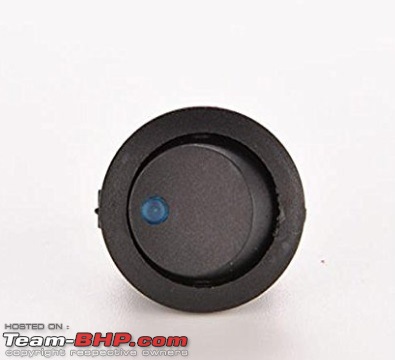
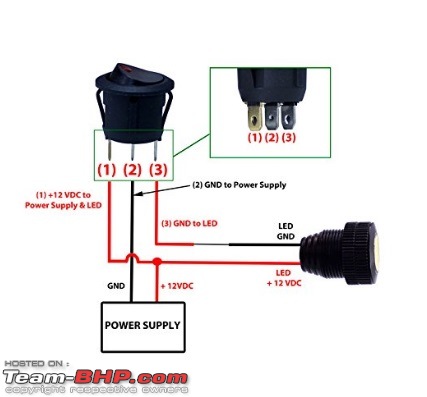
I am planning to add 2 additional accessory sockets for my Aspire, but as Samaspire mentioned that unused fuses remain on even after removing the key, I had a question, can I add a switch to the circuit so that I can switch it off when not used, maybe illuminated switch like this.

Also please help me how to go with circuit? I am unable to figure out the circuit diagram with the switch.

DIY: Hardwiring your Dashcam-switch.jpg
DIY: Hardwiring your Dashcam-switch-2.jpg
CrazyToDrive is offline   (1) Thanks
Old 4th May 2017, 15:15   #120
Senior - BHPian
 
samaspire's Avatar
 
Join Date: Sep 2015
Location: Manipal / Udupi
Posts: 1,630
Thanked: 4,860 Times
Re: DIY: Hardwiring your Dashcam

Quote:
Originally Posted by arunphilip View Post
Yep
Quote:
Originally Posted by CrazyToDrive View Post
Also please help me how to go with circuit? I am unable to figure out the circuit diagram with the ...
This was something I was planning to ask a month back, but all my DIYs have been on hold since then.

I have actually ordered the exact same switches (3 of them), so am also eagerly awaiting the answer. I want to know - why 3 prongs?

FYI, the switches are of good quality but a little hard to toggle.
samaspire is offline  
Reply

Most Viewed


Copyright ©2000 - 2024, Team-BHP.com
Proudly powered by E2E Networks