| |||||||

| Search Forums |
| Advanced Search |
| Go to Page... |
 |
| Search this Thread |  960,560 views |
 14th February 2023, 23:27
| #1051 |
| Distinguished - BHPian  | Re: My Car Hobby: A lot of fiddling, and some driving too! Jaguar XJR, Mercedes W123 & Alfa Romeo Sp Today I decided to finish the last few jobs on the Alfa Spider. First thing, a new O-ring for the nut on the pitman arm. The (castle) nut sits too low below the hole for the cotter pin. So I decided to add a thick 3mm O-ring. I could get good enough access by jacking up the Spider, axle stand underneath and with my new light I had the nut off in no time.  Here you see the castle nut and the metal O-ring from one of my many boxes with bolts, nuts and O-ring. Thickness and outer diameter are fine, but the inside diameter is way too small.  My initial thought was to put it in my lathe, bore it out to 13mm and use a boring bar to widen it up. But as luck would have it, there was no way I could get this stupid O ring to fit into my chuck. So on to plan B. Break out the BIG MACHINERY.  I put my divider table on my mill. Put the ring into it. Used my DRO (Digital Read Out) to find the exact center and started milling.  I had to mill these little steps. The pitman shaft has splines that are a slightly larger diameter than the thread. So the top of these splines should not touch the underside of the O-ring. Needs a bit of space. See images below as well.  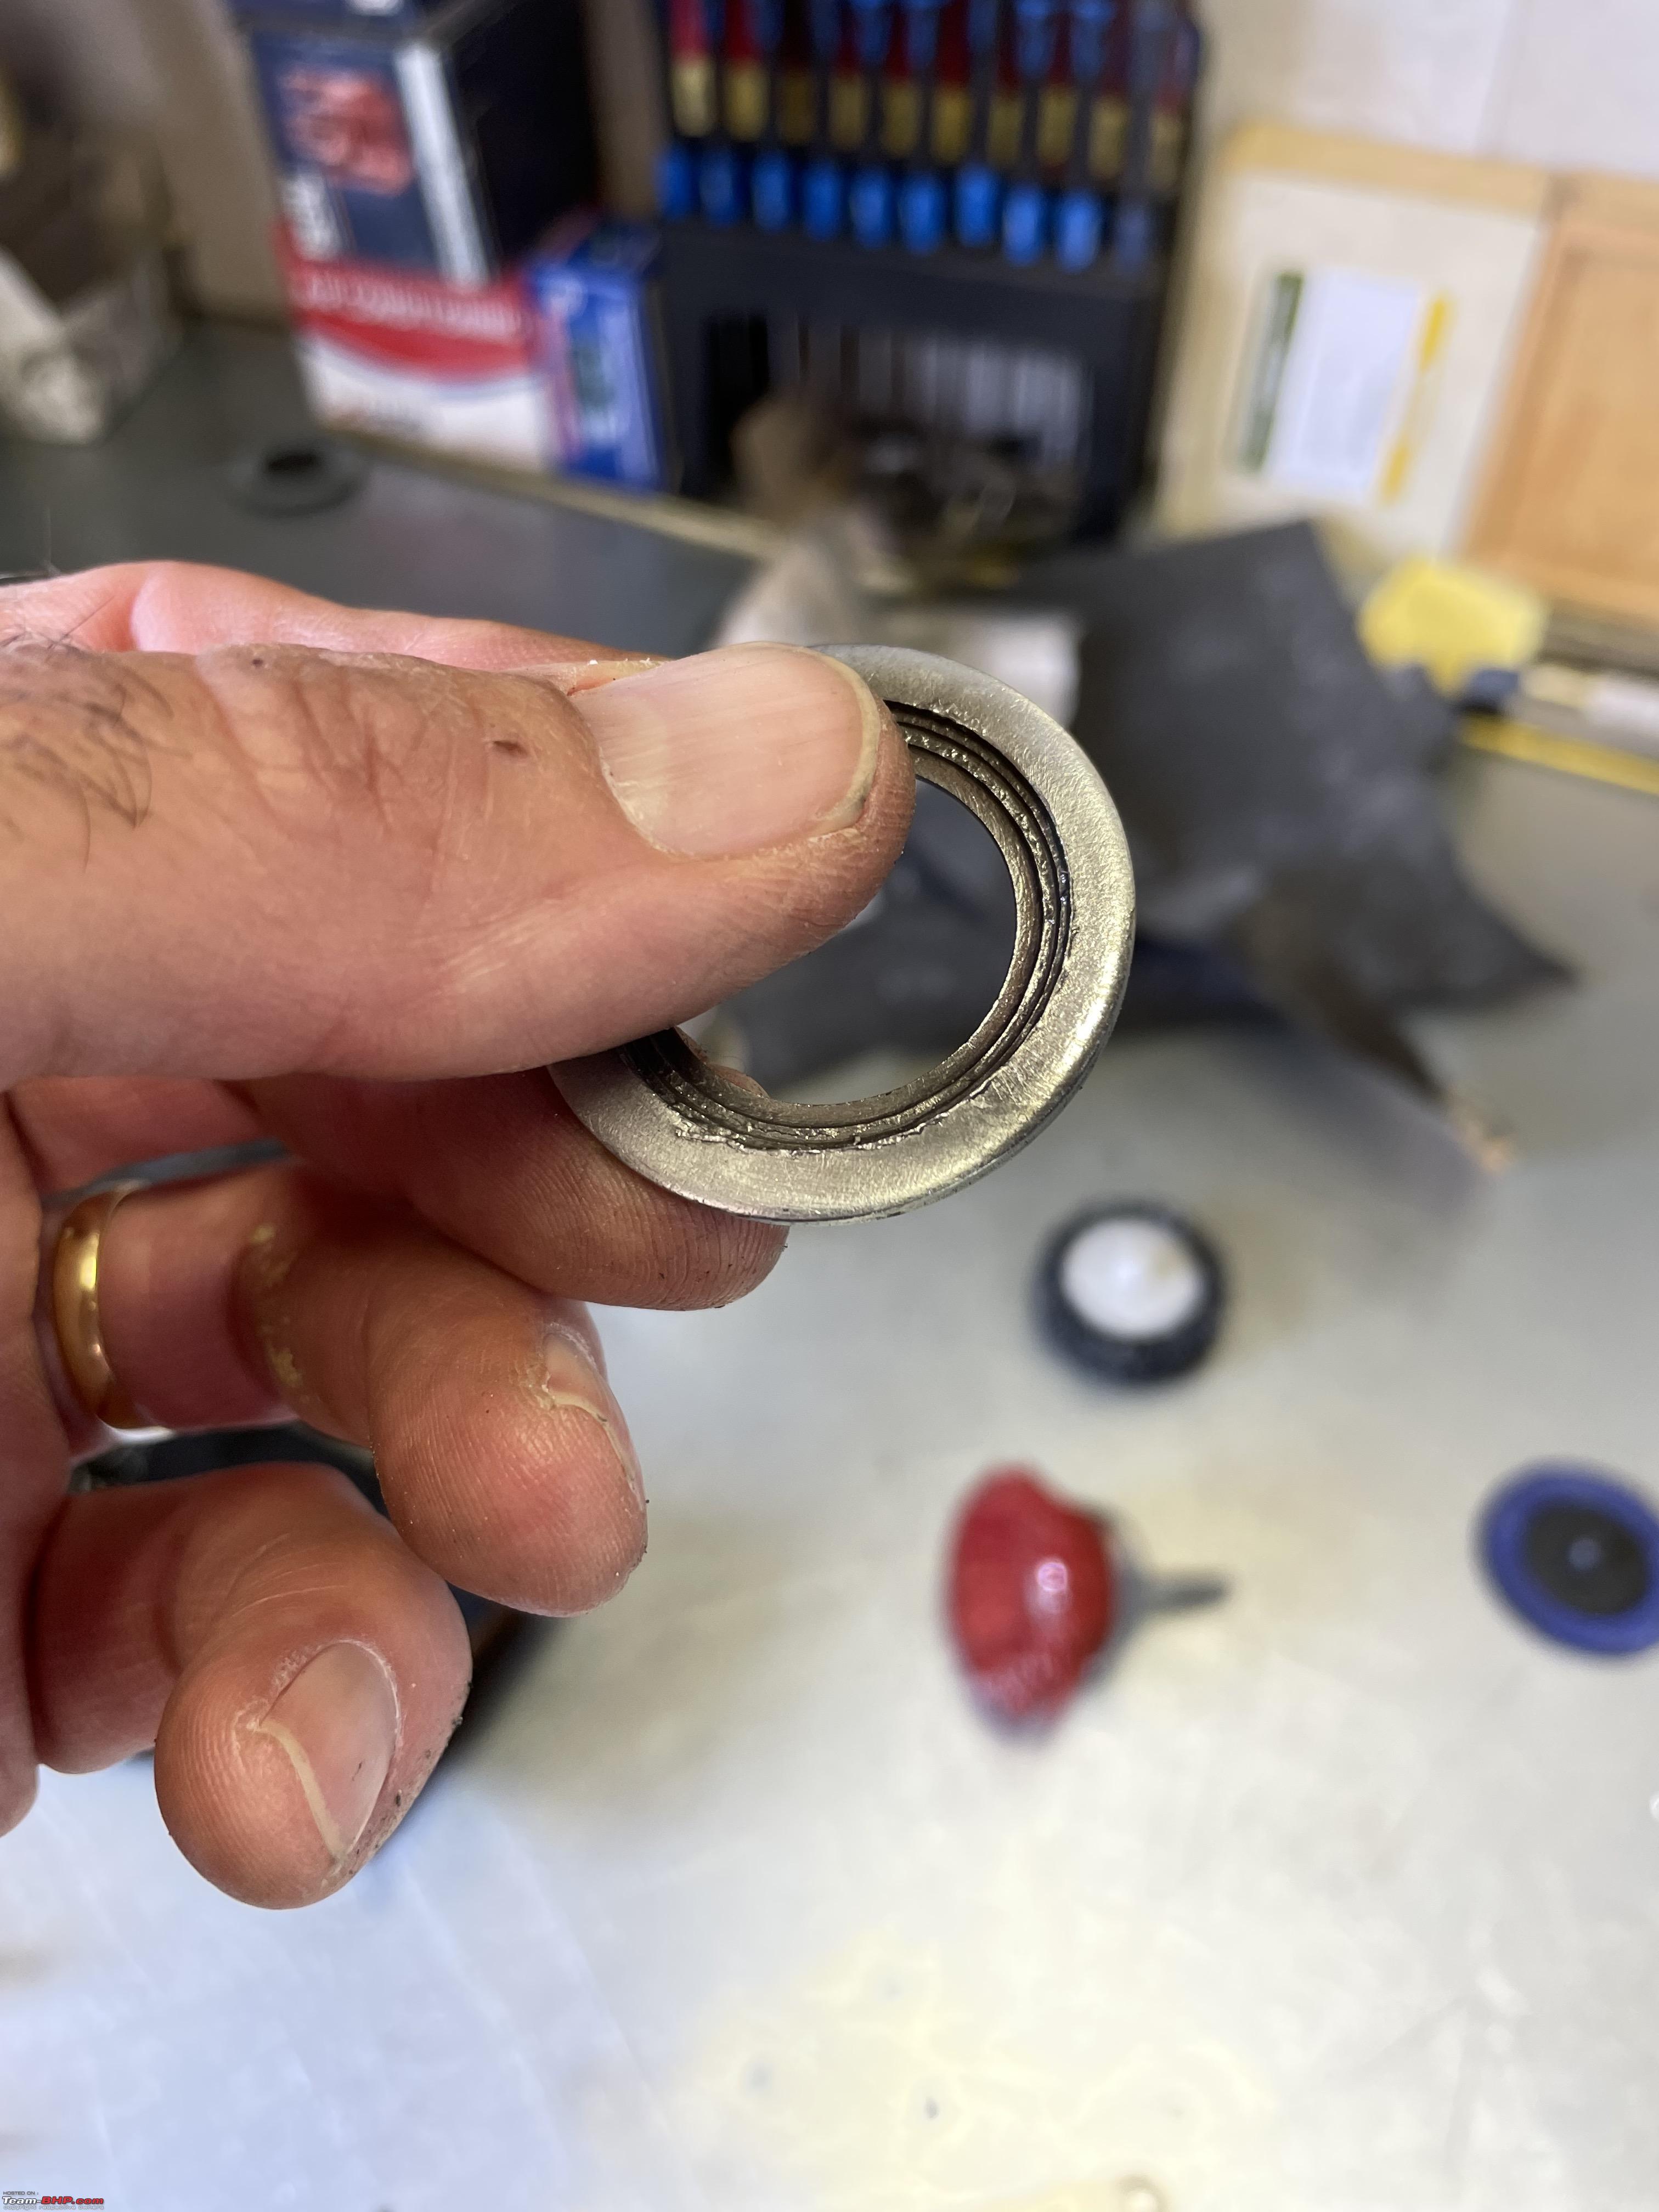 Here you see the pitman arm and you can just about see the splines as well. So the O-ring will allow the top of these splines to be pulled into the O-ring little recess/groove I made. I am not sure it is really necessary, but with the steering mechanism it is as with brakes, better safe than sorry.  Put the nut back on, tightened it up to 135Nm and put the cotter pin in.  Job done Next, onto the electrical issues. I had already noticed that the little courtesy lights underneath the knee boards dont work. I thought I had better check all lights. Sure enough none of the courtesy lights in the boot or bonnet worked. Also, more relevant the right front low bean was not working either. So I looked up the fuses in the manual to see what fuses might be involved.   I checked the fuse and it appeared ok. So the next thing is to check the light bulb. They do break after a while. Always a bit of a fiddly job on the Spider to remove them. This is how it starts.  Chrome trim removed.  Next the complete light unit can be undone by unscrewing three of these tiny bolts.  Here we are, all apart  Took the rubber boot off and you have access to the actual light bulb.  I checked the light bulb and it was actually ok. Back to the drawing board!! Or rather the fuse box. I have had problems with these fuses before. They look ok, but because dirt collects on both end, corrosion they dont work properly. So I fiddles a bit more with the fuses. Sure enough, the right low beam came on!  I decided to remove the knee board again and take the fuse box out as well.   I pulled gently on all the wires and all the fuses. Took all fuses out and cleaned the fuses and the contacts. Pulled all the relais, cleaned the contact. Put everything back together again. Presto; we have light underneath the bonnet  And in the boot too!!  I also concluded that the reason for the courtesy lights underneath the knee boards not working is because there is a timer relais missing!! Very strange. That relais was installed. I doubt it could have been knocked out during all this messing about with the steering box. I would have noticed, you dont overlook a relais that falls into the foot well. I need to see if I can get hold of such a relais. But other than that, the Spider is fine. Waiting for the wheel alignment date with Marc. Tomorrow I will finish the spraying of the Jeeps centre rim pieces. Jeroen |

|  (9)
Thanks (9)
Thanks
 |
| The following 9 BHPians Thank Jeroen for this useful post: | carthick1000, dailydriver, digitalnirvana, IcarusMan, keroo1099, Prowler, Thad E Ginathom, vb-saan, VivekCherian |
| |
|
16th February 2023, 15:37
| #1052 |
| Distinguished - BHPian | Re: My Car Hobby: A lot of fiddling, and some driving too! Jaguar XJR, Mercedes W123 & Alfa Romeo Sp I have spend some time (and money!) on the Jeeps exterior, mainly painting various bits. I already showed the sandblasted and powder coated rims. Very happy with those. Last week the Jeep had some re-spray work done. Both two front wing panel, the bonnet and a few other bits. The left front wing panel had been replaced by the previous owner. But it was not the correct panel. It had the same colour, but it also had a stripe on it and an indicator light (which was not working obviously). So I had the paint guy remove the stripe and weld up the indicator light hole in the wing panel. Here you see the Jeep as I had just bought it, about a year ago:  Also, the bonnet and the grill had some very bad big scratches on it, right down onto the bear metal. All of that has now been fixed. I am very happy with the quality of the pain work. Exact match of the colour and they did a really good job of filling/sanding down of the various little bumps and so on. Really impressive.     I am very pleased to have been introduced to them by my friend Berndt. It is car part store and paint/repair shop. Owned and run by two brothers. Very useful to know them. I can see myself going there for other jobs and parts too. Of course, with the front of the Jeep now just about perfect, I need to pay some more attention to the rest of the car paint wise. I have booked myself into a workshop car polishing in a few weeks time!! Because that is what this car really needs now; a proper machine polish. I have never done that. So I found this guy that does all sorts of car detailing courses. Its all one to one teaching with mostly practical work on your car. Of course, afterwards you can buy all the necessary machinery and products from him as well. The one little paint job I did do myself was the center pieces of the rims. They were really tacky to start with and not the correct colour.  First order of business is to remove the old paint. I was not quite sure how to go about this. These things are made of plastic, so I was reluctant to use any paint remover. In the end I had to resort to various ways, tools and lots of different sandpaper.  I managed to get these center pieces fitted into my lathe. Lathe very well covered to protect it from paint and sandpaper dust, which will ruin the bed of the lathe very quickly. Added a makeshift vacuum tube as well.  As I managed to get the paint off, it became clear that the plastic piece are actually covered by some sort of (sheet) metal frame. Some of it was broken.   So I spend some time with plastic filler to get a reasonable smooth finish. I had chosen this day because it was dry and very sunny. I need to spray outside with a decent temperature. I always put the paint and primer inside the house a couple of hours before using them. So they are at least around 20oC. Broke out my trusted 1982 Black&Decker workmate to hold the four pieces on little wire frames I made earlier.   I started with primer spray first. It needs three layers, sprayed three minutes apart. After three hours curing, the final paint can be sprayed on.  These spray on paints dry pretty quickly. I let them sit outside till about 17.00 hours drying in the sun. By then the sun was just about gone and it will get a little moist out here so I moved the workmate inside my garage.  The end result the next day!!  They look great on the Jeep!!   Another job done!! I also bought this cool key hanger. Its really nice model of the head gasket of my Jeep!! The company I ordered it from does all sorts of cool miniature head gaskets of many cars and some other stuff too.  https://disagree.de And now for something completely different: I came across this unusual car the other day:  Last edited by Jeroen : 16th February 2023 at 16:04. |
|
| (9)
Thanks
|
| The following 9 BHPians Thank Jeroen for this useful post: | carthick1000, crdi, digitalnirvana, IcarusMan, InControl, keroo1099, Prowler, Thad E Ginathom, VivekCherian |
|
17th February 2023, 20:57
| #1053 |
| Distinguished - BHPian | Re: My Car Hobby: A lot of fiddling, and some driving too! Jaguar XJR, Mercedes W123 & Alfa Romeo Sp This morning I set off really early in the W123 to go see my sister who lives in Zutphen. A very nice little provincial town east of us, not to far from the German border. She had some problems with her (17 year old) car and was given a quote to trade it in against a 2017 Citroen C1 with 53.000km on the clock. So I went to see her. We test drove the little C1, quite a nice little car. Its the version with the automatic transmission (AMT) as my sister cant drive a manual shift. We managed to close the deal, so a very happy sister. On the way back home from Zutphen I always stop at the Gallery in nearby Brummen. It might look like a museum, but everything is for sale. I know the owner, Nico Aaldering. He is just a very accomplished second hand car re-seller and specialises in classic cars and some exotics. Especially during the weekends this place gets very busy. Many people will drive for hours, coming from all over the Netherlands, Germany, Belgium to spend a couple hours here looking at all these magnificent cars. Have a look: https://www.gallery-aaldering.com/collection/ When I visited them in 2014 I wrote a little post about it. These days the cars they have on sale are quite high end market. ttps://www.team-bhp.com/forum/beyond-borders/146271-gallery-brummen-netherlands-vintage-car-mecca.html Believe it or not, I bought my 1982 Mercedes W123 200 from Nico about twenty years ago! I just did not have the time to look around extensively or take a lot of images. But I came across one car that is quite special. The car itself and the price.  This is a Shelby Cobra 289, build in 1963. The first owner was FoMoCo General Office Accounting. Yes, FoMoCo stands for Ford Motor Company. It was used for all kinds of promotional purposes. At the time the invoice shows it costed $ 5171 and that included a $300 discount for FoMoCO! Today you can buy this Cobra for Euro 995000 (say a million euros)!! So that would have been quite a good return on investment if they had kept it! There are a lot of Cobras out there. Original ones are rare though. Mostly these days you see from simple kit car replicas to almost near identical reproductions. The latter costing serious money too! Back to my workshop. I have not worked on my model engines much the last year for a variety of reason. I have done a bit and I really want to get going gain. So I dusted of my latest project; A scuderi 4 stroke engine. This is how far I got! 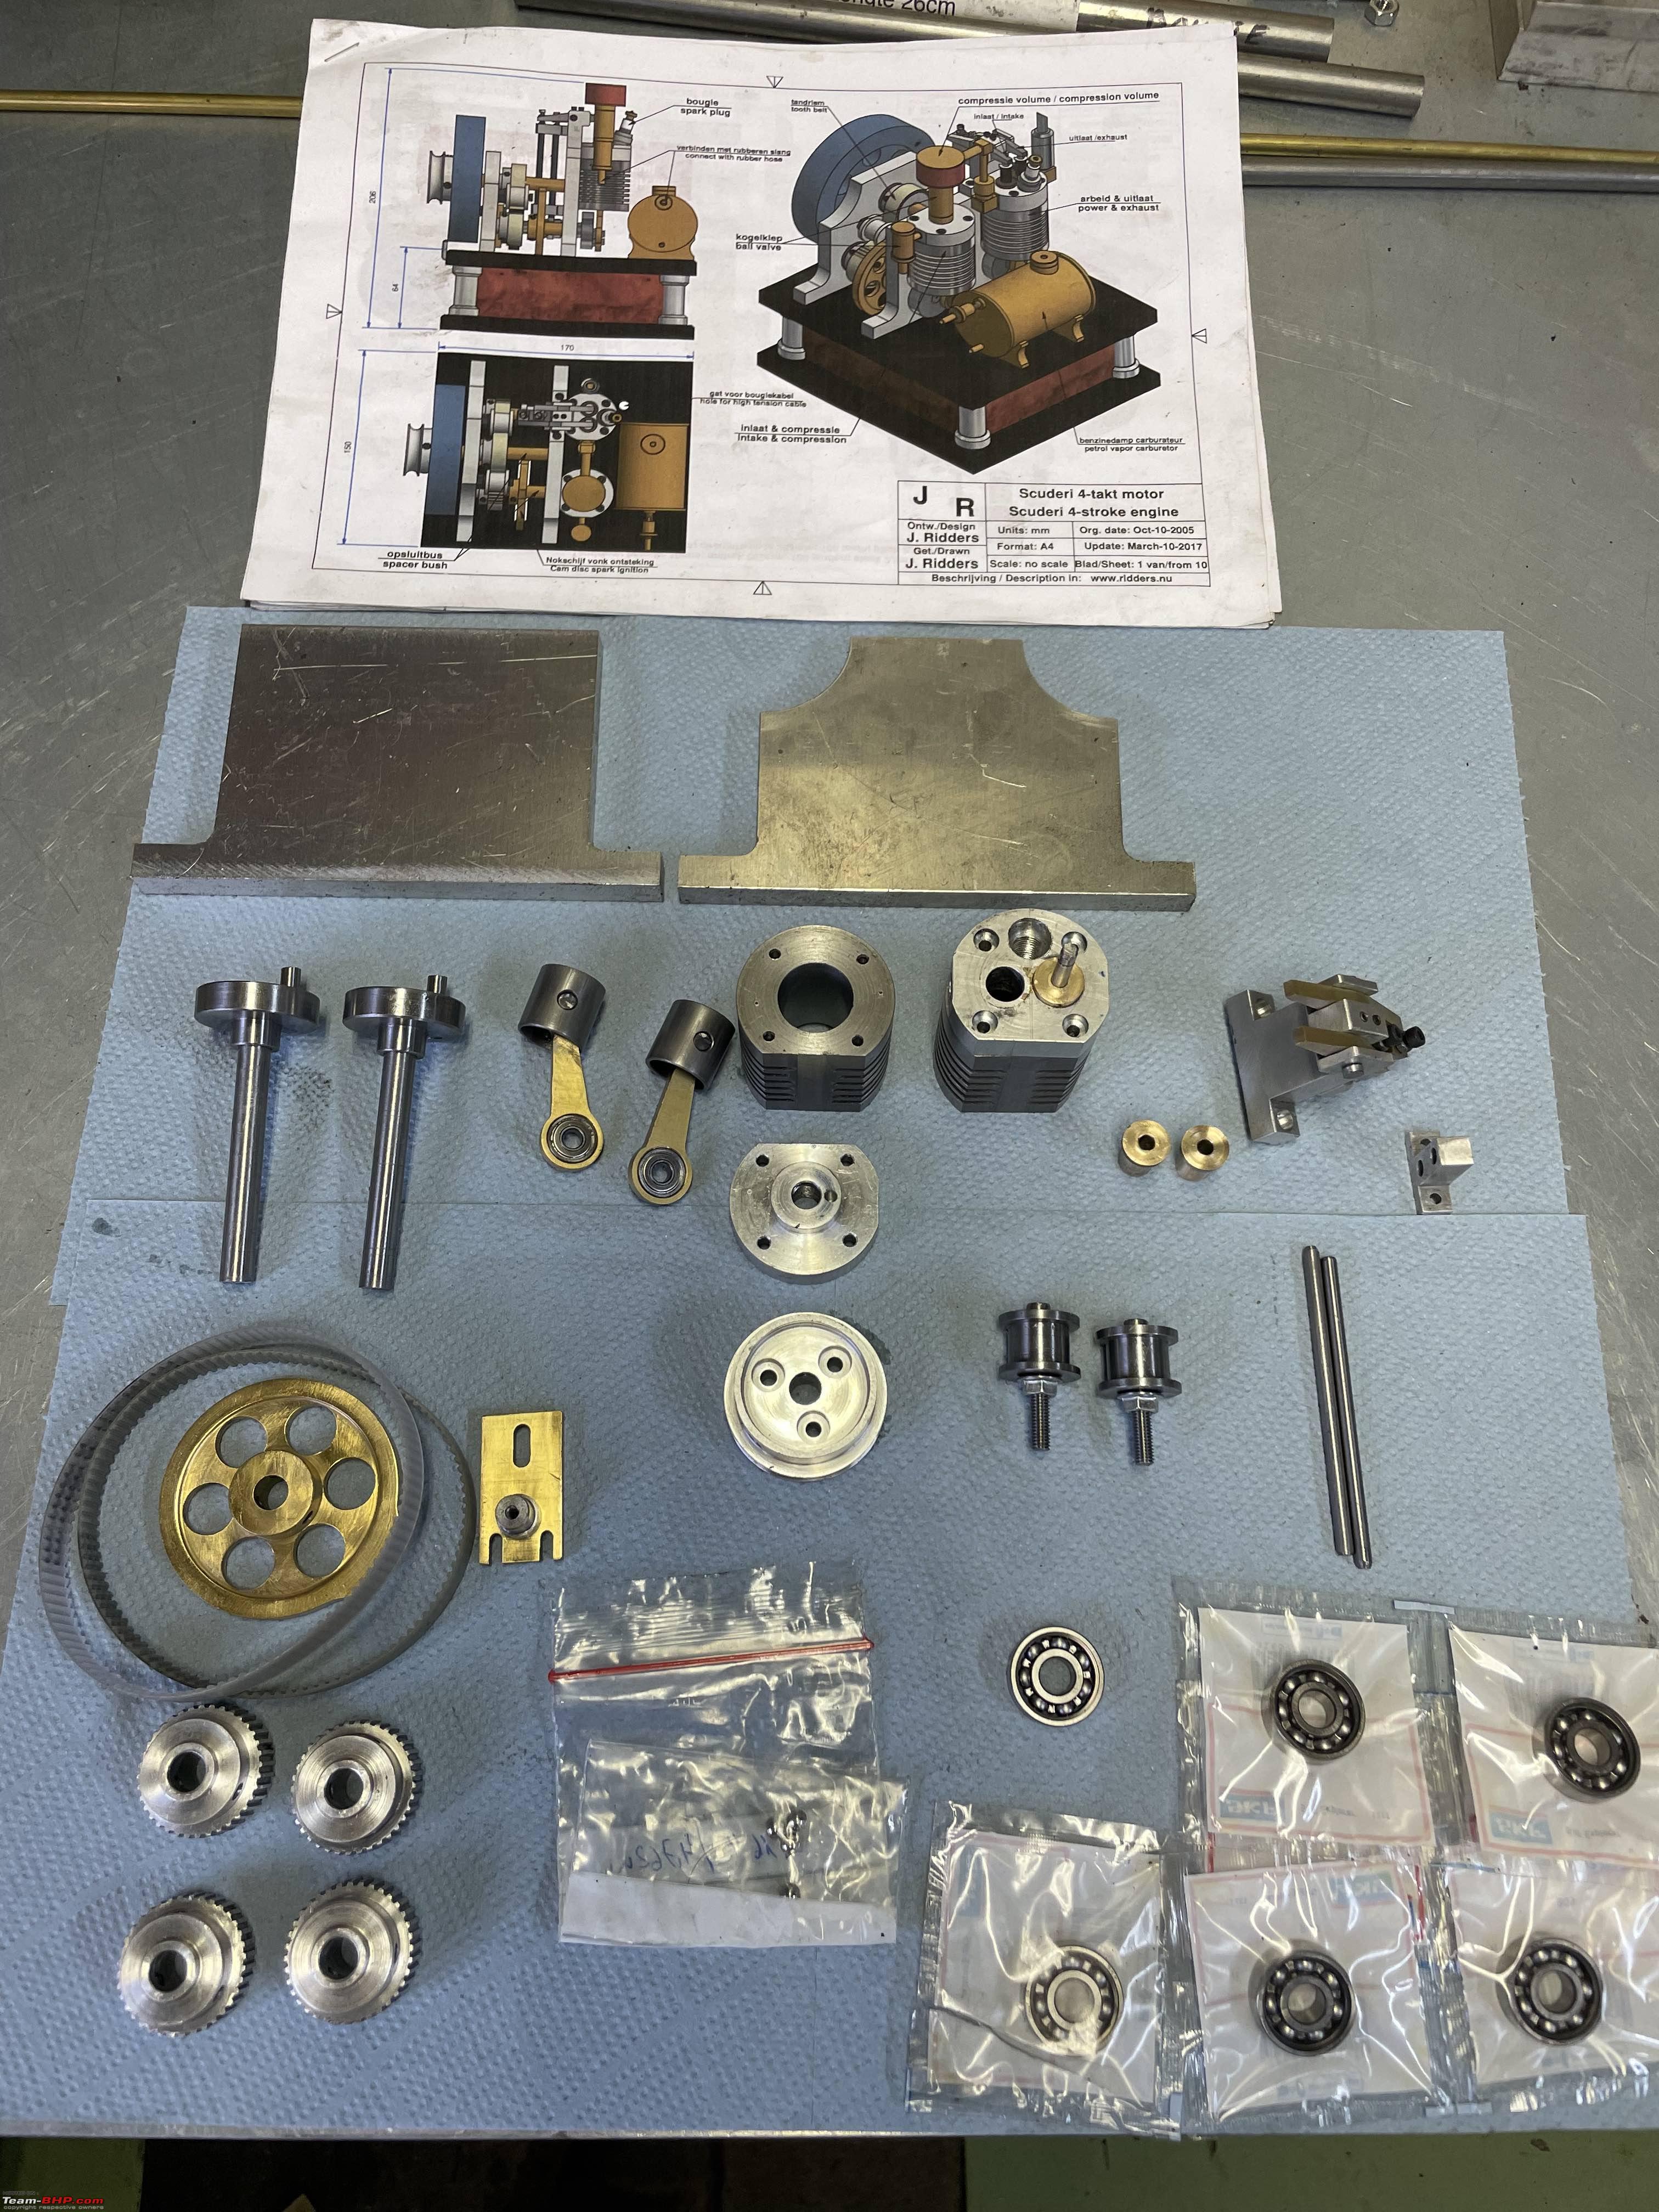 Tomorrow a fellow TeamHP-ian will come for coffee and to see my garage. Look forward to it. Jeroen |
|
| (9)
Thanks
|
| The following 9 BHPians Thank Jeroen for this useful post: | --gKrish--, carthick1000, dailydriver, digitalnirvana, IcarusMan, keroo1099, Prowler, Thad E Ginathom, VivekCherian |
|
23rd February 2023, 02:16
| #1054 | |
| Distinguished - BHPian | Re: My Car Hobby: A lot of fiddling, and some driving too! Jaguar XJR, Mercedes W123 & Alfa Romeo Sp I took my W123 to the repair/paint shop earlier this week. I popped round today to see how they were doing. Looking good so far. Should be ready this Friday!   I also ordered and received today a nifty little tool, a paint thickness gauge. All electronics. Spanner mate and classic car valuation exert Peter has one too. It cost him a lot of money, but he is a professional. Mine cost Euro 15, but I am just an amateur. Still, I am taking it with me tomorrow when I am visiting Peter to verify mine against his. To put Euro 15 (INR 1300) in some European context. That is less than the price of three Starbuck grand Caramel Macchiato’s (https://www.starbucks.com/menu/product/413/hot). I know, I know, I know. It is idiotic to call medium Grand. But what can you do. You order a medium coffee at Starbuck and the spotty kid behind the counter will look at you as if you speak Clingon. This gauge comes with special calibration accessoires. You can calibrate it to work on steel (Fe) or non steel, i.e. plastics (NFe). It has two different scales, mm and mil. I had no idea what kind of unit a mil is. Had to google it!  Quote:
I calibrated it and have already found some suspicious spots on my Spider!!  I am not worried about it. I am on the hunt for another car. Here is my theory: if I show up with my digital paint thickness gauge and find suspect areas on a car, that will ensure the owner dropping the price immediately!! I have to put this theory to practice yet, but you have to admit it makes sense!  Anyway, all ready to set off to drive to spanner mate Peter early morning. Tools are all loaded up. Taking spanners and sockets is not necessary. Peter’s Jaguar is almost 50 years old. Which means every bolt and nut is, to put it diplomatically, non metric! And I only have metric tooling! I am taking mainly various measurement tools and my special electrical/instrumentation tool kit as we will be working on the ignition mostly.  I have also checked and fixed my little UV light. We want to check for leaks on Peter’s Lancia Airconditioning system for leaks. If we have sufficient time I also want to check the steering links on my Jeep. It feels as if I have a bit of play. It could well be the new tyres. But I have already found a bit of play between the steering wheel and the steering box. Looks like an universal joint is giving up on me. More fiddling to come, no doubt!! Jeroen Last edited by Jeroen : 23rd February 2023 at 02:24. | |
|
| (7)
Thanks
|
| The following 7 BHPians Thank Jeroen for this useful post: | digitalnirvana, IcarusMan, InControl, keroo1099, Prowler, vaasu, VivekCherian |
|
24th February 2023, 20:58
| #1055 |
| Distinguished - BHPian | Re: My Car Hobby: A lot of fiddling, and some driving too! Jaguar XJR, Mercedes W123 & Alfa Romeo Sp Early Thursday morning I set off in my Jeep to drive all the way up to spanner mate Peter. Left at about 07.50 and arrived around 09.35. About 140 km, of which 110 or so motorway. Not too bad. Peter’s XJ6 S1 had not run for several years. It was running but broke down near to where he lived. Had the Jaguar towed home and that is where it has been sitting ever since. After sitting in his garage for a couple of years, the brakes had become stuck. Usually that is just rust that builds up and it just takes a bit of a push or in this case a little pull with the Jeep to get everything freed up again. So I backed up my Jeep.  As expected it needed just a little tug and it rolled out of the garage no problem. Disconnected the tow rope for now.  This is a 1973 Jaguar XJ6 S1. It will be 50 years old next month. Which means here in the Netherlands it is exempt from (bi)annual mandatory inspection, MOT or APK as we call it. It did show it had been put away in Peter’s garage for several years, with nothing done to it.    Peter bought it probably some 20-25 years ago from a guy in the USA. Had it shipped and imported it into the Netherlands. Over the years we have fiddled with it quite a bit. In fact I can honestly say I have spend more hours fiddling on this car then driving it. Come to think of it, I am not even sure I have ever driven in it. Peter has. I know he has taken to the UK once or twice as well. This car has the beautiful six inline cilinder. Coming from the USA, it also had a very special air pump attached to the engine. That ensured emissions were kept in check. Not necessary here, so it has been disconnected. Everything still works on this car, including the airconditioning. Oh well, of course the engine doesn’t work either. But everything else, such as radio, electrical windows etc does, which as far as a Jaguar from this era goes, is quite the feat!! Quite a large engine bay  You can see that emission air pump in front of the exhaust manifold. Notice no V-belt!  Peter had charged the battery and I checked it with my multimeter. Engine cranks just fine, we felt. But it doesn’t fire up. What it does do, is leak an awful lot of fuel from the two carburettors. Ten or fifteen years ago we had the same problem when we tried to revive it that time. What happens is that the fuel in the carburettor eventually evaporates. There is a large plug pushed in the float chamber which has a O-ring. When that O-ring gets exposed to fuel/air mixture it eventually dries out and it starts leaking. So Peter ordered two new plugs. It did not stop us from investigating further. Because if anything we felt the complete fuel system is working fine, except it leaks a bit. So we started by looking at the various ignition components. Easiest check is to pull a spark plug out, hold it against the engine still attached to the lead (ensure you have a good mass) and crank the engine. You should see the sparking. But we did not get any spark. So we took out the spark plug and held the lead to the engine and cranked. No spark. We checked with a different spark plug and lead and again no spark.  Whilst we had some of the spark plugs out, we decided to do a quick compression test too. The problem with engines sitting idle for years, is that sometimes the piston rings get stuck. But the compression was fine. One less worry.  Next we pulled the HT lead coming from the coil, held it near then engine and cranked. We did see a good spark!!. We wanted to have a closer look at the distributor, which meant taking the air filter assembly off, the horn and a few other bits and pieces, to get some access to the distributor. You can barely see it here, it is below that black bellowed hose, which we also removed.  Coil is also deep down in the belly of this beast.  We took several measurement of the various leads, the coil. The problem is that unless you have a real short or complete disconnect it is often difficult to draw to much of a conclusion. The leads have a certain impedance, but with a multimeter you only measure ohm. In the end we decided to remove the old mechanical breaker and capacitor. Very simple, fastened with just two little screws.  We installed an electroic breaker instead. Basically a Hall type of switch. These are very simple and extremely reliable and never wear. Instructions are simple enough.   Took us maybe 15 minute to install it and connect it up. It took that long because it has to be fastened with one tiny screw and it is very fiddly and difficult to get it all in the correct orientation. We also installed a new coil. Mechanical and electronic ignition use different coils.  Next we checked the ignition again. And the same baffling problem occurs. We get good, strong, spark on the end of the HT lead when we pull it out of the distributor, hold it near mass and crank the engine. Which means that the low and high Voltage circuit to the coil (and also a ballast resistor) and the distributor is working. As it is sparking the Hall sensor is working too. But we are not getting voltage and thus no spark at the end of the spark plug leads. So we checked everything again, check the rotor height compared to the contact in the distributor cap. Broke out all the manuals and poured over many diagrams.  We checked, measured and did everything we could think of. We checked the distributor cap with an old one. All fine. Same with the rotor, all fine. This is quite frustrating. Ignitions do not come much simpler than this. At some point I was pulling at the spark plug leads and one of the connectors came off. These leads are very very old. As I broke one, we decided we might as well replace them all and see if it makes any difference. So this trouble shooting ain’t done yet. Those of you who follow this thread now that Peter is a professional classic car valuer. He is out on the road four days a week, looking at peoples classic cars and inspecting them.listening to their stories how well they maintain their classic cars and pamper them. As the saying goes, "butchers don’t eat their own sausages". That goes to some extend for Peter as well looking at the state of his Jaguar. As a former certified Official Jaguar Concour d’elegance judge, I also pointed out to him that the window washer reservoir is not original!  Peter told me this was just a functional and practical solution get the car to pass through its last MOT/APK. I told him my Indian friends would approve! We did a few small jobs on Peters’ Lancia Dedra as well. Including checking the AC components and refrigerant circuit with my UV light. Nothing showed up. That is not a hundred percent sure, but most likely it is not a huge leak, or if we are leaky, a leak at all, that is causing the AC not to work. We also had a good look at the steering of the Jeep. I felt it has some play in it. We found one of the ball joints directly on the pitman arm is most likely the culprit. So I picked up a new one this morning from my local Jeep parts guy Edwin.  Tomorrow I am doing my car polishing workshop. Looking forward to it. I hosed down the Jeep as it was covered in Sahara sand. That happens occasionally here. Looks pretty good already. Will look even better when I am done polishing and waxing it!  The workshop guy asked me to bring all my polishing/wax material so he could have a look at it and advise me what to use, or how to use. I have a strong suspicion he will tell me I should have never used it in the first place and I should buy his stuff. We will see. Jeroen Last edited by Jeroen : 24th February 2023 at 21:09. |
|
| (12)
Thanks
|
| The following 12 BHPians Thank Jeroen for this useful post: | carthick1000, dailydriver, digitalnirvana, IcarusMan, InControl, keroo1099, koyomi_araragi, Prowler, Thad E Ginathom, vaasu, VivekCherian, ysjoy |
|
25th February 2023, 05:07
| #1056 | |
| BHPian | Re: My Car Hobby: A lot of fiddling, and some driving too! Jaguar XJR, Mercedes W123 & Alfa Romeo Sp Quote:
 Woke up my 2 yr old daughter sleeping next door, laughing out loud. (Well, its past midnight and my neighbors are still partying with loud music. No better time to read on team-bhp ) Woke up my 2 yr old daughter sleeping next door, laughing out loud. (Well, its past midnight and my neighbors are still partying with loud music. No better time to read on team-bhp ) | |
|
| (7)
Thanks
|

| The following 7 BHPians Thank carthick1000 for this useful post: | boohooper, dailydriver, digitalnirvana, IcarusMan, Jeroen, koyomi_araragi, Thad E Ginathom |
|
26th February 2023, 13:56
| #1057 |
| Distinguished - BHPian | Re: My Car Hobby: A lot of fiddling, and some driving too! Jaguar XJR, Mercedes W123 & Alfa Romeo Sp Yesterday I drove over to Houten, just south of Utrecht, for my workshop Car polishing and detailing. The workshop is organised by Wim. He still has a full time job, but car detailing is his passion and hobby. So he started organising these workshops in his spare time from home. He has an excellent website. https://www.auto-krassen-weg-poetsen.nl Unfortunately all in Dutch. But you can see how much detail and information is on it. I opted for a 3,5 hour workshop, one on one with Wim. Costs Euro 150 (INR 13000), which was excellent value for money! Wim has his garage all kitted out for car detailing. Everything is laid out precisely, very organised, meticulously clean. Those of you who follow my thread know I like that! Wim had a good look at my Jeep whilst it still stood outside in natural light. We talked a bit about it, what I had done on it so far, and what I would like to be getting out of morning detailing session. Next I drove it into Wims garage and we got going.  I dont have to many images of the workshop. I was to busy listening and discussing everything with Wim. A real expert, but even more importantly, he also really knows how to explain things. We started by opening the bonnet and had a go at the engine. Wim showed me the use of various products. What to use where (e.g. different plastics, metals, hoses). He also had some excellent tips on where I could get some materials, and in particular some cheap towels, sponges and so on. You dont need to get everything from specialist car detailing shops. You can get the same stuff for a fraction of the stuff at your local supermarket. (e.g. sponges). You cant detail a complete car in 3,5 hour. So the idea is that Wim just shows you what products you could use on different parts of your car, interior and exterior. And you get to use them yourself also, just to get a feel for it. Interestingly, I had some of the same, or similar products Wim used. But under his tuition with some simple tips and tricks I soon got much better results!! Obviously, we spend some time on my gorgeous, freshly powder coated rims!  One of my big challenges has always been the various black plastic trims on many of my cars. I have at least 6-7 different products. Some work a bit better than others, but they all wear really quickly. Wim gave me some tips on what to look for and to, very importantly, prepare the trim first properly!  We spend time on just about every detail/part of the car. Here Wim is showing me how to clean up the window wipers properly and in a way that will last!  We spend most time on polishing the car. Wim showed and explained to me the use of these double action policing machines, the various different types of pads and polishing compounds and so on. He showed me how to use it on the vertical and horizontal parts of the car. Wim showed me first, next I did, whilst he helped me and corrected me. Very useful and practical instructions.  We also had a go at polishing some of the plastic parts on the car, notably the third brake light and left rear lights. Amazing result!!  One of the last things Wim showed me, how to deal with some of the interior trim on the doors. As he was cleaning the drivers door trim he also touched some of the switches, including the central locking switch. We heard it click and Wim asked me if I had the key. Yes, I replied. But I had not quite understood what happened. The key was not in my pocket but in the car, inside the cup holder of the centre console. Did not think much of it. We were finished and I closed all the doors of the Jeep. We had some final discussion and then I wanted to get going. Only to find the Jeep closed and locked. I had locked myself out, once again!! Happened to me a few years ago with the Jaguar in France. I decided I would take the train home, pick up my spare key, return by train. Wim took and picked me up from the local train station. So I thought me and my spare key would be on our way soon. But the spare key would not open any of the doors!! This is a duplicate key I had made the very first day I had bought the Jeep. It did not have a spare key, so I had one made right away. But of course, it is a duplicate of a 25 year old, worn, key. I had checked the spare key in the ignition and that did work, but I had not checked it on the doors. Also, I had never gotten around to get a spare FOB for my spare key. Wim and I fiddled around a bit with the spare key. Sprayed some WD40 and other special lock stuff. But all to no avail. Time to call the expert! He arrived within 30 minutes. He used the same technique as on the Jaguar. Use a plastic wedge to pry open the top of the door and then shove in these special inflatable little pillows.   With the corner of the door sufficiently pried open he inserted a long narrow steel rod.  Initially he tried to push the central locking switch. But that proved to be difficult. Too long a rod against to much resistance of the switch. But I pointed out the keys and my special Jeep Head Gasket key hanger in the centre console. That was very easy to pick up. He gently put it on the drivers chair and pushed the door open button on the FOB. Presto, all doors open!!  Very glad that worked out alright. You never know, these guys tend to be very very good at breaking and entering your car. But they might cause some damage to paint, or the window might break. None of that in this case. Very relieved, very happy. All in all, an excellent and very useful workshop. Many thanks to Wim. He has also provided me with a very useful poster which shows exactly what kind of products and technique to use on what parts of the car. Also a 30 page document detailing all the various products we used and where I can order them. My birthday is coming up soon and I have informed my wife of what I will be ordering on her behalf as my birthday gift from her! On the way home I called spanner mate Peter. He had received the various parts for his Jaguar and had made good progress. With the carburettor leaks fixed and the new spark and coil leads he had not managed to get the car to start yet, but it was definitely beginning to show signs of live, with lots of spluttering and back fire. So we have spark and ignition. But Peter also discovered some additional problems with the two petrol tanks and their petrol pumps. So more work, but at least it looks like the ignition problems have been sorted by replacing these leads. More work to be done on the Jeep obviously. First I will be replacing that steering ball joint and then I will start detailing it. Jeroen |
|
| (13)
Thanks
|
| The following 13 BHPians Thank Jeroen for this useful post: | carthick1000, dailydriver, digitalnirvana, GrammarNazi, IcarusMan, InControl, koyomi_araragi, Prowler, sridhar-v, Thad E Ginathom, vaasu, VivekCherian, ysjoy |
|
27th February 2023, 23:11
| #1058 |
| Distinguished - BHPian | Re: My Car Hobby: A lot of fiddling, and some driving too! Jaguar XJR, Mercedes W123 & Alfa Romeo Sp First thing I did this morning was to hang up my new poster about car detailing. I think it will come in very handy. All in Dutch, but very detailled, precise instructions, how to details each specific part/material on your car. Wim made this poster himself, very pleased with it.  Yesterday my wife and I took the Jaguar for a little outing. We ended up at an historical costume market. But some of the market stalls had some Goth and steam punk stuff. So I bought these two items. This appears to be a Russian gauge. It says 2kV, but I dont think it is a voltage meter. It has two connectors on the back with a resistor across. Going by the scale it is supposed to measure some deviation. Does anybody speak Russian? What does it say in the middle on the dial?  I also picked up this piece. It is made/used by Stork Kwant. I have come across a lot of their equipment on the various ships/oil rigs I have worked on. This looks like some sort of dial indicator. Not sure whether it is a step motor or continuos. I will be doing some testing. Not quite sure what I will be using it for.   For now it all goes on my little museum of measuring devices.   Next I had a go at the Jeep. I wanted to replace the wonky ball joint on the Drag Link. Have a look at how this is setup on the Jeep:  The length of the drag link determines the position of both wheels in relation to the position of the pit arm and thus also the steering wheel. You can straighten the steering wheel by turning the adjustment sleeve. It wont affect the alignment of the front wheels. First things first. Put the steering wheel in the center position. It had been a little off, but not much.  Next, we dive underneath the front of the Jeep. On just about any other car you would need to put the car on a lift or jack it up at the front. The Jeep is tall enough for me to reach and work underneath with room to spare. This is how it looked before I started:  Took the cotter pin out, loosened up the nut and put my special ball joint separator on.  Couple of twist on the ball joint separator, one whack with a hammer and it popped off. Easy peasy! 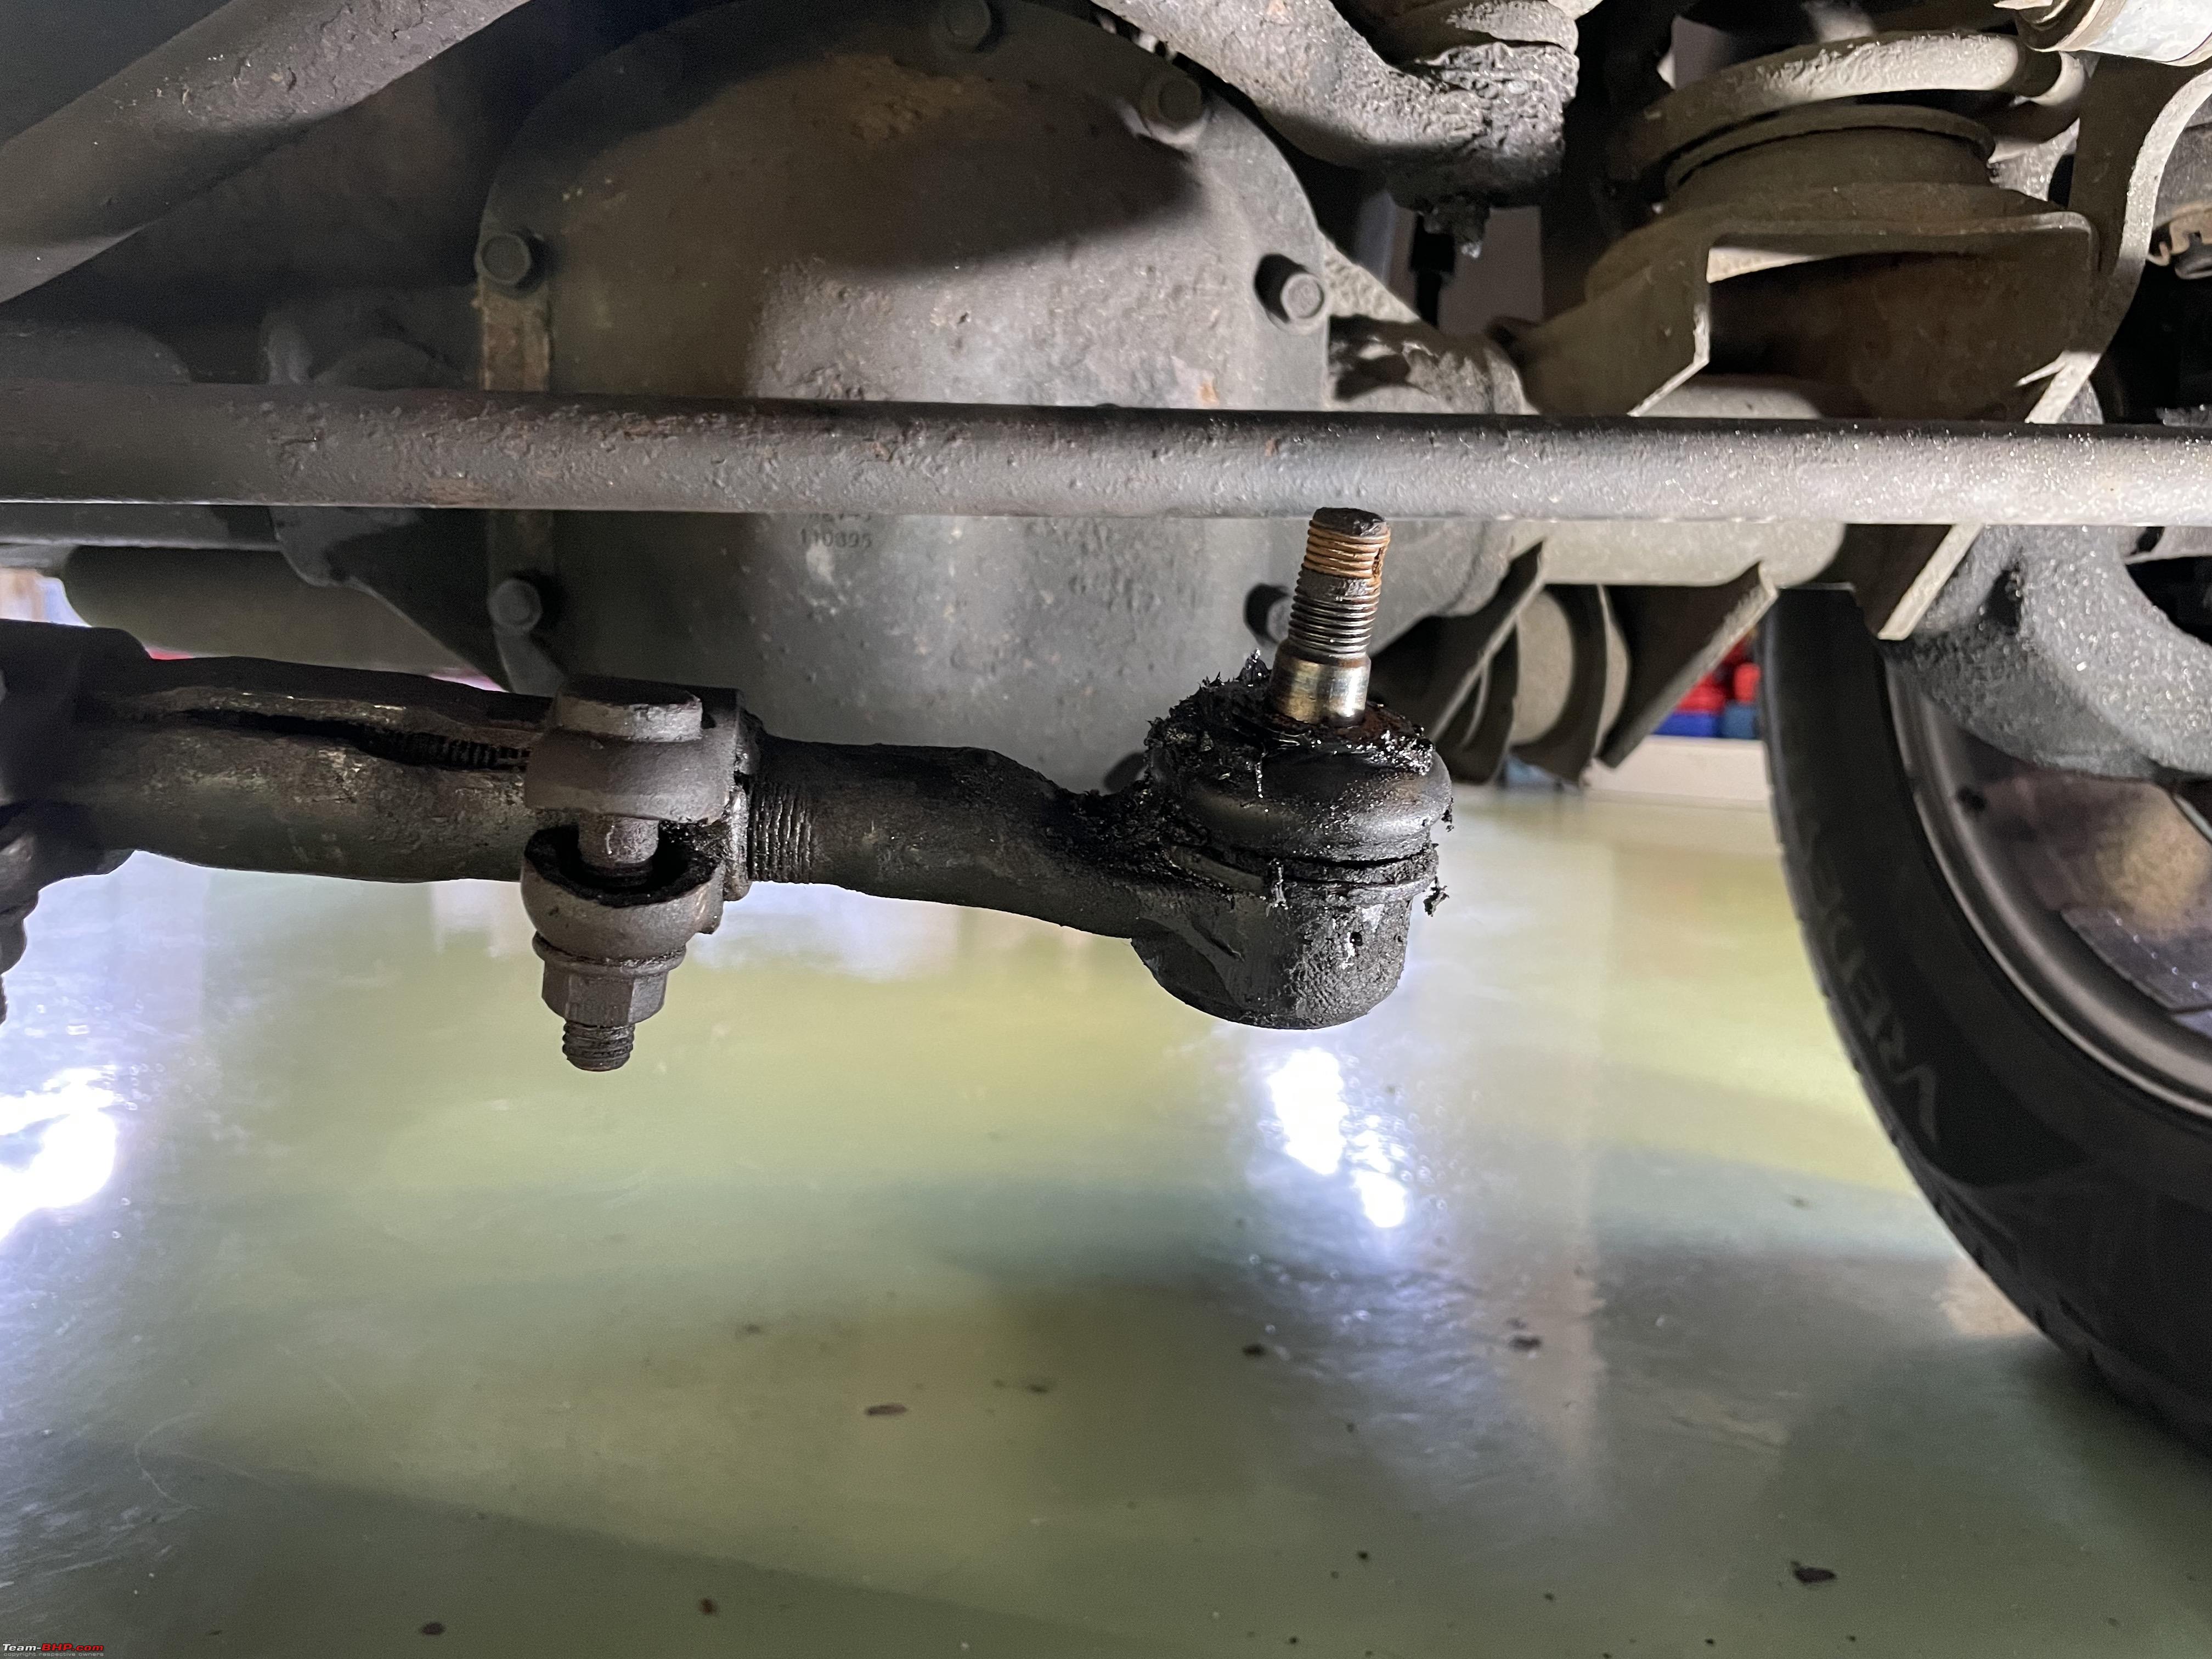 Next I very carefully took some measurements of how far the old ball joint protruded from the adjustment sleeve. Undid the locking bolt/nut on the sleeve and I could turn the ball joint out, without any problems, just by hand!!  As usual, old and new comparison.  Putting the new one back on was very easy too. I had set the correct distance in my callipers.  You can debate about how important using the correct torque specifications, but when it comes to suspension and steering components I dont take any chances. So I looked them up and torqued the respective nuts correctly.  Next check whether you can insert the cotter pin, if not, you have to tighten the nut further! It seems about as easy a job as you can find, inserting a cotter pin. But even the simplest of task have a proper correct way of doing. Here an interesting video about castle nuts and cotter pins and how to install them correctly. Done correctly:  The part that caused me the most grief this time, was also the smallest part. The little grease nipple!!  I had purposely left it off, when I was installing the ball joint. Too easy to get damaged. But I had not test fitted it. I should have, because it would not go in!! Tried the new nipple on the old ball joint and it fitted perfectly. Something amiss with the thread inside the the ball joint!! Took me the better part of half an hour to install this tiny thing!   Next I pumped some general purpose grease into the ball joint.  Checked everything and took the Jeep for a short test drive. Took it onto the motorway. The steering has improved noticeably! These Jeep, like most American cars, certainly from this and an early era, are never known for tight steering. Just as a reference: I put the old ball joint in my vice and used my very large pliers on it. Looks closely and you can see I can move it about 1-1,5mm. There should be no movement at all!! Next I decided I wanted to repair the tiny hole in my exhaust and also start on some of the rust here and there. Had to pop over to get some stuff for both. Also found these five very small size sockets. Very handy!  A couple of brackets are rusty. So I cleaned them with my wire brush. This is underneath the bonnet  I also had a good look behind the plastic liners inside the wheel arches. There is quite a bit of rust there. I will need to remove the liners to get better access. Finally fixed the exhaust leak:  I would be the first to admit, this does not look brilliant, certainly not original  I fixed this spot last year prior to its MOT and the MOT is up again in a week and a half and it developed a new tiny hole. So I fixed the hole. Which you have to do with a warmish exhaust, and next cure it by running the engine for about 10 minutes. Got some good use out of my fancy make-shift exhaust system so I dont smoke myself out of my garage (or worse)  The complete exhaust system is not allowed to have any leaks. The tiniest of leak is an immediate fail. Jeroen |
|
| (13)
Thanks
|
| The following 13 BHPians Thank Jeroen for this useful post: | dailydriver, DicKy, digitalnirvana, GrammarNazi, IcarusMan, InControl, koyomi_araragi, Prowler, sai_ace, satvik4134, Thad E Ginathom, VivekCherian, ysjoy |
|
28th February 2023, 00:23
| #1059 |
| Distinguished - BHPian Join Date: Jun 2007 Location: Chennai
Posts: 11,005
Thanked: 26,443 Times
| Re: My Car Hobby: A lot of fiddling, and some driving too! Jaguar XJR, Mercedes W123 & Alfa Romeo Sp What was the secret, in the end, to getting the grease nipple in? (Are you sure that gauge is Russian? It says "Hen." Isn't it a poultry meter? ) |
|
| (2)
Thanks
|
| The following 2 BHPians Thank Thad E Ginathom for this useful post: | koyomi_araragi, sai_ace |
|
28th February 2023, 01:40
| #1060 | |
| Distinguished - BHPian | Re: My Car Hobby: A lot of fiddling, and some driving too! Jaguar XJR, Mercedes W123 & Alfa Romeo Sp Quote:
Not sure about the Russian. The guy I bought it from said it was Russian. But then again, he was into steam punk. Not necessarily Russian technology! Jeroen | |
|
| (4)
Thanks
|
| The following 4 BHPians Thank Jeroen for this useful post: | digitalnirvana, koyomi_araragi, Prowler, Thad E Ginathom |
|
1st March 2023, 23:03
| #1061 |
| Distinguished - BHPian | Re: My Car Hobby: A lot of fiddling, and some driving too! Jaguar XJR, Mercedes W123 & Alfa Romeo Sp I have been very busy with, what else it seems, the last couple of days, my Jeep. I need to get it ready for its annual check, the APK as wel call it. (MOT). Also, I have ordered my own car polish and detail kit. I want to have the Jeep in perfect order before Peter comes later this month to value all four of my cars. One of the things I have been dreading, should have done it a long time ago, is to work on some of the (potential) rust areas. In all honesty, I should have done this prior to the re-spray, but I never got around to it. On the Jeep, any Jeep from this era, rust is everywhere. Where you can see it, its easy to fix. But you need to go looking for the known dark places. Which means pulling the wheel arch liners and the trim around the wheel arch. The wheel arch liner have only one function. They are supposed to dampen the noise from stuff (pebbles, rocks, grit, water etc) being slung of the tires into the wheel arch. On my Mercedes I have taken them off permanently. Because the problem is, dirt and water will still get behind it, and you will have an awful lot of rust on your hand. Wont show till it is too late. So here we go: Took the front wheels off, Car properly choked and on the handbrake and in park, Axle stands under the chassis.  Looking from the wheel arch to the outside world. You can see the plastic liner. Attachment 2424208 The liner is held in place with the odd little bolt and lots of plastic fasteners, which I all removed with my special fastener removal tool. Next a bit of pulling and tugging and out comes the liner.  The wheel arch with the liner removed 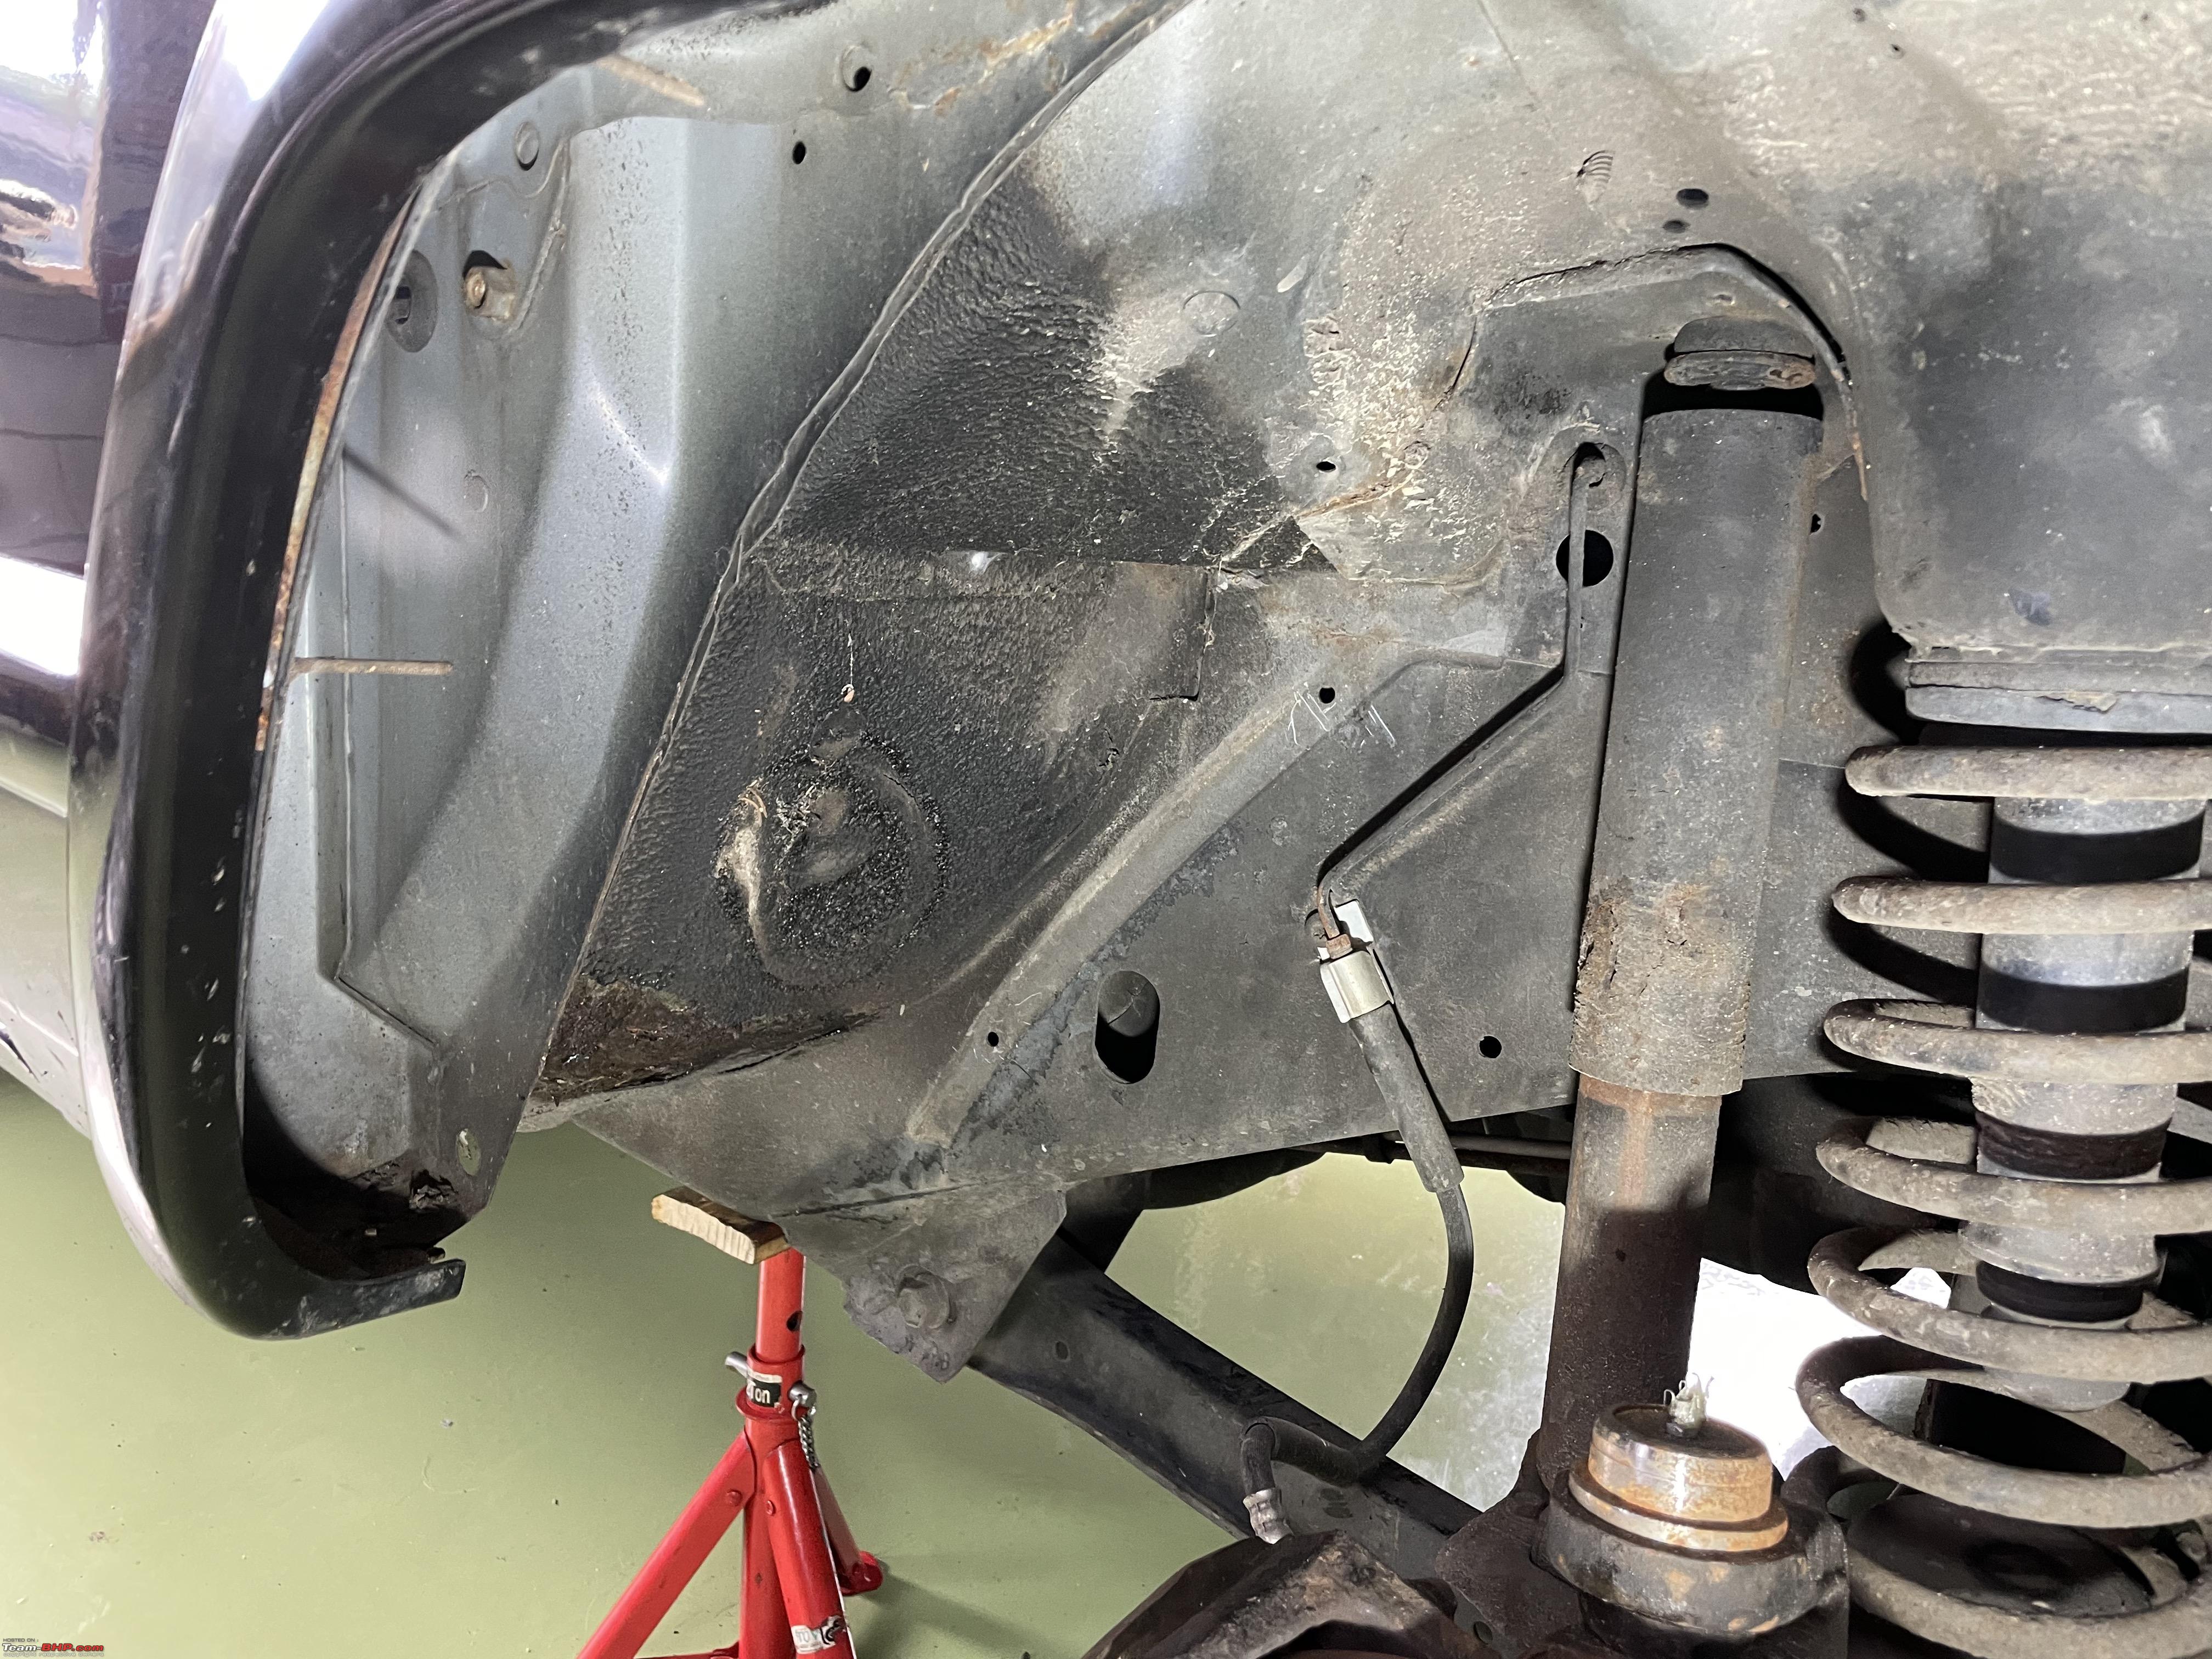 I will be honest. I was very, very relieved. yes, there was some rust, but nothing to bad, certainly not rotted through. One small spot will need some special attention. All the other stuff just regular rust prevention and stabilisation fluid required. I took the flared trim of the wheel arch off as well. The bracket holding it in place was rusted badly.  Not a big problem though. Masked it all off and run my pneumatic wire brush thingy across it.  On the Jeep I have discovered a second function of the wheel arch liner. Here you are looking right behind the wheel arch towards the rear of the car, You can actually see the door and its hinged. So the liner is actually stopping water and dirt getting in here. It was not too badly rusted. Still it got rust treatment too, of course.  There were a whole bunch of other little spots underneath the chassis that required some brushing and sanding and treatment. Nothing to bad, I have seen much, much worse! This is the worse spot, just underneath the passenger door. It was rusted badly. So I treated it several times, with my special rust inhibitor and also in the end applied some special putty across it. I am not out to win and concur prices here, nobody will see this, unless they dive underneath my car. I just want to make sure I stop the rust and rot!  I sprayed the bracket on the wheel arch with my magic black paint. Three layers, we should be good for a couple of years, I hope!  Same procedure on the left/driver side. But that side was in much better shape, a lot less problems to fix. Just a lot more dirt and mud that had collected behind the liner.   Whilst I had the wheels off, I had a good look at the various ball joint on the steering linkage. As I showed, I had already replaced one, on the pitman arm. But after a bit of poking and checking I came to the conclusion all ball joints had to be replaced too. Bummer, because that also means I need to get an alignment done. But it is very likely to fail its MOT with the amount of play I found. Irrespective of the MOT, I want this fixed. So last night I managed to get hold of my local Jeep parts guy Edwin. Luckily he had everything in stock and I could pick up my parts at around 1900 hours. Just for some easy references a few more diagrams about the steering linkage setup of the Jeep Cherokee. It doesnt come much simpler than this!   New parts at the ready!!  Just pop those suckers!! Three ball joints and also the steering damper to be removed with my splitter.  As you can see in the above image, I always loosen the nut, till it is flush with the top of the bolt/thread. That allows my ball joint splitter the best grip. Also, leaving the nut on, means the part wont be catapulted across your garage, or in your face, when it pops. However, sometimes it might be difficult to remove said nut, after you popped the ball joint. So I use my jack to push the ball joint back into its seat, so it has some resistance and I can undo the nut.  Everything came off the Jeep very easy. So I took the tie rod to my workbench to unscrew the ball joints of both ends. It needs a lot of force and I wanted to clamp it down really hard in my vice. The vice did not agree with this at all and gave up the struggle!! Will you look at this:   I broke out my old Black and Decker work mate, but is not the same.. These things were really, really stuck.  In the end I had to resort to heat them up with my torch, whack them with a hammer. As usual checking old and new before installing  Beginning to look like new!!  I had not mentioned it before, but I lost my little torch several days ago. When something like that happens, I cant let it go. I just keep looking and looking everywhere. To no avail. But would you believe, it turned up today. It must have fallen into the box of gloves!! Very happy to have it back!  Next thing: Back to the allignement shop! Jeroen |
|
| (6)
Thanks
|
| The following 6 BHPians Thank Jeroen for this useful post: | dailydriver, digitalnirvana, IcarusMan, Thad E Ginathom, vaasu, VivekCherian |
| |
|
4th March 2023, 17:33
| #1062 |
| Distinguished - BHPian | Re: My Car Hobby: A lot of fiddling, and some driving too! Jaguar XJR, Mercedes W123 & Alfa Romeo Sp With all the ball joints in the steering linkage replace it was time to get the Jeep another wheel alignment. So I went over to the same alignment shop I had visited before. Same guy helped me. Last time it was just a check as no adjustment was necessary. But with all the ball joints replaced there was some adjustment to be done. Even with all my carefully measuring, it is impossible to get everything back in place in an identical way as the old parts.   The front end needed adjusting on both adjustment sleeves.  We also noticed a tiny deviation on the rear axle.  So we investigated if we could move the rear axle a bit. I have all my workshop manuals uploaded in my iCloud, so I quickly looked up the relevant drawings.  It looked that al we needed to do was to undo the four bolts on the U-straps holding the leave springs attached to the axle.  Once we had both sides undone, we put some straps on the axle. We wanted to rotate it ever so slightly. But we only managed about 10 minutes rotation. Upon closer inspection we noticed that the axle support bracket does seem to have some sort of bolt/pin in the center going through the leave springs as well. So no movement. We just left it at that. Still a little better than before. Live and learn.  When I drove home I was not entirely happy with the postion of the steering wheel. It was not exactly straight and I want it exactly straight, of course. So when I got home I dived underneath the front again. Undid the two locking bolts on the adjustment sleeve and gave it a quarter turn. Fastened everything and a quick test drive confirmed the steering wheel is now absolutely dead centre!!  Yesterday I decided to get myself a replacement vice. I bought the previous one at this massive DIY centre, Hornbach. They still stocked the same model, so I decided to pick one up. As Hornbach is also half way to my favourite tool shop HBM and also visited them as well.  I bought some small wire brushes, micro-fibers, an assortment box of cotter pins, a socket size E21 (that was missing from my set as I found out working on the Jeeps front wheel bearings). And a cool torch:   I also bought a few small items for spanner mate Peter. I will be visiting him this Thursday to see if we can get his Jaguar XJ6S1 started.  My usual comparison old versus new. Not difficult to see which one is old.  I took the old vice apart and kept the spindle and some other small parts. These bits might come in handy during my metal model work.  One new vice, ready for some serious spannering to come.  I had cleaned the garage floor after I had finished the ball joint work on the Jeep a couple of days ago. But I had noticed that the floor was still very dirty in some places. So I had another go at cleaning the floor. I used warm water with a strong industrial degreaser in it.   Next I went out to our local Action. This is one of these shops that sells just about anything really really cheap. My Polishing Workshop guy Wim had advised me to pay them a visit and get all future sponges, buckets, micro fibres from them. Dead, dead cheap!!  I also checked the inventory of my polishing kit I had ordered. Very pleased with it. They advise to run the polisher machine for about 15 minutes without any load on it. To run in the brushes without the machine drawing a heavy current. Never to sure, if this really helps, but it wont hurt either of course. This is what my polishing kit looks like: Came in one big box.  Inside this box, this very nifty big special purpose carrier bag with everything you need!    As I was waiting for the floor of my garage to dry I had a bit of a go on both the Jaguar and the Jeep. Just to try out a few bits..  I thought I had enough detailing/polishing kit but I am still missing a few bits.  On Monday the Jeep will go to Martin for its MOT/APK. I should also get my W123 back from the spray shop. Thursday spannering with Peter. Saturday I am taking the Spider to Marc for an alignment and to check the steering box set up. Jeroen |
|
| (9)
Thanks
|
| The following 9 BHPians Thank Jeroen for this useful post: | carthick1000, chinmaypillay, dailydriver, digitalnirvana, IcarusMan, InControl, Thad E Ginathom, vb-saan, VivekCherian |
|
7th March 2023, 20:59
| #1063 |
| Distinguished - BHPian | Re: My Car Hobby: A lot of fiddling, and some driving too! Jaguar XJR, Mercedes W123 & Alfa Romeo Sp This morning I picked up my Jeep from the annual MOT/APK at Brinkman. The owner Martin had called me yesterday. They had noticed only one small problem. The rear fog light was not working. In fact it was full of water. They just cleaned and dried it out and we are good to go for another year. Very happy that all my other work on the Jeep has been approved now. Next couple of week I will be doing a lot of cleaning, polishing and waxing on the Jeep. Attached below is the Keuringsrapport (Inspection report). You always get a paper copy. As it is mandatory to have a valid APK at all times, where applicable, you used to have to carry this report with you in the car. Not necessary anymore, all digital nowadays. Anybody can check any registration plate to see if the car has a valid APK. Still, I keep all these reports for my W123 files, which is now grown to two full binders.  I had also received a call about my W123. It was ready too! They had lend me an electrical bicycle, so I peddled back. Unfortunately I had forgotten to charge the battery. Half way the battery went dead. In the middle of an almost blizzard like wet snow storm. It is very heavy going on an E-bike if the battery is dead. They gave a couple of images of the W123 during various stages of repair. They keep immaculate and very extensive records of everything and anything. These guys have build an excellent relationship with all major insurance companies. It is very rare they will send an expert. All approvals are done on the basis of their photographs, reports, calculations etc. The dent in the bonnet  Indicator light destroyed and damage to the panel    Also this rubber bumper piece was damaged.  Prepping of the car   A bit of rust, they took care of it, obviously.  All ready for the primer  Primer done   Paint and top coat on.  All done!!    Very happy with the work they have done. These guys are very very good. You will not be able to tell the difference between the sprayed parts and the old/untouched ones. These modern paint techniques are very good and also very quick and convenient. Half an hour after the last coat goes on, the car can go through a car wash or get a wax job! (But dont put big stickers on freshly re-sprayed parts, you should wait 10-14 days for that) So all in all, very happy with all my cars in running order. Then, unfortunately, this happened this morning. Scraped the bumper of the Jaguar.   Real bummer!! I have already made an appointment with my new friend Gilbert, who did a great job on my Jeep. The Jaguar will go there this Monday and will be ready a few days later. The W123 was an insurance claim, but for these small dents/dings I dont want to bother my insurance. For these little job Gilbert is now my favourite. He does a very good job and he has always time. The total damage to get the W123 restored was a whopping Euro 2600 (including 21% VAT). INS227000 is a lot of money. I spoke to spanner mate Peter today as well. Unfortunately something has come up and we had to postpone the work on his Jaguar XJ6. Jeroen Last edited by Jeroen : 7th March 2023 at 21:00. |
|
| (23)
Thanks
|
| The following 23 BHPians Thank Jeroen for this useful post: | carthick1000, chinmaypillay, dennisjs, DicKy, Geo_Ipe, GH0ST, IcarusMan, InControl, Karthik Chandra, Leoshashi, Malliketh, Mu009, Omkar, Researcher, s4ch, Sayan, shancz, swiftnfurious, Thad E Ginathom, V.Narayan, vaasu, vb-saan, VivekCherian |
|
14th March 2023, 15:33
| #1064 |
| Distinguished - BHPian | Re: My Car Hobby: A lot of fiddling, and some driving too! Jaguar XJR, Mercedes W123 & Alfa Romeo Sp Yesterday I spend quite a bit of time fiddling with the the most modern car in our home fleet these days. My wifes 2015 Ford Fiesta. This one is powered by the smallest engine, not even a turbo. Even so, it is a very nice car. My wife has clocked up some 93000 kilometers, so you would expect some wear and tear on several parts. This weekend we drove it to visit our kids and I noticed whenever we hit a speed bump (and there a billions of speed bumps in the Netherlands) a groaning sort of sound coming from the front suspension it seems. My first thought was rubbers on the torsion bar and or the connecting links or sway bar of the torsion bar to the suspension. I have heard this sound before on several cars. Had this same problem on my W123 some years ago: https://www.team-bhp.com/forum/diy-d...ml#post4178168 So put the Fiesta in my garage. Pushed the car up and down. Stood on the door sill and jumped up and down. But I could not get the suspension to move sufficiently to create the noise. Which again, suggested my earlier diagnose was correct. This happens only when the suspension gets pressed in substantially on both sides. Because that is when the torsion bar rotates the most in its rubber bushings.  Makes sure hand brake is engaged, in gear and some extra block against it rolling  Jack up the front with a jack on each side and drop it on an axle stand on each side. I always leave the jacks underneath with just a bit of tension on them too.  It was very obvious that the sway bars needed replacing. I could feel that the ball joints were extremely loose. When mounted you should not be able to rotate them left/right at all.  Taking the sway bar is very easy, just undo two nuts, that is all! Here you see the old and the new. I was lucky to find a nearby place that stocked them, but they are slightly different in appearances, but will do the job no doubt.  With the two sway bars removed I could also move the torsion bar up and done. I was surprised on how stiff that went. And more importantly, when I moved it up and down I heard the groaning noise. So time to replace the rubber bushings of the torsions bar. In order to remove the torsion bar the official Ford procedure is to drop the subframe. That might make it easier, but it is a lot of work. Also, in order to drop the front subframe you really need to have the car on a lift. Also, I am pretty sure you will need to get an alignment done afterwards. So I decided I would attempt to wrestle the brackets holding the rubber bushing out from underneath. Each bracket is held by only two M-13 bolts. Getting access to two of the four bolts is near impossible, but I managed eventually. Spend a lot of time, on my back, under the Fiesta.   These rubbers were definitely old, swollen and a bit perished. When mounting the bushings it is important to mount them in the correct orientation. They have a slit in them, so you can pop them onto the torsion bar and that slit needs to be facing forward. My Haynes Ford Fiesta workshop manual stated the brackets had a specific orientation too. But I could not find anything, they were completely symmetrical.  Unfortunately, the part shop that stocked my sway bars did not have the rubber bushing. They had to ordered. Which means they arrive later that day for me to pick up!! Parts logistic and supply is very well organised here. Stores get re-supplied three times a day!! So I had a bit of time till pick up time. We had been having some problems with the wipers too. Making an awfull noise. I tried to fix that by adjusting the wiper angle. That made some improvement. Still, driving in moderate rain at high speeds on the motorway it still made this awful stuttering noise. So I decided I would try some new wipers as well.  I also polished the front window, just to make sure everything is clean, no grease, dirts, smudges.   I am always surprised on how many different mechanisms are thought of to install wiper blades to wiper arms. Some can be a bit of a puzzle to get off and on. These are just about the simplest and easiest I have come across. You just slide them on, till they click in place  to get them off, you press the little square spot in and pull them out.  As per my usual SOP I looked up the torque specifications of the various nuts/bolts. All 48 Nm.  I went to pick up the rubbers and it took me about another hour of installing them. Not very difficult as such, just painful on my back on a cold concrete floor. Also, working all by myself it means I have to crawl from underneath and back under it again multiple times. Because I forgot to bring the correct tools, or I cant reach them where I placed them on the garage floor. Sorry, no images of me mounting the rubber bushings. Everything under the car is done more or less by feel. Impossible to take images. With the rubber bushings mounted, I moved the torsion bar up and down. Moved very smoothly and not a sound!! I had put a liberal amount of silicone grease inside the rubbers as well. You might be able to grease the old ones and it will likely get rid of the groaning, but once those rubber bushings are perished and swollen, you really need to replace them. Fitted the new sway bars, passenger side  Driver side  With the front wheels removed I also measured the thickness of the front discs, 21,8mm. Minimum is 21mm, so I will need to replace both discs in the next couple of months or so. I took the Fiesta for a test drive. Noise/groaning is definitely gone. It also steers a little bit more tight, no doubt due to the new sway bars. I did try out the new wipers as well. They are running butter smooth, but as there was no rain and I did not head out on the motorway the jury is still out on this one. Fingers crossed! Just a few more thoughts on the tools I used. When you are working, by feel and deep inside the engine bay or underneath the engine on top of the sub frame, it helps to have sufficient different tools and adapters. I used various of these extension on my sockets. These are impact-proof ones too!  Once you break a bolt or nut loose it might still be difficult to take it out. You might need many turns and often in these confined spaces you will not have much room for your ratchet tools to make a large arc. This little nifty tool comes in handy then. Also has a ratchet, so you can use it to install and remove bolts/nuts.  It was also the first time I used my new electric torque wrench. The best friend of our eldest son Luc is Koen. We have known Koen since he was about 7-8 years old. Luc and Koen have been best mates since. As it so happens, they married two ladies who are sisters. So they are best mates, were best man at their respective wedding and are also brother in law. Anyway, Koen works for Hilti. He is allowed to buy some tools every year at huge discounts for his own use, or for friends. He suggested to me I should try their newest electric torque wrench. So I ordere it from Koen. Unfortunately, the new one is out of stock. So I have two new batteries and a charger and Koen lend me an older model till the new ones arrive.   I must admit, compared to my pneumatic one, this is a very nice and versatile piece of equipement. Apart from it being much, much more powerful it is also much more controllable. Astute readers will have noticed that my garage looks very empty. That is correct. No Spider and no Jaguar. The Jaguars bumper is being fixed and I will have it back tomorrow. The Spider is a bit of a longer story. Last Saturday I took it to Marc to have it alligned. Well, long story short, I decided to leave it with Marc and have him do a complete engine overhaul. We discussed it at lengths, I have had problems with oil usage for a while, I will be doing another 6-8000km this year and I need it to be very reliable. So he will be taking the engine out, taking the head off and giving it all a full overhaul, new pistons, new sleeves, new valve guises, maybe new valves etc etc. It should be ready in about 4-5 weeks. In May we are off on our usual Spider drive to France. And I need to run in the engine for about 1000 kilometer, change the oil, also a different oil and also change the filter, before I can go full blast! More to come Jeroen Last edited by Jeroen : 14th March 2023 at 15:38. |
|
| (8)
Thanks
|
| The following 8 BHPians Thank Jeroen for this useful post: | IcarusMan, InControl, keroo1099, sai_ace, Thad E Ginathom, V.Narayan, vaasu, VivekCherian |
|
14th March 2023, 18:39
| #1065 |
| BHPian Join Date: Mar 2023 Location: Gurgaon
Posts: 49
Thanked: 232 Times
| Re: My Car Hobby: A lot of fiddling, and some driving too! Jaguar XJR, Mercedes W123 & Alfa Romeo Sp That's a neat looking Merc you have there. Looks almost new, they did a great job! W23 Era is one of the peak Mercedes quality and design periods in my opinion. Wish it was more feasable to own such older cars in India. |
|
| (1)
Thanks
|
| The following BHPian Thanks sh3lby for this useful post: | Jeroen |
|