Team-BHP > Technical Stuff > DIY - Do it yourself
Register New Topics New Posts Top Thanked Team-BHP FAQ


Reply
  Search this Thread
1,050,357 views
Old 17th November 2015, 23:24   #1186
BHPian
 
im_srini's Avatar
 
Join Date: Sep 2006
Location: Portland
Posts: 1,010
Thanked: 490 Times
Re: Tools for a DIYer

Quote:
Originally Posted by SunnyBoi View Post
I suggest Ambika/Ambitec instead, they're far far better.
http://www.industrybuying.com/drive-...?brand_id=1177
Hi SunnyBoi,
Many thanks for suggesting the tool-kit from Ambika.
I received the tool-kit 8 days after ordering it online.
The tool-kit looks awesome - the image on the web-site does not do it justice at all ( you could say neither does my pic ) :
Tools for a DIYer-ambika_tools_1.jpg
Quote:
Originally Posted by SunnyBoi View Post
There have been a lot of complaints about the quality of their bits plus all their tools are made in China.
On the subject of 'Made in China' tools, needed a couple of Torx bits to replace the HDD in my MBP, hence bought the following tool-kit from Amazon :
Tools for a DIYer-chinese_tools_0.jpg
Thought that for Rs.999, it was a steal.
I guess for low torque applications, the Chinese tool kits should be Ok.
im_srini is offline   (4) Thanks
Old 18th November 2015, 13:13   #1187
BHPian
 
AJ-got-BHP's Avatar
 
Join Date: Sep 2014
Location: Calcutta
Posts: 801
Thanked: 4,567 Times
Re: Tools for a DIYer

Quote:
Originally Posted by im_srini View Post
Hi SunnyBoi,
Many thanks for suggesting the tool-kit from Ambika.
I received the tool-kit 8 days after ordering it online.
The tool-kit looks awesome - the image on the web-site does not do it justice at all ( you could say neither does my pic ) :
Attachment 1440833

On the subject of 'Made in China' tools, needed a couple of Torx bits to replace the HDD in my MBP, hence bought the following tool-kit from Amazon :
Attachment 1440834
Thought that for Rs.999, it was a steal.
I guess for low torque applications, the Chinese tool kits should be Ok.
A few questions :
  1. How much does the Tool Kit Cost ?
  2. Do these Kits have any standard warranty ?
  3. Are you sure that these are made of Chrome Vanadium ?? As usually Chrome Vanadium does not have the glittering shine that these tools have on them.
AJ-got-BHP is offline  
Old 18th November 2015, 18:16   #1188
Senior - BHPian
 
Join Date: Aug 2010
Location: Delhi
Posts: 2,582
Thanked: 2,741 Times
Re: Tools for a DIYer

Quote:
Originally Posted by AJ-got-BHP View Post
A few questions :
......Chrome Vanadium does not have the glittering shine that these tools have on them.
Chrome Vanadium steel as far as I know is not "Stainless Steel", hence it will rust, unless coated. Some manufacturers use high gloss chrome plating, some use matt.

I have a few Taparia sockets which have high gloss finish. The Gedore ones are matt finish. Some hand tools, especially those using impact (both sockets and open ended spanners) have a brown finish as the chrome plating can get damaged and finally peel off.
Aroy is offline  
Old 18th November 2015, 18:44   #1189
BHPian
 
AJ-got-BHP's Avatar
 
Join Date: Sep 2014
Location: Calcutta
Posts: 801
Thanked: 4,567 Times
Re: Tools for a DIYer

Quote:
Originally Posted by Aroy View Post
Chrome Vanadium steel as far as I know is not "Stainless Steel", hence it will rust, unless coated. Some manufacturers use high gloss chrome plating, some use matt.

I have a few Taparia sockets which have high gloss finish. The Gedore ones are matt finish. Some hand tools, especially those using impact (both sockets and open ended spanners) have a brown finish as the chrome plating can get damaged and finally peel off.
Had been contemplating on buying a Tool Kit for my Car before I did the Ladakh Trip earlier this year in my Ford Figo in the month of August 2015. A link to our Ladakh Travelogue : http://www.team-bhp.com/forum/travel...kolkata-7.html

It was then that I got hold of a 42 Pcs 1/4" Square Drive Socket Set of GROZ (Brand) which is apparently of an extremely superior quality being made of Chrome Vanadium.

I did not buy it online, rather I bought it from a business associate of mine for Rs.3,875/= (MRP Being Rs.4,100/=) and it has a 2 Year Warranty. Meaning to say - free replacement of spares in case they get worn out or broken.

Sharing a Picture of my Kit here which I find neither to be of Gloss Finish nor a complete Matt Finish :

Tools for a DIYer-p_20150806_153908_1.jpg

Tools for a DIYer-p_20150806_153941_1.jpg


Attaching the data collected by me (before buying the product) from their website which may clarify a few points here :

Tools for a DIYer-groz-socket-socket-sets-cataloguepage001.jpg

Tools for a DIYer-groz-socket-socket-sets-cataloguepage002.jpg

Tools for a DIYer-groz-socket-socket-sets-cataloguepage004.jpg

Tools for a DIYer-groz-socket-socket-sets-cataloguepage007.jpg

Last edited by AJ-got-BHP : 18th November 2015 at 18:51. Reason: Changes
AJ-got-BHP is offline   (1) Thanks
Old 19th November 2015, 22:38   #1190
Senior - BHPian
 
SunnyBoi's Avatar
 
Join Date: Dec 2006
Location: Mysore / B'lore
Posts: 1,668
Thanked: 4,122 Times
Re: Tools for a DIYer

Borrowed a Dewalt angle grinder from my friend's dad to widen the speaker hole on my door and make way for some monstrous speakers!

This was the first time I used an angle grinder and there was a bit of learning curve especially given the tight space. But I was glad the cuts came out fine!

Tools for a DIYer-img_20151119_192456.jpg

Tools for a DIYer-img_20151119_200626.jpg

PS : this is just one portion of my friend's dad's garage. One day I must build a garage like his

Tools for a DIYer-img_20151119_173041.jpg

A small subset of his spanner collection. This photo is from 2011

Tools for a DIYer-img_20110717_095226.jpg

Last edited by SunnyBoi : 19th November 2015 at 22:45.
SunnyBoi is offline   (9) Thanks
Old 20th November 2015, 11:18   #1191
BHPian
 
adrian's Avatar
 
Join Date: Sep 2009
Location: Trivandrum
Posts: 932
Thanked: 1,217 Times
Re: Tools for a DIYer

Quote:
Originally Posted by SunnyBoi View Post
Borrowed a Dewalt angle grinder from my friend's dad to widen the speaker hole on my door and make way for some monstrous speakers!

This was the first time I used an angle grinder and there was a bit of learning curve especially given the tight space. But I was glad the cuts came out fine!
Considering the type of work and tool used, you have done an awesome job for a beginner. I have two suggestions, please don't take it as nitpicking.

1.You should remove the tar sheets prior to making the cut. There is a possibility for the cutting wheels to bind and for the grinder to walk.

2.It would have given professional results if you had marked the perimeter of the hole and used the grinding disc (not the cutting one) to remove metal towards the outward direction.
Tools for a DIYer-img_20151119_200626.jpg
adrian is offline   (5) Thanks
Old 20th November 2015, 15:38   #1192
Senior - BHPian
 
SunnyBoi's Avatar
 
Join Date: Dec 2006
Location: Mysore / B'lore
Posts: 1,668
Thanked: 4,122 Times
Re: Tools for a DIYer

Quote:
Originally Posted by adrian View Post
Considering the type of work and tool used, you have done an awesome job for a beginner. I have two suggestions, please don't take it as nitpicking.
Thank you! All suggestions and help is definitely welcome!


Quote:
Originally Posted by adrian View Post
1.You should remove the tar sheets prior to making the cut. There is a possibility for the cutting wheels to bind and for the grinder to walk.

2.It would have given professional results if you had marked the perimeter of the hole and used the grinding disc (not the cutting one) to remove metal towards the outward direction.
I did mark the section I wanted to cut. You can see faint white marks on the left door, on the right door I peeled off the tar on the section to be cut. As for the choice of wheel for the angle grinder, it was given by my friend's dad which I think is a grinding disc (please correct me if I'm wrong). I ground through the metal and didnt attempt to cut it. The metal at the edges became really thin after few passes and I did a pass holding the grinder perpendicular, that took off the thin chunks of metal.

I didn't want to cut too much metal, since the midbass I'm mounting is super heavy and hence cut just enough for the magnet to pass through without touching the sides. I didn't want to weaken the surrounding area by cutting too much. Since all of this is hidden behind a doorpad/spacer rings, I didnt care on how it looked.

However I did grind thru the tar as I had fallen short by couple of millimeters. The grinder looked like this after I was done and it did not get clogged. Thankfully no fire or smoke either when going through the tar.

Tools for a DIYer-img_20151119_201124.jpg

PS : I had picked up a 3M safety kit from PayTM for 80% off and the glasses really helped 
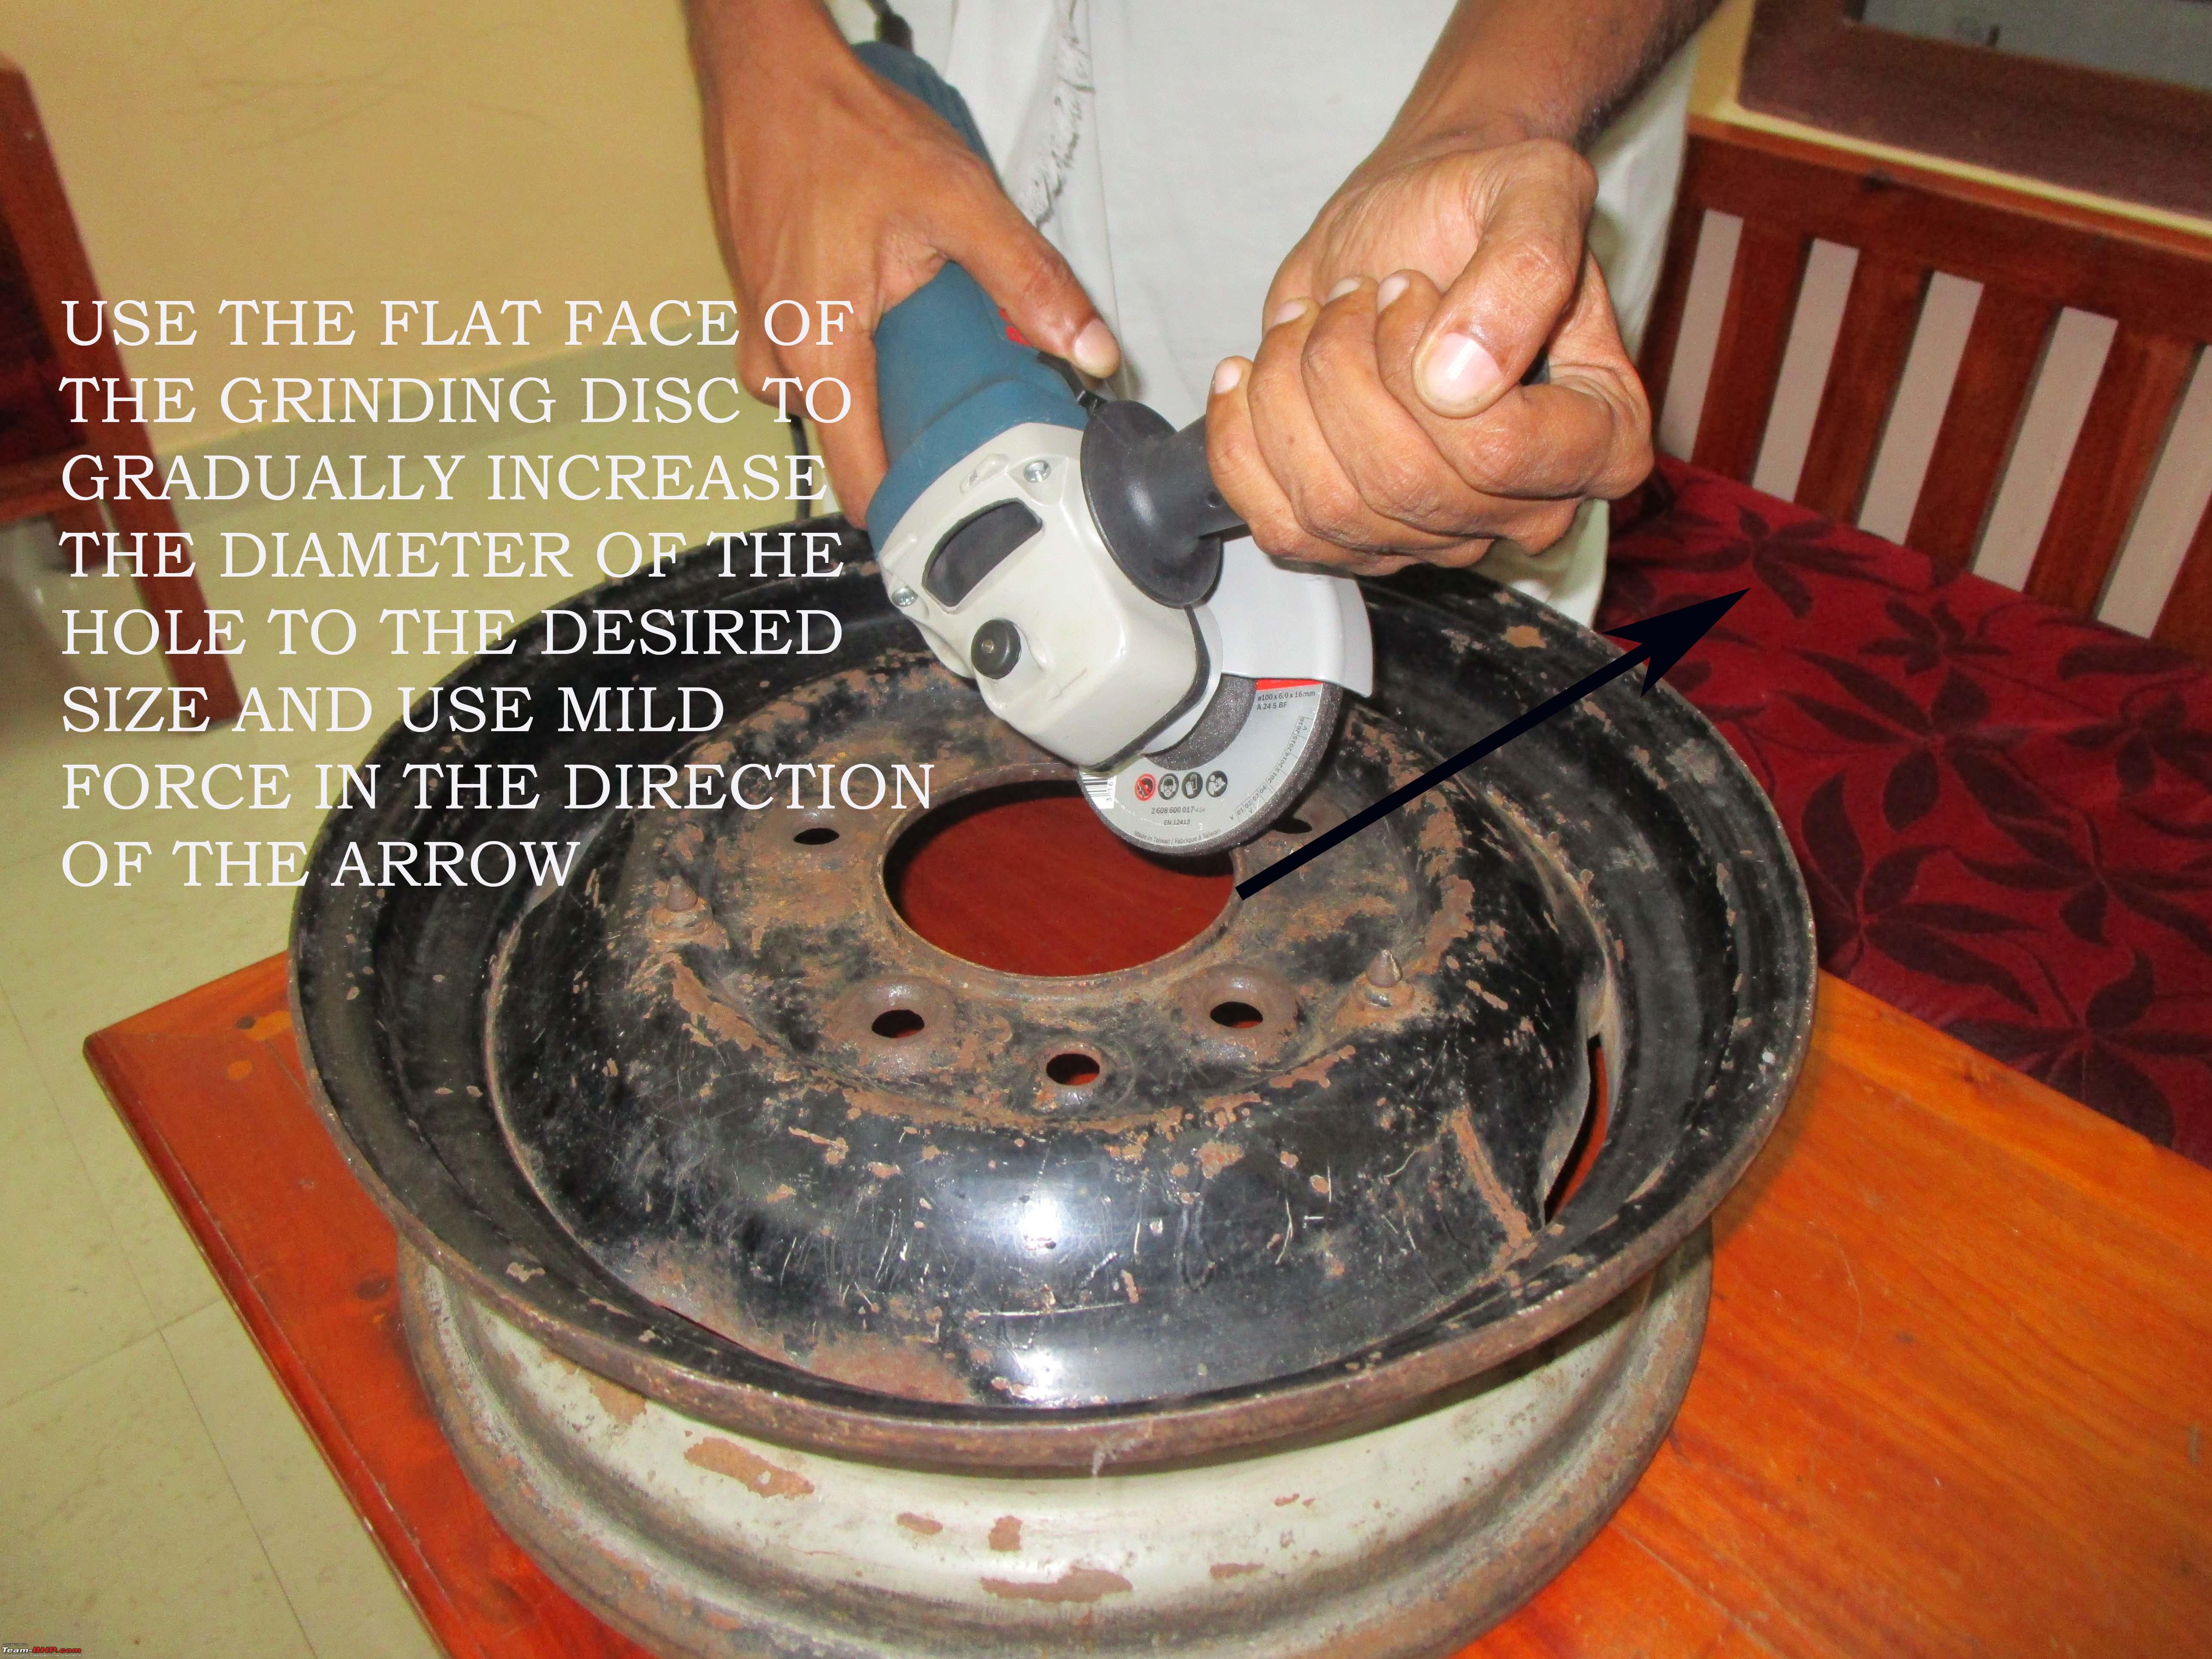
although my arms got blasted quite nicely. Any tips on how to avoid the burns?I always held it such that the sparks would fly away from me but they still ricocheted and kept hitting my arm.

Last edited by SunnyBoi : 20th November 2015 at 15:47.
SunnyBoi is offline   (1) Thanks
Old 20th November 2015, 17:23   #1193
BHPian
 
::CMS::'s Avatar
 
Join Date: Sep 2013
Location: Bangalore
Posts: 602
Thanked: 582 Times
Re: Tools for a DIYer

Get a good thick leather welding glove, you can get it in sp road for ~100 or 150.
::CMS:: is offline   (1) Thanks
Old 20th November 2015, 18:54   #1194
BHPian
 
adrian's Avatar
 
Join Date: Sep 2009
Location: Trivandrum
Posts: 932
Thanked: 1,217 Times
Re: Tools for a DIYer

Quote:
Originally Posted by SunnyBoi View Post
As for the choice of wheel for the angle grinder, it was given by my friend's dad which I think is a grinding disc (please correct me if I'm wrong). I ground through the metal and didnt attempt to cut it. The metal at the edges became really thin after few passes and I did a pass holding the grinder perpendicular, that took off the thin chunks of metal.

Any tips on how to avoid the burns?I always held it such that the sparks would fly away from me but they still ricocheted and kept hitting my arm.
You are right, what you used was a grinding disc.

Tools for a DIYer-040.jpg

The method I was talking about was to use the face of the grinding disc somewhat perpendicular to the edges of the hole, slowly working your way in the outward direction. I have used my Amby's spare wheel disc for illustrative purpose in the following picture (not sure how effective it was )

Tools for a DIYer-041.jpg

As for the protection part, I use my old full sleeved leather jacket along with snug fit nitrile gloves and gum boots while grinding. The projectiles are minute metal shaving that embed themselves into your skin, which is not good. Again care should be taken that the gloves are not of a loose fit as it may get tangled on the spinning disc causing injury. In short no loose fitting clothes while angle grinding. It is the power tool that I fear and give lots of respect when in operation.

Last edited by adrian : 20th November 2015 at 19:18. Reason: typo
adrian is offline   (7) Thanks
Old 25th November 2015, 09:01   #1195
Senior - BHPian
 
SunnyBoi's Avatar
 
Join Date: Dec 2006
Location: Mysore / B'lore
Posts: 1,668
Thanked: 4,122 Times
Re: Tools for a DIYer

The angle grinder certainly came to use a day later. Used the grinding disc to grind a taper on one of the speaker rings. this was wood though, I really missed not having a dust mask.

Tools for a DIYer-001.jpg

Switched to a cutting disc to cut the doorpad. It was cardboard, but a tough one that I couldnt cut even with my knife.

First step was keep the ring and mark the surroundings

Tools for a DIYer-img_20151121_095442.jpg

Cut! I found a single continuous cut will give better results. This right door was the second attempt after first attempt on the left door.

Tools for a DIYer-img_20151121_100550.jpg

First attempt aka left door. Short cuts leave lot of straight edges

Tools for a DIYer-img_20151121_080946.jpg

Speakers fit. Gap isnt that bad actually, I'll be cutting the original map holders to cover up the gaps left between the doorpad and rings

Tools for a DIYer-img20151121wa0025.jpg
SunnyBoi is offline   (2) Thanks
Old 28th November 2015, 13:38   #1196
BHPian
 
bejoy's Avatar
 
Join Date: Mar 2004
Location: Bangalore
Posts: 924
Thanked: 1,405 Times
Re: Tools for a DIYer

I want to increase the size of the hole to fix a bigger socket. The hole size need to be 5/8". Any suggestion?

Tools for a DIYer-wp_20151128_001.jpg
bejoy is offline  
Old 28th November 2015, 15:15   #1197
Distinguished - BHPian
 
Join Date: Oct 2012
Location: Delhi
Posts: 8,112
Thanked: 50,974 Times

Draw the larger circle on it. Put it on something flat with a hole in it and use a round metal file to increase the diameter. Its only sheet metal, will go very easily.
Good luck.
Jeroen
Jeroen is offline   (1) Thanks
Old 28th November 2015, 16:09   #1198
BHPian
 
techiecal's Avatar
 
Join Date: Apr 2015
Location: Kolkata
Posts: 109
Thanked: 66 Times
Re: Tools for a DIYer

Quote:
Originally Posted by bejoy View Post
I want to increase the size of the hole to fix a bigger socket. The hole size need to be 5/8". Any suggestion?

Attachment 1444552
These are the situations where a die grinder ( for larger holes) and a Dremel tool excels. Of course, you can always use a file if you have the space and the patience.
techiecal is offline   (1) Thanks
Old 28th November 2015, 16:52   #1199
Distinguished - BHPian
 
Thad E Ginathom's Avatar
 
Join Date: Jun 2007
Location: Chennai
Posts: 11,007
Thanked: 26,449 Times
Re: Tools for a DIYer

How big is the hole now? We do not know how much needs to be be cut/ground/filed!
Thad E Ginathom is online now   (1) Thanks
Old 29th November 2015, 07:48   #1200
BHPian
 
bejoy's Avatar
 
Join Date: Mar 2004
Location: Bangalore
Posts: 924
Thanked: 1,405 Times
Re: Tools for a DIYer

Quote:
Originally Posted by Thad E Ginathom View Post
How big is the hole now? We do not know how much needs to be be cut/ground/filed!
At least 3mm needs to be filed off.
Tools for a DIYer-photocrop_20151128_102951pm.jpg
bejoy is offline  
Reply

Most Viewed


Copyright ©2000 - 2024, Team-BHP.com
Proudly powered by E2E Networks