| |||||||

| Search Forums |
| Advanced Search |
| Go to Page... |
 |
| Search this Thread |  149,127 views |
 25th August 2020, 18:13
| #46 | |
| Distinguished - BHPian  Join Date: Aug 2006 Location: Bangalore
Posts: 5,379
Thanked: 19,315 Times
| Re: BMW R1250GS Adventure Pro MY2020 - Style HP - The Comprehensive Review Quote:
http://overdrive.in/news-cars-auto/f...k-evo-wp-boot/ I now use these boots to ride around town. With a big heavy bike like yours, i will NOT skimp on boots. After head injuries, feet injuries are the most prominent in all motorcycle accidents, falls, tip overs etc. Hinged ankle protection on BOTH sides are a must. Hyperextension or rotational twists, or worse your feet getting stuck under those huge panniers of yours in the heat of the moment as you paddle are all about when and not if. What Urban suggested above is spot on, but I think might be overkill for your riding. Which is why the Sidi Adv Goretex 2 is the preferred choice for touring. Both of our advice is based on some experience... Good luck and ride safe with your new beauty...  Last edited by Red Liner : 25th August 2020 at 18:14. | |

|  (6)
Thanks (6)
Thanks
|

| The following 6 BHPians Thank Red Liner for this useful post: | ast.ggn, Born 2 Be Wild, deepfreak15, dkaile, Sheel, SnS_12 |
| |
|
25th August 2020, 18:49
| #47 |
| Distinguished - BHPian | Re: BMW R1250GS Adventure Pro MY2020 - Style HP - The Comprehensive Review Congratulations on getting your dream bike, and what a detailed review. I was in a conference call, which i just had to listen to, and all i did was kept reading this post, and totally lost of what was said on the call. Wish you many happy kilometers of safe and blissful riding. |

| (1)
Thanks
|
| The following BHPian Thanks AtheK for this useful post: | dkaile |
|
30th August 2020, 11:51
| #48 | |
| Newbie Join Date: Aug 2013 Location: Bangalore
Posts: 8
Thanked: 5 Times
| Re: BMW R1250GS Adventure Pro MY2020 - Style HP - The Comprehensive Review Quote:
BTW, where do you get the TCX at Rs 16K? | |
|
| ()
Thanks
|
|
30th August 2020, 13:39
| #49 | |
| Distinguished - BHPian Join Date: Aug 2006 Location: Bangalore
Posts: 5,379
Thanked: 19,315 Times
| Re: BMW R1250GS Adventure Pro MY2020 - Style HP - The Comprehensive Review Quote:
 | |
|
| ()
Thanks
|
|
30th August 2020, 19:12
| #50 |
| BHPian Join Date: Aug 2009 Location: Bangalore
Posts: 776
Thanked: 468 Times
| Re: BMW R1250GS Adventure Pro MY2020 - Style HP - The Comprehensive Review Congratulations on a true mile munching Titan of a bike. My biking friends seem to be split into GSA owners and future GSA owners. While it's weight isn't my cuppa, if you can manage it, it's a joy to tour on. |
|
| (2)
Thanks
|
| The following 2 BHPians Thank imp! for this useful post: | dkaile, neil.jericho |
|
2nd September 2020, 15:47
| #51 |
| Senior - BHPian | Re: BMW R1250GS Adventure Pro MY2020 - Style HP - The Comprehensive Review Accessories Update In the meantime I received some accessories, some which I have installed - A set of 2x TFT Screen-guards from AliExpress. Quality seems very good, though I have ordered and would be installing the original BMW Tempered Glass screen protector. These will be kept in reserve for the future. https://www.aliexpress.com/item/For-...27424c4da5Cy8K 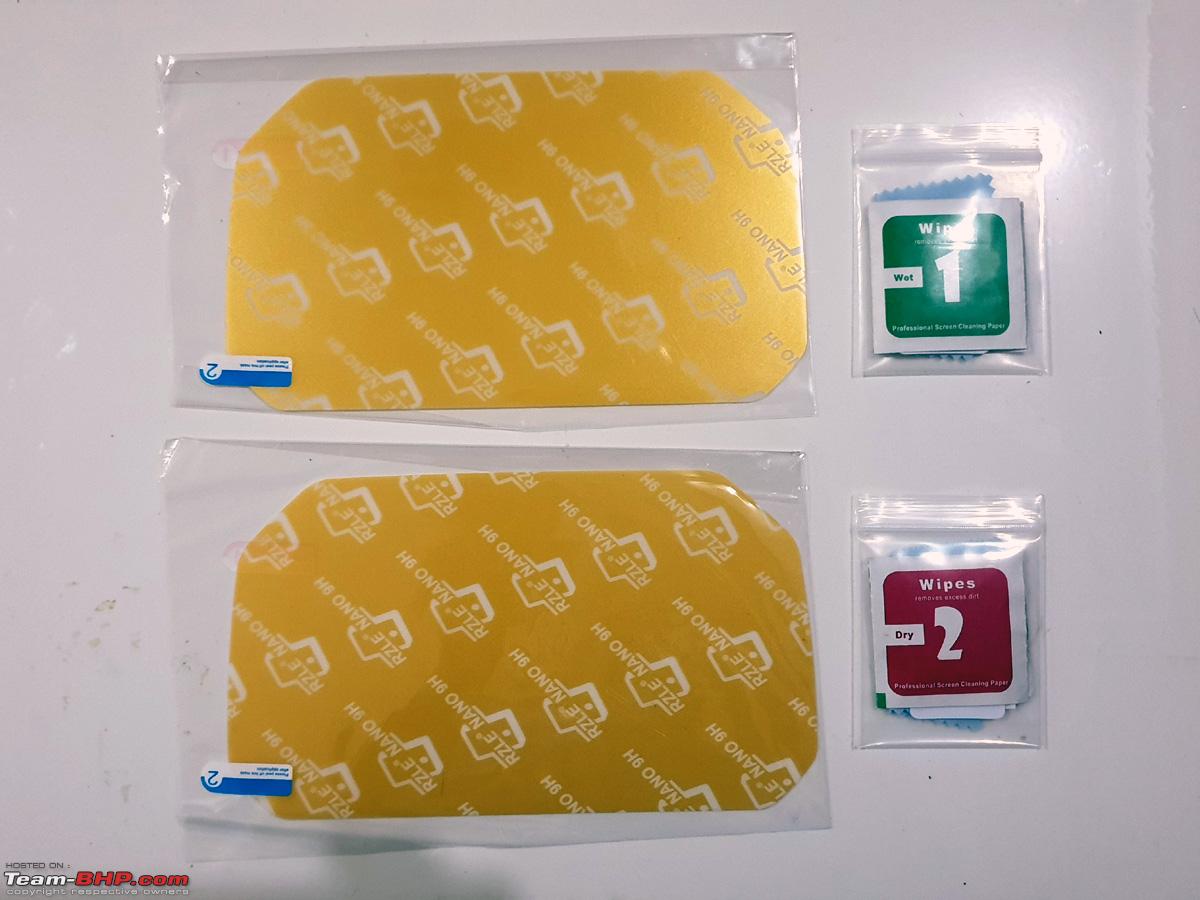 Fits perfectly  Dual USB Charger for DIN socket made with aluminium alloy. No separate wires to be cable tied like the original BMW one. Plug and play. https://www.aliexpress.com/item/Quic...27424c4da5Cy8K  Has dual Quick Charge 3.0 ports with waterproof cover  Displays the voltage also accurately. I chose the Blue display color to match the color of my bike.  Fast charging works perfectly.  Pillion Backrest, set of 2, received for attaching to the Top Box. Quality is very good again. https://www.aliexpress.com/item/2019...27424c4da5Cy8K  Has genuine 3M Tape backing to stick to the aluminium top box, just like it comes with the OE BMW ones.  Also got this handy Superglue from Loctite #401. It is not your run of the mill Feviquik and is a medium viscousity one and I would suggest all enthusiasts to keep one handy. It is available on Amazon at around 5-600 bucks - https://www.amazon.in/gp/product/B00...?ie=UTF8&psc=1  Mi Tyre Inflator - Very handy battery operated unit. Costed me around 2500/- bucks from Mi India site - https://store.mi.com/in/item/3202500016   Comes with a handy pouch for storage and some attachments for inflating balls etc.  A micro usb cable is needed to charge it which is supplied. A full charge can provide 30 minutes of running time or about 5 full size car tyres from zero inflation. For normal top ups it takes hardly less than a minute. Do note that it cannot work/inflate while charging so it is prudent to keep it charged while going on a long trip.  Checking the front tyre pressure on the Beemer. Found it to be accurate at 36 psi  The Rear Tyre pressure was 41  which got inflated to the required 42 psi in a few seconds as you can see in this video. By this account the battery will last for a many top-ups. Also received this very high quality set of Front & Rear Mudflaps at a fraction of the cost of the UK sellers. Nearly identical item and quality. https://www.aliexpress.com/item/For-...27424c4da5Cy8K  This SAE to DIN Converter Cable is of immense use to charge the bike through my 10 year old Harley SAE Charger that was purchased from AliExpress and still going strong. https://www.aliexpress.com/item/DIY-...27424c4da5Cy8K  This 9 piece set of rubber bungs to close the various chassis holes on the bike. I chose the design which matches the 2 already installed ones from the factory. Also the bike uses 4 bungs on the right side and 5 on the left, hence the asymmetric figure of 9 bungs. https://www.aliexpress.com/item/3-Co...27424c4da5Cy8K  These Crash Bar Protector Pads serve as the first contact point in case of the bike going down and provide additional protection from scuffing https://www.aliexpress.com/item/R120...27424c4da5Cy8K  Here are some of these accessories fitted - Here's a video for fitting both these Mudguards from a UK site. Exact same items, but see the difference in cost!! The Front Mudguard Fitted as per instructions in the above video 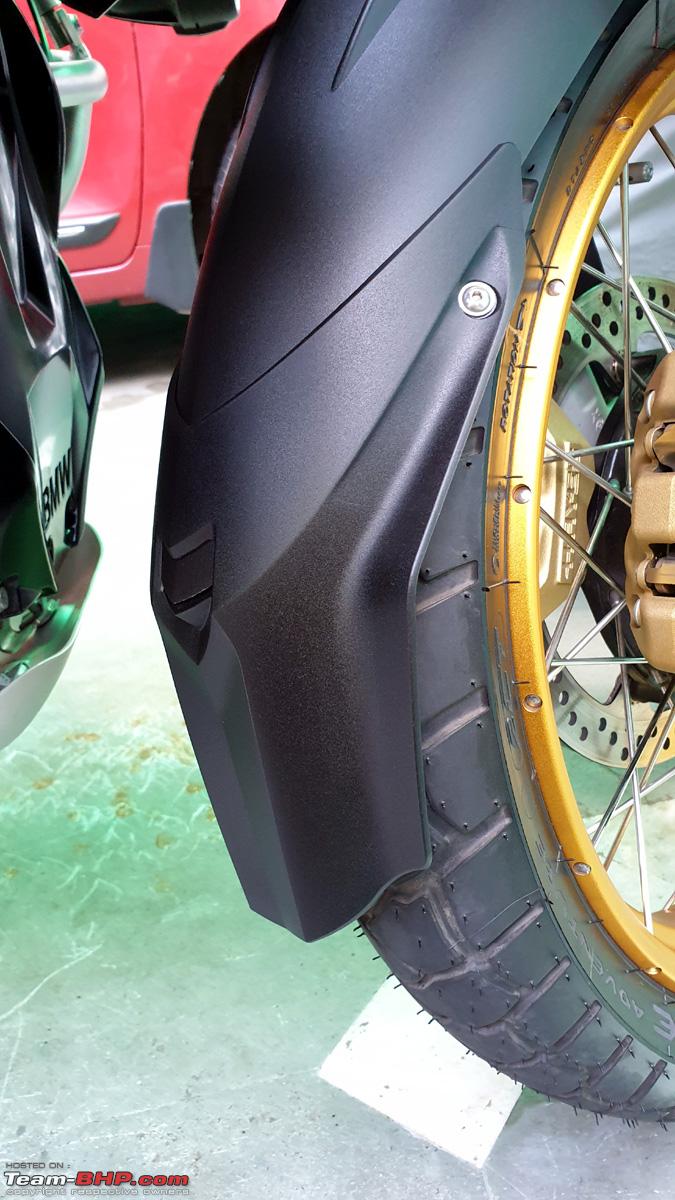 I always use Loctite Threadlocker #243 for attaching any aftermarket accessories  No clearance issues at all. Have ridden more than 200kms after attaching both these mudguards. Found significant reduction in fowling of the front engine protection plate from monsoon mud and crud.  Fitted the Rear Mudguards as per instructions in the above video. Cable ties being fitted  Now neatly clipped  As you can see from this photo, the mudflap increases coverage by 5-6 inches at the bottom and 3-4 inches on each side  A rear view of the same mudguard showing increase in coverage and increased protection for the rear electronic suspension from mud and slush  Uses 2 heavy cable ties (supplied) on the right side  and 2 on the left. The cable ties become nearly invisible on the black frame  Using my 10 year old Harley SAE Charger now to charge the BMW battery through the DIN socket. The Canbus automatically cuts off charging after the battery acquires the required charge.  Cont... Last edited by dkaile : 2nd September 2020 at 16:04. |
|
| (12)
Thanks
|
| The following 12 BHPians Thank dkaile for this useful post: | adwaith, ast.ggn, Cyborg, IntoTheStorm, krishnaprasadgg, neil.jericho, PraNeel, Red Liner, shyamg28, SnS_12, Turbanator, vaasu |
|
2nd September 2020, 16:33
| #52 |
| Senior - BHPian | Re: BMW R1250GS Adventure Pro MY2020 - Style HP - The Comprehensive Review Accessories continued - A view of the Rubber Bungs attached on the right side of the bike. Total of 4 bungs are attached on this side plus one original as marked in the picture -  One bung on each side is hidden just below each radiator cowling on both sides  5 bungs on the left side plus one original one. Gives a neat finish to the bike and also protects from any off-roading slush entering the crevices.  Crash Bar Protector Pad installed on the right side  A side view of the clearance from the clutch covers which it will be providing enhance protection. Space is restricted and it took time in the installation with a L Key. The gap that is visible between the back plate and pad gets totally compressed and tightens to a proper finish  A view of the left side Pad  SAE Battery Charging Cable - to be used for battery charging directly without using the DIN socket or the bike's Canbus electricals and also for using any high current draw accessories like a ResQtech external tyre inflator that I already own and the current draw of which is cut off by the Canbus if used through the DIN socket. I have similar cables attached to my Harley Softail Heritage and my previous Ninja 1000. https://www.aliexpress.com/item/12V-...27424c4dZvc4Xx  Here I have routed the cable from underneath the seat and attached to the Battery. Note that that a separate accessory positive terminal extension is given in the BMW which is visible with the red cap in the picture, for attaching additional accessories. The supply to the Canbus is not cut off even after removing this terminal as it is just an extension cable from the actual battery positive terminal. I was positively surprised when the time on my TFT did not reset even after removing this positive and the battery negative terminal.  I have hidden the SAE connector of the cable behind the chassis frame and subsequently cable tied it for security  Here it is being again used to charge the battery through our conventional charger without Canbus interference and without touching the bike internal electricals.  Also received these BMW Key Blanks specific to our bike. I will use them to make any extra keys from our neighborhood computerised key-maker to be used with the Panniers, as I have heard various reports on international forums of the Keyless Key Fob's metal key being broken off while using with the pannier locks frequently https://www.aliexpress.com/item/Moto...27424c4dZvc4Xx  Cheers for now... |
|
| (15)
Thanks
|
| The following 15 BHPians Thank dkaile for this useful post: | adwaith, ast.ggn, Cyborg, hiren.mistry, krishnaprasadgg, nitrogary, PraNeel, Red Liner, Rocky_Balboa, saviouravenger, shyamg28, SnS_12, surjaonwheelz, Turbanator, vaasu |
|
2nd September 2020, 18:08
| #53 |
| Senior - BHPian | Re: BMW R1250GS Adventure Pro MY2020 - Style HP - The Comprehensive Review 1st Service Report - Running-In Service - 618 kms 31-08-2020 The Running In Service Check needs to be performed between 500~1200 kms on the Odo. It is in fact equivalent to a full service and entrails all jobs which are carried out in the 1st year service at 10,000kms except change of brake oil (which is scheduled for the initial 1st year and then subsequently every 2 years). So with 618kms on the Odo I reach the dealership of Lutyens Motorrad at Okhla, New Delhi.  I am told that these are the jobs which will be done under this Running-In Check. As I mentioned, it is quite comprehensive and they changed the Engine Oil and Oil Filter as well as the Transmission Oil (Bevel Gear Oil). Air Filter was also opened up and checked and cleaned by hand carefully as they don't recommend cleaning the paper filter with compressed air.  The Bike on the Service Lift. Was scanned for any software updates of which there were none. All wheels and spokes were checked for tightness and damage. And the service jobs were started.  4 liter of 5W/40 fully synthetic BMW Advantec Ultimate Oil was replaced alongwith the oil filter and crush washer of the drain plug. The under-body bash plate needs to be removed to access the oil drain plug. The bash plate was washed as partly visible in the picture.  The original BMW Oil Filter part number is visible. Cost - Rs. 1560/-, Made in Austria by Mahle.  180 ml of Gear Oil was used to change the oil in the transmission (Bevel Gear Drive). Now the interesting thing to note is that 75W-90 grade Fully Synthetic BMW Gear Oil (Made by Shell) is used when in fact they mention 70W-80 grade in the Rider's Manual. This practice is being followed worldwide as per the International Forums that I have read.  It is exorbitantly priced at Rs. 5055/- per liter and is charged pro-rata for 180ml quantity used, when a similar grade from reputed company like Motul etc. is available around a 1000 bucks a liter.  I also got the Bevel Gear Greasing checked although it is not scheduled to be done till 10,000 kms as I had read some negative reports for the same. All was found to be well greased. Very High Molybdenum content grease is used here. It is recommended to be checked if you intend to do lots of water crossings and especially after that.  Here's a view of the 2 drain plug crush washers and 1 O-ring of the transmission oil filler nut. The spare plug cap after installing the Enduro Mode Plug, which was now done after completion of 1st service and some spare battery terminal nuts and washers are visible here.  This is the original from factory Oil Filter that was replaced. It was interesting to note that this is of a slightly smaller length than the one that will be used henceforth, to improve oil circulation in the initial running-in period. Note that the part# is also different from the one that replaces it.  The Enduro Plug now in place below the Rider's seat. The Enduro Modes are now active and a special 'Plug' sign is also now visible on the TFT dash  All these checks were carried out for torque and wearness checking of components -  I also got the OE BMW TFT Tempered Glass Protector Fitted as I mentioned earlier.  Cost was 2200/- and comes with a nice BMW Motorrad logo as visible in the picture  I reached home at 699 kms on the Odo. As you can see circled in red, the PLUG sign is now visible on the TFT dash. Also note that the Oil Level is now mentioning as OK, highlighted in red square. This was not coming earlier and starts to comes only when the bike is at proper working temperature, static and in upright condition.  The Total Cost of the Servicing was Rs. 6,052/- for Parts + Rs. 1,900/- for Servicing Labour + 1432 GST = Total Rs. 9,384/= which I would deem as quite reasonable unlike all the haywire stories I had heard about BMW Service.    Did a little trail riding with my son recently  The bike in it's elements. And What a Bike!!  Cheers for now... Last edited by dkaile : 2nd September 2020 at 18:15. |
|
| (23)
Thanks
|
| The following 23 BHPians Thank dkaile for this useful post: | adwaith, ast.ggn, bj96, Cyborg, Haroon, hiren.mistry, krishnaprasadgg, moralfibre, neerajdan, neil.jericho, nitinkbhaskar, nitrogary, PraNeel, Red Liner, saviouravenger, shyamg28, SnS_12, surjaonwheelz, Torque_Curve, Turbanator, vaasu, vijaythacker, xtremeshock |
|
2nd September 2020, 18:41
| #54 |
| BHPian Join Date: Feb 2009 Location: Pune
Posts: 268
Thanked: 1,237 Times
| Re: BMW R1250GS Adventure Pro MY2020 - Style HP - The Comprehensive Review Good to read the service procedure documented so well. If you watched it, you'll know how easy it is to do it yourself. You must be waiting to do the service by yourself! But its 5 years away if you got the extended warranty.. lol Nice bits of accessories on the bike added. Most impressive are their prices. Enjoy the 9400 km until next service! I suggest you change shaft drive oil every service and not every 20k km as recommended. |
|
| (1)
Thanks
|
| The following BHPian Thanks nitrogary for this useful post: | dkaile |
|
3rd September 2020, 20:45
| #55 |
| Senior - BHPian | Re: BMW R1250GS Adventure Pro MY2020 - Style HP - The Comprehensive Review Denali SoundBOMB Compact Installation - 03-09-2020 Received another accessory yesterday, which I had been waiting for, from Nippy Normans UK. I had paid 81.5 Pounds for it (approx. 8k) including shipping to India. Now the stock horn was quite inadequate for India and in fact a safety hazard for fast riding bikes. So I consider a horn upgrade a essential in any superbike. Now this Soundbomb Bundle contains the following items - • Denali horn mounting bracket • Denali Sound Bomb (120dB) Horn with Relay • Denali Plug and Play wiring harness • Denali horn to BMW harness adapter  Here are the actual items I received. Packaging was a little compressed by India Post but the items were all secure.  All the items opened up  Front View of the Denali Soundbomb Compact. Notice the sound outlet port. This will face the front of the bike.  The Rear alongwith the mounting point  Mounting Bracket attached after applying threadlocker. This bracket makes all the difference as it is very solidly built for secure installation which 'hopefully' will not budge for life.  This is the bolt on the bike just between the front suspension where the Horn is 'tailor made' to mount.  The original bolt is removed (on the right in the photo) and swapped with a longer replacement bolt (on the left) provided in the kit, to take care of the additional thickness of the mount  All bolts of the mount are installed with Threadlocker - most essential for long term peace of mind  This Denali Horn to BMW Harness adapter provides absolute seamless and OE fitment to the horn, without cutting or tapping into any original wiring. Notice the Denali wiring harness connections have also been routed in the background and subsequently connected to this adapter.  The Final Routing of all wires is done under the seat and the underside of the tank on the right side. The OE Denali Harness is custom made and makes the installation a breeze and a plug and play affair, but it still took me a good 2 hours for all the proper installation to my satisfaction. Wiring is zip tied on crucial points and I further taped the relay and all connections with electrical tape to properly moisture-proof the connections and so that no loose ends are visible after installation.  The Final Installed Horn. It has enough clearances on all sides and does not brush anywhere. Notice that a Brake Line Protector is installed with a abrasion resistant wrap just in case it touches during longer movement of the front suspension.  Here's a 'after' sound clip - The sound is not doing justice in the video but it really is a 'monster' of a horn. Cheers... Last edited by dkaile : 3rd September 2020 at 20:51. |
|
| (10)
Thanks
|
| The following 10 BHPians Thank dkaile for this useful post: | adwaith, bj96, Cyborg, IntoTheStorm, saviouravenger, shyamg28, SnS_12, surjaonwheelz, Torque_Curve, Turbanator |
|
15th September 2020, 16:35
| #56 |
| Senior - BHPian | Re: BMW R1250GS Adventure Pro MY2020 - Style HP - The Comprehensive Review The Bike crosses the 1100 kms mark and is riding flawlessly. Starting from where I left off, here are a few more accessories that I have since added - Here's the package in which I had received the Tempered Glass Screen Protector for the TFT, which I had missed posting last time around  Only with a 'German' product do you get a 100 page installation and care manual for a thing as simple as a screen protector!!  Next, I had received some very good quality Rubberised Fuel Tank Pad Protection https://www.aliexpress.com/item/4000...673a4c4d14qZBe  High quality 3M double side tape to attach them. Though the size of the tape needs a little trimming at the edges for a smooth finish.  I have attached just the Centre Tank Pad for now. Here's how it looks. Yeah I know, it went a wee bit tilting to the right while attaching it. Maybe one of these days I will remove and reattach it, as I have the 3M tape in my stock for re-attachment.  Here's another view of the Tank Pad on the road and a view of the brilliant new Meerut-Hapur-Bulandshahar Expressway which has been completed recently  Recently joined the GS Rider's Group of India. Received this beautiful 'paid' T-shirt. Matches my bike too. Lolz  A closer look at the GSRI Logo  Also received some high quality stickers  Received a BMW Keychain with Valve Caps from Amazon https://www.amazon.in/gp/product/B07...?ie=UTF8&psc=1  Here's how it looks attached to the Keyless Remote  And one more Keychain which I am currently using, also from Amazon https://www.amazon.in/gp/product/B07...?ie=UTF8&psc=1  Got the 2 year Extended Warranty done @ Rs. 25,500/- for total peace of mind for 3+2 = 5 years and unlimited km's. But the irony is the Rider pushing the bike to the workshop on the warranty certificate. Lolz.  Here's the Fine Print with many exclusions but pretty standard stuff  Went around and Removed the Rear Pannier Racks. Just need to remove 6 torq bolts, 4 from the top and 2 from the sides  Here's the removed Pannier Rack. I further removed the 2 bolts holding the rear enforcement bar to make it compact for storage  Cleaner finished look  Here's a look of the bike with racks removed  Received the Spare Key which I had ordered from the dealership for the Panniers. This is a key without the Transponder so it cannot start the Bike. But a idea was brewing!!  The key costed Rs. 2912/- and came in about 15 days all the way from Germany!  Now I had already received some spare blank keys from AliExpress which I had mentioned in my previous posts. I had got one of the key's cut to original but was not satisfied with the result. So a idea came to see whether the transponder from the Plastic Key can be removed and one Metal Key with Transponder can be made which can act as alternate do-it-all key for emergency usage. So on further r&d I discovered that it was very easy to remove the transponder from the plastic key, a video of which I have also posted earlier. Also removed the new original metal key that I had just received, from it's case. And fitted all these together into the Blank Key AliExpress Case. Work in progress -  Voila! Here's the finished result. The new 'original' metal key with transponder sits in the centre. Flanked on the left with the Plastic Key, now with transponder removed. And the original spare key but with the locally cut metal key. So the centre key is now the Spare Transponder Metal Key.  ------------------------ BATTERY R&D I was told by fellow 1200/1250 GS/A owners that the new battery from BMW is being charged at a whopping Rs. 15,000/- per piece for replacement. It was a Exide Technologies, EU battery. On further research I found out that the Battery Model suggested abroad is ETX-14 which is a direct fit for our bike with dimensions of (mm) 150 (L) x 87 (W) x 147 (H), 12Ah, CCA of 200A and Positive Terminal on the left as polarity.  And on further R&D I found out that this is the exact same battery is fitted by Royal Enfield on their Interceptor & Continental GT 650's!! Although this battery was not listed on Exide India's website, and RE dealers were quoting anywhere between 5-7k for it and it was not in their stock either. My friendly neighborhood Exide dealer luckily had it. He told me that it comes imported from abroad and comes without any box from the company itself. It has exact same specifications as the European one. He gave it to me with bill and 1 year warranty for a measly 3.5k. I just took it for R&D purposes and will it pass it on further to a needy GS owner, of which there are many in the que. So here it is - Same polarity, same specs  It was dated as 05/02/2020 and it's OCV was mentioned as 13.2V which it is holding even after a few days after being fully charged.  The back with the mandatory warnings  The top view  The weight was also the same of 4.81 kgs. Here it is showing around 5 kgs  Fully charged by my existing standard Harley/AliExpress charger  Cheers for now...  Last edited by dkaile : 15th September 2020 at 16:44. |
|
| (16)
Thanks
|
| The following 16 BHPians Thank dkaile for this useful post: | adwaith, Cyborg, hiren.mistry, IntoTheStorm, krishnaprasadgg, moralfibre, nitinkbhaskar, pramods, PraNeel, rakesh_r, Red Liner, saviouravenger, shyamg28, SnS_12, surjaonwheelz, Turbanator |
| |
|
16th September 2020, 10:18
| #57 |
| Senior - BHPian | Re: BMW R1250GS Adventure Pro MY2020 - Style HP - The Comprehensive Review BMW Navigator VI (Installed 12-09-2020) Received another piece of 'shoshe baaji' kit from BMW, the Navigator VI  It's MRP is a 'preposterous' 60k and mine came without any maps preloaded, which I was told later on is a paid extra in this era of FREE Google Maps!! Although I had got it at 50k during the offer while booking the bike. More on the maps later.  Here's all that comes inside the box - a 5" touch screen unit which has a circular polarisation filter (CPOL) to minimise reflections and increase contrast and readability in direct sunlight. Has bluetooth for direct phone and headset connectivity, works without any internet connection, supported my 32GB micro SD card for music and maps, is IPX7 rated (1 meter upto 30 minutes), is actually a Garmin unit and Made in Taiwan. Also visible are a beautifully crafted carry case with BMW embellishments, user replaceable battery, a Philips head screwdriver to open the battery compartment, a micro usb cable for pc connectivity and charging and manuals.  The actual unit. Now on exploring further I realised that this unit is much more than just a standalone 'antique' GPS device. It's beauty lies in creating a very 'functional' 2nd screen for your bike. And with all the GPS mount (lockable) connections already prefitted and installed on my bike from the factory, putting it on or off the bike is a matter of seconds. In fact the news is out that BMW will soon be discontinuing this Nav 6 and will be integrating the detailed GPS maps functionality on the single and larger TFT screen in future bikes. So if you are a fan of a dual screen cockpit on your bike, like I am, this is the time to get it before it vanishes into posterity. This can also be used a single standalone GPS unit which you can take off your bike and use in your car, hiking etc. if you venture deep into places with no mobile connections.  The rear. Note the direct seamless connections in the middle of the unit for charging the unit and operating it by the bike's scroll wheel on the left handlebar are built into the unit. Also visible is a manual power button on the top right, which is not needed when the unit is connected to the bike as it switches on and off automatically with the bike, a micro usb port on the bottom right covered by a waterproof rubber bung cover and battery compartment on the left. Also note the slots on the top and bottom centre for slotting on the bike for a secure connection.  The battery cover opened up  Inserting the 32 GB micro sd card which can carry your entire music collection and world wide "FREE" maps. More on that later.  The front with the protective film removed. Have ordered a tempered glass protector for the same.  The unit switched ON. Notice that the GPS satellites connectivity is visible on the top left corner.  And now connected to the bike. Now the 'dual cockpit' magic starts unfolding. Notice the GPS is not showing any maps for now on the screen.  The view of the Home Screen when you switch on the bike. This automatically switches to live maps once you start riding if you don't select any other option or any of the many inbuilt apps.  A view of the Live Compass app. Pretty useful if you are lost in the wild.  The Motorcycle Data is fully integrated with the Navigator VI and here's where the 2nd screen functionality really starts working. You can display 1, 2, 4 (as on screen in the photo) or 16 pre-selectable variables of the bike's information on the screen  Now with 16 variable on screen including GPS rated Top Speed. However the top speed is restricted to 200kmph and will not show speeds above that on the GPS unit. You will need to take the help of the TFT screen and the BMW Motorrad App which automatically records that, for that functionality. It can also display sunrise/sunset and tens of other variable as per your own customisations in any of these fields.  After a recent 250 km ride and with odo at 1113 kms. I found this screen alone worth the added functionality of the Nav 6.  It also automatically shifts to the Night Mode controlled by the the bike's auto lighting system  And Voila! I now have FREE, detailed and updated maps for which the dealership was asking anywhere between 5~7k.  This video details the exact process by which I got the open source and monthly/six monthly updated maps for FREE. Though nothing can beat Google Maps in today's day and age for pinpoint accuracy and functionality, I could still find a small restaurant like "Caltex of Omelette Fame' in my city on these free map's POI's. The India Maps which I downloaded were a 900MB download which sit in the Garmin Folder on the micro sd card. The amount of information it records and displays of your Last Ride is much more than that visible on the TFT screen. Even things like Number of turns you took on the last ride, number of gear changes, average throttle position, how many times you applied the front or the rear brakes etc. etc. is phenomenal for any geek! 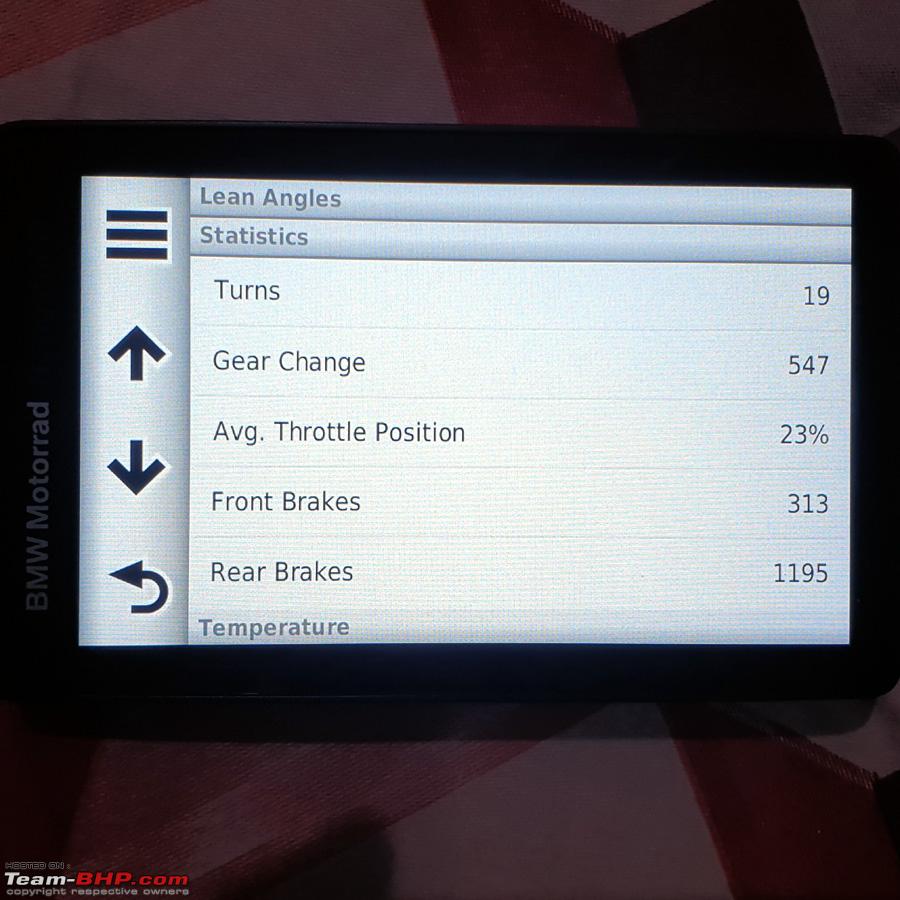 The Open Source Maps downloaded are updated just 3 months back on 20-06-2020 and can be updated at any time for free, as and when available.  And as I mentioned this Nav 6 is also a full fledged Media Player with Bluetooth Streaming to your headset and can carry your entire music collection. The quality of the onboard sound dac is also excellent.  So, in a nutshell, Navigator 6 is an over the top 'shoshe baaji' 2nd screen, but then everything about this bike is over the top. Cheers... Last edited by dkaile : 16th September 2020 at 10:32. |
|
| (10)
Thanks
|
| The following 10 BHPians Thank dkaile for this useful post: | adwaith, Cyborg, hiren.mistry, KarthikK, krishnaprasadgg, neil.jericho, PraNeel, saviouravenger, shyamg28, surjaonwheelz |
|
16th September 2020, 11:00
| #58 | |
| BHPian Join Date: Dec 2019 Location: KL52
Posts: 602
Thanked: 4,783 Times
| Re: BMW R1250GS Adventure Pro MY2020 - Style HP - The Comprehensive Review Quote:
It's something I have always wondered for quite a long time, even as a kid watching my father drive/ride I remember thinking about this. I used to wonder how many upshift/downshifts a car/bike might have gone through in it's lifetime or during a specific rides even, sometimes when a long ride in traffic always makes me wonder that. So is it specific to a Trip setting ? Does it store the value for since the bike was new or just on a trip to trip basis and count gets reset? It'd be cool to come back and see how many left/right turns, upshits/downshifts, front /back brake engagements were done over a few years time. Cheers Krishna | |
|
| (3)
Thanks
|
| The following 3 BHPians Thank krishnaprasadgg for this useful post: | Cyborg, dkaile, SnS_12 |
|
19th September 2020, 18:46
| #59 |
| Senior - BHPian | Re: BMW R1250GS Adventure Pro MY2020 - Style HP - The Comprehensive Review BMW OE Panniers (18-09-2020) Another set of ordered accessories reach for a early Diwali in these Covid time... Set of 2 Side Boxes, 44L capacity for the Left and 36L for the Right as it is shaped with the exhaust on that side, and 1 Top Box of 32L capacity with fitted Inner Waterproof Bags for all 3.  Initially I only wanted the Top Box but since they were going on a 30% off offer from BMW, had ordered all 3 with their waterproof inner bags  Unboxed and ready to install the locks. They require 8 sets of Locks and are keyed to fit your Original Key as a Single Key System (3 each on the side boxes as they can be opened from both front or back side and 2 on the top box as it can only be opened from the back. 1 lock each is used to lock the box to the pannier racks and the top box to the luggage rack). Each lock set costs Rs. 2227/-, so that's a extra expense of Rs. 17,816 for the set of 8. Notice the New Spare Key I had got made in the Left Side Pannier rear opening lock.  I had already received the optional Backrest Pad for the Top Box from AliExpress as I had already mentioned in my previous posts and the same was also attached to the Top Box.  The Top Box attached, with the Backrest also installed  Here's the installation procedure video that I made for the Top Box. It gets on or off in a jiffy. The best part of these boxes is that everything is factory fitted for attaching directly to the bike without any preparation unlike 3rd party panniers from Givi etc. Here's the installation video of the Right Box which is on the exhaust side and a view of all 3 boxes All 3 boxes attached. I find the Black color to be more suiting the look on my bike.  Here's how it will look on my bike! Tested on this 1250GSA HP style standing in the showroom to see that I don't have any fitment issues back home.  I intend to attach only the Top Box for now on my bike. A look at the Backrest Pad clearance from the hinges.  A view of the bottom of the Top Box. Comes with 3 rubber pads at the bottom so that they sit comfortably on the floor without scratching anything. Well designed and engineered.  Finally fitted on my bike  Quite narrow seeing the overall width of the bike  A view of the locked box from the bottom. Doesn't budge a bit.  As I mentioned I had also purchased all 3 Inner Waterproof Bags for these panniers. Here's a look at the one for the Top Box. Very High build quality and solid SS latches to get the luggage organised and facilitate easy loading and unloading. Comes with 2 carry handles and one shoulder strap inside the bag. BMW claims that these bags are sturdy enough and can also be attached to the outside of the cases with dedicated fittings built in, creating additional storage space.  Cavernous size to fold shut to make it 100% waterproof  Exact dimensions to fit each box perfectly  Also received this original Headlight Guard for the 1000$ LED Headlight. Lolz.  It says for "Off road Use Only' from BMW perhaps to indemnify themselves for street legal use as it can cause some beam splitting of the headlight pattern  Again had got this at 30% off offer  Cheer for now...  Last edited by dkaile : 19th September 2020 at 18:59. |
|
| (13)
Thanks
|
| The following 13 BHPians Thank dkaile for this useful post: | //M, adwaith, Cyborg, highlander, KarthikK, krishnaprasadgg, moralfibre, nitinkbhaskar, PraNeel, Red Liner, shyamg28, SnS_12, Turbanator |
|
20th September 2020, 11:46
| #60 | |
| BHPian | Re: BMW R1250GS Adventure Pro MY2020 - Style HP - The Comprehensive Review Quote:
Actually, sir, the dealership quoted 28K to me for the OEM 12V 12AH AGM battery. My GS is exactly 2 years and 1 month old and the battery is warranted till 24 months. Classic bad luck I suppose. So after your most timely discovery (at least for me) I called up 30+ dealers in Delhi looking for that Exide ETX-14 and the vast majority had never even heard of this battery, forget about having this in stock. As a last resort, I went to Karol Bagh where I was able to order it by paying a small advance, with delivery expected sometime next week. The cost as quoted is 4K and the reason given for the delay is that due to COVID there's very little steady supply of stock from the company. In addition, I was informed by the shop owner that this same ETX-14 battery is OEM for the UM Commando and he himself has installed it on a Hayabusa which is working fine, he showed me the bike's pictures with the battery on his mobile phone as well. I'd have ridden down to Meerut had I known you're planning to sell it, but by that time I'd paid that advance. Once I procure it, I will update on results. | |
|
| (1)
Thanks
|
| The following BHPian Thanks tanayr for this useful post: | dkaile |
|