News
Future Mercedes-Benz models to ditch next-gen Apple CarPlay

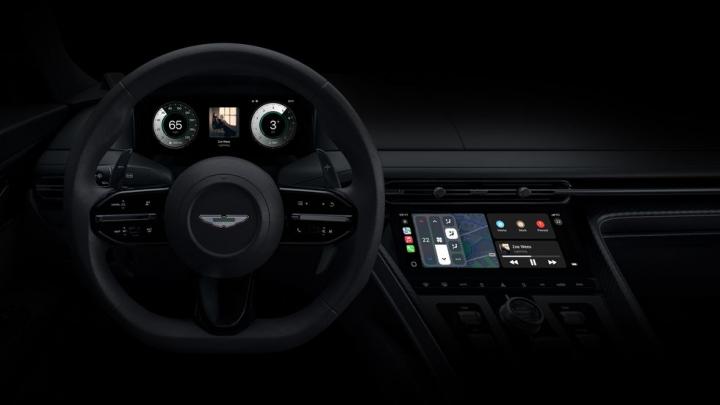
The first carmakers to get the new-generation CarPlay software later this year are Porsche & Aston Martin.
In a recent interview, Ola Kallenius, CEO of Mercedes-Benz, confirmed that the carmaker will not offer the next-generation CarPlay in its future models. Instead, the brand has decided to focus on its own Operating System.
Apple, which will introduce its next-generation CarPlay later this year, had initially named Mercedes-Benz as one of the carmakers to receive the software. However, the company CEO has confirmed that they have chosen not to adopt the upcoming CarPlay update in its models. Kallenius described Mercedes' proprietary OS as the "central nervous system" of the vehicle's software architecture. Mercedes aims to offer a holistic approach, integrating all of the vehicle's functionalities seamlessly, to offer a superior experience, which, as per Kallenius, can only be achieved by the manufacturer itself.
Having said that, Mercedes-Benz has confirmed that it will continue supporting the current generation of Apple CarPlay and Android Auto on its vehicles. Customers will get the option to choose the platform which best suits their preference.
Apple has confirmed that the first carmakers to get the new-generation CarPlay software later this year are Porsche & Aston Martin.
Source: TheVerge
- Tags:
- Indian
- International
- Apple CarPlay
News
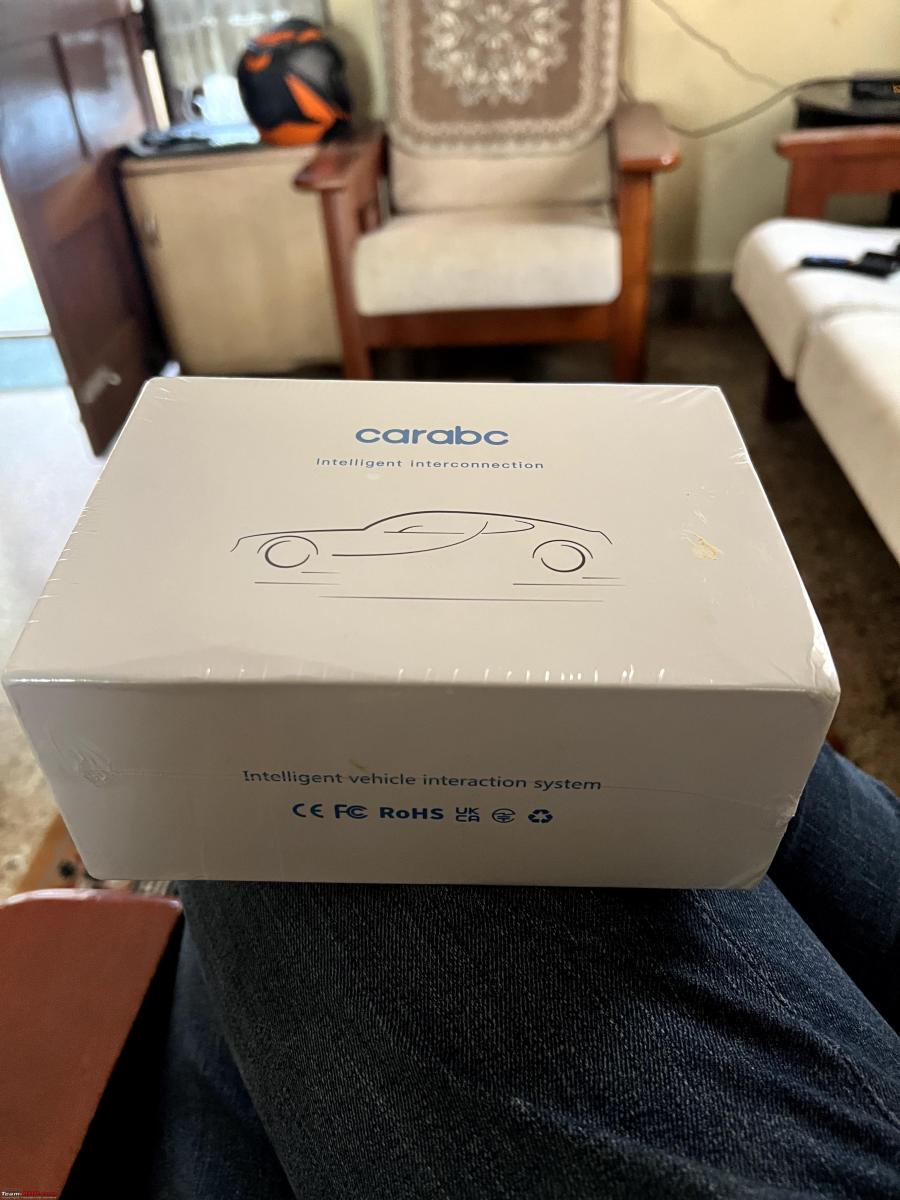
How I installed CarPlay & Android Auto on my Crysta's stock head unit

The head unit switches seamlessly between the stock interface and the CarAbc interface.
BHPian audioholic recently shared this with other enthusiasts.
Our 2020 Innova Crysta pre-facelift did not have Apple CarPlay and a few months after we purchased it, they decided to launch a facelift with a completely new head unit with Apple CarPlay and Android Auto.
Had earlier planned to change the head unit to the facelift version but realised the entire wiring was different and it was not a direct fit. Only one installer in Goa has done this so far and has worked with their own custom connectors.
But now, the long pending problem has been solved with this amazing product I found which was popular in other countries with Toyota head units. Turns out my car's head unit came with a similar interface and operating system. Found the supplier in China ordered this product and installed it as soon as it arrived. Was overjoyed by the results.
Apple CarPlay and Android Auto are now on my stock head unit with complete functionality.


The control unit is a palm-sized box which has a piggyback interface between the vehicle and the head unit. In addition to that it has a dedicated USB port for wired CarPlay and an optional interface with a rear camera which is not required in my case since the stock camera is used:

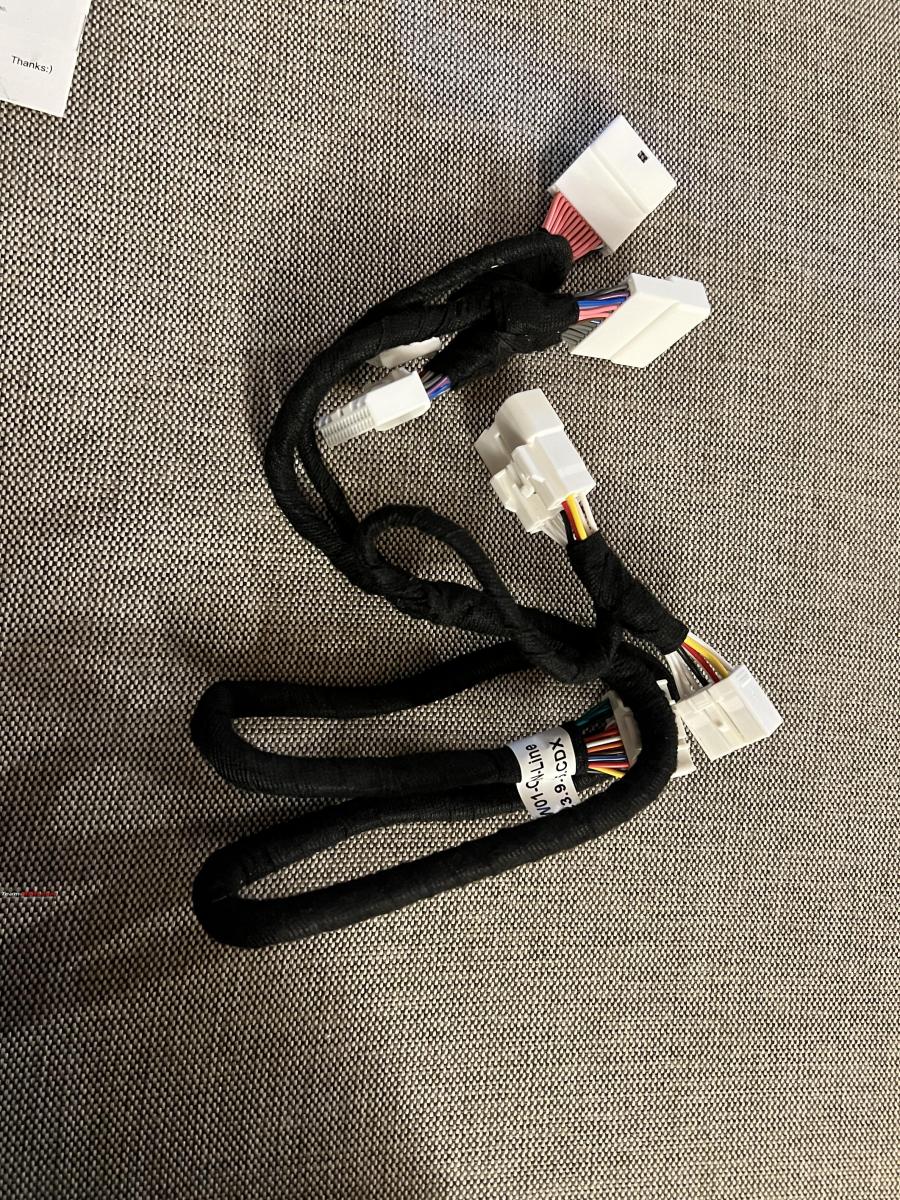
It comes with a vehicle-specific harness which will connect to the Toyota harness at three T connectors that then head to the stock HU. The connections hardly take time. We remove the three connectors from the stock HU, connect that to the harness provided and then connect the opposite pins on the harness to the head unit.
Once that's done, the ignition can be powered up and the head unit takes a while to boot since its power is disconnected. After this, to trigger the CarPlay box, we have two options:
- Switch to FM and then Aux
- Hold the Voice command button for 2s and release.
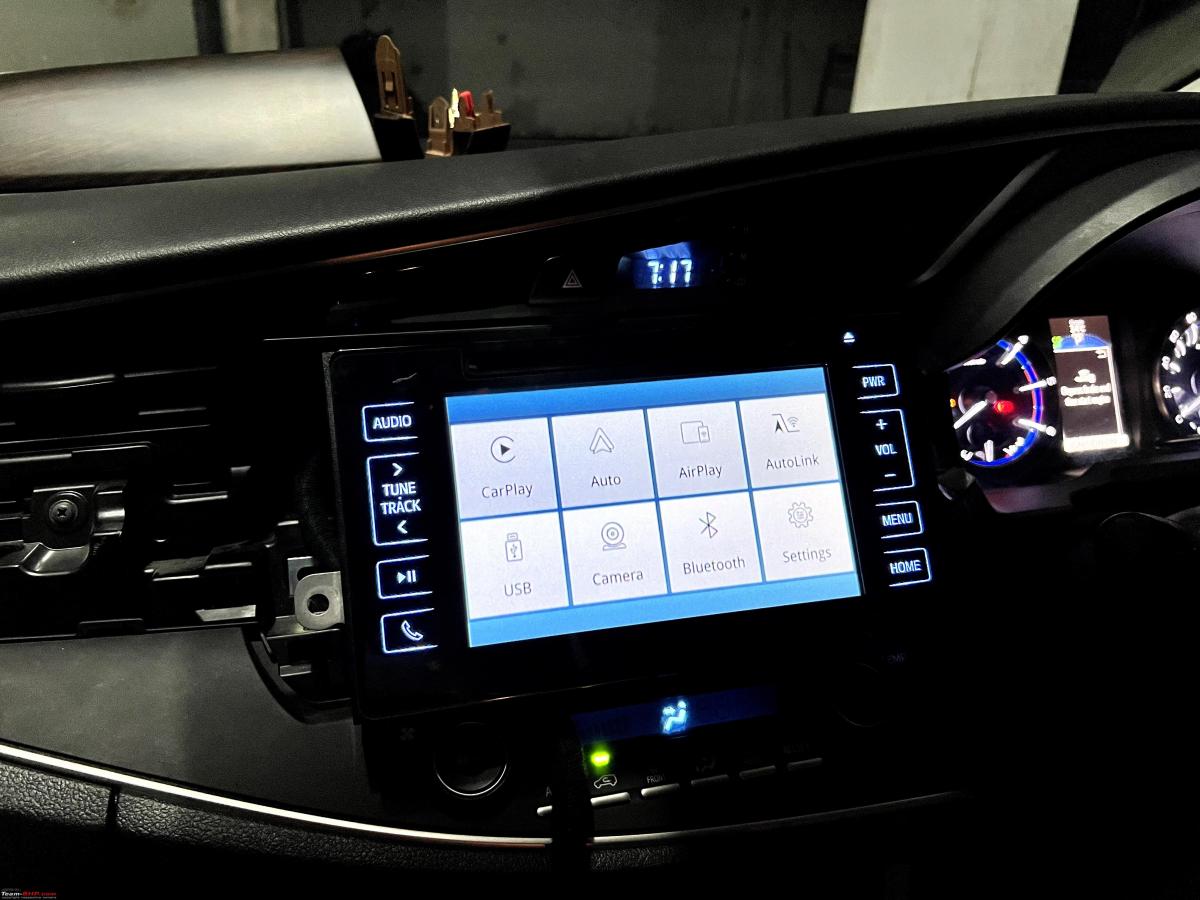
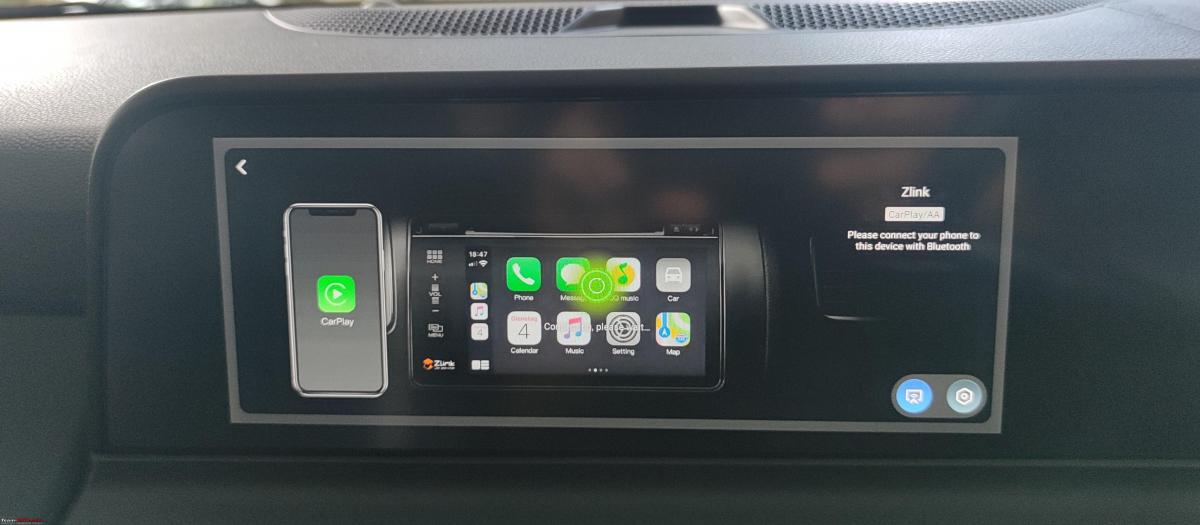
The CarAbc box immediately fires up with its interface. For the initial setup, we can pair our phone with this box(and have to delete the pairing with the stock HU to avoid clashes). Wired car play will work straight away while wireless needs a connection to the Wi-Fi access point.
Turns out, the head unit allows external devices to connect two-way and be able to even access touch screen actions, which allows the Carabc box to offer full CarPlay functionality and for the user to use the Head unit touch screen to navigate. This is common in German cars but given how Toyota electronics is ancient, it was a surprise to me.
To summarise
Pros/Features:
- Superb integration and installation
- Seamless switching between the stock Head unit sources and the CarAbc interface
- The stock reverse camera can be used as usual and the box switches without any loss of audio
- Very good sound quality and customisable settings
- Offers both wired as well as wireless ACP and AA as well as a host of other functions, typically rendering the stock HU functions redundant
- Touch screen lag is comparable to the stock head unit and is only noticeable during scrolling or moving maps
- ACP graphics performance is very good with a good frame rate
Cons:
- Screen resolution is slightly lower and since the stock HU does not have very high resolution, ACP somewhat looks low res especially since I am used to crystal clear rendering on my Slavia 10-inch display.
- The incoming call display on the instrument cluster is lost even though steering calling controls continue to work
Here is a short video showing the performance of the interface and the comparable lag between the stock interface and that of the Carabc box.
Check out BHPian comments for more insights and information.
News
Bought a CarPlay AI Box for my Seltos facelift: Review with pros & cons

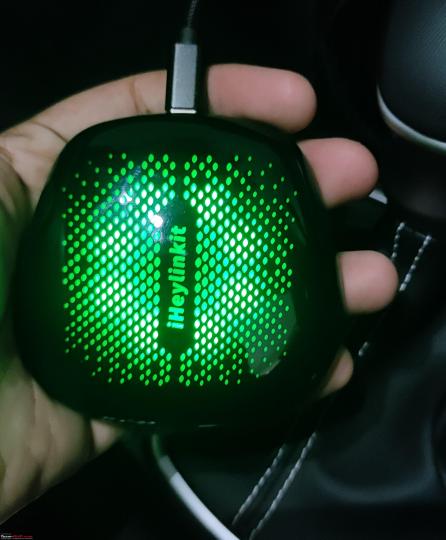


It's called the iHeyLinkit CP908 for which I paid around $380 (+duties) via AliExpress and I am very happy with the device and its performance.
BHPian MadrasTurbo recently shared this with other enthusiasts.
Background
In-car HU user experience, for me, is one of the very important aspects of a car, and though I was mostly satisfied with the OE HU on my Kia Seltos facelift, one thing that I was not a big fan of was the inbuilt Here Maps. It is not terrible but I have been so used to Live Google Maps on my previous car’s Android HU, that I really missed it on the new car. Changing the HU was out of the question, and was not even considered, but I started looking at the available options to integrate live Google Maps to the HU.
Options Considered
- Wired CarPlay/AA - This is the most straightforward way to get Google Maps and I am sure it would fit the bill for most of the users. I was also using this, but always missed the convenience, that I was used to, of just being able to use the application without a phone.
- Wireless CarPlay/AA with a dongle - Costs anywhere from ₹6,500 and goes all the way up to ₹9,000 for some models. Has the same issues as the wired counterpart, but on top, it takes a hit on the phone's battery, and if charged wirelessly, the phone heats up sometimes. I know many Kia/Hyundai users use such dongles and have a lot of positive feedback, so this option is also worth looking into.
- Side loading .apk by accessing the engineering mode - While I was reading online, I came across an interesting thread on xda-developers where someone got access to the engineering mode and could sideload apks directly to the OEM HU. Though I badly wanted to do this, it was not that straightforward, and Kia has been making it harder and harder to access the engineering mode from what I am able to read. But also, with an OTA update, the side loaded apps most likely have to be reloaded. Also, there were other concerns like keeping the application updated, warranty woes, etc. So I dropped this idea.
- Plug and Play Android Car Box a.k.a. CarPlay AI Box - Basically, an external device that uses the wired AA/CarPlay protocol to run a full-fledged Android OS. Interestingly it also supports wireless CarPlay/AA through an application. Now this was the option that could potentially give me the same experience that I had with a proper Android HU, without having to tamper with anything in the car. So I decided to buy one.
What to buy and from where?
There are a good number of options, and I am also seeing more local brands that generally rebrand and sell Android HUs, offering this product under various names - Smart AI Box, AI Car Box, Android Box, etc. But the problem was the pricing. In India, the local distributors seem to have a good markup (understandable as they have to extend warranty, support), and the prices for known brands like Carlinkit and Ottocast sometimes can even be close to ₹30,000.
Honestly, I do not mind spending money on accessories like this which I would not be changing often, and buying an inferior specced product would ruin the experience, and in the end, I may end up not using it at all. I try not to regret buying something. I paid around ₹25,000 including duties for an Android Head Unit 5 years back for my old car, as at that time, there was no one selling an OE fit for my car which was not so popular but also did not have high specs for the generic units. The product was expensive but it never gave any trouble till the day we had to part with our car.
When I was looking at the various products offered I noticed that the specs for a lot of them were identical, but they looked different and had a different name. It became clear that this is very similar to Android HUs, where brands procure from a handful of manufacturers with their custom branding or casing. So I now just needed to find the right product and buy it from the right seller who offers good support and pricing.
I started looking through AliExpress and Alibaba for these products and there were so many options to choose from at prices as low as $50 all the way up to $400. After talking to multiple sellers and watching multiple videos and reviews online, I could generalize the products based on the processor used. There can be other products out there but the majority of them use the following chipsets.
Snapdragon-based
- QCM6490 - Expensive but one of the best available options today, supports 5G, for EU and Asia. Also supports Wifi6E.
- SD662(6125) - Best VFM Chipset, supports 4G and should be the choice of most buyers.
- SD665(6115) - Good performance, supports 4G and slightly cheaper than QM6125.
All the chipsets mentioned above are octa-core processors, There are other Mediatek and Rockchip based boxes that are slightly cheaper but might offer a different UI, or functionality.
Based on information available online, I was very impressed by the performance and features that the QM6490 based boxes offered and I was convinced that this was the one that I wanted to buy. No seller in India offered this product, so I had to import it directly from China. I have good experience with ordering stuff from China in the past, but that was all through AliExpress. Now, it is a little more challenging to order from China as most sellers do not want to ship single items on their own and the buyers as well have little to no protection.
I got in touch with a company called “iHeylinkit”, and what I really liked about them was the support that they offered. I had a lot of questions and was always given a detailed and polite answer to all my questions. I ordered the QM6490 based box from the same seller, which is called the “iHeyLinkit CP908” for about $380 (+duties) via AliExpress to my EU residence. I believe it is also sold by other companies and you can find the product as “Exploter ApplePie Rocket”, “Navlynx ApplePie Rocket” etc.
The seller informed me that they would be willing to ship directly to India, so if anyone is interested, please take a look at their product line-up. You can reach them at +86 158 7619 4110 on WhatsApp.
Disclaimer
I am not linked to the company/seller in any way. I fully paid for my goods, and my review of the product is solely based on my personal experience. Also important to note, I did not order directly and used AliExpress and had full buyer protection. So if anyone happens to buy directly, please be aware of all the possible risks and if possible, share your experience in this thread.
iHeylinkit CP 908
I will start with the overall pros and cons and then go into the details for those interested.
PROS
- Full Android 13 based OS
- Outstanding performance with zero lags
- 8GB RAM with 128GB UFS2.1 storage with the ability to add a micro-SD card up to 128GB
- Dual BT 5.2
- Super quick boot time (less than 15 seconds)
- Built in GPS
- Wireless Android Auto/Apple Carplay
- 5G connectivity
- Wi-Fi 6E
- HDMI Output which is capable of outputting different content for the HU and the rear entertainment unit
- In-Car Wi-Fi Hotspot
- Supports use of OEM GPS data (for supported cars)
- Integrates well with steering controls including the voice commands
- Full access to Google Play Store
- Supports accessories like an air remote(+$20), which can enable the rear seat passengers to control volume, change tracks, and also use the voice commands from the remote. I found this useful
- Split screen support to have more than one apps open
CONS
- $$$. Costs over ₹30,000. With shipping and duties, it can be significantly higher
- UI/UX. The hardware is so capable but the implemented UI/UX out of the box is very poor. System navigation, bloatware, old security patch with an OS that is already almost 2 years old now
- SIM card is not used only for data but also has messaging and calls like a normal phone. Maybe this is useful for someone but I cannot wrap my head around getting calls in the car from the sim I installed for data. No way to uninstall the phone and messaging app. I have now resorted to call-barring and removed messaging permissions for the applications
- Hotspot has to be turned on every time manually, and there is not even a quick toggle. I resorted to using Tasker to trigger on boot
- Device can heat up quite a bit, so it is important to place it in a well-ventilated area
- By default, while using wired Android Auto, pressing the voice command button on the steering once, opens Kia’s voice command, and long pressing opens the assistant, but for some reason both actions only trigger the assistant with this box. Maybe I am missing some configuration, but I was not able to find a way to make this work properly
Unboxing
The product came well-packed with an external cardboard box and bubble wrap. The product box is relatively small and was surprisingly well made. The box contained the following items.
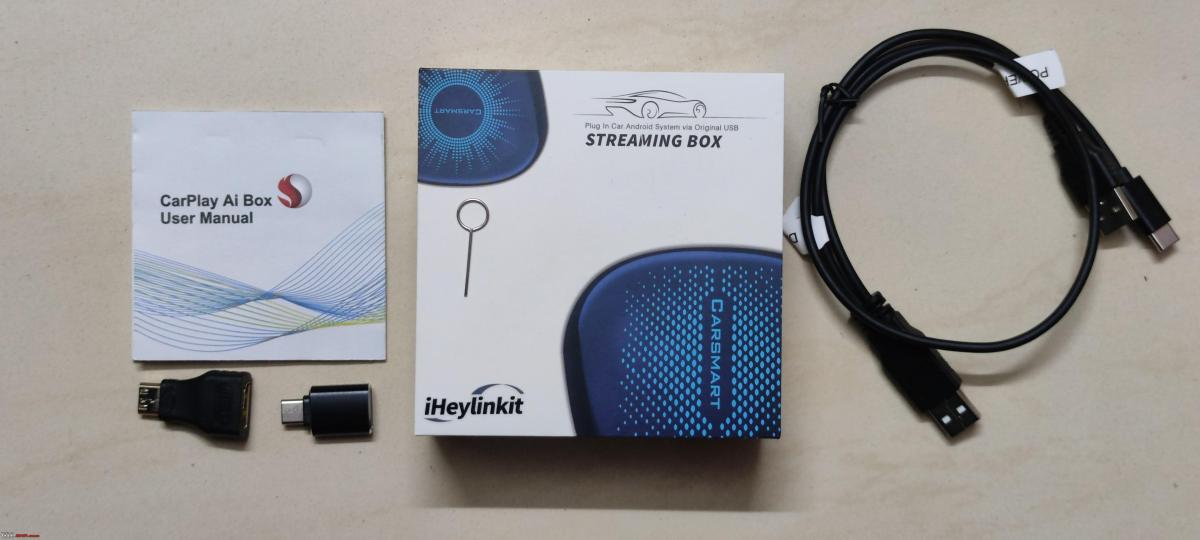
- The device itself
- USB Type A to Type C cable - Used to connect to the car's wired Apple CarPlay port
- USB Type A+Type A to Type C Y Cable - Some cars do not have sufficient power output to power this device, and in this case, additional power needs to be supplied through the Y cable
- USB Type A to USB Type C Adaptor - For cars with type-c input for CarPlay
- Mini HDMI to HDMI - To connect an external monitor like a rear entertainment unit using a full sized HDMI port
- SIM Ejector Pin - To remove the SIM and memory card tray
Boot, Setup, Tweaks and pre-installed apps removal
I used the USB A to USB C cable to connect to the CarPlay port. I was a little worried because many of the users had reported that they had to use the Y cable for additional power to power the device. I wanted to avoid this as first it then takes two USB ports but also it becomes a little too clumsy. But luckily, the power output was sufficient. The device lit up with colors changing from green to red to blue and it was really bright as well. Good thing is there is an option to change the LED color mode, and most importantly it allows you to completely turn the LED off.
It took about 25 seconds for the first boot because it automatically detects the device's resolution and restarts the device. Once it rebooted, I noticed that the resolution was too high, and it was not very usable as the fonts and the icons were small. There were also three big static widgets that were ugly and really was not looking good on the HU. There were also a lot of pre-installed applications.

I quickly realized the implemented UI was very archaic and needed a lot of tweaks. Since I have good experience with Android and customization in general, thanks to my Xda days, I started by seeing what options I had out of the box before deciding the need to root the device. Though I was still limited to how much I could customize, I could get to a point where I was happy without needing to root. A short list of the things that I did.
- Updated to the latest firmware. The firmware updates are done through an app and not the official Android system. But was surprising to see multiple updates as I expected none. The updates were mostly some minor fixes and updates, nothing major.
- Added an Airtel SIM Card and a 128GB SanDisk SD Extreme Pro SD Card.
- Removed all pre-installed applications like HBO Max, Waze etc.
- Turned off the ugly widgets.
- Increased the Magnification/Icon Size and Font Size.
- Turned off Right Hand Drive Mode - Because this aligns the applications in the app drawer to the right which is not very intuitive to use for me.
- Installed Tasker and added a profile to turn on the Wi-Fi Hotspot on boot.
- Enabled Call Barring to ensure that the SIM installed in the device does not get any incoming calls.
- Removed Calls and SMS permissions from all applications.
- Set default assistant to Google Assistant.
- Set default navigation to Google Maps.
- Setup Wireless AndroidAuto/Apple CarPlay through the ZLink app just in case.


Overall Performance and Initial Impressions
Hardware wise the device is impressive inside out. I have mentioned enough about the specs, but I must also mention that the casing feels very well made, light and easy to carry around if needed. Once I set everything up to my liking, it is a breeze to use the device. I just get in the car, use the voice command button on the steering to navigate to my destination and it works flawlessly. My phone is connected to the device’s Bluetooth normally for music and calls.
Performance-wise, the device is a lot quicker than I expected, in the sense, it boots up in parallel with the car's infotainment and in about 10-15 seconds, it fully boots up.

If you setup wireless android auto or Apple CarPlay with ZLink, then post boot up of the device it also automatically connects to AA/CarPlay all under 30 seconds. Another thing I noticed was that when played directly from the device the audio output is much better than any other input modes that I have tried. I am not able to figure out why this might be the case, as the box at the end of the day uses the same CarPlay port as my phone.

The 5G performance is exceptional, I consistently get over 150Mbps, and sometimes even recorded 500+Mbps. The hotspot also is WiFi6 so the connected devices also get access to good speeds.
All other android based car applications can be used, for example, I was able to install my dashcam app, making it easier to offload files to the SD card on board, change settings and view feed. One can also add a CANBUS-based device to connect with the device via Bluetooth, etc. Thinking slightly out of the box, the device also has some other out-of-car use cases, especially while travelling.
- Wi-Fi Hotspot.
- Can connect to any HDMI port in say a hotel TV/Airbnb to access all your content.
- Can also be paired with a mini projector.
- It can also handle some games like Asphalt and supports controllers too.
I am very happy with the device and its performance. I will consider rooting in the long run as that would open up a whole lot of options.
Conclusion and Recommendations
Good hardware, let down by mediocre software.
I am happy with the device but I cannot imagine an average user having to do all these tweaks to have an acceptable experience. The other problem is also powering the device itself, from what I read online, many of the older and some of the newer cars need the Y cable to provide sufficient power. If you want something that is the best available that money can buy, then do go ahead and buy it, but what I would recommend for others is the SD662 based box (called as iHeylinkit CP608 Ultra) for around $150-$170, which features the same UI, casing with HDMI out, and offers good acceptable performance, with 4G connectivity, which should be more than sufficient for all major use cases, I would also suggest talking to the vendor over WhatsApp to better understand the differences between all the available models, to select the one that would suit your needs best.
If you need only Wireless CarPlay/Android Auto stick with well-known adapters like Carlinkit as they are affordable and offer a no-nonsense experience out of the box. Autokit-based wireless AA/Carplay implementations generally perform better than ZLink. Ottocast and Carlinkit also have their own custom skin on the UI which in my opinion is better than the generic ones. You will be paying more for these brands, but it may be worth it as it can save a lot of hassle.
Check out BHPian comments for more insights and information.
News
Apple CarPlay to get brand-specific design & better integration


Apple will first introduce the new update on high-end brands like Porsche & Aston Martin
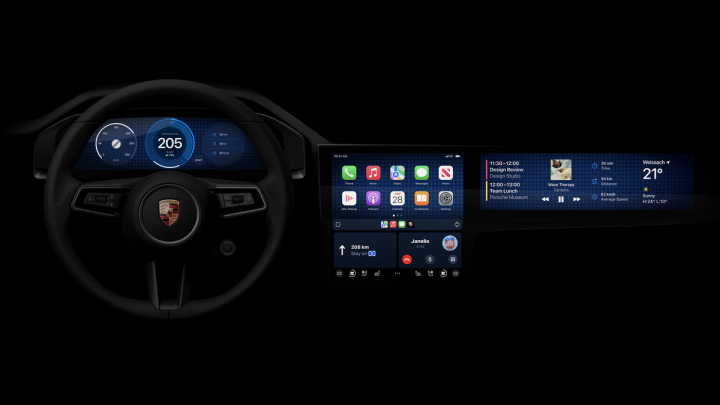
Apple will soon be bringing a major update to its CarPlay connected tech. As per reports, the US tech giant is said to be collaborating with automakers to introduce brand-distinct design details to its CarPlay environment. Reports also state that Apple will first introduce the new update on high-end brands like Porsche & Aston Martin, with their respective upcoming vehicles previewing the bespoke interface.
The next-generation Apple CarPlay will build upon previous versions and integrate into all of the displays in a vehicle, without being limited to just the infotainment screen. The new-gen CarPlay tech will also have multiple template options and special details to ensure the interface reflects a particular brand's ethos. This means in a Porsche, the Apple CarPlay interface will feature a trio of circular gauges in the cluster, with the background wallpaper mimicking the brand's distinct houndstooth seat pattern.
Aston Martin cars, on the other hand, will have a cluster with a central information screen bookended by a circular speedometer & tachometer. The latter will also integrate "Handbuilt in Great Britain" wraparound text.
The new-gen Apple CarPlay will also have a better connection to the vehicle, allowing for a more cohesive display of information on the vehicle's central infotainment system.
While Porsche hasn't revealed when the new-gen Apple CarPlay will feature in its model lineup, Aston Martin has stated that the new CarPlay tech is compatible with its latest infotainment system set to debut in 2024 on models like the DB12 & DB12 Volante.
Other manufacturers could soon follow suit in the near future.
Source: Car&Driver
- Tags:
- Indian
- International
- Apple CarPlay
News
GM to drop Android Auto & Apple CarPlay over safety issues
The new in-house developed infotainment system will debut on the 2024 Chevy Blazer EV.
General Motors will drop both Android Auto & Apple CarPlay systems across all its models & replace them with an in-house developed connected tech. As per reports, General Motors claims that both Apple & Android's connected tech cause safety issues.
Tim Babbit, GM's head of product for Infotainment, stated that the company feels that Android Auto and Apple Carplay encourage drivers to use their cell phones while behind the wheel. Both GM & Babbit think that if a car's in-built infotainment is good, drivers are less likely to use their phones for what they are trying to do when driving. Having said that, Babbit admits that this thinking hasn't been tested in any controlled environment to check whether or not it's true.
General Motors will be unveiling its new in-house developed system, called Ultifi. The new in-house developed infotainment system will debut on the 2024 Chevy Blazer EV. The new system comes with Google Maps with Assistant built into the system itself. The new tech will also be able to handle calls and texts while also controlling audio and climate systems.
Source: MotorTrend
News
Loose USB-A ports in my Hyundai i20: Want to switch to USB-C ports

I use them for charging and Apple CarPlay but they become loose and the connection gets lost while going through small rough patches.
BHPian Nicky recently shared this with other enthusiasts.
Hello all,
I have a Hyundai i20 that I bought in 2020. It comes with USB-A ports for charging and CarPlay connections. It's loose and the connection is lost while going through small rough patches.
The new model year update of the i20 comes with USB-C ports. I asked a Hyundai service centre but they refused to swap. The Hyundai accessories website also doesn't have this part. Does anyone know where can I get this part?
Here's what BHPian Mr.Boss had to say about the matter:
What you are asking for is not an accessory and obviously Hyundai A.S.S won't be entertaining it. Get the part number from them and order online (like, Boodmo).
Easy fix, get an adapter like this, Work around the metal surround so that it fits tight.
Or if you are not bothered about the warranty, get C type PCB and get it soldered to the OE harness.


Here's what BHPian Bhargav7 had to say about the matter:
I would rather suggest you change the USB cable and check if the issue persists. Quite often, the problem is with the cable and not the port. Also, USB-A ports are more robust than type C.
Here's what BHPian libranof1987 had to say about the matter:
Your problem is two fold then - the current port is loose, and you prefer a USB-C port instead?
Is the USB-C port on the new i20 a direct fit, in terms of size, placement and wiring? If so, you can try asking Hyundai just for the part, or get the part no. and order on Boodmo.
Given that you got your car in 2020, it may still be in standard/extended warranty. Changing the port can give the ASC an excuse to void the warranty.
You can try getting the factory-fitted USB-A port replaced under warranty (if applicable, else at your cost), and then use one of these adapters. My car also gets the USB-A ports all around, and since I got the new iPhone with USB-C, I had to get one, and it works perfectly. The phone charges without overheating, and Apple CarPlay works without a hitch.
Check out BHPian comments for more insights and information.
News
Finally figured out how to get Wireless Carplay to work on my Hycross
You can also use Carplay for maps on one iPhone and listen to Bluetooth audio from another.
BHPian Cresterk recently shared this with other enthusiasts.
Are you at your wit's end trying to figure out how to get wireless Carplay to work? Well, I finally figured it out.
The problem:
Wired Carplay has always worked for me but Wireless Carplay only worked with my dad's iPhone 12 pro and not mine. Despite multiple attempts at forgetting and re-pairing the Carplay device, it just would refuse to connect wirelessly. I figured it was due to my aging iPhone XS not being compatible or some other bug. I got a new iPhone 15 pro recently and I was excited to finally get wireless Carplay to work only to be met with the same issue which meant this was probably something software-related.
The troubleshooting:
I tried resetting the Hycross infotainment to see if that would fix it. Did not work.I reasoned the problem probably wasn't with the infotainment since it was working with my dad's phone.
The solution
On your iPhone, go to settings, general, reset, and then reset network settings.

Note: this will also remove all wifi passwords so make an iCloud backup first.
We will ignore the carplay tab for now on both iPhone and infotainment.
Next, go to Bluetooth and pair the car via Bluetooth like you normally would for Bluetooth audio.
You will get a notification on both the car and the iPhone telling you the Carplay device is available and asking you if you want to use it. Click yes on both devices.
You will get another notification asking you if you want to use wireless Carplay. Make sure to click yes on that too. I think I mistakenly clicked "no" when I first paired the car to check the audio quality during PDI before taking delivery of the car and the phone remembered this setting.
Only if the infotainment gets stuck on "waiting for confirmation from your phone" :
Go to wifi on phone and click and join the "MYCAR########" network. A password will not be asked, it would have been autosaved during the pairing process.
Once the iPhone joins this network created by the car, the carplay tab on the infotainment will light up. Enjoy using wireless Carplay.
Wireless Carplay not connecting automatically/sporadically:
Go to wifi and click on the (i) next to the "MYCAR######" network. Then make sure autojoin is turned on.

And that's it. Carplay may not connect automatically when you are close to your home wifi because your phone would be connected to that instead. From now on, when your phone auto connects to car Bluetooth, it should auto connect to car wifi too and you can use all the cool features introduced in iOS 17.
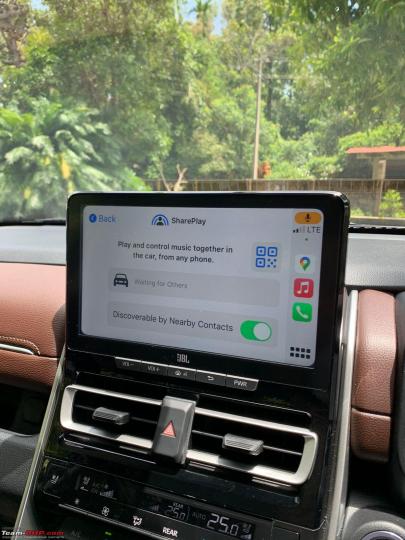
Another nice feature I noticed even before shareplay is that you can connect multiple phones to Bluetooth at the same time and switch between audio sources from the steering mode button. You can also use carplay for maps on one iPhone and listen to Bluetooth audio from another paired phone.
Check out BHPian comments for more insights and information.
News
Study: 50% car buyers won't buy a vehicle without connected tech

The McKinsey study analyses the preference of both ICE & EV owners, which is said to differ significantly.
Connected technology is increasingly becoming an essential part of modern vehicles. New car buyers now expect access to online streaming services, over-the-air updates and real-time navigation in their vehicles. Having said that, most car owners prefer using smartphone-integrated features such as Apple CarPlay and Android Auto, instead of factory-installed apps & services.
The importance of Apple CarPlay and Android Auto has increased so much that a new study by McKinsey states that 50% of new car buyers won't even consider a vehicle without these connected features. However, carmakers are slowly moving away from offering Android Auto & Apple CarPlay support, which reports suggest doesn't look like a smart move.
As per the study, customers are used to having these smartphone-integrated interfaces, and an overwhelming 85% of them prefer it over the built-in OEM system. This could become a problem for carmakers who insist that customers use their built-in connectivity features.
Tesla started the trend of not offering Android Auto or Apple CarPlay in their EVs. However, owners unanimously state that the brand's navigation and apps are at least as good as the smartphone features, hence, most don't consider either Android Auto or Apple CarPlay a priority.
The same though can't be said about other carmakers. Rivian is refusing to offer Android Auto and AppleCarPLay despite desperate requests from owners. The EV maker's current interface is said to be patchy, but the company believes its software will improve, and in the near future its customers won't feel the need to have smartphone-projected apps.
The McKinsey study analyses the preference of both ICE & EV owners, which is said to differ significantly when it comes to software & connectivity issues.
Source: AutoEvolution
News
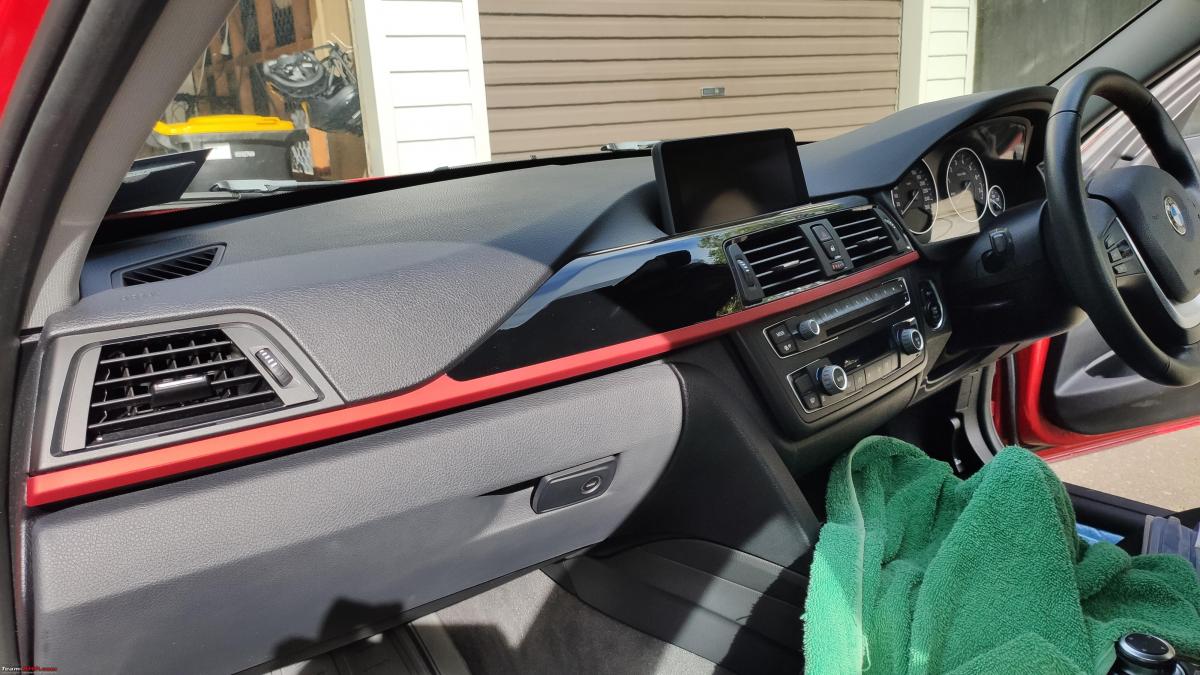
Added Wireless Apple Carplay to my decade old BMW: Here's how
There is nothing fast you can do here. This Road Top upgrade needs time and patience. No way you are going to do this in 30 minutes as shown on You Tube.
BHPian sandeepmohan recently shared this with other enthusiasts.
This post is about a Apple Car Play/Android Auto box install. The product is made by the ever popular and known brand called Road Top. I think there are a few Audi users here who’ve done the install.
Road Top decoder box for CIC HI enabled Head Units
My car is a Japanese Import of a 2013 328i sedan. The idrive is practically useless in this day and age. The only thing working or doing its job being the radio and Bluetooth audio streaming. While the inbuilt navigation was updated by the dealer to New Zealand maps, it is a pain to use and outdated in terms of knowledge of roads.
For BMW’s and maybe even most other cars, the compatibility of Road Top products depends on the generation of your car stereo. The stock BMW head unit I have is the older generation one known as CIC HI. Make sure you order the right one. The plus side is that the chaps at Road Top are proactive online and you get a response to a query fast.
I went with the usual box unit where the stock head unit plugs into it and you link the car’s stock center console display to the Road Top box. They have another version where the entire screen is replaced to a touch screen unit and the hardware is also housed in that new screen (No external decoder box). I did think about. The cost was quite a bit higher which is why I didn’t buy one.
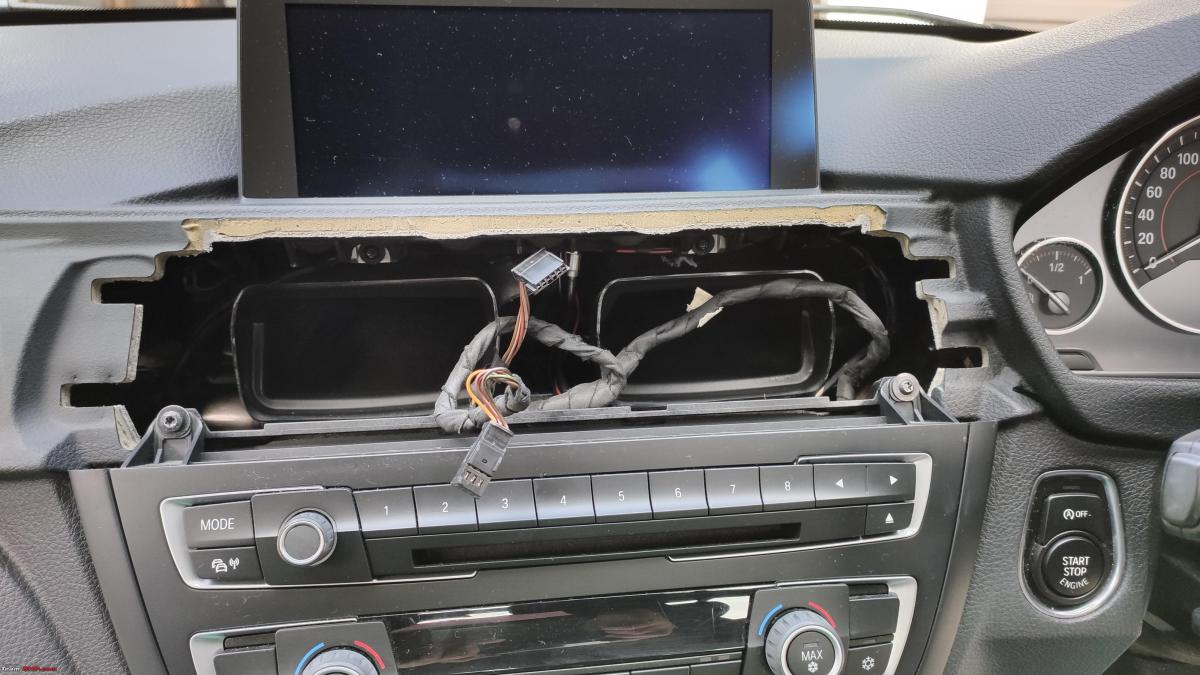
I attempted this as a two part DIY. Thanks to several users on the tube who’ve shared their install process. This helped immensely. The hardest part of the job is unmounting/refitting the glovebox, followed by all the cable routing required more for CIC HI head units. Units after this such as the NBT and Evo series are a little less complicated to install.
Challenges faced:
- Routing of the Aux audio cable from the Road Top unit to the center armrest console, where you have a USB and Aux input. This needs to be plugged in else there won’t be any audio.
- Tapping the stock mic from the roof liner with the Road Top supplied mic jumper cable and routing it through the dashboard.
- Tidying up all the wiring can be time consuming.
- This part is specific to my car only. Being a Japanese import, the previous owner had fitted what looked like another Apple Car Play/Android Auto box, which ended up being a TV Tuner sort of thing as I later discovered. Removal of this unit took time as I had to trace all the wiring and not cut off, remove anything by accident.
- Dropping and refitting the glovebox
Tools:
- A trim Removal Tool
- A T20 and T25 Torx screwdriver
- A small reversible ratchet wrench which can handle T20 and T25 screw heads and sockets
- A motor driven screw driver, if you can manage. Makes the job a whole lot easier, as I later discovered.
- A lot of patience
- Fine work Gloves or Band aid. Brace yourself for a few small cuts and bruises
DIY Part 1 : Started and Abandoned
I started with pulling off some of the dash trim, which came off as expected based on all the footage I had watched. Disconnecting some of the cables, especially the center console screen can be hard as the cable length from the head unit isn’t much. Plus, the cable is a tight fit behind the screen.
You go in this order for all the trim removal:
- Ambient lighting plastic trim unit below the Climate Control
- Removal of center console AC vents. This starts from the passenger side to the middle. It is one long piece. Does pop of easily. You have two cables to release in this step. The Hot/Cold air mix and the Hazard Light/Central Lock switch.
- Unscrewing of climate control unit and removal of the control cable
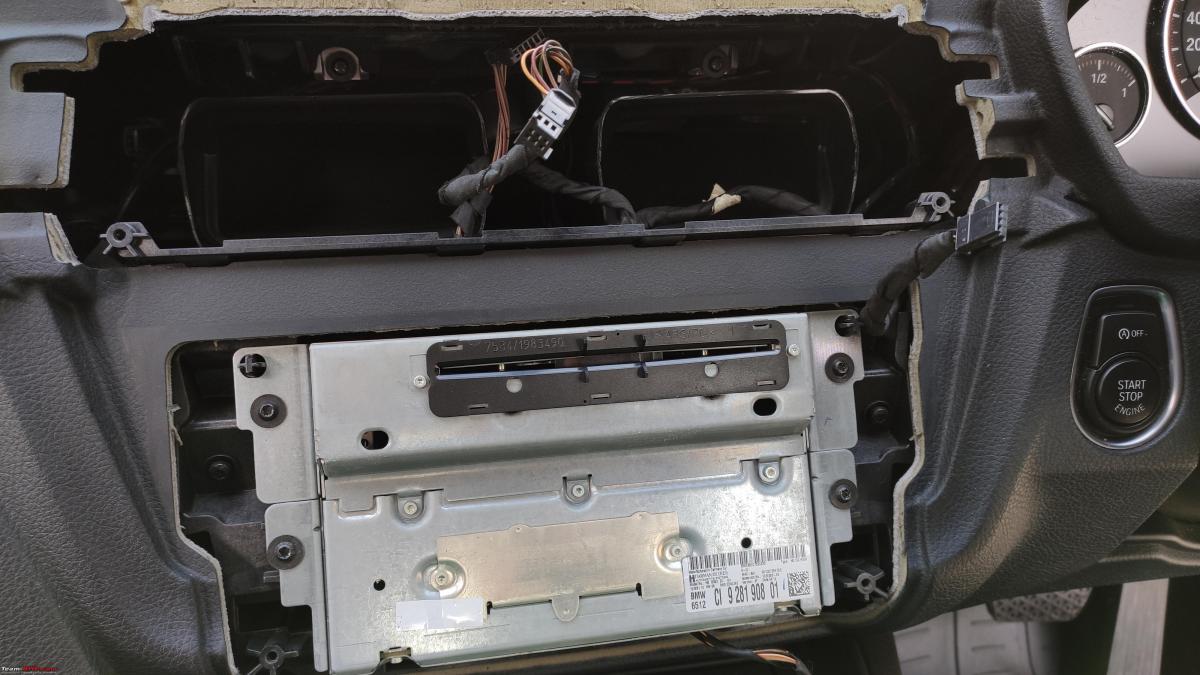
- Unscrewing the head unit
- Removal of the lower tray unit, below the glovebox.
- If you’re car has a knee air bag, then you need to remove this.
- Dropping the glovebox
In all of the above, I’d say dropping the glovebox was the hardest. 9 screws secure the glovebox and they are not easily accessible, which is where a motor driven tool comes handy. Mounting back the glovebox can be a challenge.
Fortunately (or unfortunately) my car did not come with a knee air bag unit so I had one less thing to worry about. Removal or unmounting of the air bag unit is required to gain access to 2 of the 9 glove box screws. If you do have an airbag unit and need to lower it, I’d recommend disconnecting the battery. All you need to do is lower the air bag unit. Don’t disconnect the cable that goes to it. In general, I’d say disconnect the battery before you start this DIY.
After removal of all the trim, I found what looked like an Android unit already installed plus another unit that looked similar to it, right above the glovebox. It had the same LVDS video cable connection and a dummy cable sitting behind the air vents. I tried to look into the routing of all the wiring and could not figure it out. It was frustrating. I wasn’t sure if the unit was active. It had a label on the unit that said Parking Assist feature. I wasn’t sure if the car’s reverse camera was connected to this unit. Not all versions of the 3 series had a factory reverse camera. Some were aftermarket installed. Without knowledge of what wires I could remove or even remove this unit, I decided to put a hold on this DIY. This unit was hidden in the section towards the left of the cars stock head unit. I took some pictures of the unit, did a bit of googling for a whole week, looking at wiring diagrams, etc. Figured out the box was linked to a Pioneer TV Tuner unit. These were popular in Japan back when this car was new. The previous owner must have installed this. Once the car was imported in to New Zealand, they disabled the unit. However, I could see a power lead running to the Pioneer TV Tuner box.
DIY Part 2 : Started and Completed. Between 5 and 6 hours of time.
Getting started was easy. I had removed all the dash trim as before. This time around, I had a Bosch Go electric screw driver. Made a world of a difference.I traced all the wiring for the Parking Assist box to the Pioneer unit and removed whatever I could, including the decoder boxes. As expected, nothing was connected to the cars main head unit. However, rogue cables were running everywhere. There’s still some excess cable which I decided to leave in the car such as 4 TV Antennas as the routing was going all the way from under the dashboard and towards the lower trim, besides the passenger front seat. They were also zip tied to some of the cars original wiring harness. I was nervous touch anything that could disturb this setting. One error with cutting or removing any of the cars stock wiring on these complex Euro cars and you’re done with the car.
First step was connecting the Road top power cable harness with the stock harness behind the head unit. This is pretty much THE main cable where everything plugs in and works. The process can be a little hard as stock cable play is minimum and the head unit is rather heavy. The stock head unit harness can have a optical fiber cable on it (some of them don’t). You need to transfer that green optical cable onto the power harness cable that Road Top provides. This is relatively easy. The next part requires plugging in one end of Road Top’s power cable harness to the stock harness and the other end to the stock head unit. There is one more end of this cable which plugs in the Road Top decoder box. Sufficient length is provided.
Next step is taking the LVDS cable from the head unit (Was connected to the stock car screen) and routing that to the Road Top decoder box. Another LVDS video cable goes from the decoder box to the screen. This cable is provided by Road Top.
Next is taking the Aux Audio cable from the main Road Top power cable harness, routing in through the center console which has the gear shifter and plugging this into the Aux input below the arm rest. Some cars have this, some cars don’t. If you have a USB, Aux input below the center armrest, you need the aux cable connected, else there won’t be any sound. Videos show removal of parts of the center console to route the cable below the unit. I took the easy path and just routed it via gaps on the side of the center console, where it meets the cloth trim of the car. I used a little stiff copper wire to pull the cable into armrest area. Its not perfect but does the job and there are no cables visible externally.
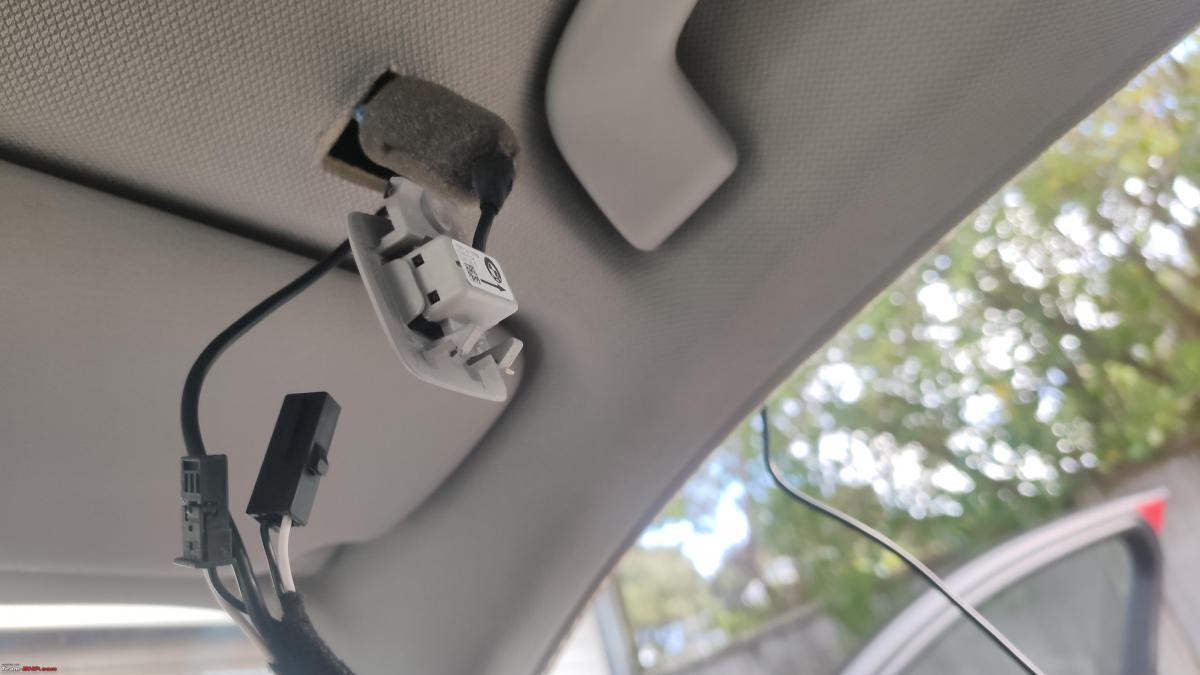
The next bit is taking the Road Top supplied mic jumper cable and plugging that into the mic on the roof liner. I did this on the drivers side. I don’t know if you can do it via the passenger side instead. It will make routing the cable a little easier as you’ve dropped the glovebox. Once again, this is a requirement for the CIC HI stock head unit equipped cars. NBT and later probably don’t need this step. You need to pull out a little plastic trim on the side of the dashboard and pull away some of the door rubber trim leading up to where the mic is located. The mic pops off easily with a trim tool. Disconnect the mic from the stock wiring harness. Using the Road Top supplied mic tap, you need to plug one end into the mic and the other end into the stock wiring harness. This ensures you can continue to use the mic via the stock iDrive system and Apple Car Play/Android Auto. Routing the mic cable via the roof liner and A pillar needs some care. I used a little copper wire to get over the A pillar air bag and pull the mic cable over this and down the A pillar. This mic cable needs to plug into the Road Top wiring harness. I used the same copper wire to pull the cable behind the dashboard and through to the other side of the glovebox. Tuck the cables and push the mic unit back into the roof liner, run the mic cable along the A pillar trim, put back the rubber door seal trim and put back the side dashboard cover we removed earlier. This whole process is relatively easy. Take care around the air bag unit is all.
Next up is the USB cable and WIFI Antenna. While you don’t need the USB cable for wireless car play or android auto operation, you do need this for future system updates Road Top may send out. I needed the USB cable as my phone is running Android 10 and wireless Android Auto is available only on versions 11 and higher. I tucked the usb cable on the side of the center console, on the passenger side. The Wifi Antenna is stuck to the center console.
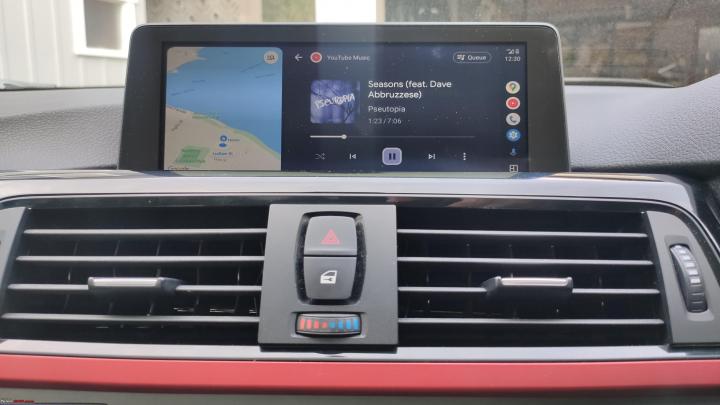
With all the cable work done, I decided to test the system out before doing any cable tidying, routing and putting everything back. Started the car and the usual iDrive screen popped up. A good sign. Next was to hold down the menu button on the iDrive controller for a couple of seconds. This takes you into the Road Top decoder unit settings where you initialize Car Play/Android Auto. As my method of connection was wired, it worked at the first go. I was quite thrilled to see Google maps load up full screen. The resolution, color rendering and quality of maps is surprisingly good for such an old idrive display unit. You use the idrive controller to navigate around the screen. Super easy to use and there is zero lag. The one thing odd I found with Android Auto is that you don’t have all the Apps on your phone available on the screen. I found only a handful of them. The essentials are there so I am not worried. I got YouTube Music App which is all I care about. Maybe there is a way to get all apps visible. Steering wheel controls work. You can navigate the display using the scroll wheel, adjust volume, trigger Siri/Hey Google, Take/Reject calls. Everything works as advertised by Road Top.
You need to disable or unpair your phone Bluetooth to the cars iDrive system and enable Aux input. Turn the Aux input volume up to 90%. If you don’t, there will be a imbalance in the sound for music while being played via Airplay and the various stock car chimes. This takes some trial and error to get all the volume levels balanced. Audio reproduction quality isn’t the best straight out of the Aux input. Fortunately, the Road Top decoder has a few Audio Presets, a customizable Equalizer and Loudness setting which allow you to compensate for some lost audio quality. Does the job. Don’t expect perfection to a stock and modern iDrive Harman Kardon unit. The one catch with adjusting audio parameters or the Equalizer is that you need to quit your Car Play session. You cannot make changes on the fly or hear changes as you make them.
With the test now successful, the next part was tidying up all the cables and mounting the Decoder box against a steel dashboard support brace. This is right between the glove box and head unit. There is a space there to place the decoder box. I used some 3M double sided tape for this. Only time will tell if this will hold up and hopefully no rattles surface. Its definitely a lot of of cables leading to the Road Top decoder box and there’s not much you can do about. I did the best I could of tidying them up while not causing too much stress to the cable bends.
Putting things back also takes some time. Pushing the stock head unit back into its slot needs some effort as the cables right behind it are more now. It can be done. A little patience and observation is all.
Refitting the glovebox is about the hardest part of this process. It goes in the same way you took it out. There are 4 support mounts under the glovebox that need to align. You need to do some acrobatics of looking below the glovebox area as you mount it back so you get this perfectly aligned. Not to forget, put back all the cables you removed that were attached to the glovebox such as the light, stock idrive usb cable and glover box lamp switch. 9 screws secure the glovebox.
Next you have air bag unit, if you removed it. Followed by the glove box under tray which has a cabin light connector you need to put back.
Put the screws back for the screen. Note that while the screws are the same T20’s for pretty much everything, the display screen screws are slightly shorter and thicker. I had made this mistake during DIY attempt 1 by putting in the wrong screws. The head unit will take another 4 screws to secure, followed by 4 more screws to mount the Climate Control unit. The final screwless bit is the AC duct and dashboard trim. This requires refitting the Hazard lamp and Hot/Cold wires and gently pushing the trim unit into the dashboard. Go easy while doing this.
As you would have understood by now, not the easiest or fastest of DIY jobs. There is nothing fast you can do here. This Road Top upgrade needs time and patience. No way you are going to do this in 30 minutes as shown on You Tube. Thats edited footage. I ran into complications primarily due to a third party decoder box already installed which took a whole week to figure out. Even without this, the process takes time. In the end, I am not regretting this upgrade. The screen is not a lot more useable than displaying the outdated idrive interface. You modernize the inside of the car a little bit. If you have the cash, I’d say go for Road Top Touch Screen unit. Will make things even better and more up to date.
The dashboard, before ripping everything apart. The green towel on the center console is there to rest the head unit after taking it out. Its a heavy unit with a lot of sharp edges. Can damage the dashboard and console surface easily.
Lower trim removed. Some cars have a ambient light placed here. Some cars do not. You can see the disconnected wire for that here.

Taking out the AC duct trim piece. This is a long unit and requires a trim removal tool. Take care when removing this as the red strip at the bottom is delicate.

The two circled yellow connectors need to be removed. One is for the hazard/central locking switch and the other for the Hot/Cold air mix control.

Next, take out the Climate Control unit secured by 4 screws. This revels the head unit. Cars with inbuilt navigation have this large 2 din sort of head unit. Cars that don't have navigation have a 1din size unit. Makes it easier to place the Road Top decoder box below the head unit for the ones without inbuilt navigation.
Its a bit hard to see. Above and behind the internal AC ducts are two screw that you need to remove to take out the screen. Note that these screws are slightly different to the screws used to hold the head unit and climate control unit. Don't mix them up.
Yellow box marking the type of head unit. In this case CIC HI. Later generations are NBT and EVO.

There are some steps to the process where I missed taking pictures. Was too involved that I forgot.
The next stage requires dropping the glovebox thats secured by 9 screws. Not easily accessible and some will require odd angles. This is where a motorized tool comes handy. Before you can drop the glovebox, you'll need to take out a glovebox under tray that hides all the screws. This under tray unit is secured by two bolts and has a cabin light fixture that needs removal. You'll find in one of the pictures of a screw hole with no screw in it. Thats for the knee air bag mount. My car does not have a knee air bag unit so that slot was free.
Black box on the floor mat is the Road Top decoder box. Everything plugs into this unit.
Yellow U and Yellow box drawing are markers to align the glovebox when you refit. If you don't get this right, you'll be pulling your hair out. There is a similar thing to be observed on the other side of the glovebox too. Best is to take pictures before removal.


Yellow dot seen deep inside the glovebox (right edge) cavity is the location of a steel dashboard brace. This is where I secured the decoder box. This was the same point where the Japanese Parking Assist box was placed.

The quad lock connector. You're looking at the Road Top connector that is connected to the cars Quad Lock connector unit. Its a big block connector that secures a green optic fiber cable on some cars. For cars with this cable, you need to take it off the cars quad lock connector and move it over the connector supplied by Road Top. The thick cables, limited stretch to the stock car quad lock cable make it hard to push all the cables back. Not easy work.

Next up was the mic tap. You need to do this for CIC HI equipped cars, else the mic won't work. Road Top supplies this mic tap cable. You need to take out the stock mic and disconnect from the stock wiring harness. Take the Road Top mic tap wire and connect one end to the stock mic wiring you just disconnected and the other end to the mic unit. Run the cable via the roof liner, down the A pillar and through the dashboard. I used a stiff copper wire to pull it across the dashboard. This is not a hard process. Take care around the curtain air bag unit and run the mic tap wire over the air bag. In the event the air bags has to deploy, the wire won't come in the way.

Securing the WIFI Antenna and USB connector. The WIFI antenna should not be stuck onto anything metal. Its possible to stick it on the glove box under tray. I stuck it to the center console. I can always move it later.

The all important Audio Aux cable you need to connect on CIC HI enabled BMW Head units. This cable runs from the Road Top main wiring harness, through the center console and into the armrest. I pulled the cable via gaps on the side of the console. Some folks have removed parts of the gear console for routing. I chose not to do that.

Test run and taking Android Auto for a spin. Works flawlessly. Stock iDrive based Reverse camera is triggered automatically and the display switches and goes back. The only thing I've noticed is that when I am done reversing, my car camera tends to stay on for a little longer. Unless I pop the gear shifter into D, it won't go back to Android Auto. Some fine tuning needed in the Decoder box settings.
You can prioritize which app to populate the larger part of the screen or make Google maps populate the entire real estate of the screen if you like.


Read BHPian comments for more insights and information.
News
Carluex Pro+ converts wired Apple CarPlay into an Android device

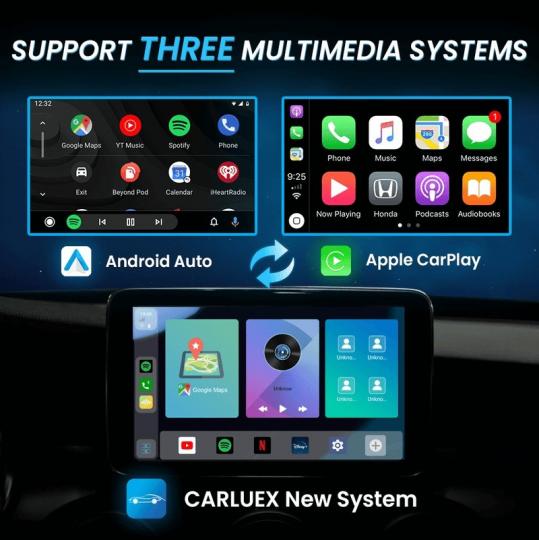


The Carluex Pro+ takes 6 seconds to boot up and comes with Wi-Fi 6 for faster wireless connections and a USB-C port.
According to a media report, CARLUEX PRO+ is the latest device which offers car owners a wireless connectivity experience. However, what's interesting about Carluex Pro+ is that it converts wired CarPlay (Apple) into a full Android computer. The small device offers Apple users a full Android experience, even giving them access to all the perks of Google's mobile operating system.
The Carluex Pro+ doesn't come with a stand-alone screen but uses the car's display. The device connects to the CarPlay port and then offers full Android access on the same display. The device is said to be more responsive, has shorter loading times, and promises improved performance compared to its previous iterations and some other Android head units in the market.
The company also states that the Carluex Pro+ device comes with a Qualcomm chip. It connects to the CarPlay port and then uses a wireless connection to run either Android Auto or CarPlay. The device comes pre-loaded with Android 13 OS, and users can get the full Android experience on any device. So essentially, owners can choose whether to run wireless Android Auto, wireless Apple CarPlay or an embedded system powered by Android 13.
The embedded Android experience allows all customers access to all apps on Google's Play Store. This includes apps like YouTube and Netflix to run on the car's screen. The Carluex Pro+ takes 6 seconds to boot up and comes with Wi-Fi 6 for faster wireless connections and a USB-C port.
At $359, the price of Carluex Pro+ is on the expensive side. For that, you get the device itself, a USB-A to USB-C adaptor, a cable to connect to the car and the manual.
Source: AutoEvolution
- Tags:
- Indian
- Android Auto
- Apple CarPlay
Pages
About Us