News
Blaupunkt DH05 reversing camera on my XUV700: Installation & experience
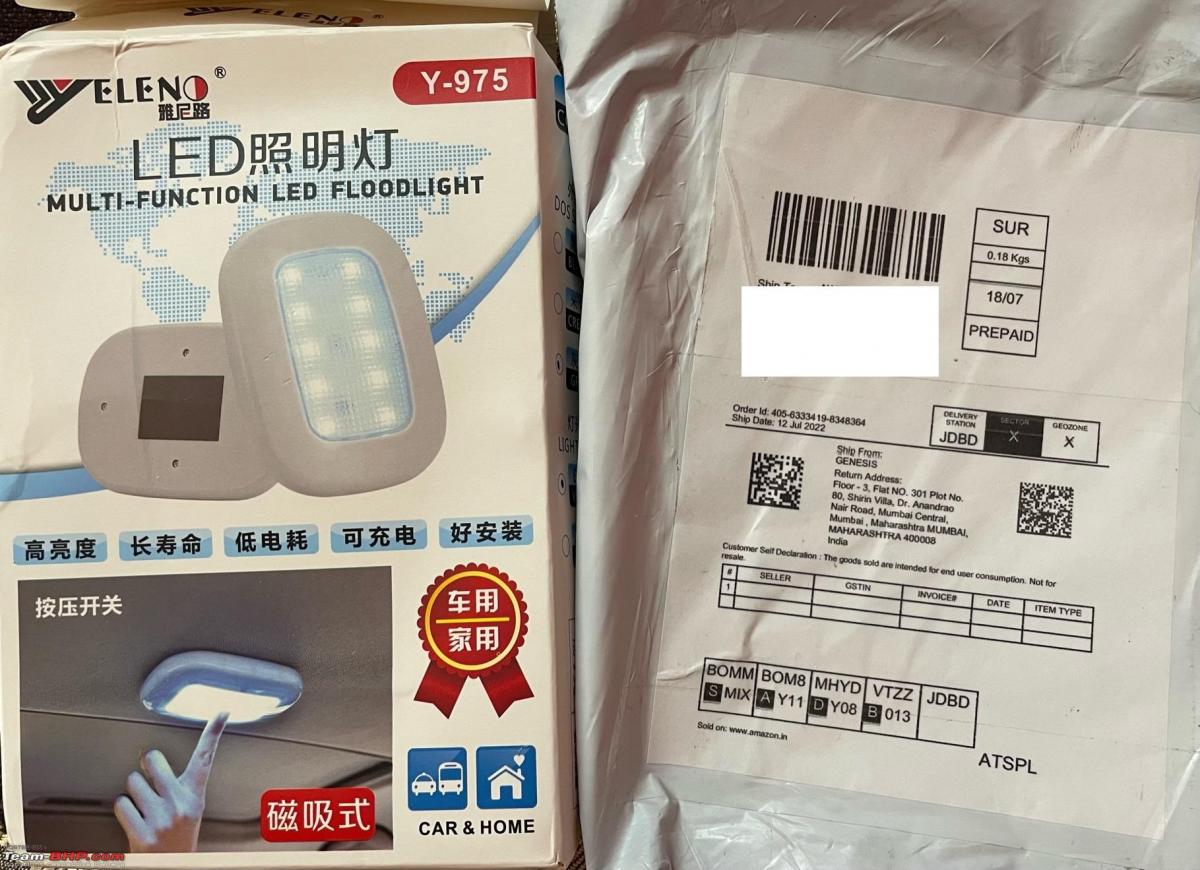
Please note that the wiring kit that comes with DH05 is not compatible with the XUV.
BHPian sbm recently shared this with other enthusiasts.
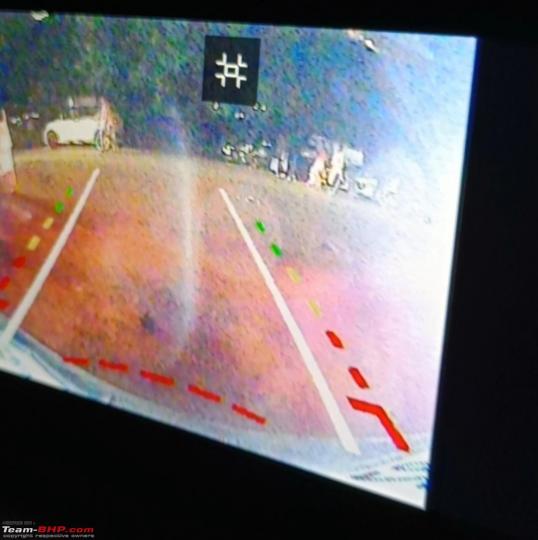
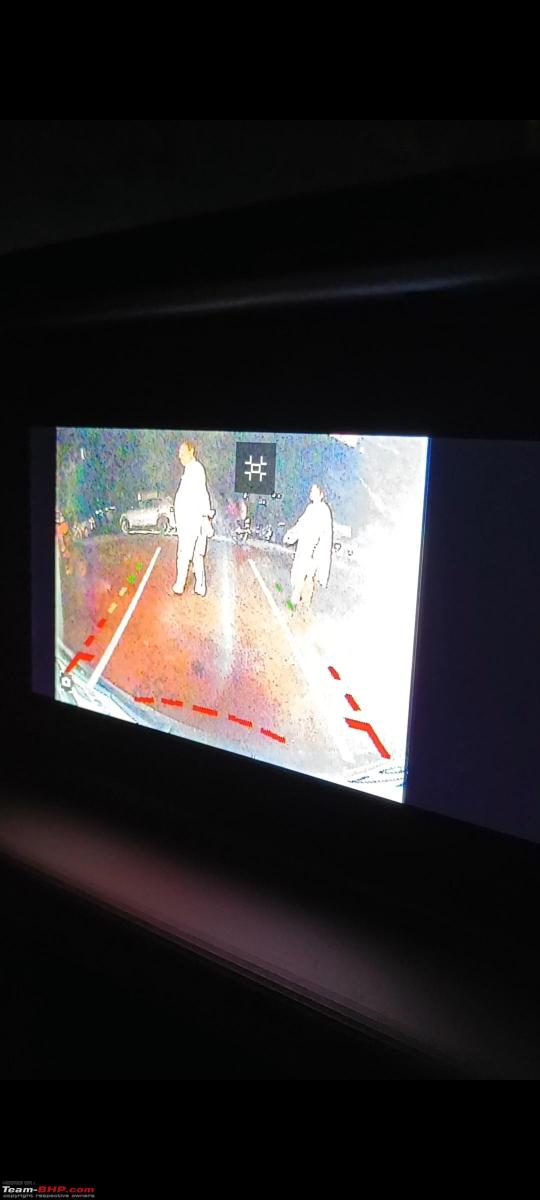
I installed Blaupunkt DH05 in my AX5 today. Although the picture quality during the day is acceptable and the angle is pretty wide, I am appalled by the nighttime quality. I do not have experience regarding this matter, so please have a look at the attached pictures and tell me if it's like this only at night or if have I purchased the wrong/fake camera.
Please note that the wiring kit that comes with DH05 is not compatible with XUV, so either ask your service guys to arrange the original wiring kit separately or else buy the cheaper bumper-mount Mahindra camera (the one that costs Rs 2500) and use the wiring from that along with the Blaupunkt DH05 (both cameras are interchangeable). The total cost this way will be Rs 2500 for the Mahindra camera and Rs 2500 or so for the DH05 camera, i.e., Rs 5000. What you get extra with the DH05 is the moving guidelines and a much better viewing angle as compared to the AW60118 (Rs 3000) camera from Mahindra.
To summarise, I would say that those who are not in a hurry should try getting the AX7 camera installed in their car from a service centre. If they are not willing or don't know how to do it, wait for Bhpian Ravenavi's report on the same and then talk to your service guys to follow the same procedures.
Also, they did a software update to version 8, and after that, the DISCLAIMER remains there for a longer time, and the infotainment takes a long time to boot up at the start of the trip. Even if you engage the reverse gear, the screen shows DISCLAIMER and you can't see the rearview cam display. It works fine once the system is booted up. Is there any way to communicate these bugs to Mahindra?


Check out BHPian comments for more insights and information.
- Tags:
- Indian
- XUV700
- Reverse Cam
News
Pics: Installed the VW MIB-2 head unit in my VW Polo GTI

The flip camera from a VW Passat (lowline camera without dynamic guidelines) is installed with a custom stainless steel (SS304) plate.
BHPian robimahanta recently shared this with other enthusiasts.
Decided to go ahead with Apple CarPlay installation in the GTI along with the OEM flip camera. I had been contemplating whether to go ahead with the infotainment module upgrade since a long time and finally bit the bullet as I decided not to sell the GTI any time soon. It is expensive but completely retains the stock look and all components are OEM VW.
I got it done at home by the "German DNA" guys. They came home and did the installation in a couple of hours. The display unit remains the same and the unit in the glove box is replaced to MIB2 Discover media (navigation, app connect, camera feed) from the stock MIB1 unit.
The flip camera from a VW Passat (lowline camera without dynamic guidelines) is installed with a custom stainless steel (SS304) plate.
I didn't opt for TPMS sensors (already using Sensairy sensors) and high line camera.
Sharing some pictures,
Using a Panasonic Toughpad FZ G1 with VCDS for all the coding and diagnostics

Old unit in the glove box

3Q0035819B MIB1 stock unit

3Q0035866C MIB2 Discover Media with latest navigation and all FEC unlocked, firmware 0480 and all possible features activated


Stock boot hatch coming off

New OEM Flip Camera with custom plate installed

The camera flips open when reverse is engaged

The clarity is decent and integration with stock optical parking sensors is nice (no dynamic guidelines for the low line camera)


Finally Car Play in the GTI (wired)


Some extra unlocked features (sport and off-road menu, mostly gimmicks)

Offroad menu showing steering angle, compass and elevation

Performance menu has options for power, oil temperature, boost pressure, coolant temperature, g forces etc.

Lap timer too

Read BHPian comments for more insights and information.
News
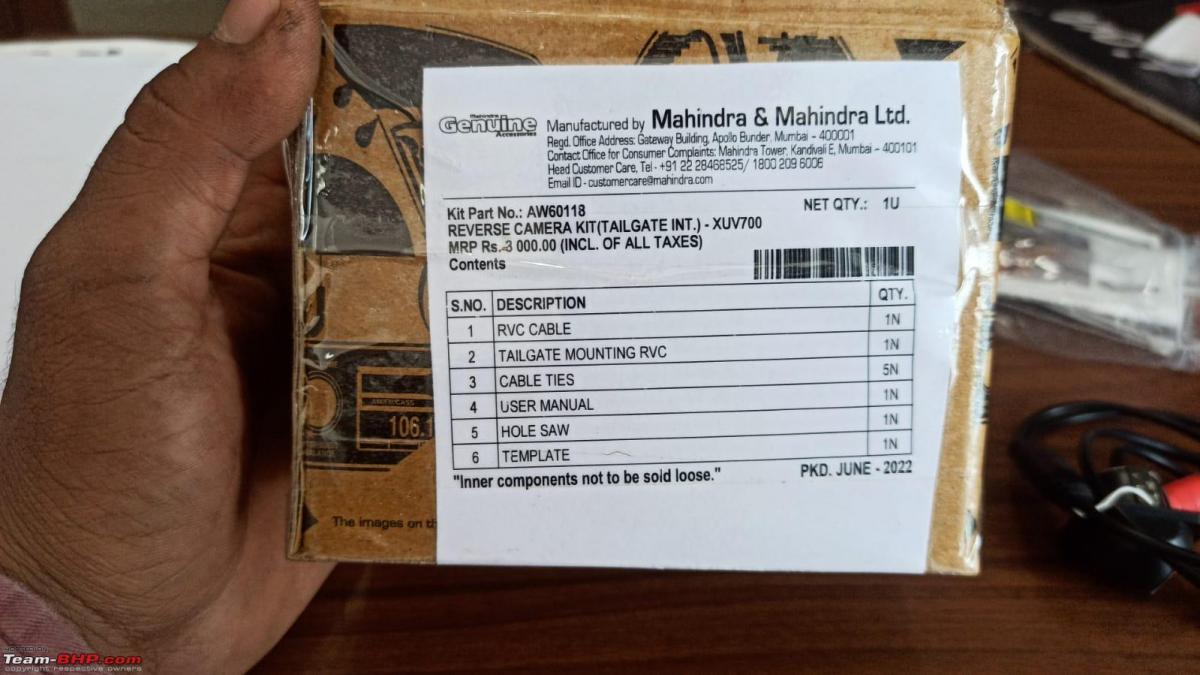
XUV700 accessories: Bought the updated reverse camera from Mahindra


I haven't checked the display output of this camera but I've been told that it is slightly better than the one offered earlier.
BHPian RavenAvi recently shared this with other enthusiasts.
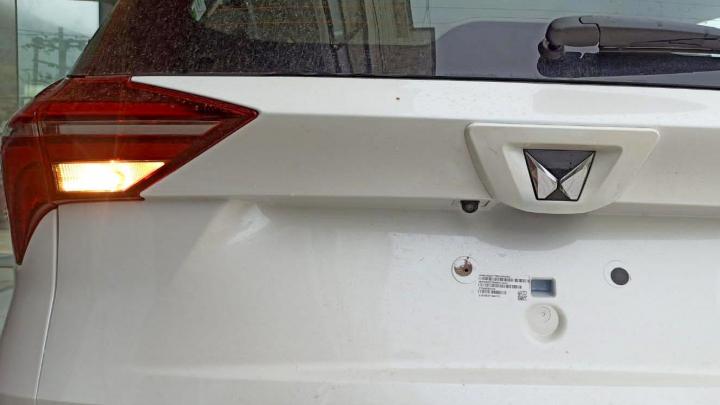
For those who are buying the AX5 or lower variants of the XUV700, Mahindra has changed the design and type of the Reverse Camera which is being offered as an official accessory. You can order it through your dealership. The M2ALL website isn't updated with this item yet.
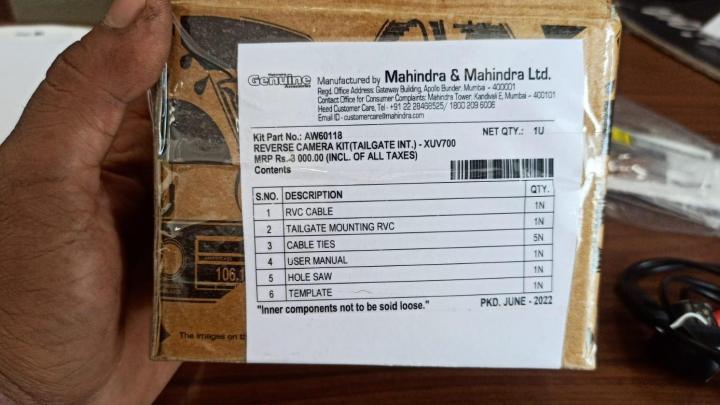
Part Number - AW60118
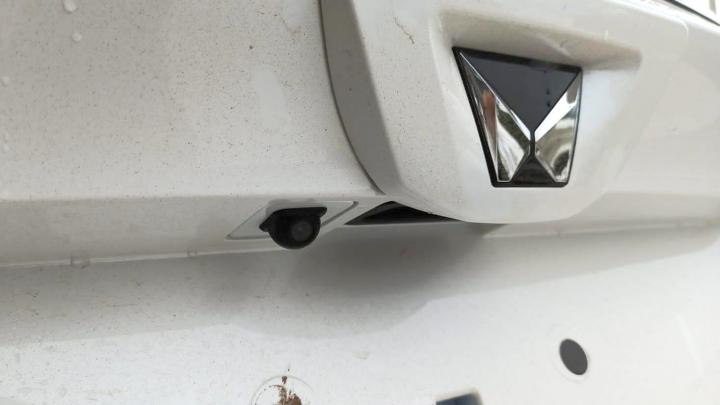
The new accessory reverse camera is angled downwards in its housing and should offer proper laid-out guidelines on the ground behind for reversing, unlike the previous offering which was straight and the display had guidelines pointing towards the sky!
Details
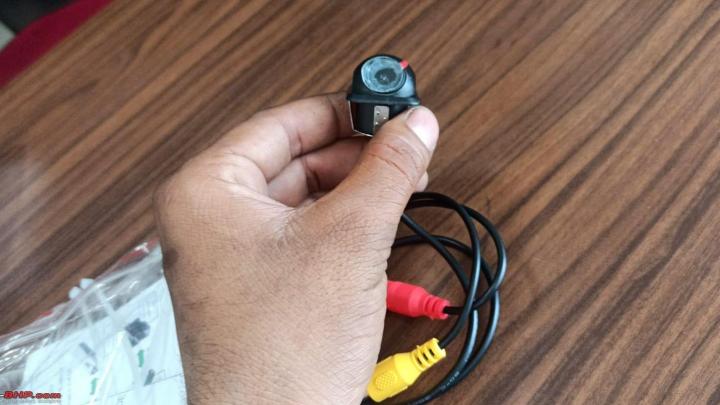
The kit

Camera & mounting instructions
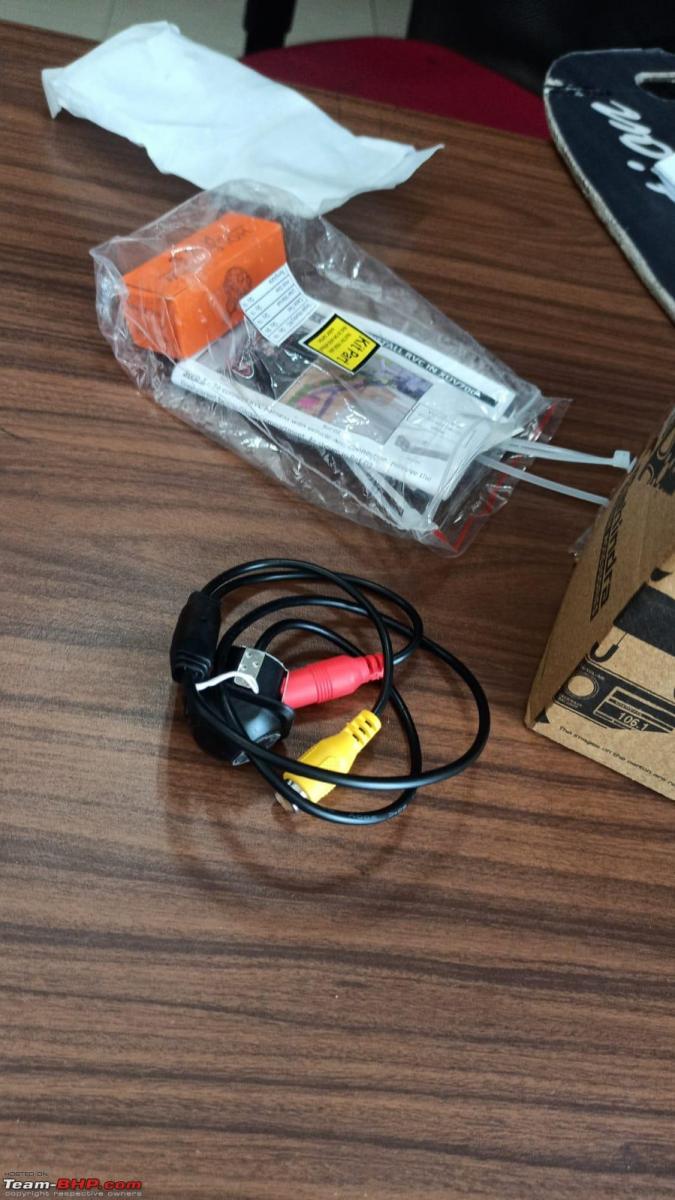
Looks identical to the Blaupunkt DH05 reverse camera

Placement
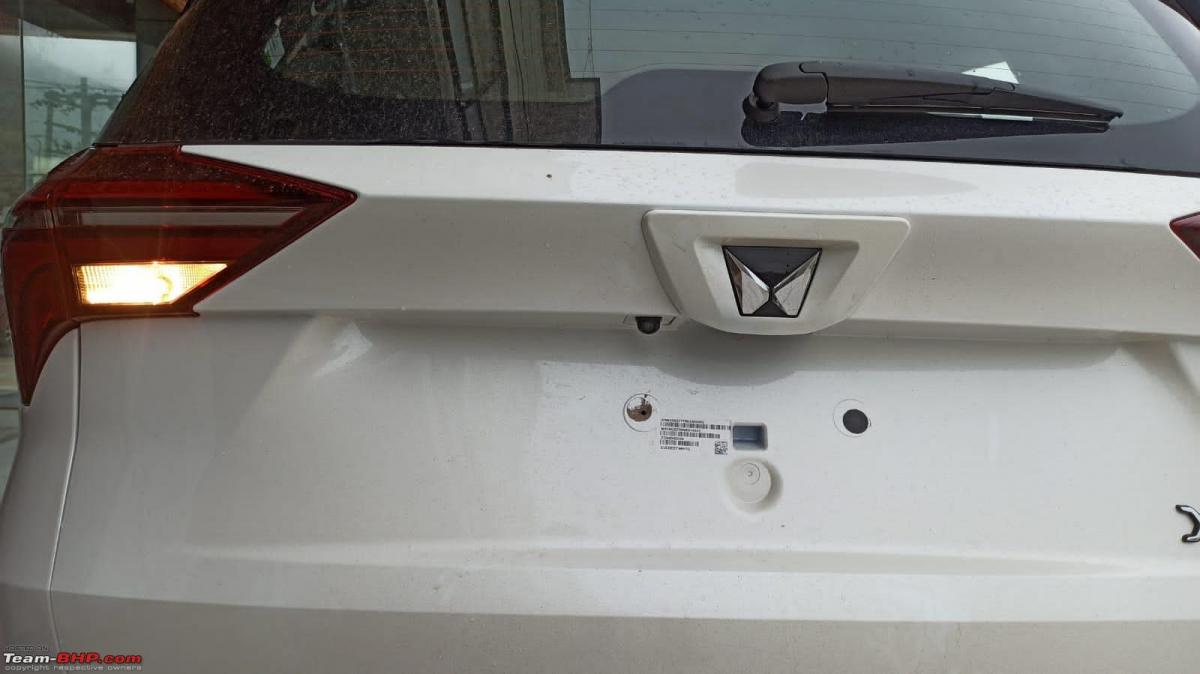
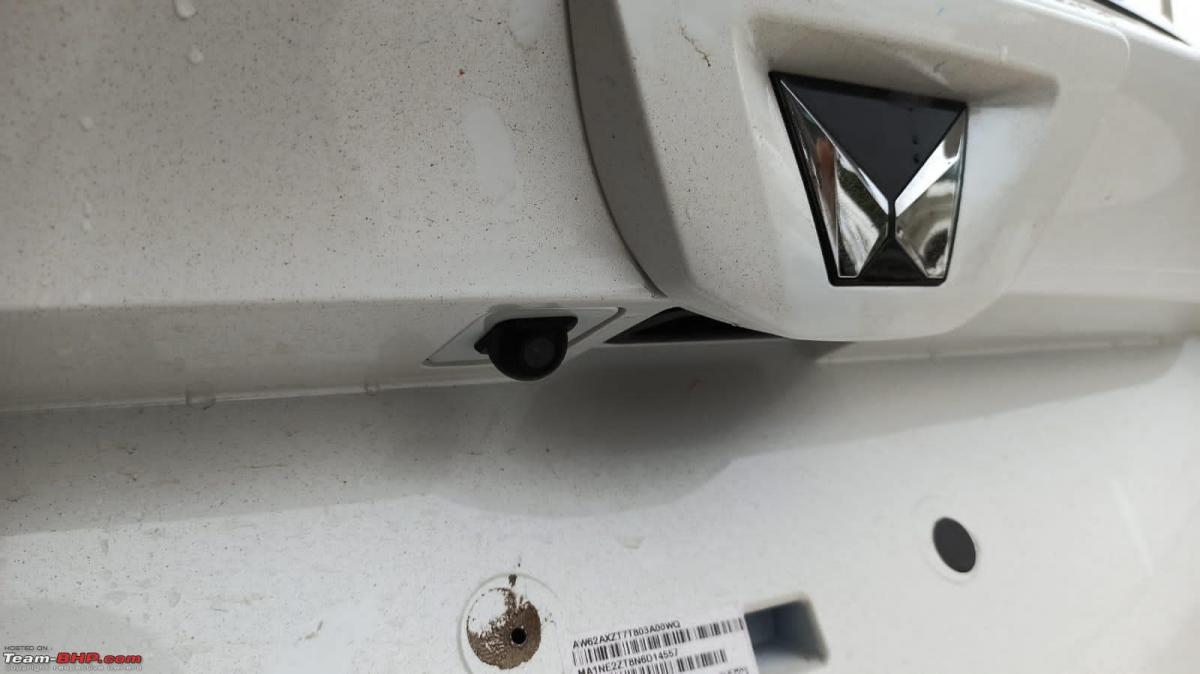

Please be informed that I haven't yet had a chance to check the display output of this reverse camera accessory yet, although I am told that the output is slightly better than the accessory offered earlier (the straighter reverse camera which was either drilled and fitted into the rear bumper or beside the number plate lights).
My order of the AX7 reverse camera and its two harnesses have an update - the harnesses have been shipped but the camera unit itself hasn't been dispatched yet. Hopefully soon.
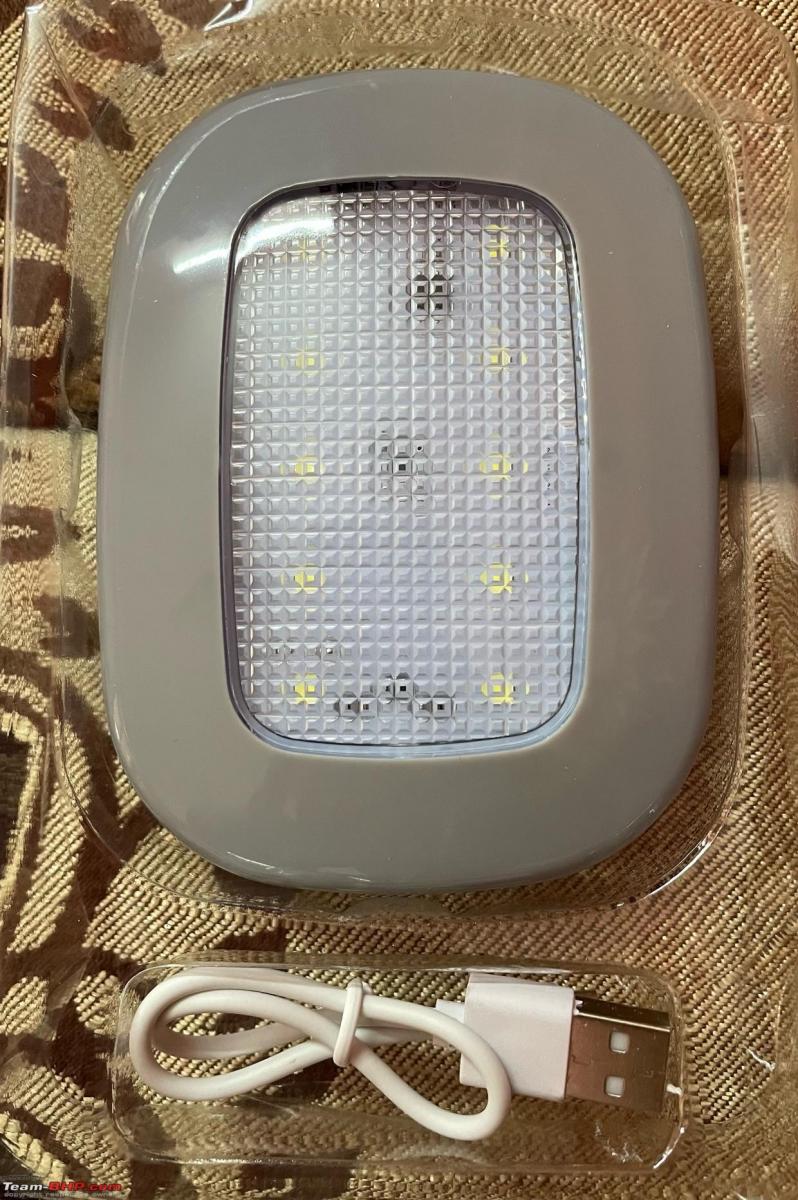
Ordered the Coxeer Universal Car Ceiling Dome Light from Amazon as a backup for the 3rd-row lighting, should the existing LED unit doing duty go dim with depleted charge or conk out while in use. Till then, it will do duty as a standalone emergency light as and when I need it. It came highly recommended by a couple of friends who are using it on their Thars. Got lucky with the order as it was the last piece left at the older price of Rs 850/-
Also, the bumper corner protectors (OEM accessory) on Icarus have peeled off on one side of each (two in the rear, one on front at driver's side) from their stuck edges and are looking bad now. Not sure if they weren't stuck properly, the glue given was bad or it's just bad quality overall but nevertheless, I would suggest avoiding corner protectors from Mahindra's official accessory section. Better go aftermarket for these for your XUV700s.
Rear left
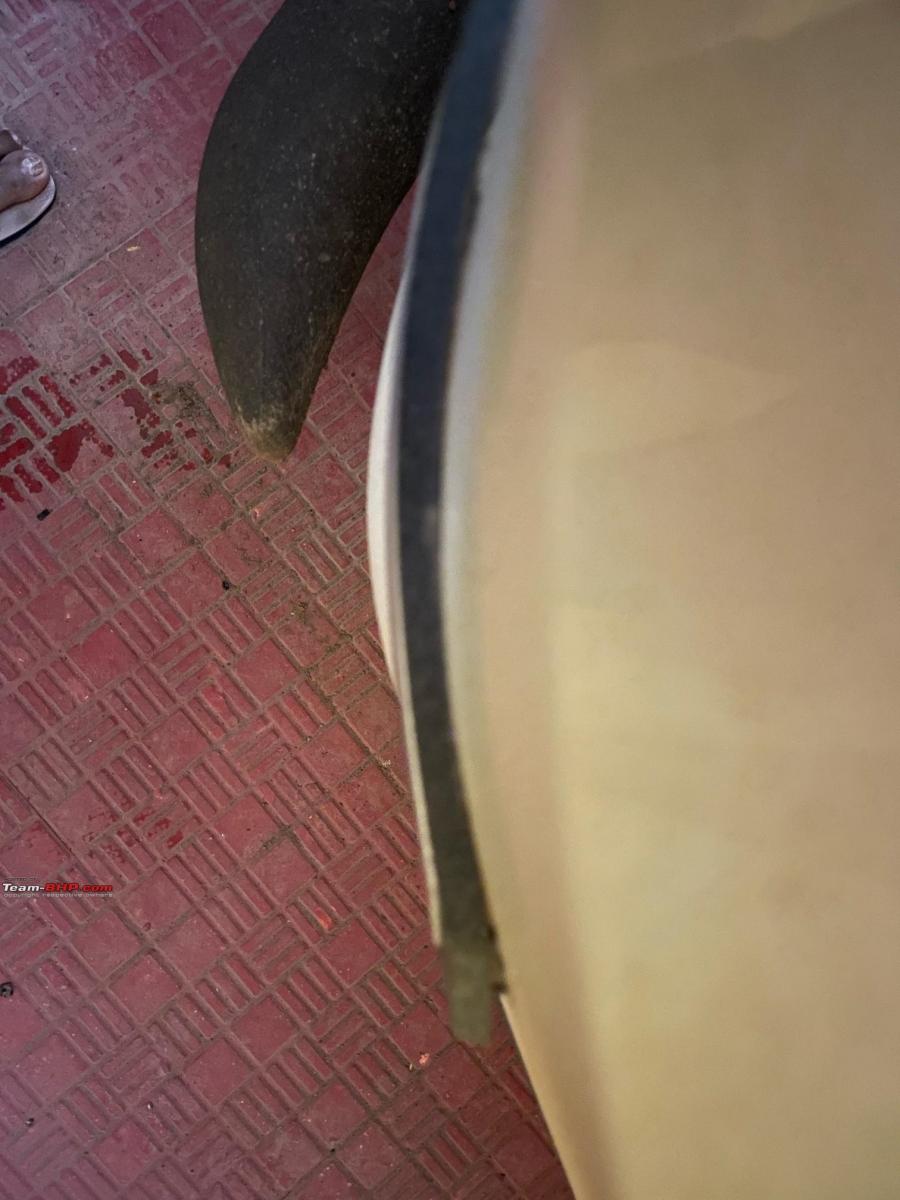
Rear right
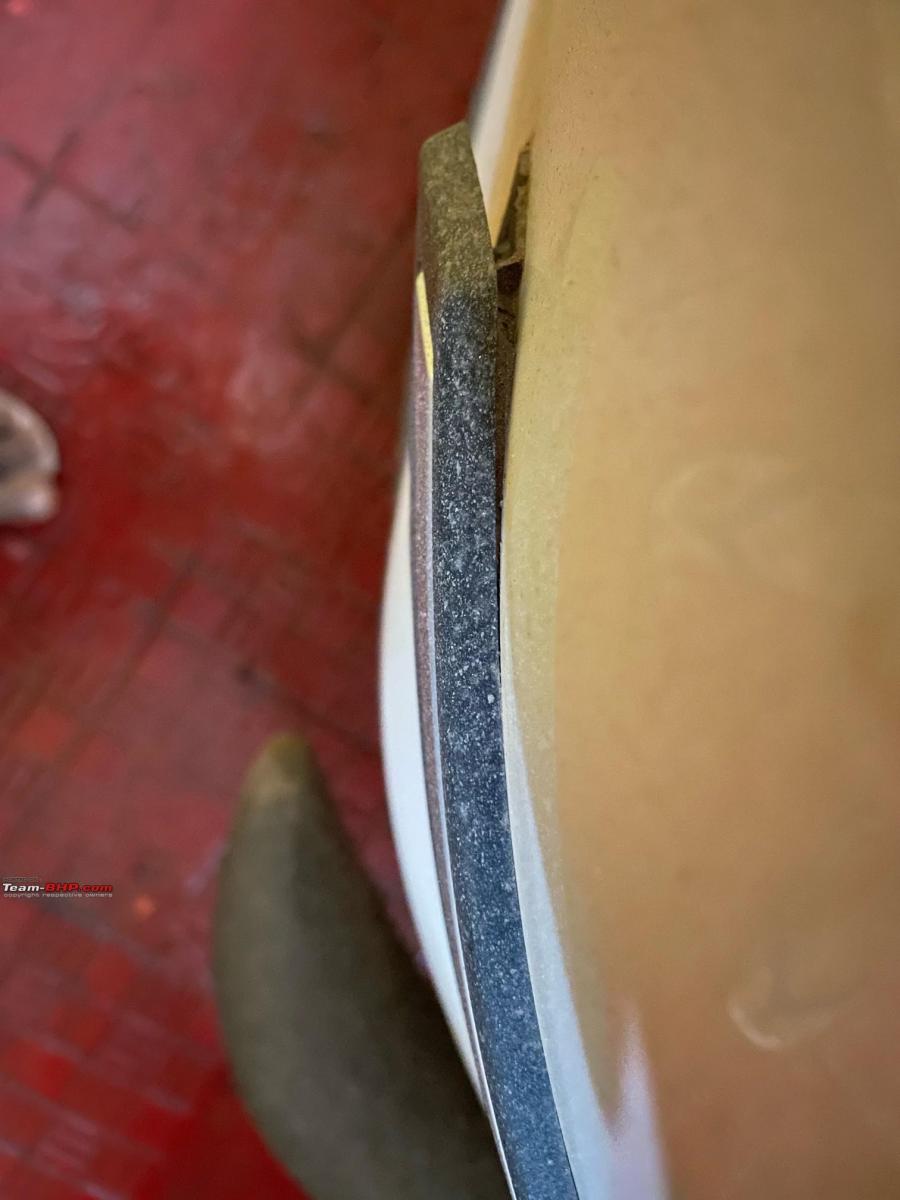
Front driver side

Check out BHPian comments for more insights and information.
- Tags:
- Indian
- Mahindra XUV700
- Reverse Cam
News
DIY Installation: Rear view Dashcam + Night Vision Rear Cam

Both the cameras come with a 1080p resolution. The front camera is without night vision. Visibility is great in the daytime and acceptable at night.
BHPian itsbaman recently shared this with other enthusiasts.
Disclaimer: I do not represent 70mai in any way and this article does not promote any product of any particular brand. The same procedure can be applied for the installation of any similar Dashcam of any other brand.
Hello everyone. Hope you are all doing well in these tough times of the COVID pandemic. This is my first ever article on the forum. Due to the ever-growing traffic on Indian roads and our infamous driving style, sometimes we all have to face minor or major accidents which involve our beloved cars. It’s OK when we are at fault, we make peace with the fact that we were not behaving as responsible drivers and we have to pay for that. But for drivers who drive safely and responsibly on roads, it’s always unfair for them to pay for someone else’s mistake. Like pedestrians jumping in between the road out of nowhere, motorists coming in front from link roads out of nowhere, sudden brakes from the vehicle in front of you, and many more such incidents. I too have faced my fair share of such incidents where I have mostly paid for someone else’s mistake. Thank god we have a thing called insurance to get us out of trouble, but still, keeping your vehicle in the garage for 1-2 weeks for repairs is always annoying. And things get ugly when the accidents involve the other party’s bodily injury or worse, casualty. For the innocent, it’s the worst kind of nightmare, and strong evidence is needed to prove the innocence. That is where Dashcam recordings come into play. These things can save you a lot of mental trauma and financial loss. Therefore, investing in a good Dashcam is always a wise choice.
I recently bought a dual-channel dashcam for my vehicle. I have a November 2017 manufactured Ford EcoSport Titanium TDCi (Facelifted). It came with 8-inch SYNC 3 touchscreen infotainment system with Android Auto and Apple CarPlay. Current Titanium variant misses on SYNC 3, Android Auto, and Apple CarPlay along with few other things like ambient lighting, puddle lamps, etc. However, it didn't come with a reverse parking camera at that time, which is present in the current Titanium. Though I never felt the absence of a reverse parking camera as I am more old school that way and rely mostly on IRVM and ORVMs. But the new dashcam came with a reverse parking camera mode which is a plus.
I got 70mai Rearview Dashcam + Night Vision Rear Cam from Amazon for 11k. I recommend going with a Night vision rear cam as it's only 1k more than the regular one but visibility at night is great. Both the cameras come with a 1080p resolution. The front camera is without night vision. Visibility is great in the daytime and acceptable at night.
Contents of the package
- 130-degree wide-angle, 1080p front dashcam mounted on the backside of the 9.35-inch full-screen non-touch display. This screen replaces the IRVM and needs to be attached over the stock IRVM with the help of the straps provided in the package.
- 135-degree wide-angle, 1080p Night Vision rear camera which serves as both rear recording camera as well as reverse parking camera. It has IP67 waterproofing. Comes with double-sided tape, 2 screws for fixing it on the surface, and two screws for vertical adjustment of the camera.
- 12volt to 5volt charger/adapter with USB to the micro USB power cable for power supply.
- AV cable for rearview camera display output to 9.35-inch full-screen display.
- Plastic tool to tuck in the cables inside the roof lining.
- Hardwire kit and SD card (up to 64GB, Class 10 and above) are not included in the package and need to be purchased separately.
Four stages of installation
- Installation of front camera and power supply.
- Installation of Rear camera and AV cable.
- Activation of reverse parking mode.
- Hardwiring the Dashcam for parking surveillance (not yet installed).
Installation of Front Camera and Power Supply
It's pretty simple. Just attach the 9.35-inch full-screen display onto the IRVM with the help of the rubber straps provided in the package. It will fit perfectly for most cars. The front dashcam which is attached on the backside of the display is provided with extendable support so that if the IRVM is of the same size as the display, the extendable support can be stretched out to adjust the camera. The camera itself comes with a four-way adjustment so that it can be adjusted for the perfect front vision. Now attach the micro USB power supply to the display and route the power cable through the roof-line, weather seal at A-pillar, then to the back of the glove box, and finally to the 12 Volt output of the car. Use the plastic tool to perfectly tuck in the cable inside the weather seal and roof lining so that no part of the cable is visible outside. Now switch on the display. It will immediately start recording. Keep in mind that the footage visible on the display is not the complete view of the front camera. The full view can be obtained by installing the 70mai android/iOS app and connecting the display with the app. After a successful connection, it will project the actual view of the camera to the mobile app. Now, the view can be adjusted as per requirements. This display can also be used as normal IRVM when in screen-OFF mode (recording continues in screen-OFF mode). But I strongly advise using the rear camera view as it gives a much better 135-degrees rear view. It might be weird in the beginning but you’ll get used to it with time. This completes the installation of the front camera/display and power supply.


Installation of Rear camera and AV cable
For this installation, separate the rear camera and AV cable by detaching the male/female connector provided near the rear cam. Now AV cable and rear camera can be installed separately.
For installation of AV cable, connect the output end of AV cable to AV input port at the 9.35-inch display. Now route the AV cable through roof-line, weather seal at A-pillar, above the front door, B-pillar, above the rear door, C-pillar, then weather seal in the boot. Keep the terminal end of this cable in the boot. It will be connected to the AV cable coming from the rear camera later.
It is advisable to install the rear camera above/below the registration number plate for most of the vehicles as most of the OEMs install reverse parking cameras there for maximum view. It can be different for different vehicles. In my case, I installed it between the two lights above HSRP with the help of double-sided tape and two screws provided in the package. A dedicated space was already provided by Ford. I routed the cable through a small hole above the dedicated space for the reverse parking camera, then to below the water drain hole provided below the tool kit (Jack, spanner, reflector, tow hook). I had to make some adjustments to the rubber seal at one of the drain holes so as to avoid damage to the camera cable by constantly rubbing it against the metal edge. Now connect the cable coming from the camera to the cable terminal end we left in the boot earlier by means of the male/female connector provided. The rear camera output should start displaying on the 9.35-inch display. Adjust the camera with the help of two vertical adjustment screws provided on the rear camera as per your requirement. This completes the installation of the rear camera and AV cable.


Normal rear view:

Activation of reverse parking mode
A red/black cable is provided with the rear camera which originates from the male/female connector. This red cable needs to be connected to the red/yellow/green cable of the reverse parking white tail light so that whenever reverse gear is engaged, it will get supply along with the reverse parking white tail light, and reverse parking guidelines start appearing on the 9.35-inch display. It also changes the display on the screen so that the maximum focus of the camera stays on the lower backside while reversing. For most of the vehicles, reverse parking white tail light is provided within the main tail light enclosure along with the brake light and indication light. But for EcoSport, it is provided at the rear bumper on the lower side. This made it difficult for me to connect the reverse parking mode cable as opening the main tail lights enclosure was relatively easy. Nonetheless, I had to install the jack and remove the rear left wheel so that I can access the reverse light which was exactly behind the rear wheel arch. In my case, the color of the main power cable for the reverse light was greenish. It can be red or yellow for other cars. Just connect this green cable with the red cable coming from the camera connector with the help of a scotch lock as it involves zero cutting. I didn’t have the scotch lock so I had to make few cuts to expose the conductor on the green cable and then connect it with the red one with the help of PVC insulation tape. Apply insulation to the terminal end of the black cable from the camera and just leave it there. Now engage the reverse gear, reverse parking guidelines must be appearing on the 9.35-inch display. This completes the activation of reverse parking mode.

Rear view with guidelines while reverse gear in engaged:

Hardwiring the Dashcam for parking surveillance (Not yet installed)
I haven’t hardwired the dashcam for parking surveillance mode yet. Will update it in the future.
Check out BHPian comments for more insights and information.
- Tags:
- Indian
- DIY
- dashcam
- Reverse Cam
About Us