Team-BHP > Technical Stuff > DIY - Do it yourself
Register New Topics New Posts Top Thanked Team-BHP FAQ


Reply
  Search this Thread
250,129 views
Old 14th December 2015, 17:07   #46
Distinguished - BHPian
 
procrj's Avatar
 
Join Date: Oct 2013
Location: Bangalore
Posts: 1,849
Thanked: 5,735 Times
Re: DIY: Hardwiring your Dashcam

Quote:
Originally Posted by audioholic View Post
Modified the Power supply provided with the camera in order to hardwire. The power supply was originally meant for the 12V socket but yours truly did an implant surgery on the adapter
Can you elaborate a little more on this? Have ordered the same dashcam based on your review on the dashcam thread and want to hardwire the connection. Also do let us know if this is working fine or if you have had any issues because of this jugaad.

Last edited by procrj : 14th December 2015 at 17:08.
procrj is offline  
Old 14th December 2015, 19:08   #47
Distinguished - BHPian
 
Join Date: Jun 2012
Location: BengaLuru
Posts: 5,956
Thanked: 21,233 Times
Re: DIY: Hardwiring your Dashcam

Quote:
Originally Posted by procrj View Post
Can you elaborate a little more on this? Have ordered the same dashcam based on your review on the dashcam thread and want to hardwire the connection. Also do let us know if this is working fine or if you have had any issues because of this jugaad.
Basically, the dashcam comes with a power adapter that you should connect to the cigarette lighter socket. This is not an actual hardwired setup. Instead, I soldered wires into the power adapter and connected the other end to the fuse tap. This way, the adapter could directly draw power from the BCM and the cigarette lighter socket/12V socket will be left free. You can see from the images that I have drawn wires from inside the power adapter which I used for further connections. Now that adapter won't work if plugged in the conventional way since I have removed the outer contacts that exist.
audioholic is offline   (1) Thanks
Old 15th December 2015, 17:10   #48
BHPian
 
vsathyap's Avatar
 
Join Date: Aug 2011
Location: BengaLuru
Posts: 430
Thanked: 1,669 Times
Re: DIY: Hardwiring your Dashcam

Can you please confirm if I need to get a ATM fuse Tap? I have the new Alto K10 with me. Owners manual simply says "fuse" and does not provide any description.
vsathyap is offline  
Old 17th December 2015, 09:23   #49
Senior - BHPian
 
ghodlur's Avatar
 
Join Date: Sep 2009
Location: Bangalore
Posts: 6,236
Thanked: 4,730 Times
Re: DIY: Hardwiring your Dashcam

Dashcam experts,

Where can I get a longer length min 5 or 10 mts mini USB cable with cigarette lighter connection on the 12 V socket. I am asking this for my MMI GPS unit which comes with mini USB connection port. The present cable is too short and interferes with the gear stick and looks bad in present hanging condition. I am not too interested in tampering with the fuse box connections. The car in question is Grande Punto.
ghodlur is offline  
Old 17th December 2015, 11:01   #50
Distinguished - BHPian
 
Join Date: Jun 2012
Location: BengaLuru
Posts: 5,956
Thanked: 21,233 Times
Re: DIY: Hardwiring your Dashcam

Quote:
Originally Posted by vsathyap View Post
Can you please confirm if I need to get a ATM fuse Tap? I have the new Alto K10 with me. Owners manual simply says "fuse" and does not provide any description.
You should the fuse tap sized medium as per most online websites. Only the large taps meant for older fuses wont fit into the Alto. The smaller sizes have same blade width and only the size of the fuse will vary AFAIK. My WagonR and SX4 have different types of fuses and yet the same fuse tap fits both. .

EDIT: As per wikipedia, it is the Mini fuse in my SX4 and Low profile Mini in my WagonR. Both are the same in terms of contact points and only the body of the fuse is different.

Last edited by audioholic : 17th December 2015 at 11:04.
audioholic is offline  
Old 19th December 2015, 20:56   #51
BHPian
 
vsathyap's Avatar
 
Join Date: Aug 2011
Location: BengaLuru
Posts: 430
Thanked: 1,669 Times
Re: DIY: Hardwiring your Dashcam

I did a little research on the Fuses of the new Alto K10.

As a reference, I am posting a pic of all the types of fuses available in vehicles. This pic has been taken from Wiki and all ownership and copyrights are those of the original submitter. Referring here for educational purposes only.

Name:  Electrical_fuses_blade_type.svg.png
Views: 4431
Size:  50.7 KB

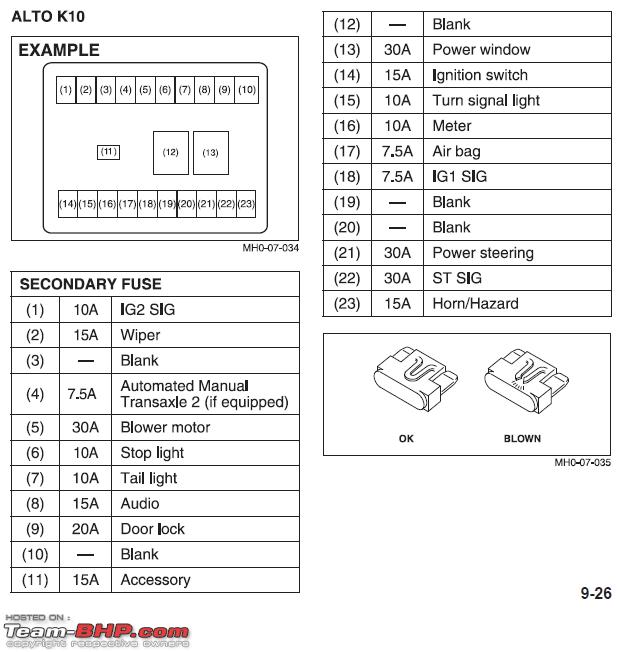
I checked the user Manual of the New Alto K10 and here is what the fuse board and the fuses and their ratings looks like:

Name:  AltoK10FuseDiagram.png
Views: 14947
Size:  66.5 KB

Now, after peeking below the steering, right next to the OBD2 Port, I find the block of fuses and here's what it looks like - exactly like the fuse diagram given in the user manual.

DIY: Hardwiring your Dashcam-img_20151219_103628.png

Looking back at the user manual and referring the fuse type from the Wiki Image, I am satisfied that the Alto K10 uses the ATM Mini Low Profile type fuse. I go ahead and add it to my cart on Amazon and was about to order the Fuse Tap. Sixth sense prevailed and I decided to have a look at what type the fuse is. This is after many customers had the feedback that the seller shipped the wrong type of fuse which did not match with their vehicle.

Now, even one of the posts above mentioned something about the Low Profile type ATM fuses for the K10. But, I decided to check for myself nonetheless - after all, seeing is believing!

Fast forward 5 minutes and I have a surprise! The Alto K10 uses the REGULAR PROFILE type of ATM Mini Fuse.

Name:  IMG_20151219_200137.png
Views: 4453
Size:  268.4 KB

Others can also chip in with their vehicle's fuse types so that this becomes somewhat of a "FYI" for your "DIY"

All said and done, I'll be ordering the Mini ATM "regular profile" Fuse Tap from Amazon in some time. Looking at the Fuse Diagram from the User Manual, can anyone suggest where I could possibly connect the fuse tap? Logically speaking, I'd like my Dashcam (I plan to use my Xiaomi Yi Cam) to get power as soon as the Ignition is in Position 2 (just before the crank).

Inputs and feedback welcome!
vsathyap is offline   (1) Thanks
Old 19th December 2015, 21:31   #52
Distinguished - BHPian
 
Join Date: Jun 2012
Location: BengaLuru
Posts: 5,956
Thanked: 21,233 Times
Re: DIY: Hardwiring your Dashcam

Quote:
Originally Posted by vsathyap View Post

All said and done, I'll be ordering the Mini ATM "regular profile" Fuse Tap from Amazon in some time. Looking at the Fuse Diagram from the User Manual, can anyone suggest where I could possibly connect the fuse tap? Logically speaking, I'd like my Dashcam (I plan to use my Xiaomi Yi Cam) to get power as soon as the Ignition is in Position 2 (just before the crank).

Inputs and feedback welcome!
There will be no difference between ATM regular and ATM low profile when it comes to fuse tap as I mentioned in my previous post. The tap will fit in either socket without issues. The contact points are the same and only the fusible link location will change with regular and low profile. So in case it is swapped, it wont be an issue.

Coming to where to tap, the Accessory fuse is where you should tap the connection from. From what I have seen, that is the only point that gets powered up only when the key is in ACC position. Rest all are powered by default irrespective of the position of key. Even I wanted it to turn on in second position. But I couldnt find a suitable point to tap. Next time I will check the power steering fuse, which I did not do last time.

Last edited by audioholic : 19th December 2015 at 21:32.
audioholic is offline  
Old 19th December 2015, 21:54   #53
BHPian
 
vsathyap's Avatar
 
Join Date: Aug 2011
Location: BengaLuru
Posts: 430
Thanked: 1,669 Times
Re: DIY: Hardwiring your Dashcam

Quote:
Originally Posted by audioholic View Post
Even I wanted it to turn on in second position. But I couldnt find a suitable point to tap. Next time I will check the power steering fuse, which I did not do last time.
Do you know what the IG2SIG refers to in the User Manual's Fuse Lookup Table? Plus, how do I test the fuses for power ? I have a regular household tester that I use for testing 220V AC power sockets. Will the same thing work ?

I saw a "jugaad" setup for this at one of the local accessories shop - the guy has a bulb which has 2 wires soldered to it. He grounds one end of the wire to the body and the other end to "touch" connections to check power delivery. If the bulb glows, its ON, else, he asks his buddy to turn the key / honk / etc. He then figures how to go about the wiring for the actual circuit. Dont know what bulb and what rating he was using.. it was so old and dusty that I was wondering what he was upto. Didnt realize what he did until I connected the dots and figured it out and I was like duhhh
vsathyap is offline  
Old 19th December 2015, 22:07   #54
BANNED
 
Join Date: Oct 2011
Location: Hyderabad
Posts: 12,346
Thanked: 21,451 Times
Re: DIY: Hardwiring your Dashcam

Quote:
Originally Posted by vsathyap View Post
Do you know what the IG2SIG refers to in the User Manual's Fuse Lookup Table?
IMO, it means 'IG'nition 'Si'gnal.


Quote:
Originally Posted by vsathyap View Post
Plus, how do I test the fuses for power ? I have a regular household tester that I use for testing 220V AC power sockets. Will the same thing work ?
Look at the things I used when I did a DIY for installing the Auto-dimming IRVM using a Hard wiring kit.

Tools Required

Here are links to buy:

Link to Buy

Link to buy the tester for checking the Fuses:

12V Car Voltage Tester

My Swift uses the Low-Profile ATM Fuse:

Low-profile ATM Fuse
a4anurag is offline   (1) Thanks
Old 22nd December 2015, 12:22   #55
BHPian
 
Join Date: Oct 2015
Location: The Netherlands
Posts: 61
Thanked: 92 Times
Re: DIY: Hardwiring your Dashcam

Hello,

Does anybody have fuse details (layout details) for Skoda Rapid?

I have a Blaupunkt 2.0 dashcam for which I am using the lone 12V socket that is available in the car.

In order to tap a connection from any of the fuses (either to have second 12V socket or to connect dash cam cable directly, I am in search of the fuse details. The owner's manual does not mention any details, neither the service people share it.
JitendraK78 is offline  
Old 9th September 2016, 14:07   #56
BHPian
 
dpkbehera's Avatar
 
Join Date: Sep 2015
Location: Hyderabad, Pune
Posts: 386
Thanked: 247 Times
Re: DIY: Hardwiring your Dashcam

Nice to see you back after a long time. I think you were away for some time in between. This post has an amazing attention to detail. Fuses,Wiring etc i thought were beyond me and as a result stayed away from them. However this article did bring clarity on them. I need to use both the dashcam and mobile (navigator). But since i have only one 12V socket in front, will have to look at the options mentioned by you. However in the long run, as you mentioned it is always better to go in for hardwiring.

I am guessing irrespective of hardwiring, it is always better to keep the following for long road trips i.e.
Car Radio Stereo, Dash Removal Install Tools (Set of 12)
Low-Voltage Car Electric Circuit Tester
Emergency Fuse Kit
dpkbehera is offline   (1) Thanks
Old 11th September 2016, 20:35   #57
Distinguished - BHPian
 
arunphilip's Avatar
 
Join Date: May 2007
Location: Bangalore
Posts: 2,012
Thanked: 6,479 Times
Re: DIY: Hardwiring your Dashcam

Quote:
Originally Posted by dpkbehera View Post
Nice to see you back after a long time. I think you were away for some time in between. This post has an amazing attention to detail.
Thank you for your kind words. Yes, I'd gone on silent mode for a few months, but am now back to contributing

Quote:
Originally Posted by dpkbehera View Post
I need to use both the dashcam and mobile (navigator). But since i have only one 12V socket in front, will have to look at the options mentioned by you. However in the long run, as you mentioned it is always better to go in for hardwiring.
While I will still recommend hardwiring the dashcam to make its operation transparent and automatic, you do have a few other options:

Get a Dual-Port Car Charger
If your 12V socket switches off when you turn off the ignition, then you can use a dual-port car charger. I personally recommend and use this Aukey charger, because I trust the brand, and because it has a healthy 2+ amp output per port. The charger is also very compact, and sticks out only about 1-2 mm from the socket.
DIY: Hardwiring your Dashcam-41oetpgvevl.jpg

If you also get a lengthy USB cable (like this 10-foot one) you can use it to route the cable to the dashcam quite neatly in the way I described. This will help you minimize wiring clutter.

Get a Y-Cable for Mini-USB and Micro-USB
There are Y-cables which have a regular sized USB port on one side (i.e. a USB A male port), and have 1 mini-USB and 1 micro-USB port on the other side. You can use this to change your phone and run your GPS using just a single USB port.

For example, consider this Y-cable. I would personally look at this Y-cable from Amazon.com since it has good reviews.
DIY: Hardwiring your Dashcam-51yklhz6sal._sl1000_.jpg DIY: Hardwiring your Dashcam-31brxa58l.jpg

The cable lengths are pretty short, so you might require extension cables based on how you usually position your dashcam and where you keep your phone.

Quote:
Originally Posted by dpkbehera View Post
I am guessing irrespective of hardwiring, it is always better to keep the following for long road trips i.e.
Car Radio Stereo, Dash Removal Install Tools (Set of 12)
Low-Voltage Car Electric Circuit Tester
Emergency Fuse Kit
I definitely agree that keeping the 12V circuit tester and an emergency fuse kit is a good idea. The dash removal tools are required only in those cars where we cannot access the passenger compartment fuse box directly (our EcoSports are a great example of this! ).
arunphilip is offline   (3) Thanks
Old 26th September 2016, 11:29   #58
Distinguished - BHPian
 
Join Date: Sep 2008
Location: --
Posts: 3,617
Thanked: 7,691 Times
Re: DIY: Hardwiring your Dashcam

How do you guys identify which type of Fuse tap would fit the vehicle? Seeing the fuses in the fuse box, I am confused between the standard and mini one.

Anyone hardwired a dashcam in a Scorpio?
Dry Ice is offline  
Old 26th September 2016, 12:07   #59
Distinguished - BHPian
 
arunphilip's Avatar
 
Join Date: May 2007
Location: Bangalore
Posts: 2,012
Thanked: 6,479 Times
Re: DIY: Hardwiring your Dashcam

Quote:
Originally Posted by Dry Ice View Post
How do you guys identify which type of Fuse tap would fit the vehicle? Seeing the fuses in the fuse box, I am confused between the standard and mini one.
This is how the different fuse types look. Look at the shape and size (both width and height) of the pins when comparing.
Name:  Electrical_fuses_blade_type.svg.png
Views: 3815
Size:  41.2 KB

Do you have a picture of the Scorpio's fuse, lying flat, to compare? You might not have to access and remove a fuse, your Scorpio's emergency kit should have a few spare fuses in there. Page 21 of the owner's manual shows where the fuse box is present, by the way.

Last edited by arunphilip : 26th September 2016 at 12:10. Reason: Resized image for watermark
arunphilip is offline   (2) Thanks
Old 26th September 2016, 12:24   #60
Distinguished - BHPian
 
Join Date: Sep 2008
Location: --
Posts: 3,617
Thanked: 7,691 Times
Re: DIY: Hardwiring your Dashcam

Quote:
Originally Posted by arunphilip View Post
This is how the different fuse types look. Look at the shape and size (both width and height) of the pins when comparing.

Do you have a picture of the Scorpio's fuse, lying flat, to compare? You might not have to access and remove a fuse, your Scorpio's emergency kit should have a few spare fuses in there. Page 21 of the owner's manual shows where the fuse box is present, by the way.
Thanks Arun. So very nice of you to pull the owner's manual. Mine is actually the previous gen but the fuse box locations are identical. I had removed one from behind the steering wheel (from where I wish to route the wire), but did not take a picture. To my eyes, it looks like a mini fuse. But I am not really sure. I will try to get a picture by evening. The pain with ordering from Aliexpress is the long drawn delivery time. God forbid if I order the wrong one, that 60 day cycle will start again!

That is why I want to be sure before placing the order.
Dry Ice is offline   (1) Thanks
Reply

Most Viewed


Copyright ©2000 - 2025, Team-BHP.com
Proudly powered by E2E Networks