Team-BHP > Technical Stuff > DIY - Do it yourself
Register New Topics New Posts Top Thanked Team-BHP FAQ


Reply
  Search this Thread
137,840 views
Old 18th May 2017, 14:42   #31
Distinguished - BHPian
 
BoneCollector's Avatar
 
Join Date: Apr 2011
Location: .....
Posts: 3,329
Thanked: 11,369 Times
Re: DIY Install: 3" XP Micro Bi-Xenon Foglight Projectors on my Swift

Quote:
Originally Posted by a4anurag View Post

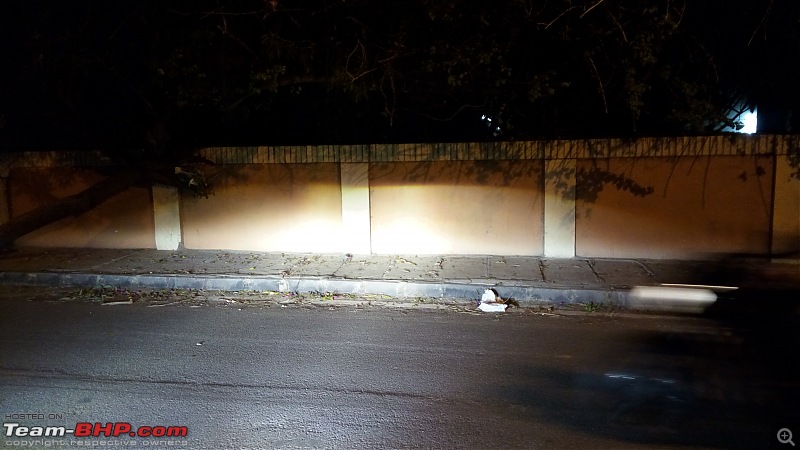
When I press the second switch, the green light comes up activating the high beam of the XP Micro. Here's how it in the night.
Attachment 1639845


.

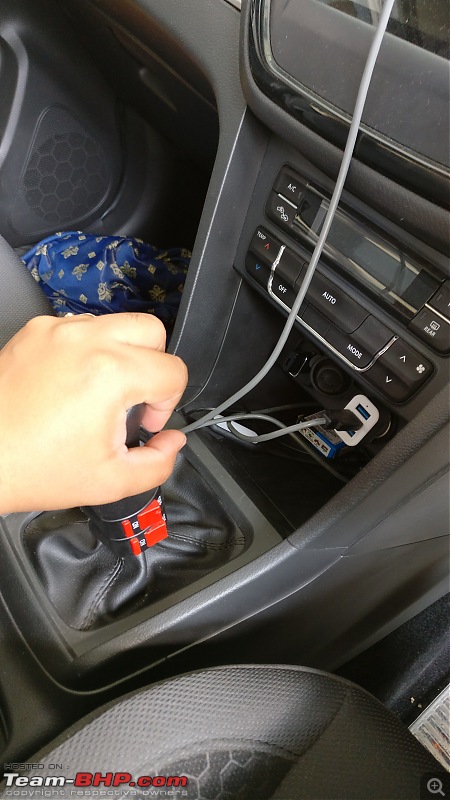
I have used a different way to light up my Micro Fog's high beam with a switch mounted on the gear lever. Sadly, I don't have a snap right now as I'm out of town. Will update the working and everything in my thread next week.


http://www.team-bhp.com/forum/test-d...ml#post4192362
BoneCollector is offline  
Old 18th May 2017, 16:09   #32
BANNED
 
Join Date: Oct 2011
Location: Hyderabad
Posts: 12,346
Thanked: 21,451 Times
Re: DIY Install: 3" XP Micro Bi-Xenon Foglight Projectors on my Swift

Quote:
Originally Posted by BoneCollector View Post
I have used a different way to light up my Micro Fog's high beam with a switch mounted on the gear lever.
Yes sir, I have seen the update.

I went for this setup because of my love for OE looks.

PS: Doesn't the wiring used for the switch clutter around the gear lever area? Do take images when possible.

Last edited by Aditya : 19th May 2017 at 08:09. Reason: Typo
a4anurag is offline   (1) Thanks
Old 18th May 2017, 22:22   #33
BHPian
 
Join Date: Sep 2015
Location: Jaipur
Posts: 176
Thanked: 279 Times
Re: DIY Install: 3" XP Micro Bi-Xenon Foglight Projectors on my Swift

Excellent DIY Anurag! The way you've sorted out the issues is just brilliant and I'm sure you would be satisfied with the amazing output. This DIY can very well be used by XP as an SOP to install Micros

I just haven't found time to get the alignment right on my EcoSport but am very happy with the way these perform. Totally eliminates the need for a full blown retro, at-least for me.
k.sumit is offline   (1) Thanks
Old 24th May 2017, 18:58   #34
BHPian
 
sudeepg's Avatar
 
Join Date: Feb 2006
Location: Bangalore
Posts: 900
Thanked: 2,894 Times
3 Inch XP Micro Installation Report

The S-Cross Alpha variant’s headlight poor performance has been a much discussed matter. Not only are they useless on highways, they are totally useless in rainy conditions. I drive at nights and the poor performance of the headlights was always a problem for me. I was thinking of many possibilities such as opening up the headlights and installing Morimoto D2S or upgrading the fog lamps with better bulbs, none of which were easy options.

Not so long ago, a brave doctor and proud owner of a 1.6 Alpha, Dr. Naren, made the first move to install 2.5 inch Micros from XenonPlanet. His report was like a life saver and I was immediately sure that Micros would be the solution to my car’s lighting problems. Thanks, Naren! The only fly in the ointment, the fit was not flush. Due to popular demand, XenonPlanet came out with a 3.0 inch ones which were perfect fit and also OEM look alike. This is a short report of my experience considering & installing Micros

Likes
  • Very good light output.
  • Water proof clear lens projectors.
  • Excellent support from XenonPlanet
  • Many positive feedbacks from many users on many forums

I am not going into the details of the product since Anurag has already covered it in this beautiful thread. Thanks mate!

Installation Contact @ Evo – ShyamSundar Hegde

Kanhiah is the one who installed it on my car. I'd say he certainly knows his work. During the install, one of the 15 Amp fuses blew. he was able to diagnose the fault and fix it immediately.

Install time – 2 Hours 45 minutes in all, 45 minutes for wiring and fixing the projectors, 2 hours for alignment check and testing.

Experience Rating with Xenon Planet (XP) – 5 Stars

Why 5 stars?

Although not a 100% smooth ride with XP, overall I’d give them a very good rating. I was one of the first to sign up for installing the 3.0 Micros. XP was flooded with orders and Rajat from XP was busy fulfilling them. A group of us had ordered in bulk, but a problem with the bulbs set us back.

The great thing about Rajat at XP is that they try and check EVERY shipment to ensure zero errors. Even then there were a couple of mismatched bulbs. But, they didn’t pass it off, rather acknowledged the issue and made arrangements to fix them, unlike many other vendors who wash their hands off once the install is done. Given they had many orders at hand, we ended up waiting for a several weeks. This is the only part I was unhappy with, but that said, the communication from Rajat has been EXCELLENT! He responds via WhatsApp well and I guess it is easy to catch him on WhatsApp. I certainly loved it. If you are not getting the attention you need, ensure you tell them upfront about it. They do care and they will try and to their best to make things work for you.

Broad Steps to Install
  • Remove the fog covers
  • Unscrew the OEM fog lamps. They are held together using three screws
  • Mount the Micros on the mounting bracket.
  • Prepare the wiring
  • Cut out some of the protruding parts in the fog lamp housing to make room for Micros
  • Connect the ballast and complete wiring
  • Tap the power from headlight wiring.
  • Align

I am sharing the work in progress which explains the procedure and end results. Hopefully this is useful for others in DIY themselves or have a good idea when installing it from outside.

What I did not like about the install

The Micro works in low beams by default when the fog light switch is on. High beam is optional and syncs with the headlight high beam. To accomplish this, you need to tap power from the head’s light high beam wire. Evo used the splice connector with insulation tapes. This isn’t a reliable long term solution in my opinion and not 100% water proof, especially considering that the place where the fog lamps are sitting is very close to the road. The best is to have a proper compatible, water proof wiring harness. As far as I know, there is no such wiring harness available as of today.

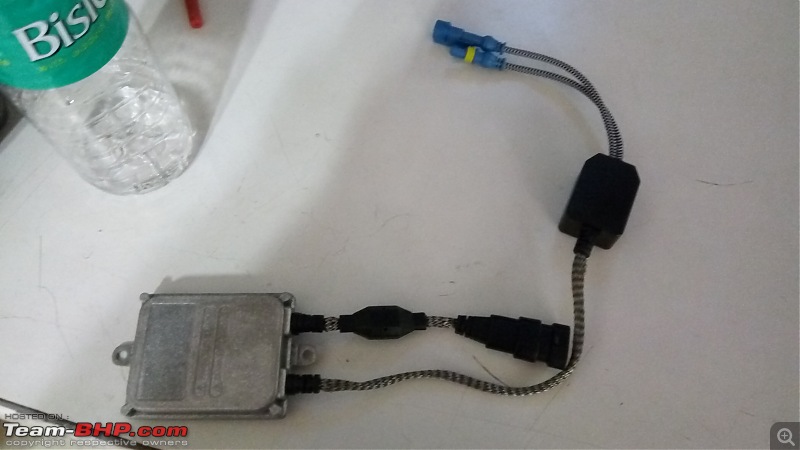
The stock fogs are H8 bulbs, 35W 12 V. The connectors of the fogs are not an exact match for the Micro’s. You need a workaround solution which I am not 100% satisfied with. XP is working to try and resolve that – This is why I like them. They don’t install and forget you and I hope it remains this way.
Pictures & videos
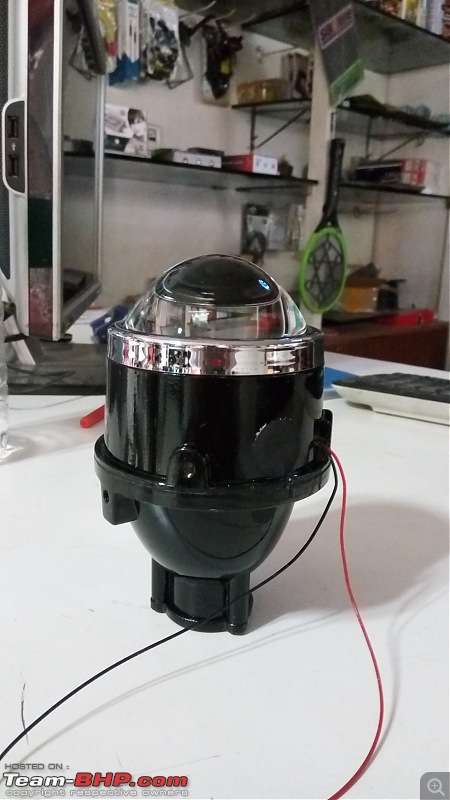
DIY Install: 3" XP Micro Bi-Xenon Foglight Projectors on my Swift-013inchmicro.jpg

DIY Install: 3" XP Micro Bi-Xenon Foglight Projectors on my Swift-02bulbs.jpg

DIY Install: 3" XP Micro Bi-Xenon Foglight Projectors on my Swift-03ballast.jpg

DIY Install: 3" XP Micro Bi-Xenon Foglight Projectors on my Swift-04foglampconnector.jpg

DIY Install: 3" XP Micro Bi-Xenon Foglight Projectors on my Swift-05mounting.jpg

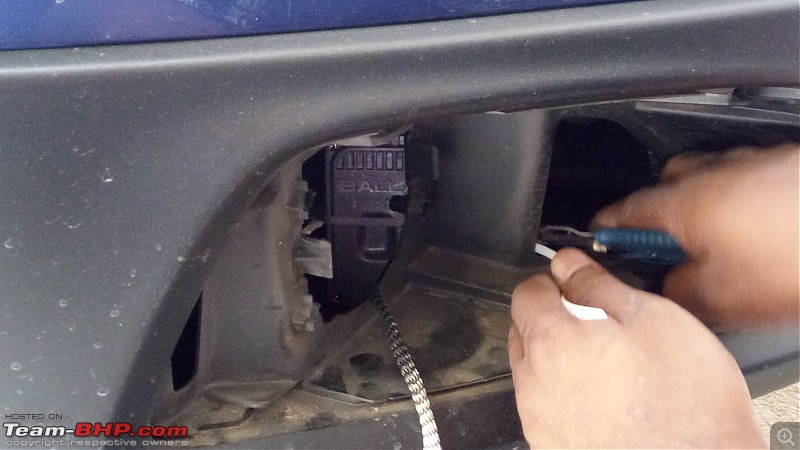
DIY Install: 3" XP Micro Bi-Xenon Foglight Projectors on my Swift-06ballastinstall.jpg

DIY Install: 3" XP Micro Bi-Xenon Foglight Projectors on my Swift-07ballastinstalled.jpg

DIY Install: 3" XP Micro Bi-Xenon Foglight Projectors on my Swift-08wiring.jpg

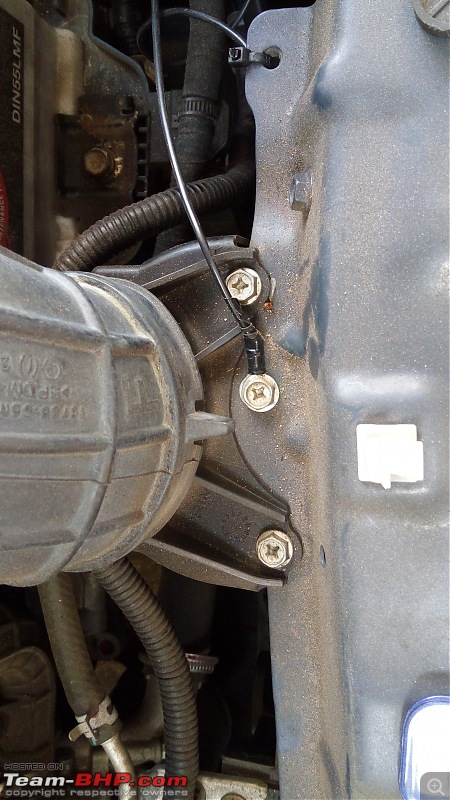
DIY Install: 3" XP Micro Bi-Xenon Foglight Projectors on my Swift-09earthing.jpg

DIY Install: 3" XP Micro Bi-Xenon Foglight Projectors on my Swift-10connections.jpg

DIY Install: 3" XP Micro Bi-Xenon Foglight Projectors on my Swift-11fixing.jpg

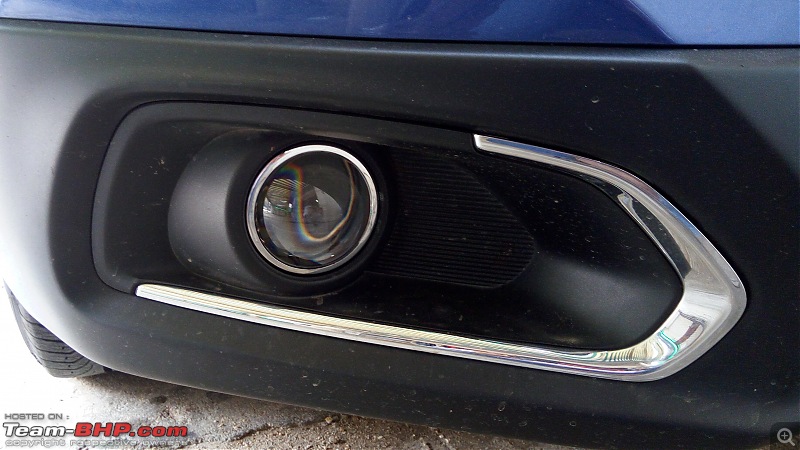
DIY Install: 3" XP Micro Bi-Xenon Foglight Projectors on my Swift-12installed.jpg

DIY Install: 3" XP Micro Bi-Xenon Foglight Projectors on my Swift-13sideview.jpg

DIY Install: 3" XP Micro Bi-Xenon Foglight Projectors on my Swift-14highbeam.jpg

DIY Install: 3" XP Micro Bi-Xenon Foglight Projectors on my Swift-15lowbeamcutoff.jpg

Headlight high beam sync wire tap using splice connector. The not so good part. This has been taped up properly with insulation tape for now

DIY Install: 3" XP Micro Bi-Xenon Foglight Projectors on my Swift-xpinstall-tap.jpeg


3-Inch XP Micros in Action

Sequence:
  • Pitch dark
  • @ 5 seconds, XP Micros ON (low beam)
  • @ 20 seconds, Headlights ON - Low beam. At this point, both lights are in low beam
  • @31 seconds, XP micros are switched off. This is what you need to see the difference of XP and Stock HL
  • @41 seconds, XP come back on. See the difference it makes!
  • @45 seconds, high beam from both. (High beam of HL turns on High beam of XP Micro)
  • @58 seconds, both lights Off

PS: Sorry for the shaky video in the beginning.

Last edited by sudeepg : 24th May 2017 at 19:10. Reason: Adding details
sudeepg is offline   (12) Thanks
Old 5th June 2017, 10:26   #35
BHPian
 
sudeepg's Avatar
 
Join Date: Feb 2006
Location: Bangalore
Posts: 900
Thanked: 2,894 Times
Re: DIY Install: 3" XP Micro Bi-Xenon Foglight Projectors on my Swift

Some more updates from my Xenon Planet (XP) Micro Experience

Of late, a couple of us which got this installed in our cars ran into problems, specifically with the bulbs - BHPian lovetorque being the other. This post is an update on what to expect and what to be prepared with if you are going in for the XP Micro installation

NOTE: All of this experience is based on folks who installed it from Bangalore as well and information available from other sources.
  • First and foremost - the Product. XP Micro still has a lot of Quality Control checks that needs to get better. XP says they check EVERY bulb, but the fact is slip-ups occured, and frequently! The GOOD THING - They always RESPOND and HELP. Be prepared to make multiple trips to the installer.
  • The main installer at Evo Bangalore is currently on vacation (as of this post). He is expected back sometime. The current installer is good for Micros, it seems the other guy is better. We also heard about a guy called Robin from Thrissur who is believed to have done a pretty good job. But so far, the one and ONLY install that seems perfect is the DIY by our distinguished BHP-ian a4anurag

    Link
  • The install location at Evo, Bangalore is NOT at all ideal for XP Micro installation because the place is right beside a very busy main road, nosiy and the wall across the main road is used for alignment and wall shot. Most time you are distracted and the beam visibility is cut off by passing vehicles. So you cannot really see the light output to make a determination if its accurate. We noticed yellow shades here and there in an isolated road and that too with careful examination.
  • Shyam is the official contact point for XP Micro install in Bangalore. He is believed to have a long and good reputation with these installs, also a silent T-BHPian. He has trained his installers, but yet he usually isn't physically present to sign off on the work. At least that was the case for me and lovetorque. The installer exchanges photos in WhatsApp and Shyam gives his comment. Not ideal considering the phone cameras don't capture the light as well as our eyes. Besides note point above.
  • Bulb seating problems can result in poor alignment or light output. Be sure to check the lights by standing in front of the car a few yards away and comparing the light output in both. They must match. Take your time - don't rush. Factor in a minimum of 4 hours for install. Time is spent mostly in alignment. Install is done in evening times only.
  • For S-cross owners, recommendation is to turn on main headlamps in low beams AND with leveler position set to your desired position, match the low beam alignment with Micro low beams or keep it a few cms lower. The latter is recommended
  • Be aware that Micro low beam should be at par or below the head lamp low beam and high beam of Micro will go over the head lamp low beam. So a combination of both will blind out others. Use carefully and BE CONSIDERATE to other fellows on the road. With both at high, you can light up a trucker's cabin!
  • BHPian a4anurag has used an empty slot in the dash switch board with a dedicated fog light switch to power up the high beam of Micro. By default they are in low beam only. If you want high beam, your options are to tap power from the high beam wire of the stock head lamp, which means using the stalk to set the high beam of head lamp will activate the high beam of Micro. This is what I use since I had no empty slots in switch box due to TPMS install. Also, I am very careful in using high beams. Even if others beam high beam at me, I usually refrain from even flashing unless the idiot has really ticked me off. In city driving, I mainly use head lights only. The other option is to do what a4anurag did. Link from his post

    High Beam Switch
  • THIS is how light output should be with 4300K bulbs and matching. Notice how accurate the position is. In my case the starting point of the beam from both projectors was not aligned in a perfect straight line. One was a little ahead by a few cms.

    DIY Install: 3" XP Micro Bi-Xenon Foglight Projectors on my Swift-anuragsxpmicro.jpeg
  • The alignment is mostly specific to each individual's driving position. I sit forward, many others not so ahead, especially tall folks. Some may sit lower, some higher. Ensure that you get the alignment per your driving position because once it is locked, they apply MSEAL to make it a permanent fix. This is the procedure done in Bangalore, Evo but not elsewhere from what we know. Frankly I have no idea why a screw can't secure it well enough. Using mSeal prevents any further adjustments but will ensure the projector doesn't go out of its set position.
  • The bulbs given by XP didn't have any temperature or wattage/making marks. It was plain bland which was odd. But they say they provide premium H11 bulbs in 4300K and 5000K temperatures. 4300K is recommended as it has the best output. In my install, I was given 5000K though I asked for 4300K
  • In my install, the alignment in left projector went out and I noticed it yesterday. In talking to XP, we figured a possibility is the bulb getting loose. As it turned out, THAT was the case in my left side projector. It had unscrewed itself a bit and I had to tighten it again. Not sure if the projector unit itself is faulty. XP is working on it.
  • Finally - With all the issues with this, the RESPONSE from XP has been outstanding. Gotta give it to them for that. They work towards a resolution, but multiple pitfalls in multiple cases continue, but they try and address it. So the after sales is fair IMO. They just have to iron out their product issues and I believe they are working on it. Obviously they cannot control installers located outside Delhi (where they are based out of)
  • Installation charges vary by cities, Bangalore, without a doubt carry the highest fees with a not so good experience. Currently Delhi, Chennai, Bangalore, Mumbai and few others are what we know of.

Last edited by sudeepg : 5th June 2017 at 10:37.
sudeepg is offline   (11) Thanks
Old 5th June 2017, 11:24   #36
Distinguished - BHPian
 
Dr.Naren's Avatar
 
Join Date: Dec 2015
Location: Bangalore
Posts: 5,121
Thanked: 17,276 Times
Re: DIY Install: 3" XP Micro Bi-Xenon Foglight Projectors on my Swift

@sudeepg : Thanks for the honest and detailed feedback. I am using XP Mini Super in Baleno and XP Micro in S-Cross. I had minor issues in both setups. But, the good part was they rectified it.. Yes, it took time and multiple visits to the installer.

Waiting for your next update. Hope the issue gets fixed!!
Dr.Naren is online now   (2) Thanks
Old 5th June 2017, 11:40   #37
Distinguished - BHPian
 
BoneCollector's Avatar
 
Join Date: Apr 2011
Location: .....
Posts: 3,329
Thanked: 11,369 Times
Re: DIY Install: 3" XP Micro Bi-Xenon Foglight Projectors on my Swift

Quote:
Originally Posted by sudeepg View Post
Some more updates from my Xenon Planet (XP) Micro Experience

Of late, a couple of us which got this installed in our cars ran into problems, specifically with the bulbs - BHPian lovetorque being the other. This post is an update on what to expect and what to be prepared with if you are going in for the XP Micro installation
The units sent to me were sealed units, bulb was already inside it. The ballasts that you have are different ​from the ones which I have. I guess, they procure things from somewhere and then send it across. I hope the bulbs last as promised by them and they honour the warranty.

As far as fitting and alignment was concerned, I took help of MASS and fixed it myself. And thankfully, the alignment has been good since the first attempt itself. Moreover, the high beams are controlled by a separate switch therefore not blinding oncoming traffic. I use it only if some rogue SUV/ taxi fellow or a trucker doesn't go into low beam. After switching it on, all of them go to low beam.


DIY Install: 3" XP Micro Bi-Xenon Foglight Projectors on my Swift-img_20170521_191707.jpg
Micro-fogs low beam only.

DIY Install: 3" XP Micro Bi-Xenon Foglight Projectors on my Swift-img_20170523_080816.jpg
Switches on gear lever, upper one controls the Micro-fogs High beams and lower one is for front camera.

DIY Install: 3" XP Micro Bi-Xenon Foglight Projectors on my Swift-img_20170523_080834.jpg

DIY Install: 3" XP Micro Bi-Xenon Foglight Projectors on my Swift-img_20170523_080843.jpg
The switch is easily accessible.

DIY Install: 3" XP Micro Bi-Xenon Foglight Projectors on my Swift-img_20170523_080946.jpg
The switches from other side.

DIY Install: 3" XP Micro Bi-Xenon Foglight Projectors on my Swift-img_20170605_114551.jpg
View from front.


Overall I'm satisfied with the product. The lights need to be on for some time for its peak intensity.

Last edited by BoneCollector : 5th June 2017 at 11:49.
BoneCollector is offline   (5) Thanks
Old 5th June 2017, 12:13   #38
BHPian
 
Mr_Bean's Avatar
 
Join Date: Nov 2008
Location: Bangalore
Posts: 894
Thanked: 241 Times
Re: DIY Install: 3" XP Micro Bi-Xenon Foglight Projectors on my Swift

Quote:
Originally Posted by sudeepg View Post
Some more updates from my Xenon Planet (XP) Micro Experience[/list]
Your long post was extremely insightful, thanks!.

I got my XP micro 2.5 installed at Evo, Bangalore for my maruti astar on 30th May. My last interaction with Evo was back in 2009 for my Baleno audio install.

I never checked for projector alignment after the install largely due to my ignorance, saw the bulbs light up the road well, didn't check any further. My install was not a direct fit, they had to use an adaptor & bulbs were screwed rather than using mseal. So I am assuming your/shyam's feedbacks were considered during my install.

Like you said, the bulbs not holding up is indeed worrisome. Evo had only 5000k bulbs as stock, though i wanted 4300k on my car. He did give me an option to change if I was not happy with them.

Can you please post a picture of the earlier projector misalignment on your car? That way it is easy to compare, identify and sort out the problem, if any.


Rgds,
Vinod
Mr_Bean is offline   (1) Thanks
Old 5th June 2017, 12:26   #39
Distinguished - BHPian
 
Dr.Naren's Avatar
 
Join Date: Dec 2015
Location: Bangalore
Posts: 5,121
Thanked: 17,276 Times
Re: DIY Install: 3" XP Micro Bi-Xenon Foglight Projectors on my Swift

Quote:
Originally Posted by Mr_Bean View Post
I got my XP micro 2.5 installed at Evo, Bangalore for my maruti astar on 30th May. My last interaction with Evo was back in 2009 for my Baleno audio install.
I had got XP Micro 3.0 inch installed at EVO on 26th May. As you said.. They had only 5000k H11 hid bulbs in stock. But I did not mind trying them out as it would match the colour temperature of my stock Bixenon Projectors in headlamps.

http://www.team-bhp.com/forum/modifi...ml#post4205197
Dr.Naren is online now   (1) Thanks
Old 5th June 2017, 12:45   #40
BHPian
 
Keynote's Avatar
 
Join Date: Aug 2015
Location: Bangalore
Posts: 268
Thanked: 1,207 Times
Re: DIY Install: 3" XP Micro Bi-Xenon Foglight Projectors on my Swift

Quote:
Originally Posted by sudeepg View Post
Some more updates from my Xenon Planet (XP) Micro Experience
Sudeep, thanks a lot for your time in updating the developments and putting everything in black-n-white literally. Truly appreciate it man.

Since I've an empty switch slot, would prefer to follow similar approach to what a4anurag has done as far as the high beam position is concerned. With the help of this switch I can keep XP fog high-beams in reserve mode let alone for those idiot drivers.

Like most I too believe, stock headlamps output on low-beam along with XP fogs on low beam would do the job perfectly. Stock headlamp on high-beam and XP fogs on low-beam can still take you places with utmost confidence during night especially with 1.6 on a highway. The 35W ballast with 4300K bulb is an ideal combination to improve visibility to a greater extent than bothering the incoming traffic / vehicles.

Now these are probably the only meaningful upgrade I would think of adding in my vehicle. However each time I think of ordering them, QC issues such as you have mentioned and the lack of knowledgeable installer is what puts me off, makes me take a step back and ponder over if there are any other better options available.

If Xenon Planet or Evo is reading this : Enough has been said already (both good and bad) but folks please pull up your socks! I personally hate to make multiple trips to get things sorted out post installation. Time is more important than a penny saved!

Last edited by Keynote : 5th June 2017 at 12:50. Reason: spelling
Keynote is offline   (2) Thanks
Old 5th June 2017, 14:44   #41
BHPian
 
sudeepg's Avatar
 
Join Date: Feb 2006
Location: Bangalore
Posts: 900
Thanked: 2,894 Times
Re: DIY Install: 3" XP Micro Bi-Xenon Foglight Projectors on my Swift

Quote:
Originally Posted by BoneCollector View Post
The units sent to me were sealed units, bulb was already inside it. The ballasts that you have are different ​from the ones which I have. I guess, they procure things from somewhere and then send it across. I hope the bulbs last as promised by them and they honour the warranty.

As far as fitting and alignment was concerned, I took help of MASS and fixed it myself. And thankfully, the alignment has been good since the first attempt itself.

[center]
Attachment 1645883
Micro-fogs low beam only.

Attachment 1645885
Switches on gear lever, upper one controls the Micro-fogs High beams and lower one is for front camera.
Thank you BoneCollector. I'd say that your alignment is higher than what we have and the right side fog is a little head of left side one. However, the light output is fantastic. What wattage ballast are you using? We are using 35W.

MASS here won't touch this stuff. Forget this, they won't even change bulbs which are of same wattage but sourced after market.

The switches on the gear level - I personally find them odd. I wouldn't fix it on the gear lever as it looks out of place.

I wish you a hassle free ownership of the Micros. It's good to hear nice stories around this since it raises my hope that things will be ironed out soon.
sudeepg is offline  
Old 5th June 2017, 15:00   #42
Distinguished - BHPian
 
BoneCollector's Avatar
 
Join Date: Apr 2011
Location: .....
Posts: 3,329
Thanked: 11,369 Times
Re: DIY Install: 3" XP Micro Bi-Xenon Foglight Projectors on my Swift

Quote:
Originally Posted by sudeepg View Post
Thank you BoneCollector. I'd say that your alignment is higher than what we have and the right side fog is a little head of left side one. However, the light output is fantastic. What wattage ballast are you using? We are using 35W.
You can see the alignment in this post. http://www.team-bhp.com/forum/test-d...ml#post4192362

I've found that it's a little lower than stock headlights in low beam for Micro-fogs low beam and a little higher in high beam than stock headlight's high beam. The ballasts are 35W. This snap is after driving for 40kms so the HIDs are at full brightness. I drove this distance with only Micro-fogs low and occasionally high beams without using headlights as there was no need for it. At one point, I flashed my headlamps and the realised that it's not on!

I couldn't understand your point that I've highlighted in bold.


Quote:
MASS here won't touch this stuff. Forget this, they won't even change bulbs which are of same wattage but sourced after market.
No comments!

Quote:
The switches on the gear level - I personally find them odd. I wouldn't fix it on the gear lever as it looks out of place.
It might look out of place but it's far better than the high beam of Micro-fogs switching on with headlamp high beams. My Micro-fogs are independent of headlights. The wiring diagram can be seen in the above mentioned post.


Quote:
I wish you a hassle free ownership of the Micros. It's good to hear nice stories around this since it raises my hope that things will be ironed out soon.
Thanks and hope you get an early resolution.
BoneCollector is offline  
Old 5th June 2017, 15:21   #43
BHPian
 
sudeepg's Avatar
 
Join Date: Feb 2006
Location: Bangalore
Posts: 900
Thanked: 2,894 Times
Re: DIY Install: 3" XP Micro Bi-Xenon Foglight Projectors on my Swift

Quote:
Originally Posted by BoneCollector View Post
I couldn't understand your point that I've highlighted in bold.
Thanks. What I meant is that if you look at the U shape area where the lights start to beam from, the one on left doesn't seem to be in line with the right and perhaps a bit tilted. It might be just the way the photo was taken, but me and many other BHPians have been trying to get that perfect in our setup
sudeepg is offline  
Old 5th June 2017, 16:37   #44
BANNED
 
Join Date: Oct 2011
Location: Hyderabad
Posts: 12,346
Thanked: 21,451 Times
Re: DIY Install: 3" XP Micro Bi-Xenon Foglight Projectors on my Swift

Quote:
Originally Posted by BoneCollector View Post
I couldn't understand your point that I've highlighted in bold.
Quote:
Originally Posted by sudeepg View Post
Thanks.
I have drawn a yellow line at the base where the light output starts on the road. The two "U-like" projections aren't on the same line.

DIY Install: 3" XP Micro Bi-Xenon Foglight Projectors on my Swift-img20170605wa0008_01.jpg

Is this what you meant Sudeep?!

____________________

I have been having no issues so far with the XP Micro so far (Touchwood!!).

Xenon Planet guys need to get their QC in line and it is not possible for customers to go back to installer week by week to get corrections done. It is a pain and one looses confidence.

We were assured QC is done in each setup before shipping but God knows how I got 6000K bulbs instead of 4300K bulbs that i ordered actually. Same is the case with Sudeep, he asked for 4300K but got 5000K.

I am a guy that looks for attention to detail. The ballast that I got had 55W stickering instead of 35W. Funny again. Bulbs have no indication or specifications on the bulb.

How does the customer know what is being sent unless he/she encounters an issue where the unit is stripped open to realise bulbs are wrong. Damn!! Not done, because not everyone stays near the installer nor does one have that time to go to the installer again and again to rectify small petty issues. But the support is there always from the guy but it is nail biting everytime.

Peace of mind factor is near to null. Don't know what issue will crop up.

Last edited by a4anurag : 5th June 2017 at 16:42.
a4anurag is offline   (3) Thanks
Old 5th June 2017, 16:52   #45
Distinguished - BHPian
 
Dr.Naren's Avatar
 
Join Date: Dec 2015
Location: Bangalore
Posts: 5,121
Thanked: 17,276 Times
Re: DIY Install: 3" XP Micro Bi-Xenon Foglight Projectors on my Swift

Quote:
Originally Posted by a4anurag View Post
Xenon Planet guys need to get their QC in line and it is not possible for customers to go back to installer week by week to get corrections done. It is a pain and one looses confidence.
True that. I too had to make multiple visits. Anyways, now both the setups are working perfectly

Quote:
Peace of mind factor is near to null. Don't know what issue will crop up.
Xenon Planet provides 2 years warranty.. That's something reassuring and peace of mind factor for me. But, yes it's time consuming : warranty claim process, multiple visits to the installer etc. I have AES brand projector setup in my SX4 and had faced numerous issues. There was 1 year warranty and had got it from local shop. Finally, I got frustrated with multiple visits and just left it as it is
Dr.Naren is online now   (1) Thanks
Reply

Most Viewed


Copyright ©2000 - 2025, Team-BHP.com
Proudly powered by E2E Networks